impey AQUA SCREEN PURE User manual

Check contents of the pack before installation. If there is anything missing, contact our Technical Helpline Number for assistance.
The fixings may be spread across several packs - please check the contents of each pack carefully.
Screw
cover cap
2 & 3mm
Allen keys
PN50247
PN4745
PN60162
PN50266
Top cap
Corner
joint cap
Shower
panel foot
Top
panel
bracket
Plastic
threshold
strip
PN80501
PN80500
*PN10785
2
2
1/2
1
1
1/2
2
0
2
1
0
1
32mm
Screw
Tie bar
bracket
PN8212
PN8203
PN80499
PN40166
PN60210
Wall plug
Tie bar
bracket
Washer
2
2
0
0
2
5
5
4
0
1
10
10
8
2
4
5
5
4
1
1
OPTIONS: 54
23
OPTIONS: 542 3 OPTIONS:
1 1 1
1
0
1
1
0
5
5
4
PN40177
Aluminium
threshold
strip
1
1
5
4
5
6
PN80506
Seal
02422 2
*1
*1
0
Note: The quantities of the threshold
strips will depend on size of panels.
*Optional Extras, not included in pack.
6
Note: The *Spacer Plate PN80573 50
is only included with option 6.
Note: The *Spacer Plate PN80583 is
only included with option 6.
AQUA SCREEN PURE
PAGE 1
71399 00 / Issue 11 / 16
TECHNICAL HELPLINE: 01460 258682
542 3
2
2/4
0
1/1
1
1/2
1
1/1
0
2
2
1/1
0
1
1
1/1
1
1
0
1/1
1/2
1
0
1/1
6
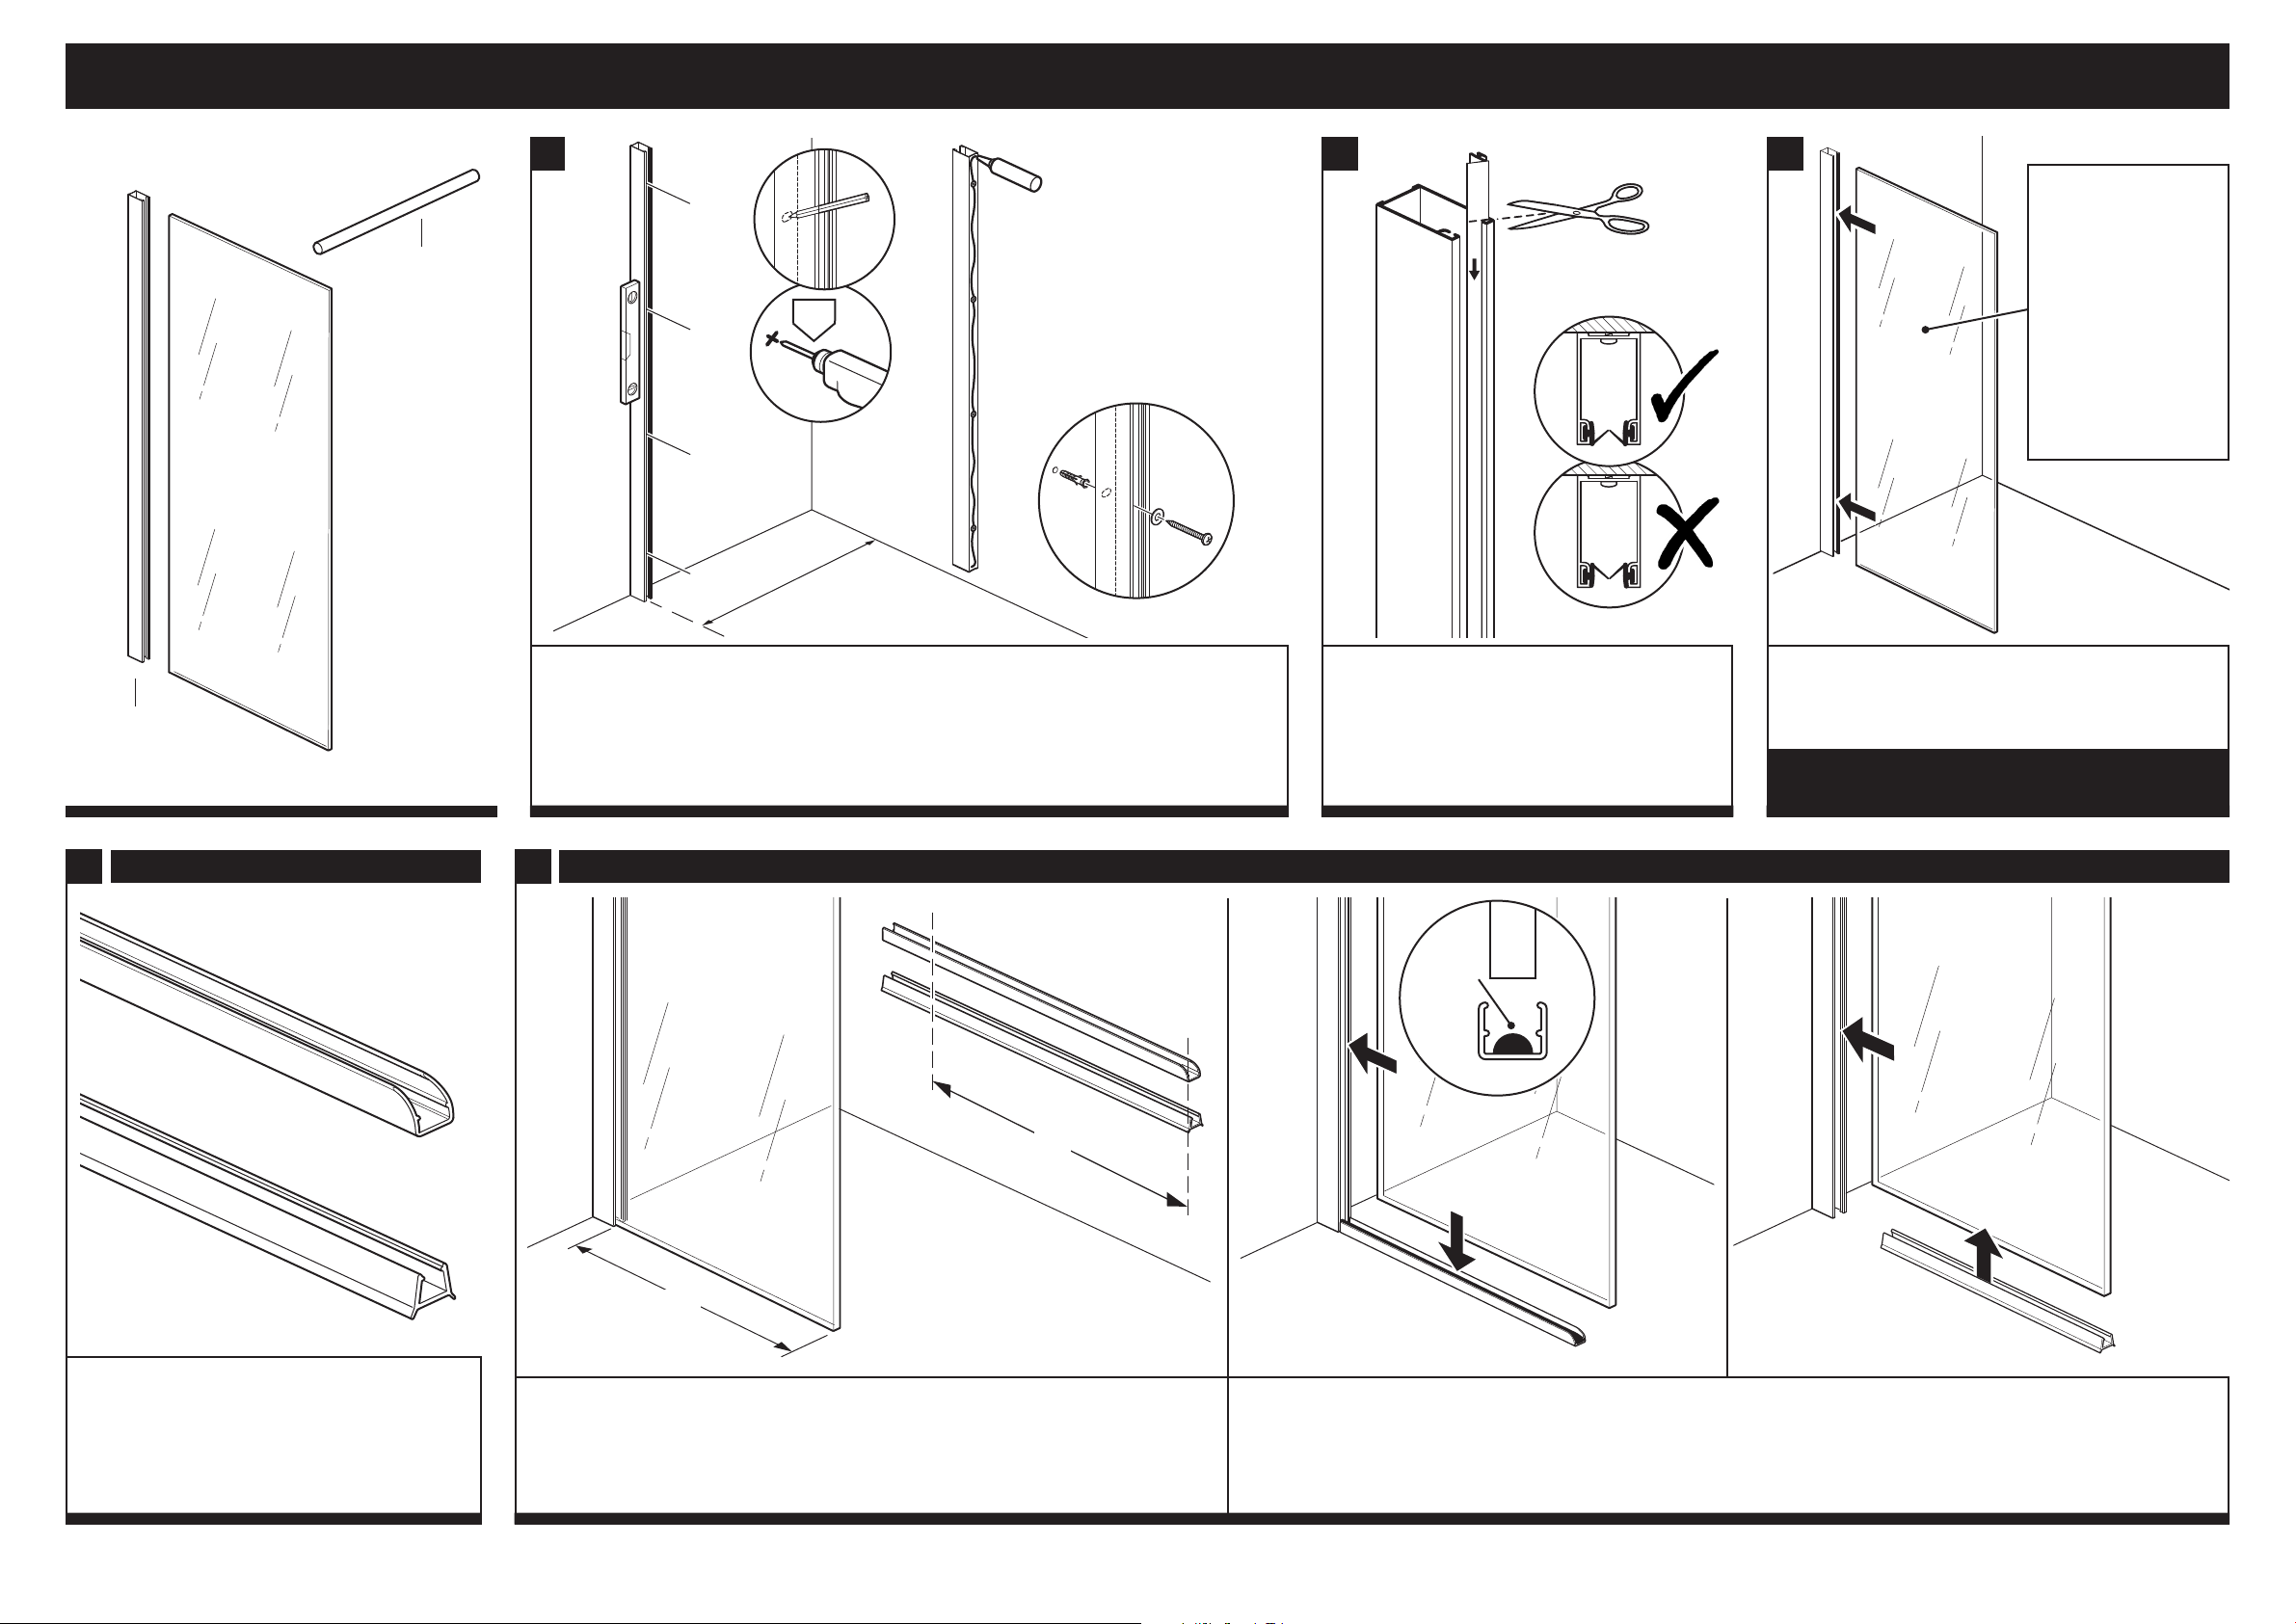
Please read these instructions carefully and keep for future reference.
Incorrect fitting will invalidate the guarantee.
SAFETY
● Handle glass with care. Although the glass is very tough, sharp impacts can damage
both the glass and metal frame.
●Do not remove the plastic corner protectors from the glass panels until the panels
are about to be fitted.
● As the parts are large, we recommend that two people are needed to carry out parts
of the installation.
● Make sure there are no hidden pipes or cables in the floor and walls where you
intend to drill.
● Wear safety goggles, shoes and appropriate clothing.
BEFORE INSTALLATION
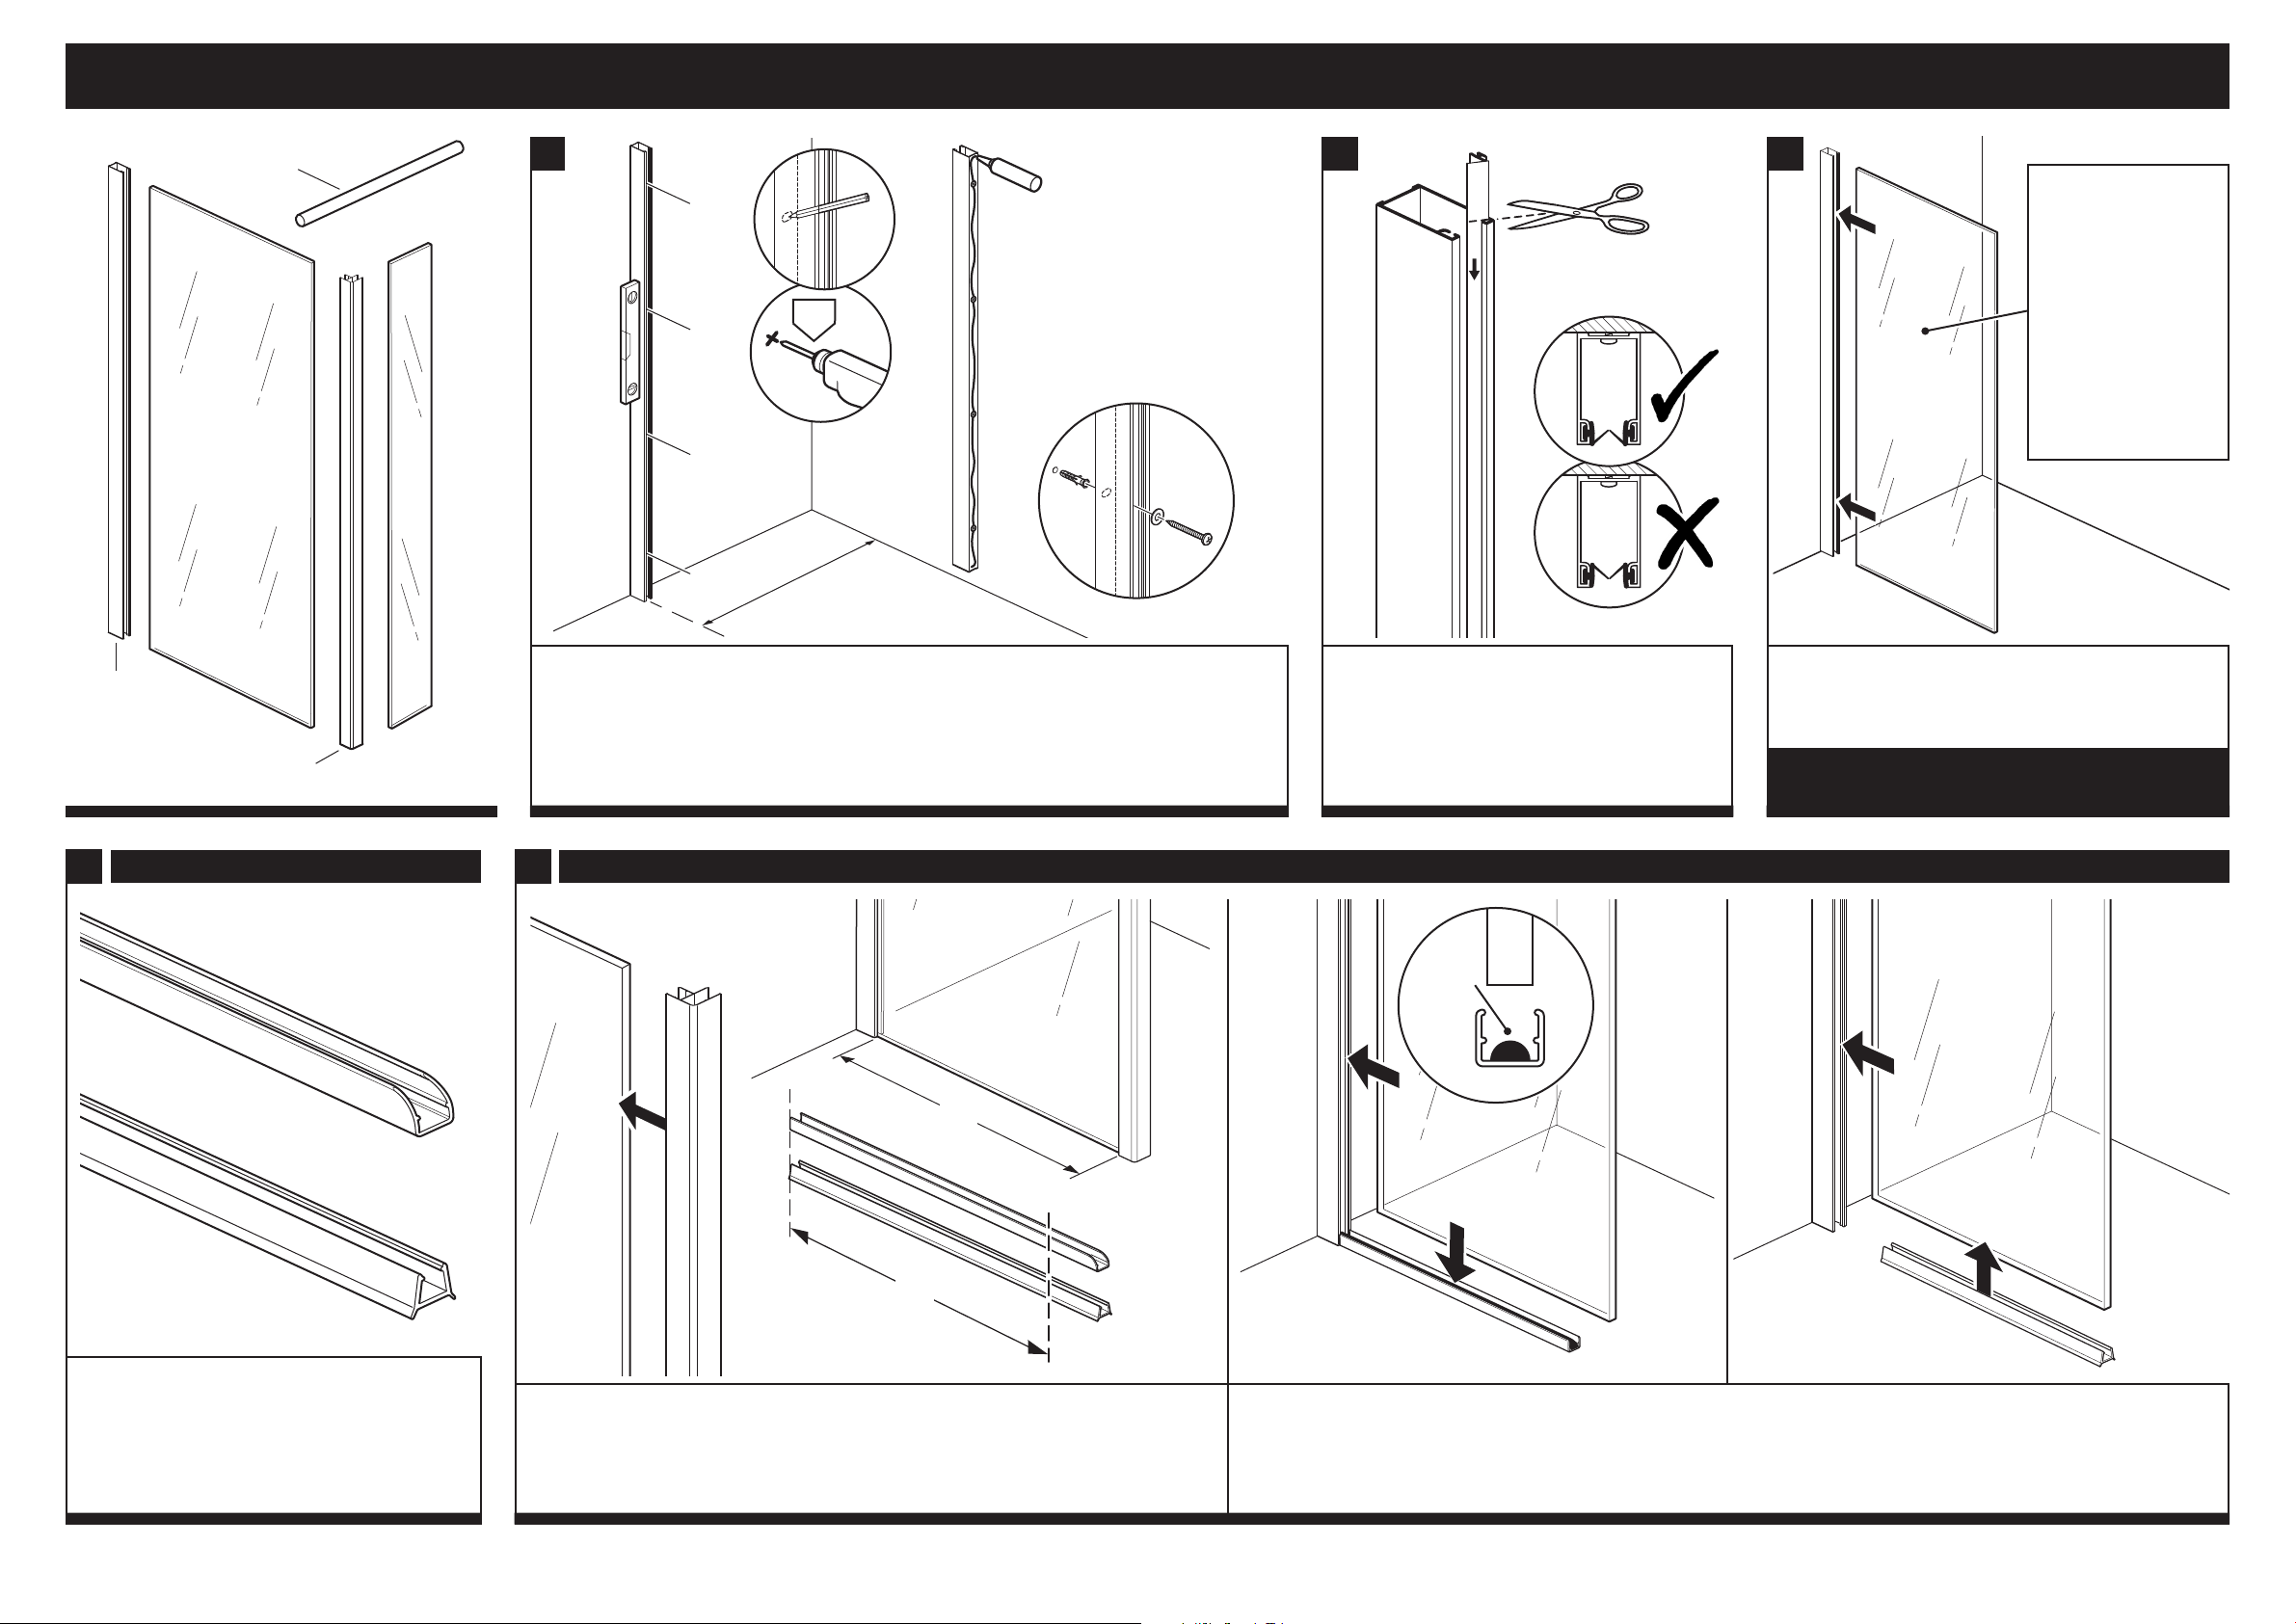
● The panel/s will not sit correctly on an uneven surface. If uneven, the wall
channels may not fit.
● Note: If not fitted on a tray, ensure panel/s are fitted to a tiled or waterproof
composite floor.
● The panel/s should be fitted on tiled walls which are sealed with waterproof grout.
● Always check very carefully that components are vertical.
EQUIPMENT NEEDED:
Drill, 4mm & 6mm Masonry Bits, Crosshead Screwdriver, Flatblade Screwdriver (small &
medium), Spirit Level, Pencil, Fine Tooth Saw, Silicone Sealant, Scissors, Masking Tape,
Tape Measure.
Note: The screws and wall plugs supplied are for masonry walls. For lightweight walls
i.e. stud partitions, plasterboard etc, use the correct type of fixings.
OPTION 1 - PAGES 2 - 4 OPTION 4 - PAGES 9 - 13OPTION 3 - PAGES 5 - 8OPTION 2 - PAGES 5 - 7 OPTION 5 - PAGES 14 - 17 OPTION 6 - PAGES 18 - 20
OR
*
*

PAGE 2
Tie bar
PN10786
Wall channel
PN10754
OPTION 1 - SINGLE PANEL WITH STRAIGHT TIE BAR
32
Slide both seals down into the wall channel and
cut off any excess.
Note the orientation of the soft flippers.
1
Place the wall channel in position against the wall at the required distance from the opposite
wall, as shown (a maximum of 1180mm).
a: Ensure the wall channel is vertical and mark the four holes onto the wall.
b: Drill the four positions marked using a 6mm drill bit.
c: Apply silicone sealant to the back of the wall channel.
d: Insert the wall plugs. Place washers over the 32mm screws and x the wall channel to the
wall. If necessary, slight adjustment is available in the wall channel.
Carefully push the panel (the correct way around) into
the wall channel.
Note: Wetting the edge of the panel with water will
help the panel insert.
If not using the threshold strips,
proceed straight to step 7.
ø 6
mm
a
b
d
32
mm
1180mm
max.
c
IMPORTANT
Ensure Glass Guard
H2o label is to the
outside of the panel.
Satin glass patterns
MUST be installed
to the outside of the
panel.
Note: The Glass
Guard coating is on
the opposite side to
the label or satin glass
patterns.
54
If using the threshold strip, there are 2 types
available (A& B) and 2 tting options:
Option 1:
Fitting up to wall channel - follow step 5.
Option 2:
Fitting inside wall channel - follow step 6.
Optional threshold strips
A
Aluminium
B
Plastic
2
1
Carefully measure the amount of panel protruding from the wall channel ‘X’.
Carefully trim your chosen threshold strip to length ‘X’.
Remove the panel from the wall channel.
Option 1 - Fitting threshold strips up to the wall channel
A: Aluminium threshold strip - Position the strip up against the wall channel.
Run a bead of silicone sealant down the length of the threshold strip. Angle the panel and carefully push (the correct way
around) into the wall channel and threshold strip. Wipe off any excess silicone.
B: Plastic threshold strip - Position the strip onto the bottom of the panel, ush with the front edge (1). Carefully push the
panel (the correct way around) into the wall channel (2) and ensure the strip makes full contact with the oor.
Sealant
A
X
XAB

8
PAGE 3
7
a: Ensure that the open end of the panel is vertical and the panel is parallel with the opposite wall.
Carefully measure the distance ‘X’ between the glass panel and the wall.
b: If required, trim the tie bar to length: X - 50mm.
X
Wall
Opening
=
=
PN80499
X - 50mm 3mm
2mm
Assemble the tie bar: slide on the top panel bracket and tie bar bracket. Lightly tighten the tted grub screws.
Carefully place the tie bar assembly onto the glass, approximately 100mm from the edge (depending on your installation). Ensure the tie bar is level and mark the
position of the tie bar bracket onto the wall.
Approx.
100mm
PN80499
a b
6
Remove the panel from the wall channel.
Carefully trim your chosen threshold strip down to the same width as the panel.
Measure the height of the threshold strip ‘X’ and remove the same amount off each ‘seal’.
A: Aluminium threshold strip - Position the strip inside the wall channel. Run a bead of silicone sealant down the length of the threshold strip.
Angle the panel and carefully push (the correct way around) into the wall channel and threshold strip. Wipe off any excess silicone.
B: Plastic threshold strip - Position the strip onto the bottom of the panel, ush with the front edge (1). Carefully push the panel (the correct way
around) into the wall channel (2) and ensure the strip makes full contact with the oor.
2
1
Sealant
AB
Option 2 - Fitting threshold strips inside the wall channel
A
X
= Height of
threshold strip

PAGE 4
9
ø 6
mm
f
e
PN80499
Remove the tie bar assembly from the panel.
a: Unscrew the wall bracket from the end of the tie bar bracket.
b: Place the wall bracket in the marked position and mark the xing hole onto the wall.
c: Drill the position marked using a 6mm drill bit, 30mm deep.
d: Insert the wall plug and x the wall bracket to the wall using a 32mm screw and washer.
Note: The screws and wall plugs supplied are for masonry walls. For lightweight walls i.e. stud
partitions, plasterboard etc, use the correct type of fixings.
e: Screw the tie bar bracket back onto the wall bracket.
f: Reposition the tie bar into the tie bar bracket and the other end (with top panel bracket tted) onto the
panel (with grub screw on the inside). Tighten the tie bar bracket grub screw onto the tie bar.
g: From inside, tighten the grub screw (1) onto the panel. Ensure the panel is vertical and tighten the grub
screw in the top of the bracket onto the tie bar (2). Push t the screw cover cap.
10
Push t the top cap onto the top of the wall channel.
32
mm
a
1
2
c
d
g
Inside
b
3mm
2mm
11
Without threshold strip - from outside only, seal along the bottom of the panel and wall channel, 50mm up the wall channel and the joint between the wall channel and panel.
Aluminium threshold strip - from
inside and outside,
seal along the bottom and top of the threshold strip.
From outside only,
seal along the bottom of the wall channel, 50mm up the wall channel and up the joint between the wall channel and threshold strip.
Plastic threshold strip - from outside only, seal along the bottom of the wall channel, 50mm up the wall channel and the joint between the wall channel and threshold strip.
Outside -
Aluminium threshold strip
Outside -
Plastic threshold strip
Outside -
Without threshold strip

PAGE 5
OPTION 2 - SINGLE PANEL WITH ANGLED TIE BAR
3
2
Slide both seals down into the wall channel and
cut off any excess.
Note the orientation of the soft flippers.
1
Place the wall channel in position against the wall at the required distance from the opposite
wall, as shown (a maximum of 1180mm).
a: Ensure the wall channel is vertical and mark the four holes onto the wall.
b: Drill the four positions marked using a 6mm drill bit.
c: Apply silicone sealant to the back of the wall channel.
d: Insert the wall plugs. Place washers over the 32mm screws and x the wall channel to the
wall. If necessary, slight adjustment is available in the wall channel.
ø 6
mm
a
b
d
32
mm
1180mm
max.
c
IMPORTANT
Ensure Glass Guard
H2o label is to the
outside of the panel.
Satin glass patterns
MUST be installed
to the outside of the
panel.
Note: The Glass
Guard coating is on
the opposite side to
the label or satin glass
patterns.
Tie bar
PN10786
Wall channel
PN10754
Carefully push the panel (the correct way around) into
the wall channel.
Note: Wetting the edge of the panel with water will
help the panel insert.
If not using the threshold strips,
proceed straight to step 7.
4
If using the threshold strip, there are 2 types
available (A& B) and 2 tting options:
Option 1:
Fitting up to wall channel - follow step 5.
Option 2:
Fitting inside wall channel - follow step 6.
Optional threshold strips
A
Aluminium
B
Plastic
5
2
1
Carefully measure the amount of panel protruding from the wall channel ‘X’.
Carefully trim your chosen threshold strip to length ‘X’.
Remove the panel from the wall channel.
Option 1 - Fitting threshold strips up to the wall channel
A: Aluminium threshold strip - Position the strip up against the wall channel.
Run a bead of silicone sealant down the length of the threshold strip. Angle the panel and carefully push (the correct way
around) into the wall channel and threshold strip. Wipe off any excess silicone.
B: Plastic threshold strip - Position the strip onto the bottom of the panel, ush with the front edge (1). Carefully push the
panel (the correct way around) into the wall channel (2) and ensure the strip makes full contact with the oor.
Sealant
A
X
XAB

PAGE 6
PN80499PN80506
8
7
Ensure that the open end of the panel is vertical
and the panel is parallel with the opposite wall.
Wall
Opening
=
=
a: Loosen the large screw on both tie bar brackets. b: Slide a tie bar bracket onto both ends of the tie bar and position the top panel bracket onto one of the tie bar brackets. Lightly tighten the tted grub screws.
c: Carefully place the tie bar assembly onto the glass, approximately 250mm from the edge (depending on your installation), angle the tie bar brackets as required.
Important note: The tie bar will be most effective when at a 45 degree angle to the panel and wall.
d: If required, trim the tie bar to length e &f: Ensure the panel is vertical and the tie bar is level, mark the position of the angled tie bar bracket onto the wall.
Approx.
250mm
PN80499
PN80499
3mm
2mm 2mm
6
Remove the panel from the wall channel.
Carefully trim your chosen threshold strip down to the same width as the panel.
Measure the height of the threshold strip ‘X’ and remove the same amount off each ‘seal’.
A: Aluminium threshold strip - Position the strip inside the wall channel. Run a bead of silicone sealant down the length of the threshold strip.
Angle the panel and carefully push (the correct way around) into the wall channel and threshold strip. Wipe off any excess silicone.
B: Plastic threshold strip - Position the strip onto the bottom of the panel, ush with the front edge (1). Carefully push the panel (the correct way
around) into the wall channel (2) and ensure the strip makes full contact with the oor.
2
1
AB
Option 2 - Fitting threshold strips inside the wall channel
Sealant
A
X
= Height of
threshold strip
a
b
c e
fd

PAGE 7
9
ø 6
mm
f
e
PN80499
Remove the tie bar assembly from the panel.
a: Unscrew the wall bracket from the end of the tie bar bracket.
b: Place the wall bracket in the marked position and mark the xing hole onto the wall.
c: Drill the position marked using a 6mm drill bit, 30mm deep.
d: Insert the wall plug and x the wall bracket to the wall using a 32mm screw and washer.
Note: The screws and wall plugs supplied are for masonry walls. For lightweight walls i.e.
stud partitions, plasterboard etc, use the correct type of fixings.
e: Screw the tie bar bracket back onto the wall bracket.
f: Reposition the tie bar into the tie bar bracket and the other end (with top panel bracket tted)
onto the panel (with grub screw on the inside). Tighten the tie bar bracket grub screw onto the tie
bar.
g: From inside, tighten the grub screw (1) onto the panel. Ensure the panel is vertical and tighten
the grub screw in the top of the bracket onto the tie bar (2). Push t the screw cover cap.
10
Tighten the large screws on both of the tie bar brackets.
32
mm
a
1
2
c
d
g
Inside
b
3mm
2mm
11
Push t the top cap onto the top of the wall channel.
12
Without threshold strip - from outside only, seal along the bottom of the panel and wall channel, 50mm up the wall channel and the joint between the wall channel and panel.
Aluminium threshold strip - from
inside and outside,
seal along the bottom and top of the threshold strip.
From outside only,
seal along the bottom of the wall channel, 50mm up the wall channel and up the joint between the wall channel and threshold strip.
Plastic threshold strip - from outside only, seal along the bottom of the wall channel, 50mm up the wall channel and the joint between the wall channel and threshold strip.
Outside -
Aluminium threshold strip
Outside -
Plastic threshold strip
Outside -
Without threshold strip

PAGE 8
OPTION 3 - DOUBLE PANEL WITH ANGLED TIE BARS
Tie bars
PN10786
Wall channel
PN10754
Wall channel
PN10754
1
Plan position of panels. The size of the opening will depend on the tray
(if used) or the site conditions.
To fit the
DOUBLE PANEL
WITH ANGLED
TIE BARS option,
follow the same
steps as the
SINGLE PANEL
WITH ANGLED
Tie bar.
PANEL
A
PANEL
B
Opening
A
B
Wall

PAGE 9
OPTION 4 - SINGLE PANEL WITH RETURN PANEL
3
2
Slide both seals down into the wall channel and
cut off any excess.
Note the orientation of the soft flippers.
1
Place the wall channel in position against the wall at the required distance from the opposite
wall, as shown (a maximum of 1180mm).
a: Ensure the wall channel is vertical and mark the four holes onto the wall.
b: Drill the four positions marked using a 6mm drill bit.
c: Apply silicone sealant to the back of the wall channel.
d: Insert the wall plugs. Place washers over the 32mm screws and x the wall channel to the
wall. If necessary, slight adjustment is available in the wall channel.
Carefully push the panel (the correct way around) into
the wall channel.
Note: Wetting the edge of the panel with water will
help the panel insert.
If not using the threshold strips,
proceed straight to step 7.
ø 6
mm
a
b
d
32
mm
1180mm
max.
c
IMPORTANT
Ensure Glass Guard
H2o label is to the
outside of the panel.
Satin glass patterns
MUST be installed
to the outside of the
panel.
Note: The Glass
Guard coating is on
the opposite side to
the label or satin glass
patterns.
Tie bar
PN10786
Wall channel
PN10754
Corner joint PN11011
54
If using the threshold strip/s, there are 2 types
available (A& B) and 2 tting options:
Option 1:
Fitting up to wall channel - follow step 5.
Option 2:
Fitting inside wall channel - follow step 6.
Optional threshold strips
A
Aluminium
B
Plastic
2
1
a: Temporarily, position the corner joint (short side*as shown) onto the main panel.
b: Carefully measure the panel between the wall channel and corner joint = ‘X’.
c: Carefully trim your chosen threshold strip to length ‘X’.
Remove the corner joint and panel from the wall channel.
Option 1 - Fitting threshold strips up to the wall channel
A: Aluminium threshold strip - Position the strip up against the wall channel.
Run a bead of silicone sealant down the length of the threshold strip. Angle the panel and carefully push (the correct way
around) into the wall channel and threshold strip. Wipe off any excess silicone.
B: Plastic threshold strip - Position the strip onto the bottom of the panel, ush with the front (1). Carefully push the panel
(the correct way around) into the wall channel (2) and ensure the strip makes full contact with the oor.
AB
X
X
a b
c
*Sealant
A

PAGE 10
8
7
a: Ensure that the open end of the panel is vertical and the panel is parallel with the opposite wall.
Carefully measure the distance ‘X’ between the glass panel and the wall.
b: If required, trim the tie bar to length: X - 50mm.
X
Wall
Opening
=
=
X - 50mm
Assemble the tie bar: slide on the top panel bracket and tie bar bracket. Lightly tighten the tted grub screws.
Carefully place the tie bar assembly onto the glass, approximately 100mm from the edge (depending on your installation). Ensure the tie bar is level and mark the
position of the tie bar bracket onto the wall.
Approx.
100mm
PN80499
a b
6
Remove the panel from the wall channel.
a: Temporarily, position the corner joint (short side*as shown) onto the main panel.
b: Carefully measure and trim your chosen threshold strip down to the width of the panel, minus the corner joint.
c: Measure the height of the threshold strip ‘X’ and remove the same amount off each ‘seal’.
A: Aluminium threshold strip - Position the strip inside the wall channel. Run a bead of silicone sealant down the length of the threshold strip.
Angle the panel and carefully push (the correct way around) into the wall channel and threshold strip. Wipe off any excess silicone.
B: Plastic threshold strip - Position the strip onto the bottom of the panel, ush with the front (1). Carefully push the panel (the correct way around)
into the wall channel (2) and ensure the strip makes full contact with the oor.
Option 2 - Fitting threshold strips inside the wall channel
X
= Height of
threshold strip
2
1
AB
a
*
b c
Sealant
A
3mm
2mm
PN80499

PAGE 11
9
ø 6
mm
f
e
PN80499
Remove the tie bar assembly from the panel.
a: Unscrew the wall bracket from the end of the tie bar bracket.
b: Place the wall bracket in the marked position and mark the xing hole onto the wall.
c: Drill the position marked using a 6mm drill bit, 30mm deep.
d: Insert the wall plug and x the wall bracket to the wall using a 32mm screw and washer.
Note: The screws and wall plugs supplied are for masonry walls. For lightweight walls i.e. stud
partitions, plasterboard etc, use the correct type of fixings.
e: Screw the tie bar bracket back onto the wall bracket.
f: Reposition the tie bar into the tie bar bracket and the other end (with top panel bracket tted) onto the
panel (with grub screw on the inside). Tighten the tie bar bracket grub screw onto the tie bar.
g: From inside, tighten the grub screw (1) onto the panel. Ensure the panel is vertical and tighten the grub
screw in the top of the bracket onto the tie bar (2). Push t the screw cover cap.
10
Push t the top cap onto the top of the wall channel.
32
mm
a
1
2
c
d
g
Inside
b
11 Return panel - fitting options
Option A: Without threshold strips and foot - follow step 12.
Option B: With threshold strips - follow step 13.
Option C: With threshold strips and foot - follow step 14.
Option D: With foot only - follow step 14 (ignoring the threshold strips).
Option A - Return panel without threshold strips and foot
MAIN
PANEL
(outside)
12
a: Apply silicone sealant down the inside of the ‘long and short sides’ of the corner joint.
b: Push t the corner joint cap on to the corner joint.
c: Carefully push the ‘long side’ of the corner joint fully onto the return panel. (Ensure ‘Glass Guard H2o’ label
is to the outside of the panel.)
RETURN
PANEL
(inside)
a b c
d: Carefully push the corner joint and return panel fully onto the main
panel.
Now proceed straight to step 15 to seal the panel/s.
d
RETURN
PANEL
(outside)
A B
C D
3mm
2mm

PAGE 12
13 Option B - Return panel with threshold strips
a b
a: Temporarily, position the return panel into the ‘long side*’ of the corner joint.
(Ensure ‘Glass Guard H2o’ label is to the outside of the panel.)
b: Position the ‘short side’ of the corner joint onto the main panel.
c: Carefully measure the length of return panel protruding out of the corner
joint = ‘X’.
d: Carefully trim your chosen threshold strip to length ‘X’.
Remove the corner joint and return panel.
X
c
d
MAIN
PANEL
(outside)
e: Apply silicone sealant down the inside of the ‘long and short sides’ of the corner joint.
f: Push t the corner joint cap on to the corner joint.
g: Carefully push the ‘short side’ of the corner joint fully onto the main panel.
e f g
14 Option C -Return panel with threshold strips and foot & Option D -Return panel with foot only
c
a: Temporarily, position the return panel into the ‘long side*’
of the corner joint. (Ensure ‘Glass Guard H2o’ label is to the
outside of the panel.)
b: Position the ‘short leg’ of the corner joint onto the main
panel.
c: Use the 3mm allen key to wind-up the pin on the inner foot*so it is ush with the underside. Place the inner foot into
the foot. Position the assembled foot under the return panel, ush with the edge.
d: Ensure the return panel is vertical and if required adjust the foot to level the panel. Mark the position of the foot onto
the oor (all the way around). Carefully measure the return panel between the corner joint and foot = ‘X’.
e: Carefully trim your chosen threshold strip to length ‘X’.
Remove the corner joint, return panel and foot.
*
*
a b
X
d
X
e
X
*
RETURN
PANEL
(outside)
RETURN
PANEL
(outside)
RETURN
PANEL
(outside)
RETURN
PANEL
(outside)
RETURN
PANEL
(outside)
Option B - continued
A: Aluminium threshold strip - Position the strip up against the corner joint. Run
a bead of silicone sealant down the length of the threshold strip. Carefully push the
return panel (the correct way around) into the corner joint (1). Slide the return panel
down the corner joint and into the threshold strip (2). Wipe off any excess silicone.
B: Plastic threshold strip - Position the strip onto the bottom of the return panel,
ush with the front (1). Carefully push the return panel (the correct way around) into
the corner joint (2) and ensure the strip makes full contact with the oor.
Now proceed straight to step 15 to seal the enclosure.
12
2
1
AB
Sealant
A
3mm

PAGE 13
2
1
Inside
c: Apply silicone sealant down the inside of the ‘long and short sides’ of the
corner joint.
d: Push t the corner joint cap on to the corner joint.
e: Carefully push the ‘short side’ of the corner joint fully onto the main panel.
A: Aluminium threshold strip - Position the strip up against the corner joint.
Run a bead of silicone sealant down the length of the threshold strip. Carefully push
the return panel (the correct way around) into the corner joint (1). Slide the return panel
down the corner joint and into the threshold strip (2). Wipe off any excess silicone.
B: Plastic threshold strip - Position the strip onto the bottom of the return panel,
ush with the edge (1). Carefully push the panel (the correct way around) into the
corner joint (2) and ensure the strip makes full contact with the oor.
Options C & D - continued
a
Option a: Drilling floor for foot - Use the dimensions above to mark and drill the ‘pin’ hole in the oor.
Using a 4mm drill bit, carefully drill a shallow hole (no deeper than half the thickness of the tile etc.).
Use the allen key to adjust the ‘pin’ in the inner foot*to t into the hole. Position the assembled foot in
the marked position.
Option b: Sealing foot to floor - Use the allen key to remove the ‘pin’ from the inner foot*. Apply
silicone sealant to the underside of the inner foot. Position the assembled foot in the marked position.
b
15
Apply silicone sealant along the bottom of the panels and optional foot, as shown.
Without threshold strip - from outside only, seal along the bottom of the panels, corner joint and wall channel also 50mm up the wall channel and the joints between the wall channel/corner joint and panels.
Aluminium threshold strip -
from
inside and outside,
seal along the bottom
and top
of the threshold strips.
From outside only,
seal along the bottom of the
corner joint and the wall channel. Also 50mm up the
wall channel and the joints between the wall channel/corner joint and threshold strips.
Plastic threshold strip - from outside only, seal along the bottom of the wall channel and corner joint and 50mm up the wall channel and the joints between the wall channel/corner joint and threshold strips.
Outside -
Aluminium threshold strip
Outside -
Plastic threshold strip
Outside -
Without threshold strip
Outside of foot
Inside of foot
Options C & D - continued
From inside, if required adjust the height of the foot (1) so that
the return panel is vertical.
Tighten the grub screw (2) onto the return panel.
Push t the screw cover caps.
MAIN
PANEL
(outside)
c d e
2
1
AB
17
mm
17
mm
8
mm
ø 4
mm *2mm
2mm
*
3mm
1
2
Sealant
A

PAGE 14
2
If using the threshold strip, there are 2 types
available A -Aluminium & B - Plastic.
Optional threshold strips
A
Aluminium
B
Plastic
OPTION 5 - SINGLE PANEL WITH 2 RETURN PANELS
a: Temporarily, position both corner joints (short side*as shown) onto the main panel.
b: Carefully measure the panel between the corner joints = ‘X’.
c: Carefully trim your chosen threshold strip to length ‘X’.
Remove the corner joints from the panel.
X
*
1
Plan the position of the main panel, the maximum distance the
main panel can be from the wall is 1180mm.
Mark the position of the inner face of the panel onto the oor.
Ensure the line is parallel to the wall.
If not using the optional threshold strips,
proceed straight to step 3.
1180mm
max.
=
1180mm
max.
=
Wall
X
a b
c
Inner face of
main panel
4
a: Ensure that the panel is vertical and the panel is parallel with the opposite wall. Carefully measure the distance
‘X’ between the glass panel and the wall.
b: If required, trim the tie bars to length: X - 50mm.
c: Assemble the tie bars: slide on the top panel brackets and tie bar brackets. Lightly tighten the tted grub screws.
X
Wall
Opening
=
=
X - 50mm
ab
c
3
Carefully place the panel (the correct way around) up
against the line marked on the oor and support the
panel.
IMPORTANT
Ensure Glass Guard
H2o label is to the
outside of enclosure/
panel. Satin glass
patterns MUST be
installed to the outside
of the enclosure.
Note: The Glass
Guard coating is on
the opposite side to
the label or satin glass
patterns.
A: Aluminium threshold strip - Position the strip up against the line marked on the oor.
Run a bead of silicone sealant down the length of the threshold strip. Place the panel (the
correct way around) into the threshold strip. Wipe off any excess silicone.
B: Plastic threshold strip - Position the strip centrally onto the bottom of the panel, position
the panel and strip up against the line marked on the oor (the correct way around).
A
Aluminium
B
Plastic
Optional threshold strips
Sealant
A
Tie bars
PN10786
Corner joint
PN10754
Corner joint PN11011
3mm
2mm
PN80499

PAGE 15
6ø 6
mm
fe
PN80499
Remove the tie bar assemblies from the panel.
a: Unscrew the wall brackets from the end of the tie bar brackets.
b: Place the wall brackets in the marked positions and mark the xing holes
onto the wall.
c: Drill the positions marked using a 6mm drill bit, 30mm deep.
d: Insert the wall plugs and x the wall brackets to the wall using a 32mm
screws and washers.
Note: The screws and wall plugs supplied are for masonry walls.
For lightweight walls i.e. stud partitions, plasterboard etc, use the correct
type of fixings.
e: Screw the tie bar brackets back onto the wall brackets.
f: Reposition the tie bars into the tie bar brackets and the other end (with top
panel bracket tted) onto the panel (with grub screws on the inside). Tighten the
tie bar bracket grub screws onto the tie bars.
g: From inside, tighten the grub screws (1) onto the panel. Ensure the panel is
vertical and tighten the grub screws in the top of the brackets onto the tie bars
(2). Push t the screw cover caps.
32
mm
ac
d
b
2mm 1
2
g
Inside
3mm
5
a: Carefully place the tie bar assemblies onto the glass, approximately 100mm from the edges
(depending on your installation).
b: Ensure the tie bars are level and mark the positions of the tie bar brackets onto the wall.
Approx.
100mm
PN80499
Approx.
100mm
a b
7Return panels - fitting options
Option A: Without threshold strips and feet - follow step 8.
Option B: With threshold strips - follow step 9.
Option C: With threshold strips and feet - follow step 10.
Option D: With feet only - follow step 10 (ignoring the threshold strips).
Option A - Return panels without threshold strips and feet
MAIN
PANEL
(outside)
8
a: Apply silicone sealant down the inside of the ‘long and short sides’ of the corner joints.
b: Push t the corner joint caps on to the corner joints.
c: Carefully push the ‘long side’ of the corner joints fully onto the return panels. (Ensure ‘Glass Guard H2o’
label is to the outside of the panel.)
RETURN
PANEL
(inside)
a b c
d: Carefully push the corner joints and return panels fully onto the main
panel.
Now proceed straight to step 11 to seal the panel.
d
RETURN
PANEL
(outside)
A B
C D

PAGE 16
9Option B - Return panels with threshold strips
a b
a: Temporarily, position the return panels into the ‘long side*’ of the corner joints.
(Ensure ‘Glass Guard H2o’ label is to the outside of the panel.)
b: Position the ‘short side’ of the corner joints onto the main panel.
c: Carefully measure the length of return panel protruding out of the corner
joints = ‘X’.
d: Carefully trim your chosen threshold strips to length ‘X’.
Remove the corner joints and return panels.
X
c
d
MAIN
PANEL
(outside)
e: Apply silicone sealant down the inside of the ‘long and short sides’ of the corner joints.
f: Push t the corner joint caps on to the corner joints.
g: Carefully push the ‘short side’ of the corner joints fully onto the main panel.
e f g
*
X
RETURN
PANEL
(outside)
RETURN
PANEL
(outside)
RETURN
PANEL
(outside)
10 Option C -Return panels with threshold strips and feet & Option D -Return panels with feet only
c
a: Temporarily, position the return panels into the ‘long side*’
of the corner joints. (Ensure ‘Glass Guard H2o’ label is to the
outside of the panel.)
b: Position the ‘short leg’ of the corner joints onto the main
panel.
c: Use the 3mm allen key to wind-up the pin on each inner foot*so they are ush with the underside. Place the inner
feet into the feet. Position the assembled feet under the return panels, ush with the edge.
d: Ensure the return panels are vertical and if required adjust the feet to level the panels. Mark the position of the feet
onto the oor (all the way around). Carefully measure the return panels between the corner joint and foot = ‘X’.
e: Carefully trim your chosen threshold strips to length ‘X’.
Remove the corner joints, return panels and feet.
*
a b
X
d
X
e
*
RETURN
PANEL
(outside)
RETURN
PANEL
(outside)
3mm
Option B - continued
A: Aluminium threshold strip - Position the strips up against the corner joints.
Run a bead of silicone sealant down the length of the threshold strips. Carefully
push the return panels (the correct way around) into the corner joints (1). Slide the
return panels down the corner joints and into the threshold strips (2). Wipe off any
excess silicone.
B: Plastic threshold strip - Position the strips onto the bottom of the return panels,
ush with the front (1). Carefully push the return panels (the correct way around) into
the corner joints (2) and ensure the strips makes full contact with the oor.
Now proceed straight to step 11 to seal the enclosure.
12
2
1
AB
Sealant
A

PAGE 17
c: Apply silicone sealant down the inside of the ‘long and short sides’ of the
corner joints.
d: Push t the corner joint caps on to the corner joints.
e: Carefully push the ‘short side’ of the corner joints fully onto the main panel.
A: Aluminium threshold strip - Position the strip up against the corner joints.
Run a bead of silicone sealant down the length of the threshold strips. Carefully push the
return panels (the correct way around) into the corner joints (1). Slide the return panels
down the corner joints and into the threshold strips (2). Wipe off any excess silicone.
B: Plastic threshold strip - Position the strips onto the bottom of the return panels,
ush with the edge (1). Carefully push the panels (the correct way around) into the
corner joints (2) and ensure the strips make full contact with the oor.
Options C & D - continued
a
Option a: Drilling floor for feet - Use the dimensions above to mark and drill the ‘pin’ holes in the
oor. Using a 4mm drill bit, carefully drill shallow holes (no deeper than half the thickness of the tile
etc.). Use the allen key to adjust the ‘pin’ in the inner feet*to t into the hole. Position the assembled
feet in the marked position.
Option b: Sealing feet to floor - Use the allen key to remove the ‘pins’ from the inner feet*. Apply
silicone sealant to the underside of the inner feet. Position each assembled foot in the marked position.
b
17
mm
17
mm
8
mm
ø 4
mm *2mm
2mm
*
2
1
Inside
11
Apply silicone sealant along the bottom of the panels and optional feet, as shown.
Without threshold strip - from outside only, seal along the bottom of the panels and the corner joints also 50mm up the joints between the corner joints and panels.
Aluminium threshold strip -
from
inside and outside, seal along the bottom
and top
of the threshold strips. From outside only,
seal along the bottom of the
corner joints. Also seal up the joints between the
corner joints and threshold strips.
Plastic threshold strip - from outside only, seal along the bottom of the corner joints and up the joints between the corner joints and threshold strips.
Outside -
Aluminium threshold strip
Outside -
Plastic threshold strip
Outside -
Without threshold strip
Outside of foot
Inside of foot
Options C & D - continued
From inside, if required adjust the height of the feet (1) so that
the return panels are vertical.
Tighten the grub screw (2) onto the return panels.
Push t the screw cover caps.
3mm
MAIN
PANEL
(outside)
c d e
2
1
AB
1
2
Sealant
A

PAGE 18
Tie bar
PN10786
Wall channel
PN10754
OPTION 6 - SINGLE CURVED PANEL WITH TIE BAR
32
Slide both seals down into the wall channel and
cut off any excess.
Note the orientation of the soft flippers.
1
Place the wall channel in position against the wall at the required distance from the opposite
wall, as shown (a maximum of 1180mm).
a: Ensure the wall channel is vertical and mark the four holes onto the wall.
b: Drill the four positions marked using a 6mm drill bit.
c: Apply silicone sealant to the back of the wall channel.
d: Insert the wall plugs. Place washers over the 32mm screws and x the wall channel to the
wall. If necessary, slight adjustment is available in the wall channel.
Carefully push the panel (the correct way around) into
the wall channel.
Note: Wetting the edge of the panel with water will
help the panel insert.
ø 6
mm
a
b
d
32
mm
1180mm
max.
c
PN80499
=
=
PN80499PN80506
54
Ensure that the open end of the panel is vertical
and the panel is parallel with the opposite wall.
Wall
Opening
a: Loosen the large screw on both tie bar brackets. b: Slide a tie bar bracket onto both ends of the tie bar and position the top panel bracket onto tie bar bracket (PN80506). Lightly tighten the tted grub screws.
c: Carefully place the tie bar assembly onto the glass, where required (depending on your installation), angle the tie bar brackets as required.
d: If required, trim the tie bar to length e &f: Ensure the panel is vertical and the tie bar is level, mark the position of the tie bar bracket onto the wall.
PN80499 &
PN80506
3mm
2mm 2mm
a
b
c e
fd
IMPORTANT
Ensure Glass Guard
H2o label is to the
outside of the panel.
Satin glass patterns
MUST be installed
to the outside of the
panel.
Note: The Glass
Guard coating is on
the opposite side to
the label or satin glass
patterns.

PAGE 19
6
ø 6
mm
f
e
PN80499
Remove the tie bar assembly from the panel.
a: Unscrew the wall bracket from the end of the tie bar bracket.
b: Place the wall bracket in the marked position and mark the xing hole onto the wall.
c: Drill the position marked using a 6mm drill bit, 30mm deep.
d: Insert the wall plug and x the wall bracket to the wall using a 32mm screw and washer.
Note: The screws and wall plugs supplied are for masonry walls. For lightweight walls i.e. stud
partitions, plasterboard etc, use the correct type of fixings.
e: Screw the tie bar bracket back onto the wall bracket.
f: Reposition the tie bar into the tie bar bracket and the other end (with top panel bracket tted) onto the panel
(with grub screw on the inside). Tighten the tie bar bracket grub screw onto the tie bar.
g: From inside, slide the spacer plate (PN80573 50) up between the bracket and glass panel, tighten the grub
screw (1) onto the panel. Ensure the panel is vertical and tighten the grub screw in the top of the bracket onto
the tie bar (2). Push t the screw cover cap. Tighten the large screws on both tie bar brackets.
7
Push t the top cap onto the top of the
wall channel.
32
mm
a
1
2
c
d
g
Inside
b
3mm
2mm
8Foot Options
Option A: Without foot - follow step 10.
Option B: With foot - follow step 9.
A
B
9Option B -With foot
a
a: Use the 3mm allen key to wind-up the pin on the inner foot*so it is ush with the underside. Place the inner
foot into the foot. Position the assembled foot under the panel as far as it will go without lifting the panel off the
oor. b: Ensure the panel is vertical and if required adjust the foot to level the panel. Mark the position of the foot
onto the oor (all the way around).
Remove the foot and the panel.
b
*
3mm
a
Option a: Drilling floor for foot - Use the dimensions above to mark and drill the ‘pin’ hole in the oor. Using
a 4mm drill bit, carefully drill a shallow hole (no deeper than half the thickness of the tile etc.). Use the allen key
to adjust the ‘pin’ in the inner foot*to t into the hole. Position the assembled foot in the marked position.
Option b: Sealing foot to floor - Use the allen key to remove the ‘pin’ from the inner foot*. Apply silicone
sealant to the underside of the inner foot. Position the assembled foot in the marked position.
b
17
mm
17
mm
8
mm
ø 4
mm *2mm
2mm
*
PN80573 50

IMPEY SHOWERS LTD
Conquest Business Park, Ilton, Somerset, TA19 9EA
Tel: 01460 256080 •Fax: 01460 259800
CARE AND MAINTENANCE
IMPORTANT: When silicone sealant is used you must not use or work on
the panel/s for 24 hours after installation.
DO NOT use bleach, scouring powders, solvents or other aggressive
cleaning agents.
To clean use warm soapy water and a clean cloth and rinse off.
Periodically check all fixings and tighten if necessary.
Please note: There has been a glass coating applied to this product,
use a squeegee to remove water and debris.
RECYCLING
Packaging:- The cardboard and polythene parts of this packaging
can be recycled.
End of life:- This product contains materials such as aluminium and
glass which can be recycled.
Please contact your local authority to find your nearest recycling centre.
TECHNICAL HELPLINE: 01460 258682
PAGE 20
10
Seal along the bottom of both sides of the glass, outside of the bottom of the wall channel,
50mm up the wall channel and the joint between the wall channel and panel.
Optional foot - apply silicone sealant along the bottom of the optional foot, as shown.
Outside of foot
Inside of foot
Carefully push the panel back into the wall
channel (1). Slide the panel down the wall
channel and into the foot (2).
Reattach the tie bar.
Option B - continued
1
2
2
1
Inside
From inside, if required adjust the height of the foot (1) so that the panel
is vertical. slide the spacer plate (PN80583) down between
the bracket and glass panel.
Tighten the grub screw (2) onto the panel. Push t the screw cover
caps.
3mm
PN80583
Table of contents
Popular Shower Cabin manuals by other brands

RIHO
RIHO NOVIK Z400 installation manual

Schulte
Schulte MasterClass D1209030 Assembly instructions

BATH DELUXE
BATH DELUXE DETROIT SQUARE LOW TRAY installation guide

Omnires
Omnires NDC80X Installation and Maintenance

glass 1989
glass 1989 pasodoble steam 100 manual

Insignia
Insignia GT5000L installation manual

Duscholux
Duscholux BELLA VITA 3 PLUS installation instructions

Aston Global
Aston Global SDR981.00-L Installation and owner's manual

Noro
Noro FIX R installation instructions

Jacuzzi
Jacuzzi MORPHOSIS Omega Use & maintenance

VINNOVA
VINNOVA Tafaala 316034-WR-BG Installation instruction

STEIN
STEIN GEORGIA SQUARE quick start guide