Improvements DAZZLE User manual

DAZZLE
3-in-1 Jewelry Cleaner and Sanitizer
SJC-1601
INSTRUCTION MANUAL

2
INTRODUCTION
Thank you for choosing Improvements for all your jewelry and accessory cleaning needs. The
Improvements Dazzle is the world’s rst jewelry cleaner and sanizer combining ultrasonic cleaning,
high pressure steam cleaning and UV sanitization for jewelry, glasses, watch bands, dentures,
manicure/pedicure tools and more! There are no harsh chemicals needed, just add water. The
ultrasonic sound waves vibrate to safely loosen dirt, oils, and make up in minutes at 43,000 vibraons
per second. High pressure steam funcon blasts away any leover residue like a professional jewelry
cleaner. Allow the jewelry to dry and sanize in the UV light chamber for dazzling 99.9% bacteria free
jewelry.
IMPORTANT – READ BEFORE CLEANING ANY TYPE OF JEWELRY
Prior to using the Improvements Dazzle 3-in-1 Jewelry Cleaner and Sanizer, always conrm if the jew-
elry in queson may be cleaned either in an ultrasonic cleaner, steam cleaner and/or exposed to
UV light. Always inspect the seng for loose stones prior to cleaning. Stones that are insecurely
set may fall out when cleaned by ultrasonic or steam cleaner.
While some general guidelines are noted below (see page 4) for what may or may not be cleaned
in an ultrasonic cleaner, steam cleaner and/or exposed to UV light, the guidelines are not represented
as being complete and are not meant to be used as your nal determinaon as to whether or not
the jewelry in queson is suitable for being cleaned by the jewelry cleaner. Before cleaning any
piece of jewelry or gemstone, you should consult with a professional to correctly idenfy the
item you desire to clean and conrm that it is suitable to be cleaned in and by an ultrasonic cleaner,
steam cleaner and exposed to UV light. Improvements disclaims, to the maximum extent
permissible, (a) any responsibility for damage to jewelry or any other items, and (b) any responsibility
for direct, special, incidental or consequenal damages under any legal theory.
For more information on jewelry care and cleaning, or assistance with finding qualified
professionals with whom you may consult regarding the potential cleaning of your jewelry,
visit the following jewelry industry websites:
American Gem Society (AGS)
Guide to Fine Jewelry Care
hp://www.ags.org
Gemological Instute of America (GIA)
hp://www.gia.edu/
Jewelers of America (JA)
hp://www.jewelers.org
The following types of jewelry should only be cleaned by a knowledgeable professional:
• Anque jewelry
• Enamel jewelry
• Paste jewelry (common with costume jewelry)
• Costume jewelry
• Jewelry containing stones that have been set with glue

3
SAFETY GUIDELINES
WARNING: Be sure to read and follow all safety instruc ons before using
your jewelry cleaner. Proper care and maintenance will help expand the life
of your jewelry cleaner.
When using an electrical appliance, basic precau ons should always be followed. To reduce the
risk of re, electric shock, or injury:
• Carefully read all instruc ons prior to use.
• USE CAUTION – do not touch hot surfaces. Use tweezers, and stainless steel basket as
instructed in order to prevent injury.
• Be sure to unplug the electrical cord when appliance is not in use.
• The steamer is not intended for use by persons (including children) with reduced physical,
sensory, mental capabilities or lack of experience and knowledge unless they have
been instructed to do so by a person responsible for their safety.
• Do not leave the appliance una ended while plugged in.
• Children should be supervised at all mes and cau oned that the steamer is not a toy
and should not be played with.
• Only use tap water or distilled water. Never add cleaning solutions or agents to the
ultrasonic reservoir and water tank.
• The jewelry cleaner is designed to operate with a maximum of 350ml/12 oz of water
in its tank. To produce the driest steam, it should be operated with 325ml/ 11 oz of
water. DO NOT over ll the water tank. If the water tank is over lled, it will produce a
hazardous spla ering of water and wet stream.
• Always dry all excess water from within the funnel area before replacing the water tank
cap. Any excess water within and around the water tank cap will boil out (appearing as
though it is leaking). Never touch the boiling water or you may get burned.
• Never operate the jewelry cleaner without suffi cient water in the ultrasonic reservoir
and water tank.
• Never a empt to unscrew the water tank cap while it is s ll hot and under pressure.
• If the steamer runs out of steam during use, turn it o and unplug it. Allow 30 minutes
for the steamer to cool before re lling the water tank.
• Do not unscrew water tank cap during or after use. Allow to completely cool down
before re lling water tank. If cap is unscrewed under pressure, it may cause injury or
burns.
• Be certain that the water tank cap is screwed on by hand prior to use. Do not over- ghten.
Never operate the jewelry cleaner without the water tank cap properly installed.
• Do not immerse the cleaner in water or other liquids.
• Do not pull power cord to disconnect appliance from outlet or use cord as a handle.
• Do not use if cord or plug is damaged. If the power cord is damaged, it must be
replaced by the manufacturer, its service agent, or similarly quali ed persons in order
to avoid hazard.
• Do not use extension cords or outlets with inadequate current carrying capacity.
• Be sure to keep cord away from heat, water and sharp edges.
• Do not disassemble unit or a empt to make any repairs yourself. Incorrect assembly or
repair could result in a risk of re, electric shock, or injury to persons when opera ng.
• Always allow your jewelry cleaner to cool down for at least 30 minutes before storing
in a cool, dry place.
• For indoor use only. Do not use outdoors.
• Do not use appliance for other than the intended use. This appliance is for domes c
use only. Any commercial use will void warranty. The manufacturer declines all
responsibility for any damage caused by improper, incorrect or irresponsible use.

4
GUIDELINE FOR GEMSTONE CLEANING
Gemstone Durability Steam Ultrasonic UV light
Agates Moderate Not Recommended* Not Recommended* Yes
Alexandrite Strong Yes Yes** Yes
Amazonite Moderate Not Recommended* Not Recommended* Not Recommended*
Amber Fragile Not Recommended* Not Recommended* Not Recommended*
Amethyst Moderate Not Recommended* Yes** Not Recommended*
Aquamarine Strong Yes** Yes** Yes
Carnelian Moderate Yes** Yes** Yes
Chalcedony Moderate Yes** Yes** Yes
Citrine Moderate Not Recommended* Yes** Not Recommended*
Coral Fragile Not Recommended* Not Recommended* Yes***
Diamond Strong Yes Yes Yes
Diamond
Colored/Inclusion
Strong Yes Yes** Yes
Emerald Strong Not Recommended* Not Recommended* Not Recommended*
Garnet
(Malaya/Rhodolite)
Moderate Not Recommended* Yes** Yes
Hemate Moderate Yes Yes Yes
Iolite Moderate Not Recommended* Not Recommended* Yes
Jade Moderate Yes** Yes** Yes
Lapis Lazuli Moderate Not Recommended* Not Recommended* Yes
Malachite Fragile Not Recommended* Not Recommended* Yes
Marcasite Moderate Not Recommended* Not Recommended* Not Recommended*
Onyx Moderate Yes** Yes** Yes
Opal Moderate Not Recommended* Not Recommended* Yes***
Pearl Fragile Not Recommended* Not Recommended* Yes
Peridot Moderate Not Recommended* Not Recommended* Yes
Ruby Strong Yes Yes** Yes***
Sapphire Strong Yes Yes** Yes
Spinel Strong Yes Yes** Yes
Tanzanite Moderate Not Recommended* Not Recommended* Yes
Topaz Strong Not Recommended* Not Recommended* Yes***
Tourmaline Moderate Not Recommended* Not Recommended* Yes
Turquoise Moderate Not Recommended* Not Recommended* Yes
Variscite Fragile Not Recommended* Not Recommended* Not Recommended*
Zircon Moderate Not Recommended* Not Recommended* Yes***
Information used in Guideline for Gemstone cleaning is based on Essential Colored Stone
Reference Guide from Gemological Institute of America (GIA).

5
* When Not Recommended, consult a jeweler prior to using the ultrasonic, steam and UV light features.
** Hard natural gemstones can be put into an ultrasonic cleaner provided that they have few
inclusions and have not been treated with heat or chemicals. Treated gemstones become more
vulnerable with using the ultrasonic funcon. Consult your Jeweler.
***UV light exposure is generally stable for most gemstones, but we recommend you consult
your jeweler.
IMPORTANT NOTE: Many colored gemstones are routinely treated to improve the appearance of
color and clarity. These treatments can be negavely aected by heat, solvents, steam and ultrasonic
cleaners. Knowing whether your gem has been treated is the rst step to knowing how to care for it.
Durability of Gemstones is based on the Mohs Scale
Mohs Scale: 1 – 10: 1 = weakest/ 10 = strongest
Mohs Scale Durability Scale
1-4 Fragile
5- 7 Moderate
8-10 Strong
GUIDELINE FOR PRECIOUS METAL CLEANING
Metal Durability Steam Ultrasonic UV light
Gold Strong Yes Yes Yes
Planum Strong Yes Yes Yes
Stainless Steel Strong Yes Yes Yes
Sterling Silver Strong Yes Yes Yes
Titanium Strong Yes Yes Yes
Tungsten Carbide Strong Yes Not Recommended* Yes

6
KEY FEATURES
A. Upper cover
B. Water tank cap
C. Power on/o buon
D. Steam on/o buon
E. Steam-ready buon
F. Ultrasonic buon
G. UV buon
H. Steam Nozzle
I. Base plate
J. Side door
K. Hanger
L. Ultrasonic reservoir
M. Measuring cup
N. Stainless steel basket
O. Tweezers
P. Funnel
A
L
B
CD
E
H
J
K
M N O
G
F
P
I

7
ASSEMBLY AND USE
1) Set the jewelry cleaner on a at, level surface. DO NOT plug in the electrical cord yet.
2) Remove the upper cover and take out the measuring cup and funnel from the ultrasonic
reservoir.
NOTE: Leave the upper cover o during use.
3) Open the side door and take out the stainless steel basket and tweezers from the UV
chamber. Then close the side door.

8
4) To ll the jewelry cleaner, unscrew water tank cap and ll the water tank with water by
using the measuring cup, ll with water to the 250ml/9 oz mark. The water tank only
requires 250ml/9 oz (one measuring cup) for the best steam pressure results. Replace
water tank cap. Do not over ghten.
WARNING: Do not over ll the water tank. If the water tank is over lled it
will produce a hazardous spa er of wet stream. Never touch the boiling
water or you may get burned.
NOTE: The maximum water tank capacity is 350ml/12 fl oz.
NOTE: The jewelry cleaner does not require dis lled water. Residents in areas with
hard water should use distilled water for better performance. Fill water tank with
water only. Do not add any type of chemicals or cleaning solu ons.
5) Using the measuring cup again, ll the ultrasonic tank with water to the MAX ll mark. The
MAX ll requires 16 oz of water.
9
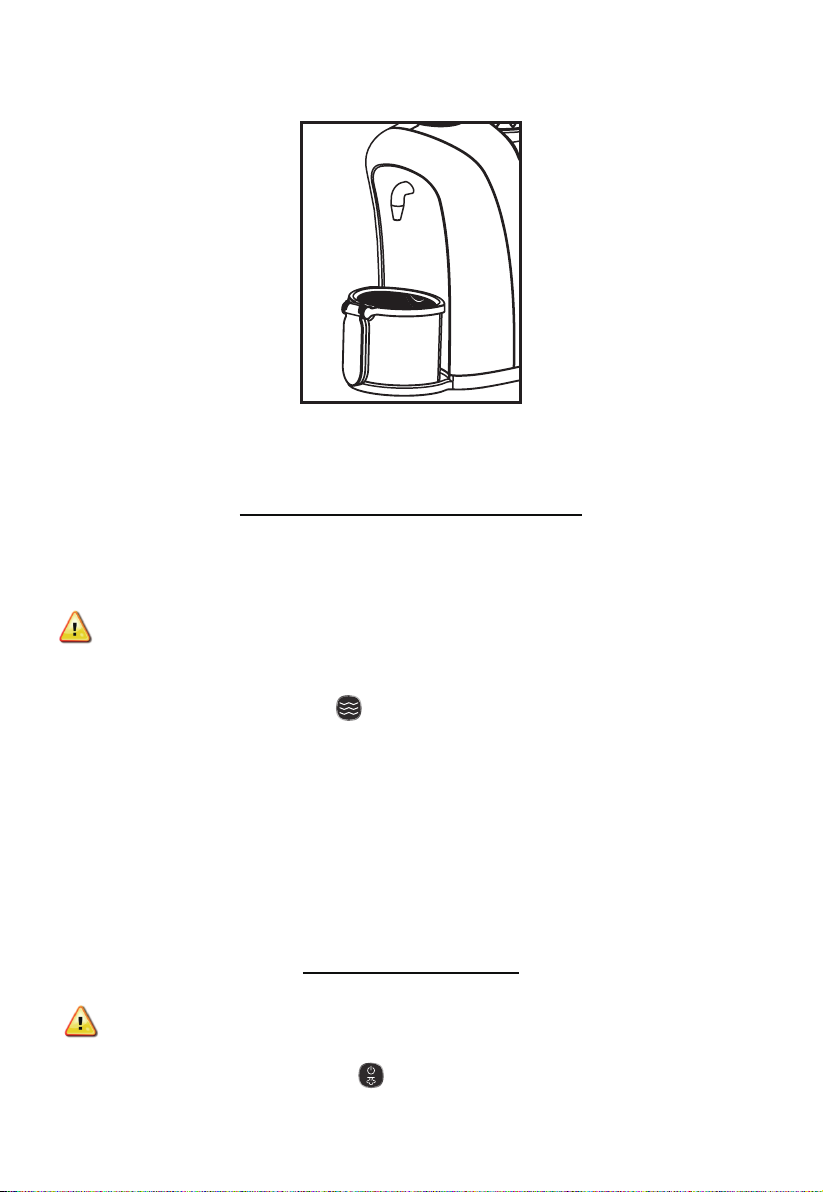
6) Put the measuring cup on the base plate below the steam nozzle; put the stainless steel
basket on the measuring cup. Make sure all loose parts are securely in place.
7) Plug in unit. The power bu on will begin to ash. Press the power on/o bu on once to
power on unit. The on/o bu on will stop ashing.
TO USE THE ULTRASONIC CLEANER
NOTE: It is recommended that another high wa age appliance is not operated on the
same circuit to avoid a circuit overload.
WARNING: Never run the ultrasonic reservoir without water.
1) Place the jewelry or accessories into the ultrasonic reservoir.
2) Press the ultrasonic bu on“ ” on the control panel to turn on.
3) Ultrasonic will shut o a er 5 minutes automa cally with beep indicator. You can shut
o the ultrasonic func on if 5 minutes is not required by pressing the ultrasonic bu on
a second me.
4) Items that are very dirty should be cleaned rst in the ultrasonic reservoir and then
with the steamer.
5) While wai ng for the ultrasonic cleaning, press the steam on/o bu on for hea ng.
After ultrasonic cleaning is done, using the tweezers, remove the jewelry from the
ultrasonic reservoir and put them in the stainless steel basket. You may also hold the
jewelry by using the tweezers during steam cleaning.
TO USE THE STEAMER
WARNING: Never run the steamer without water.
1) Press the steam on/o bu on“ ” allowing the steam pressure to build-up.
2) The steamer may be used as soon as the steam-ready light has turned RED.
10
3) Double click the steam-ready bu on“ ” to generate con nuous steam to clean the
jewelry. Press the steam-ready bu on“ ” to stop steam.
NOTE: The steam hea ng takes approximately 3.5 minutes a er pressing the steam
on/o bu on. The steam-ready bu on light will turn RED when the steam is ready to
be dispersed.
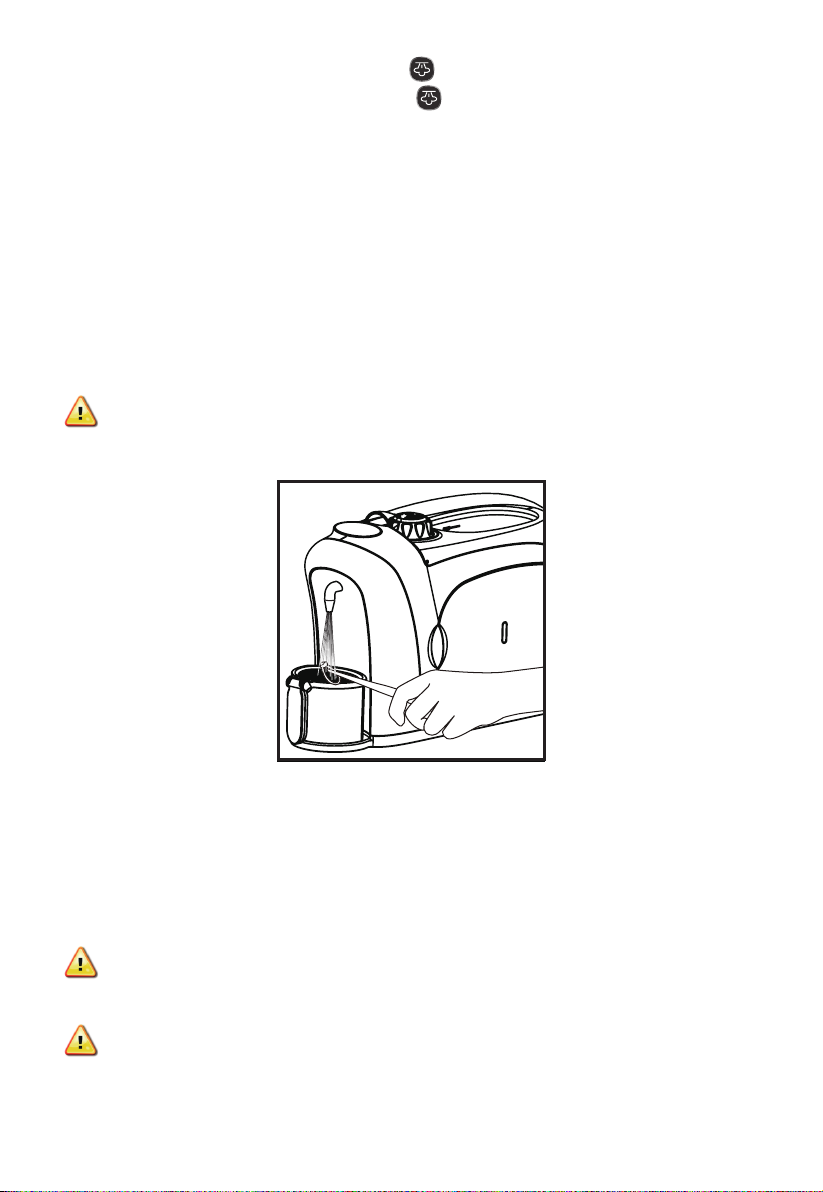
4) Using the tweezers, place the jewelry in the stainless steel basket. Double click the
steam-ready bu on to turn on steam. Allow to steam for approximately 2 seconds, turn
o steam by pressing the steam-ready bu on once. Using your tweezers, rotate or turn
jewelry in basket, con nue steaming for another 2 seconds. If more steam cleaning is
required repeat the process as necessary.
5) You may also hold the jewelry by using the tweezers during steam cleaning. Hold jew-
elry approximately one inch beneath the steam nozzle. Using your tweezers, rotate or
turn jewelry during steam process. Allow to steam for approximately 2 seconds. Repeat
process as necessary.
CAUTION: Jewelry will get hot during steam cleaning. Handle with care
and allow to cool.
NOTE: When steamer loses steam pressure, the steamer will automa cally stop steaming and the
steam-ready light will turn off. In approximately 5 seconds, the steam-ready light will turn back
on, indica ng that steam is available. We recommend that you wait an addi onal 60 seconds to
allow the steam pressure to build up. You are ready to steam clean again. If the steam-ready light
illuminates but no steam comes out when double clicking the steam-ready bu on that indicates
the water tank is empty. Press Power on/o bu on to turn o and unplug from the outlet. Allow 30
minutes for the steamer to cool before re lling the water tank.
CAUTION: Never attempt to unscrew the water tank cap and refill the
water tank while it is s ll hot and under pressure.
WARNING: The steam nozzle, water tank cap, and the surrounding areas
will become hot a er using the steam func on. Do not touch.

11
TO USE THE UV SANITIZER
1) After steam cleaning, remove the jewelry from the stainless steel basket and open the
side door to the UV chamber. There are 3 hangers inside to hang rings, earrings or other
accessories. Close the side door. Press the UV buon“ ”. The UV light will operate for a
30-minute cycle and then automacally shut o with a beep indicator. You can shut o the
UV light if 30 minutes is not required, by pressing the buon a second me.
NOTE: If your item is not designed to hang, you may place it on the base of the UV chamber. It
is recommended that you rotate your item so light hits all sides of the item.
NOTE: In order to kill 99.9% of all bacteria such as E. coli, Staphylococcus and Salmonella,
30 minutes is required for full sanizaon.
NOTE: The UV Light will shut o automacally if you open the side door during the
UV cycle to avoid UV leakage. Once the side door is closed, the UV light will turn back
on to connue sanizing for the remaining UV cycle.
2) When nished sanizing, press the power on/o buon to shut the appliance o. Unplug
power cord from outlet. Allow remaining water in the water tank to cool for approximately
30 minutes. Slowly unscrew the water tank cap to release any remaining pressure. Turn the
unit upside down over a sink to drain the water tank and ultrasonic reservoir.

12
CLEANING AND MAINTENANCE
CAUTION: Prior to cleaning your jewelry cleaner, isolate the unit by removing
the cord from the power outlet and avoid immersing the unit in water.
1) Allow 30 minutes for the steamer to cool before storing and emptying water.
2) Unscrew the water tank cap slowly a er the jewelry cleaner has cooled, allowing the water
tank to gradually release its pressure un l fully released.
WARNING: Never a empt to unscrew and re ll the jewelry steam cleaner
while s ll hot and under pressure.
3) Empty the water tank and the ultrasonic reservoir when storing the unit for a prolonged period.
4) Wipe the jewelry cleaner and accessories with a so cloth when/if necessary.
CUSTOMER SUPPORT
For problems with your Improvements Dazzle 3-in-1 Jewelry Cleaner and Sani zer, please refer to
Troubleshooting guide. Additional inquiries should be directed to our Customer Service
department by calling 1-888-574-3662 or by e-mail to: customer[email protected].
Product Specs:
Voltage supply: 120V, 60 Hz
Output: 1100 W
Water tank capacity: max. 350ml / 12 oz
Cord: 3.94 .
Weight: 7.9 lbs
Protec on class: 2
13
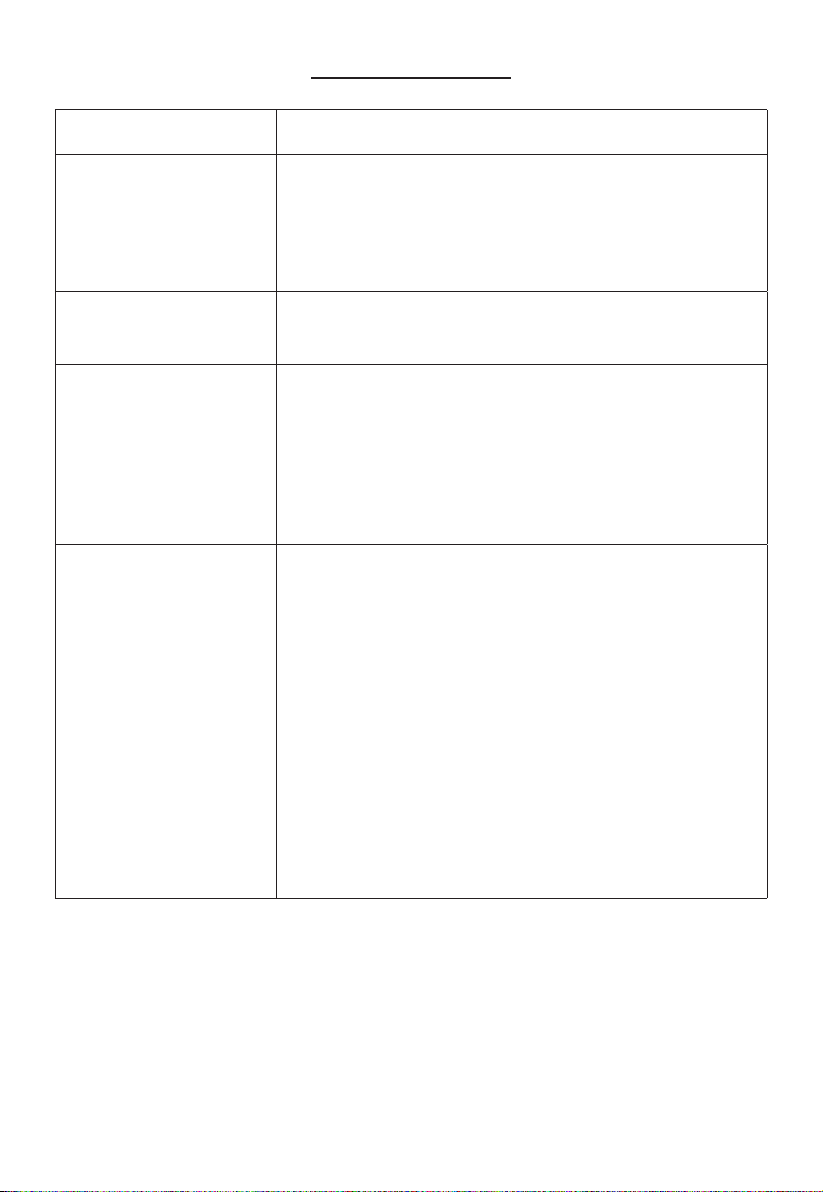
TROUBLESHOOTING
Problem Soluon
Jewelry cleaner not turning
on;
Touch panel has no illuminat-
ing lights
• Ensure power cord is plugged into 120V AC power outlet only.
• Ensure circuit breaker is operaonal.
• Unplug the unit from the power outlet for 5 minutes then
plug it back in.
• Try operang jewelry cleaner from another power outlet.
• If unit is sll not working, call customer service 1-888-574-3662.
Ultrasonic function not work-
ing
• Ensure control panel lights are on.
• Make sure ultrasonic buon is pressed.
• Ensure reservoir has water.
Steamer not steaming • Ensure there is water in the tank.
• Ensure cap is securely ghtened.
• Ensure control panel lights are on.
• Make sure steam on/o buon is pressed.
• Make sure to wait 3-4 minutes for steam pressure to build-up.
• Double click steam-ready buon.
• Calcium and mineral deposits can build-up and impact performance
of your steamer, use dislled water if necessary.
UV light not working • Ensure control panel lights are on.
• Make sure to press the UV light buon.
• Ensure the UV Side door is completely closed.
• Ensure UV light hasn’t come lose during handling and shipping.
Open UV side door, remove protective cover by pulling
outwards firmly. Ensure UV light is installed in socket and
securely locked in place.
• To check if your UV light is locked into place, gently tap the
UV light outward with your nger. If the UV light slides out of
socket, it has loosened during transportaon.
• To re-install, line up its prongs with the slots on each side of sock-
et. Push the UV light straight back into sockets and then rotate
90 degrees unl you hear a click locking into place. You can give
the UV light a gentle tug to ensure that it is rmly in place.
• Re-install protecve cover.
• For addional assistance, call customer service at 1-888-574-3662

14
ONE YEAR LIMITED WARRANTY
Our Improvements product warranty extends only to the original customer purchaser of the
product. It is warranted by the manufacturer to be free from all defects in materials or workmanship
for a period of one year from the date of original purchase. This warranty is subject to the following
condions, exclusions and excepons.
Exclusions:
This warranty does not cover normal wear and tear of parts and does not apply to any product that
has been tampered with or used for commercial purposes. This warranty does not cover damage
cause by misuse, abuse or negligent handling or damage due to mishandling in transit or shipping. This
warranty does not cover damage or defects caused by or resulng from repairs, service or alteraons
to the product or any of its parts, which have been performed by a repair person not authorized by
the manufacturer. This warranty is eecve only if the product is purchased and operated in the USA,
and does not extend to any units which have been used in violaon of wrien instrucons furnished
by the manufacturer, or to units which have had the serial number removed, altered, defaced or
rendered illegible.
Performance:
During the limited warranty period, the manufacturer will, at its option, repair or replace free of
charge a defecve product or part that is covered by this warranty. As a maer of warranty policy, the
manufacturer will not refund the purchase price. A repaired or replacement product will be covered
by this warranty for the balance of the inial one year warranty period.
To contact Customer Service:
Write: Anvid Products, Inc.
1401-1499 Greenville Rd.
Livermore, CA 94550
E-mail: customerservice@anvidproducts.com
Call: 1-888-5SIENNA (1-888-574-3662)
Please refer to your product name and model number when contacng Customer Service.
Customer Service will give you further instrucons for returning a defecve product for repair or
replacement. When returning a defecve product, carefully pack the item to avoid damage in
shipping.
The manufacturer cannot assume responsibility for loss or damage during incoming shipment.
We recommend that you insure the package, as shipping including the shipping cost is not
covered under warranty. Be sure to include the following items with your product: any accessories
related to the product, a completed warranty form, and a copy of your sales receipt or other proof
of purchase to determine warranty status. C.O.D. shipments cannot be accepted.
Limitations of Remedies: No representative or person is authorized to assume for the
manufacturer any other liability in connecon with the sale of our products. This limited warranty is
not transferable and any sale, transfer or other disposition of the product voids this limited
warranty. There shall be no claims for defects or failure of performance or product failure under

15
any theory of tort, contract or commercial law including, but not limited to, negligence, gross
negligence, strict liability, breach of warranty and breach of contract.
ANY IMPLIED WARRANTIES, OBLIGATIONS, OR LIABILITIES, INCLUDING, BUT NOT LIMITED TO,
THE IMPLIED WARRANTY OF MERCHANTABILITY AND FITNESS FOR A PARTICULAR PURPOSE,
SHALL BE LIMITED TO THE DURATION OF THIS WARRANTY. Some states do not allow limitaons
on how long an implied warranty lasts, so the above limitaons may not apply to you.
REPAIR OR REPLACEMENT SHALL BE THE SOLE REMEDY OF THE PURCHASER UNDER THIS
LIMITED WARRANTY, AND IN NO EVENT SHALL THE MANUFACTURER BE LIABLE FOR ANY
SPECIAL, INCIDENTAL, OR CONSEQUENTIAL DAMAGES, LOSSES OR EXPENSES YOU MAY INCUR IN
CONNECTION WITH YOUR PURCHASE PRIOR TO USE OF THE PRODUCT OR FOR ANY BREACH OF
THIS OR ANY OTHER WARRANTY, EXPRESS OR IMPLIED, WHATSOEVER. Some states do not allow
exclusion or limitaon of special, incidental, or consequenal damages, so the above limitaon may
not apply to you. This limited warranty gives you specic legal rights, and you may also have other
rights which vary from state to state.
Correct Disposal of this Product
This marking indicates that this product should not be disposed
with other household wastes throughout the US. To prevent
possible harm to the environment or human health from
uncontrolled waste disposal, we recommend recycling it
responsibly to promote the sustainable reuse of material
resources. To dispose of your used device, please contact your
local city for proper disposal locations.

16
This manual suits for next models
1
Table of contents


