Impulse Dynamics AIM HIGHer OPTIMIZER User manual

Part No.: 12-250-004-US Rev. 00
OPTIMIZER™ Smart Mini
System
* * *
For the Treatment of Symptomatic Heart Failure
(With LV Ejection Fraction ≥ 40% and ≤ 60%)
Patient Manual for the
AIM HIGHer Clinical Trial
Limited by United States (Federal) law to investigational use

Impulse Dynamics (USA) Inc.
Suite 100
50 Lake Center Executive Parkway
401 Route 73 N Bldg. 50
Marlton, NJ 08053-3425
OPTIMIZER™ and CCM™ are trademarks of Impulse Dynamics.
OPTIMIZER®is a US registered trademark property of Impulse Dynamics
The information in this document can be changed without prior notice.
No part of this manual may be reproduced or transmitted in any way or by
any means, either electronic or mechanical, for any purpose without the
prior express written consent of Impulse Dynamics.
The OPTIMIZER Smart Mini system and the CCM technology are
protected by several U.S. Patents. For an up-to-date list of relevant
patents and patent applications, visit our patents page:
http://www.impulse-dynamics.com/us/patents
Revision 00, Date of Issue: 2021-08-08

i
TABLE OF CONTENTS
IMPORTANT MEDICAL NOTICE ........................................................................... i
1.0 INTRODUCTION.......................................................................................... 1
2.0 THE OPTIMIZER SMART MINI SYSTEM.................................................... 1
2.1 OPTIMIZER Smart Mini Implantable Pulse Generator ....................... 1
2.2 Vesta Charger .................................................................................... 3
3.0 POTENTIAL COMPLICATIONS.................................................................. 3
3.1 Complications Associated with Implantation ...................................... 3
3.2 Complications Associated with Device / Charger Operation .............. 5
4.0 FOLLOWING IMPLANTATION ................................................................... 6
5.0 LIVING WITH YOUR OPTIMIZER SMART MINI IPG .................................. 7
5.1 General Expectations......................................................................... 7
5.2 Effect on Your Activities ..................................................................... 7
5.3 Medications........................................................................................ 7
5.4 How Other Devices May Affect Your OPTIMIZER Smart Mini IPG .... 7
5.5 The Importance of Your Implanted Medical Device Identification Card
........................................................................................................... 9
6.0 VESTA CHARGER .................................................................................... 10
6.1 System Components........................................................................ 10
6.2 Features ........................................................................................... 11
6.3 Description ....................................................................................... 12
6.4 Charging Method.............................................................................. 12
6.5 Removal and Installation of the Plug Adapter .................................. 13
6.5.1 Removal of the Plug Adapter ................................................. 13
6.5.2 Installation of the Plug Adapter .............................................. 14
6.6 Charging Your Vesta Charger.......................................................... 15
6.7 Charging Your OPTIMIZER Smart Mini IPG .................................... 18
6.8 Termination of the Charging Session ............................................... 22
6.8.1 Early Termination of Charging Session.................................. 22
6.8.2 Termination of Charging Session Due to IPG Temperature... 23

ii
6.8.3 Termination of Charging Session Due to Charging IPG Timeout
24
6.8.4 Termination of Charging Session Due to Low Charger Battery
Level.......................................................................................24
6.9 Vesta Charger Placement When Not Being Used for Device Charging
.........................................................................................................25
6.10 Frequency of Charging Sessions .....................................................25
6.11 Communications with Your OPTIMIZER Smart Mini IPG .................26
6.12 Call Doctor Alert Codes....................................................................28
6.13 Cleaning ...........................................................................................30
6.14 Maintenance..................................................................................... 30
6.15 Storage and Handling.......................................................................31
6.16 Disposal............................................................................................31
7.0 REPLACEMENT OF YOUR OPTIMIZER SMART MINI IPG .....................32
8.0 FREQUENTLY ASKED QUESTIONS........................................................32
APPENDIX I ......................................................................................................... 34
Statement of FCC Compliance...................................................................34
FCC Compliance of the Vesta Charger ............................................34
FCC Compliance of the OPTIMIZER Smart Mini IPG ......................35
Electromagnetic Immunity ..........................................................................36
Electromagnetic Immunity of the Vesta Charger ..............................36
Electromagnetic Immunity of the OPTIMIZER Smart Mini IPG.........39
Electromagnetic Emissions ........................................................................44
Electromagnetic Emissions from the Vesta Charger ........................44
Electromagnetic Emissions from the OPTIMIZER Smart Mini IPG...49
Wireless Technology ..................................................................................51
Quality of Service (QoS) for Communications between the Vesta
Charger and the OPTIMIZER Smart Mini IPG........................53
Troubleshooting Wireless Connection between OPTIMIZER Smart
Mini IPG and Vesta Charger...................................................55

i
IMPORTANT MEDICAL NOTICE
24-hour Support Hotline: 866-312-5370
You are participating in a blinded clinical research study. If you go to
the emergency room, please contact the study doctor or the 24-hour
Support Hotline IMMEDIATELY.
It is important that you carry your Implanted Medical Device Identification
Card and a current list of your medications with you at all times. In the
event of a medical emergency, the Implanted Medical Device Identification
Card contains information of great importance to an attending physician
and will assist in expediting any emergency medical care you may require.
In addition, it is important to notify all your health care providers that you
have an OPTIMIZER Smart Mini device implanted. As such, the next time
you visit your doctor or dentist, show them your Implanted Medical Device
Identification Card (see example below) so that a copy of it may be made
for their records. If you have a smart phone with a camera, it may be
helpful to take a picture of both the front and back of your Implanted
Medical Device Identification Card in case you ever misplace it or forget to
bring it with you.
Implanted Medical Device Identification Card (front)

ii
Implanted Medical Device Identification Card (back)

1
1.0 INTRODUCTION
You are participating in an investigation called the AIM HIGHer Clinical
Trial and have received the implantable OPTIMIZER Smart Mini System.
The AIM HIGHer Clinical Trial is a randomized study to evaluate the
effectiveness of the Cardiac Contractility Modulation (CCM) therapy in
symptomatic heart failure patients with a Left Ventricular Ejection Fraction
(LVEF) of ≥ 40% and ≤ 60%. This is a blinded study and you have been
randomly placed into one of two patient groups for the first 18 months of
the study. You have 67% chance of being placed in the CCM Therapy ON
group and a 33% chance of being placed in the CCM Therapy OFF group.
Neither you nor your doctor will know in which group you have been
placed.
The purpose of this manual is to provide you with information about the
OPTIMIZER Smart Mini system, what to expect after your implant
procedure, introduce you to the components of the system, and provide
you with instructions on how to use the Vesta Charger.
2.0 THE OPTIMIZER SMART MINI SYSTEM
The OPTIMIZER Smart Mini system is comprised of the following
components:
•OPTIMIZER Smart Mini Implantable Pulse Generator (IPG)
•Vesta Charger
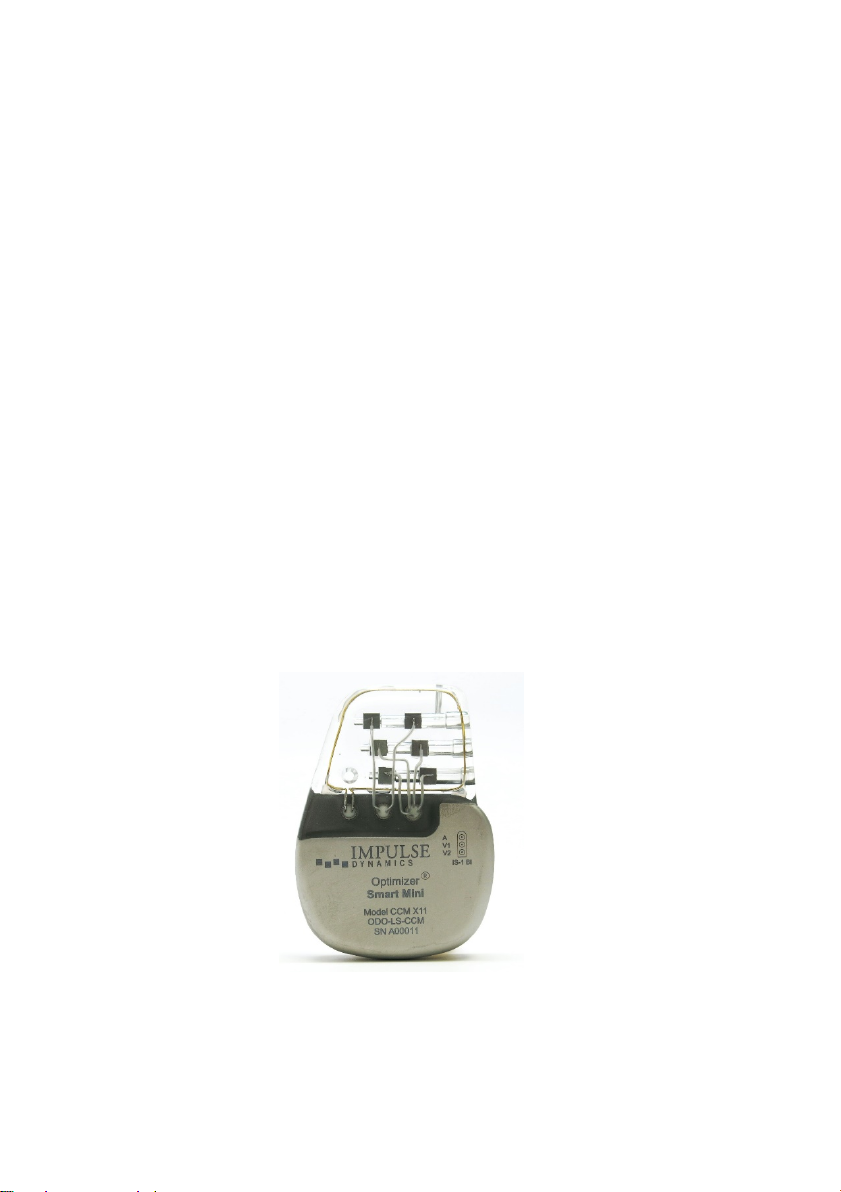
2.1 OPTIMIZER Smart Mini Implantable Pulse
Generator
The OPTIMIZER Smart Mini Implantable Pulse Generator (IPG) is
a medical device used for the treatment of NYHA Class III heart
failure. It is typically implanted under the skin in the upper left or
right chest.
Connected to the OPTIMIZER Smart Mini IPG are two (or
optionally three) cardiac leads that your doctor will insert through
a large vein and into the heart during the implantation process.
These leads have electrodes that allow the OPTIMIZER Smart
Mini IPG to monitor the electrical activity of your heart and deliver
special Cardiac Contractility Modulation (CCM) therapy pulses to
the heart at a specific time during each heartbeat.
2
The primary effect of this CCM therapy is an increase in the
efficiency and strength of each cardiac contraction, with the
intended result being that more blood is pumped out by the heart
with every heartbeat.
The OPTIMIZER Smart Mini IPG is powered by a rechargeable
battery to extend its service life. A charger specifically designed to
recharge the battery of the OPTIMIZER Smart Mini IPG will be
provided to you after your implant surgery.
The expected life of the OPTIMIZER Smart Mini IPG is limited by
the expected service life of its rechargeable battery.
With weekly charging of your OPTIMIZER Smart Mini IPG, the
rechargeable battery inside the OPTIMIZER Smart Mini IPG
should provide you with at least 20 years of service.
Your OPTIMIZER Smart Mini IPG will need to be replaced when
its battery, after being fully recharged, can no longer maintain
enough charge to deliver CCM therapy for an entire week without
becoming severely depleted.
When being evaluated for elective replacement, you will be
instructed to fully charge your OPTIMIZER Smart Mini IPG 7 days
before your scheduled routine checkup. During your checkup,
your doctor may evaluate the charge capacity of the battery in
your OPTIMIZER Smart Mini IPG.
Figure 1: OPTIMIZER Smart Mini IPG

3
2.2 Vesta Charger
The Vesta Charger is powered by a rechargeable battery and is
specifically designed for use with the OPTIMIZER Smart Mini IPG.
After your implant procedure, you will be providedwith a Vesta
Charger and receive instructions on its usage. Please proceed to
Section 7.0 for more details about your Vesta Charger.
Figure 2: Vesta Charger
3.0 POTENTIAL COMPLICATIONS
3.1 Complications Associated with Implantation
As with any surgical procedure, the implantation of the
OPTIMIZER Smart Mini IPG involves some degree of risk. This
section is intended to provide you with an explanation of the
various potential complications associated with having a device
implanted. These potential complications are not unique to the
OPTIMIZER Smart Mini IPG, as they may also occur during the
implantation of other implantable cardiac devices (e.g., cardiac
pacemakers or defibrillators).
The risks associated with the implantation are listed in Table 1
and are grouped based on their prevalence.

4
Table 1: Risks Associated with Implantation
Common (greater than or equal to 5%)
•Post-procedural pain, bruising, and discomfort at insertion site
•Bleeding
•Infection at site of insertion
•Pocket hematoma
•Migration of leads
•Migration of implanted IPG
Uncommon (between 1-5%)
•Chest trauma (such as a collapsed lung or bleeding into the
chest)
•Generator complication
•Cardiac perforation (puncture of the heart caused by the
leads)
•Endocarditis (infection of the heart valves)
•Arrhythmia (irregular heartbeat, including heartbeats that are
too slow or too fast)
•Tricuspid valve damage (the valve between the right upper
and lower chambers of the heart that prevents blood from
flowing back into the upper chamber), possibly leading to
tricuspid valve regurgitation or leakage
•Vessel trauma (perforation, dissection, or rupture)
•Thrombosis (formation of blood clots in the veins)
•Damage to the specific type of heart tissue responsible for
triggering heartbeats (i.e., the cardiac conduction system)
•Allergic reaction
Rare (less than 1%)
•
Bradycardia (slow heart rate)
•Cardiac tamponade (build up of fluid around the heart that can
be life-threatening)
•Myocardial infarction (heart attack)
•Mini stroke (TIA), or stroke
•Death

5
The OPTIMIZER Smart Mini IPG uses its leads to detect the
electrical activity of your heart. Complications that can affect the
lead’s ability to perform this function may occur. These include:
•A lead may become dislodgedfrom where it was placed
during implantation, necessitating re-operation.
•A lead may fracture or break producing a poor electrical
connection, necessitating re-operation.
The lead problems described above can occur at any time during
the implant life of a lead. Surgical correction is typically required.
3.2 Complications Associated with Device /
Charger Operation
Complications associated with device/charger operation include,
but are not limited to:
•An OPTIMIZER Smart Mini IPG may not properly sense
and deliver CCM signals due to a software or hardware
problem, necessitating replacement.
•An OPTIMIZER Smart Mini IPG may detect environmental
interference and inappropriately deliver CCM therapy.
See Section 6.4.
•A Vesta Charger may not function as designed due to a
software or hardware problem and not charge your
OPTIMIZER Smart Mini IPG as intended. A replacement
charger will be required.

6
4.0 FOLLOWING IMPLANTATION
You must become actively involved in your own recovery by following your
doctor’s instructions carefully, including:
•Report any redness, swelling, or drainage from your incision to
your doctor.
•Avoid lifting heavy objects until instructed by your doctor.
•Walk, exercise, and bathe according to your doctor’s instructions.
•Be sure to contact your doctor if you develop a fever that persists
for more than two or three days.
•Ask your doctor any questions you may have about your device,
heart rhythm, or medications. Be sure to take all medications as
directed by your doctor.
•Do not wear tight clothing that could irritate the skin over the
device.
•Avoid rubbing the device or the surrounding chest area.
•If directed by your doctor, limit any arm movements that may
affect the implanted lead system.
•Avoid rough contact that could result in blows to the implant site. If
you fall or are in an accident that results in an impact to the
implant site, contact your doctor.
Note:If you have a slender build, your implanted device may
appear more prominently under the skin. If this is the case, extra
care should be taken to avoid any direct blows to your implant
site.
•Contact your doctor if you notice anything unexpected or unusual
such as new symptoms.
•Inform your doctor if you plan to engage in long-distance travel.
•If you plan to change your place of residence, inform your doctor,
and discuss the need for a referral in the new area.
•Your doctor may limit your driving, at least initially, to avoid putting
undue strain on your wounds.

7
5.0 LIVING WITH YOUR OPTIMIZER SMART
MINI IPG
5.1 General Expectations
You will be able to feel your OPTIMIZER Smart Mini IPG beneath
the skin. Normal body movement will cause no harm to it or the
attached leads. However, it is important that you not try to move
or turn your implanted IPG. It has been implanted with a specific
orientation to the skin to ensure proper communication with the
Intelio Programmer and your Vesta Charger.
5.2 Effect on Your Activities
Once the wounds from your surgery are healed, you can expect to
resume your normal activities, including sexual intimacy. Your
implanted OPTIMIZER Smart Mini IPG is unaffected by walking,
bending over, or other normal daily activities.
5.3 Medications
Prescription medications, taken as directed, have no effect upon
the proper operation of your OPTIMIZER Smart Mini IPG.
In general, the implantation of your OPTIMIZER Smart Mini IPG
should not require you to alter the use of any medication.
5.4 How Other Devices May Affect Your
OPTIMIZER Smart Mini IPG
In general, household appliances in good repair and personal
communication devices held 25 cm (10 in) or more from your
implanted OPTIMIZER Smart Mini IPG should not affect its
operation. However, you should be cautious when in the vicinity of
devices that generate strong electrical or magnetic fields. For
example, interference may occur from some electric razors,
electric power tools, and electrical ignition systems, including
those used on gasoline-powered equipment. In general, gasoline-
powered equipment may be operated provided that protective
hoods, shrouds, and other shielding are not removed.
Any such interference detected by your OPTIMIZER Smart Mini
IPG may cause false detection of your heartbeat and improper
timing of CCM therapy delivery.

8
You should avoid getting too close to equipment or devices that
contain strong magnets (e.g., stereo speakers) or leaning over an
open automobile engine compartment, as the alternator generates
a strong electromagnetic field. Your OPTIMIZER Smart Mini IPG
contains a magnetic switch that, when exposed to a strong
magnet for 3-5 seconds, will disable CCM therapy delivery. If this
occurs by accident, your doctor may require you to come to their
office to restore CCM therapy delivery. Since your OPTIMIZER
Smart Mini IPG is not a life-sustaining device, you are unlikely to
be placed at risk by such an event.
Always seek medical advice before entering an area posted with a
warning for pacemaker patients (or other medical implantable
devices) or where there is industrial machinery or radio
transmitters, including ham radios and mobile radios.
Always inform your doctor that you have an implanted
OPTIMIZER Smart Mini IPG before you undergo the following
procedures:
•Surgery where electrocautery is going to be used
•A procedure involving Radiofrequency (RF)Ablation
•Medical Diathermy
•Cardioversion
•Therapeutic Radiation
•Therapeutic Ultrasound
•Lithotripsy
•Nuclear Magnetic Resonance (NMR)
•Magnetic Resonance Imaging (MRI)
Warning: DO NOT undergo an MRI procedure when implanted
with an OPTIMIZER Smart Mini IPG.
Caution: Your OPTIMIZER Smart Mini IPG should either be
deactivated or closely monitored prior to and during any medical
treatment in which electrical current is passed through the body.
Caution: Your OPTIMIZER Smart Mini IPG should not be directly
exposed to therapeutic ultrasound or therapeutic radiation. This
type of exposure may damage the device that may not be
immediately detectable.

9
Caution: Store anti-theft systems and airport security screening
systems normally will not harm your OPTIMIZER Smart Mini IPG.
However, do not linger around the equipment. Before going
through airport security screening, it is recommended that you
show your Implanted Medical Device Identification Card to
security personnel for review.
5.5 The Importance of Your Implanted Medical
Device Identification Card
Following your implantation surgery, your doctor will provide you
with an Implanted Medical Device Identification Card indicating
that you are implanted with an OPTIMIZER Smart Mini
Implantable Pulse Generator.
It is important that you carry your Implanted Medical Device
Identification Card and a current list of your medications with you
at all times. In a medical emergency, the Implanted Medical
Device Identification Card contains information of great
importance to an attending physician and will assist in expediting
any emergency medical care you may require.
In addition, it is important to notify all your health care providers
that you have had an OPTIMIZER Smart Mini device implanted.
As such, the next time you visit your doctor or dentist, show them
your Implanted Medical Device Identification Card so that a copy
of it may be made for their records.
10
6.0 VESTA CHARGER
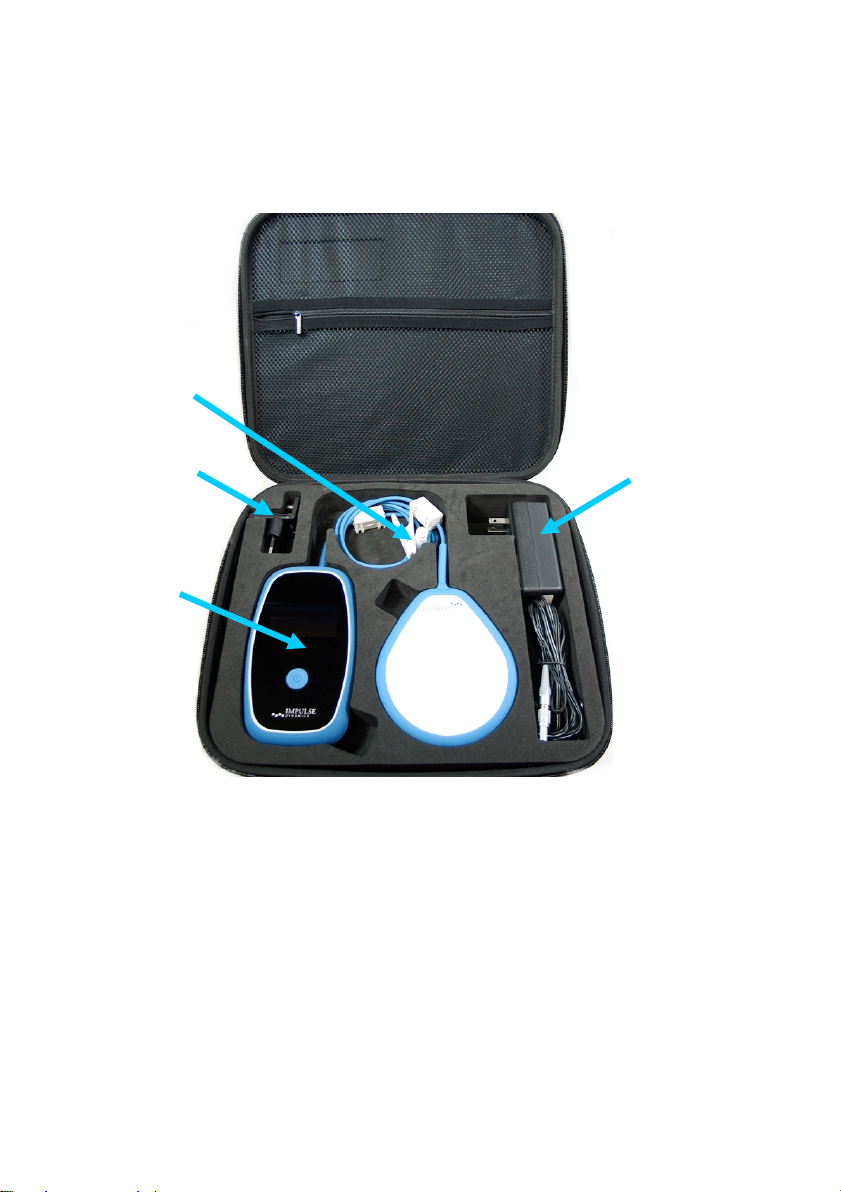
6.1 System Components
Your Vesta Charger System consists of the following components:
Figure 3: Vesta Charger System Components
•Vesta Charger (with attached charging wand and
charging wand cable clip) – used to charge your
OPTIMIZER Smart Mini IPG.
•AC Adapter – used to charge the internal battery of your
Vesta Charger.
•E.U. / U.S. Plug Adapters – plug adapters for the AC
Adapter, allowing the AC Adapter to be connected to wall
outlets in the E.U. and the U.S.
•Carrying Case – used to store and transport your Vesta
Charger System.
Carrying Case
AC Adapter with
attached U.S.
Plug Adapter
Charging
Wand
E.U. Plug
Adapter
Vesta
Charger
Charging Wand
Cable Clip
11
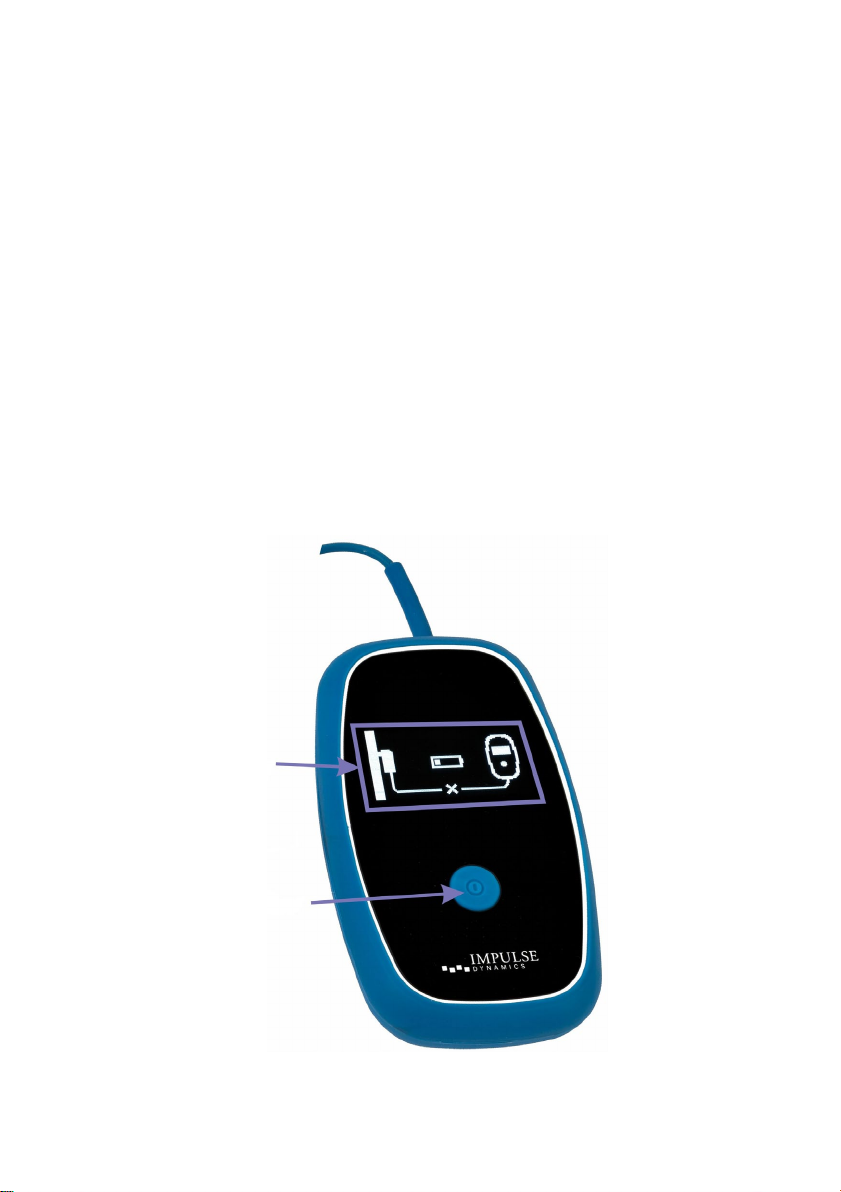
6.2 Features
Your Vesta Charger has the following features:
•Graphical Display: Display screen used by your Vesta
Charger to communicate information to you
•Power Button: Press-button switch used to initiate
charging of your OPTIMIZER Smart Mini IPG
•Buzzer: An internal buzzer that produces beeping tones
to inform you of a condition that requires action
•Charging Wand: Wand containing a coil and circuitry
used by your Vesta Charger for charging as well as short-
range communications with your OPTIMIZER Smart Mini
IPG
•Radio Transceiver: Device used by your Vesta Charger
for long-range communications [between zero and at least
1.5 m (5 ft)] with your OPTIMIZER Smart Mini IPG
Figure 4: Vesta Charger Features
Graphica
l Display
Power
Button

12
6.3 Description
Your Vesta Charger is designed to charge the battery of your
OPTIMIZER Smart Mini IPG with minimal intervention while
ensuring your safety during the charging process.
In addition, your Vesta Charger is programmed to display alerts
and other messages that may require action on your part (e.g.,
Call Doctor Alert Codes that require you to contact your doctor,
reminders to charge your implanted device, etc…).
Caution:The operation of other electrical devices in the vicinity of
your Vesta Charger may potentially cause electromagnetic or
other interference with the charger. Portable and mobile Radio
Frequency (RF) equipment are especially prone to impair the
normal function of the charger.
Caution: When in operation, your Vesta Charger System may be
a potential source of electromagnetic interference for other
electronic equipment in close proximity to the charger system.
6.4 Charging Method
The charging method utilized by your Vesta Charger to charge the
battery of your OPTIMIZER Smart Mini IPG is called inductive
energy transfer. Since magnetic fields can easily pass through the
skin with little to no resistance, the charging method used by your
Vesta Charger is a proven and effective way to transfer energy to
your implanted device. Charging may be performed over clothing.
The manner in which inductive energy transfer is used to charge
the battery of your OPTIMIZER Smart Mini IPG is as follows:
1. Electrical energy from the battery of your Vesta Charger
passes through a primary coil connected to the electronic
circuitry of the charger that converts it into an oscillating
electromagnetic field.
2. When a primary coil is placed in close proximity to a
secondary coil, the oscillating electromagnetic field
generated by a primary coil is picked up by a secondary
coil.
3. The secondary coil that picks up the oscillating
electromagnetic field is connected to the electronic
circuitry of the implant that converts it back into electrical

13
energy. That electrical energy is used to charge the
battery of your OPTIMIZER Smart Mini IPG.
6.5 Removal and Installation of the Plug Adapter
Your Vesta Charger system includes an AC Adapter installed with
a U.S. Plug Adapter. If a different Plug Adapter is required, the AC
Adapter allows the option of removing and installing a different
Plug Adapter.
6.5.1 Removal of the Plug Adapter
To remove the Plug Adapter from the AC Adapter,
perform the following steps:
1. Grasp the AC Adapter in your hand and place
your thumb on the ridged area below the plug
prongs of the Plug Adapter.
2. Using your thumb, push up on the Plug Adapter
to unlock it from the AC Adapter. See Figure 5.
3. Slide the Plug Adapter upwards to remove it from
the AC Adapter.
Figure 5: Removing the Plug Adapter
Push
Upwards
to Unlock
and
Remove
Plug

14
6.5.2 Installation of the Plug Adapter
To install the Plug Adapter onto the AC Adapter, perform
the following steps:
1. While holding the AC Adapter in your hand, insert
the Plug Adapter into its corresponding slot on the
AC Adapter.
2. Using your index finger, push down on the Plug
Adapter until it is fully inserted onto the AC
Adapter. See Figure 6.
Figure 6: Installing the Plug Adapter
Push Down
to Install
Plug
Adapter
Table of contents


B Life + Beauty JAWLINE DEFINER user guide")
