IMV AlphaVision User manual

Your complete animal imaging solution
Instruction
manual

2|

www.imv-imaging.com | 3
Contents
Certication ...................................................................................................................... 4
Preamble ........................................................................................................................... 5
Introduction ....................................................................................................................... 6
Overview ............................................................................................................................ 7
Carry case composition .................................................................................................. 8
Activation .......................................................................................................................... 9
Operating instructions .................................................................................................... 13
Dismantling the device ................................................................................................... 20
Care and maintenance................................................................................................... 21
Cleaning ........................................................................................................................... 21
Specications ................................................................................................................... 22
Warranty ............................................................................................................................ 22
Environmental conditions ............................................................................................... 22
Service centres ................................................................................................................ 23

4|
Hereby, IMV imaging (UK) Ltd, declares that
the radio equipment type AlphaVision WiFi is
in compliance with Directive 2014/53/EU. The
full text of the EU declaration of conformity is
available at the following internet address:
Certication
www.imv-imaging.com/avv2-doc/
Agência Nacional de
Telecomunicações
“Este equipamento nao tem o direito a
proteção contra interferência prejudicial
e nao pode causar interferência em
sistemas devidamente autorizados."
07346-19-09891

www.imv-imaging.com | 5
Preamble
This user manual is intended to serve as a
reference guide on how to install and operate
IMV imaging products.
Every effort has been made to ensure the
reliability and accuracy of the information
contained in this user manual at the time of
going to press. However, the specifications and
procedures may undergo changes owing to
our ongoing efforts to respond to our customers’
demands and maintain a process of research
and development and continuous improvement
for all IMV imaging products.
IMV imaging reserves the right to make changes
to the specifications and procedures relating
to its products and the related documentation
at any moment and without prior notice. The
information contained in this user manual is
considered to be reliable and exact with regard
to IMV imaging products.
IMV imaging has taken all reasonable precautions
in preparing the information contained in this
User Manual, but does not guarantee that
this information is free from error. IMV imaging
assumes no liability for damage incurred by the
user owing to errors or omissions coming from the
information contained in this document.
IMV imaging cannot be held responsible
and assumes no liability for losses incurred by
the user or by third parties resulting from the
incorrect installation, operation or maintenance
of the system in cases where procedures
and specifications have not been correctly
followed. It is therefore essential that the user
follows the specifications, procedures and
recommendations described in this user manual.
Before using an IMV imaging product, please
confirm the latest information on the product
with an IMV sales representative. Similarly, please
pay regular and ongoing attention to additional
information that IMV imaging may issue, such as
that published on our website.
The warranty on IMV imaging products will not
apply in the following situations:
- The equipment was repaired using non-genuine
parts.
- The consumable used with the equipment
was not approved by IMV imaging and could
damage its products.
Refer to sections of this manual for additional
information on the equipment warranty.
IMV imaging configures its products in a standard
mode that may differ from the user’s specific
conditions. To ensure that IMV imaging products
correspond to the specific situation and
environment of each user, the products must
be qualified by the final user under their own
responsibility by ensuring that the final product
complies with their individual specifications. IMV
imaging cannot be held liable in any way for
the performance levels (i.e. fertility, prolificacy,
etc.) resulting from the use of the final products
marketed by the customer.
Please use IMV imaging products in accordance
with all the applicable regulations and laws.
IMV imaging assumes no liability in the event of
damage or loss resulting from failure to comply
with the applicable regulations and laws.

6|
!
Note:
All IMV imaging products are to be
used for animal applications only.
A few recommendations to ensure you
get the best use from AlphaVision:
• Before each use, read the manual
carefully and especially chapter on how
to clean the AlphaVision unit.
• Always handle the camera and
terminal with the greatest care,
particularly during cleaning.
• After using your AlphaVision unit, store
it away in its carry case for additional
protection.
IMV imaging is the market leader in the
development and production of veterinary
imaging devices for large animal species.
AlphaVision is designed to assist bovine
insemination and reproduction management. It
brings the very latest technology in the field of
cattle artificial insemination.
Our insemination systems, featuring a sealed HD
camera, make working conditions significantly
more comfortable. In particular, it enables users
to check cervical involution and the presence of
mucus in cows and simplifies locating the cervix,
making the insemination procedure less invasive
it also helps to investigate cervix malformation.
IMV imaging has utilised the latest camera and
WiFi technology in AlphaVision to deliver the
highest quality image.
Lastly, using the application on the vision
terminal, the user can save photos and videos
of the cervix. The photo library is also accessible
on the terminal, only if it is a phone/tablet - BUGs
won’t allow this, allowing the user to share the
images with a veterinary surgeon to perform any
diagnoses required.
IMV imaging
Imaging House
Phoenix Crescent
Strathclyde Business Park
Bellshill ML4 3NJ
Scotland, UK
+44 (0) 1506 460 023
www.imv-imaging.co.uk
AlphaVision is developed in France, engineered
and manufactured in Scotland at:
As specialists in providing imaging equipment for
animal husbandry applications, we understand
the importance of using reliable equipment.
All IMV imaging products are designed and
manufactured to withstand the environments
in which they are used. However, should you
experience any problems with your AlphaVision,
our service engineers are available to provide
rapid support service and ensure optimum
performance.•
Introduction

www.imv-imaging.com | 7
Overview
SPECULUM ASSY - SOFT TIP
MEC09-013
SPECULUM ASSY - NO TIP
MEC09-014
CHASSIS
HANDLE
MEC09-002
BATTERY
ESG-BATT
KOMBICOLOR GUIDE
MEC09-015
CAMERA
ALPHAVISION SYSTEM

8|
- 1 AlphaVision tted with a miniature sealed
high denition camera
- 2 extensions for connecting to the Kombicolor
insemination gun (MEC09-015)
- 2 speculum tubes : with or without soft tip.
- 1 charger for AlphaVision Battery
(ref ESG-CHARGER)
- 1 bottle of B-LUBE gel (ref. 023917)
- 1 straw cutter (ref. 005233)
- 2 Kombicolor insemination guns
(ref. 018398 / 018400)
- 1 Treatment sheath
- 50 Alpha sheaths (ref. 024485)
- 1 Carry case (ref PAK15041)
- 150 sanitary sheaths (ref. 027149)
Carry case composition
Optional
Phone holder ACC-CHEST
HARNESS
ref BUG-VGA:GO Belt ref ACC-BELT-AV
Bottle of
B-Lube gel
Straw cutter Box of sanitary
sheaths
Alpha sheathsKombicolor
insemination gun

www.imv-imaging.com | 9
Power on
Fit the battery into the dock on the underside of
the device and ensure that the battery clip is fully
engaged.
To power on the AlphaVision, press and hold the
power button for approximately 3 seconds until
the power LED comes on.
For best results it is advised that you turn on your
AlphaVision as you prepare the accessories and
animal(s). This is particularly relevant during the
colder months, this helps raise the temperature
of the device before it enters the warm humid
environment inside the animal. •
Activation
Normal start up process
Your AlphaVision can be connected to Android
and Apple devices.
To nd the app search for ‘IMV AlphaVision WiFi’
in either the Google Play store or the Apple store
and install the app.
Lanch the app.
1. With the AlphaVision
turned on open app on
the smart device. The app
will request to connect to
the AlphaVision. Click OK.
2. Select
AlphaVision from the Wi-Fi
page and return to the
app by clicking on the
arrow on the top of the
screen.
The app will get the
serial number from the
AlphaVision.
After a few seconds, the camera image will appear. Touch anywhere on the screen to bring up
the menu.
Note: If the Wi-Fi LED is ashing on the AlphaVision it is not connected to any smart device.
Review saved
images & videos
Take pictures
and video
Open manual

10 |
Live menu
You can capture a picture or video by pressing
the relevant icon. If the app is currently
recording pressing any of the icons will stop the
recording.
Each recording is limited to 60s after which it
will automatically stop.
When recording ends the Save Video pop-up
will appear. •
Save Video pop-up
This menu appears when recording stops, the
meta-data is optional, if entered, it is stored
alongside the video as a text file.
Selecting “Yes” will save the video and any meta-
data, selecting “Delete “ will delete the video.
AlphaVision
charge level
Capture
picture
Start/stop video
recording
Phone charge
level
Open Settings
menu
Review saved
images & videos
Elapsed and
remaining
recording time
Activation

www.imv-imaging.com | 11
Save Image
Pressing “Return to live menu” will show a prompt
asking to exit without saving the image.
The app will not allow an image to be saved
unless an Animal ID and Farm name have been
entered.
Images will be saved with the meta-data
embedded, including additional meta-data from
the Post-Partum menu and written to the csv file.
If the lock icon is red then the meta-data will
be retained after returning to the live scan,
otherwise it will be reset. Changing the Animal ID
automatically resets the meta-data.
The cine loop stores the previous 100 frames of
videos, the controls can be used to move through
the loop to find a particular image.
Review Data
Any previously saved images and videos can be
viewed by selecting from the list.
Any meta-data associated with the file will be
displayed.
If text is typed in the search box, only images and
videos which contain that text will be visible in
the list. The app searches the file name and any
meta-data for the text.
The Filter button changes the types of files
displayed; Images & Videos, Images only or
Videos only.
Selecting the delete button will ask if you want to
delete the file before deleting.
Post-Partum menu.
Additional meta data can be entered in this
menu.This data will also be embedded in the
saved image and written to the csv file.
Selecting “OK” will save the meta-data, selecting
“Cancel” will reset the values without saving the
data.
Image Meta-
Data
Return to Live
Menu
Cine loop
controls
Retain Meta-
Data
Open Post-
Partum menu
Save image
Meta-data of
selected le
Search text
Return to
previous menu Delete selected
le
List of saved
images and
videos
Filter les
Next le
Previous le
Activation

12 |
Settings menu
The WiFi quality indicators show the availability of
the WiFi channels. If the AlphaVision is not using a
channel that is green, there is a greater chance
of interference.
To change to a different channel, press one of the
grey channel buttons, the app may disconnect
from the AlphaVision and require a manual re-
connection.
Data saving and upload
Images and videos are saved to the device’s
gallery, the csv files are also stored here. If there
are stored data files and the app is connected to
WiFi when it is opened, then the app will prompt
to upload the images to the IMV server.
Once the images are uploaded, they are moved
to a different folder (IMV_AlphaVision_Uploaded)
and are no longer visible in the Review data
menu.
System update
The app automatically checks the IMV licence
server for scanner software updates when
connected to Wi-Fi.
After connecting to an AlphaVision you may
be prompted to update the software. The
AlphaVision will only update if the battery is
above 50% charge.
Press OK or Cancel. Pressing OK will cause the
AlphaVision LEDs to flash yellow - it will take
roughly two minutes to update. Press cancel if
you wish to update later.
Once the update is finished the AlphaVision
will switch off. The AlphaVision software version
number can be checked in the User Settings
section
WiFi quality
indicators
AlphaVision
serial number
Return to
live menu
App software
version
AlphaVision software
version
Change WiFi channel
Current WiFi channel
Activation

www.imv-imaging.com | 13
LED indicators
The AlphaVision has 2 LEDs on the front keymat. •
LED sequence Power LED Wi-Fi LED
Blue Flashing Device turning on AlphaVision searching for
available viewing device
Blue Device on and battery between
66-100% charge Connected to AlphaVision
Yellow Device on and battery between
33-66% charge -
Yellow ashing Device on and battery between
0-33% charge -
Both LEDs ashing Yellow Updating Firmware Updating Firmware
Power
button
Power
LED Wi-Fi
LED
Operating
instructions
Image and
video capture
button
Buttons
The AlphaVision has 2 buttons on the keymat.
Power button - one long press (2-3 seconds) will turn the device on. Repeat this to turn the device off.
Image and video capture button - A single press will take an image. A longer press will start a video
capture, a further single press after this will stop the video capture. Images and videos can only be
saved if a tablet or phone is connected to the AlphaVision. •
Your AlphaVision can be reset to factory
rmware settings in the unlikely event the device
fails. Hold down the power and Image capture
buttons until both LEDs glow yellow and release.
This will take a few minutes and the scanner will
then switch off – removing the license from the
AlphaVision Wi.
Factory reset
14 |
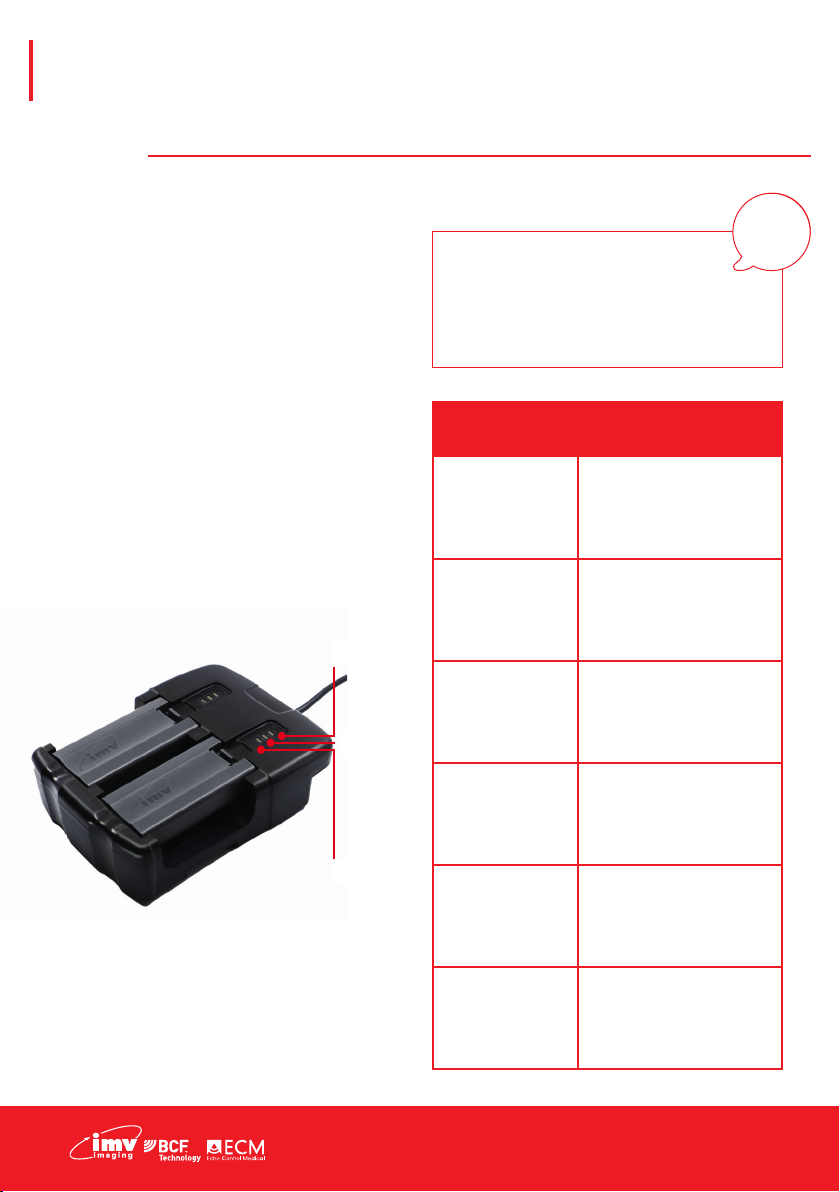
Charging
The battery can be charged in the charging dock,
powered by a standard outlet. The charging
dock can also be connected for in-car charging
when using the ACC-DC LEAD accessory.
A fully discharged battery should be fully charged
within 5.5 hours. While in a good condition, the
battery run time will be 7 hours. The Li-ion cells
used in the battery pack do not suffer from the
‘Memory effect’. For optimal battery longevity,
avoid letting the battery run completely down
and recharge at approximately 20°C/68°F.
Electrical connection to the power pack is
through the gold pads on the battery and the
AlphaVision. Power pack output is protected but
care should be taken to prevent short circuiting
the gold connector pins and pads. •
Operating
instructions
!
Warning:
To reduce the risk of burns, fire,
electric shock or injury to persons
an appliance should never be left
unattended when plugged into mains
or 12 V cigarette lighter.
3rd LED
2nd LED
1st LED
LED sequence
One Blue
Flashing
Charging, charge level
below 33%
First LED solid
blue
Second LED
ashing blue
Charging, charge level
below 66%
First and second
LEDs solid blue
Third LED
ashing blue
Charging, charge level
below 100%
All LEDs solid
blue Fully charged
All LEDs ashing
yellow
Temperature is too high
(more than 45°C/113°F)
for safe charging
All LEDs ashing
blue
Temperature is too low
(less than 0°C, 32°F) for
safe charging

www.imv-imaging.com | 15
Operating
instructions
Fitting the speculum
Fit the speculum to the AlphaVision chassis. It
should ‘click’ into place.. •
Fitting the handle
To fit the handle it should be rotated into the
‘keyhole’ shaped hole. Once rotated to the point
where the handle is paralell to the lower section
of the chassis it should ‘click’ into place and feel
secure. •
Operator safety
When using viewing devices in combination with your Alphavision and working with animals please
be aware of your own spatial environment to avoid colliding
with unseen objects.
For best results we recommend pairing the Alphavision with IMV
imaging’s BUGs heads up display goggles. The BUG VGA:Go
goggles are specically designed for use in the eld providing
excellent image visibility whilst maintaining full peripheral vision
to ensure the user remains safe in their environment and keeps
both hands free to work.•

16 |
Operating
instructions
Fitting the sanitary sheath
Your AlphaVision comes with a roll of sanitary sheaths. These are designed to protect your device
against heavy soiling as well as help maintain a clear image on the camera when you need it most.
Warning:
Do not wind the sheath around the
speculum; this will trap the sheath and
make it difficult to open.
!
1. Always work with a dry speculum. Wipe
carefully with a paper towel between uses.
2. Pull the sanitary sheath from the box.
3. The sanitary sheath needs to be orientated
correctly with the wider section at the handle
end of the AlphaVision.
4. If possible moisten your ngers in order to
separate the two sides of the sheath.
5. Slide the sanitary sheath over the speculum. •

www.imv-imaging.com | 17
Checking the cervix
1. Clean the animal’s vulva using the same
protocol as with a standard insemination.
2. Put B-LUBE gel on the end of the speculum
over approximately the rst 10cm.
3. Part the vulva. Position the end of the
speculum against the vulva. Point the
camera upwards at a 45º angle.
4. Gently insert the speculum, aligning it
parallel to the vagina.
Operating
instructions
5. Once it is 10cm inside the vagina pull back
on the sanitary sheath to open it at the front.
6. Progress towards the cervix using the
image displayed on your viewing device to
navigate.
7. Check the condition of the cow’s cervix on
the image
Now you should be able to make a diagnosis
or a decision on insemination. If insemination,
proceed with the next steps.

18 |
Preparing the straw and Kombicolor
2. Insert the straw into the Kombicolor shaft.
3. Insert the Alpha sheath into the Kombicolor
until it is fully locked.
4. ‘Click’ the Kombicolor gun into the
Kombicolor guide.
5. Slide the Kombicolor guide into the
AlphaVision handle up to the second
notch. •
1. After thawing and drying out, cut the
welded part of the straw with the straw
cutter supplied.
Operating
instructions

www.imv-imaging.com | 19
Insemination
1. Repeat the same steps listed previously on
‘checking the cervix’.
2. Slide the Kombicolor guide into the AlphaVision
handle up to the second notch.
3. Push the Kombicolor guide until the insemination
sheath appears on the image at the entrance to
the cervix.
4. Insert the sheath by continuing to push the
Kombicolor guide. 1 notch or ‘click’ is equal to 1cm.
5. Check that the end of the insemination syringe
is positioned correctly by rectal palpation. If the tip
of the sheath is still in the cervix, move the cervix to
help progress the sheath through it.
6. Inseminate by gently pressing the plunger of the
Kombicolor. Be careful not to move the Kombicolor
guide.
7. After completely emptying the straw withdraw
the AlphaVision device slightly.
8. Check the entrance to the cervix to ensure that
no semen ows back.•
Operating
instructions
Warning:
Do not force it! !

20 |
Dismantling the
device
1. Remove the AlphaSheath and the insemination straw by pulling forwards so as not to soil the
inside of the AlphaVision.
2. Remove the Kombicolor guide from the handle and pop the Kombicolour out of the guide.
3. Remove the speculum by pressing the two spring plungers.
4. Remove the handle by pressing the spring plunger and rotate the handle out of the chassis. •
Other manuals for AlphaVision
1
Table of contents
Other IMV Farm Equipment manuals


