IMV AlphaVision User manual

Read this manual carefully
before using AlphaVision
IFU-000228 B
User Manual
A new vision
of reproduction

2/32
IFU-000228 B
1. PREFACE
2. INTRODUCTION
2.1 Applications
2.2 Overview
3. ASSEMBLY
3.1 Positioning and connecting the device
3.2 Starting the application
3.3 Fitting the sanitary sheath
3.4 Checking the cervix
3.5 Assembling the insemination gun
3.5.1 Assembling the Kombicolor
3.5.2 Preparing the straw
4. INSEMINATION
5. DISMANTLING AND CLEANING THE DEVICE
6. APPLICATION FUNCTIONS AND PHOTO MANAGEMENT
6.1 Conguringtheterminalandapplicationlanguage
6.2 Taking photos and videos with the application
6.3 Managing photos and videos
6.4 Retrieving data
7. ACCESSORIES AND SPARE PARTS
8. TROUBLESHOOTING
9. TECHNICAL CHARACTERISTICS
9.1 General characteristics
9.2 Electrical safety standards
9.3 Transportation and storage
9.4 Operating conditions
10. IMPORTANT INFORMATION
10.1 Ordering
10.2 Terms of warranty for new equipment
10.3 Disclaimer
10.4 Contacts
10.5 IMV Customer Service
CONTENTS

IFU-000228 B
3/32
Thank you for purchasing the new IMV Technologies
AlphaVision designed to assist insemination and
reproduction management.
AlphaVisionbringsyouourverylatesttechnologyintheeld
ofcattlearticialinsemination.
Thisinseminationsystem,featuringasealedhigh-denition
camera, makes working conditions signicantly more
comfortable. In particular, it enables the user to check
cervical involution in cows and simplies location of the
cervix, making the insemination procedure less invasive.
Should you require any technical support, please contact
IMV Technologies.
A few recommendations to ensure you get the best use from
AlphaVision:
• Before each use, read the manual carefully and
especially chapter 5 on how to clean the AlphaVision
unit.
• Always handle the camera and terminal with the
greatest care, particularly during cleaning.
• After using your AlphaVision unit, store it away in its
carrying case for additional protection.
• If you require any further information, feel free to consult
the “how to use” video provided on our website.

4/32
IFU-000228 B
PREFACE
This user manual is intended to serve as a reference guide on how to install and
operate IMV Technologies products.
Every effort has been made to ensure the reliability and accuracy of the
information contained in this User Manual at the time of going to press. However,
thespecicationsandproceduresmayundergochangesowingtoourongoing
efforts to respond to our customers’ demands and maintain a process of research
and development and continuous improvement for all IMV Technologies products.
IMV Technologies reserves the right to make changes to the specications and
procedures relating to its products and the related documentation at any moment
and without prior notice. The information contained in this User Manual is considered
to be reliable and exact with regard to IMV Technologies products.
IMV Technologies has taken all reasonable precautions in preparing the information
contained in this User Manual, but does not guarantee that this information is free
from error. IMV Technologies assumes no liability for damage incurred by the
user owing to errors or omissions coming from the information contained in this
document.
IMV Technologies cannot be held responsible and assumes no liability for losses
incurred by the user or by third parties resulting from the incorrect installation,
operation or maintenance of the system in cases where procedures and
specications have not been correctly followed. It is therefore essential that the
userfollowsthespecications,proceduresandrecommendationsdescribedinthis
user manual.
BeforeusinganIMVTechnologiesproduct,pleaseconrmthelatestinformation
on the product with an IMV sales representative. Similarly, please pay regular and
ongoing attention to additional information that IMV Technologies may issue, such
as that published on our website.
The warranty on IMV Technologies products will not apply in the following situations:
- The equipment was repaired using non-genuine parts,
- The consumable used with the equipment was not approved by IMV
Technologies and could damage its products.
Refer to sections 10.2 and 10.3 of this manual for additional information on the
equipment warranty.
IMV Technologies congures its products in a standard mode that may differ
from the user’s specic conditions. To ensure that IMV Technologies’ products
correspondtothespecicsituationandenvironmentofeachuser,theproducts
mustbequaliedbythenaluserundertheirownresponsibilitybyensuringthatthe
nalproductcomplieswiththeirindividualspecications.IMVTechnologiescannot
beheldliableinanywayfortheperformancelevels(i.e.fertility,prolicacy,etc.)
resultingfromtheuseofthenalproductsmarketedbythecustomer.
Please use IMV Technologies products in accordance with all the applicable
regulations and laws. IMV Technologies assumes no liability in the event of damage
or loss resulting from failure to comply with the applicable regulations and laws.
1.

IFU-000228 B
5/32
INTRODUCTION 2.
2.1 Applications
Developed and manufactured in France by IMV Technologies, AlphaVision is a
system used to assist bovine insemination and reproduction management.
AlphaVision is a valuable diagnostic tool, enabling the user to check cervical
involution and the presence of heat mucus in cows or to investigate cervix
malformation.
During insemination, it helps the user locate the cow’s cervix quickly and easily in
order to conduct the procedure.
Lastly, using the built-in application on the vision terminal provided, the user can
save photos and videos of the cervix. The photo library is also accessible on
the terminal, allowing the user to share the images with a veterinary surgeon to
perform any diagnoses required.
2.2 Overview
AlphaVision comprises:
-1griphandlettedwithasealed
miniaturecamera(ref.028117)
- 2 graduated extensions for attaching
the Kombicolor insemination gun
(ref.026679)
- 2 insemination rods for attaching the
Kombicolorplunger(ref.026662)
- 2 speculum tubes: standard
(ref.028211)andwithtip(ref.028140).
-1visionterminal(ref.027116)
- 1 charger for the vision terminal
- 1 telephone charging cable
(ref.028100)
-1bottleofB-LUBEgel(ref.023917)
-1strawcutter(ref.005233)
-1visionterminalcase(ref.028156)
- 2 Kombicolor insemination guns
(ref.018398/018400)
-50Alphasheaths(ref.024485)
- 1 carrying case
-1neckstrap(ref.027076)
-150sanitarysheaths(ref.027149)
- 5 Green Air biodegradable gloves
- 1 “Good Practices” sheet
- 1 bag to be used for after-sale returns

6/32
IFU-000228 B
Detail of AlphaVision accessories
Vision terminal Neck strap Telephone
charging cable
Kombicolor
insemination gun
Alpha sheaths Straw cutter Box of sanitary
sheaths
Bottle of
B-Lube gel
Protective case and vision
terminal AlphaVision cable
Detailed view of AlphaVision
Graduated extension
ref. 026679
Grip handle
ttedwithaminiaturecamera
ref. 028117
INTRODUCTION
2.
Speculum tube
with tip
ref. 028140
Insemination rod
ref. 026662 Speculum tube,
standard
ref. 028211

IFU-000228 B
7/32
ASSEMBLY 3.
3.1 Positioning and connecting the device
1. Position the neck strap
3. Carefully connect the vision terminal
to the micro USB socket.
4. Open the neck strap clamp and insert the vision
terminal.
5. Connect the other end of this cable to the AlphaVision.
Be careful to line up the two red dots opposite each other.
2. Insert the vision terminal in its protective
case through the opening provided.

8/32
IFU-000228 B
3.2 Starting the application
5. Check that the image quality is good (if the image is blurred or spots appear,
cleantheendofthecamerawithasoftcloth).
ASSEMBLY
3.
12
1. Switch on the terminal.
2. Ensure that the battery
charge level is at least 50%.
4. Check the box and
press: OK.
3. Start the application.

IFU-000228 B
9/32
6. Fit the speculum to the AlphaVision gun.
7. Very important: Place the cable behind your neck.
ASSEMBLY 3.
10/32
IFU-000228 B
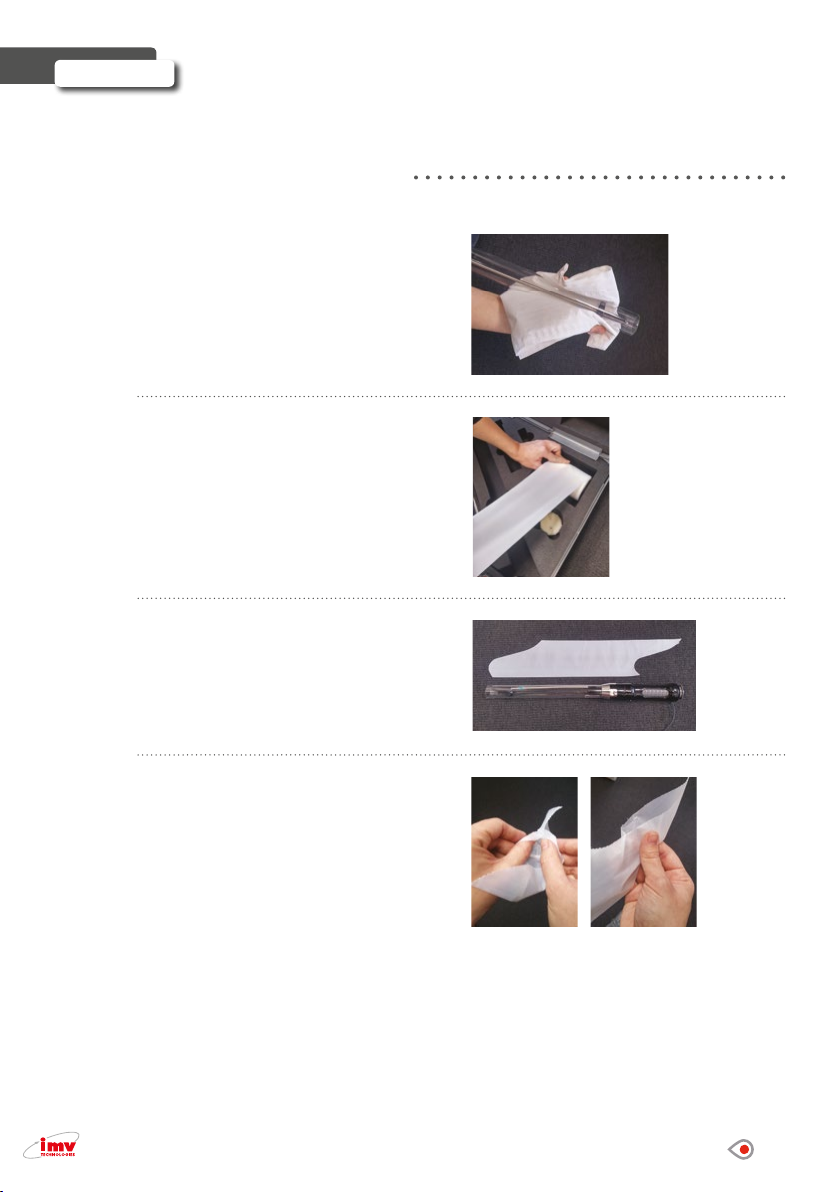
3.3 Fitting the sanitary sheath
ASSEMBLY
3.
1. Always work with a dry tube. Wipe
carefully with a paper towel between
uses.
2. Detach the sanitary sheath from
the roll: holding the roll with one hand,
take a sheath in the other and pull it
outwards until it tears off completely
from the roll.
3. Position the sanitary sheath
correctly: the “handle” and the
“curve” of the sheath must cover the
AlphaVision gun in order to protect it
from soiling.
4. Moisten your ngers in order to
separate the two sides of the sanitary
sheath. Open the sheath fully,
following the dotted lines.

IFU-000228 B
11/32
5. Slide the sanitary sheath over the
speculum.
6. After use, remove the sanitary
sheath from the AlphaVision gun by
pulling forwards in order to keep the
gun clean.
7. Warning: Do not wind the
sheath around the tube; this will trap
the sheath and make it difcult to
open.
ASSEMBLY 3.
12/32
IFU-000228 B
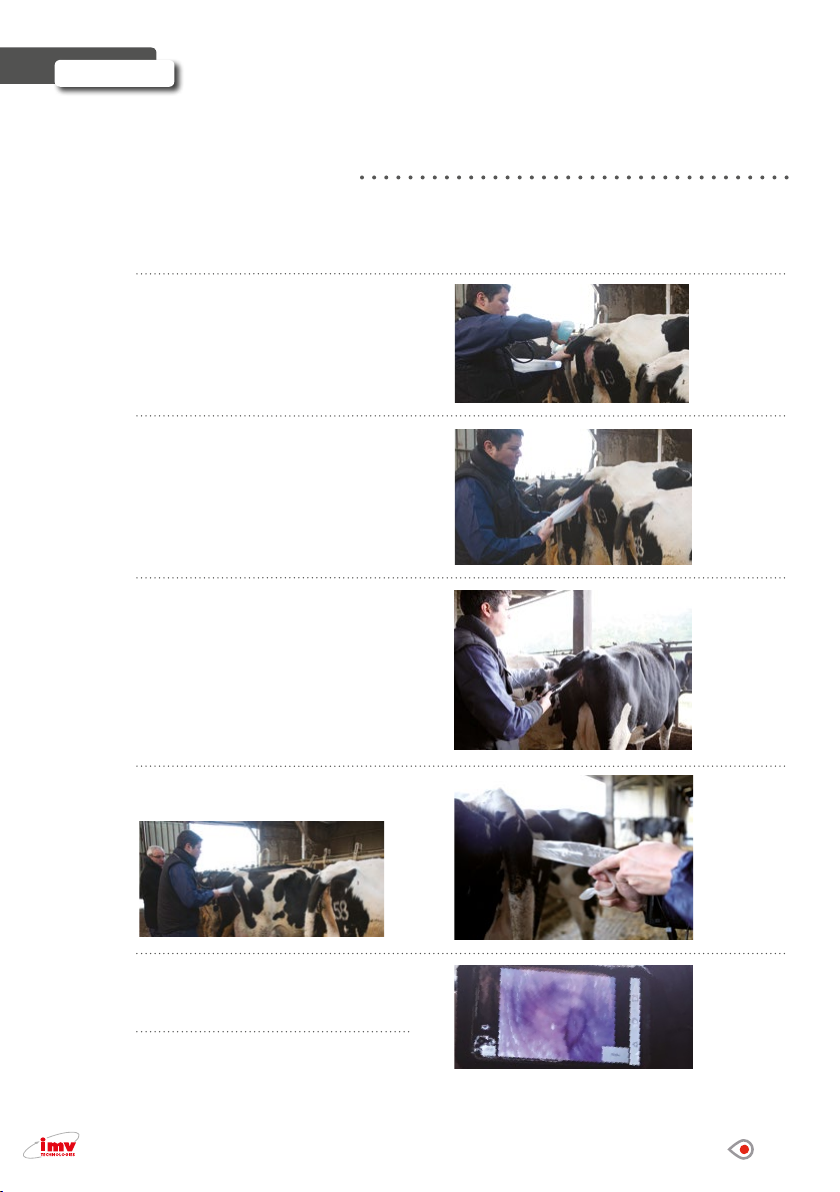
3.4 Checking the cervix
1. Clean the animal’s vulva, using the same protocol as with standard
insemination.
3. Part the vulva.
Position the end of the speculum
against the vulva.
Point the camera upwards at a 45°
angle.
2. Put B-LUBE gel on the end of
the speculum over a length of
approximately 10 cm.
ASSEMBLY
3.
4. Gently insert the speculum, aligning
it parallel to the vagina.
5. Once it is 10 cm inside the vagina,
pull the sanitary sheath to open it.
6. Progress towards the cervix, using
the image displayed on terminal.
7. Check the condition of the cow’s
cervix on the image.

IFU-000228 B
13/32
3.5 Assembling the insemination gun
3.5.1 Assembling the Kombicolor
1. Holding the Kombicolor in one hand, pull back the plunger and draw it
completely inside the graduated extension.
2. Clip the colored ring of the Kombicolor
to the end of the graduated extension.
3. Slide the steel ring of the Kombicolor plunger into the housing provided
on the rod until it clips into position. Insert the rod into the graduated
extensionasfarastherstnotch.
1
2
ASSEMBLY 3.

14/32
IFU-000228 B
3.5.2 Preparing the straw
1. After thawing and drying, cut the
welded part of the straw with the straw
cutter supplied.
2. Insert the straw into the Kombicolor
shaft.
3. Insert the Alpha sheath into the Kombicolor until it is fully blocked.
5. Prime the Kombicolor.
4. Insert the Kombicolor gun into the
AlphaVisionunituptotherstnotch.
ASSEMBLY
3.

IFU-000228 B
15/32
INSEMINATION 4.
11. Progress towards the cervix, using the image displayed on the terminal.
12. Insert the Kombicolor insemination syringe into the AlphaVision device.
6. Clean the animal’s vulva, using the same protocol as with standard
insemination.
8. Part the vulva.
Position the end of the speculum
against the vulva.
Point the camera upwards at a 45°
angle.
7. Put B-LUBE gel on the end of
the speculum over a length of
approximately 10 cm.
10. Gently insert the speculum,
aligning it parallel to the vagina.
9. Position the end of the speculum.

16/32
IFU-000228 B
13. Push the graduated extension until
the insemination sheath appears on the
image at the entrance to the cervix.
Warning: Do not force it!
1 notch = 1 cm
14. Place the Alpha insemination sheath opposite the
entrance to the cervix and insert it into the cervix by
continuing to push the graduated extension.
15. Check that the end of the insemination syringe is positioned correctly by
rectal palpation. If the syringe is still in the cervix, move the cervix over the
syringe.
16. Inseminate by gently pressing the rod until it stops, being careful not to
move the graduated extension.
18. Checktheentrancetothecervixtoensurethatnosemenowsback.
17. After completely emptying the straw, withdraw the AlphaVision
device slightly.
INSEMINATION
4.

IFU-000228 B
17/32
1. Click “STOP” and close the application.
DISMANTLING AND CLEANING THE DEVICE 5.
3. Remove the Alpha sheath and the
insemination straw by pulling forwards so
as not to soil the inside of the AlphaVision
device.
6. Clean all the parts with water containing an antiseptic (e.g. Chlorhexidine
or other surgical equipment disinfectant), being careful not to get the
connectors wet.
2. Leave the cable connected
to the AlphaVision.
4. Remove the speculum by pressing the two
spring clips.
5.Immersethespeculuminthecleaningliquid(e.g.:water+Chlorhexidrine).
The temperature must be below 45° C. See the “Good Practices” sheet.

18/32
IFU-000228 B
Note:
o Do not use alcohol or iodine derivatives
o Maximum water temperature: 45°C
o Temperature indicator is white: compliant use
Temperature indicator is black: risk of
damaging the device
o Keep the carrying case foam dry at all times.
7 . Dry the device before using it again, taking care to wipe the camera lens
withasoftcloth(similartothoseusedforspectacles).
8. Remove the Kombicolor, graduated extension and rod from the grip handle.
9. Withdraw the rod and unclip the Kombicolor plunger.
10. Unclip the colored ring on
the graduated extension.
11. Charge the telephone.
Leave the telephone in the protective case.
Use the telephone charging cable supplied in the
AlphaVision carrying case.
12. Put the unit and its cleaned and dried accessories in the protective
carrying case in order to prevent any damage.
13. Store the AlphaVision unit in a clean, dry place at a temperature between
+5 and +45°C. Do not store at negative temperatures.
14. Avoid impacts and shocks during transportation.
1
2
DISMANTLING AND CLEANING THE DEVICE
5.

IFU-000228 B
19/32
APPLICATION FUNCTIONS AND
PHOTO MANAGEMENT
6.
We remind you that the terminal supplied is to be used exclusively with AlphaVision.
IMV disclaims any liability in the event of any use other than as stipulated in the
manual.
6.1Conguringtheterminaland
application language
The default language of the application is that of the telephone.
1. Click “Settings”
2. Select “Language
and input”
3. Select
“Language”
4. Select
the required
language

20/32
IFU-000228 B
APPLICATION FUNCTIONS AND
PHOTO MANAGEMENT
6.
6.2 Taking photos and videos with the application
Press
to take a
photo
Press
to take a
video
Maximum length
of video recording:
1 min.
Add comments
Camera settings
•To add a comment, click “Yes”
Press in the comment box, type
the text and then click “OK”
Lastly, move the text box wherever you like on the photo and save the comment
by pressing “OK”.
If you wish to change the camera settings (contrast,
brightness,saturation),clickthesettingstabandslide
the cursors.
• If you do not wish to add a
comment, press “No”; the photo
will be saved by default without
comments and with the date and
time.
Other manuals for AlphaVision
1
Table of contents
Other IMV Farm Equipment manuals


