GrainPro GRAINSAFE 1.0/GHF User manual

GRAINPRO® GRAINSAFE™BAG-1.0/G-HF
INSTRUCTION MANUAL
MA4020JVD1025-3

2/19
GrainPro® GrainSafe™ Bag-1.0/G-HF Instruction Manual
MA4020JVD1025-3
GrainPro®, Inc.
200 Baker Ave., Suite 309 Concord, MA 01742 USA
Phone: +1 978 371 7118 Fax: +1 978 371 7411 Website: www.grainpro.com
GrainPro® Philippines, Inc.
Lot 46 Efficiency Avenue, Subic Bay Gateway Park I, Subic Bay Freeport Zone 2222 Philippines
Phone: +63 47 252 7884 Fax: +63 47 252 7885 Website: www.grainpro.com
Email: salesasia@grainpro.com
GrainPro® Kenya
Shop A2, Space Apartments Mai Mahiu Road, Near T Mall Nairobi, KENYA
Phone: +254 710 933 717 Website: www.grainpro.com
Email: saleseafrica@grainpro.com
GrainPro® Mexico
Cto. Garona No. 903, Sección Tres, Col. Amberes, 37237, León, Gto. Mexico
Phone (Mobile): +52 1 (477) 392-0851 Website: www.grainpro.com
Email: guillermo@grainpro.com
GrainPro® Costa Rica
Paseo Colón, Centro Colón, en Bufete Robles Oreamuno District Merced, San José, Costa Rica
Phone: +506 4701-1173 Website: www.grainpro.com
GrainPro® India Postharvest Technology Pvt Ltd
B305, Grande View 7 Hsg. Soc. Ltd., Phase - I, Near Ashok Leyland, Ambegaon BK, PUNE,
Pune, Maharashtra, India, 411046
Phone (Mobile): +91 9970157263 Website: www.grainpro.com

3/19
GrainPro® GrainSafe™ Bag-1.0/G-HF Instruction Manual
MA4020JVD1025-3
TABLE OF CONTENTS
1. INTRODUCTION..............................................................................................................4
2. CHECKLIST ......................................................................................................................5
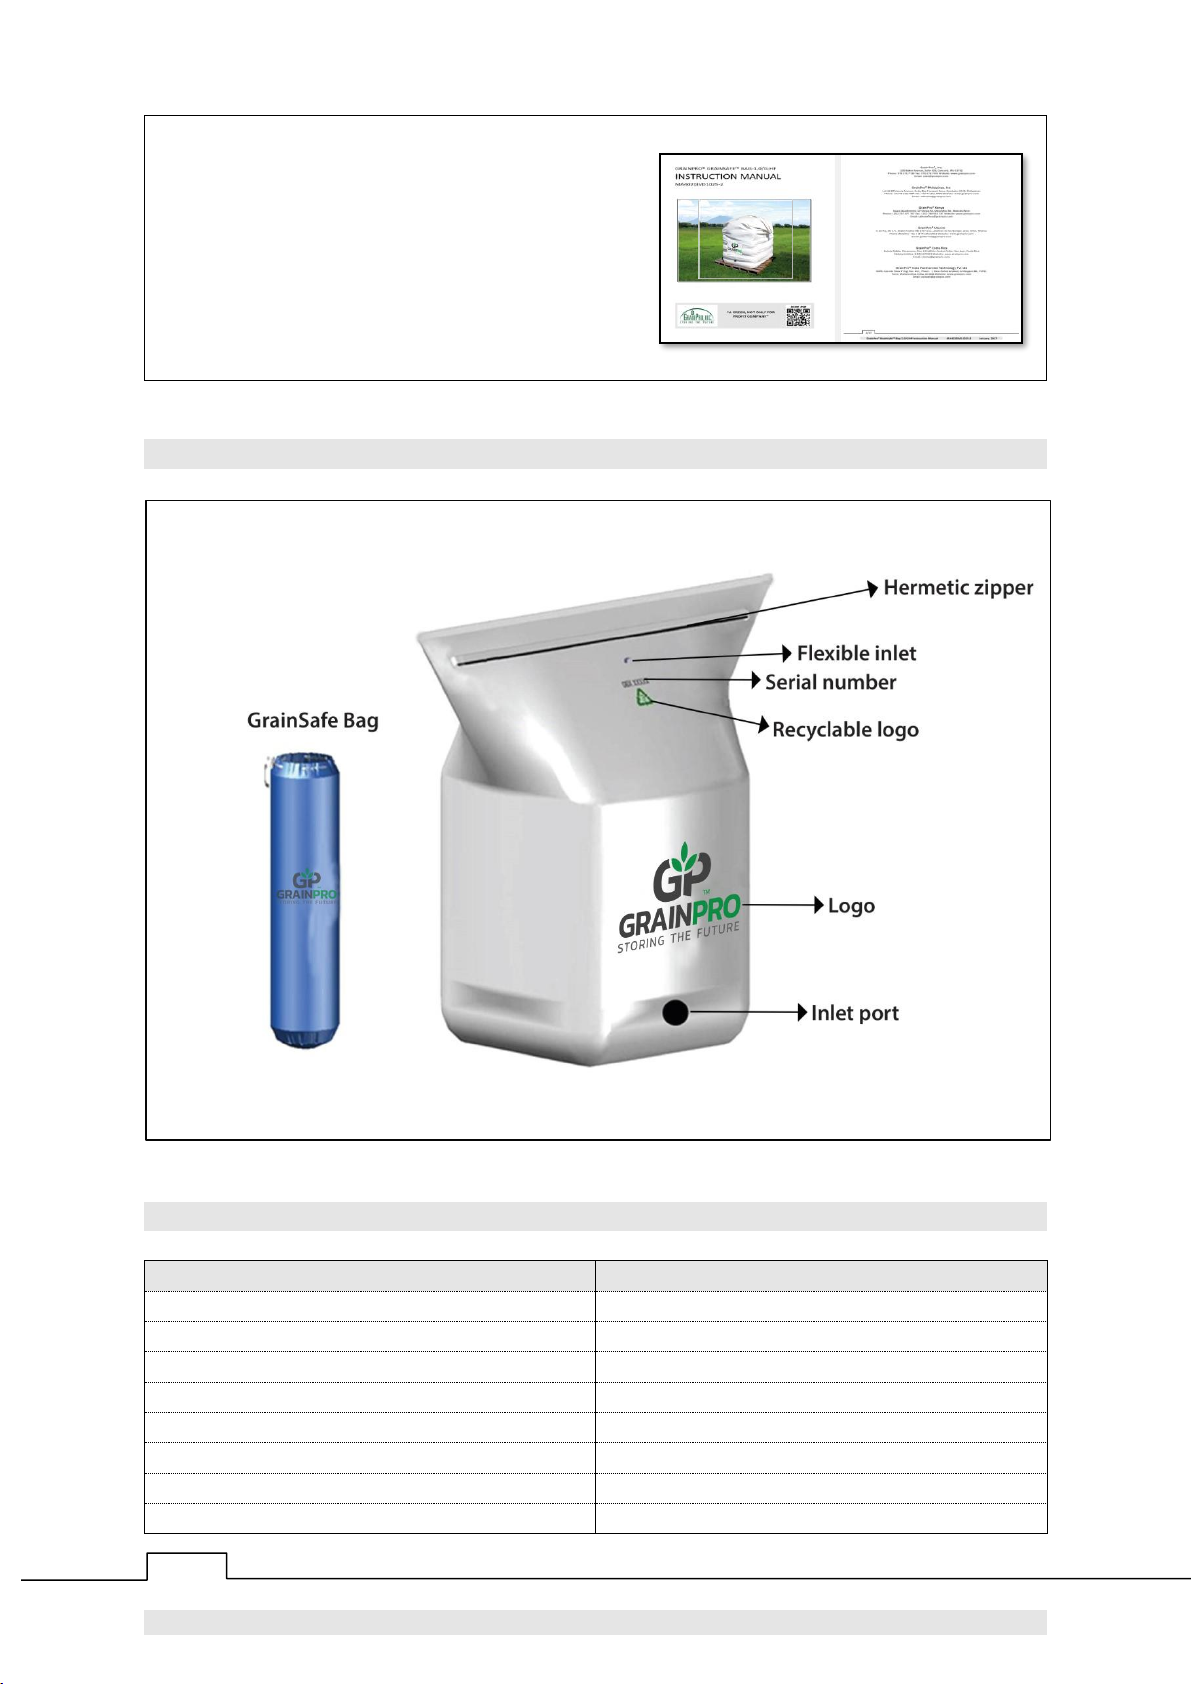
3. COMPONENTS................................................................................................................6
4. SPECIFICATIONS .............................................................................................................6
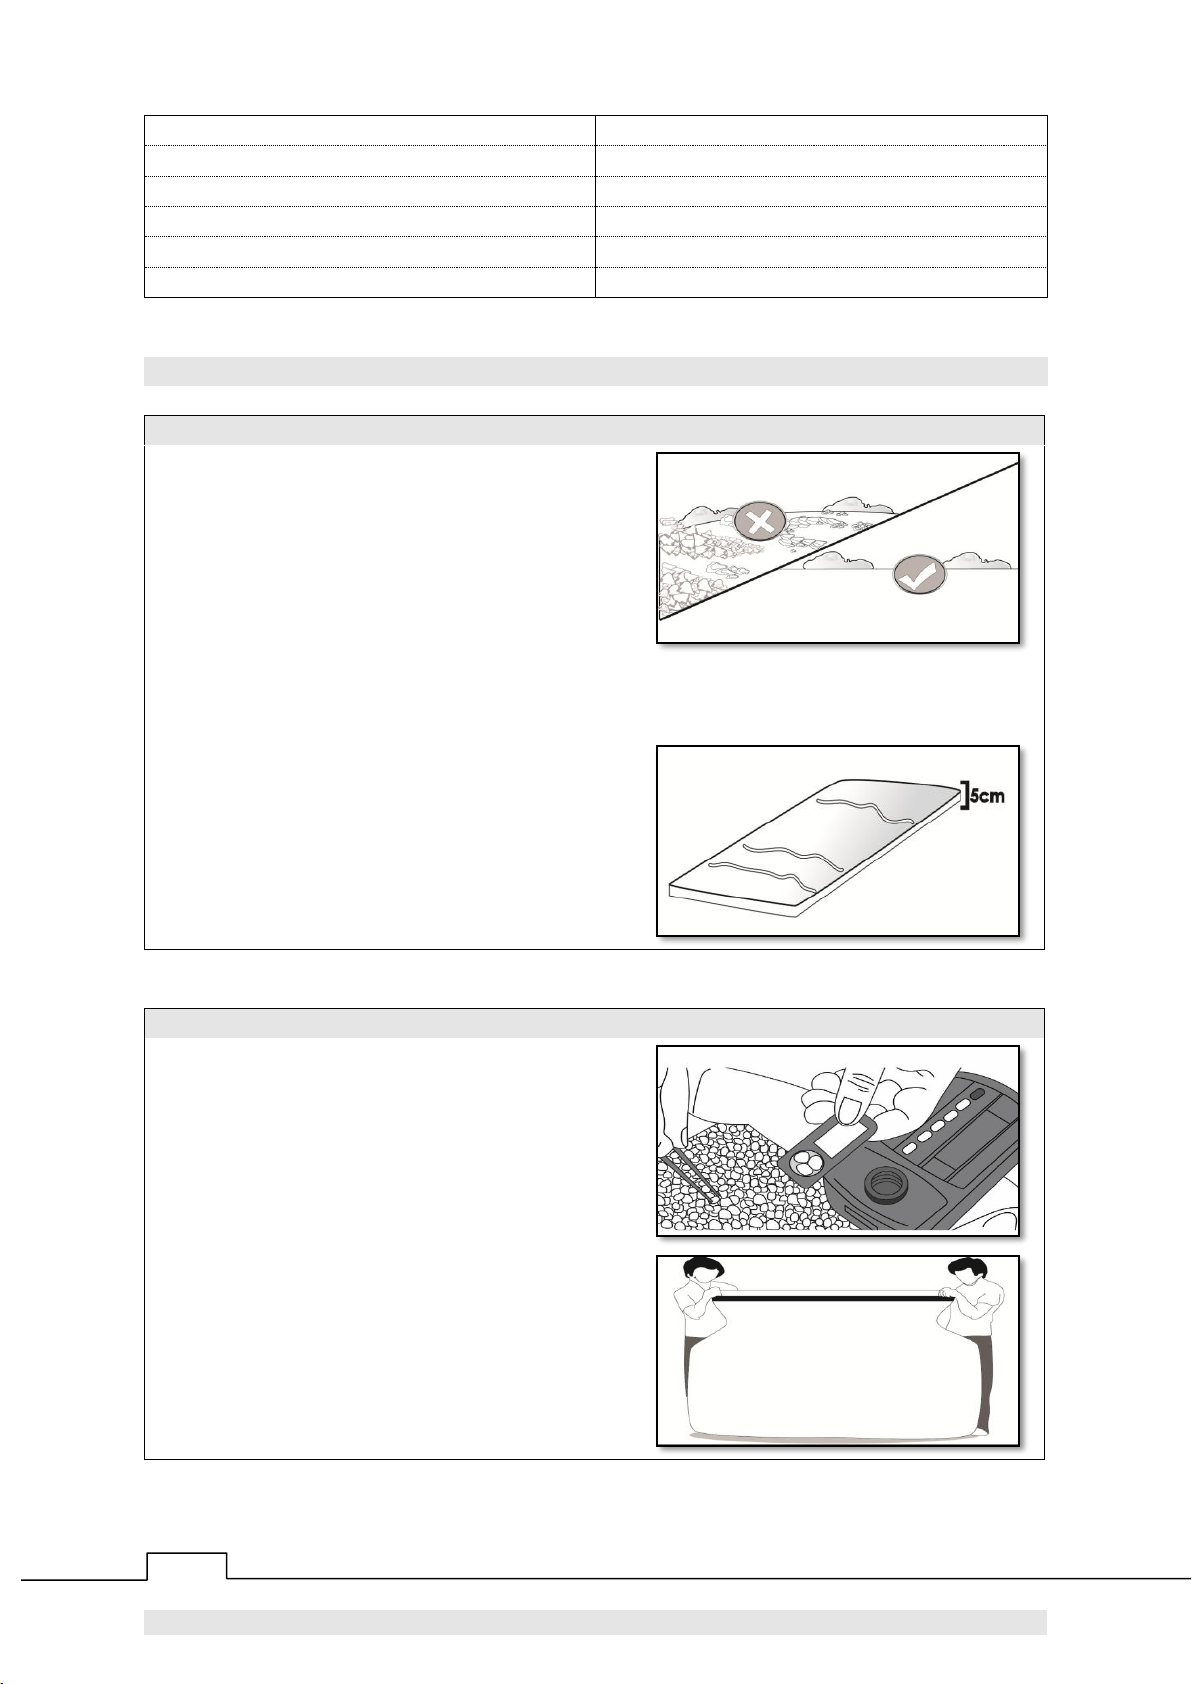
5. INSTALLATION................................................................................................................7
Site selection .............................................................................................................7
Loading ...................................................................................................................... 7
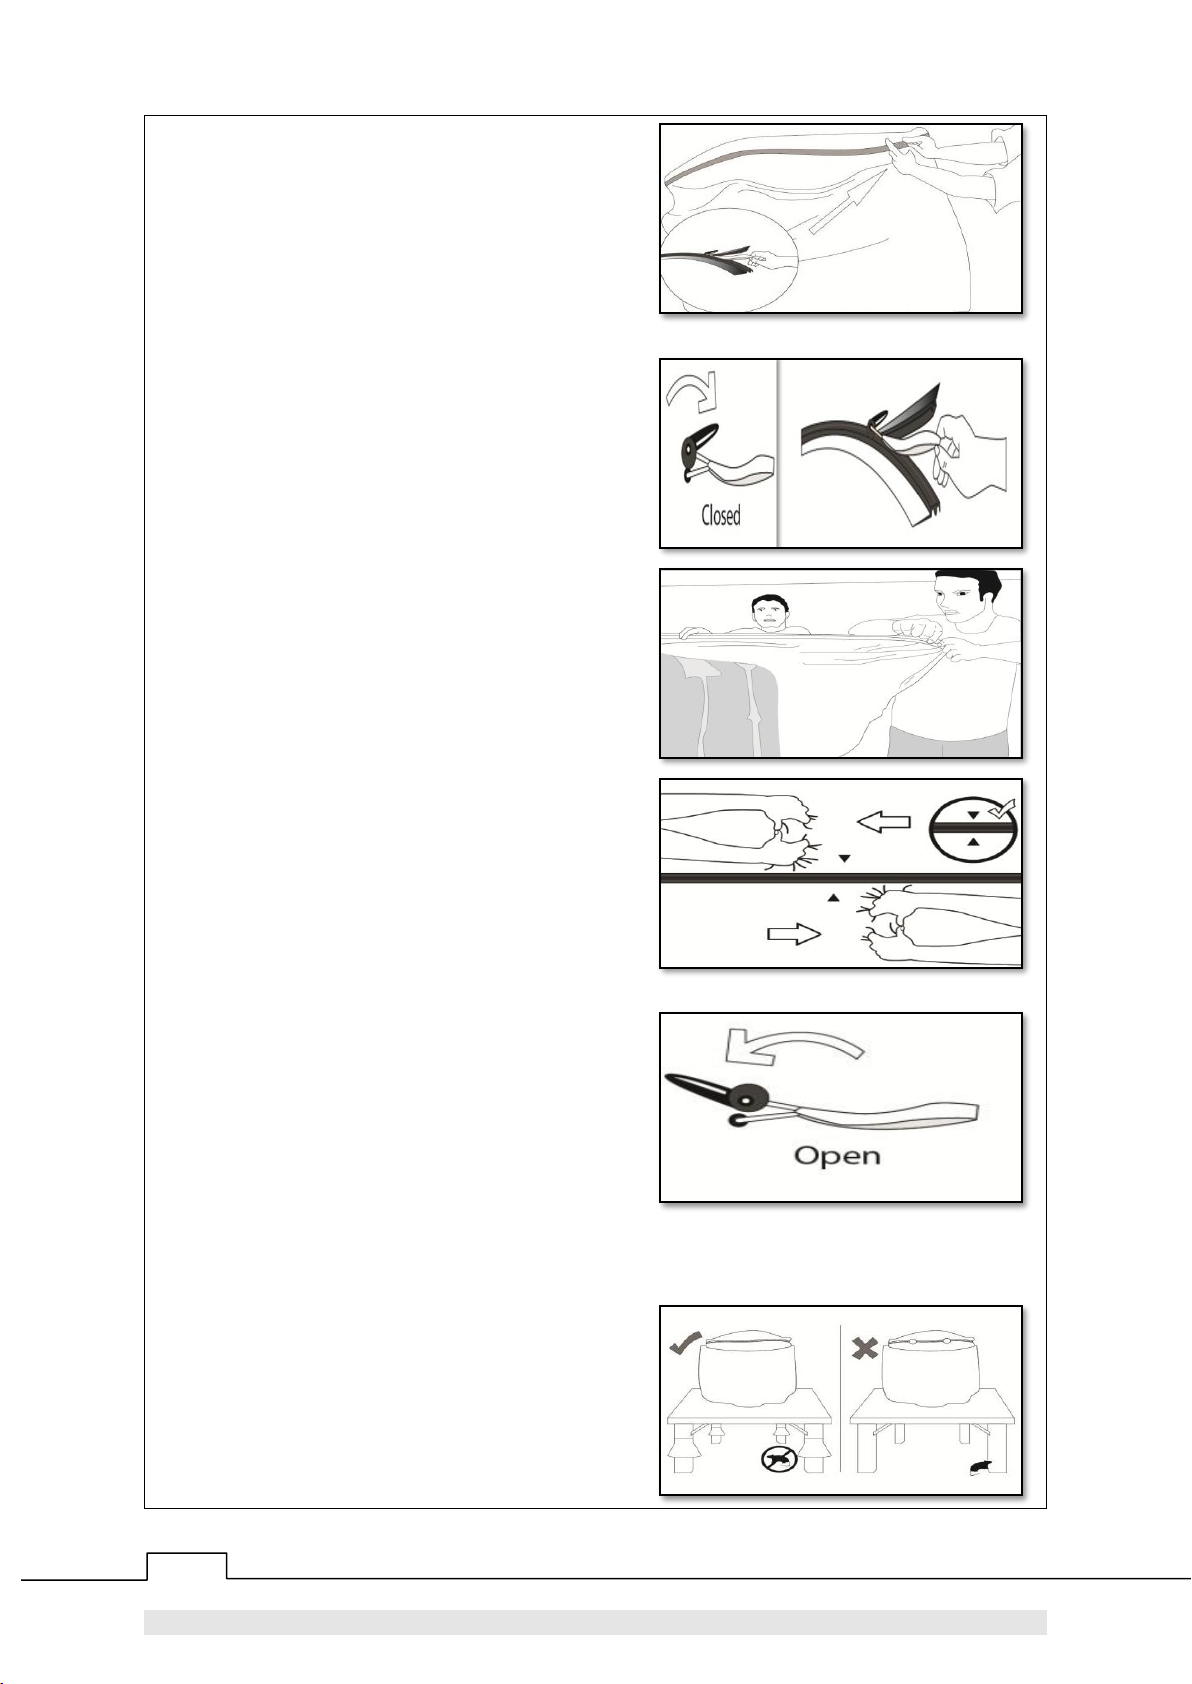
Zipping.......................................................................................................................8
Pressure decay test .................................................................................................10
Installation of rodent guard ....................................................................................10
Outdoor installation................................................................................................11
Procedure for purging carbon dioxide....................................................................11
Monitoring the oxygen level ...................................................................................14
Dismantling .............................................................................................................15
6. PREVENTING CONDENSATION ....................................................................................15
Why does condensation occur................................................................................15
Moisture content requirement for safe storage..................................................... 15
7. MAINTENANCE AND CARE ...........................................................................................16
Regular examination ...............................................................................................16
Repairing punctures and other damages................................................................ 16
Recommended weekly monitoring.........................................................................16
Cleaning................................................................................................................... 17
Safekeeping.............................................................................................................17
Prohibited item not allowed to ship .......................................................................17
Recycling.................................................................................................................. 17
8. FREQUENTLY ASKED QUESTIONS AND ANSWERS .......................................................17
9. WARRANTY CLAUSE .....................................................................................................19

4/19
GrainPro® GrainSafe™ Bag-1.0/G-HF Instruction Manual
MA4020JVD1025-3
1. INTRODUCTION
The GrainPro® GrainSafe Bag™-1.0/GHF (GS Bag-1.0/GHF) is a portable bagged storage
for grain and seed, normally set-up on ground levels such as concrete pavement or
pallet. Use of a platform is also an option. It safely stores any dry agricultural commodity
at or below safe moisture content like maize, wheat, paddy, coffee, and others. It works
as a hermetic storage system (airtight) using modified atmosphere technology. It is
specially designed as a secondary packaging made from ultra-hermetic material and
zipper. Respiration of insects, microflora and commodity depletes the available oxygen
and replaces it with carbon dioxide. This conversion typically occurs within 10 days of
storage which depends on level of insect infestation. Heavier infestation results in more
rapid insect kill. The liner of GS Bag-1.0/GHF is UV-resistant, waterproof, less permeable
and resistant to rodent penetration when properly installed.
1.1. FEATURES:
1.1.1. Quality of commodity is preserved without the use of chemicals.
1.1.2. It maintains its effectiveness under adverse weather conditions.
1.1.3. It is designed for outdoor with shades/cover or indoor.
1.1.4. It can be set-up on a platform with anti-rodent protection to prevent rodent attack.
1.1.5. It is designed to store commodities up to 1 metric ton capacity based on wheat.
1.1.6. A green technology certified as safe secondary packaging for organic produce such as
grains or dried agricultural commodities.
1.2. PRODUCT GUARANTEE:
1.2.1. In accordance with the terms and conditions herewith, GrainPro, Inc. guarantees the
quality of this product per its written warranty provided it is used according to the
instructions in this manual.
1.2.2. Please read and understand the manual thoroughly before using the GS Bag-1.0/G-HF.
1.3. COMMENTS, COMPLAINTS, AND/OR CLARIFICATIONS:
1.3.1. Please contact [email protected].
1.3.2. We shall be glad to address any of your concerns.

5/19
GrainPro® GrainSafe™ Bag-1.0/G-HF Instruction Manual
MA4020JVD1025-3
2. CHECKLIST
Please inspect your GrainPro GS Bag-1.0/G-HF to ensure that the package includes the
following items:
PART NAME
DESCRIPTION
IMAGE
2.1. CARRY BAG
2.1.1. GrainSafe Bag.
2.1.2. Small parts.
2.1.3. Instruction manual.
2.2. ZIPPER PULL
2.2.1. For zipper sealing.
Two (2) pieces (left
and right)
2.3. PVC
PATCHING
MATERIAL
2.3.1. White-colored PVC
roll for patching
holes and other
damages.
(One) 1 piece
(30cm x 1.5m)
2.4. PETACKS
BOND GLUE
2.4.1. For patching PVC
materials.
One (1) tube
2.5. RODENT
GUARD
2.5.1. For platform post
to prevent rodent
access when
storing the empty
GS Bag-1.0/GHF.
Four (4) pieces per
pack

6/19
GrainPro® GrainSafe™ Bag-1.0/G-HF Instruction Manual
MA4020JVD1025-3
2.6. INSTRUCTION
MANUAL
2.6.1. Installation
instructions.
2.6.2. Maintenance
instructions.
2.6.3. Frequently asked
questions and
answers.
2.6.4. Warranty clause.
3. COMPONENTS
4. SPECIFICATIONS
PARAMETERS
SPECIFICATION
Material
Flexible Polyvinyl Chloride (PVC)
Thickness PVC, mm (inch)
0.83(0.33)
Color
White
Dimension (LWH), cm (inch)
120x120x190 (47.24x47.24x74.80)
Material weight, gsm
1,050
Capacity (Based on wheat), kg (lbs)
1,000 (2,204.62)
OTR, cc/m2/day @0.1MPa
500 max
WVTR, g/m2/day
8 to 9

7/19
GrainPro® GrainSafe™ Bag-1.0/G-HF Instruction Manual
MA4020JVD1025-3
Shelf life, years
10
Warranty, years
5
Packed weight, kg (lbs)
13 (28.66)
Packed dimensions, cm (inch)
100x40x10 (39.37x15.75x3.94)
Product weight, kg (lbs)
12.5 (27.56)
Packed volume, m3(ft3)
0.04 (1.413)
5. INSTALLATION
5.1 SITE SELECTION
5.1.1 In selecting a site, look for a concrete or
asphalt platform.
a. A smooth area away from standing or
running water.
b. Prepare the site by clearing away all
sharp objects (stones, broken glasses,
nails, etc.) that may puncture the GS
Bag-1.0/GHF.
c. An inspection path around the
perimeter (at least 75cm).
5.1.2 If ground will be used as flooring, put a
layer (5cm) of fine sand (or any
equivalent) on top of the soil as ground
foundation to prevent rats and termites
from damaging the bottom of GS Bag-
1.0/GHF.
5.2. LOADING
5.2.1 Check the moisture content (MC) of the
commodity to ensure commodity will be
stored at safe MC.
5.2.2 Unfold the bag and lay it out on the
prepared site. Place the empty bag on the
prepared area with the bottom stretched.

8/19
GrainPro® GrainSafe™ Bag-1.0/G-HF Instruction Manual
MA4020JVD1025-3
5.2.3 Loading procedure (requires at least two
people):
a. One person fills the GS Bag-1.0/GHF.
b. The second person keeps the bag open
and maintain proper arrangement of
sacks.
c. Load the bagged commodities through
the open zipper while stretching the
bag to prevent crumpling.
5.2.4 Platform positioning (if necessary):
a. Wood, bamboo, bricks or concrete can
be used to construct the platform.
Ensure that the platform is sturdy and
stable enough to take the load of the GS
Bag-1.0/GHF with the commodity.
Added protection such as mat, old sacks
or cardboard is also recommended
5.2.5. Providing cavity for CO2flushing:
a. Aligned to the inlet port, create a
cavity/canal about along the second
layers of stack.
b. This will help facilitate CO2flushing and
avoid dry ice build-up.
5.2.6.Required capacity:
a. Keep the sacks stable by loading layers
in a crisscross manner.
b. Continue piling until the desired GS Bag-
1.0/G-HF height is reached.
5.3 ZIPPING
5.3.1 Preparing to zip:
a. After the GS Bag-1.0/GHF has been filled to its recommended capacity, position
the hermetic zipper flat on top of the stack.
b. Ensure that the zipper tracks are free from dirt so that the zipping can be done
properly.

9/19
GrainPro® GrainSafe™ Bag-1.0/G-HF Instruction Manual
MA4020JVD1025-3
5.3.2 Using the zipper pull:
a. Starting from the end of the zipper,
place the smaller black running wheel
inside the liner facing upward to lock
the bottom liner zipper track.
b. Place the larger wheel outside the liner
facing upward to lock the top liner
zipper track.
c. Rotate the zipper pull’s plastic handle
180° toward its pulling loop, forcing the
tongues and grooves of the two zipper
tracks together.
d. Slide the zipper pull to the other entire
length of the zipper track.
e. To make zipping easier, two persons
are required. One will do the zipping
and the other will hold the other end
steadily making both sections of the
zipper in a straight line to avoid
zagging.
5.3.3 Completing the zipper process:
a. Align the marks (“triangles”) printed on
both track located above and below
zipper.
b. If a pair does not match, slide back the
zipper by pulling the top and bottom
part in opposite directions until the
marks meet.
5.3.4 Removing the zipper pull:
a. When you have zipped the entire
length of the zipper track, take the
zipper pull off the track by rotating the
plastic handle 180° away from the
zipper pull loop.
b. Close the last few centimeters of the
zipper track by manual pressing to
latched the zipper’s tongue and
groove.
5.3.5 Ensuring a complete hermetic closure:
a. Make sure to close the zipper correctly
to maintain gas-tightness.

10/19
GrainPro® GrainSafe™ Bag-1.0/G-HF Instruction Manual
MA4020JVD1025-3
5.4. PRESSURE DECAY TEST (PDT)
5.4.1.After completely zipping and closing,
perform a Pressure {Vacuum} Decay Test
(PDT) to ensure gas-tightness:
a. Use digital manometer.
5.4.2.Either, a commercially available or
improvised U-tube manometer can be
used to monitor the pressure.
5.4.3.Connect the manometer hose into the
flexible inlet of the GS Bag 1.0/GHF.
5.4.4. Use a vacuum pump [at least 2.3 cubic
meters per minute with 600 Watts
(0.80horsepower) centrifugal pump]:
a. Connect the vacuum pump hose to the
inlet port of the GS Bag 1.0/GHF.
b. Create at least -250 Pascals (Pa) or -25
millimeters’ water (mm H2O) vacuum.
Doing this can also help engage the zipper
tracks properly as there may be
imperfections during zipping.
c. For it to be considered sufficiently airtight, the final pressure should not be greater
than one-half (½) of the initial pressure (created by the vacuum pump) within five (5)
minutes.
d. If the PDT test failed, check for holes/tears and poorly sealed zippers then repeat the
PDT procedures.
5.5. PLATFORM INSTALLATION OF RODENT GUARD (RG)
5.5.1.For protection against rodent attacks (one
set contains 4 pieces):
a. One set can be installed on any
platform legs with leg perimeter
(round or square) of 22 cm (9'') to 44
cm (17'').

11/19
GrainPro® GrainSafe™ Bag-1.0/G-HF Instruction Manual
MA4020JVD1025-3
b. If the leg area is smaller, can be
optionally cut in half to fit. Cut along the
lines at the back of the rodent guard.
5.5.2.Fold the rodent guard's teeth upwards
against the sides of the leg to keep it from
slipping.
5.5.3.Make sure to overlap the sides at least one
inch.
5.5.4.Lock the overlap using staple wire, cable
wire, or any fastener.
5.6. OUTDOOR INSTALLATION
5.6.1.The GS Bag-1.0/G-HF must be
protected from the direct heat of the
sun by installing shade/cover such as a
roof cone from any available
insulating material (straw, reflective
material, matting) that are commonly
used to protect traditional local
storage facilities.
5.7. PROCEDURE FOR PURGING CARBON DIOXIDE (CO2)
5.7.1.Calculation:
a. Total Volume – Volume Occupied by the Commodity.
b. For every 2.0kg CO2, 1 cubic meter of gas is being liberated.
c. Additional 15% will be added to the total capacity.
d. Formula: (1-Bulk Density) x Volume x 2 x 1.15.

12/19
GrainPro® GrainSafe™ Bag-1.0/G-HF Instruction Manual
MA4020JVD1025-3
COMMODITY
BULK
DENSITY
GS Bag-
1.0/G-HF
COMMODITY
BULK
DENSITY
GS Bag-
1.0/G-HF
MT/m3
2.2
MT/m3
2.2
Barley
0.62
2
Oats
0.43
3
Cashew nuts
0.50
3
Paddy
0.60
2
Chia seeds
0.68
2
Paddy, rice bran
0.55
2
Chickpeas
0.74
1
Peanuts, shelled
0.64
2
Cocoa beans
0.56
2
Rice, milled
0.80
1
Coffee beans
0.59
2
Rye
0.72
1
Cotton seed
0.40
3
Sesame
0.59
2
Cowpea
0.75
1
Sorghum
0.72
1
Maize
0.72
1
Soybean
0.75
1
Millet
0.63
2
Sunflower
0.41
3
Mung bean
0.75
1
Wheat
0.77
1
5.7.2. CO2application:
a. Make sure that enough CO2is available on site. The weight of the CO2in the cylinder is
supplied by the industrial companies (i.e. 22kg standard capacity) which may be used
to calculate the number of cylinders required. CO2cylinders are available with or
without siphon (dip tube).
b. For rapid flushing, the cylinder should
be inverted using mechanical inverter.
However, the cylinders with siphon
should be in upright position during
flushing.
c. Partially open the zipper of GS Bag
1.0/GHF to relieve excess pressure and
to release air from inside.
d. A Snap-on standard high-pressure hose
(not supplied/separate item) should be
connected between the cylinder and
the gas inlet valve. This hose should be
guaranteed to withstand a pressure of
88 atmospheres (1,300 psi, or 92
kg/cm2). Ensure that all connections are
made properly and gaskets are in place
where they are required. The high-
pressure hose should have a length of
about 2-meter to facilitate easy
connection to the inlet valve.

13/19
GrainPro® GrainSafe™ Bag-1.0/G-HF Instruction Manual
MA4020JVD1025-3
e. Open the gas inlet valve of the GS Bag-
1.0/G-HF and then open the cylinder
tap. The cylinder tap should only be
turned to a point where you can hear
the liquid passes through the hose into
the bag. The liquid CO2flushes into the
bag and evaporates inside through the
expansion pipe and will push the air
upward starting from the bottom core,
following the piston effect, until the air
is totally replaced.
5.7.3. Ice formation along the pressurized
hose and the pipe connector during CO2
flushing:
a. During this procedure, some ice may
form around the gas inlet and high-
pressure hose.
b. If this happens do not touch the PVC
liner because it becomes brittle, less
flexible and may crack!
c. Flushing (emptying of the cylinder) depends on the amount of CO2 to be applied.
Emptying one 22kg cylinder should only take about 20 to 30 minutes. If the pressure
hose or the inlet valve gets blocked with ice, this is an indication that the CO2is being
released too quickly. If this happens the cylinder should be closed until the ice melts,
and then the cylinder tap should be re-opened and adjusted to reduce the flow.
d. An additional indication that the gas is being released too quickly is when the bag
begins to balloon because pressure begins to build-up inside. If this happens, the gas
flow should be decreased at the cylinder tap until the rate of air being expelled through
the partly opened zipper is approximately equal to the rate of CO2entering the bag.
e. If necessary, for small scale applications or non-inverted cylinder, weighing scales may
be used to control the weight of the gas delivered. In this case the gas is released
slowly, through a pressure gauge adjusted to control the flow-rate.
5.7.4. Since CO2is heavier than air, the air in the GS Bag 1.0/G-HF will be displaced
upwards and will be lifted out of the container through the partly opened zipper.
Complete displacement is not possible as there is always some mixing of air and CO2.
However, if the final CO2concentration reaches 80% then the O2concentration in the
remaining air is at 4%. Mixing of CO2with the remaining air as well as absorption of
CO2by the commodity, will take 12-24 hours depending on temperature. The initial
concentration of O2 is taken after 24 hours.
5.7.5. After the required weight of CO2has
been applied,
a. Immediately close the CO2cylinder tap
and the inlet port of the bag.

14/19
GrainPro® GrainSafe™ Bag-1.0/G-HF Instruction Manual
MA4020JVD1025-3
b. Close the partly opened zipper (used as
exhaust of air) by reloading the zipper
pull or manually pressing (against the
bags) both zipper tracks.
5.7.6. For control insect infestation, a treatment with CO2above 50% (10.5% O2) for 10
days, or CO2above 35% (13.5% O2) for 15 days is sufficient to provide complete control,
after which the GS Bag 1.0/G-HF may be opened. In addition, temperature accelerates
treatment. Effective insect control may be achieved in as little as three days at 25°C
and less at higher temperatures. Although CO2is not toxic, it is an asphyxiant hence it
is advised to unzip the liner and wait until most of the CO2has been dispersed.
5.8. MONITORING THE OXYGEN LEVEL
5.8.1.Recommended pest reduction timeline:
a. Leave the GS Bag 1.0/G-HF closed for 10 days with at least 50% CO2(10.5% O2) or
14 days with at least 35% CO2(13.5% O2) to eliminate all stages of insects and
achieve best result.
b. When storing commodities, leave the GS Bag 1.0/G-HF sealed until it is unloaded
completely.
5.8.2.Use of an oxygen analyzer:
a. During the first 15 days of installation,
oxygen level should be checked daily
using the oxygen analyzer.
b. Succeeding monitoring should be done
twice a week. Measurements should be
recorded on a record sheet.
5.8.3.When carrying-out a CO2treatment, the approximate CO2concentrations can be
determined by measuring O2concentrations using below conversion table:
O2
CO2
O2
CO2
O2
CO2
O2
CO2
O2
CO2
O2
CO2
O2
CO2
0.0
100
3.0
85.7
6.0
71.3
9.0
56.9
12.0
42.6
15.0
28.3
18.0
13.9
0.2
99.0
3.2
84.7
6.2
70.3
9.2
56.0
12.2
41.6
15.2
27.3
18.2
12.9
0.4
98.1
3.4
83.7
6.4
69.4
9.4
55.0
12.4
40.7
15.4
26.3
18.4
12.0
0.6
97.1
3.6
82.8
6.6
68.4
9.6
54.1
12.6
39.7
15.6
25.4
18.6
11.0
0.8
96.2
3.8
81.8
6.8
67.5
9.8
53.1
12.8
38.8
15.8
24.4
18.8
10.1
1.0
95.2
4.0
80.9
7.0
66.5
10.0
52.2
13.0
37.8
16.0
23.4
19.0
9.1
1.2
94.3
4.2
79.9
7.2
65.6
10.2
51.2
13.2
36.8
16.2
22.5
19.2
8.1

15/19
GrainPro® GrainSafe™ Bag-1.0/G-HF Instruction Manual
MA4020JVD1025-3
1.4
93.3
4.4
79.0
7.4
64.6
10.4
50.2
13.4
35.9
16.4
21.5
19.4
7.2
1.6
92.3
4.6
78.0
7.6
63.6
10.6
49.3
13.6
34.9
16.6
20.6
19.6
6.2
1.8
91.4
4.8
77.0
7.8
62.7
10.8
48.3
13.8
34.0
16.8
19.6
19.8
5.3
2.0
90.4
5.0
76.1
8.0
61.7
11.0
47.4
14.0
33.0
17.0
18.7
20.0
4.3
2.2
89.5
5.2
75.1
8.2
60.8
11.2
46.4
14.2
32.1
17.2
17.7
20.2
3.4
2.4
88.5
5.4
74.2
8.4
59.8
11.4
45.5
14.4
31.1
17.4
16.8
20.4
2.4
2.6
87.6
5.6
73.2
8.6
58.9
11.6
44.5
14.6
30.1
17.6
15.8
20.6
1.4
2.8
86.6
5.8
72.3
8.8
57.9
11.8
43.5
14.8
29.2
17.8
14.8
20.8
0.5
5.8.4.Check for leakage, and do repairs. If the cause is not found, consult GrainPro’s
5.9. DISMANTLING
5.9.1.The commodity will only be unloaded
at the end of storage.
6. PREVENTING CONDENSATION
6.1. WHY DOES CONDENSATION OCCUR?
6.1.1.Condensation is caused by temperature changes i.e. hot weather by day and cool at
night or sudden rains in a hot sunny day. When air collides with a cool surface at dew
point temperature the vapor in the air condenses on the surface. Air movement
inside the GS Bag-1.0/GHF follow the natural forces i.e. in convection currents hot air
rise and cool air sinks (except for the phenomenon called inversion). Hence, when
warm air inside the GS Bag-1.0/GHF rises and hits the cool GS Bag-1.0/GHF top cover
at dew point temperature, condensation occurs.
6.1.2.Therefore, avoiding trapped warm air inside the GS Bag-1.0/GHF can prevent
condensation at the top layer. This is the role of the roof cone (shade/cover). It
prevents heating of air inside the GS Bag-1.0/GHF by repelling solar radiation.
6.2. MOISTURE CONTENT (MC) REQUIREMENT FOR SAFE STORAGE
6.2.1.Commodities should be dried before storage to at least 12% MC for sorghum, 9-10%
millet, 12-14% for paddy and maize, and 13% for wheat.
6.2.2.When the commodity is properly dried, there is virtually no “available water” that the
microorganisms can use for growth and development.
6.2.3.This condition can be maintained by avoiding ambient air (with variable moisture
content) to be in contact with the dried product using the hermetic storage
technology.

16/19
GrainPro® GrainSafe™ Bag-1.0/G-HF Instruction Manual
MA4020JVD1025-3
7. MAINTENANCE AND CARE
7.1. REGULAR EXAMINATION
7.1.1.Check the zipper track for any small opening/s and push the opened track section by
hand.
7.1.2.Check GS Bag-1.0/GHF for punctures or cuts (do not forget to check near the bottom,
particularly for rodent damage). If there are any, repair them with the patch kit as
described below.
7.1.3.Avoid low overhanging structure or tree branch that would allow rodents to jump on
the less-protected top of the GS BAG-1.0/GHF.
7.1.4.During rainy season, the upper surface of the GS BAG-1.0/GHF. should be regularly
inspected for water accumulation and damages that would permit water to sip into
the GS BAG-1.0/GHF. The content is not adequately protected if the GS BAG-1.0/GHF
is not completely sealed.
7.1.5.Carbon dioxide level does not increase:
a. Check for possible opening of zippers, and holes/punctures/cuts.
b. Seal/repair it immediately.
c. Monitor the carbon dioxide level with the use of analyzer through the gas sampling
port.
7.2. REPAIRING PUNCTURES AND OTHER DAMAGES
7.2.1.Use the patching material and
adhesive found in the repair kit:
a. Clean the area to be patched with a
damp cloth or organic solvent.
b. Apply glue (150-200g) on both
surface with a brush or equivalent.
c. Let it dry for 5-10 minutes and
stick and apply sufficient pressure.
7.2.2.Protective maintenance:
a. Check the patched PVC
occasionally and replace or re-
patch if necessary.
7.4. RECOMMENDED WEEKLY MONITORING
7.4.1.Check whether hermetic zipper has not opened anywhere along the length. If it has,
press the tracks together by hand.
7.4.2.Inspect liner and make sure there are no punctures or tears (or rodent damages). If
there are any, repair them immediately.
7.4.3.Check top of GS BAG-1.0/GHF to ensure that there is no standing water (especially
during the rainy season). Water if present should be removed by hand or tools that
do not risk puncturing the liner.
7.4.4.Ensure that there is no low overhanging structure or tree branch, which would allow
rodents to jump on top of the GS BAG-1.0/GHF.

17/19
GrainPro® GrainSafe™ Bag-1.0/G-HF Instruction Manual
MA4020JVD1025-3
7.5. CLEANING
7.5.1.If necessary, use soap and water.
7.5.2.Dry under the sun.
7.7. SAFEKEEPING
7.7.1.The empty GS Bag-1.0/GHF should be stored away from heat or direct sunlight and
away from rodent.
7.7.2.Do not place heavy object on top of the stored GS Bag-1.0/GHF to prevent damage
or deformity.
7.3. PROHIBITED ITEM NOT ALLOWED TO SHIP
7.3.1.Glue (for patching PVC materials) is not allowed to be shipped in air cargo. This item
is removed from the package.
7.3.2.The client is advised to purchase local equivalent.
7.7. RECYCLING
GrainPro GS Bag 1.0/GHF is made of PVC.
7.7.1. The products can be delivered to the nearest recycling facilities in the area.
7.7.2. Plastic #3 –PVC (Vinyl) can be recycled into paneling, flooring, speed bumps, decks
or roadway gutters.
8. FREQUENTLY ASKED QUESTIONS AND ANSWERS
8.5. DO I NEED TO PUMP THE AIR OUT OF THE GS BAG-1.0/G-HF OR MODIFY THE AIR INSIDE
THE GS BAG-1.0/G-HF, FOR EXAMPLE WITH CARBON DIOXIDE?
▪No, you do not need to pump out or change the atmosphere in any way. The insects
own natural metabolic functions use up all the available oxygen and replace it with
carbon dioxide. Atmospheres modified with carbon dioxide or vacuum can enhance
the quality of stored product, and reduce the insect kill time, but are not required to
eliminate insect infestations.
8.6. IF THE STORED COMMODITY IS ALREADY INSECT INFESTED, DO I NEED TO FUMIGATE IT
OR OTHERWISE KILL THE INFESTATION BEFORE STORING IT?
▪No, you do not need to fumigate or kill the infesting pests before storing the food.
The insects will die naturally in a matter of days. The greater the infestation the faster
the kill.

18/19
GrainPro® GrainSafe™ Bag-1.0/G-HF Instruction Manual
MA4020JVD1025-3
8.7. IS THERE ANYTHING YOU DO NOT RECOMMEND THE GS BAG-1.0/G-HF FOR?
▪Yes, the GS Bag-1.0/G-HF is not recommended for storing fresh fruits, vegetables, or
medicines.
8.8. CAN YOU ADD OR TAKE OUT ITEMS ONCE THE GS BAG-1.0/G-HF IS FILLED AND CLOSED?
▪Yes, you may add and subtract items. If the added items are infested, the insects will
naturally modify the internal atmosphere again and die off.
8.9. DO I NEED TO FILL THE GS BAG-1.0/G-HF ENTIRELY FOR IT TO WORK?
▪GS Bag-1.0 is designed to work effectively at any given load. Load your GS Bag-
1.0/GHF to its optimum dimensions to ensure full protection from insect
infestations.
8.10. SHOULD THE GS BAG-1.0/G-HF BE ONLY ERECTED INDOORS?
▪No. GS Bag-1.0/G-HF is designed for outdoor use also under all types of climatic
conditions
8.11. WILL A PUNCTURE NEGATE THE BENEFITS OF HERMETICITY OF THE GRAINPRO GS BAG-
1.0/G-HF?
▪No. Although a hole/tear will allow oxygen to sip into the GS Bag-1.0/G-HF and will
cultivate live insects around the puncture/hole. Tight stacking of the stored
commodity tends to prevent spreading of infestation inside the GS Bag-1.0/G-HF. We
recommend immediate repair of all punctures or tears.
8.12. HOW DRY MUST GRAIN BE TO STORE IT SAFELY IN THE GS BAG-1.0/G-HF?
▪The GS Bag-1.0/G-HF works best with grains at or below critical moisture content.
8.13. CAN RODENTS CHEW RIGHT THROUGH THE PVC MATERIAL WHEN THE GS BAG-1.0/G-
HF IS ERECT?
▪Yes, but only if the sides are not taut enough. Rodents can only gnaw on the smooth,
slippery surface of a GS Bag-1.0/G-HF if the sides are not properly stretched or
rodents drops down from any object hanged over the GS Bag-1.0/G-HF such as low–
hanging branch of a tree. In areas with high rodent activity, we recommend that a
GS Bag-1.0/G-HF be protected using anti-rodent barriers.
8.14. CAN AGRICULTURAL COMMODITIES OTHER THAN GRAIN BE STORED IN A GS BAG-
1.0/G-HF?
▪Yes, most dry agricultural commodities such as seeds, pulses, beans, coffee, cocoa,
some dried fruits, and even dried chilies can be safely stored. When in doubt, ask
GrainPro.

19/19
GrainPro® GrainSafe™ Bag-1.0/G-HF Instruction Manual
MA4020JVD1025-3
9. WARRANTY CLAUSE
GrainPro® hereby warrants that products sold by it to Buyer shall be free of defects in
workmanship and materials, for a period as follows, starting from the date of shipment (B/L):
Five years for the GrainSafe™Bag-1.0/Gas-Hermetic Fumigation (GS Bag-1.0/G-HF) liner and
zipper. One year for all other parts.
The warranty liability is limited to replacement of defective products during the warranty
period at GrainPro’s plant in accordance with the provisions specifically and expressly set
forth herein.
The Buyer will pay for Products which need to be replaced under warranty, a percentage of
the full list price according to the ratio between the period, which has passed until
replacement, and the full warranty period.
The Buyer shall bear shipping costs for shipment of defective Products to GrainPro, and
GrainPro shall bear shipping costs of returning good Products to Buyer.
The Warranty does not cover the cost of any services, work, or materials required for the
replacement of defective Products with good Products at the site of installation.
GrainPro shall have no obligation under the warranty to replace defective Products or parts
thereof if the defect is a result of any of the following: normal wear and tear; damages
occurring after delivery, accidents, acts of God, or catastrophes, fault or negligence, or
improper storage installation, maintenance of the Products.
Replacement costs and shipping charges for Products found not to be under warranty as
specified above would be paid in full by the Buyer before new/refurbished Products are
shipped to.
Notwithstanding the above, if the Products include main parts or sub-assemblies purchased
by GrainPro from other vendors ("Additional Equipment"), then the period and terms of
warranty for Additional Equipment are limited to the period and terms offered by the vendors
of such equipment.
The Buyer agrees that the warranty liabilities of GrainPro shall be and are limited to the
express foregoing terms: THE EXPRESS WARRANTIES AND OBLIGATIONS SET FORTH ABOVE,
ARE AND SHALL BE IN LIEU OF ALL OTHER WARRANTIES AND OBLIGATIONS OF GRAINPRO,
EXPRESSED OR IMPLIED. EXCEPT TO THE EXTENT HEREIN PROVIDED, GRAINPRO DOES NOT
MAKE AND SHALL NOT BE DEEMED TO MAKE ANY WARRANTY WHATSOEVER TO THE, TO ANY
END USER OR TO ANY OTHER PERSON OR PARTY, INCLUDING, WITHOUT LIMITATION, ANY
WARRANTY OF MERCHANTABILITY OR OF FITNESS FOR ANY PARTICULAR USE OR PURPOSE.
GRAINPRO SHALL NOT BE LIABLE FOR ANY LOSS OF USE, SALES OR PROFIT OR FOR ANY
INDIRECT, CONSEQUENTIAL OR INCIDENTAL DAMAGES CAUSED BY OR SUFFERED AS A RESULT
OF THE SALE OR USE OF THE PRODUCTS.
For further information and clarifications, visit our website at www.grainpro.com; email our
Table of contents
Other GrainPro Farm Equipment manuals

GrainPro
GrainPro TRANSAFELINER User manual

GrainPro
GrainPro TRANSAFELINER MA4081RAD1219-01 User manual

GrainPro
GrainPro GRAINSAFE BAG-1.0 User manual

GrainPro
GrainPro TRANSAFELINER BULK User manual

GrainPro
GrainPro COLLAPSIBLE DRYER CASE II User manual

GrainPro
GrainPro TRANSAFELINER MA3001RR0208-21 User manual

GrainPro
GrainPro TRANSAFELINER User manual
Popular Farm Equipment manuals by other brands

QUIEDAN COMPANY
QUIEDAN COMPANY 2000 Series installation manual

Kellfri
Kellfri 35-HKKFE Original operating instructions

Chore-Time
Chore-Time Control Installation and user manual

Kuhns mfg
Kuhns mfg Tie Grabber Series owner's manual

Titan Attachments
Titan Attachments 177CBUCKET owner's manual

Rabe
Rabe Digger HA operating instructions