Inaca FJORD 300 User manual

FJORD 300
www.inaca.com
Prenox 25/22
Europa 300
Talla ZZTalla Y-Z
Talla W-X
Talla V
Talla R-S-T-U
FJORD 300
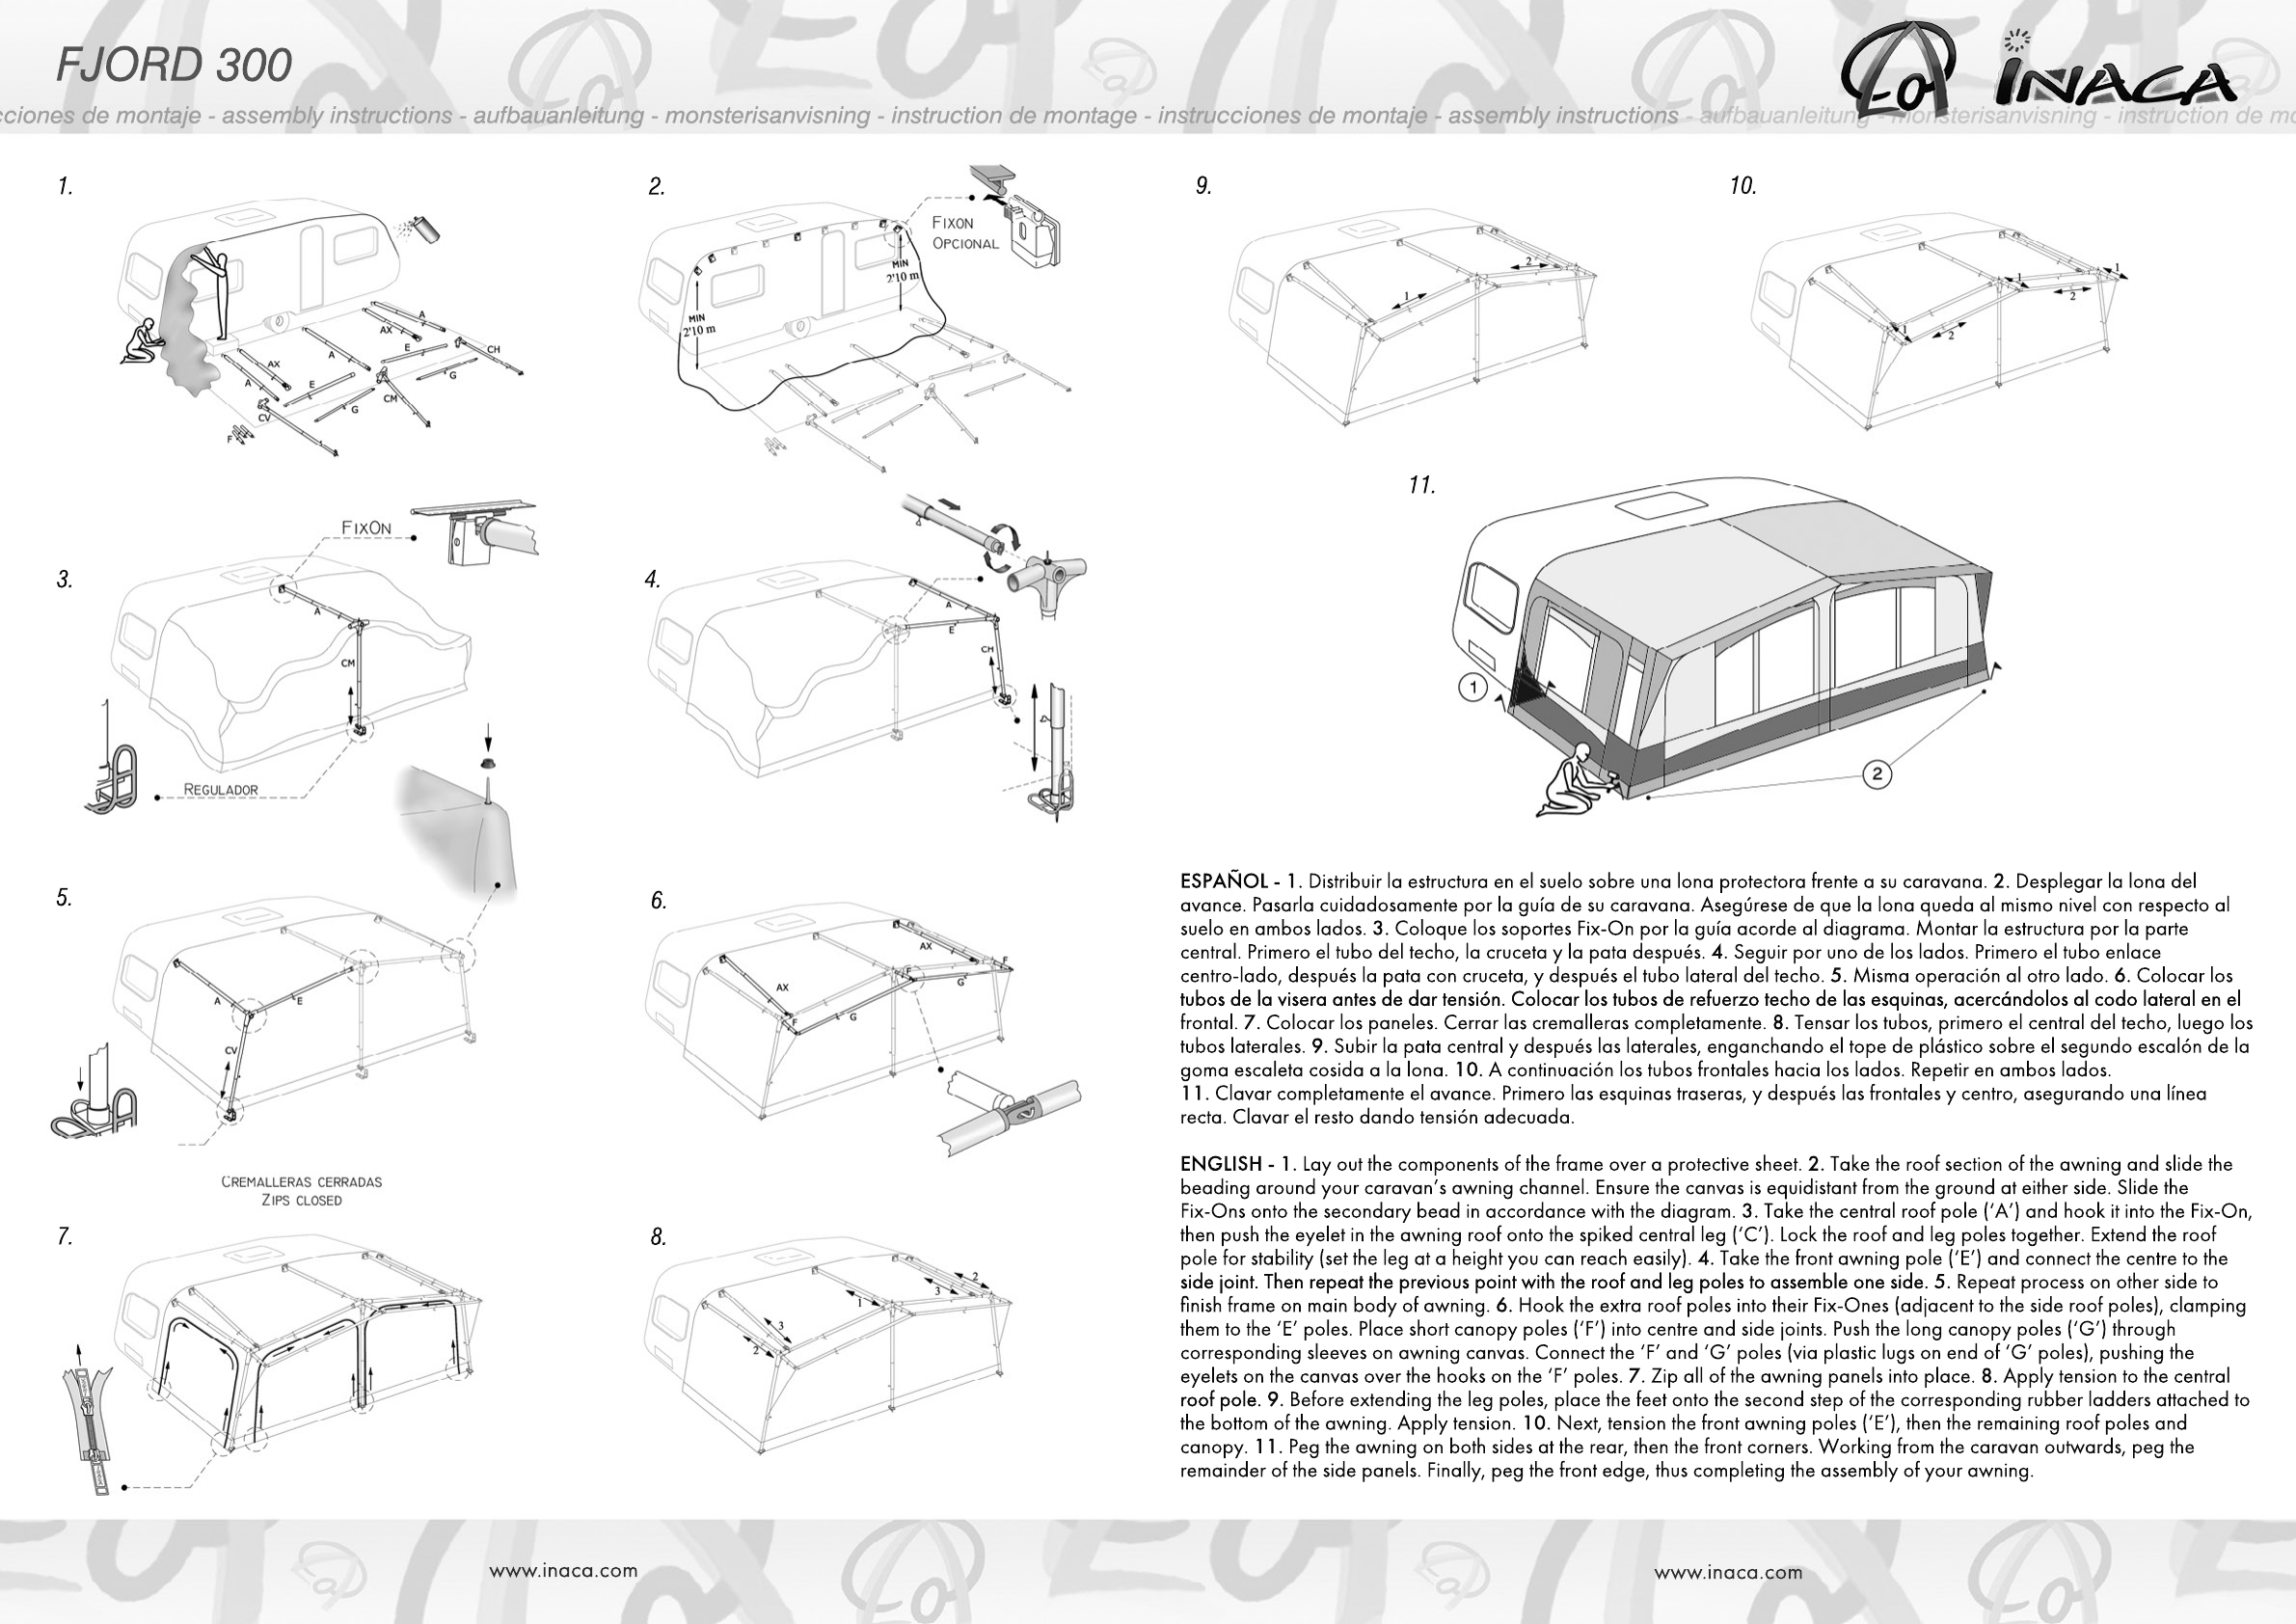
11.
10.9.
8.
7.
6.
5.
4.
3.
2.
1.
ESPAÑOL - 1. Distribuir la estructura en el suelo sobre una lona protectora frente a su caravana. 2. Desplegar la lona del
avance. Pasarla cuidadosamente por la guía de su caravana. Asegúrese de que la lona queda al mismo nivel con respecto al
suelo en ambos lados. 3. Coloque los soportes Fix-On por la guía acorde al diagrama. Montar la estructura por la parte
central. Primero el tubo del techo, la cruceta y la pata después. 4. Seguir por uno de los lados. Primero el tubo enlace
centro-lado, después la pata con cruceta, y después el tubo lateral del techo. 5. Misma operación al otro lado. 6. Colocar los
tubos de la visera antes de dar tensión. Colocar los tubos de refuerzo techo de las esquinas, acercándolos al codo lateral en el
tubos de la visera antes de dar tensión. Colocar los tubos de refuerzo techo de las esquinas, acercándolos al codo lateral en el
frontal. 7. Colocar los paneles. Cerrar las cremalleras completamente. 8. Tensar los tubos, primero el central del techo, luego los
tubos laterales. 9. Subir la pata central y después las laterales, enganchando el tope de plástico sobre el segundo escalón de la
goma escaleta cosida a la lona. 10. A continuación los tubos frontales hacia los lados. Repetir en ambos lados.
11. Clavar completamente el avance. Primero las esquinas traseras, y después las frontales y centro, asegurando una línea
recta. Clavar el resto dando tensión adecuada.
ENGLISH - 1. Lay out the components of the frame over a protective sheet. 2. Take the roof section of the awning and slide the
beading around your caravan’s awning channel. Ensure the canvas is equidistant from the ground at either side. Slide the
Fix-Ons onto the secondary bead in accordance with the diagram. 3. Take the central roof pole (‘A’) and hook it into the Fix-On,
then push the eyelet in the awning roof onto the spiked central leg (‘C’). Lock the roof and leg poles together. Extend the roof
pole for stability (set the leg at a height you can reach easily). 4. Take the front awning pole (‘E’) and connect the centre to the
side joint. Then repeat the previous point with the roof and leg poles to assemble one side.
side joint. Then repeat the previous point with the roof and leg poles to assemble one side. 5. Repeat process on other side to
finish frame on main body of awning. 6. Hook the extra roof poles into their Fix-Ones (adjacent to the side roof poles), clamping
them to the ‘E’ poles. Place short canopy poles (‘F’) into centre and side joints. Push the long canopy poles (‘G’) through
corresponding sleeves on awning canvas. Connect the ‘F’ and ‘G’ poles (via plastic lugs on end of ‘G’ poles), pushing the
eyelets on the canvas over the hooks on the ‘F’ poles. 7. Zip all of the awning panels into place. 8. Apply tension to the central
roof pole.
roof pole. 9. Before extending the leg poles, place the feet onto the second step of the corresponding rubber ladders attached to
the bottom of the awning. Apply tension. 10. Next, tension the front awning poles (‘E’), then the remaining roof poles and
canopy. 11. Peg the awning on both sides at the rear, then the front corners. Working from the caravan outwards, peg the
remainder of the side panels. Finally, peg the front edge, thus completing the assembly of your awning.
www.inaca.com www.inaca.com

www.inaca.com
Anexo Luxe
Luxe Annexe
Anexo Storage
Storage Annexe
Patas de Refuerzo
Reinforcement leg poles
Tubos de Refuerzo Techo
Reinforcement roof poles
Set Cinchas UNI
UNI Storm straps
Tubos Balconera
Verandah bars
FixOn
Lateral Mosquitera
Mosquito net Side
Accesorios
NEDERLANDS - 1. Verwijder bramen of ongerechtigheden in de caravan rail. Zet de caravan waterpas. Een grondzeil voor uw caravan voorkomt het
vuil worden van uw nieuwe voortent. De frame delen op de juiste plaats voor de caravan leggen. 2. Schuif de voortent door de caravan rail. Zorg dat er
aan beide zijkanten even veel slikrand op de grond ligt. 3. Plaats de Fix-On blokjes op de aangegeven plaatsen. Begin met de opbouw van het frame in
het midden. Monteer de nokstang aan het middenhoekstuk en zet de staander rechtop (op werk hoogte). 4. Ga verder aan de zijkant. Eerst de
verbin
verbinding maken in de breedte (voorwand), daarna de staander rechtop zetten en de nokstang monteren. 5. Zelfde volgorde aan de andere kant.
6. Voor het uitspannen van het frame, monteer eerst de petluifelstokjes en de nokstangen in de breedte van de petluifel. 7. Monteer de panelen in de
voorwand en zijwanden. Sluit alle ritssluitingen. 8. Span de nokstang in in het midden uit, daarna het frame in de voorwand op de juiste spanning
zetten. Indien nodig de nokstangen in de zijwand uitspannen. 9. Plaats nu de staanders (begin in het midden) in de tweede opening van de ladder
spanner. Zet nu de staanders op de juiste hoogte. 10. Span de nokstangen in de petluifel. 11. Plaats de haringen. Begin op de hoeken bij de caravan,
daarna bij de buitenste nokstangen, nu in het midden. Daarna de rest van de haringen plaatsen.
FRAN
FRANÇAIS - 1. Etaler l’armature au sol sur un tapis de sol face à la caravane. 2. Déplier la toile de l’auvent. La passer avec précaution dans le rail de sa
caravane. S’assurer que la toile de l’auvent soit au même niveau par rapport au sol de chaque côté de la caravane. 3. Accrocher les supports Fix-On sur
le rail en accord avec le schéma. Monter l’armature par la partie centrale. D’abord la faîtière de toit, la croix ensuite le mât. 4. Continuer par un des
côtés. D’abord le tube reliant le côté au centre, ensuite le mât avec la croix, puis le tube de toit latéral. 5. Même opération pour l’autre côté. 6. Placer les
tubes de la visiè
tubes de la visière sans les mettre en tention. 7. Accrocher les panneaux. Fermer les fermetures à glissières complétement. 8. Tendre les tubes, d’abord le
tube de toit central, ensuite les côtés. 9. Monter le mât central et ensuite les mats latéraux, accrocher le crochet de plastique au deuxième échelon du
caoutchouc à échelle cousu à la toile. 10. Tendre les tubes de la visière de chaque côté. 11. Piqueter entièrement l’auvent, commencer par les angles de
l’arrière, les angles devant puis le centre en gardant des liges droites et une tension correcte.
DEUTSCH - 1. Packen Sie das Gestänge aus und legen Sie es auf eine Unterlage. 2. Nehmen Sie das Dach des Vorzeltes (ohne Seitenteile) und ziehen
Sie es vorsichtig in die Kederleiste ein. Achten Sie auf eine gleichmäßige Höhe der beiden Enden vom Boden. 3. Ziehen Sie die FIX-ON Gestängehalter
in die entsprechnde Leisten und fixieren sie an den im Diagramm angegebenen Stellen. Beginnen Sie den Gestängeaufbau immer in der Mitte des
Vorzeltes mit der mittleren Dachstange und dann mit dem dazugehörigen Bein. 4. Nehmen Sie nun die Verbindungsstange vom First zu einer Seite, dann
das Bein und dann
das Bein und dann die Dachstange um die erste Seite aufzustellen. 5. Verfahren Sie entsprechend mit der anderen Seite. 6. Bevor sie die Stangen
spannen stecken Sie die Dorne durch die dafür vorgesehenen Löcher. 7. Ziehen Sie die Front und Seitenwände mit den Reißverschlüssen ein. 8. Spannen
Sie die Stangen in der Reihenfolge mittlere Dachstange, linke und rechte Verbindungsstange zu den Beinen, dann die Dachstangen links und rechts.
9. Montieren Sie die Stangen für das Vordach, und spannen Sie diese. 10. Stellen Sie das Gestänge auf Höhe, beginnend mit der mittleren Stange.
11. Spannen Sie nun das gesamte Gestänge nach, beginnend mit den Stangen am Wohnwagen und danach an den vorderen Ecken.
Table of contents
Other Inaca Tent manuals


Popular Tent manuals by other brands

Shelldome
Shelldome SH-RO46 Building instructions

Vango
Vango BRECON Pitching instructions

COVERPRO
COVERPRO 56410 Owner's manual & safety instructions

LEINER
LEINER WPS A3 Assembly and operating instruction

Nemo
Nemo HORNET 1P FOOTPRINT Connection instructions

Pragma
Pragma Sunny C052.105.00 instruction manual


Kiwi Camping
Kiwi Camping Harrier 4 Tourer Tent Pitching instructions

Tentipi
Tentipi Comfort 9 11999 Assembling & installation instructions

Polymer
Polymer EASY-TOP 1400 quick start guide

Fox
Fox Evo Bivvy XS manual

Garden Treasures
Garden Treasures GSS00132AE manual

Snow Peak
Snow Peak Amenity Dome Small in Ivory instruction manual