Inca 8712F Manual

For your safety, always switch off the supply before changing lightbulbs, or cleaning.
This system contains non-replaceable parts and cannot be serviced. If damage occurs the part should be scrapped.
Waste electrical products should not be disposed of with household waste. Please recycle where facilities
exist. Check with your Local Authority or retailer for recycling advice.
Recycling advice
Safety information
Care and Cleaning
Do not use solvents or abrasive cleaners as these could damage the finish.
In normal circumstances, stainless steel is very resistant to corrosion. It does however require maintenance to
preserve the high quality appearance. Wash the product with warm soapy water, removing all surface deposits. Rinse
with clear water and with a soft cloth, wipe dry.
In some cases, surface corrosion may arise after installation. This is normally caused by tiny iron particles left behind
after the brushing process when finishing.
Wash and dry as detailed above. Then with a soft cloth soaked with a protective oil, wipe all over.
However if the product is subject to extreme environmental conditions such as marine locations, industrial pollution
and acid rain these maintenance procedures should be carried out around four times a year. For severe corrosion,
non-abrasive cream cleaners or proprietary stainless steel cleaners should be used to remove the corrosion. Wash
and dry as detailed above. Then with a soft cloth soaked with a protective oil, wipe all over.
Do not clean the units with a pressure washer.
• Push the terminal block up into the tube.
• Locate the product in position and fit the screws to secure in place.
• Replace fuse or circuit breaker and switch on. Your light is now ready for use.
Commissioning
This system contains non-replaceable parts and cannot be serviced.
Fitting/Replacing Bulbs
Instruction leaflet
Inca LED Outdoor Light Post
8712F
The LEDs are protected by a glass shade. The shade cannot be replaced, if the shade becomes cracked or damaged,
this fitting must be discarded.
20/09/2021
UK Manufacturer:
BH17 7BY
EU Manufacturer:
1 Gnarrenburg, 27442
This product contains a light source of energy efficiency class F.
Thank you for purchasing this light fitting. Please read the instructions carefully before use to ensure safe and
satisfactory operation of this product. Please retain these instructions for future reference.
Warning
Specification
Voltage: 240V 50Hz a.c.
Lamp: 3W LED Module
IP rating: 44
Installation
Existing fittings must be completely removed before
installation of a new product. Before removing the
existing fitting, carefully note the position of each set
of wires.
• Using base plate as a template, mark the fixing
holes onto the mounting surface.
• Drill holes to the necessary size and depth - taking
care not to damage any concealed pipes or wiring
below the mounting surface.
• We recommend fitting this product with screws
(A) which are suitable for use on most surfaces,
however alternative fixings may be required.
• Push the plastic plugs (B) into the mounting holes
as shown.
• You have correctly identified the wires.
• The connections are tight.
• No loose strands have been left out of the connection block.
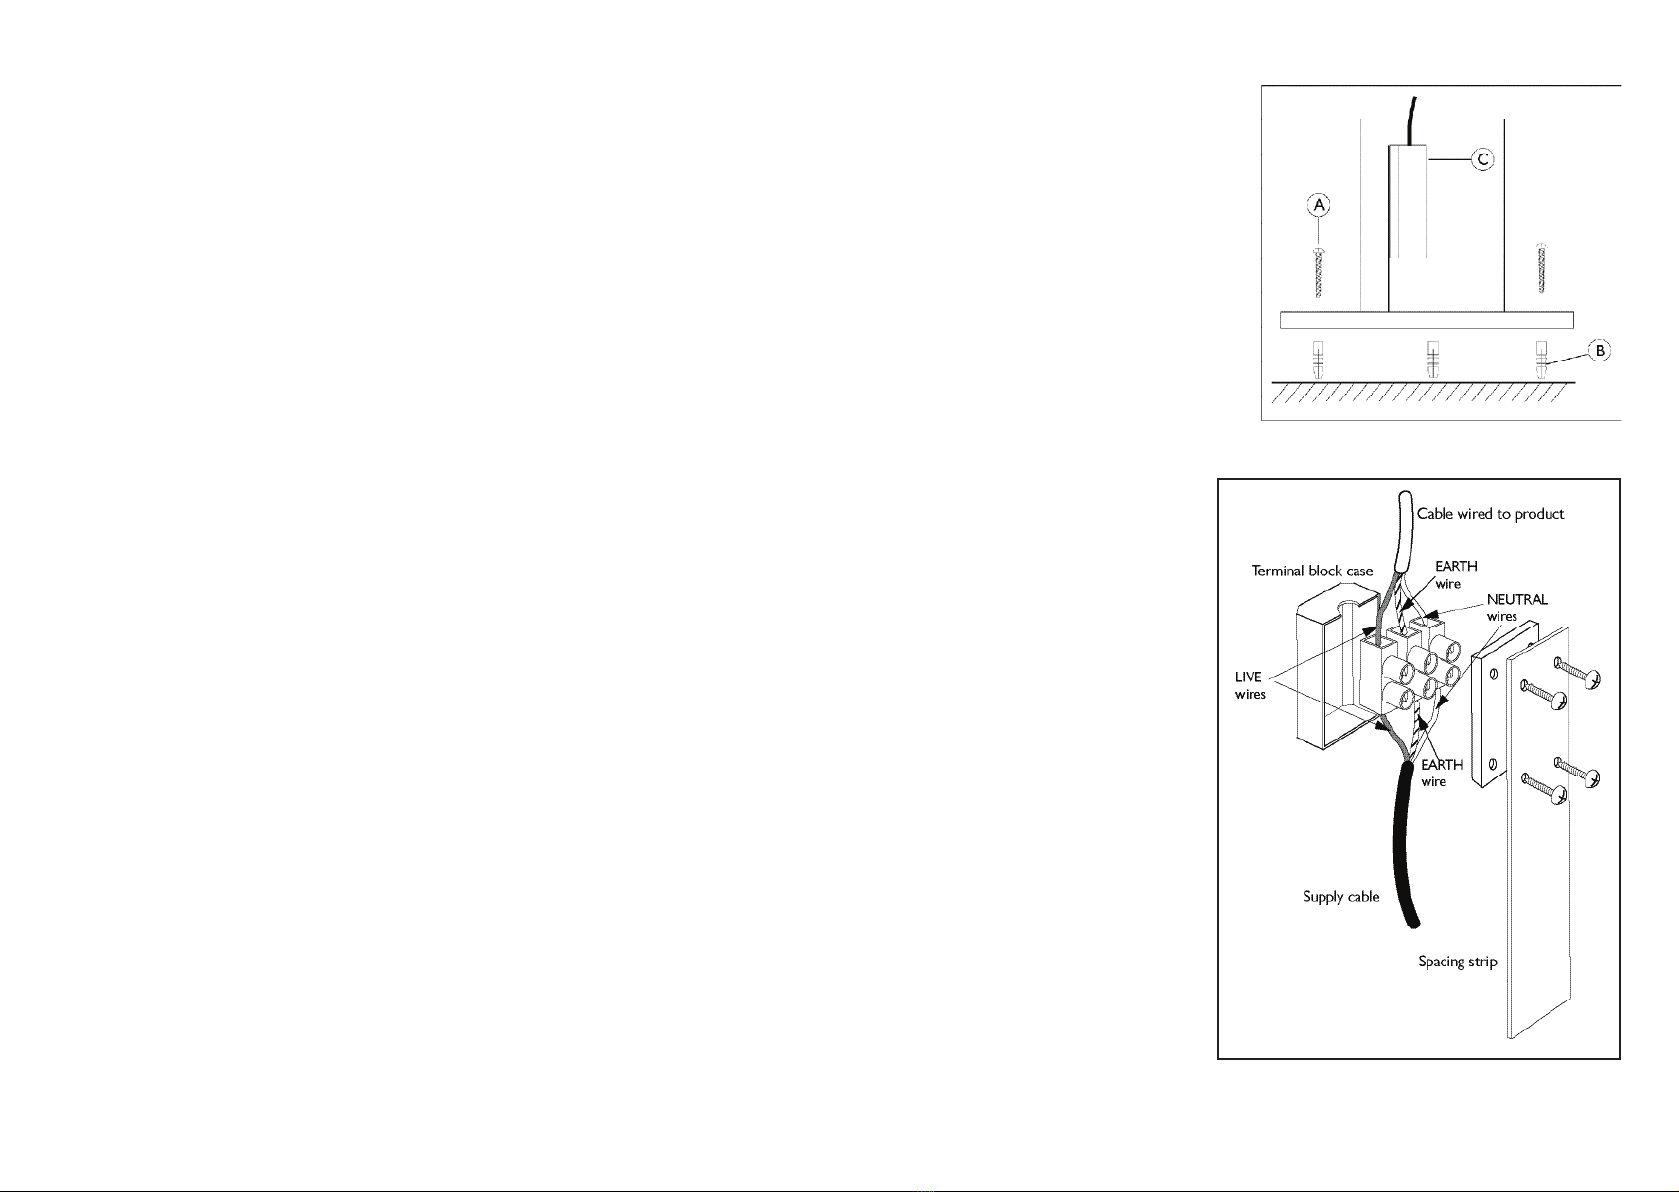
Having correctly identified the wiring from your
existing light fitting, pull the wire through the hole
and connect to the connection block inside the
product in the following way:
• Pull terminal block (D) from inside of tube.
• Unscrew the 4 screws which attach the
black box to the spacing strip. Open the
black box and pull out the terminal block.
• Connect Live input wire to brown wire
on product (or terminal on terminal block
marked ‘L’).
• Connect Neutral input wire to blue wire
on product (or terminal on terminal block
marked ‘N’).
• Connect Input Earth wire (Green/yellow) to
Earth wire on fitting,
• Check that you have correctly identified the
supply wires, the connections are tight and
that no loose strands have been left out of
the connection block.
• Push terminal block back into the black box
and refit the terminal block cover.
Wiring
Check that...
This is a Class 1 product and must be earthed.
Please read these instructions carefully before commencing any work.
This unit must be fitted by a competent and qualified electrician.
Install in accordance with IEE Wiring regulations and current Building Regulations.
To prevent electrocution switch off at mains supply before installing or maintaining this fitting. Ensure other persons
cannot restore the electrical supply without your knowledge. If you are in any doubt, please consult a qualified
electrician.
This light fitting should be connected to a circuit with a 30mA RCD fitted.
If replacing an existing fitting, make a careful note of the connections.
This system contains non-replaceable parts and cannot be serviced. If damage occurs the part should be scrapped.
Waste electrical products should not be disposed of with household waste. Please recycle where facilities exist.
Check with your local authority or retailer for recycling advice.
This product is not suitable for dimming.
This product is rated at IP44.
This product is not suitable for location in or near a marine or sea environment.


