inCourage RespirTech User manual


This manual contains words and symbols that bring attention to specific statements.
WARNING Indicates a potentially hazardous situation which, if not
avoided, could result in death or serious injury.
CAUTION Indicates a potentially hazardous situation which, if not
avoided, may result in minor or moderate injury.
The following symbols are used in this manual and on the inCourage®Airway
Clearance Therapy. Their meanings are as follows:
2
inCourage®Airway Clearance Therapy | INSTRUCTION MANUAL
RespirTech Business Hours: Monday – Friday 8 am – 5 pm CT
Toll Free: 800–793–1261
www.respirtech.com
2896 Centre Pointe Drive, St. Paul, MN 55113
TF 800.793.1261 | Fax 800.962.1611
© 2016 Respiratory Technologies Inc. 900141-000 Rev B
Attention: Consult
Accompanying
Documents
Warning: Risk of
Electric Shock
Upper and Lower
Temperature Limits
Typ e BF
Applied Part
Manufacturer
Lot Number Reference
Number
Date of
Manufacture
Federal law
restricts this
device to sale by
or on the order
of a physician
Serial
Number
Protective
Earth
Terminal
TUV Mark
SN
RX Only

TABLE of CONTENTS
Introduction ..................................................................................................... 4
Components and Controls ................................................................................ 5
Safety Instructions............................................................................................. 7
System Setup.................................................................................................... 8
Fitting the inCourage Comfort Vest ............................................................. 8
Treatment Definitions ...................................................................................... 12
Starting a Treatment Session ............................................................................ 13
Turn On the inCourage System ................................................................. 14
Quick Start Mode.................................................................................... 14
Auto Pause Mode .................................................................................... 15
Multi Step Mode...................................................................................... 16
Modify a Multi Step Session............................................................................. 17
Fast Set Programming (FS)........................................................................ 17
Review and Adjust Multi Step Session Settings ............................................ 18
Set Session to Factory Default ................................................................... 19
System Utilities ............................................................................................... 20
Information Menu (i) ................................................................................ 20
Retrieve Hour Meter Reading (HMR) .......................................................... 20
Retrieve Software Version.......................................................................... 20
Retrieve Device Average Use Information................................................... 21
Setup Menu ............................................................................................ 21
Beep Control ................................................................................... 22
Quick Start/Auto Pause Session Time ................................................. 22
Pause Time ...................................................................................... 22
Pressure Limit ................................................................................... 23
Pressure Increment............................................................................ 23
Reset Defaults................................................................................... 23
Clear Average Use ........................................................................... 23
Using the Button Lock ..................................................................................... 24
Cleaning the System ....................................................................................... 25
Filter and Fuse Replacement ............................................................................ 26
Troubleshooting Guide ................................................................................... 27
Specifications................................................................................................. 28
Contraindications ........................................................................................... 29
Electromagnetic Emissions............................................................................... 30
Electromagnetic Immunity ............................................................................... 31
Patient Bill of Rights and Responsibilities ........................................................... 32
Notice of Privacy Practices............................................................................... 36
Medicare DMEPOS Supplier Standards ............................................................ 42
3
inCourage®Airway Clearance Therapy | INSTRUCTION MANUAL

INTRODUCTION
Thank you for selecting the inCourage®Airway Clearance Therapy from RespirTech.
RespirTech’s vision is to improve lives by helping people breathe better.
How does the inCourage Airway Clearance Therapy work?
The inCourage System consists of an inflatable vest, interconnecting hoses, and a
Pulsating Therapy Unit (PTU) that creates compressions to the chest to help loosen,
thin, and move mucus throughout the lungs.
Indications for Use
The inCourage Airway Clearance Therapy is indicated when external manipulation
of the chest is the physician’s treatment of choice for increasing the clearance of
mucus in patients with pulmonary disorders. The system promotes airway clearance
and improves bronchial drainage utilizing High Frequency Chest Compression (HFCC).
This manual includes instructions for setup, use, and maintenance of the
inCourage System. It is to be used as a reference guide. Please review all sections
carefully prior to using the inCourage System.
The device operating instructions contained herein apply to devices with
V4.0 software.
Warranty provided separately with shipment of device.
CAUTION: Federal law restricts this device to sale by or on
the order of a physician!
4
inCourage®Airway Clearance Therapy | INSTRUCTION MANUAL

COMPONENTS and CONTROLS
Pulsating Therapy Unit (PTU)
The PTU is the main control unit, which creates
the pulsating air compressions that are transferred
to the vest. It is the source of control for the system.
PTU Model number: ICS-1M-US-A
inCourage Comfort Vest
The vest is made of multi-layered nylon. It is
secured utilizing QuickFit straps that allow you to
quickly set the vest to the recommended size to
optimize the benefits of the pulsating air.
Interconnecting Hoses
The two hoses are made of high-strength, PVC.
The hoses deliver the pulses of air from the PTU
to the vest.
Locking Hose Connectors
The connectors are made of high strength
plastic with locking levers.
Power Cord
The power cord plugs into the PTU and to a
grounded, three-pronged outlet. Grounding
reliability can only be achieved when the
equipment is connected to a properly grounded,
three-pronged outlet.
On/Off Switch
The power to the unit is controlled by the On/Off
switch located on the back of the unit.
On = I Off = 0
5
inCourage®Airway Clearance Therapy | INSTRUCTION MANUAL

Control Panel
The control panel is located on
the top/front of the PTU and
provides all interactive menus
and performance readouts.
Control Buttons
The control buttons are located just
below the display. As the readout
above each button changes, the
function of the button changes.
Power Indicator
The power indicator glows green when
the unit is plugged in and the On/Off
button is in the On position.
Stop/Reset Button
This button ends all current functions,
resets the control board, and returns to
the main menu.
QuickFit Adjustable Straps
These straps allow you to size your vest
to the exact, repeatable, recommended
therapy spacing.
Air Ports
The air ports are located at the front
of the PTU and on the front of the vest.
The interconnecting hoses attach to the
ports to complete the connection from
the vest to the PTU.
COMPONENTS and CONTROLS (cont’d)
6
inCourage®Airway Clearance Therapy | INSTRUCTION MANUAL

WARNING: To reduce the risk of electrocution, ALWAYS unplug this
product immediately after using. Failure to do so could result in
personal injury or damage to equipment!
WARNING: To reduce the risk of electrocution, fire, or personal injury,
follow these instructions!
1. Be sure to read all information and instructions prior to setting up and using the
inCourage System. Failure to do so could result in equipment damage, personal
injury, or death.
2. Close supervision is necessary when this product is used by or near children or
individuals incapacitated by a chronic illness or injury.
3. Product is to be used only as described in this manual and only as prescribed by a
physician. Failure to do so could result in serious injury or death.
4. All attachments must be recommended by the manufacturer. Use only
components specified in the manual.
5. Do not use device near flammable substances.
6. Inspect power cord and unit prior to use. Do not use this product if any damage
has occurred to power cord or any part of the system. Call a RespirTech Customer
Support Representative at 1-800-793-1261 if any damage is suspected.
7. Keep all components of the inCourage System away from heated surfaces to avoid
damage and possible injury.
8. Do NOT insert any object into any opening on the system. Do NOT place objects
on or over the top of the inCourage System.
9. Always observe ALL warnings, cautions, and notes listed in this manual and posted
on the inCourage System.
10. Be sure to plug the inCourage System DIRECTLY into a properly grounded,
three-pronged electrical outlet. Grounding reliability can only be achieved when
the equipment is connected to a properly grounded, three-pronged outlet.
11. Do not use the inCourage System near water or ANY wet surface. Allow the
inCourage System to dry completely before plugging it into an electrical outlet if
the system becomes wet.
12. Place the inCourage System only on a flat and stable surface away from any
materials that could block unit air intake or exhaust.
13. When traveling by air, the inCourage System should always be
considered carry-on baggage and NEVER checked baggage.
14. It is recommended that the owner or renter of the inCourage Airway Clearance
Therapy insure the device under their renters or homeowner insurance policy
to cover non-warranty damage expenses.
SAFETY INSTRUCTIONS
7
inCourage®Airway Clearance Therapy | INSTRUCTION MANUAL

STEP 1: Fitting the inCourage Comfort Vest
Inspect the Comfort Vest:
Note: Prior to use, the vest should be inspected for any sign of defects. If any of
the following defects are found, please contact a RespirTech Customer Support
Representative at 1-800-793-1261 for immediate vest replacement:
1. Any size hole found in the vest (inner layer, outer layer, seams, or vest ports).
2. Any stitching that has become loose or frayed on the vest.
3. Any damage to the buckles or straps that restricts the function of the strap system.
Adjust the Comfort Vest Straps:
We have taken careful consideration in supplying you with the appropriate size vest
based on your information. Please take a moment and review the fitting instructions
carefully and consult your physician if any discomfort develops.
NOTE: We recommend a thin layer of cotton clothing to be worn under the vest
for best comfort.
To loosen straps: Lift the back of the buckle.
To tighten straps: Hold the buckle and pull the end of the strap
to the patient’s right.
1. These instructions refer to the
three colored QuickFit tabs:
blue, white, and yellow.
2. Before putting on the vest, preset
the QuickFit tabs to the pre-therapy
position by placing the blue tabs
over the yellow tabs.
SYSTEM SETUP
8
inCourage®Airway Clearance Therapy | INSTRUCTION MANUAL

3. Put the vest on and connect the
buckles located on the front.
4. Adjust the shoulder straps so the
bottom edge of the vest sits at the
top of the hipbone.
5. Gently tighten the front straps
until each is snug to the chest.
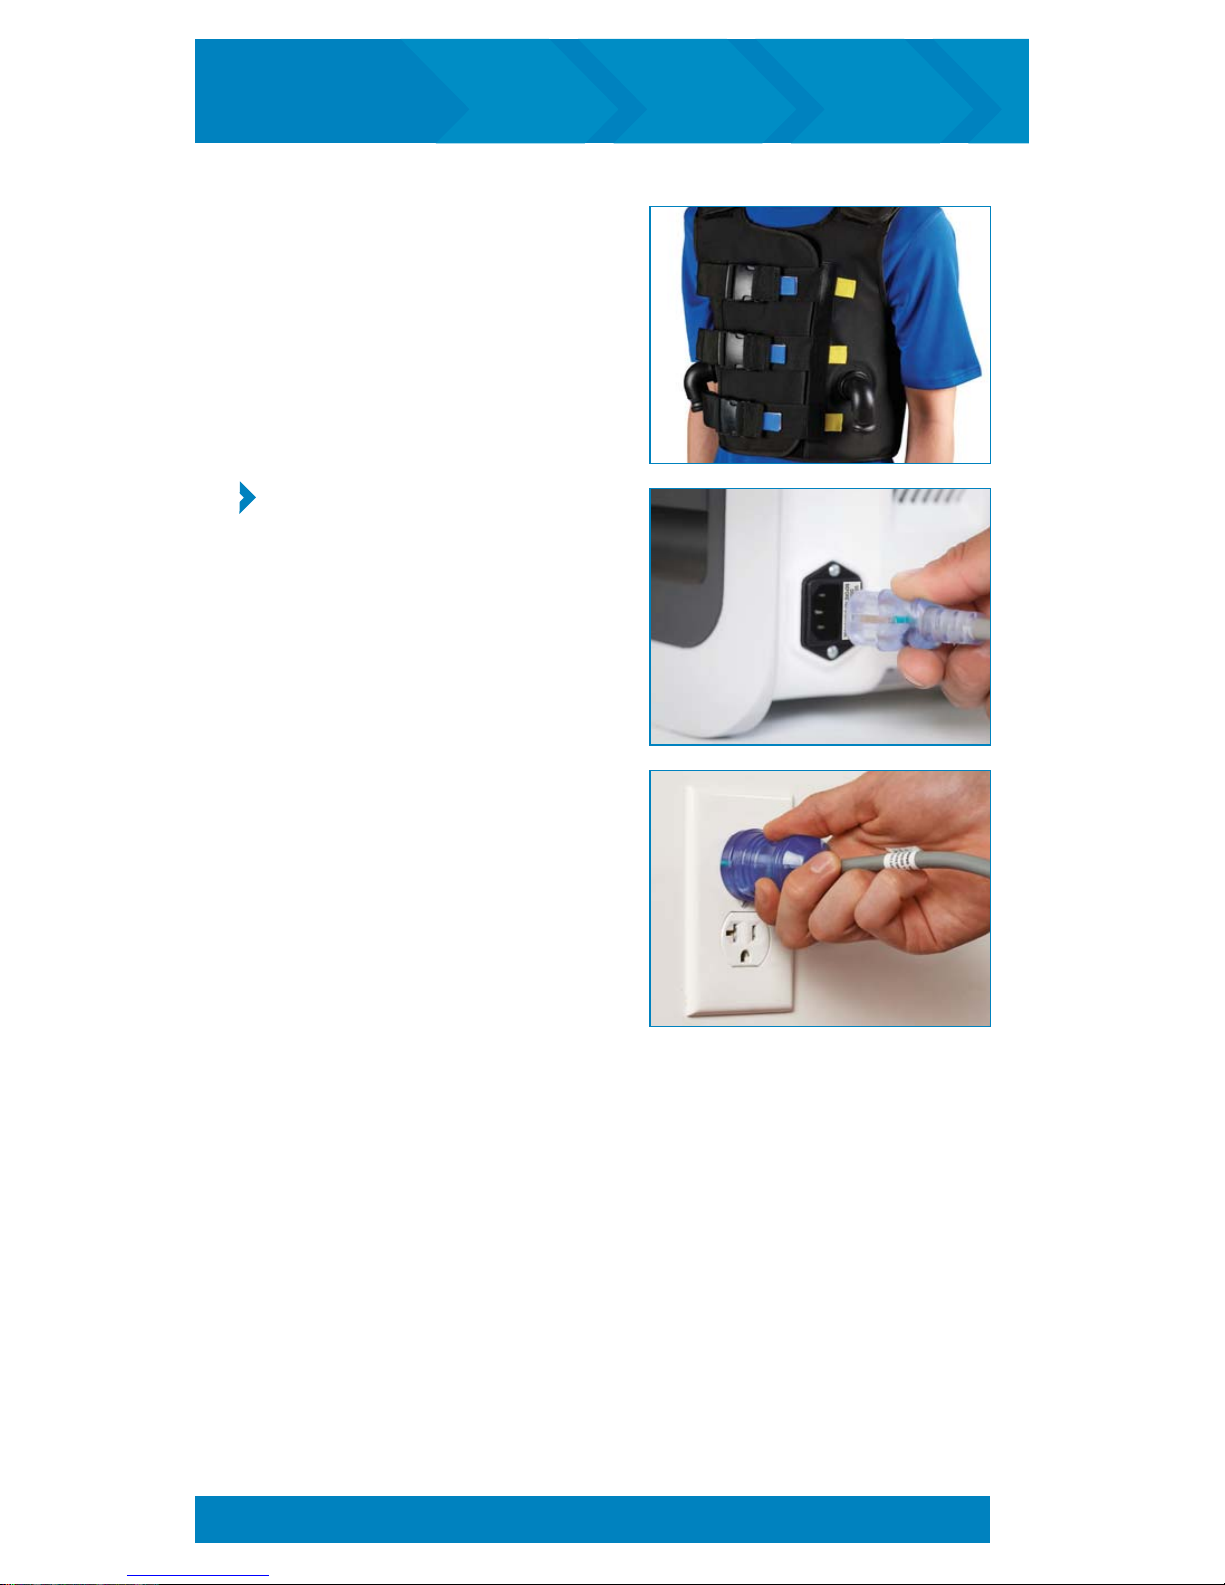
6. Pull each of the QuickFit blue
tabs off the yellow tabs, then
place the blue tabs over the
white tabs.
SYSTEM SETUP (cont’d)
9
inCourage®Airway Clearance Therapy | INSTRUCTION MANUAL
7. You are now ready to connect
vest to the PTU.
STEP 2 : Plug in the PTU
1. Place the PTU on a level, sturdy,
dry surface, clear of any flammable
materials or obstructions.
2. Plug the power cord to the back of
the PTU.
3. Plug the power cord into a
properly grounded, three-pronged
outlet. Grounding reliability can
only be achieved when the
equipment is connected to a
properly grounded, three-pronged
outlet. See product specifications
for power requirements.
SYSTEM SETUP (cont’d)
10
inCourage®Airway Clearance Therapy | INSTRUCTION MANUAL

STEP 3 : Connecting the Vest to the PTU
NOTE: The interconnecting hoses are interchangeable and can be flipped. You
do not need to worry about which end of the hose is attached to the PTU or
the vest.
1. Grasp the sides of the locking
hose connecter and push onto the
device (Image A). Blue lever on
hose connector will automatically
flip up (Image B).
2. Continue to push the hose
connector firmly against device
until hose connector has been
properly fitted against device
(lever will flip down).
3. Verify the blue lever is securely
latched by pressing down firmly.
(Image C).
NOTE: Do not force blue lever
to close. If you feel resistance,
push the hose connector more
firmly against device.
4. Grasp the sides of the locking
hose connecter and push onto
the vest port as show (Image D).
Blue lever on hose connector will
automatically flip up.
5. Continue to push the hose
connector firmly against the vest
port until hose connector has been
properly fitted (lever will flip down).
6. Verify the blue lever is securely
latched by pressing down firmly.
(Image E).
NOTE: To disconnect the vest, lift
the lever and pull hose off the
vest port.
AB C
ED
SYSTEM SETUP (cont’d)
11
inCourage®Airway Clearance Therapy | INSTRUCTION MANUAL

Treatment Definitions:
1. FREQUENCY (F) – Represents the number of air pulses that are delivered over
a period of time. [The inCourage System represents frequency in Hertz (Hz), or
the number of pulses per second.]
2. PRESSURE (P) – Represents the force that the system places against your body.
[The inCourage System represents pressure as a percentage (%) of the
maximum pressure created.]
3. SESSION – A full treatment of individual or combined steps.
4. STEP – A segment of frequency, pressure, and time that together with other steps
make up a complete session.
5. RAMPING – During a step, the inCourage System gradually increases or
decreases the frequency to the next step’s frequency.
6. AUTO PAUSE – Automatically pauses session every 5 minutes. Press RUN to resume.
7. HOUR METER READING (HMR) – Represents the total use time over the life of
the device. This timer cannot be reset.
8. USE INFO – Represents the average session length in minutes and average
pressure setting for the previous number of sessions displayed. Only sessions
over five minutes will be counted. The user can reset this information.
9. PAUSE TIME – Allows for automatic continuation of therapy after a pre-
programmed pause during an Auto Pause or Multi Step session.
10. PRESSURE LIMIT – The maximum allowable pressure setting for all therapy
sessions and programming.
11. PRESSURE INCREMENT – The amount of pressure percent (%) changed
when increasing or decreasing pressure.
12. FAST SET PROGRAMMING (FS) – A method for creating a customized Multi
Step session of up to 12 steps with alternating frequency with an input of 6
settings: Number of Steps, Low Frequency, High Frequency, Pressure Setting,
Total Program Time, and Auto Pausing On or Off.
CAUTION: Use of the system other than as prescribed could result in
ineffective treatment. Prescribed settings must be utilized!
TREATMENT DEFINITIONS
12
inCourage®Airway Clearance Therapy | INSTRUCTION MANUAL

The inCourage®Airway Clearance Therapy is programmed to provide easy-to-follow
instructions with an easy-to-understand menu. It has three types of sessions, each with
unique advantages. The Quick Start session is a pre-programmed session that starts
immediately. The Auto Pause session is the Quick Start program with an automatic
feature to pause the session every 5 minutes1. The Multi Step sessions are for custom
programs that can be saved for future use.
NOTE: The PTU will generate an audible tone as feedback when pressing
any of the front panel buttons.2
1. Quick Start and Auto Pause default duration of 30 minutes can be adjusted by 5 minute intervals from a
minimum of 5 minutes to a maximum of 90 minutes per session, the number of minutes per step will vary.
2. By default, the audible tone is only generated when pressing one of the front panel buttons. Setting Beep
Control to ‘On’ will also generate audible feedback at the end of a step.
QUICK START AUTO PAUSE MULTI STEP
Key Feature
Program
Session
Length
Pressure
Frequency
Memory
Instant 30-minute1
ramping session
Pre-programmed
30-minute session
divided into 12 steps
of 2.5 minutes each1
Default set at 60%
and adjustable during
session
Ramps from 6Hz
to 15Hz over a 2.5
minute period – then
ramps from 15Hz to
6Hz over the next 2.5
minutes and repeats
for a total of 30
minutes1
Last pressure setting
used is retained for
the start of the next
session
Pauses session every
5 minutes1
Pre-programmed
Same as Quick Start with
automatic pause every 5
minutes1
Default set at 60% and
adjustable during session
Ramps from 6Hz to
15Hz over a 2.5 minute
period – then ramps from
15Hz to 6Hz for the next
2.5 minutes followed by
a pause. Repeats for a
total of 30 minutes1
Last pressure setting used
is retained for the start of
the next session
Customized therapy
with multiple steps
and ramping
Programmable up to
12 steps
12 User-
programmable steps
up to 99 minutes each
Set at desired
pressure per step
and adjustable
during session
User defined per step
between 5Hz and 30Hz
Ramping
3 programmable
memory buttons
STARTING A TREATMENT SESSION
13
inCourage®Airway Clearance Therapy | INSTRUCTION MANUAL

NOTE: The power indicator light on the
control panel will light green to show
that the unit is in use.
A U T O M U L T I Q U I C K
P A U S E ( i ) S T E P S T A R T
STEP 1: Turn On the inCourage Airway Clearance PTU
1. Turn the power switch on the back of the PTU to
the On position. (Ensure unit is plugged in to a
properly grounded three-pronged outlet.)
2. Adjust pressure by pressing either DOWN
or UP. Press PAUSE to temporarily stop the
session. Press RUN to resume the session
or END to return to the startup screen.
3. When the session pauses, press RUN
to resume the session or END to return
to the startup screen.
STEP 2: Choose a Session Mode (Quick Start,
Auto Pause, Multi Step)
To run Quick Start mode:
1. From the startup screen, select QUICK
START. Your QUICK START session
will begin.
A U T O M U L T I Q U I C K
P A U S E ( i ) S T E P S T A R T
1 8 . 9 6 0 % 2 9: 3 4
P A U S E D O W N U P E N D
S E S S I O N P A U S E D
R U N E ND
STARTING A TREATMENT SESSION (cont’d)
14
inCourage®Airway Clearance Therapy | INSTRUCTION MANUAL

S E S S I O N P A U S E D
R U N 3 : 4 8 E ND
S E S S I O N P A U S E D
R U N E ND
A U T O M U L T I Q U I C K
P A U S E ( i ) S T E P S T A R T
To run Auto Pause mode:
1. From the startup screen, press
AUTO PAUSE. Your AUTO PAUSE
session will begin.
2. Adjust pressure by pressing either
DOWN or UP. Press PAUSE to temporarily
stop the session or END to return to the
startup screen.
3. When the session pauses, press RUN
to resume the session or END to return to
the startup screen.
4. When a Pause Time is set, a countdown
to resume will be displayed and therapy
will automatically resume when the
counter reaches 0:00. The RUN button
will also continue therapy at any time.
1 8 . 9 6 0 % 2 9: 3 4
P A U S E D O W N U P E N D
STARTING A TREATMENT SESSION (cont’d)
15
inCourage®Airway Clearance Therapy | INSTRUCTION MANUAL

1 8 . 9 6 0 % 2 9: 3 4
P A U S E D O W N U P E N D
S E S S I O N P A U S E D
R U N 1 : 5 5 E ND
S E S S I O N P A U S E D
R U N E ND
M U L T I S T E P P R O G R A M S
1 2 3 E ND
A U T O M U L T I Q U I C K
P A U S E ( i ) S T E P S T A R T
To run Multi Step mode:
1. From the startup screen, press MULTI STEP.
2. Select the program number you would
like to run. (Program 1 will be used as
an example.)
3. To run the previously saved program,
press RUN. To edit the previously saved
program, see the Modify a Multi Step
Session section on page 17.
4. The Program 1 session will begin. Adjust
pressure by pressing either DOWN or UP.
Press PAUSE to temporarily stop the session
or END to return to the startup screen.
5. If the session is paused, press RUN to
resume the session or END to return to
the startup screen.
6. When a Pause Time is set, a countdown
to resume will be displayed and therapy
will automatically resume when the
counter reaches 0:00. The RUN button
will also continue therapy at any time.
P R O G R A M 1 R E A D Y
R U N E D I T P R E S E N D
STARTING A TREATMENT SESSION (cont’d)
16
inCourage®Airway Clearance Therapy | INSTRUCTION MANUAL

P R O G R A M 1 E D I T ME N U
B A C K S T E P S F S D F L T
P R O G R A M 1 R E A D Y
R U N E D I T P R E S E N D
M U L T I S T E P P R O G R A M S
1 2 3 E ND
A U T O M U L T I Q U I C K
P A U S E ( i ) S T E P S T A R T
Multi Step Editing Options:
1. From the Startup Screen, Press MULTI STEP
2. Select the program number you would
like to edit. (Program 1 will be used as
an example.)
3. The Program Ready screen has two
options for editing the selected program.
Selecting EDIT will continue to the
Program Edit Menu. Selecting PRES
will allow a single pressure to be set for
all steps.
4. The Program Edit Menu screen has three
options for editing the selected program:
STEPS, FS, and DFLT. These options are
described in the following instructions.
Fast Set Programming (FS) for Multi Step Sessions:
MULTI STEP PROGRAM # EDIT FS
PRESS:
Fast Set Programming creates a customized Multi Step session of up to 12 steps of
alternating frequencies with an input of 6 settings: Even Number of Steps, Low Frequency
(odd steps), High Frequency (even steps), Pressure Setting, Total Program Time, and Auto
Pausing On or Off. Total time is divided equally over the number of steps.
The FS menu is accessed as described in the previous Multi Step Editing Options section
above. FS menu screens prompt for setting of STEP QTY, LOW FREQ, HIGH FREQ,
PRESSURE, TOTAL PRG TIME, and PAUSE STEPS, YES or NO. Selecting the SAVE option
in the PAUSE STEPS menu will store the new selections into the selected program.
MODIFY A MULTI STEP SESSION
17
inCourage®Airway Clearance Therapy | INSTRUCTION MANUAL

The STEPS edit option is used to review or manually change the individual
set points for each parameter of each step within a Multi Step Session.
1. Select STEPS edit option from the Multi Step Editing Options described on page 17.
2. After the STEPS option is selected, session
step quantity is requested for the selected
program. Press DOWN or UP to adjust
desired number of steps, then press NEXT.
3. The step summary information will then display for
the first step as displayed in the example to the
right. The line includes the step number (1),
frequency (6), pressure (60), step time (2:30), and
pause step ("–" indicates off, "Pse" indicates on).
If no selections are made, the top line will begin
to scroll providing expanded parameter information about the step. The user can
quickly check the settings of each step by pressing NEXT after reviewing a step. The
EXIT button will return to the Program Ready screen.
4. Select EDIT to begin adjusting the parameters of the selected step that is
currently displayed.
5. Once in step EDIT mode, pressing the BACK button at any time will return
to the step summary for the previous parameter viewed.
6. Press DOWN or UP to adjust frequency (FREQ)
to desired level, then press NEXT.
7. Press DOWN or UP to adjust pressure
(PRES) to desired level, then press NEXT.
S E T S T E P Q T Y : 1 2
B A C K D OW N U P N E X T
Review and Adjust Multi Step Session Settings:
MULTI STEP PROGRAM # EDIT STEPS
PRESS:
1 F } 6 P } 6 0 T } 2 : 3 0 –
B A C K E D I T E X I T N E X T
1 / 1 2 S E T F R E Q : 6 H z
B A C K D OW N U P N E X T
1 / 1 2 S E T P R E S : 6 0 %
B A C K D OW N U P N E X T
MODIFY A MULTI STEP SESSION (cont’d)
18
inCourage®Airway Clearance Therapy | INSTRUCTION MANUAL

8. Press DOWN or UP to adjust the desired
length of time, then press NEXT.
9. Press YES or NO to enable or disable the Auto
Pause, then press NEXT.
10. After a full step is programmed, the display
will proceed to the next step.
11. Repeat 6 through 9 above to program
each of the remaining steps. The screen will
automatically bring you to the Program Ready
screen after the final step.
Note: After programming is completed, it is
recommended to verify program for accuracy.
Selecting DFLT as described in the Multi Step
Editing Options section on page 17 will bring
up the default confirmation screen. To confirm
program reset to default, select YES.
Set a Multi Step Session to Factory Default Settings:
MULTI STEP PROGRAM # EDIT DFLT
PRESS:
Note: As you complete programming
for each step, the display will briefly
show that settings were saved.
C O N F I R M 1 T O D E F A U L T
C O NF I R M : Y E S N O
2 / 1 2 S E T F R E Q : 1 5 H z
B A C K D OW N U P N E X T
1 / 1 2 P A U S E ? Y
B A C K N O Y E S N E X T
1 / 1 2 S E T T I M E : 2 . 5m
B A C K D OW N U P N E X T
S E T T I N G S S A V E D
MODIFY A MULTI STEP SESSION (cont’d)
19
inCourage®Airway Clearance Therapy | INSTRUCTION MANUAL

Screen Saver:
If the device is not actively running a program and a button is not pressed for 10
minutes, the display will start a scrolling text. After an additional 20 minutes, the
screen will blackout. At any time, press any button to reactivate the display and
return to the main menu.
The screen saver cannot be modified.
Information Menu (i):
The Information Menu contains options to view
the device Hour Meter Reading (HMR), Average
Use Information, and Setup Menu. The Information
Menu is accessed by pressing the (i) option from
the startup screen.
Selecting END will return to the startup screen.
To Retrieve Hour Meter
Reading (HMR) and Device
Software Version:
1. Press the Information (i) button to display
the Information Menu.
2. Press the HMR button.
3. The HMR will be displayed on the right
side of the screen, Hours : Minutes :
Seconds. The software version will be
displayed on the left side of the screen.
4. Press the END button to return to the
Information Menu. The HMR and
Software Version screen display will remain
up until the END button is pressed or the
screen saver timeout is reached.
(i) HMR
PRESS: Information Menu (i)
V 4.0 3 1 3 : 5 5 : 2 1
E N D
A U T O M U L T I Q U I C K
P A U S E ( i ) S T E P S T A R T
U S E S E T U P
H MR I N F O ME N U
E N D
SYSTEM UTILITIES
20
inCourage®Airway Clearance Therapy | INSTRUCTION MANUAL
Table of contents
Popular Medical Equipment manuals by other brands

MyPurMist
MyPurMist handheld steam inhaler user manual

ZELTIQ
ZELTIQ CoolSculpting System user manual

Biim
Biim Ultrasound System quick start guide

Ergosana
Ergosana Sana Sedeo 150 HK user guide

Sota
Sota Magnetic Pulser MP6 Troubleshooting

Weinmann
Weinmann BiLevel-ST VENTImotion WM 24800 Service and repair instructions


Integra
Integra 90520 Operation and service manual

DePuy Mitek
DePuy Mitek vapr vue instruction manual

Braun
Braun Aesculap activ C Instructions for use/Technical description

Stryker Medical
Stryker Medical Venture Series Maintenance manual

Lojer
Lojer SALLI Series operating instructions

RhythMedix
RhythMedix RhythmStar Operator's manual