Independence Evo CROSS 100 User manual

Owner´s manual version 1.1 - 06.06.2012
Rescue system
Evo CROSS 100
Evo CROSS 120
Evo CROSS 160
Fly market GmbH & Co. KG
Am Schönebach 3
D-87637 Eisenberg
Tel.: +49-8364-9833-0
Fax: +49-8364-9833-33
Mail: [email protected]
gliders for real pilots
independence
www.independence-world.com

Inhaltsverzeichnis
1. Technical Data
2. Purpose
3. Conditions of use
4. Necessary documentation
5. Mode of operation
6. Inspection of the parachute
7. Behaviour if damages are noticed
8. Storage
9. Maintenance
10. Cleaning
11. Repairs
12. Nature and environment friendly behaviour
13. Environmentally compatible waste disposal
14. Spare parts / changeable parts
15. Structure of the parachute
16. Packing the parachute
17. Mounting in an outer container
18. Mounting / integration to a harness
19. Specialtities for paraglider´s winch towing
20. Pre-flight check
Warning
It´snotallowedtousethisrescueparachuteforskydiving!
AccordingtoEN12491:Notsuitableforusageatspeedsabove32m/s(115km/h).
The rescue systems of the Evo Cross serie are certified according to EN 12491 (European standard) and LTF 91/09
(Germantypeapproval).
The manufacturer can not be made liable for any possible damages to persons or material damages, which may result
fromthisrescueparachutesinanyway.
1.TECHNICALDATA
Type: EvoCROSS100,120,160
Manufacturer: FlymarketGmbH&Co.KG
AmSchönebach3
D-87637Eisenberg
Tel.+49-8364-9833-0
Rescueparachute
Weightoftheparachute(kg):
Surface(m²):
Numberoflines/panels:
LengthaccordingtoEN(m)
(Paraglidingversion)
Max.Load(kg)
accordingtoLTF:
Sinkrateatmaxload(LTF)
Max load(kg)
AccordingtoEN(sinkrate5,5m/s)
Volumen(Milliliter)
(Withoutbridle)
Evo Cross
120*
1,9
36,81
8,12
120
4,7 m/s
120
@ sink rate
4,7 m/s
5200
16
Evo Cross
160*
2,4
41,12
8,60
160
5,6 m/s
155
@ sink rate
5,5m/s
5700
20
Evo Cross
100
1,5
25,06
6,92
100
4,9 m/s
100
@ sink rate
4,9 m/s
4500
16
* available as hang gliding version.

2.Purpose
The emergency parachutes are manually-released parachutes for paraglider / hangglider pilots in an emergency situation
whileflying.
3.Conditionsofuse
Maximumspeedforusage:115km/h(32m/s)
Intervalforrepacking:12month,thentherescueparachutehastoberepackedandthisrepackinghastoberecordedinthe
“Repackandinspectionlogbook”.
Interval of inspection: 24 month, then a complete inspection of the rescue parachute is necessary. The inspection have to
berecordedinthe“Repackandinspectionlogbook”.
Operational lifespan of parachute: 10 years. The lifespan can be extended for 2 more years if the rescue parachute is
inspectedyearlyduringthislasttwoyears.Sothetotalmax.possiblelifespanis12years.
4.Necessarydocumentation
a)Owner´smanual
b)Repackandinspectionlogbook
5.Modeofoperation
During an emergency situation while flying the pilot pulls at the release handle with a firm tug. Thereby the outer container
opensandthedeploymentbagisreleased.Afterthattherescueparachutepackage(whichisstillpackedinit´sdeployment
bag)havetobethrownwithadynamicmoveintothefreeair-space.Thatmeansthereleasehandlehavetobethrownaway
togetherwiththedeploymentbag!!!
Thedeploymentbagandtheconnectionbridle,aredesignedinawaywhichreleasesthelinesandcanopyoftheparachute
notbeforetheparachutepackageisthrownaway.
This prevents an unintentional or too early opening of the rescue parachute. This is minimizing the danger of tangling up
with the paraglider, the pilot or the reason which maybe causal for the emergency case (e.g. collision with another
paraglider).
Moreover the maximum throwing speed of the deployment bag should be reached when the deployment bag leaves the
pilothand.
Ingeneral:Thefastertherescueparachutepackageisthrownaway,thequickertheparachutewillopen.
After the throw the depolyment bag opens and releases lines and canopy. The powerful throw and/or the airstream
stretchesthelinesandcanopynowtherescueparachutesopens.
Aftertherescueparachuteisopenedcompletely,youfirsthavetocheckthealtitudeaboveground.
If you have still enough height you should ty to make the paraglider unable to fly according to the doctrine, to avoid an V-
positionoftheparagliderandtherescueparachute.
Ifyoudonothaveenoughheightanymore,justfocusonthegroundandprepareyourselfforthelandingfall.
6.Inspectionoftheparachute
Aparachutemustbe controlledby aregisteredpacker beforeit ispacked.Afteranemergencyopeningthe parachutemust
be inspected by the manufacturer or a workshop which is authorized by the manufacturer. After a re-pack the rescue
parachuteshouldundergoareleasetest.Thisverifiesthattheopeningforceoftheharnesscontaineroroutsidecontaineris
in between2daNand7daN.
Acompatibility test must be performed by an authorized person if the rescue system and harness (with integrated rescue
container)ismountedthefirsttimeinthiscombination.Thecompatibilitymustberecordedintheparachutelogbook.
7.Behaviourifdamagesarenoticed
If you notice any damage at the rescue parachute, which may affect the airworthy condition of the rescue parachute, you
have to send the rescue parachute for inspection/repair to the manufacturer.Also, if you are not sure about the airworthy
conditioninanyway,youhavetosendtheparachutetothemanufacturer.
Attention:Chemicals,detergents,insects,mouldstainsor thelikecanhavethe samenegativeeffectstothestrengthofthe
partsasmechanicalinfluences.
8.Storage
Oil, grease, acid and paint should not be stored near the parachute. The storage space should be dry. Parachutes which
havenotbeenusedforalongperiodoftimeshouldbeopenedandthecanopylooselyrolledandstoredinabag.
Avoidunnecessaryhightemperature(e.ginaparkingcar)!
9.Maintenance
Thelifespanandconditiondepends mainlyuponhow carefullyyou handleandmaintain yourparachute.Out ofthisreason
werecommendtocontroltheparachuteregularly,atthelatestifitisrepacked,ifthereareanywearsordamages.
Duringnormaluseyouhavetotakecareofthefollowingpoints:
If the parachute got wet, you have to open it and dry it at a well-ventilated place as soon as possible (but avoid direct
sunlight!)Thefastdryingisimportanttoavoidmouldstains.Aftertheparachuteiscompletedryitcanberepacked.
Iftheparachuteisstrainedmorethannormal(forexample:acardroveovertheharnessinwhichtheparachuteisplaced,or
itmaybeisdamagedbyasharpobject,oranyotherpossibledamage),youhavetosendtheparachutetothemanufacturer
tocheckit.
Avoidcontactwithsaltwater,acidsorotheraggressivesubstances!
Alsoavoidunnecessaryexposuretosunlight,causetheUVraysmaydamagethemolecularstructureofthematerial.
10.Cleaning
Adirtycanopyandcontainercanbecarefullycleanedwithclearwaterandasoftsponge.
Attention: Never use detergents, chemicals, brushes or hard sponges to clean the parachute! Also a cleaning in the
washingmaschineisnotallowed.
If the rescue parachute gets in contact with salt water, you have to wash it with fresh water. A cleaning accelerates the
ageingofthesystem.
11.Repairs
Repairjobshavetobeperformedonlybythemanufactureroraworkshopwhichiscertifiedbythemanufacturer.
12.Natureandenvironmentfriendlybehaviour
Pleasedoournature-nearsportinawaywhichdonotstressnatureandenvironment!Donotwalkbesidethemarkedways,
don´tleaveyour litter,don´tmake unnecessaryloud noisesand respectthe sensitivebalance inthe mountains.Especially
atthetake-offwehavetotakecareforthenature!
13.Environmentallycompatiblewastedisposal
Thematerialsof whicha rescueparachute ismade requiresa special wastedisposal. Soplease senddisused parachutes
backtous.Wewillcareaboutanprofessionalwastedisposal.
14.Spareparts/changeableparts
Excepttherubberbands ofthe innercontainerandsealingthreadnosparepartisnecessaryat theEvoCrossseries.Only
approved rubber bands with the size 30x3x1 mm or 25x3x1 mm should be used! An inexpensive purchase is possible
throughus.
The deployment bag is except for the use of an under point 18.4. described the deployment bag part of the rescue system
and may not be exchanged for an other one. If another deployment bag as described is used you will loose the type
approval.

15.Structureoftheparachute
Theparachutestructureissquareandhas,dependingonthemodel16or20gores(see“technicaldatas”)
Thecanopyismadeoftearrestistant,highstrenghtnylonfabric.Themainseamsareflatfellseamsandarereinforcedby
a band. The lines are sewn to the canopy and reinforced with V-tapes at the canopy. The crown is pulled down by the
centerlines.Alllinesandcenterlinesareconnectedtothebridle.
The bridle has a strength of more than 2400 daN. Hang gliding models only differ from paragliding models by a longer
bridle.
Standarddeploymentbag:
The deployment bag is made of nylon fabric and gets closed
atthreepoints.
Ontheflatside ofthedeployment bagarefourloops.Atone oftheseloopstherelease-handle oftheoutercontaineror the
harnessistobeattached.
Theoutercontainerismadeofrobust,water-repellentnylonfabric.Itconsistsof2lateralflaps,theupperandlowerflap,the
release-handlewith2pins,whichclosethecontainer.
Backside of the outercontainer,
with attachment-points
Outercontainer open
Velcro-tapes for attaching
the container to the harness
Release-handle
Attachment points for
release-handle
2. Separate the lines left and right the center lines (marked
yellow) and check that they are not crossed and running
free.
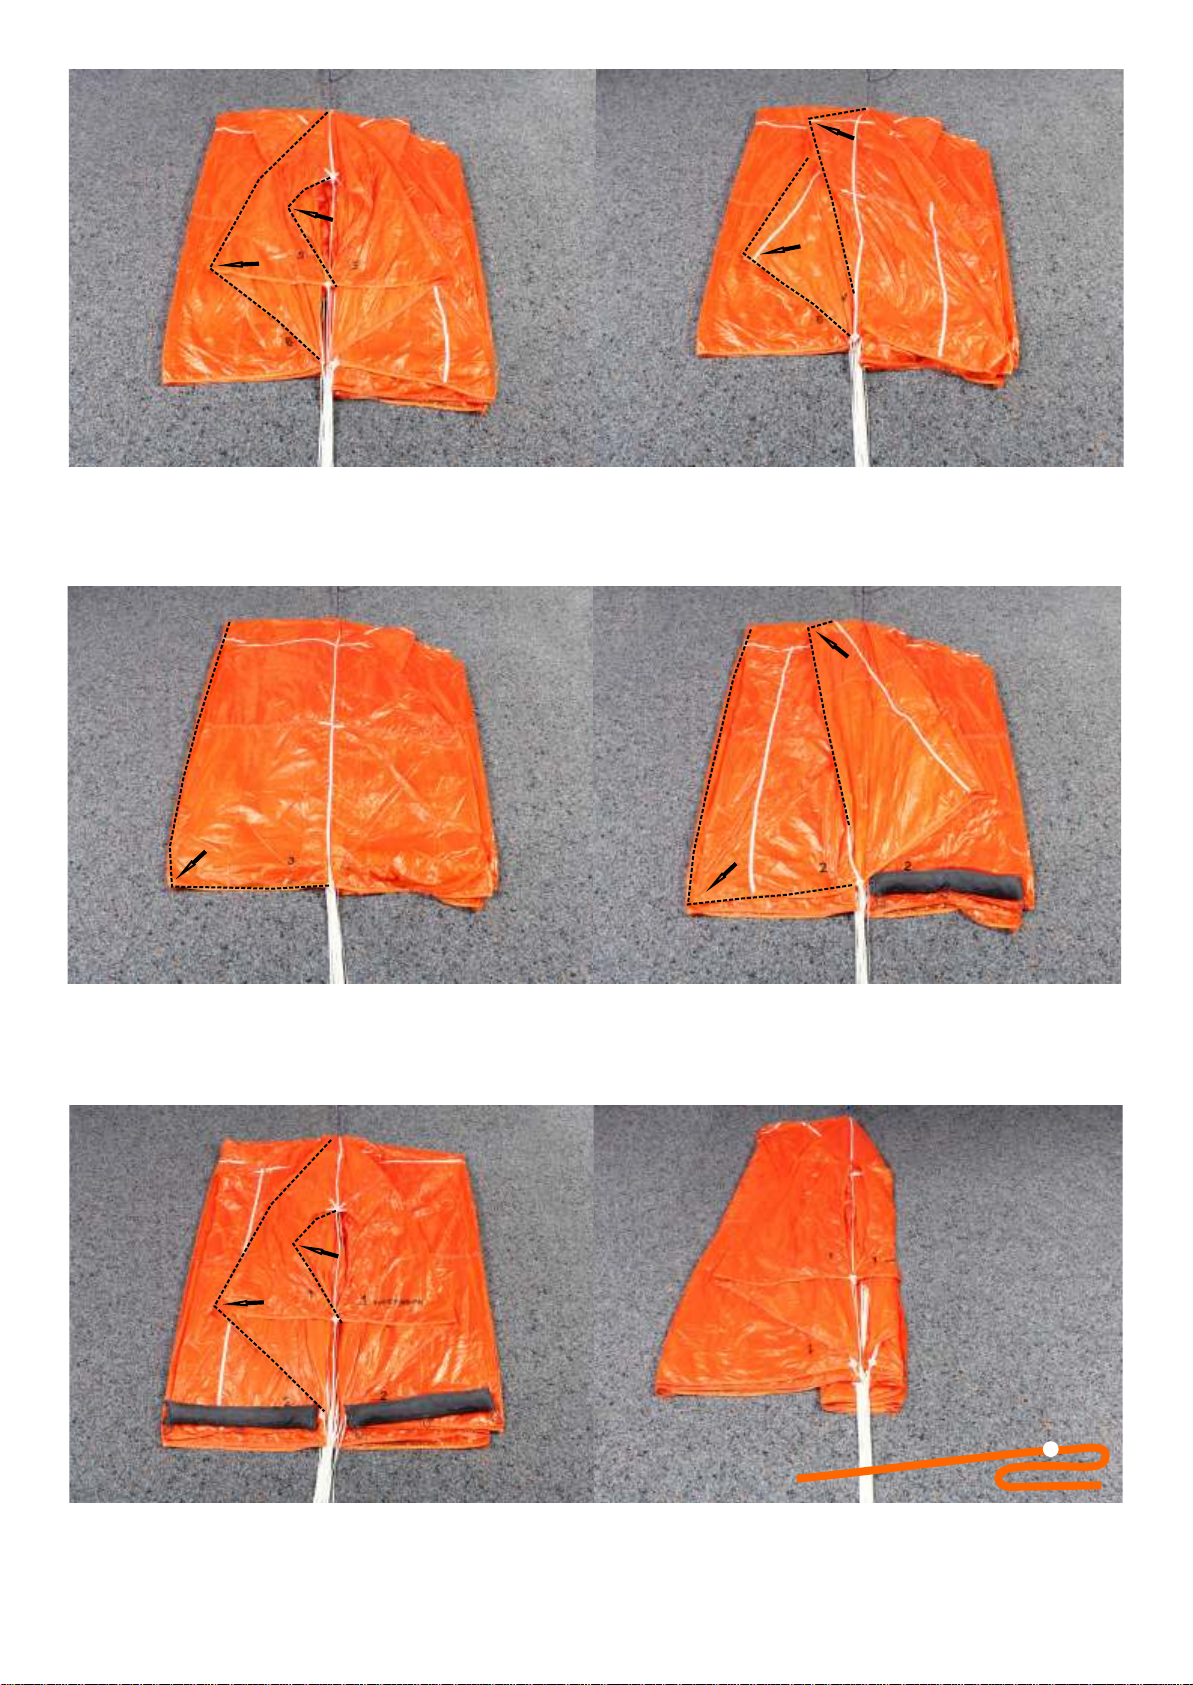
16. Packing the parachute
3. Separate canopy and lines to the left and right that
panels marked with 1 are on top, panels no 9 (Evo Cross
160:10)onthebottom.
4. Hook in packing cord. Bundle the lines, stretch the lines
by fixing the bridle on the other end and put the canopy to
theleftside.
5. Place panel 9 (Evo Cross 160: panel 11) centered to the
the floor and arrange panel 8 (Evo Cross 160: panel 10) to
theside.
6.Arrange the upper part of panel 8 (Evo Cross 160: panel
10)totheside.
Bridle
Suspension
lines
Canopy
Line
attachment
points
Packing loopsPacking loops
Packing loops
in corners
Packing loops
in corners
Attachmen p inst o t
f apex lines
o
1. Slide on the packing loops on a line (packing cord). The
packing loops are colored to find them more easy. At the
corners they are green, yellow on the sides. Slide on 3
yellowpackingloopsinbetweenthegreenones(EvoCross
160:4).
Optionaldeploymentbag:
Thedeploymentbagisavailableas anoptionifa smaller
packing volume is needed. The construction is a hybrid
ofacloverleafandapocketcontainer.
Attachment points for
release-handle

15.Structureoftheparachute
Theparachutestructureissquareandhas,dependingonthemodel16or20gores(see“technicaldatas”)
Thecanopyismadeoftearrestistant,highstrenghtnylonfabric.Themainseamsareflatfellseamsandarereinforcedby
a band. The lines are sewn to the canopy and reinforced with V-tapes at the canopy. The crown is pulled down by the
centerlines.Alllinesandcenterlinesareconnectedtothebridle.
The bridle has a strength of more than 2400 daN. Hang gliding models only differ from paragliding models by a longer
bridle.
Standarddeploymentbag:
The deployment bag is made of nylon fabric and gets closed
atthreepoints.
Ontheflatside ofthedeployment bagarefourloops.Atone oftheseloopstherelease-handle oftheoutercontaineror the
harnessistobeattached.
Theoutercontainerismadeofrobust,water-repellentnylonfabric.Itconsistsof2lateralflaps,theupperandlowerflap,the
release-handlewith2pins,whichclosethecontainer.
Backside of the outercontainer,
with attachment-points
Outercontainer open
Velcro-tapes for attaching
the container to the harness
Release-handle
Attachment points for
release-handle
2. Separate the lines left and right the center lines (marked
yellow) and check that they are not crossed and running
free.
16. Packing the parachute
3. Separate canopy and lines to the left and right that
panels marked with 1 are on top, panels no 9 (Evo Cross
160:10)onthebottom.
4. Hook in packing cord. Bundle the lines, stretch the lines
by fixing the bridle on the other end and put the canopy to
theleftside.
5. Place panel 9 (Evo Cross 160: panel 11) centered to the
the floor and arrange panel 8 (Evo Cross 160: panel 10) to
theside.
6.Arrange the upper part of panel 8 (Evo Cross 160: panel
10)totheside.
Bridle
Suspension
lines
Canopy
Line
attachment
points
Packing loopsPacking loops
Packing loops
in corners
Packing loops
in corners
Attachment points
of apex lines
1. Slide on the packing loops on a line (packing cord). The
packing loops are colored to find them more easy. At the
corners they are green, yellow on the sides. Slide on 3
yellowpackingloopsinbetweenthegreenones(EvoCross
160:4).
Optionaldeploymentbag:
Thedeploymentbagisavailableas anoptionifa smaller
packing volume is needed. The construction is a hybrid
ofacloverleafandapocketcontainer.
Attachment points for
release-handle

7.Arrangepanel7.(EvoCross160:panel9/8) 8. Arrange panel 6 and upper part of panel 5 to the side.
(EvoCross160:panel7,upperpartofpanel6)
9.Arrangepanel5(cornerpanel)(EvoCross160:panel6) 10.Arrangepanel4andupperparttotheside.(EvoCross
160:panel5)
11.Arrangepanel3.(EvoCross160:panel4/3) 12.Arrangepanel2andupperpartofpanel1totheside.
13. Arrange panel 1 (corner panel) and place a packing
weight onto the peripery. 14.Foldtheleftsideontotherightside.
15.Placepanel9(EvoCross160:panel11)centeredtothe
the floor and arrange panel 8 (Evo Cross 160: panel 10) to
theside.
16.Arrange the upper part of panel 8 (Evo Cross 160: panel
10)totheside.
17.Arrangepanel7.(EvoCross160:panel9/8) 18. Arrange panel 6 and upper part of panel 5 to the side.
(EvoCross160:panel7,upperpartofpanel6)
19.Arrangepanel5(cornerpanel)(EvoCross160:panel6) 20.Arrangepanel4andupperparttotheside.(EvoCross
160:panel5)
21.Arrangepanel3.(EvoCross160:panel4/3) 22.Arrangepanel2andupperpartofpanel1totheside.
23. Arrange panel 1 (corner panel) and place a packing
weight onto the peripery. 24.FoldrightsideS-shaped.(Step1)
25.FoldleftsideS-shaped.(Step2) 26.Removepackingcord.
27a.Stowtopofthecanopyinthedeploymentbag. 28a.FoldtherestofthecanopyinsmallS-foldsandplaceit
infrontofthedeploymentbag.
29 a. Put the S-folded canopy in the
deploymentbag. 30 a. Bundle the lines in 3x3 “8-
shaped”hanks.Donotbundlethelast
50cmoflines.
Schematic
illustration
S-fold
Schematic
illustration
S-fold
Schematic
illustration
S-fold
Schematic
illustration
S-fold
31 a. Close the deployment bag with
the lines. First in the middle then the
sides.
Attention: You have to use new rubber bands for hanks and deployment
bageverytimetheparachuteispacked.
Versiona)pocketdeploymentbag(standardversion):

17. Mounting in an outercontainer
1. Connect the release handle at the loop in the middle of
the deployment bag. Place the bridle at the side of the
containerwhichyouprefer.
2.Closethe twolateral flaps ofthe outercontainerwithtwo
packing-cords and closed it with the pins of the handle
provisionally.
3.Closetheupperandlower flapwiththepins. Removethe
packingcordsthen! 4. Close the upper flap finally. Notice the packing in the
“repackandinspectionlogbook”.
5. To avoid an unintentional opening, the German type
approval (LTF) prescribe a minimum release-force of 20 N.
Ifthesystemdoesnothavethisminimumrelease-force,itis
necessary to build in a predetermined breaking point
(special thread). This have to define a minimum release
forceof20N.
The special thread which is used as predetermined
breaking point must be put through the hole of the pin and
aroundtheloopasshownonthepicture.
Bothendsofthis specialthreadarefixed withaknotand an
additionalseal.
To secure the pin it is only allowed to use certified material
because if the strength of this material is too high the save
operationoftherescuesystemisnotguaranteed.
This thread is supplied by Fly market GmbH & Co. KG! Do
notuseotherthreadswhichmaylookthesame!
Versionb)hybriddeploymentbag(optional):
27b.Stowtopofthecanopyinthedeploymentbag. 28b.FoldtherestofthecanopyinS-folds(stack-pack).
31b.Closetheleftandrightside.
29 b. Bundle the lines in 3x3 “8-shaped” hanks. Do not
bundlethelast70cmoflines. 30 b. Close the deployment bag with the lines. First the
long side. 1) then 2). No 2) is to be closed with the middle
grommetoftheremainingflapA).
Attention: You have to use new rubber bands for
hanksanddeploymentbageverytimetheparachute
ispacked.
11
22
AA

18.1.harnesseswithoutintegratedrescuesystemcontainer:
If the harness does not have an integrated rescue system container use one of the outercontainer which is shown at point
15.
The outercontainer shown at point 15 has got several loops, eyelets and velcro-tapes on it´s back side to attach it at the
harness.The possibilitiesoftheattachmenttotheharness dependsontheharness.Foracorrect mountingon theharness
pleaserefertotheharnessmanual.
18.2.Usageofafrontcontainer/outercontainerofanothermanufacturer:
The possible usage of a front container or of an outercontainer of an other manufacturer depends on the size and if the
container is certified. If the container is too small or not certified the operating license of the rescue system expires. If it is a
containerofanothermanufactureryouhavetoreadthemanualofthecontainer.
Forattachingthesystemtotheharnesspleaserefertotheharnessmanual.
18.3.harnesseswithintegratedrescuecontainer:
Almostallmodernharnesseshaveanintergratedrescuecontainerinwhicharescuesystemcanbeplaced.Forthecorrect
mountingoftherescuesystem insuchacontainerpleaserefertotheharnessmanual.
18.4.Harnesseswithcombineddeploymentbag/releasehandle
Severalharnessesareequippedwithacompletereleasehandle/deploymentbagsystem,whichisadaptedoptimallytothe
correspondingharness.
Whenusingsuchasystemensurethatthedeploymentbagiscompatibletotherescuesystemused.Pleaseconsider:
1. The permitted volume range of the handle/deployment bag system must cover the volume of the rescue system. The
volumeoftherescuesystemistobefoundunder1.Technicaldatas.
2.Inadditionmakesurethatthedeploymentbagreleasestherescuesystemwithoutanyproblem.
Adeploymentbagwith4ormoreflaps(socalledcloverleafdeploymentbag)isingeneralcompatible.
The use of a deployment bag in the shape of a pocket (so called pocket container - exemplary design see under no 15) is
possible, but must be tested and certified by a LTF test laboratory separately for every rescue system model.The
deploymentbagwhichcomesasstandardwiththeEvoCrossSerieisofcoursecompatible.
Mounting:
Iftheaboveconditionsaremet,therescuesystemistobepackedbyfollowingNo.16(Packingtheparachute)step1to26.
The remaining steps of stowing the rescue system in the harness specific deployment bag is shown in the manual of the
harness.
If the harness manual shows a so called stack-packpacking method, this is also possible! The below imaging shows the
Cloverleaf container Bridle
Lines
Lines hanks
Closure loop cloverleaf deployment bag
Canopy in S-folds
(stack pack)
Basis
Cloverleaf deployment bag
packing with lines bundles on the bottom of the container:
Cloverleaf deployment bag
packing with lines bundles on top of the canopy:
Lines
Bridle
Closure loop cloverleaf deployment bag
Lines hanks
Canopy in S-folds
(stack pack)
Basis
Fangleinenbündel
Bottom of container
Bottom of container
stack-packmethodonlyexemplary!
Attention:
If the parachute is mounted to a harness or a front/outer container you have to check the compatibility. This check is only
allowed to be done by therefore authorizied persons. The compatibility check have to be noticed in the “Repack and
inspectionlogbook”.
Beside some other points you have to take care particularly that the connection length of the release handle to the
innercontainerisminimized.Thereforearethree loopsatthe deploymentbagatwhich thereleasehandlecanbe attached.
Youshouldalwaystrytousetheshortestpossibleconnectiontoensurethattherescueparachutecanbethrownasgoodas
possible. But you also have to take care that the release out of the container is not hinderd in any way. (take care that the
releasepindoesnotblock!!!). Readthemanualoftheharnessinanyway.
19.Specialitiesforparaglider´swinchtowing
Forwinchtowingyouhavetoconsidertheinstructionsoftheharness-,paraglider-andtowingreleasemanufacturer!
Ifyouuseafrontcontaineryouhavetoensurethattherescueparachutecanbereleasedineverysituation.
20.Pre-flightcheck
Inadditiontoanormalpreflightcheck(seemanualoftheglider/harnessormaybetowingdevice),youhavetocheckbefore
everytakeoffthattherescuecontainerisclosedcorrectlyandthereleasehandleisplacedcorrectly.
Iftherescueparachuteconnectionbridleisremovedaftereveryflight(forexample:whenyouuseafrontcontainer)youalso
18. Mounting / integration to a harness

This manual suits for next models
2
Table of contents
Popular Measuring Instrument manuals by other brands


Pepperl+Fuchs
Pepperl+Fuchs F2D0-TI-Ex8.FF Series manual

Seametrics
Seametrics iMAG 4700r quick start guide

Haag-Streit
Haag-Streit AT 900 D Instructions for use
Icon Process Controls
Icon Process Controls truflo TK Series manual

Sedanamedical
Sedanamedical AMG-06 user manual

Advanced Instruments
Advanced Instruments 3300 Service manual