IndigoVision Compact NVR-AS 4000 User manual

IndigoVision
Compact NVR-AS 4000
User Guide

2 User Guide - v14
THIS MANUAL WAS CREATED ON WEDNESDAY, JANUARY 9, 2019.
DOCUMENT ID: IU-NVR-MAN018-14
Legal Considerations
LAWS THAT CAN VARY FROM COUNTRY TO COUNTRY MAY PROHIBIT CAMERA SURVEILLANCE. PLEASE ENSURE THAT THE RELEVANT LAWS
ARE FULLY UNDERSTOOD FOR THE PARTICULAR COUNTRY OR REGION IN WHICH YOU WILL BE OPERATING THIS EQUIPMENT. INDIGOVISION
LTD.ACCEPTS NO LIABILITY FOR IMPROPER OR ILLEGAL USE OF THIS PRODUCT.
Copyright
COPYRIGHT © INDIGOVISION LIMITED. ALL RIGHTS RESERVED.
THIS MANUAL IS PROTECTED BY NATIONAL AND INTERNATIONAL COPYRIGHT AND OTHER LAWS. UNAUTHORIZED STORAGE,REPRODUCTION,
TRANSMISSION AND/OR DISTRIBUTION OF THIS MANUAL,OR ANY PART OF IT,MAY RESULT IN CIVIL AND/OR CRIMINAL PROCEEDINGS.
INDIGO VISION IS A TRADEMARK OF INDIGO VISION LIMITED AND IS REGISTERED IN CERTAIN COUNTRIES . INDIGO ULTRA , INDIGO PRO ,
INDIGO LITE , INTEGRA AND CYBERVIGILANT ARE REGISTERED TRADEMARKS OF INDIGO VISION LIMITED . C AMERA GATEWAY IS AN
UNREGISTERED TRADEMARK OF INDIGOVISION LIMITED. ALL OTHER PRODUCT NAMES REFERRED TO IN THIS MANUAL ARE TRADEMARKS OF
THEIR RESPECTIVE OWNERS.
SAVE AS OTHERWISE AGREED WITH INDIGO VISION LIMITED AND/OR INDIGOVISION, INC., THIS MANUAL IS PROVIDED WITHOUT EXPRESS
REPRESENTATION AND/OR WARRANTY OF ANY KIND. TO THE FULLEST EXTENT PERMITTED BY APPLICABLE LAWS, INDIGOVISION LIMITED
AND INDIGO VISION, INC.DISCLAIM ALL IMPLIED REPRESENTATIONS,WARRANTIES ,CONDITIONS AND/OR OBLIGATIONS OF EVERY KIND IN
RESPECT OF THIS MANUAL . ACCORDINGLY ,SAVE AS OTHERWISE AGREED WITH INDIGOVISION LIMITED AND/OR INDIGOVISION, INC., THIS
MANUAL IS PROVIDED ON AN “AS IS”, “WITH ALL FAULTS”AND “AS AVAILABLE”BASIS. PLEASE CONTACT INDIGOVISION LIMITED (EITHER BY
POST OR BY E-MAIL AT TECHNICAL.SUPPORT@INDIGOVISION.COM)WITH ANY SUGGESTED CORRECTIONS AND/OR IMPROVEMENTS TO THIS
MANUAL.
SAVE AS OTHERWISE AGREED WITH INDIGO VISION LIMITED AND/OR INDIGO VISION, INC., THE LIABILITY OF INDIGO VISION LIMITED AND
INDIGOVISION, INC.FOR ANY LOSS (OTHER THAN DEATH OR PERSONAL INJURY)ARISING AS A RESULT OF ANY NEGLIGENT ACT OR OMISSION
BY INDIGO VISION LIMITED AND/OR INDIGO VISION, INC.IN CONNECTION WITH THIS MANUAL AND/OR AS A RESULT OF ANY USE OF OR
RELIANCE ON THIS MANUAL IS EXCLUDED TO THE FULLEST EXTENT PERMITTED BY APPLICABLE LAWS.
Contact address
IndigoVision Limited
Charles Darwin House,
The Edinburgh Technopole,
Edinburgh,
EH26 0PY
Compact NVR-AS 4000

User Guide - v14 3
TABLE OF CONTENTS
Legal Considerations 2
Copyright 2
Contact address 2
1 About This Guide 5
Safety notices 5
2 Hardware Description 7
Overview 7
Metrics 8
Connections 8
Video 9
USB 9
LAN 10
Serial port 10
Power 10
Power requirements 10
3 Getting Started 11
Package contents 11
Front connections 12
Rear connections 12
Additional items 12
Power 12
Power on 12
Power off 12
Remote power on 13
Remote power off 13
Initial configuration 13
DHCP 14
Using a monitor and keyboard 14
Using the Serial port 14
Configure the License Server 15
4 Installation 17
Attach the device to the network 17
5 Operations 19
Protect recordings 19
Format a disk 19
Configure network redundancy 19

4 User Guide - v14
Power off 20
Backup a recording 20
Install a new license or update an existing license 20
Create and send a fingerprint file 21
Apply a license file 21
6 Configuration 23
Web Configuration pages 23
Home 23
Network 24
Date & Time 24
Disk 25
NVR 25
Alarms 26
Status Monitoring 27
Network Security 27
Email 29
Bandwidth Management 29
License 30
Firmware Upgrade 31
Diagnostics 31
7 Troubleshooting 33
Monitor recordings 33
NVR Alerts 33
Recording failure alerts 33
Network failure alerts 33
8 Hardware Specification 35
Video 35
Audio 35
Network 35
Storage 35
Performance 35
Environment 36
Regulatory 36
A General Public License 37
Compact NVR-AS 4000

User Guide - v14 5
1ABOUT THIS GUIDE
This guide is written for users of IndigoVision Compact NVR-AS 4000 devices. It provides
installation and configuration information for the device, as well as a description of the
hardware and specifications.
Please ensure you read the instructions provided in the guide before using the device.
Safety notices
This guide uses the following formats for safety notices:
Indicates a hazardous situation which, if not avoided, could result in death or serious injury.
Indicates a hazardous situation which, if not avoided, could result in moderate injury, damage
the product, or lead to loss of data.
Indicates a hazardous situation which, if not avoided, may seriously impair operations.
Additional information relating to the current section.

6 User Guide - v14
1 About This Guide Compact NVR-AS 4000
User Guide - v14 7
2HARDWARE DESCRIPTION
This chapter details the Compact NVR- AS 4000 device's connections, weight and
dimensions.
Overview
The Compact NVR-AS 4000 is a standalone video and audio recorder. It contains a disk,
which allows you to store recordings and play them back at a later date. It provides a powerful
and integrated recording and playback system for video and audio from cameras,
transmitters, and receivers.
Each Compact NVR-AS 4000 in a system can record from up to 40 cameras or transmitters
while simultaneously playing back up to 20 recordings, all at full frame rate. The Compact
NVR-AS 4000 is managed and configured by the ControlCenter application. Video can be
played back to PCs, analog monitors, and standard VCRs.
The Compact NVR-AS 4000 allows the following:
• Recording and playing back MJPEG, MPEG-4, and H.264 video and audio streams
• Third party camera support
• Redundant network connections
• Powerful and distributed alarm management
• Digital Signatures and Tamper Protection of recordings
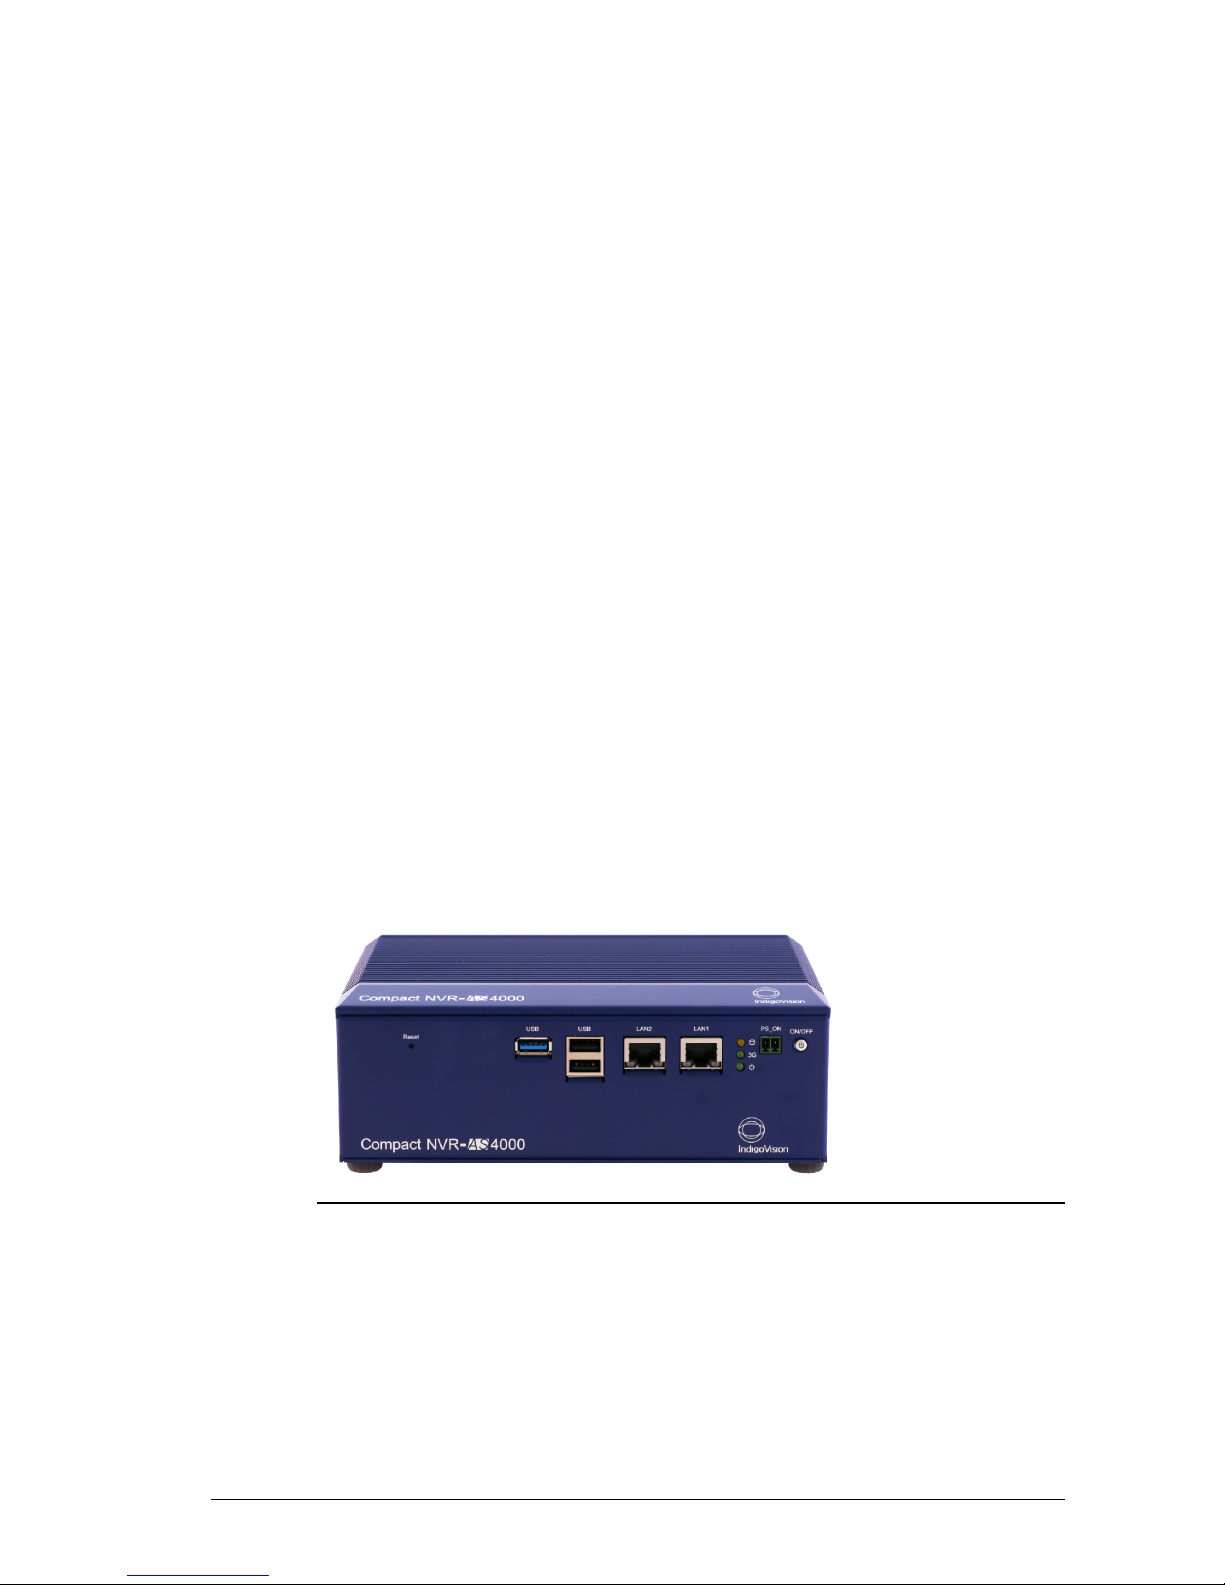
Figure 1: Compact NVR-AS 4000 (Standard)
8 User Guide - v14
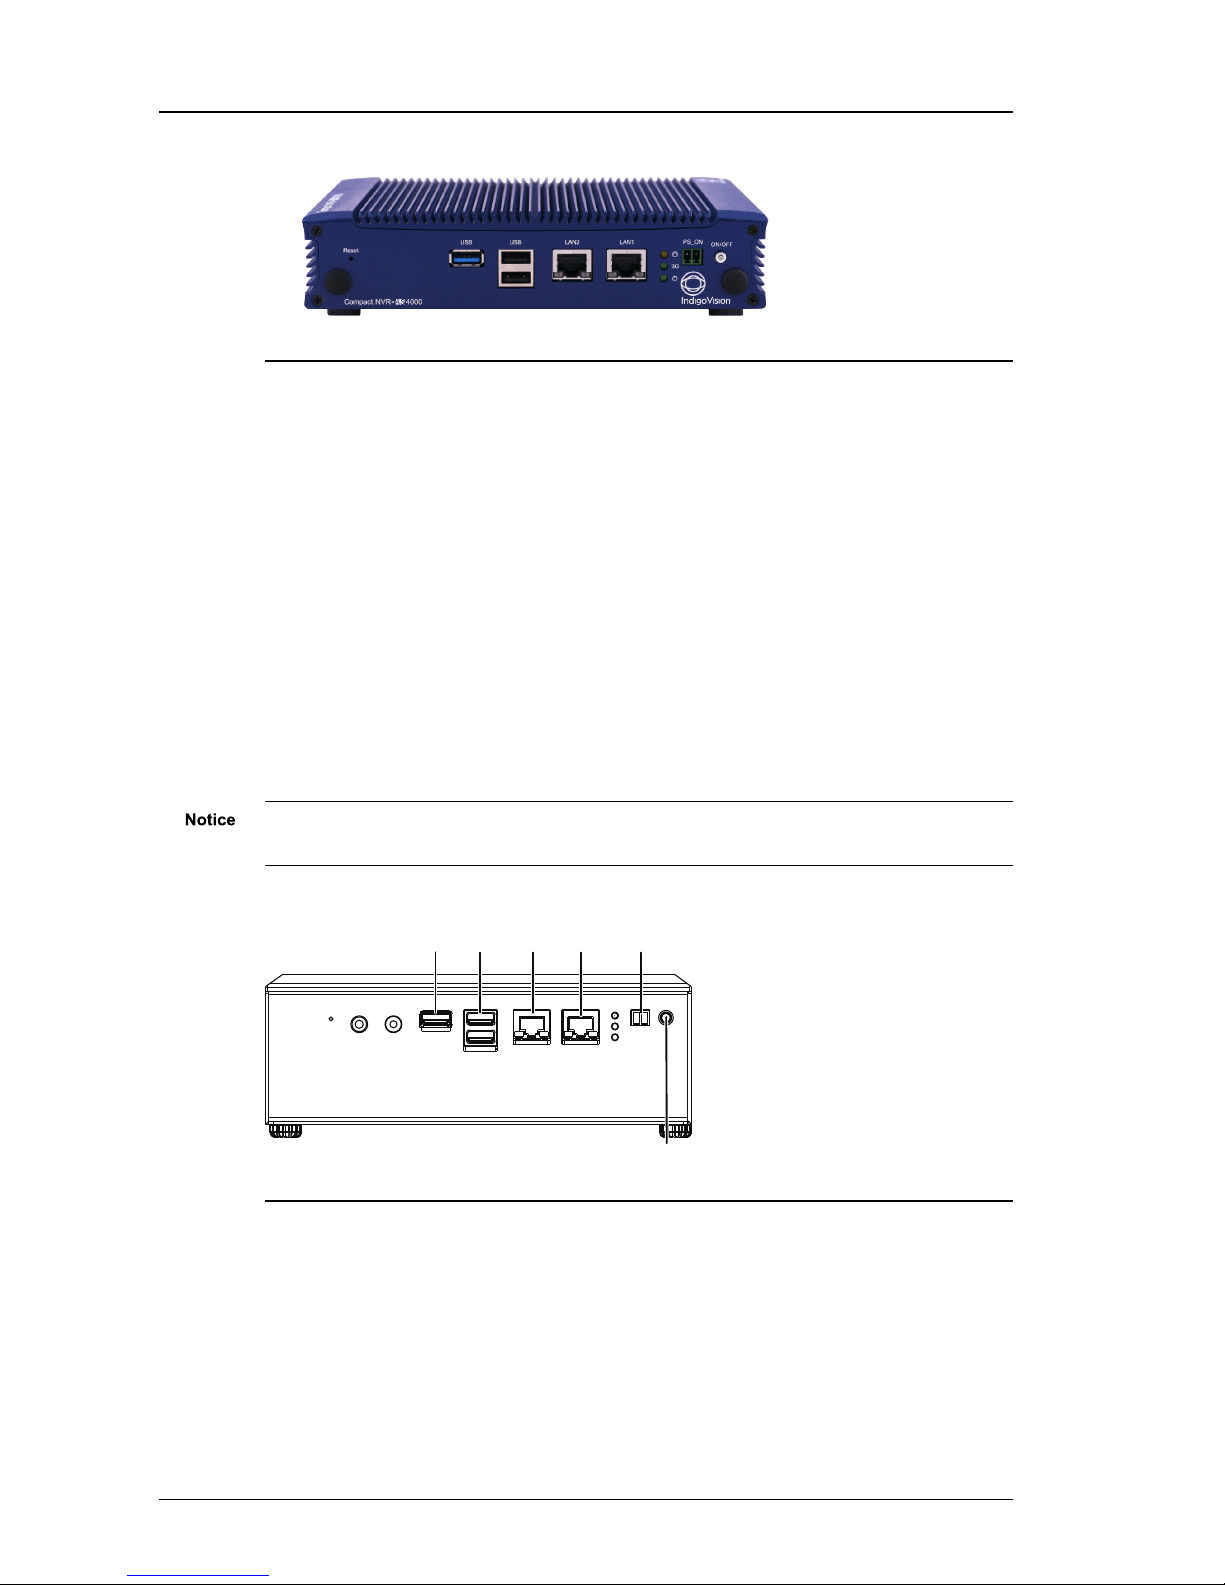
Figure 2: Compact NVR-AS 4000 (Slimline)
Metrics
Dimensions
• 200 mm (W) x 144 mm (D) x 70.5 mm (H)
• 198 mm (W) x 144.8 mm (D) x 48 mm (H) (Slimline)
Weight
• 1.56 Kg
• 1 Kg (Slimline)
Connections
There are connections on the front and rear of the device.
Not all ports are supported, and not all should have devices connected to them.
►For more information, see "Package contents" on page 11
USB ports
LAN ports
Remote power
on/off connector
Manual power
on/off button
Figure 3: Front connections - Standard variant
2 Hardware Description Compact NVR-AS 4000

User Guide - v14 9
HDMI port VGA port Serial port Power socket
Figure 4: Rear connections - Standard variant
USB ports LAN ports
Remote power
on/off connector
Manual power
on/off button
Figure 5: Front connections - Slimline variant
HDMI port Serial port Power socket
VGA port
Figure 6: Rear connections - Slimline variant
Video
There are two video connections.
• HDMI
• VGA
A monitor should only be connected for initial configuration.
USB
There are three USB connection ports.
• 2 x USB 2.0
• 1 x USB 3.0
Only USB keyboards are supported for initial network configuration. No other USB devices
should be connected to the Compact NVR-AS 4000.
Compact NVR-AS 4000 2 Hardware Description

10 User Guide - v14
LAN
• 2 x RJ-45 10/100/1000 Mbps adaptive Ethernet interface
Serial port
There is one RS-232 Serial port.
6 7 8 9
1 2 3 4 5
Figure 7: RS-232 Serial port
Item Description
1 Data Carrier Detect (DCD #)
2 Receive Data (RXD)
3 Transmit Data (TXD)
4 Data Terminal ready (DTR #)
5 Ground (GND)
6 Data Set Ready (DSR #)
7 Request To Send (RTS #)
8 Clear To Send (CTS #)
9 Ring Indicator (RI #)
Power
In addition to the front panel power button, it is possible to remotely power on the NVR by
connecting a pair of switch contacts to the PS_ON connector.
To power on or off the NVR, momentarily short and then open pins 1 and 2 of PS_ON.
Power requirements
The Compact NVR-AS 4000 is powered using a universal mains powered PSU which
supplies 12V DC +/- 5% at 5A maximum. The maximum power consumed by the product is
19W.
2 Hardware Description Compact NVR-AS 4000

User Guide - v14 11
3GETTING STARTED
This chapter describes the initial steps required to start using the Compact NVR-AS 4000
device.
Package contents
Before continuing, please check that you have been shipped the items listed for your device.
1 2 3 4 5 6
7
8 9 10
Figure 8: Front connections - Standard variant
1 2 3 4 5 6
Figure 9: Rear connections - Standard variant
1 2 3 4 5 6 7 8 9 10
Figure 10: Front connections - Slimline variant

12 User Guide - v14
1 2 3 4 5 6
Figure 11: Rear connections - Slimline variant
Front connections
1. Reset switch
2. MICIN (currently not supported)
3. LINEOUT (currently not supported)
4. USB 3.0 port
5. 2 x USB 2.0 ports
6. Network connection 10/100/1000Mbps port (LAN2)
7. Network connection 10/100/1000Mbps port (LAN1)
8. Status LED indicators (HDD and Power)(3G currently not supported)
9. Remote power on/off connector (PS_ON)
10.Power on/off button
Rear connections
1. HDMIport
2. VGAport
3. DIO (currently not supported)
4. RS-232 Serial Port (COM1)
5. RS-232 Serial Port (COM2) (currently not supported)
6. Power adapter socket (DC_IN)
Additional items
• 2 x Terminal blocks
• 12V Power supply with regional IEC mains lead
Power
The Compact NVR-AS 4000 can be powered on and off either manually or remotely.
Power on
The Compact NVR-AS 4000 can be powered on by pressing the manual power on/off button.
When power is applied to the NVR it will automatically power up. No button press is required.
Power off
The Compact NVR-AS 4000 can be powered off by briefly pressing the manual power on/off
button.
3 Getting Started Compact NVR-AS 4000

User Guide - v14 13
Continuously holding the button causes the NVR to shut down instantly, and can cause data
loss.
After the power button LED has turned red, the mains power can be disconnected.
Removing the mains power while the power button LED is green can result in data loss.
Remote power on
To remotely power on the Compact NVR-AS 4000, momentarily apply a short circuit across
pins 1 and 2 of PS_ON.
►For more information, see "Power" on page 10
Remote power off
To remotely power off the Compact NVR-AS 4000, momentarily apply a short circuit across
pins 1 and 2 of PS_ON.
►For more information, see "Power" on page 10
Initial configuration
Initial configuration can be done using one of the following methods:
• DHCP (default method)
• Monitor and keyboard connected directly to the device
• Serial connection
After initial configuration is complete, further device configuration and setup is completed
using the Web Configuration pages.
When using the Web Configuration pages for the first time you will be prompted to set a
password for the device. The password must contain between 8 and 32 printable ASCII (7-bit
US-ASCII) characters. Enter the password again to confirm it.
A warning message may be produced if the password is thought to be weak or insecure. After
you have logged in with this password you will be able to set a different or stronger password
at any point.
The web access password must be configured before the NVR is capable of performing any
authenticated network services, including recording.
►For more information, see "Configuration" on page 23
Compact NVR-AS 4000 3 Getting Started

14 User Guide - v14
DHCP
If your network supports DHCP connections, attach the device to the network and a valid IP
address is automatically assigned. The Compact NVR-AS 4000 can then be discovered
using the Control Center front-end application.
If your network does not support DHCP, the device will not be assigned an IP address and
you must follow either the monitor and keyboard or serial port instructions.
Using a monitor and keyboard
The Compact NVR-AS 4000 device can be configured by connecting a monitor to the VGA or
HDMI port and a keyboard to one of the USB ports.
1. Connect the keyboard and monitor to the device and press Enter.
You should see the following prompt:
IndigoVision Compact NVR-AS 4000 [standaloneNVR]
login:
2. Log in to the device using the username config and password config.
The device prompts you to enter the new configuration values.
3. At each prompt, press Enter to accept the current value.
•DHCP - Enter Yor Nto chose between a DHCP or static IP configuration.
•IP Address — Enter the IP address for the unit's network connection.
•Subnet Mask — Enter the IP network subnet mask for the unit's network
connection.
•Gateway — Appropriate default gateway for remote network access: this is only
required if the unit is to communicate with devices on a different subnet.
•Preferred/Alternate Name Server Address — Enter the IP address of the DNS
server used to convert network names into numerical IP addresses. You only need
to enter a name servers if you wish to specify NTP or SMTP server addresses as
names and not as IP addresses.
•NVR name — Enter a name to describe the unit.
•NVR location — Enter a name to describe the location of the unit.
•Reset network security — Enter Yto reset all passwords used to access device,
disable IP Access Restrictions, and reset the device to HTTP use only by deleting
any HTTPS certificate or certificate request.
You are now ready to attach the device to the network.
The VGA and HDMI ports go into sleep mode after a period of inactivity. To bring back out of
sleep mode, press any key.
Using the Serial port
To configure the Compact NVR-AS 4000 using the serial port, you require an RS-232 Null
Modem serial cable.
1. Connect the serial cable between the device (COM 1) and the PC.
2. On the PC, use a Terminal Emulation program such as Windows HyperTerminal, and
set the serial port parameters as follows:
• 115200 baud
• 8 bits
3 Getting Started Compact NVR-AS 4000

User Guide - v14 15
• No parity
• 1 stop bit
• Flow Control: None
3. Connect to the device and press Enter.
You should see the following prompt:
IndigoVision Compact NVR-AS 4000 [standaloneNVR]
login:
4. Log in to the device using the username "config" and password "config".
The device prompts you to enter the new configuration values.
5. At each prompt, press Enter to accept the current value.
•DHCP - Enter Yor Nto chose between a DHCP or static IP configuration.
•IP Address — Enter the IP address for the unit’s network connection.
•Subnet Mask — Enter the IP network subnet mask for the unit's network
connection.
•Gateway — Appropriate default gateway for remote network access: this is only
required if the unit is to communicate with devices on a different subnet.
•Preferred/Alternate Name Server Address — Enter the IP address of the DNS
server used to convert network names into numerical IP addresses. You only need
to enter a name servers if you wish to specify NTP or SMTP server addresses as
names and not as IP addresses.
•NVR name — Enter a name to describe the unit.
•NVR location — Enter a name to describe the location of the unit.
•Reset network security — Enter Yto reset all passwords used to access device,
disable IP access restrictions, and reset the device to HTTP use only by deleting
any HTTPS certificate or certificate request.
You are now ready to attach the device to the network.
Configure the License Server
To complete the NVR-AS setup and allow it to record, you must configure the Compact NVR-
AS 4000 to use an IndigoVision License Server. You can do this by using the device web
configuration pages.
►For more information, see "License" on page 30
Compact NVR-AS 4000 3 Getting Started

16 User Guide - v14
3 Getting Started Compact NVR-AS 4000
User Guide - v14 17
4INSTALLATION
This section details how to install Compact NVR-AS 4000.
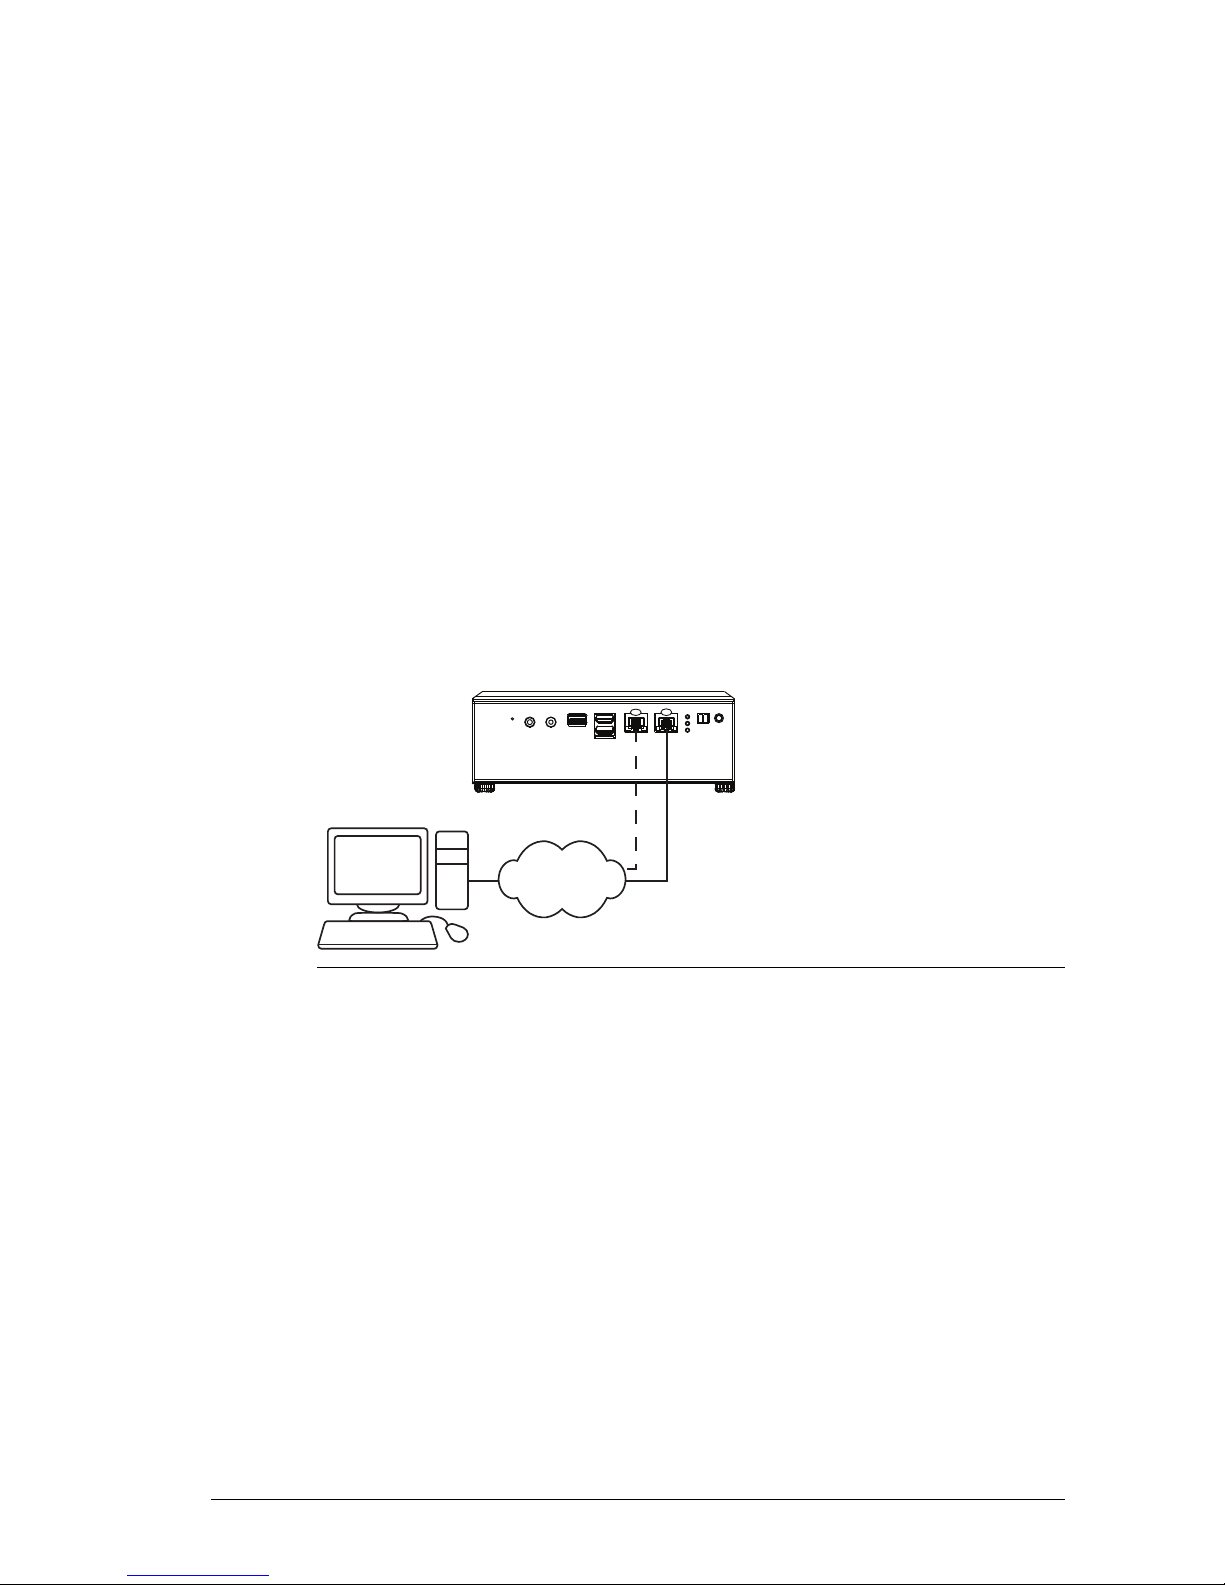
Attach the device to the network
You can connect the NVR-AS to the Ethernet network using a standard CAT5 Ethernet
cable. Connect either LAN port 1 or LAN port 2 on the front of the device to an Ethernet
switch.
The NVR-AS has redundant Ethernet capability. If you connect both Ethernet ports to the
network, and a link is not detected on one port, the NVR-AS automatically switches over to
use the other port. To use this feature connect both ports to (preferably) different network
switches.
Used for
redundancy NVR-AS
PC Network
2
1
Figure 12: Connecting a device to the network

18 User Guide - v14
4 Installation Compact NVR-AS 4000

User Guide - v14 19
5OPERATIONS
This chapter describes common tasks required for the operation of the Compact NVR-AS
4000 device.
Protect recordings
To protect all recordings on the disk:
1. Enter the IP address of the NVR-AS containing the recordings into the URL field of a
web browser, or view the Configure tab for the NVR-AS in Control Center.
2. Click Disk in the menu on the left. The Disk Configuration page opens.
3. Click Protect All to protect all recordings on the disk. (Similarly, click Unprotect All
to allow all recordings to be deleted.)
4. Click OK to perform the operation, or click Cancel.
Please be aware that if you protect all recordings, you lose the ability to identify the
recordings that were previously protected. If you unprotect all recordings, then all of the
footage becomes available for reaping.
Format a disk
To format the current disk:
1. Enter the IP address of the NVR-AS containing the disk into the URL field of a web
browser.
2. Select Disk from the menu on the left.
The DiskConfiguration page opens.
3. Click Format.
All of the recording files, zones, detectors, alarm history, bookmarks, and other configuration
information is erased when the disk is formatted.
Configure network redundancy
You can configure the Compact NVR-AS 4000 to provide redundant network connectivity.
Connect both of the network ports to connections on the same IP network. Should one
20 User Guide - v14
network connection fail, the IP address of the device migrates to the other network
connection.
The NVR-AS does not route traffic between independent networks.
IndigoVision recommends that each network port on the device is connected to a separate
switch. This ensures that network connectivity is maintained if one of the network switches
fails.
NVR-AS network redundancy does not require the Spanning Tree Protocol to be enabled on
the network switches it is attached to.
Power off
To prevent damage to the Compact NVR-AS 4000 and recordings on the disk, the device
must be powered off in a controlled manner.
1. Briefly press the power on/off button on the front of the device.
Continuously holding down the button can cause data loss.
2. Wait for the power LED on the front power switch to change from green to red.
3. Remove the mains power cable from the NVR-AS power supply.
4. After removing mains power, remove the DC power connector from the NVR-AS.
There is also an option to power off the device remotely through the Web Configuration page.
►For more information, see "Diagnostics" on page 31
Backup a recording
To back up recordings, use a Secure File Transfer Protocol (SFTP) client to copy the
recordings from the /storage/VideoLibrary directory. To access the SFTP site, log in as
support (recommended), with the support user password, or as root using your web access
password.
Install a new license or update an existing license
You can configure the Compact NVR-AS 4000 to act as a License Server for IndigoVision
products.
Each IndigoVision site should only have a single License Server. If you configure the
Compact NVR-AS 4000 to act as a License Server, make sure that there are no other
License Servers active in your site.
5 Operations Compact NVR-AS 4000
Table of contents
Other IndigoVision Network Hardware manuals


Popular Network Hardware manuals by other brands


Schrack Technik
Schrack Technik HSERG245GS instruction sheet

Lowrance
Lowrance General information Pamplet General information

Bryant
Bryant EVOLUTIONR SYSTEM SYSTXBBRWF01 installation instructions

Delta Electronics
Delta Electronics Network Device DVPPF01-S instruction sheet

MikroTik
MikroTik PL7411-2nD Connecting guide

Carotron
Carotron AM-1000 instruction manual


