INDRA 190105A101 User manual

INDRA Pioneer
User Guide

32
Content
Contents 2
Important Safety Notes 3
Introduction 4
Operation 6
Charging Cable Stowage 15
Technical Specifications 16
Troubleshooting 17
Servicing, Maintenance & Support 19
Models:
190105A101 Type 1 Tethered
190105A102 Type 2 Tethered
190105A103 Type 2 Socketed
Important Safety Notes
WARNING: Pioneer charger installation must only be performed by a
certified electrician who has been trained in dealing with high voltage electricity.
WARNING:Use the Pioneer only as directed.
WARNING: Do not use the Pioneer if it is defective, appears broken, cracked or
fails to operate or is otherwise damaged. In this case, you must
report the damage immediately to your original installation partner, quoting
the serial number as shown on the product label.
WARNING: Do not insert any foreign objects into the Pioneer
or its charging cable.
WARNING: Do not expose the Pioneer or its components to open flames.
WARNING: Do not expose the Pioneer to heating equipment.
WARNING: Do not immerse the Pioneer or its components in
water or other fluids.
WARNING: The Pioneer is not to be used by persons (including children) with
reduced physical, sensory or mental capabilities; or lack of experience and
knowledge, unless they have been given supervision or instruction concerning
use of the device by a person responsible for their safety.
Users with implanted cardiac pacemakers or implanted cardiac defibrillators
should not stand close to the unit during charging.
WARNING: Install the Pioneer in a location that mitigates
damage from flooding.
WARNING: Operating or storing the Pioneer in temperatures outside its speci-
fied range may cause damage to the charger.
CAUTION: Ensure that no water sources are above or near the Pioneer, such as
taps or sprinklers.
CAUTION: Ensure that the charging cable is correctly and neatly stowed after
use, to prevent any inadvertent tripping hazards

54
Introduction
Welcome
Congratulations on your purchase of a Pioneer! The Indra team hope you’ll be
delighted with the features, quality and user experience of the Pioneer.
This manual covers how to get started with your Pioneer, explains key features,
the troubleshooting tips along with important safety and warranty information.
It is important that you read this manual carefully before using the Pioneer, so
you’re completely familiar with all features, safety advice and are able to get the most
from your Pioneer.
Overview
The Pioneer is a permanently installed electric vehicle charger providing
up to 32 Amps (7.2kW) at 230V, 50Hz. There are 3 Pioneer variants:
• Pioneer Type 1 (170915A104) has a SAE J1772 (Type 1) tethered charging
connector to be used with Type 1 socket fitted EVs;
• Pioneer Type 2 (170915A105) has an IEC 62196 (Type 2) tethered charging
connector to be used with Type 2 socket fitted EVs;
• Pioneer Type 2 Socket (170915A106) can be used with multiple types of
charging cables, provided at least one end of the cable is fitted with an IEC 62196
male connector.
The Pioneer works like conventional chargers, but also offers a range of smart charging
modes, designed to take advantage of local generation (e.g. solar PV),
variable rate tariffs (e.g. Time of Use), as well as schedule charging according to live
carbon intensity of grid power. In all modes, the Pioneer calculates the best charging
schedule that gets your EV ready when you need it.
Features
• Available in Type 1, Type 2 Tethered and Untethered versions
• 3 charging modes: Smart, Boost & Home Alone
• Remote control and analytics via the ev.energy App
• Works with local generation e.g. Solar
• Economy tariff charging
• Minimises the carbon of a charging session
• Manual override on the charger and in the ev.energy App
• Integral cable storage and charging holster
• Supplied with a current sensor
• Remote software updates
• High weather protection rating (IP65)
Controls and Indicators
1
25
6
4
3
1Primary Status LED
Multi-coloured, highlighting the operational state and mode
2Charging Status Indication
Four individual LEDs indicating whether the unit is discon-
nected from your EV, Connected but Idle or Charging
3Tethered Charging Cable
For tethered variants, a 5m long charging cable is attached
4Charging Connector Holster
When not in use, and to prevent water ingress, the charging
connector should be pushed into the unit’s holster
5BOOST Button
If you need to over-ride your pre-set schedule, press BOOST on the
unit or in the App to charge instantaneously at maximum rate
6Integrated Cable Storage
When not in use, simply wrap the charging cable around the unit

76
Operation
Getting started
As soon as installation is complete, your Pioneer will be ready to start charging.
All you need to do is plug your EV in and go, it’s that simple.
ev.energy App
At the end of the install process, you will also automatically receive a welcome email
from ev.energy with details of how to register for the ev.energy App.
The ev.energy App is designed to get the most out of your Pioneer, from seeing
the charger status, setting the charging mode, updating preferences, viewing charging
history, getting support and much more.
The ev.energy App is available through your phone’s app store and works on all major
platforms (including Android & iOS).
Once you create an account and sign-in for the first time, you will be guided through
the initial set-up and details of the key smart features how to use them:
• Welcome screen
• Five dashboards providing information on the app features
• Smart mode and how to manage your charging
• Boost mode to override the Pioneer smart schedules and
charge your EV immediately
• How to add local generation, like solar, and the option to divert
surplus energy into your EV
• Track your charging costs, energy consumption and carbon impact
• Your energy tariff details to ensure the cheapest charging session

98
Using the ev.energy App
Smart Mode
The INDRA Pioneer will operate in Smart Mode by default, automatically
calculating your personalised charging schedule, every time you plug in. To do this the
Pioneer will use the information you provide in the ev.energy App - for example your
energy tariff and when you need your EV – to make sure your EV is ready when you
need it and at the lowest cost.
ev.energy tip: Don’t worry if your EV doesn’t start charging immediately when plugged
in, Smart Mode is waiting for the best time to start charging. You can check when the
charging session is due to start on your dashboard page within the app.
Charging Status
Schedule Details
Boost Mode
Navigation
Boost Mode
Boost Mode allows you to override Smart Mode to charge at full power,
immediately. This might not be the cheapest option on your tariff or use
the most solar, but it will be the fastest!
ev.energy Tip: you can switch Boost Mode on and off either in the App or
on the front panel of the Pioneer unit itself.
Boost Status
Toggle Boost On/Off
Stats
See a complete history of your charging – things like how
much you’ve spent charging, or how much energy you’ve
used throughout the month.
ev.energy Tip: Your EV may not always accept the full 32A
(7.2kW), despite the Pioneer offering this to the
vehicle. You may notice times when this is the case in
the charging history.

11
Charging Schedule
To set up your charging schedule, simply select the time you’d like your car to be
charged by each day. When the charger is in Smart Mode, it’ll make sure your car is
ready to drive by these times.
Vehicle Details
To ensure scheduling is met, the associated battery capacity of your EV must
be added. From the App dashboard, click on “Account” where you will find
“Car Details”. Within this page select the appropriate vehicle manufacturer
and then the specific model of your EV.
ev.energy tip: Ensure the correct battery capacity (Trim) is selected in
the App, this is one of the most important things Smart Mode will use
to calculate your personal schedule.
10

1312
Solar Matching
Where solar PV, or other forms of local generation have been installed, your
Pioneer can use surplus solar output to charge your EV, increasing your
self-consumption.
This can be set up within the ev.energy app by navigating to your Account tab
> Your charger and then enabling “Solar matching mode”.
ev.energy Tip: Only turn this On if your charger supports solar matching mode.
In Solar matching mode your car will only charge when it’s sunny. Smart charging
will turn off if you turn this setting on. Likewise, turning on smart charging will
result in solar matching being disabled.
Here on your charger details you can also check the “Status” of your unit to make sure
it’s online and connected to the ev.energy app. Ensuring this will help keep your smart
charging schedule working and the tracking of your usage up to date.
Charger Status
Toggle Solar On/Off
Rewards
Get rewarded for smart charging your EV with us!
The aim of ev.energy is to reduce electricity bills for you, and reduce CO2
emissions for the planet. Use our app to complete Smart Charges of at least
10kWh each, earn reward points and then use them to redeem rewards.
Some of the rewards on offer:
• 100% Zero-Carbon Charging with Carbon Credits
• £5 Amazon vouchers
To claim these rewards, all you will need to do is:
• Ensure Smart Charging is enabled in your app
• Collect 20 reward points by completing 20 qualifying Smart Charges
• Head to the Rewards tab in the app and tap a reward to claim!

14
Support & Frequently Asked Questions
Although the ev.energy App has been designed to be
intuitive and self-explanatory, should you have any further
questions, please check out our “Help and FAQs” which
cover a host of topics.
You’ll also find more ways to get help in the “Contact us”
page by heading to your account tab in the app.
Charging Cable Stowage
NOTE: APPROPRIATE CHARGING CABLE STOWAGE IS ESSENTIAL TO PREVENT
INADVERTANT TRIPS/ FALLS OR DAMAGE TO THE EV CONNECTOR
Tethered Variants (190105A101 & 190105A102)
• Disconnect the Pioneer’s connector from your EV.
Seek manufacturer guidance on how to do so, as this is often EV specific
(Nissan Leaf disconnection is via the EV’s key fob for example)
• Coil the long charging cable around the circumference of the Pioneer
enclosure, several times, leaving a very short tail.
• Push the male charging connector into the blank holster recess of the
Pioneer unit, so that it clips/ latches into position and is held.
• Ensure that no part of the coiled charging lead is trailing on or close to the ground.
Socketed Variant (190105A103)
• Disconnect the Pioneer from your EV.
Seek manufacturer guidance on how to do so, as this is often EV specific
(Nissan Leaf disconnection is via the EV’s key fob for example)
• Remove your charging cable connector from the EV socket FIRST.
• Completely detach your charging cable from the Pioneer unit by first pushing
gently inwards towards the rear of the charger unit (this removes any pressure from
the locking pin, allowing it to retract fully).
• Secondly, carefully pull downwards on your charging cable connector to remove it
from the Pioneer device.
• Coil and stow this loose cable somewhere secure, and where it won’t
create a trip hazard.
15

17
General Specification
Model Name Pioneer
Mode Mode 3: Type 2 socket, Type 1 or Type 2 tethered cable
Overall Dimensions 200mm x 130mm x 420mm
Weight 3.5kg (excluding cable)
Technical Specifications
Operating temperature -20℃to 50℃
Charging Cable Length Up to 4.5m
Operating humidity 10% to 85%
Installation Indoor / Outdoor wall mounted
Communications Ethernet or Cellular Network (optional)
Communication Protocol ev.energy
User Interface Capacitive Touch Panel
Customer Companion App
Certification CE certified
Electrical Specification
Max. output power 7.2kW (1P)
Input voltage 230V, AC ± 10% (1P)
Nominal frequency 50Hz
Variable up to 32A
Output current
IP64 protection
Degree of protection
CAT III
Overvoltage category
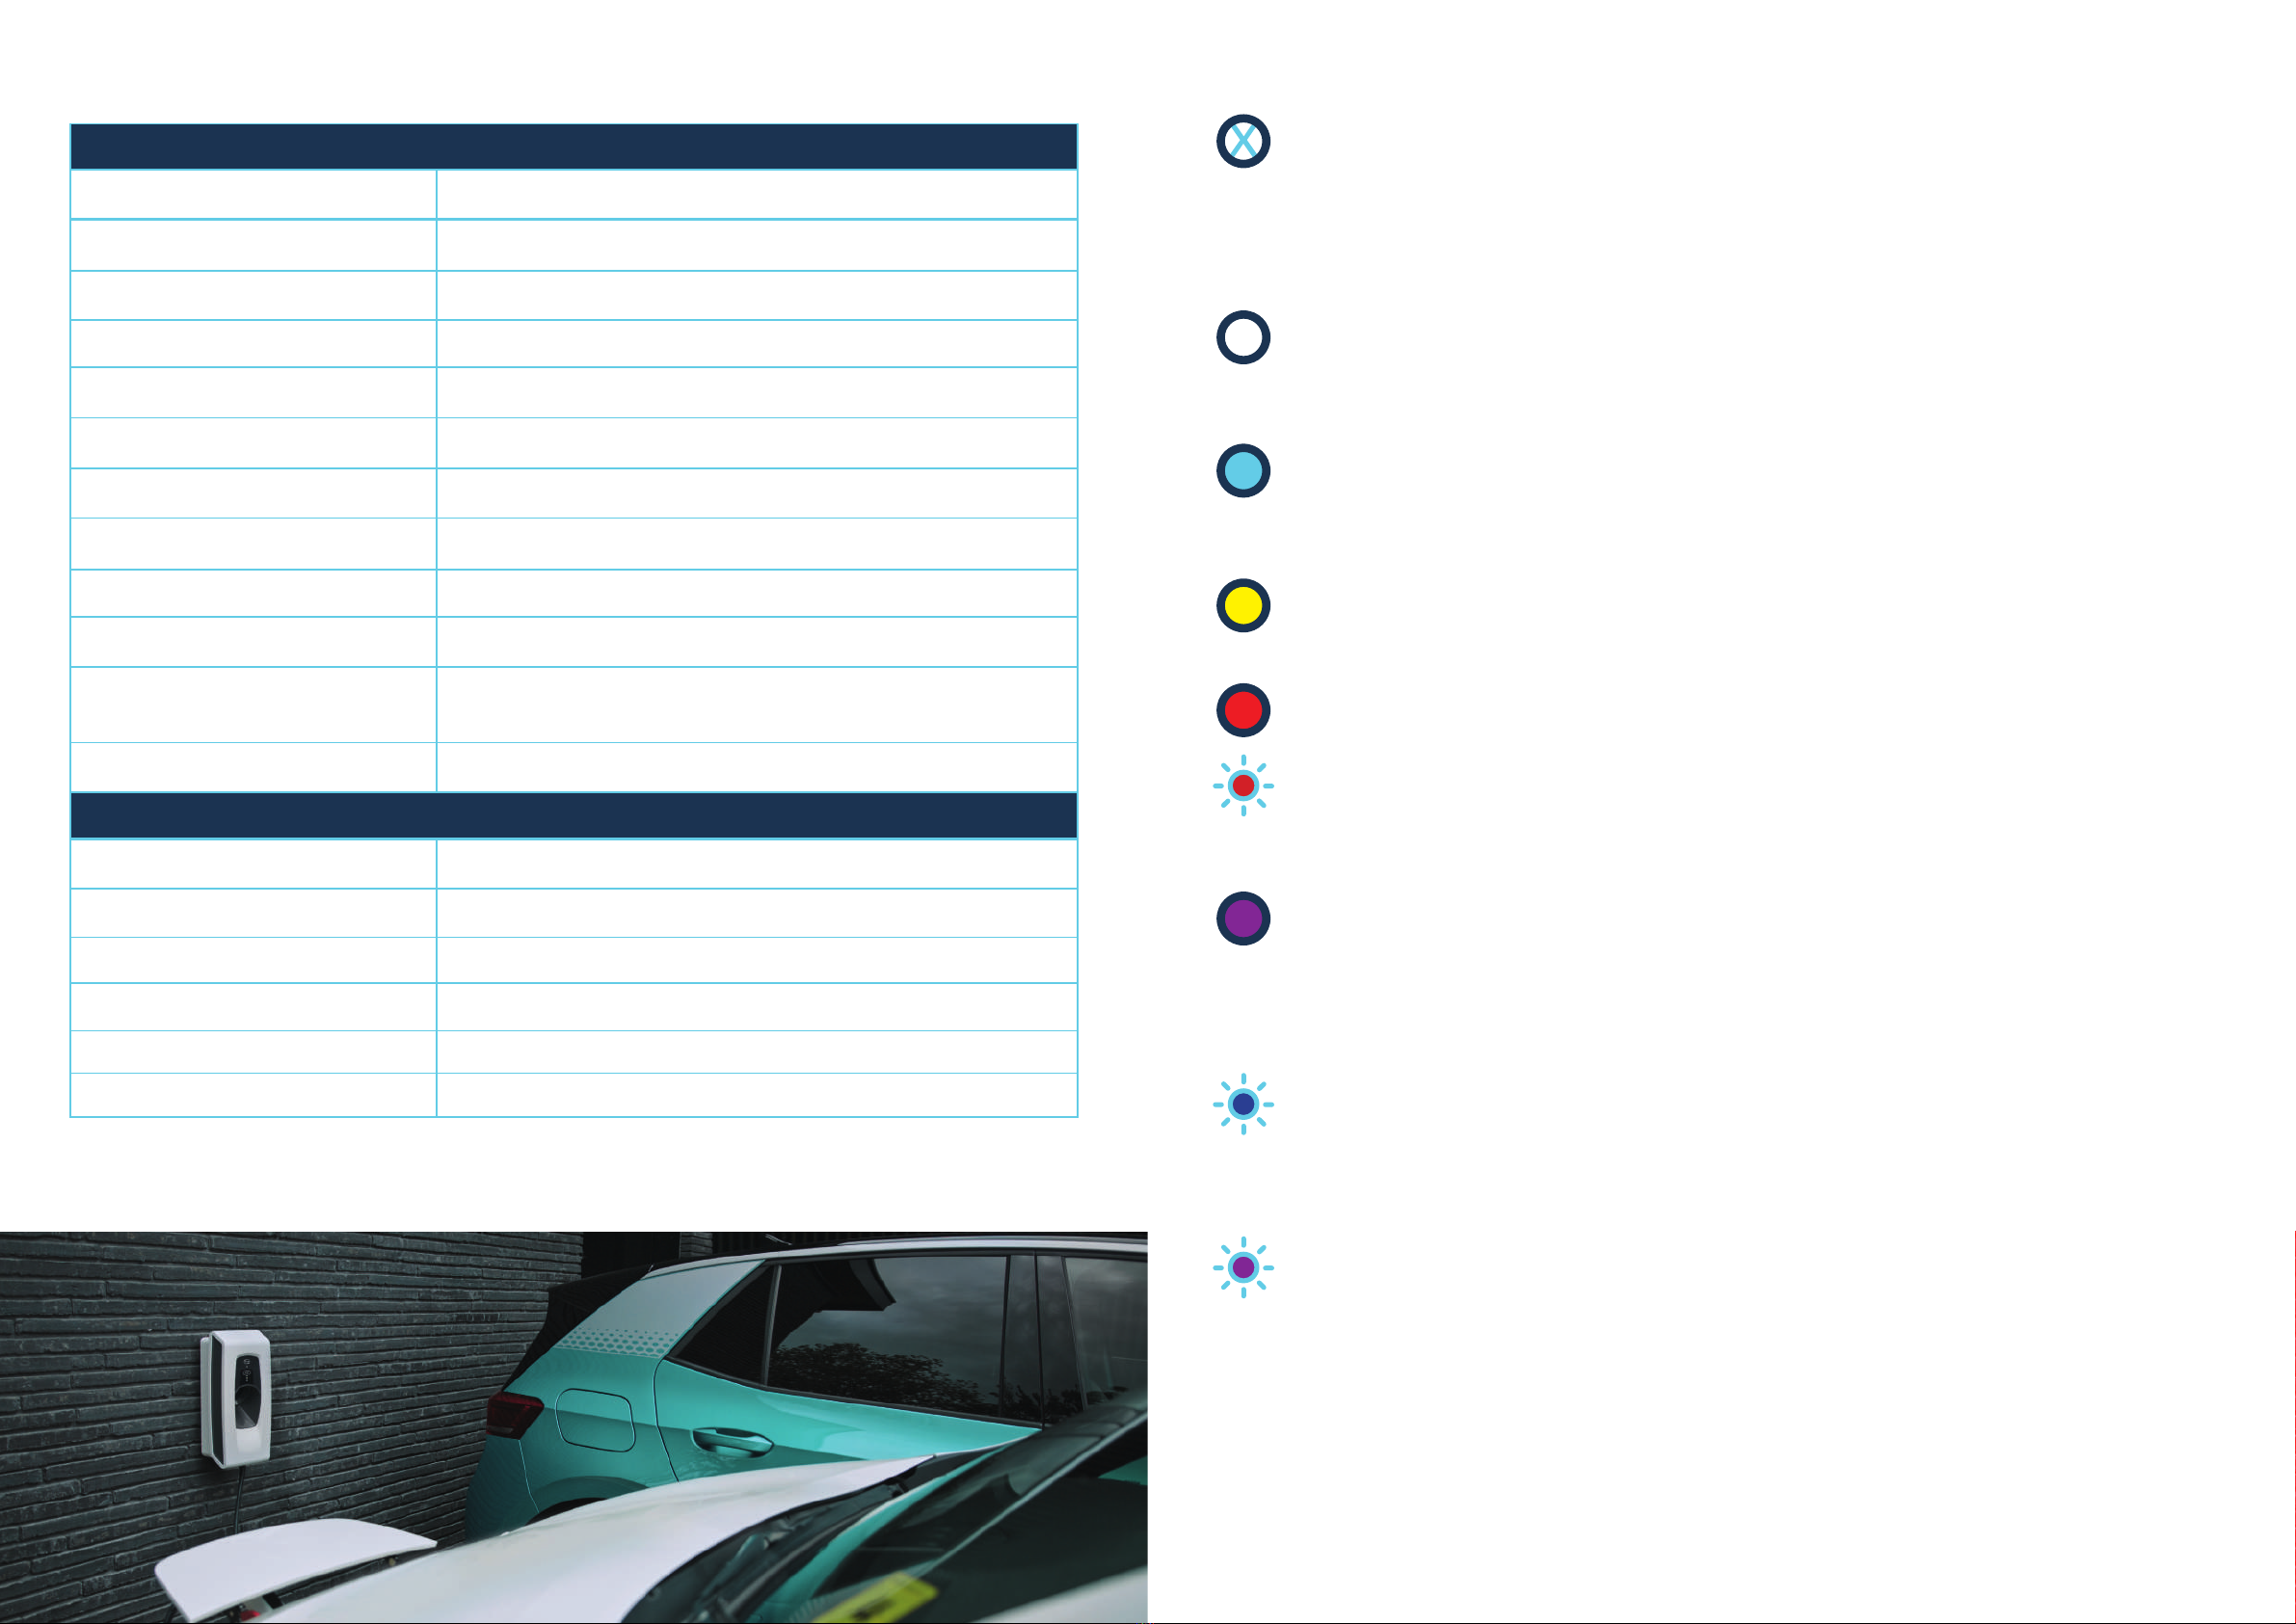
Troubleshooting
All LEDs are off
Unit is in a powered OFF state.
The unit has no power. Check the mains wiring and make sure that all
connections are correct. Ensure that all RCD or selector switches are in the
correct operational state. If the connections are correct and checked twice
contact Customer support.
Primary LED White, lit in Steady State
Smart mode
The unit is connected to Indra. The unit will charge based on driver requirements
and smart schedules.
Primary LED Blue, lit in Steady State
Boost mode
The ‘Boost’ button has been pressed. The unit is now charging at full power
and will over-ride any scheduling commands.
Primary LED Yellow, lit in Steady State
Solar Match mode
The unit is using micro-generated, on-site electricity to charge the EV
Primary LED Red, lit in Steady State OR Primary LED Red, Flashing**
Fault mode
The unit has encountered an error.
Perform a hard restart on the unit by turning the rotary isolator switch on and off
or by flipping the RCD inside the house consumer unit.
If the steady red light persists upon reboot, contact Customer Support.
Primary LED Purple, Solid on Start-up/immediately after a Power Cycle
Booting
The unit is now powering up and running its start-up sequence, this will last for
a period of approximately 30 seconds.
Do not attempt to plug the device into an EV whilst booting is in progress.
Primary LED Blue, Flashing**
Software update in progress.
The unit is now downloading a software update from the cloud. Ensure that the
unit is not disconnected from the internet, or power removed from the device,
during this period/ procedure.
Primary LED Purple, Flashing** (continuing after Start-up sequence)
The charger cannot communicate with Indra.
The repeating flashing pattern gives an indication of the fault:
1 flash, repeating - Connected to the internet but unable to connect to Indra.
Contact Customer Support. 2 flashes, repeating - There is a problem with the
connection to your router. Check all cables are plugged in, that the ethernet
cable functions and that other devices in the home are connected to the
internet or try restarting the router. 3 or more flashes, repeating - There is likely
a problem with the router. Check that other devices in the home are connected
to the internet and try restarting the router.
16

19
Troubleshooting continued
Charging Status Indicators Off
EV is not connected
Plug in your EV to enable charging
Where an untethered cable is being used, ensure the device end
is plugged in first, before plugging the opposite end into the EV
Charging Status Indicators White, Cycling Downwards
Charging Mode
The charger is currently charging your vehicle.
Charging Status Indicators White, all Flashing
Delay
The charger knows a vehicle is connected but is currently Idle.
Either the car is fully charged or awaiting a scheduled charge.
If neither of the above applies, contact Customer Support.
Charging Status Indicators White, all lit in Steady State
Idle
The charger is currently idle and not charging.
Servicing, Maintenance & Support
If you run into any problems with your Pioneer, please don’t try to
repair it yourself.
The Pioneer MUST NOT be repaired by the customer. Repair of the charger is
to be carried out ONLY by the manufacturer or their approved installation partners.
In the case that any Pioneer system safety component (defined as any breaker, fuse,
limit cut out, enclosure, grounding equipment) fails completely or partially;
maintenance or replacement of the charger may be required.
Disposal
In accordance with European Directive 2002/96/EC on Waste Electrical and
Electronic Equipment (“WEEE”) and its implementation in national law, used
electrical devices such as the Pioneer must be collected separately and
recycled in an environmentally responsible manner.
All end of life Pioneer devices must be returned to Indra Renewable
Technologies Ltd for appropriate recovery & recycling.
If this cannot be achieved, then the customer must take the end of life product
to a designated collection facility (DCF) as detailed by their local authority (LA).
Such facilities include civic amenity and waste collection sites.
Support and Contact Information
We’re sure you’ll enjoy charging with your Pioneer, but if you do experience any issues
or require technical support, please get in touch with your installation retail
partner in the first instance.
Information you will require to hand includes your charger serial number, the date of
installation, and a brief description of the issue.
You will find further details within the ‘Contact Us’ section of the ev.energy App.
Open Source Declaration
This product contains Free/Open Source Software. For further information, please visit
https://storage.googleapis.com/etp_oss/index.html
18

Visit www.indra.co.uk
United Kingdom 01684 770 631
Worldwide 00441684 770 631
INDRA Renewable Technologies
Unit 1, Sentinel House,
Sparrowhawk Close, Malvern,
Worcestershire, WR14 1GL
Contact INDRA
For more information, please contact us;
This manual suits for next models
7
Table of contents
Other INDRA Automobile Accessories manuals