Indumicro IMP-A150 User manual

1
User Manual
IMP-A120 / A150 / A170 / A190
Industrial Panel PC

2
Warning!
___________________________________
This equipment generates, uses and can radiate radio frequency energy and if not installed and
used in accordance with the instructions manual may cause interference to radio communications.
It has been tested and found to comply with the limits for a Class A computing device pursuant to
FCC Rules, which are designed to provide reasonable protection against such interference when
operated in a commercial environment. Operation of this equipment in a residential area is likely
to cause interference in which case the user at his own expense will be required to take whatever
measures may be required to correct the interference.
Disclaimer
This information in this document is subject to change without notice. In no event shall
Indumicro.com be liable for damages of any kind, whether incidental or consequential,
arising from either the use or misuse of information in this document or in any related
materials.
Electric Shock Hazard – Do not operate the machine with its back cover removed. There are
dangerous high voltages inside.
___________________________________

Table of Contents
Chapter 1: Getting Started
1.1 Specifications…………………………………………………………………………..1
1.2 Dimensions…………………………………………………………………………….2
1.3 Brief Description of the IMP-A1x0.......................................………………………6
Chapter 2: BIOS Setup
2.1 Operations after POST Screen..…....……………………..………………………..7
2.2 Standard CMOS Features..…………………………………………………………..9
2.3 Advanced BIOS Features..………………………………………………………….12
2.4 Advanced Chipset Features.………………………………………………………..15
2.5 Integrated Peripherals……………………………………………………………….19
2.6 Power Management Setup...………….……………………………………………24
2.7 PnP/PCI Configurations...………….……………………………………………….27
2.8 PC Health Status....………….………………………………………………………29
2.9 Load Fail-Safe/Optimized Defaults...………………………………………………30
2.10 Set Administrator/User Passwords.………………………………………………31
2.11 Save & Exit Setup……………….....………………………………………………32
2.12 Exit Without Saving ………………....……………………………………………32

Specs IMP-A120T IMP-A150[G]T IMP-A170[G]T
Model
CPU Intel Atom N270 1.6 GHz processor with FSB 533 MHz
Chipset Intel 945GSE+ Intel ICH7M
System Memory1 x 200-pin DDR2 533 MHz SO-DIMM slot, up to 2 GB
BIOS Award 4 MB SPI BIOS
Display Size
Maximum Colors
Viewing Angle (H/V)
Luminance (cd/m²)
262K
140˚/110˚
370
12.1” 800x600 TFT
16.2M
15” 1024x768 TFT
350
140˚/125˚
17” 1280x1024 TFT
16.2M
300
160˚/160˚
19” 1280x1024 TFT
16.2M
300
160˚/160˚
Backlight Lifetime 40,000 Hours
Touch Screen Type Analog Resistive on ‘T’ models, GFG on ‘GT’ models
Serial Port 2x RS-232 Port, 1 x RS-232/422/485 Port
USB Port
LAN 2 x Gigabit LAN
4 x USB 2.0 Port
Display Port
Audio MIC, Line-out
VGA
1 x CF slot (external)
Storage 1 x 320GB HDD,
Expansion Slot None
Power Supply 11~32 VDC
Construction Heavy-duty Steel Chassis
RatingNEMA 4/IP65 certified Front Bezel
Mounting Panel / VESA 75 Mount
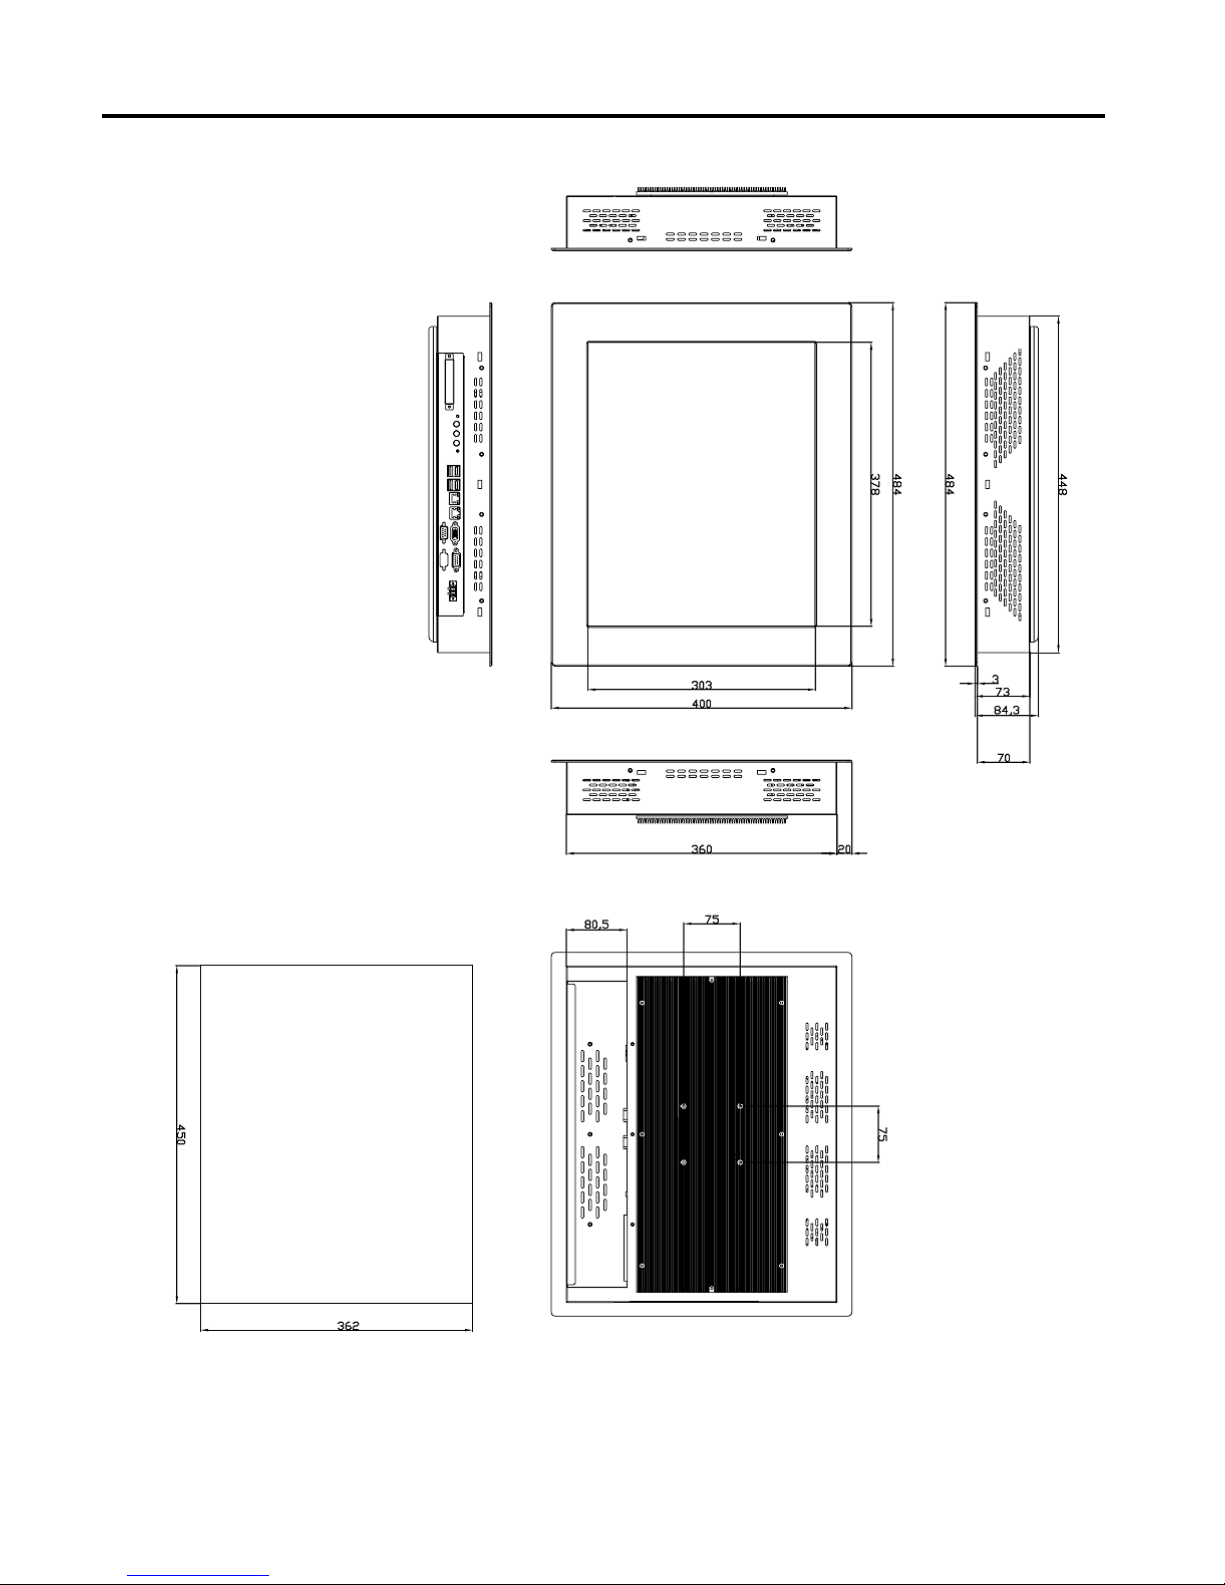
Dimensions (WxHxD) 410 x 310 x 83484 x 400 x 84
317 x 243 x 76 439 x 348 x 83
Weight 5.82kg 8.5kg 13.8kg
10kg
Operating Temperature
Storage Temperature
RelativeHumidity
Vibration
Shock
Certificate
10~90% (non-condensing)
5~17Hz, 0.1” double amplitudedisplacement / 17~640Hz, 1.5G acceleration peak to peak
10G acceleration peak to peak (11 millimeters)
Meet CE / FCC Class A
0~50
-20~60
゚C
゚C
1.1 Specifications
Chapter 1: Getting Started
IMP-A190T
IMP-A1x0T User Manual 1
Power consumption Max. 21W Max. 35W Max. 45W Max. 45W

1.2 Dimensions
Chapter 1: Getting Started
Dimensions of the IMP-A120
Panel
Cut-out
IMP-A1x0T User Manual 2
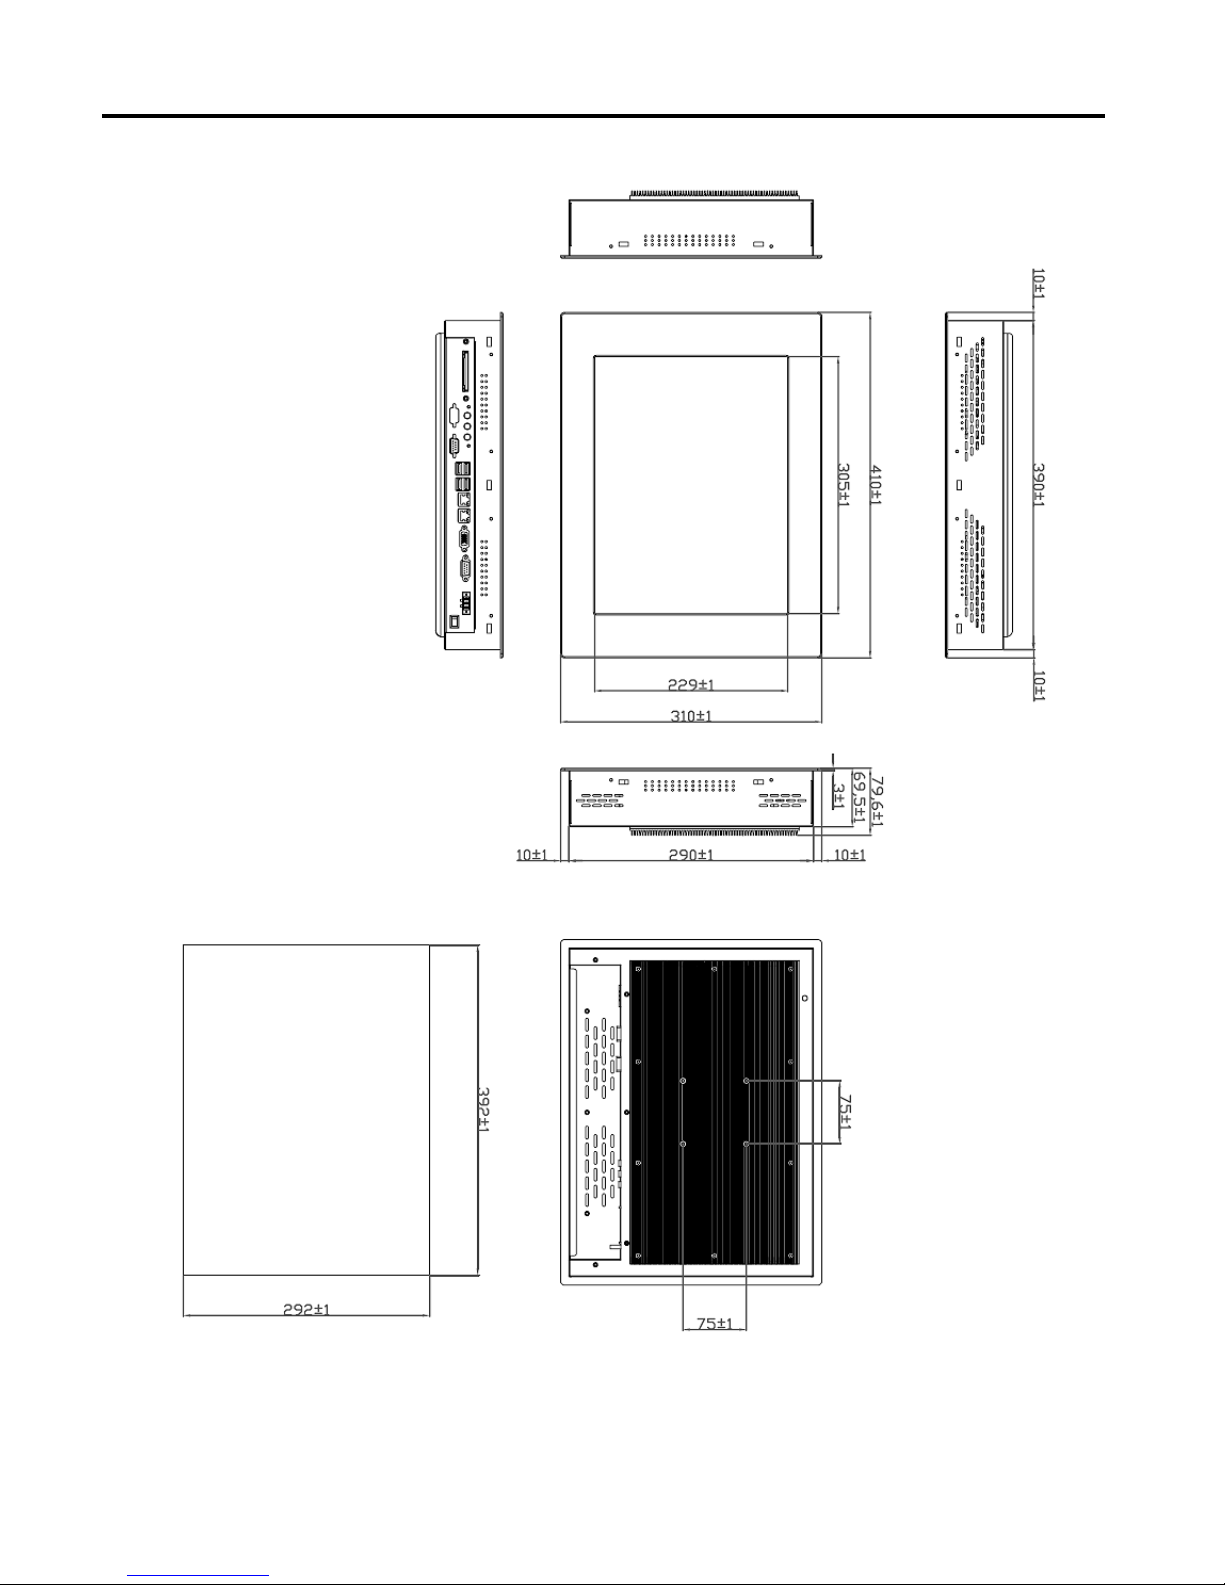
Chapter 1: Getting Started
Dimensions of the IMP-A150
Panel
Cut-out
IMP-A1x0T User Manual 3

Chapter 1: Getting Started
Dimensions of the IMP-A170
Panel
Cut-out
IMP-A1x0T User Manual 4
Chapter 1: Getting Started
Dimensions of the IMP-A190
IMP-A1x0T User Manual 5
Panel
Cut-out

1.3 Brief Description of the IMP-A1x0
The power-optimized IMP-A1x0 systems deliver robust performance-per-watt as an embedded HMI.
The systems are powered by an Intel Atom™N270 1.6 GHz processor.
They come with a CompactFlash slot, 2.5”hard disk drive, DDR2 memory, 3 serial ports, 4 USB
ports, 2 Gigabit LAN ports, audio and a wide range 11~32VDC power input.
The ‘T’models are equiped with an analog resistive touch screen while the ‘GT’models come with
a GFG (Glass-Film-Glass) touch screen.
GFG touch screens are not only resistant to scratch and abrasion but also to most chemicals.
Apart from that, glass is transparent and does not impair the brilliance of the picture at all.
Chapter 1: Getting Started
IMP-A1x0T User Manual 6
Front and rear view of the IMP-A1x0

2.1 Operations after POST Screen
After CMOS discharge or BIOS flashing operation, the system will display the following screen for your
further operation. Press F1 key to continue or Del key to enter CMOS Setup.
Phoenix – AwardBIOS v6.00PG, An Energy Star Ally
Copyright © 1984-2007, Phoenix Technologies, LTD
ASB-L701 V012
Main Processor : Intel® Atom™ 1.60GHz(133x12)
Memory Testing :515008K OK + 8M shared memory
CPU Brand Name : Intel® Atom™ CPU N270 @1.60GHz
C1E BIOS Supported
Hyper-Threading Technology CPU Detected (Hyper-Threading
Technology Enabled)
Memory Frequency For DDR2 533
IDE Channel 0 Master : None
IDE Channel 0 Slave : None
IDE Channel 1 Master : None
IDE Channel 1 Slave : None
CMOS checksum error – Defaults loaded
Press F1 to continue, DEL to enter SETUP
11/25/2009-Silverthrone-6A79KAPXC-00
After optimizing and exiting CMOS Setup, the POST screen displayed for the first time is as follows
and includes basic information on BIOS, CPU, memory, and storage devices.
Chapter 2: BIOS Setup
IMP-A1x0T User Manual 7

Phoenix – AwardBIOS v6.00PG, An Energy Star Ally
Copyright © 1984-2007, Phoenix Technologies, LTD
ASB-L701 V012
Main Processor : Intel® Atom™ 1.60GHz(133x12)
Memory Testing :515008K OK + 8M shared memory
CPU Brand Name : Intel® Atom™ CPU N270 @1.60GHz
C1E BIOS Supported
Hyper-Threading Technology CPU Detected (Hyper-Threading
Technology Enabled)
Memory Frequency For DDR2 533
IDE Channel 0 Master : None
IDE Channel 0 Slave : None
IDE Channel 1 Master : None
IDE Channel 1 Slave : None
Press DEL to enter SETUP, F12 to Enter Boot Menu
11/25/2009-Silverthrone-6A79KAPXC-00
Press F12 key to enter Boot Menu during POST, as shown by the following figure.
Boot Menu
== Select a Boot First device ==
+
+ Hard Disk
+ CDROM
LAN
↑↓:Move Enter:Accept F4:Exit
Removable
Chapter 2: BIOS Setup
IMP-A1x0T User Manual 8

2.2 Standard CMOS Features
Press [Del] key to enter BIOS Setup utility during POST, and then a main menu containing system
summary information will appear.
Standard CMOS Features
Use this menu to modify basic system configurations such as time, date and etc.
Advanced BIOS Features
Use this menu configure advanced features of Award® BIOS.
Advanced Chipset Features
Use this menu to change the values in the chipset registers and optimize your system
performance.
Integrated Peripherals
Use this menu to specify your settings for integrated peripherals.
Power Management Setup
Use this menu to specify your settings for power management.
PnP/PCI Configurations
This menu is valid only if your system supports PnP/PCI.
PC Health Status
This menu shows the current status of your PC.
Chapter 2: BIOS Setup
Phoenix – AwardBIOS CMOS Setup Utility
Standard CMOS Features Load Fail-Safe Defaults
Advanced BIOS FeaturesLoad Optimized Defaults
Advanced Chipset FeaturesSet Administrator Password
Integrated PeripheralsSet User Password
Power Management SetupSave & Exit Setup
PnP/PCI ConfigurationsExit Without Saving
PC Health Status
ESC : Quit : Select Item
F10 : Save & Exit Setup
Time, Date, Hard Disk Type . . .
IMP-A1x0T User Manual 9

Load Fail-Safe Defaults
Use this menu to load Fail-Safe defaults into BIOS for the most stable, and minimal-performance
system operations.
Load Optimized Defaults
Use this menu to load factory settings into BIOS for optimal-performance system operations.
Set Administrator Password
Use this menu to set Administrator password.
Set User Password
Use this menu to set user password.
Save & Exit Setup
Save all changes to the CMOS and exit BIOS Setup.
Exit Without Saving
Abandon all changes to the CMOS and exit BIOS Setup.
The following figure shows the items of Standard CMOS Features menu, which may exclude any
modifiable subitem or contain one or more modifiable subitems. Use arrow keys to select the items
to be modified and <PgUp> or <PgDn> key to select desired settings.
Chapter 2: BIOS Setup
Phoenix – AwardBIOS CMOS Setup Utility
Standard CMOS Features
Date (mm:dd:yy) Thu, Dec 23 2009 Item Help
Time (hh:mm:ss)20 : 11 : 17
Menu Level
IDE Channel 0 Master [ None]
IDE Channel 0 Slave[ None] Change the day, month,
year and century
IDE Channel 1 Master [ None]
IDE Channel 1 Slave[ None]
Video
Halt On
[EGA/VGA]
[All, But Keyboard]
Base Memory 639K
Extended Memory 1038336K
Total Memory 1039360K
:Move Enter: Select +/-/PU/PD:Value F10:Save ESC:Exit F1:General Help
F5: Previous Values F6: Fail-Safe Defaults F7: Optimized Defaults
IMP-A1x0T User Manual 10

Date This item allows you to set a desired system date (usually current date).
Day It
is a read-only and bios-defined weekday attribute ranging from Sun (Sunday) to Sat
(Saturday).
Month It is a month attribute ranging from Jan (January) to Dec (December).
Date It is a date attribute ranging from 1 to 31 and can be modified via numeric keys.
Year It is a user-defined year attribute.
Time This item allows you to set a desired system time (usually current time).
Channel 0 Master / Channel 0 Slave
Channel 1 Master / Channel 1 Slave
Press PgUp/<+> or PgDn/<-> key to select among Manual, None and Auto type. Note that the
specification of your drive device must be in compliance with the contents of Drive Table. If the
information registered in this item is not correct, your hard disk will not work properly; if your hard
disk specification is not found or does not conform to or the Driver Table, you may select Manual
type to set the specification manually.
If you choose Manual, you will be requested to enter relevant information in the following entries.
Keyboard input is also supported. For details, you may refer to the instructive materials provided
by distributor or device manufacturer.
If a SCSI HDD device is used, set this item to "NONE".
If a CD-ROM drive is connected to the HDD port, set this item to "NONE"
AccessMode Options are: Auto, Normal, Large and LBA
Cylinder Number of cylinders
Head Number of heads
Precomp Write precompensation cylinder
Landing Zone Head landing zone
Halt on
The item allows you to determine when the system will stop.
Options are: No Errors; All Errors; All, But Keyboard
No Errors The system boot will not stop for any error.
All Errors Whenever the BIOS detects a non-fatal error, the
system boot will stop.
All, But Keyboard The system boot will not stop for a keyboard error but
stop for all other errors as detected by BIOS. (default)
The time format is <hour><minute><second>.
The date format is <day><month><date><year>.
Chapter 2: BIOS Setup
IMP-A1x0T User Manual 11

2.3 Advanced BIOS Features
CPU Feature
The item has the following options:
Delay Prior To Thermal [16 Min] (This item allows you to set the duration of entering CPU
thermal throttling.)
C1E Function [Auto] CPU Power-saving State Enable Control
Chapter 2: BIOS Setup
Phoenix – AwardBIOS CMOS Setup Utility
Advanced BIOS Features
CPU Feature [Press Enter] Item Help
Hard Disk Boot Priority[Press Enter]
Virus Warning [Disabled] Menu Level
CPU L1 & L2 Cache[Enabled]
Hyper-Threading Technology[Enabled]
Quick Power On Self Test[Enabled]
First Boot Device[CDROM]
Second Boot Device[Hard Disk]
Third Boot Device[LAN]
Boot Other Device [Enabled]
PXE Boot For Onboard LAN1 [Disabled]
PXE Boot For Onboard LAN2 [Disabled]
Boot Up NumLock Status [On]
Gate A20 Option [Fast]
x APC Mode Enabled
MPS Version Control For OS [1.4]
OS Select For DRAM > 64MB [Non-OS2]
Small Logo(EPA) Show [Disabled]
Security Option [Setup]
:Move Enter: Select +/-/PU/PD:Value F10:Save ESC:Exit F1:General Help
F5: Previous Values F6: Fail-Safe Defaults F7: Optimized Defaults
CPU C State Capability [C1]
Execute Disable Bit [Enable]
CPU Power-saving State Control
Virus Protection Technology
Hard Disk Boot Priority (IDE Storage Device Boot Priority)
This item is used to specify boot priority of IDE devices. Press "Enter" key for detailed setting.
Virus Warning
This item has two options: "Disabled" and "Enabled".
IMP-A1x0T User Manual 12

CPU L1 & L2 Cache
This item can be used to enable or disable the CPU’s primary (L1) or secondary (L2) cache. If set
to Enabled, operating speed of PC will be increased remarkably; if set to Disabled, the function will
be inactivated.
Hyper-Threading Technology
Enable and disable Intel's hyper-threading technology.
Quick Power On Self Test
This item is used to accelerate Power On Self Test (POST) process. If set to Enabled, BIOS will
shorten or skip some of its tests.
Enabled (default) Quick POST
Disabled NormalPOST
First/Second/Third/Boot Other Device
BIOS will load the operating system according to the boot order of available devices. If disabled,
the function will be inactivated.
Boot Up NumLock Status (Default: On)
On (default) Keypad numeric keys remain valid
Off Keypadarrowkeysremainvalid
Gate A20 Option
Normal Gate A20 signal is controlled by keyboard controller or chipset hardware
Fast (default) Gate A20 signal is controlled by port 92 or specific programs of chipset.
APIC Mode
It refers to an advanced interrupt controller mode to meet the requirements of multi-core CPU.
MPS Version Control For OS
This item is used to specify the multiprocessor specification version of the system. It is
recommended to keep the default value (1.4).
Chapter 2: BIOS Setup
OS Selection for DRAM > 64MB
You must only select OS/2 when installing an OS/2 operating system with a RAM greater than
64MB. The options are: Non-OS/2 (default) and OS/2.
Small Logo [EPA] Show
This item is used to determine whether the Energy Star Logo will be displayed during POST. The
options are: "Disabled" and "Enabled".
IMP-A1x0T User Manual 13

Security Option
Such option allows users to set access restrictions to both system and Setup utility, or just Setup
utility.
System If one fails to enter a valid password in the popup box, the system will not
boot up and the Setup utility will not be accessible.
Setup (default) If one fails to enter a valid password in the popup box, the system will boot
up as usual, but the Setup utility will not be accessible.
Chapter 2: BIOS Setup
IMP-A1x0T User Manual 14

2.4 Advanced Chipset Features Setup
Advanced Chipset Features Setup is used to change the values of chipset registers that control
most options of computer.
Select ADVANCED CHIPSET FEATURES in the main menu, and the following screen will be
displayed.
Note: If you are not familiar with chipset, never modify these settings at will.
Chapter 2: BIOS Setup
Phoenix – AwardBIOS CMOS Setup Utility
Advanced Chipset Features
DRAM Timing Selectable [By SPD] Item Help
x CAS Latency TimeAuto
x DRAM RAS# to CAS# Delay Auto Menu Level
x DRAM RAS# PrechargeAuto
x Precharge Delay (tRAS)Auto
x System Memory FrequencyAuto
SLP_S4# Assertion Width[ 1 to 2 Sec.]
System BIOS Cacheable[Enabled]
Video BIOS Cacheable [Disabled]
Memory Hole At 15M-16M [Disabled]
PCI Express Root Port Func [Press Enter]
** Onboard VGA Setting **
On-Chip Frame Buffer Size [ 8MB]
DVMT Mode [DVMT]
DVMT/FIXED Memory Size [ 128MB]
Boot Display [VGA + LVDS]
LCD Panel Type [LVDS 18 800x600]
LCDS Panel Brightness [Level 10]
:Move Enter: Select +/-/PU/PD:Value F10:Save ESC:Exit F1:General Help
F5: Previous Values F6: Fail-Safe Defaults F7: Optimized Defaults
By SPD DRAM timing is set automatically according to memory SPD data
When selecting Manual, the following five items are configurable; when selecting By SPD, the
following five items are not configurable.
CAS Latency Time
Once a SDRAM is installed, the clock latency will be determined by DRAM clock settings. The
options are: 5, 4, 3 and Auto.
DRAM Timing Selectable
Two options are available.
Manual Manual setup
IMP-A1x0T User Manual 15

DRAM RAS-to-CAS Delay
You may set the delay period between CAS and RAS signal for DRAM read & write or refreshing.
Shorter delay means quicker response, while longer delay means more stable performance. Options
are: 2, 3, 4, 5, 6 and Auto.
DRAM RAS Precharge
If number of cycles is not sufficient enough to ensure that RAS saves its instructions before
DRAM refreshing, it may cause incomplete refreshing and the DRAM will fail to maintain its data.
Faster precharge means quicker response, while slower precharge means more stable performance.
This item is only valid when a SDRAM is installed.
Options are: 2, 3, 4, 5, 6 and Auto.
Precharge Delay (t RAS)
Options are: Auto and 4~15.
System Memory Frequency
Options are: Auto, 533 and 667(MHz).
SLP_S4# Assertion Width
Four options are available: 4 to 5 Sec.
3to4Sec.
2to3Sec.
1to2Sec.
System BIOS Cacheable
If set to Enabled, the feature will enable the caching of BIOS ROM at F0000h-FFFFFh for better
system performance. However, if any program writes into this memory area, it will result in a system
error. Options are: Enabled and Disabled.
Chapter 2: BIOS Setup
Memory Hole At 15M-16M
This feature will decrease your memory by 1M and allow the few old ISA cards that require this
memory to work properly on your system. Options are: Enabled and Disabled.
Video BIOS Cacheable
If set to Enabled, the feature will enable the caching of video BIOS ROM for better system
performance. However, if any program writes into this memory area, it will result in a system error.
Options are: Enabled and Disabled.
PCI Express Root Port Func
This item is used to configure PCI-E slot. For motherboards not equipped with PCI-E slot, such
configuration is not required. If set to Disabled, the slot and slot device will be disabled. For example,
onboard network adapter card can be disabled or enabled via PCI-E slot 1.
IMP-A1x0T User Manual 16

On-Chip Frame Buffer Size
This feature controls the amount of video memory allocated to integrated graphic card. The
system memory can be used as video memory.
DVMT Mode
Three options are available: "FIXED", "DVMT" and "Both (FIXED+DVMT)".
When set to "FIXED" mode, a fixed portion of the system memory will be allocated to GPU. Two
allocation sizes are available: 64MB and 128MB.
When set to "DVMT" Mode, the system will dynamically allocate system memory to GPU. In this
mode, up to 224MB of system memory can be allocated.
When set to "Both(FIXED+DVMT)" mode, the system will allocate a fixed memory of 64MB as
dedicated graphic memory, as well as allow a memory of 64MB to be dynamically allocated between
GPU and operating system.
DVMT/FIXED Memory Size
Refer to the previous item.
Boot Display
This feature is to select desired display device. VBIOS, LVDS1, VGA+LVDS1, LCDS2 and
VGA+LVDS2 can be selected as display device.
Chapter 2: BIOS Setup
LVDS1 18 1280X768
LVDS2 24 1024X768
LVDS2 24*2 1280X1024
LVDS2 24*2 1440X900
LVDS2 24*2 1920X1080
Note:Due to limited address length of BIOS, only a portion of panel parameters are listed in
BIOS Setup. If the connected panel is not included in the parameter list, display problem
will occur in this case, we need to adjust BIOS setup.
LCD Panel Type (LVDS Panel Type)
This feature is to select between LVDS1 and LVDS2. When selecting LVDS panel, users should
be informed of LVDS panel types supported by the motherboard. The following options are available:
LVDS1 18 800X600
LVDS1 18 1024X768
LVDS1 18*2 1280X1024
LVDS1 18*2 1440X900
LVDS1 18*2 1400X1050
LVDS1 18*2 1600X1200
LVDS1 18 1280X800
IMP-A1x0T User Manual 17
This manual suits for next models
3
Table of contents
Other Indumicro Touch Panel manuals

![Indumicro IMP-A151[G]T User manual](/data/manuals/1w/j/1wjfs/sources/indumicro-imp-a151-g-t-manual.jpg "Indumicro IMP-A151[G]T User manual")


