Inel PIL-99TST User manual

Original instructions EN
PIL remote control operating instructions
Model: PIL-99TST
PIL-99TST remote control with color touch screen
on / wake-up button
USB-C port for
battery charging
1Registration of remote control channels
to the receiver (drive, controller)
Control of any channel from the remote control is
possible after registering this channel to the given drive
or controller.
In our devices we distinguish the following ways to
enter the recording option:
oFirst registration after switching on the supply
voltage (230 V mains-powered radio drive, ST-
01RL),
oFirst registration for radio drive supplied with
DC (LER)
oRegistration to ST-01R controller,
oRegistration with a pre-programmed remote
control (radio drive, ST-01RL, ST-01R).
1.1 First registration for 230 V mains-powered
radio drives and ST-01RL controllers
NOTE: The procedure will erase from the
drive's memory all remote controls that
were previously registered.
•Connect the 230 VAC supply voltage to the
drive/controller.
•Within 10 seconds of power on, touch the
programming button of the remote control, the
shutter will make an up and down movement.
•In the next 10 seconds, touch the button on
the selected remote control channel; a short up
and down movement will confirm that the
registration is correct.
1.2 First registration for DC radio drives (LER)
In the case of a drive received from the manufacturer,
or if the remote control is lost, register the remote
control using the following procedure:
•press the SW button on the drive head for a short
time (< 2 seconds) –the drive will make a short
up-down movement
•within 10 seconds, select the desired channel on
the remote control and touch the
programming button on the remote control –the
drive will make a short up and down movement
•within the next 10 seconds, touch the button
of the remote control –the drive will confirm the
channel registration by making a long up-down
confirmation movement
1.3 Programming the ST-01R controller
•press programming button S1 on the controller –
the LED will blink and remain lit with a
continuous green light
•select the desired channel on the remote control
•touch the button on the remote control; the
controller will signal the registration of the
remote control by blinking green and red LEDs
1.4 Once you have a registered remote control
Once you have a registered remote control, you can
register further remotes without powering off.
Using a pre-registered remote control, put the
drive/controller into programming mode:
•touch the programming button of the
registered channel of the PIL-99TST remote
control; the shutter will make an up and down
movement, followed by a series of short up and
down movements in an amount equal to the
number of registered remote controls,
•within the next 10 seconds, touch the "up"
button of the new channel or the new remote
control
1.5 Changing the direction of the shutter
movement
If it is necessary to change the direction of movement
of the shutter (the movement of the shutter is opposite
to the directions on the remote control), put the drive
into programming mode by touching the
programming button of the remote control, and then
touch the button. In RE and PR and LER
motors, this operation should be performed twice.

2Home screen of the remote control
The home screen contains
the following items (listed
from top to bottom of the
screen):
ocurrent time
obattery status
indicator
osunrise/sunset time
obutton to activate
the blind mode
onumber of the
selected channel
obutton to open the
shutter
oSTOP button to stop the shutter movement
obutton to close the shutter
oprogramming button (visible only in
installer mode)
ochannel name
ochannel selection buttons: ,
oMenu button
3Menu
To enter the remote control menu, touch the Menu button
The menu consists of the
following items:
–return to
home screen
–channel selection
mode settings
–time
program settings
–naming channel numbers
–settings of date and time, geographical
coordinates, time zone, screen brightness, sleep, wake
up, language, factory settings, remote control
information
4Settings
The following settings are made
in this menu item:
In this menu item, you should:
•set the current date: day,
month and year
•set the current time: hour
and minutes
•Select one of the options:
Daylight or
In this menu item, you should:
•set the latitude and
longitude of your location
(e.g., for Gdansk: latitude:
5421N,
longitude: 1840E)
•select the time zone of
your location (for Poland:
UTC+01:00)
With this data
,
the sunrise and
sunset times for the current date
will automatically appear in the
time programs
.
In this menu item you can:
•adjust screen brightness
•set sleep time (available
values: 5 s, 10 s, 15 s, 20
s)
•You can select the option
lifting
In this menu item, you can select
the language of the interface
(choices include
and ).
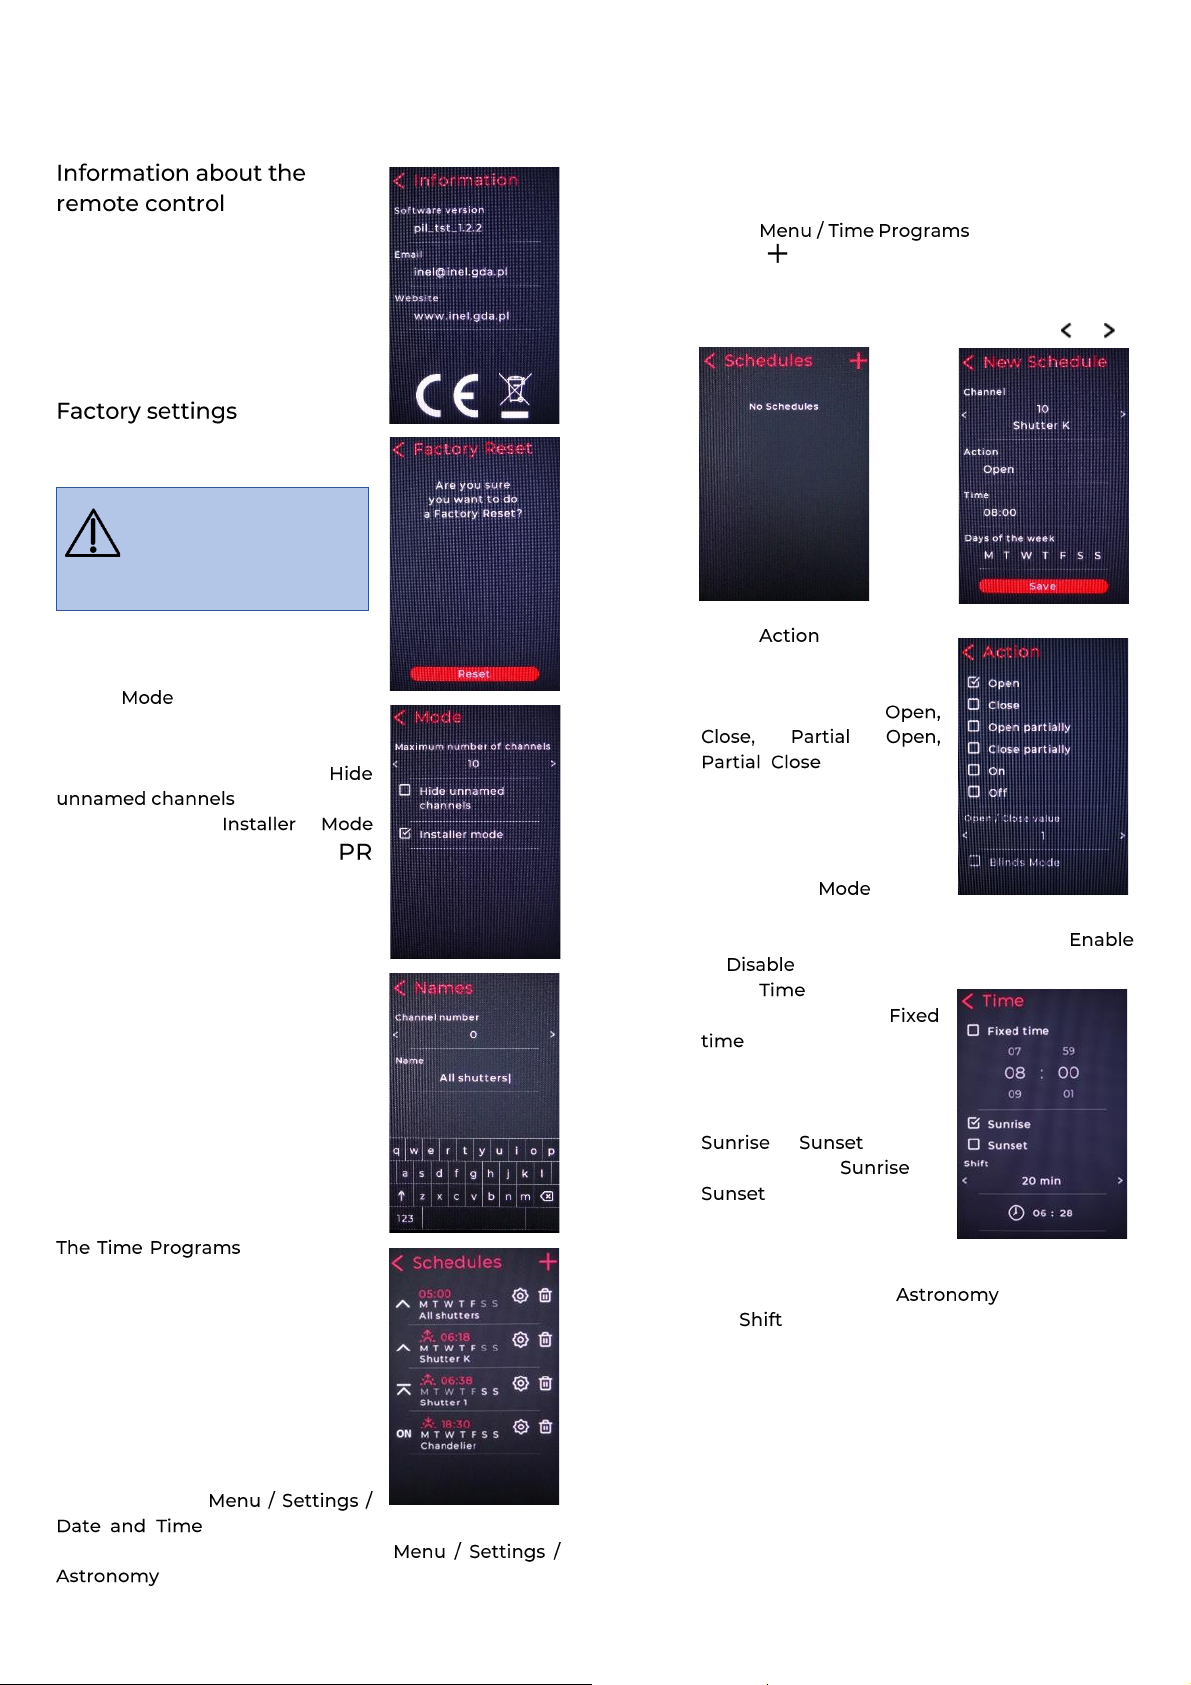
This menu item includes:
•software version
•manufacturer's e-mail
address
•manufacturer's website
address
This menu item allows you to
reset to factory settings.
NOTE: All user-entered
settings (channel names,
time programs, date and
time, geographical
coordinates) will be erased.
5
Mode
In the menu item, you can
set the maximum number of
channels and check the option to
hide unnamed channels:
.
Selecting the
option brings up the
programming button on the main
screen for programming drives
and controllers.
6
Names
Each channel can be given a
name. The name can have up to
16 characters: upper and lower
case letters digits and special
characters
7
Time programs
item sets and
changes programs for automatic
opening, closing, partial opening
of specific shutters and switching
on/off of lighting at a specific
time and on a specific day of the
week. 32 time programs can be
defined.
In order to define the program, it
is necessary to first set the date
and time under and the geographic coordinates and
time zone for your location under
Adding a time program
To add and define a time program:
▪
select
▪
select in the upper right corner of the
screen
▪
select the channel number for which the
program is to be executed by touching or
▪
select and check
the desired action
For shutters and louvres
you can select:
. For Partial
Open/Close, you can set
the degree of
opening/closing and for
shutters, you can select
the Louvre option
(setting the angle of the slats).
For lighting controllers, you can select
or
▪
select
You can select the
option and set the
time and minutes of the
start of the action, or
select one of the options:
or .
If you select or
, the sunrise and
sunset times (for each
day) will be set for the
geographic coordinates of the location
previously set in the menu item. In
the item, you can make adjustments to
these times of up to +/- 60 minutes (with a
step of 10 minutes).
▪
select
Select the days of the
week ( ) on
which you want the
program to run. By
default, all days of the
week are enabled.
Disabling a particular day
from the program is done
by touching its symbol
(the symbol becomes
dimmed).
▪
tap
Switching on/off the time program
Time programs can be turned on
or off. A program can be disabled
by touching the field with the data
of this program in
. The contents of the
disabled program field are
dimmed. Touching this field
again will turn the time program
on
Editing time program
The program settings can be
changed by selecting in the
program field under
The changes will be saved when
you tap
Deleting time program
The time program will be deleted
by selecting in the program
field in
and confirming by tapping
8Channel selection
Channels are selected
sequentially by tapping or
.
This can also be done by swiping
left or right on the screen.
9Shutter activation
To make the selected drive move, touch (open)
or (close).
This can also be done by swiping your finger up or
down on the screen. You can stop the drive by
touching the button.
10 Blind activation
Switching to blind mode (setting the blinds) is done
by touching . In this mode, the motor makes only a
short movement causing the slats to rotate.
To cause the slats to rotate, touch or
Return to normal operation mode is done in the same
way, i.e. by touching
.
NOTE: The blind must be stopped in order to set
the slats in the blind. If the blind does not set the
slats from the remote control, touch STOP before
setting the slats.
11
Battery charging
The remote control is powered by a built-in 3.7V
lithium polymer battery with a capacity of 1800 mAh.
The battery should be charged when the battery status
icon indicates a low state of charge (red rectangle in
the battery icon). The battery is charged from the
computer's USB port using the included USB-
A/USB-C cable or by using a phone charger with a
USB-C plug. The battery is fully charged when the
entire battery icon is white.
12 Disposal of waste equipment
It is prohibited to dispose of waste equipment
together with other waste. Dispose of in a
place specially designated for this purpose. An
important role in the recycling system of
waste equipment is played by the household. Through
proper segregation of waste, including waste
equipment and batteries, household members ensure
that waste equipment does not end up in municipal
waste, but in a place specially designated for this
purpose and, after recycling, can be used as raw
material for reuse.
Przedsiębiorstwo Informatyczno-
Elektroniczne INEL Sp. z o.o.,
1 Mostowa St., 80-778 Gdansk, as the
manufacturer of the product, hereby declares that the
remote control described herein complies with
Directive 2014/53/EU.
The full text of the EU Declaration of Conformity is
available at the following web address:
www.inel.gda.pl
Przedsiębiorstwo Informatyczno-Elektroniczne INEL Sp. z o.o., 1 Mostowa St., 80-778 Gdańsk | [email protected] | www.inel.gda.pl
Other Inel Remote Control manuals


