Inel PIL–19DLT User manual

PARTIAL
Num.: 05
Val.: 02
NAME EDIT
12
SALON
RIGHT
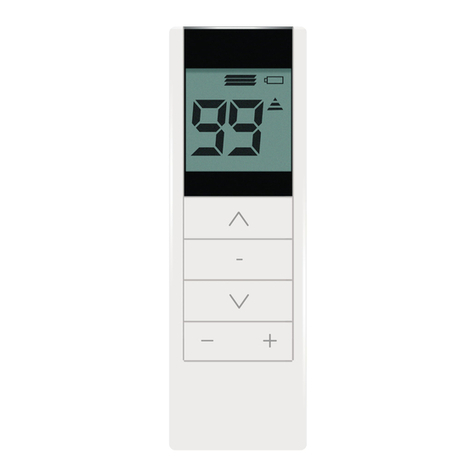
USER MANUAL PIL – 19/99DLT REMOTE CONTROL
A remote control with a graphical display and an option to add names to channels and time programs with sun function.
The remote control is available in two versions with a different number of channels:
PIL-19DLT – 19-channel remote control,
PIL-99DLT – 99-channel remote control
and in three colour versions (white, black-white, black).
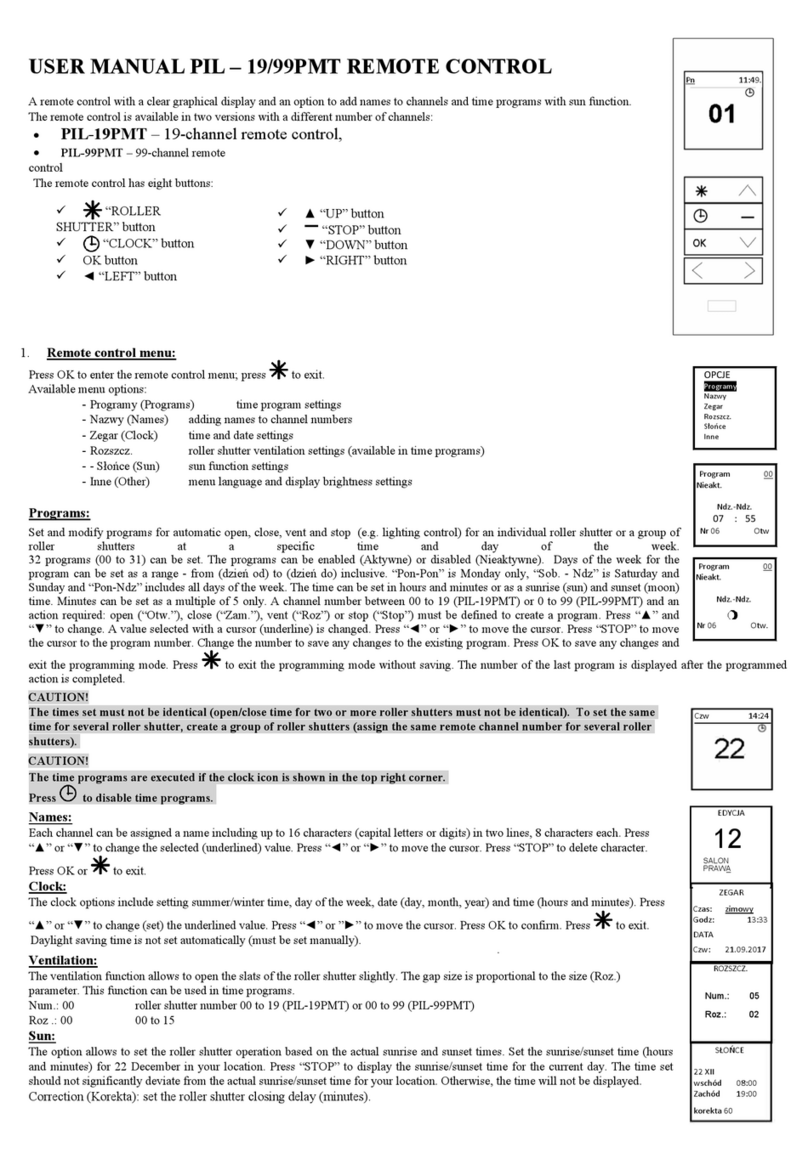
The remote control has seven buttons:
At the front panel:
▲ “UP” button
“STOP” button
▼ “DOWN” button
+ “PLUS” button
- “MINUS” button
Under the battery cover:
“CLOCK” button
M “MENU” button
1. Remote control menu:
Press M under the battery cover to enter the remote control menu.
Press ▲ “UP” and ▼ “DOWN” to move through the menu. Press “STOP” to select one of the options. Press “STOP” again
to return to the main menu.
Available menu options:
- Programs time program settings
- Names adding names to channel numbers
- Clock time and date settings
- Partial roller shutter ventilation settings (available in time programs)
- Sun sun function settings
- Other menu language and display brightness settings
Press M again to exit.
Programs:
Set and modify programs for automatic open, close, partial and stop (e.g. lighting control) for an individual roller shutter or a group
of roller shutters at a specific time and day of the week. 32 programs (00 to 31) can be set. The programs can be enabled (Active) or
disabled (Inactive). Days of the week for the program can be set as a range - from day to day inclusive.
“Mon-Mon” is Monday only, “Sat. - Sun” is Saturday and Sunday and “Mon-Sun” includes all days of the week. The time can be set
in hours and minutes or as a sunrise (sun) and sunset (moon) time. Minutes can be set as a multiple of 5 only. A channel number
between 00 to 19 (PIL-19DLT) or 0 to 99 (PIL-99DLT) and an action required: open (“Up”), close (“Dn”), partial (“Part”) or stop
(“Stop”) must be defined to create a program. Press “▲” and “▼” to change the value indicated with a cursor (underlined).
Press “-” or “+” to move the cursor. Press “STOP” to move the cursor to the program number. Change the number to save any changes to the existing
program.
The number of the last program is displayed after the programmed action is completed.
CAUTION!
The times set must not be identical (open/close time for two or more roller shutters must not be identical).
To set the same time for several roller shutter, create a group of roller shutters (assign the same remote channel number for
several roller shutters).
CAUTION!
The time programs are executed if the clock icon is shown in the top right corner. Press the clock button (under the battery cover) to disable the
time programs.
Names:
Each channel can be assigned a name including up to 16 characters (capital letters or digits) in two lines, 8 characters each.
Press “▲” or “▼” to change the selected (underlined) value. Press “-” or “+” to move the cursor. Press “STOP or change the channel
number to save the name.
Clock:
The clock options include setting summer/winter time, day of the week, date (day, month, year) and time (hours and minutes).
Press “▲” or “▼” to change (set) the underlined value. Press “-” or “+” to move the cursor. You can set the day of the week, month,
year, hours and minutes. Press “STOP” to confirm.
Daylight saving time is not set automatically (must be set manually).
Partial:
The partial function allows to open the slats of the roller shutter slightly. The gap size corresponds to the size (Val.) parameter.
This function can be used in time programs.
Num.: 00 roller shutter number 00 to 19 (PIL-19DLT) or 00 to 99 (PIL-99DLT)
Val .: 00 00 to 15
Sun
Set the roller shutter operation based on actual sunrise and sunset times. Set the sunrise/sunset time (hours and minutes) for 22
December in your location. Press “CLOCK” to display the sunrise/sunset time for the current day. The time set should not
significantly deviate from the actual sunrise/sunset time for your location. Otherwise, the time will not be displayed.
Correction (Korekta): set the roller shutter closing delay (minutes).
Other:
Bright. display brightness 00 to 16
Lang. menu language English (EN), French (FR), German (DE), Polish (PL)
Program version software version
Mo 11:48
OPCJE
Programs
Names
Clock
Partial
Sun
Other
Program 00
Active
Mon.- Sun.
07 : 55
Nr 06 Dn
Program 00
Active
Sun.-Sun.
Nr 06 Up
CLOCK
Time: Winter
Hour: 13:33
DATE
Fri 21.09.2017
SUN
22 XII
Sunrise 08:00
Sunset 19:00
Offset 60
OTHERS
Bright 15
Lang. PL
Program version
dlt99.06

2. Registering the remote controls
PIL-19/99DLT remote control can be used to control any channel, provided that the channel has been previously registered for a specific motor or
controller.
Entering the programming mode:
Initial programming of radio controlled drives and ST-01RL controllers:
- connect 230 VAC power supply to the drive/controller,
- press ▲ “UP” and ▼ “DOWN” simultaneously within 10 seconds from the power-on, ( is momentarily displayed),
- the drive will move up and down,
- press ▲ “UP” on the selected remote control channel within 5 seconds,
- short up and down movement of the drive confirms the registration.
CAUTION: This will remove all the previously registered remote controls from the drive memory.
Programming ST-01R controller:
- press S1 - LED will blink and light green,
- press ▲ “UP” on the remote control,
- LED will blink green and red to confirm registration of the remote control,
For a previously registered remote control:
Other remote controls can be registered without switching off the power. Enter the drive/controller programming mode using a previously
registered remote control.
- press ▲ “UP” and ▼ “DOWN” simultaneously after selecting a previously registered channel,
- the drive will move up and down in a series of short movements corresponding to the number of registered remote controls,
- press ▲ “UP” for a new channel or on a new remote control within 10 seconds,
- the drive will move up and down in a series of short movements to confirm registration of the next channel.
3. Activating the roller shutter:
Press ▲ “UP” (open) or ▼ “DOWN” (close) to activate the drive. Press “STOP” to interrupt. After 15 seconds without any activity (no button pressed),
the remote control switches to standby mode (reduced power consumption). By default, the remote control is in standby mode. Press any key to activate
(LED corresponding to the last selected number will light, no action is taken), press again to execute the selected command.
4. Activating the roller shutter:
Press and hold “PLUS” or “MINUS” for 3 seconds to switch to the roller shutter mode (slat adjustment). Three horizontal lines are
displayed above the channel number. Press ▲ “UP” or ▼ “DOWN” to adjust the slats. Press and hold “PLUS” or “MINUS” (for
approx. 3 seconds) to return to normal operation mode.
CAUTION!
The roller shutter must be stopped before adjusting the slats. Press STOP before adjusting the slats, if the slats cannot be
adjusted via the remote control.
5. Selecting channel in PIL-19DLT (PIL-99DLT easy mode):
Press “-” “MINUS” to select previous channel.
Press “+” “PLUS” to select next channel.
6. Selecting channel in PIL-99DLT:
A single channel (01 to 99) can be selected (PIL-99DLT). Procedure:
Press “-” “MINUS” to change the left digit (tens); up/down arrow is displayed. Press ▲ “UP” or ▼ “DOWN” to change
the selected value and press “-” “MINUS” again to exit.
Press “+” “PLUS” to change the right digit (units); up/down arrow is displayed. Press ▲ “UP” or ▼ “DOWN” to change
the selected value and press “+” “PLUS” again to exit.
If the value is not changed, pressing ▲, ▼ will send a command (open, close) to an individual controller or a group of
controllers.
To enable (disable) easy (sequential) mode in PIL-99DLT:
- select the lowest channel number used
- press “+” “PLUS” and “-” “MINUS” simultaneously
“S” followed by a number of the highest channel number used is displayed.
In easy mode, the number of selectable channels (“+” and “-”) is limited. You can select channels from 0 to the highest channel number used.
7. Replacing the batteries:
The remote control uses 3V CR 2430 batteries.
Remove the battery cover at the bottom of the remote control. Replace the battery (“+” sign facing up).
It is not permitted to dispose of waste equipment together with other waste. Dispose only in specially designated areas. The household plays a
key role in the recycling of waste equipment. By correct sorting of waste, including waste equipment and batteries, household members ensure
that the equipment is not disposed together with household waste, but in specially designated areas, and thus may be used again after
recycling.
Mo 14:24
Mo 14:24
Mo 14:24
Mo 14:24
This manual suits for next models
1
Table of contents
Other Inel Remote Control manuals

