InfraScan Infrascanner 2000 User manual

DOCUMENT NO. 920012 REV 2 EFFECTIVE 03-14-18 INFRASCAN CONFIDENTIAL PAGE 1 OF 35
Infrascanner Model 2000
Operation Manual

DOCUMENT NO. 920012 REV 2 EFFECTIVE 03-14-18 INFRASCAN CONFIDENTIAL PAGE 2 OF 35
COPYRIGHT 2018 by InfraScan, Inc.
This manual and the information contained herein are confidential and proprietary to InfraScan, Inc.
(“InfraScan”). Only InfraScan and its Licensees have the right to use the information. Any
unauthorized use, disclosure or reproduction is a violation of the licenses and/or InfraScan’s
proprietary rights and will be prosecuted to the full extent of the law.
DISCLAIMER
Neither InfraScan nor any of its worldwide subsidiaries shall be liable in any manner in respect to
bodily injury and/or property damage arising from this product or the use thereof if the Infrascanner
is not operated and maintained in strict compliance with instructions and safety precautions
contained herein, in all supplements hereto and according to all terms of warranty and sale relevant
to this product.
CAUTION
The Infrascanner contains a near infrared laser and should be handled carefully.
May cause interference to other infrared devices when the Measurement Button is
depressed.
Class 1 Laser Product
The Infrascanner is not suitable for use in the presence of a flammable anesthetic
mixture with air or with oxygen or nitrous oxide

DOCUMENT NO. 920012 REV 2 EFFECTIVE 03-14-18 INFRASCAN CONFIDENTIAL PAGE 3 OF 35
REVISION RECORD
Rev.
Issue
Date
CRR No.
CRR Incorporation Approved
Date
Initials
0
06-10-15
15-046
06-10-15
D. Solt
1
01-25-18
18-014
01-25-18
T. Groch
2
03-14-19
19-025
03-14-19
I. Shipway
DOCUMENT NO. 920012 REV 2 EFFECTIVE 03-14-18 INFRASCAN CONFIDENTIAL PAGE 4 OF 35
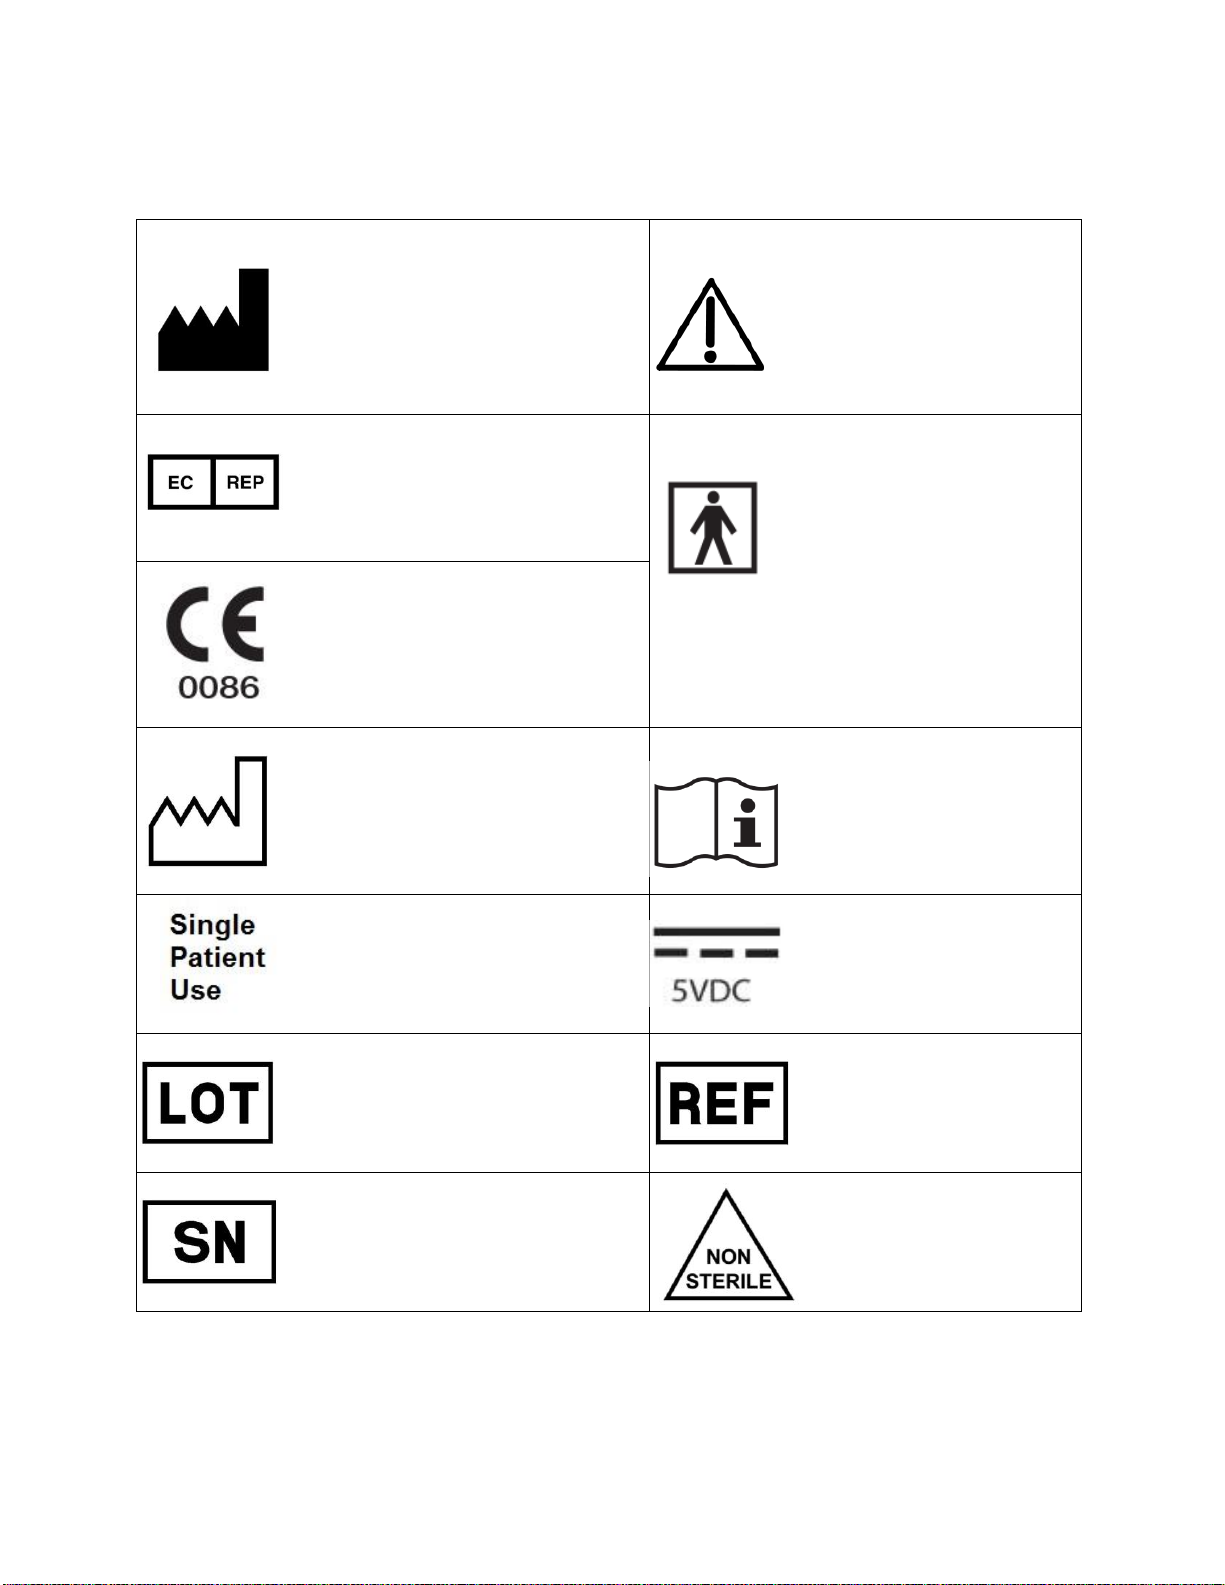
Symbol Information
InfraScan, Inc.
3508 Market Street
Philadelphia, PA 19104
215.387.6784,
www.infrascanner.com
Caution, see Operation
manual. Attention, voir
manuel d'utilisation
Qarad b.v.b.a.
Cipalstraat 3
B-2440 Geel
Belgium
Type BF equipment -
having an applied part with
or without an intentional
electrical path to the
patient.
Équipement de type BF - partie
appliqué avec ou sans chemin
conducteur intentionnel vers le patient
CE Mark
Date of manufacture
Attention, see
Operation Manual for
use. Attention, voir
manuel d'utilisation
Single Patient Use (for
disposable shield only).
Usage unique (seulement pour
protecteur jetable)
Cradle Power Adapter
is 5 VDC.
Le bloc d'alimentation
du support est de 5 V
Batch Code
Catalog Number
Serial Number
Non Sterile

DOCUMENT NO. 920012 REV 2 EFFECTIVE 03-14-18 INFRASCAN CONFIDENTIAL PAGE 5 OF 35
TABLE OF CONTENTS
1.0 System Components..........................................................................................................8
2.0 Theory of Operation............................................................................................................9
2.1 Basic Near Infrared Theory..............................................................................................9
2.2 The Infrascanner System...............................................................................................11
3.0 Operating Procedure........................................................................................................13
3.1 Setting up the System.....................................................................................................13
3.2 Measurements with the System....................................................................................16
3.3 Database, Archive, and Printing....................................................................................19
3.4 Settings .............................................................................................................................23
3.5 Troubleshooting...............................................................................................................24
3.6 Error Messages................................................................................................................26
4.0 Cleaning, Preventive Inspection and Maintenance..................................................27
5.0 Support.................................................................................................................................29
6.0 Infrascanner Model 2000 TECHNICAL Specifications.............................................33
7.0 Warranty...............................................................................................................................34
7.1 Limited Warranty..............................................................................................................34
7.2 Limitation of Warranty.....................................................................................................34
7.3Limitation of Liability........................................................................................................35

DOCUMENT NO. 920012 REV 2 EFFECTIVE 03-14-18 INFRASCAN CONFIDENTIAL PAGE 6 OF 35
Classification
Equipment Function: Detection of superficial supratentorial traumatic
intracranial hematomas
Type of protection against
electrical shock: Internally powered/battery operated
Degree of protection against
electrical shock: Type BF applied part.
Supply connection: Internal rechargeable or disposable battery
Cradle Power Adapter: Medical Grade 5 VDC at >1.2 Amp
Mode of Operation: Continuous with intermittent loading
Degree of mobility: Handheld
Laser Classification: Class 1 Laser Product
Not suitable for operation in presence of
flammable anesthesia
Warnings and Cautions
WARNINGS
•The Infrascanner is a screening device intended as an adjunct to the standard clinical
assessment of adult patients with suspected traumatic intracranial hematoma. A
“negative” Infrascanner result should be interpreted with caution since such a result
does not adequately exclude the presence of serious underlying intracranial
hematoma.
•In the clinical study of the device, patients were to be scanned with the Infrascanner
within 30 minutes before or after CT scan. Since a traumatic hematoma may evolve
rapidly the Infrascanner result is not predictive of the absence of a hematoma when
longer than 30 minutes have elapsed since the test was completed.
•Complete the Training and read the entire Instruction manual before attempting to
operate the Infrascanner.
•Only connect the Cradle Power Adapter to the Cradle, otherwise hazards may exist.
•The Infrascanner should not be modified in any way or by any user. Unauthorized
modifications to the Infrascanner may cause it to malfunction or fail in use.
•Do not allow light from the laser diode to enter the eye.
•Use caution in exercising pressure on the head when using Infrascanner since
excessive pressure might exacerbate an underlying skull injury.
PRECAUTIONS
•The accuracy of Infrascanner in detecting subarachnoid hemorrhage has not been
established.
•Device safety and effectiveness have not been established in a pre-hospital setting.
•The Infrascanner should be operated by a physician or by a nurse, on order of a
physician. Any user of the Infrascanner must be trained on the use of the Infrascanner.
The Infrascanner should not be operated by users who were not trained on its use.
•The performance of the Infrascanner has not been established for the detection of
hematomas less than 3.5 cc in volume or more than 2.5 cm from the brain surface

DOCUMENT NO. 920012 REV 2 EFFECTIVE 03-14-18 INFRASCAN CONFIDENTIAL PAGE 7 OF 35
including intraventricular hemorrhage. The performance of the Infrascanner has not
been established for the detection of posterior fossa hemorrhage.
•The performance of the Infrascanner in detecting subarachnoid hemorrhage alone or
with other types of hemorrhage has not been established.
•Because Infrascanner result is based on the difference in infrared light absorption on
homologous left and right regions of the skull:
oThe Infrascanner result may be negative in the presence of bilateral hematomas of
similar size and location.
oThe Infrascanner may only detect the larger of bilateral hematomas in a similar
location.
oThe performance of Infrascanner may be affected by the presence of blood within or
under the scalp and by the presence of scalp edema.
oThe performance of Infrascanner may be affected by increased skull thickness.
oThe Infrascanner cannot detect chronic (non-acute) hematomas.
•Do not re-use the Disposable Fiber Optic Shield on another patient. The Disposable
Shield is for single patient use only. When the Disposable Shield contacts the patient, it
is capable of transferring infectious agents.
•The Infrascanner should not be used on patients for whom the use of an unsterilized
device might pose a risk of infection.
INTENDED USE/INDICATIONS
The Infrascanner is indicated for the detection of traumatic supratentorial hematomas of
greater than 3.5 mL in volume that are less than 2.5 cm from the brain surface, as an
adjunctive device to the clinical evaluation in the acute hospital setting of adult and
pediatric patients with suspected traumatic supratentorial intracranial hematoma. The
device is indicated to assess patients for CT scans but should not serve as a substitute for
these scans. The Infrascanner is indicated for use by Physicians, or under the direction of
a physician, who has been trained in the use of the device.

DOCUMENT NO. 920012 REV 2 EFFECTIVE 03-14-18 INFRASCAN CONFIDENTIAL PAGE 8 OF 35
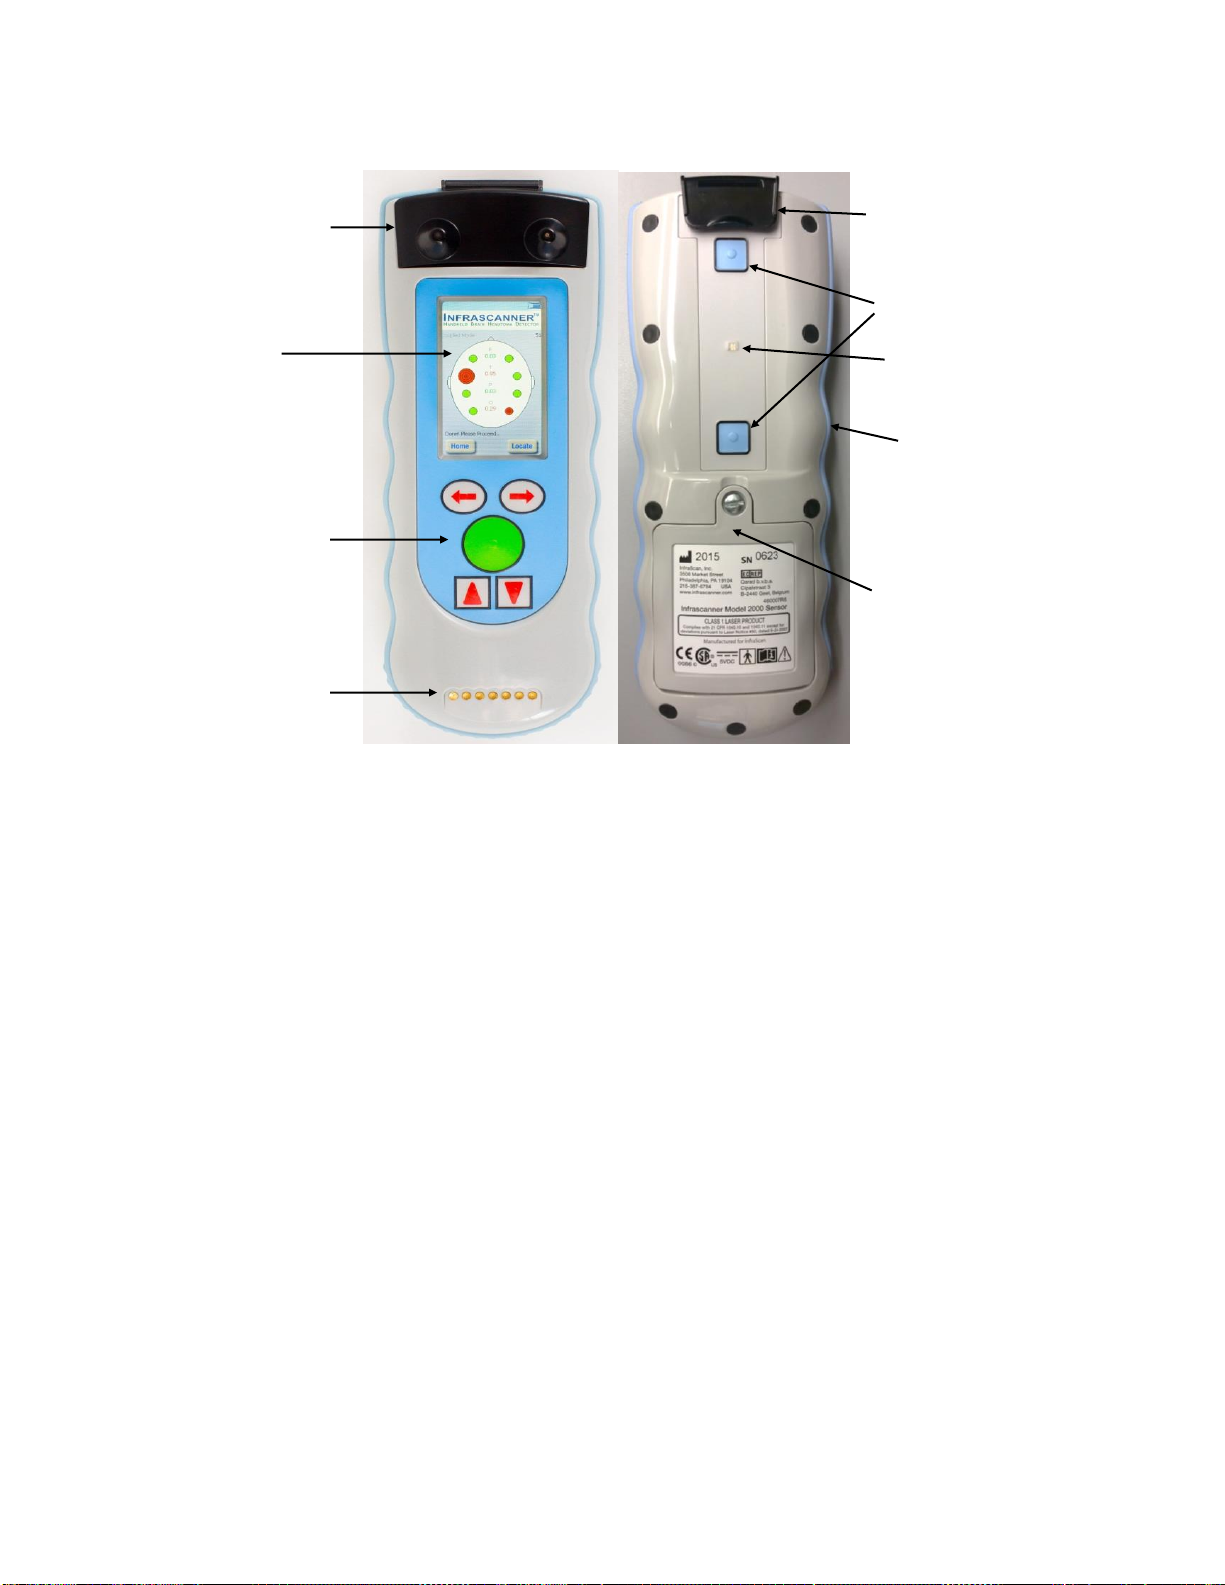
Controls and Indicators
A. Measure Buttons
Located on the back of the Infrascanner are two
buttons, depressing and releasing either one of
them initiates a measurement.
B. Software Arrows and Enter Button
Located on the front of the Infrascanner, are 5
buttons that are used to control the software of the
Infrascanner.
C. Power and USB Receptacles
Located on the back of the Cradle are the
receptacles that accept the 5.5mm by 2.5mm
Cradle Power Adapter connector and the mini-USB
connector to connect to a personal computer.
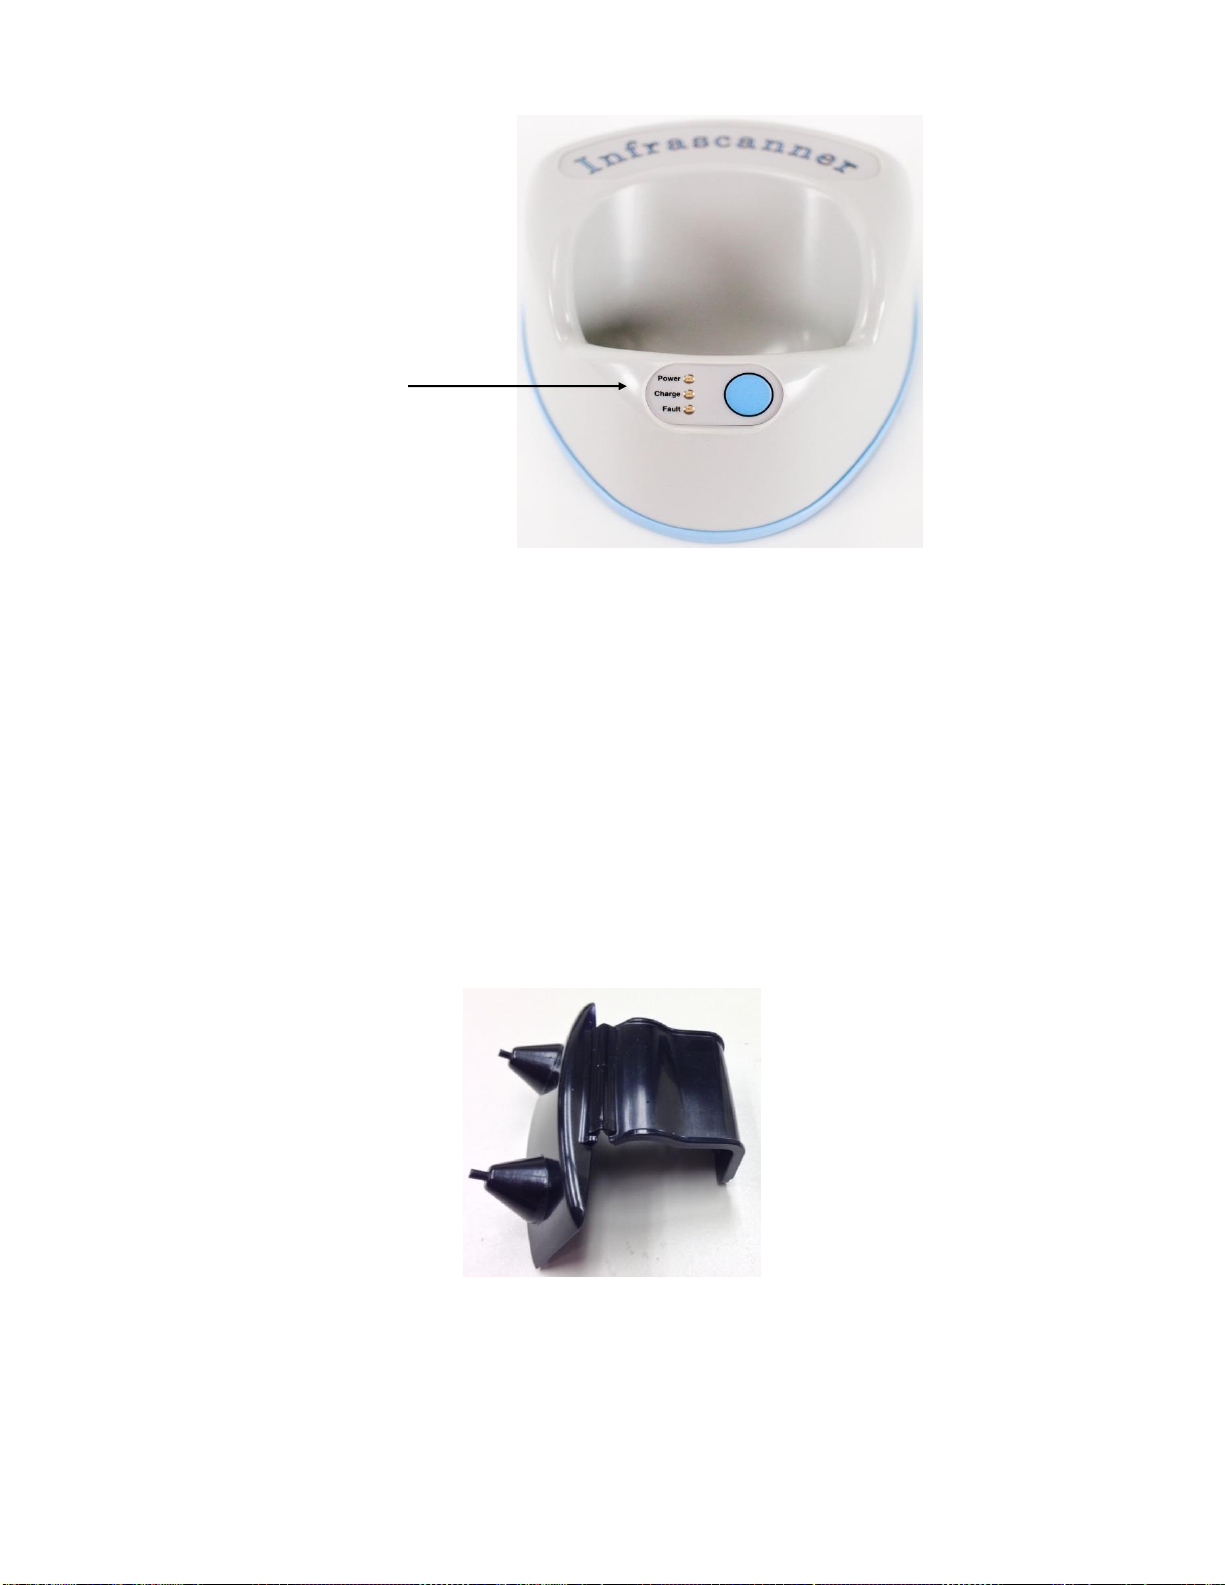
D. Charging LEDs and Cradle ON/OFF switch
The blue cradle ON/OFF switch is used to turn on
the Infrascanner, when the Infrascanner is placed
in the Cradle, instead of using a Disposable Fiber
Optic Shield to turn it on. When the Infrascanner is
being charged in the Cradle, an amber LED will
illuminate behind the power switch. When disposable
batteries are used in the Infrascanner, the orange Fault LED will illuminate, to indicate that
the Infrascanner is not charging. Disposable batteries cannot be charged by the Cradle.
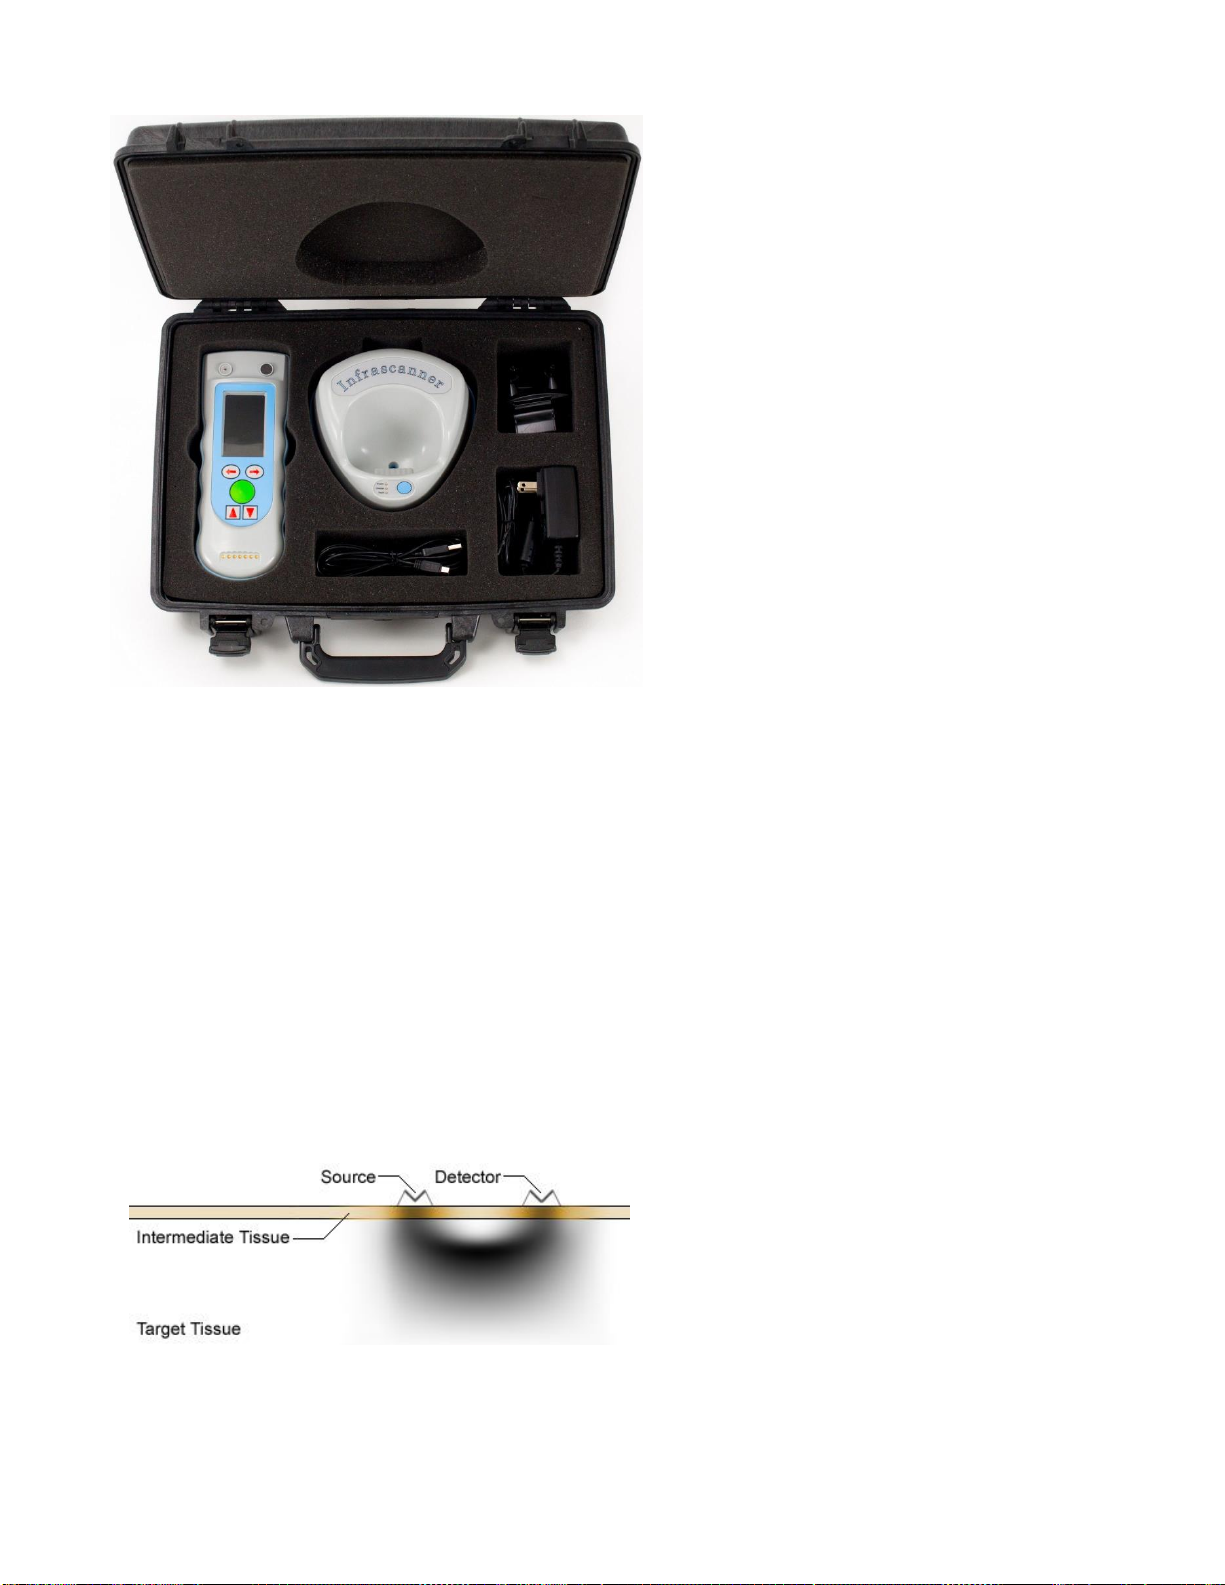
1.0 SYSTEM COMPONENTS
The InfraScan Model 2000 Infrascanner is a handheld Near InfraRed (NIR) brain
hematoma detector. This manual familiarizes the operator with the Infrascanner operation,
the technology of the Infrascanner, and the software used in its operation.
Items that are included in the system are:
Figure 1-1: Model 2000 in Cradle
DOCUMENT NO. 920012 REV 2 EFFECTIVE 03-14-18 INFRASCAN CONFIDENTIAL PAGE 9 OF 35
•The Infrascanner Model 2000
•The Infrascanner Model 2000
Cradle
•An Infrascanner Model 2000
Disposable Shield
•The Infrascanner Model 2000
Transport Case
•The Infrascanner Model 2000
Operation Manual
•The USB Cable to connect the
Cradle with a PC computer
•The Cradle Power Adapter, 5VDC
•Rechargeable Battery
A computer running Microsoft Windows
7, or later, is required to download the
Infrascanner’s data
Figure 1-2: Transport Case with system
components
2.0 THEORY OF OPERATION
2.1 BASIC NEAR INFRARED THEORY
All biological tissue is, to differing extent, permeable to electromagnetic (EM) radiation of
different frequencies and intensities. This can also be considered permeability to photons
of different energy levels. This permeability to EM energy is the basis of all imaging based
on transmission/scattering characteristics such as x-ray, Computed Tomography (CT), and
Near InfraRed (NIR) imaging. From the principles of spectroscopy, it is also known that
different molecules absorb different wavelengths of EM radiation (which is synonymously
referred to as light at smaller wavelengths). Similarly, tissue scatters EM radiation to
different degrees. The Infrascanner is concerned with NIR imaging of the hemoglobin
molecule.
From any light source, photons follow a characteristic path through the target tissue back
to a detector on the same approximate
plane as the source. While the light is
severely attenuated due to the scattering
and absorption process, it is nonetheless
encoded with the spectroscopic
signatures of the molecules encountered
en route to the detector. By carefully
choosing the wavelengths that are produced by the source, it is possible to detect the
relative concentration of hemoglobin in the target tissue. By comparing these levels to
tissue in a “baseline” state, and using
some basic knowledge about “interesting”
Figure 2-1: Simulated Photon Diffusion Path
DOCUMENT NO. 920012 REV 2 EFFECTIVE 03-14-18 INFRASCAN CONFIDENTIAL PAGE 10 OF 35
conditions for the tissue, it is possible to draw conclusions from these levels. Figure 2-1
shows the simulated diffusion path through target tissue from source to detector. This
simulation shows the photon path density, not the overall transmission level.
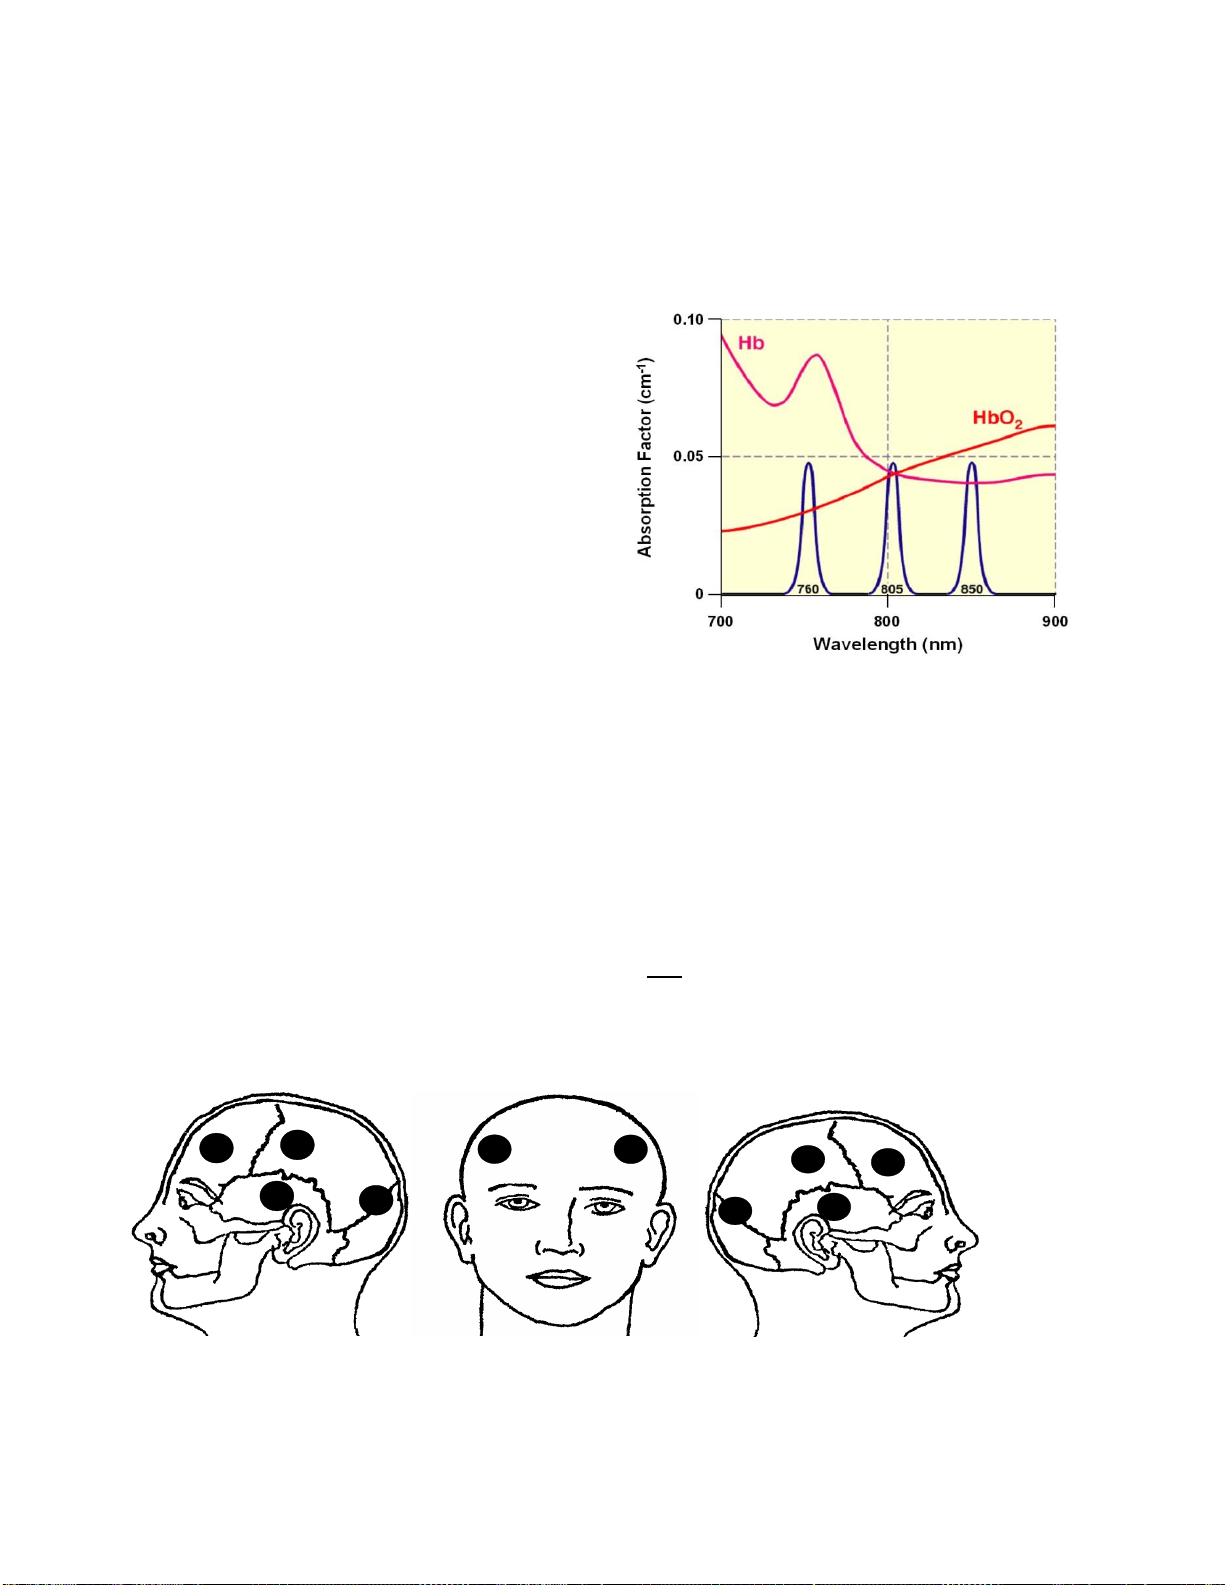
The principle used in identifying intracranial hematomas with the Infrascanner is that
extravascular blood absorbs NIR light more than intravascular blood. This is because
there is a greater (usually 10-fold) concentration of hemoglobin in an acute hematoma than
in normal brain tissue where blood is
contained within vessels. The Infrascanner
compares left and right side of the brain in
four different areas. The absorbance of NIR
light is greater (and therefore the reflected
light less) on the side of the brain containing
a hematoma, than on the uninjured side.
The wavelength of 805nm is sensitive only to
blood volume, not to oxygen saturation in the
blood. The Infrascanner is placed
successively in the left and right frontal,
temporal, parietal, and occipital areas of the
head and the absorbance of light at 805 nm
is recorded and compared.
Frontal Left/Right forehead, above the frontal sinus
TemporalIn the Left/Right temporal fossa in front of the top of the Left/Right ear
Parietal Above the Left/Right ear, midway between the ear and the midline of the skull
Occipital Behind the top of the Left/Right ear, midway between the ear and the occipital
protuberance
The difference in optical density (ΔOD) in the different areas is calculated from the
following formula:
(1)
Where IN= the intensity of reflected light on the normal side, IH= the intensity of reflected
light on the hematoma side.
LEFT SIDE FRONT RIGHT SIDE
Figure 2-3: Head locations of NIR measurement
=
H
N
I
I
OD 10
log
T
F
O
P
T
F
O
P
FF
FF
O
PF
T
O
PF
T
Figure 2-2: Absorption of light by hemoglobin

DOCUMENT NO. 920012 REV 2 EFFECTIVE 03-14-18 INFRASCAN CONFIDENTIAL PAGE 11 OF 35
Figure 2-4: Infrascanner head scanning sequence
2.2 THE INFRASCANNER SYSTEM
The system includes two components: the Infrascanner and the Cradle. The Infrascanner
includes a safe Class 1 NIR 808nm diode laser and a silicon detector. The light to and
from the laser and detector are optically coupled to the patient’s head through two short
disposable light guides. The light guides are long enough to reach through hair and
contact the scalp. The light guides are placed 4 cm apart allowing optimal detection of
hematomas. The detector light passes through an optical bandpass filter centered at
808nm in order to minimize background light interference. Electronic circuitry is included
to control laser power and the detector signal amplifier gain. The detector signal is
digitized and analyzed by a single board computer (SBC) in the Infrascanner. The SBC
receives the data from the detector and automatically adjusts the settings of the
Infrascanner to ensure good data quality. The data is further processed by the SBC and
the results are displayed on the screen.
The Infrascanner is turned on by placing a Disposable Fiber Optic Shield on the
Infrascanner and turned off by removing the Disposable Shield. After approximately 10
minutes of inactivity, if the shield is not removed, the Infrascanner starts beeping until the
Disposable Shield is removed. When the Infrascanner is in the Measurement screen,
pressing and releasing one of the Measure Buttons activates a measurement sequence at
a given head location. While the measurement is in process, the amber Measure LED (not
available on older units) will illuminate. When a successful measurement is finished, the
Measure LED will blink green. If there is an error message, the Measure LED will blink
amber. The measurement includes an initial adjustment phase and then the data
collection. The adjustment of laser power and detector signal gains is only done at the first
head location of a pair. The contra-lateral location uses the same Infrascanner hardware
parameters as the ipsi-lateral location. After a measurement pair, the screen will display
the differential optical density for that pair. The absolute value of optical density is not
relevant, just the relative difference between left and right sides of the head.
Frontal
Left Frontal
Right
Temporal
Left Temporal
Right
Parietal
Left Parietal
Right
Occipital
Left Occipital
Right
Frontal
Left Frontal
Right
Temporal
Left Temporal
Right
Parietal
Left Parietal
Right
Occipital
Left Occipital
Right
DOCUMENT NO. 920012 REV 2 EFFECTIVE 03-14-18 INFRASCAN CONFIDENTIAL PAGE 12 OF 35
Audible signals indicate when the measurement is done. A first short beep indicates when
the measurement button is pressed and the measurement begins and a second short beep
indicates a completed measurement. Four short beeps indicate a time out message. An
elongated beep indicates an error message. The error message must be cleared by
pressing the green button. If the data is unacceptable, the measurement pair is to be
repeated before proceeding to the next head pair. The Infrascanner can be powered either
by a rechargeable NiMH battery pack or by 4 disposable AA batteries.
The Cradle is used to charge the rechargeable battery pack, if it is used in the
Infrascanner, and to transfer data from the Infrascanner to a Personal Computer (PC) or
printer.
Screen
Disposable
Fiber Optic
shield
Pins for
Cradle
Software
arrows and
Enter
Rubber
Bumper
Measure
buttons
Rechargeable
Or Disposable
Batteries
Compartment
ON/OFF
Micro switch
Infrascanner Front
Infrascanner Back
Figure 2-5: Model 2000 Infrascanner
Measure
LED
DOCUMENT NO. 920012 REV 2 EFFECTIVE 03-14-18 INFRASCAN CONFIDENTIAL PAGE 13 OF 35
The Disposable Fiber Optic Shield is used to couple the light to the patient’s head.
Attaching the Shield turns the Infrascanner on, and removing the Shield turns the
Infrascanner off.
Caution: Select a Shield for each patient. Do not re-use the Disposable Fiber Optic
Shield on a different patient. The Disposable Shield is for single patient use only.
When the Disposable Shield contacts the patient, it is capable of transferring
infectious agents.
Note: The Shield is non-sterile and should not be sterilized.
Note: When reusing on same patient, the Shield can be cleaned by wiping with a soft
tissue damp with alcohol.
Note: Dispose of used Shields in accordance with local ordinances.
3.0 OPERATING PROCEDURE
3.1 SETTING UP THE SYSTEM
3.1.1. Battery Installation. Use a ¼” flat blade screwdriver (or a coin) to release the
battery door latch by turning one half turn counter clockwise.
LED’s and Cradle
ON/OFF switch
Figure 2-6: Model 2000 Cradle
Figure 2-7: Model 2000 Disposable Shield

DOCUMENT NO. 920012 REV 2 EFFECTIVE 03-14-18 INFRASCAN CONFIDENTIAL PAGE 14 OF 35
3.1.1.1. If using disposable AA batteries, ensure that proper polarity is
observed when inserting the new batteries.
3.1.1.2. If using rechargeable battery, plug in the leads from the battery pack
to the connector in the battery compartment assuring proper polarity. Place the
battery pack against the left wall of the compartment with the edge towards the
bottom inserted against the battery springs. Press on the battery to compress
the two springs and push the top edge against the case. The single spring on
the top side should be moved if necessary to be pressed against the middle of
the battery pack. Verify that the leads are positioned as indicated in the
picture, and not pinched or compressed in any way.
3.1.2. Install the battery door and use the screwdriver to turn one half turn
clockwise. You may need to press downwards with the screwdriver while turning to
engage the latch.
3.1.3. Charging. Attach the Cradle Power Adapter to the Cradle and connect it to
the AC Power Mains. The green “Power” LED on the Cradle should illuminate.
Place the Infrascanner in the Cradle, taking care to insert the Infrascanner
vertically and then let the Infrascanner lean backwards pushing the contacts
against the spring loaded cradle pins. When removing the Infrascanner from the
Cradle tilt it back to vertical, to first disengage the pins, and then pull it out
vertically. When the Infrascanner is placed in the Cradle, the amber “Charge” LED
will blink for 10 seconds, (unless the rechargeable battery pack is severely
depleted at which point it can blink slowly for several hours). Do not place the
Infrascanner into the Cradle with the Disposable Shield installed. If the
Figure 3-1: Installing Disposable Batteries
Figure 3-2: Installing Rechargeable Battery

DOCUMENT NO. 920012 REV 2 EFFECTIVE 03-14-18 INFRASCAN CONFIDENTIAL PAGE 15 OF 35
Infrascanner turns on when the Infrascanner is placed in the Cradle, disconnect the
mains power briefly and reconnect.
3.1.3.1 If the disposable batteries are installed, the amber Charge LED will not
illuminate continuously. If the rechargeable battery pack is installed, after the
variable time of blinking, the amber “Charge”LED will illuminate continuously.
If no batteries are installed after the 10 seconds of blinking, neither the Charge
LED nor the Fault LED will illuminate.
3.1.3.2 The Infrascanner requires approximately 6 hours to charge, and is fully
charged when the amber “Charge” LED on the Cradle extinguishes. The
Infrascanner battery will not charge if the Infrascanner is ON or if the battery
temperature is below 0 degrees Celsius or above 50 degrees Celsius. The
Infrascanner detects when disposable batteries are in the Infrascanner and will
not charge them. There is no hazard under this condition. If the orange Fault
LED illuminates replace the rechargeable battery pack.
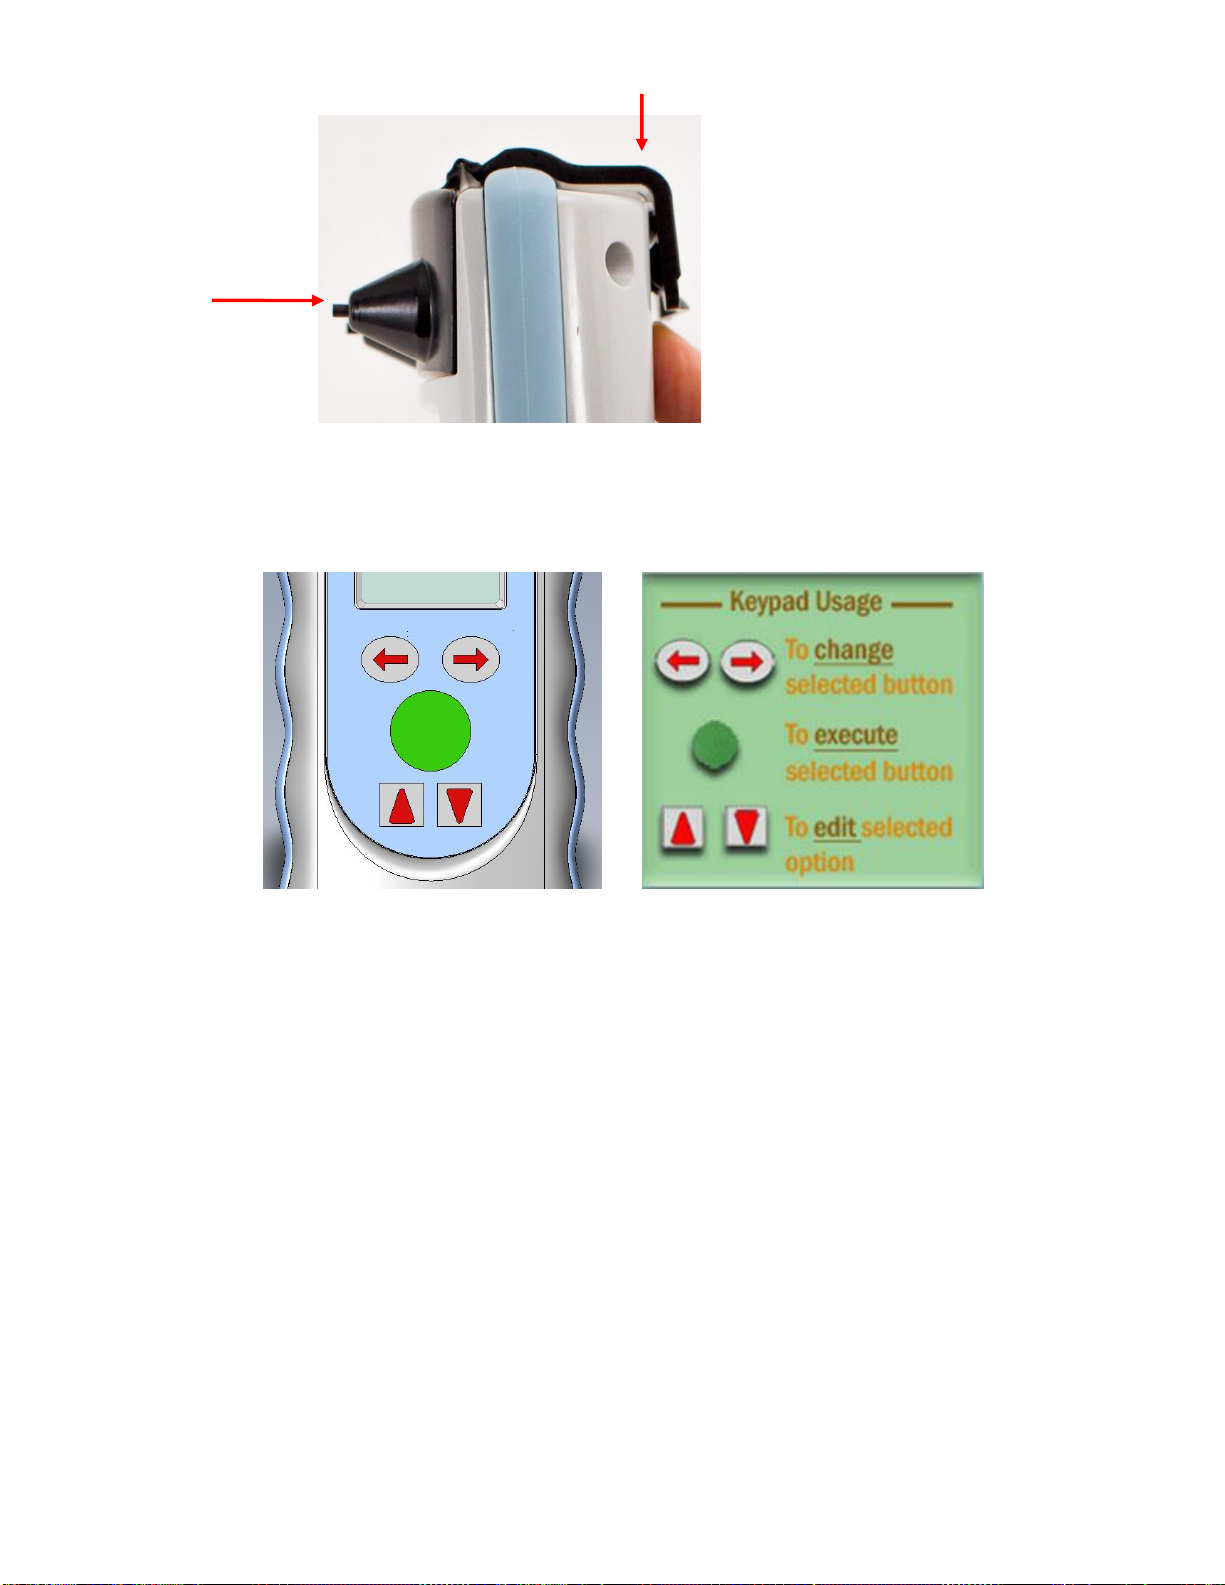
3.1.4. Fiber Optic Disposable Shield. Press fibers outward so that don’t get bent
against the windows during installation, as shown in Figure 3-3.
3.1.5. Attach the Disposable Shield to the Infrascanner as shown in Fig. 3-4. Place
the fibers over the optical towers and push firmly at the top/back of the disposable,
until you feel the disposable snap onto the Infrascanner. Once the disposable
Shield is installed press the fibers inward so that they are up against the windows.
Note: Attachment of the Fiber Optic Disposable Shield turns on the
Infrascanner.
Caution: Select a new Disposable for each patient. Do not reuse the
Disposable Fiber Optic Shields on a different patient. Disposable Shields
contact the patient and may be contaminated. The Disposable Shield is
Single Patient Use.
Figure 3-3: Proper Placement of Fibers
DOCUMENT NO. 920012 REV 2 EFFECTIVE 03-14-18 INFRASCAN CONFIDENTIAL PAGE 16 OF 35
Figure 3-4: Attaching the Disposable Fiber Optic Shield
3.1.6. Software Navigation. Use the Left/Right arrows to change which button is
selected. Use the Green central “Enter” button to execute the selected button in the
software. Use the Up/Down arrows to edit the selected field values.
Figure 3-5: Software Navigation Buttons of the Infrascanner and their use
3.2 MEASUREMENTS WITH THE SYSTEM
1. Attach a Disposable Fiber Optic Shield to turn on the Infrascanner.
2. Press the “Measure” button, as shown in Figure 3-6. The indicator in the upper right
corner of the screen shows the battery capacity status.
Press here to snap shield
onto Infrascanner
Push here to press
fibers against
windows

DOCUMENT NO. 920012 REV 2 EFFECTIVE 03-14-18 INFRASCAN CONFIDENTIAL PAGE 17 OF 35
(a) (b)
Fig 3-6: Main Screen (a –standard, b –when the battery is low)
Figure 3-7: Select Study ID Screen
3. The Select Study ID screen (Figure 3-7) displays the next sequential number of the
measurement. Please record this number (or the patient ID number) in your notes,
if you are interested in a later analysis of the data. If the Infrascanner clock was
reset, due to battery depletion or removal, a yellow triangle will ask the user to set
the Infrascanner real-time clock.
4. The Select Study ID screen (Figure 3-7) allows the user to select Independent
Mode or Guided Mode. Guided Mode helps the user through the measurement
process by displaying tutorial screens (Figure 3-8) and guiding the user to repeat
measurements when a potential hematoma is detected. Guided mode is intended
Battery capacity
symbol

DOCUMENT NO. 920012 REV 2 EFFECTIVE 03-14-18 INFRASCAN CONFIDENTIAL PAGE 18 OF 35
for novice users. Once the user is more experienced with the use of the
Infrascanner, Independent Mode should be selected.
Figure 3-8: Guided Mode Measurement Windows
5. Click on the “Next” button to start patient measurement. After the appearance of
the Measurement Screen (Figure 3-9) verify that the “OK, Waiting probe” message
appears on the bottom left of the screen. Verify that “Coupled Mode” is indicated on
the top left of the screen. If not, contact the factory. If a “communications error”
message is indicated instead of the “OK, Waiting probe” message, remove the
Disposable Fiber Optic Shield and put it back on to
reset the Infrascanner. Re-initiate the data collection.
6. The Infrascanner is ready to begin measuring. Take
the Infrascanner, and start the head scan, alternating
between left and right positions according to the head
scanning sequence in Figure 2-4. The blue square on
the screen in Figure 3-9 indicates the current
measurement location.
7. In each location wiggle the light guides so they will be in
clear contact with the scalp. Ascertain that no hair is
between the light guides and the scalp. After
establishing firm contact press and release one of the
two “Measure” Buttons on the rear of the Infrascanner.
Either one of the buttons can be used, depending on
which is more convenient. The measurement begins
after the button is released and an audible beep is
sounded. Use your free hand to support patient’s head,
by placing it on the contra-lateral side of the
measurement.
Figure 3-9: Measurement
Screen

DOCUMENT NO. 920012 REV 2 EFFECTIVE 03-14-18 INFRASCAN CONFIDENTIAL PAGE 19 OF 35
8. After each successful measurement, the Infrascanner
will beep and the blue square indicator will prompt
the user to move to the next head location. An error
will be indicated by an elongated beep. When an
error occurs look at the screen to read the error
message. Then clear the message by pressing the
green button. Repeat the measurement in the same
location (or in the contralateral side –depending on
the error message). After successful measurement of
two contralateral head locations the Infrascanner will
display the relative optical density difference between
left and right sides of the head with a relative
measurement uncertainty of 0.02, left vs. right. The
green circle in the display changes to red when the
OD difference exceeds 0.2. The OD is a logarithmic
scale and represents about a 50% difference between
the light intensity from one side to the other.
9. The Infrascanner may be used on patients with open
wounds but is placed adjacent to, not in, the wound. Wipe away any residual blood
before placing the light guides on the scalp. Feel the measurement area with your
fingers to verify that you are not measuring over a subcutaneous scalp injury (“head
bump”). This condition could adversely affect the results of the measurement.
10. After completing each data pair, review the screen. If one of the locations is red,
use the arrow keys to navigate to that location and repeat the measurement of the
pair (up to two more times), to confirm the findings and reduce the chances of a
false indication due to a trapped hair under the light guides. Continue testing until
the entire head scan is complete. To assist color blind users, the red locations have
different pattern than green locations. Note: Taking measurements with dark
skinned, dark haired subjects is more difficult than light haired, light skinned
subjects, because the dark pigment in skin, hair, and hair follicles is very absorbent
of NIR light resulting in a weaker signal for the Infrascanner to detect.
11. If it is desired to re-take data, press the “Home” button for a new head scan.
Otherwise, remove the Disposable Fiber Optic Shield to turn off the Infrascanner.
3.3 DATABASE, ARCHIVE, AND PRINTING
All measurements are automatically saved on the Infrascanner. Each measurement is
saved as a text file. The name of each data file is the date and time of that measurement:
“n_yymmdd-hhmmss.txt” (measurement serial number, year, month, date, hour, minutes
and seconds).
To view archived measurements on the Infrascanner:
1. In the Main Screen (Figure 3-6), click on “Archive” button.
2. To view archived measurements click on “View” button, as shown in Figure 3-11.
3. In the list of all the measurements select the required serial number of the
measurement and click on “View” button, as shown in Figure 3-12.
Figure 3-10: Measurement
Screen with results

DOCUMENT NO. 920012 REV 2 EFFECTIVE 03-14-18 INFRASCAN CONFIDENTIAL PAGE 20 OF 35
4. The next screen (Archived Measurement screen, Figure 3-13 is the same as the
Measurement Screen (Figure 3-9) shown at the end of a measurement.
5. In the Archive List, the way to jump a page forward or backward in the list is to
depress the up or down button for 2 seconds. Upon release it will page up or page
down. It will revert to single step after that, so if you need to jump another page, you
need to repeat the depressing the button for two seconds.
Figure 3-11: Archive Screen Figure 3-12: List of Figure 3-13: Archived
Measurements Measurement
6. In order to print a data file to the optional label printer, go to the Archive Screen and
view the data file that you wish to print. Then, select the Print button. It will take
about 10 seconds to transfer the data to the printer and print the label. Printing is
only possible when the Infrascanner is in the Cradle and is connected to power and
the optional label printer.
Downloading Data Files to a Computer: To review the stored data, follow the steps below
1. All measurements are automatically saved on the Infrascanner. Each measurement
is saved as a text file. The name of each data file is the date and time of that
measurement: “n_yymmdd-hhmmss.txt” (measurement serial number, year, month,
date, hour, minutes and seconds).
2. Data files can downloaded to a computer by using Windows Mobile Device Center
(embedded in Windows 7 and above) while the Infrascanner is installed in a Cradle
connected via USB to a computer running Windows.
3. Plug the power supply adapter into a power outlet, then plug the other end into the
Cradle.
Table of contents
Popular Medical Equipment manuals by other brands

Breg
Breg Quantum Instructions for use

Cantel Medical
Cantel Medical Medivators BF-30 instructions

Sunrise Medical
Sunrise Medical Joerns Easy Care 2004 User & service manual

PFM Medical
PFM Medical ASEPT 600 ml Drainage Kit L Instructions for use

DJO
DJO Procare NEXTEP CONTOUR WALKER instruction manual

Siemens
Siemens SONOLINE G50 Service manual


