InkOwl T7601 User manual
Rev W4.00D
Thank you for purchasing our InkOwl
®
Refillable Cartridge System for your EPSON printer.
The “Auto-Reset” Chips and “Spongeless” design make this solution the most reliable and user-friendly possible.
Please follow the instructions herein for best results and do not hesitate to contact us at [email protected] should you have any
questions or require any assistance.
We recommend switching to our refillable cartridge system before your original Epson-brand cartridges become empty (if
at all possible) so that steps 1.1.1 - 1.1.4 can be performed.
1. Before Installation
1.1 Before replacing your original Epson cartridges with the InkOwl
®
Refillable Cartridges, it is important to confirm that your
printer is working correctly.
1.1 Perform a printer nozzle check. **
1.2 If the nozzle check is not ok, perform cleaning cycles and nozzle checks until it becomes ok.
1.3 Once the nozzle check is ok, print out a document or photo that contains all the colors to confirm that everything is
in order.
1.4 At this point, you are ready to switch over to the Refillable Cartridges.
** NOTE: If one of your original EPSON cartridges is “empty”, you will not be able to perform the nozzle check
and/or cleaning cycles. Therefore, you can skip this section. However, if your printer has not been
operational for more than two weeks, it may take longer than usual to get the Refillable Cartridge System
primed and ready to print in your printer.
*VERY IMPORTANT*
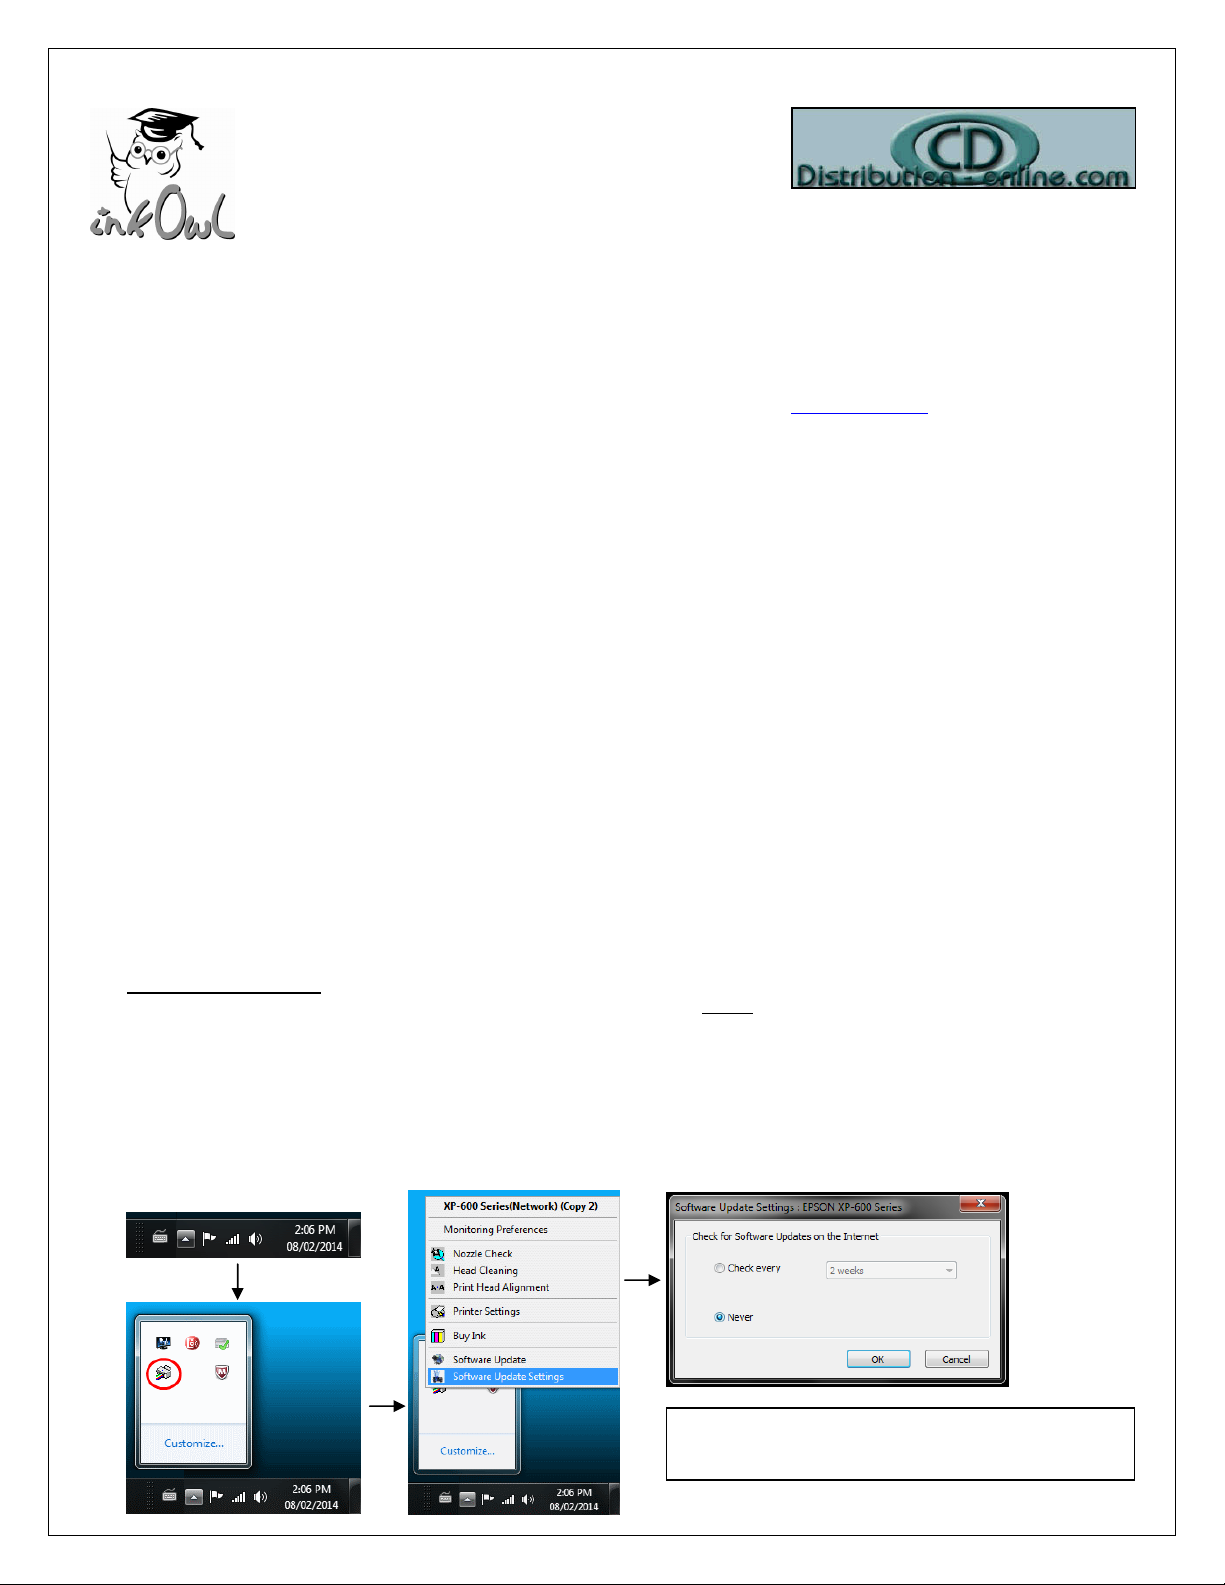
1.2 If your Windows computers have the Epson software installed, you MUST disable automatic updates of the printer
software. You must do this on every Windows computer that has the printer installed. This is crucial since printer updates
from Epson may cause the auto-reset chips on the Refillable Cartridges to stop being recognized. If ever you are
prompted to accept an update, you must refuse. Please be sure to repeat this procedure if you install the printer on a new
computer.
To disable automatic updates, right-click the Epson printer icon on the Windows taskbar to display the menu, and select
Software Update Settings. Then, set all updates to Never.
NOTE: Mac users do not need to perform this step.
1-888-4-INKOWL
1-888-446-5695
Save up to 90% on printing supplies.
Refillable Cartridge
Instructions for Epson P600
Cartridge models: #760
Please don't forget to do this on every computer
with this printer installed.

Rev W4.00D
2. Installation
Please follow these installation instructions closely for each cartridge. Note that you must install the full set of cartridges
provided. Proper cartridge functionality is not guaranteed when mixing the cartridges from this set with any other cartridges,
including your original EPSON cartridges.
2.5 PRIMING: Attach the included priming attachment tip to the syringe (image 3):
2.1 *** VERY IMPORTANT ***
Ensure that the air vent hole on the cartridge is no
t
blocked. This is required so that ink can flow correctly
.
Please DO NOT cover these air ve
nt holes for any
reason. Remove any tape or plug if present.
2.3
*** CRITICAL ***
Your ink kit may have been supplied with sharp needles which
can cause
damage to the delicate cartridge wall membranes if you are not attentive.
It is therefore VERY IMPORTANT to insert the needle straight down
(image 2) to avoid damage to the cartridge walls.
2.4 Using the method described above, inject 20mL of
ink into the cartridge
through the fill hole.
Inject slowly to avoid the formation of air bubbles.
When sucking ink from the bottle into the syringe, put the needle in deep to
avoid sucking any air bubbles into the syringe. Note that the top-
left
“damper” compartment will remain unfilled at this point.
Please DO NOT inject any ink into the air vent hole.
2.2 Note where the fill hole is located (image 1) and
remove the plug from the fill hole.
*** IMPORTANT ***
Do not shake the ink bottle prior to use.
Fill Hole/Ink Plug
Air Vent Hole
Damper
Image 1
Image 3
Image 2
Rev W4.00D
The goal of priming is to fill the “damper” compartment completely with ink. Always perform this procedure the first time you
use the Refillable Cartridge System.
3. Priming the Printer with the Refillable Cartridge System
Perform a nozzle check and printhead cleanings, as required. Several printhead cleanings may be required to pump all the air
out of the system. However, it should not take any more than 3 cycles for the printer to be ready.
If after 3 cleaning cycles, the nozzle check pattern is not perfect, wait 12-24 hours before performing additional cleanings. As
mentioned in section 1, if the printer has not been in operation for over two weeks, it may take some time to get the refillable
cartridge system working. If you continue to see no improvement, see section 5 (Troubleshooting) or email us for support at
NOTE: Once this initial setup is complete, cleaning cycles will be required from time to time, as per normal Epson operating
procedures. For best results, we recommend keeping the printer turned on at all times and using it frequently
(at least weekly).
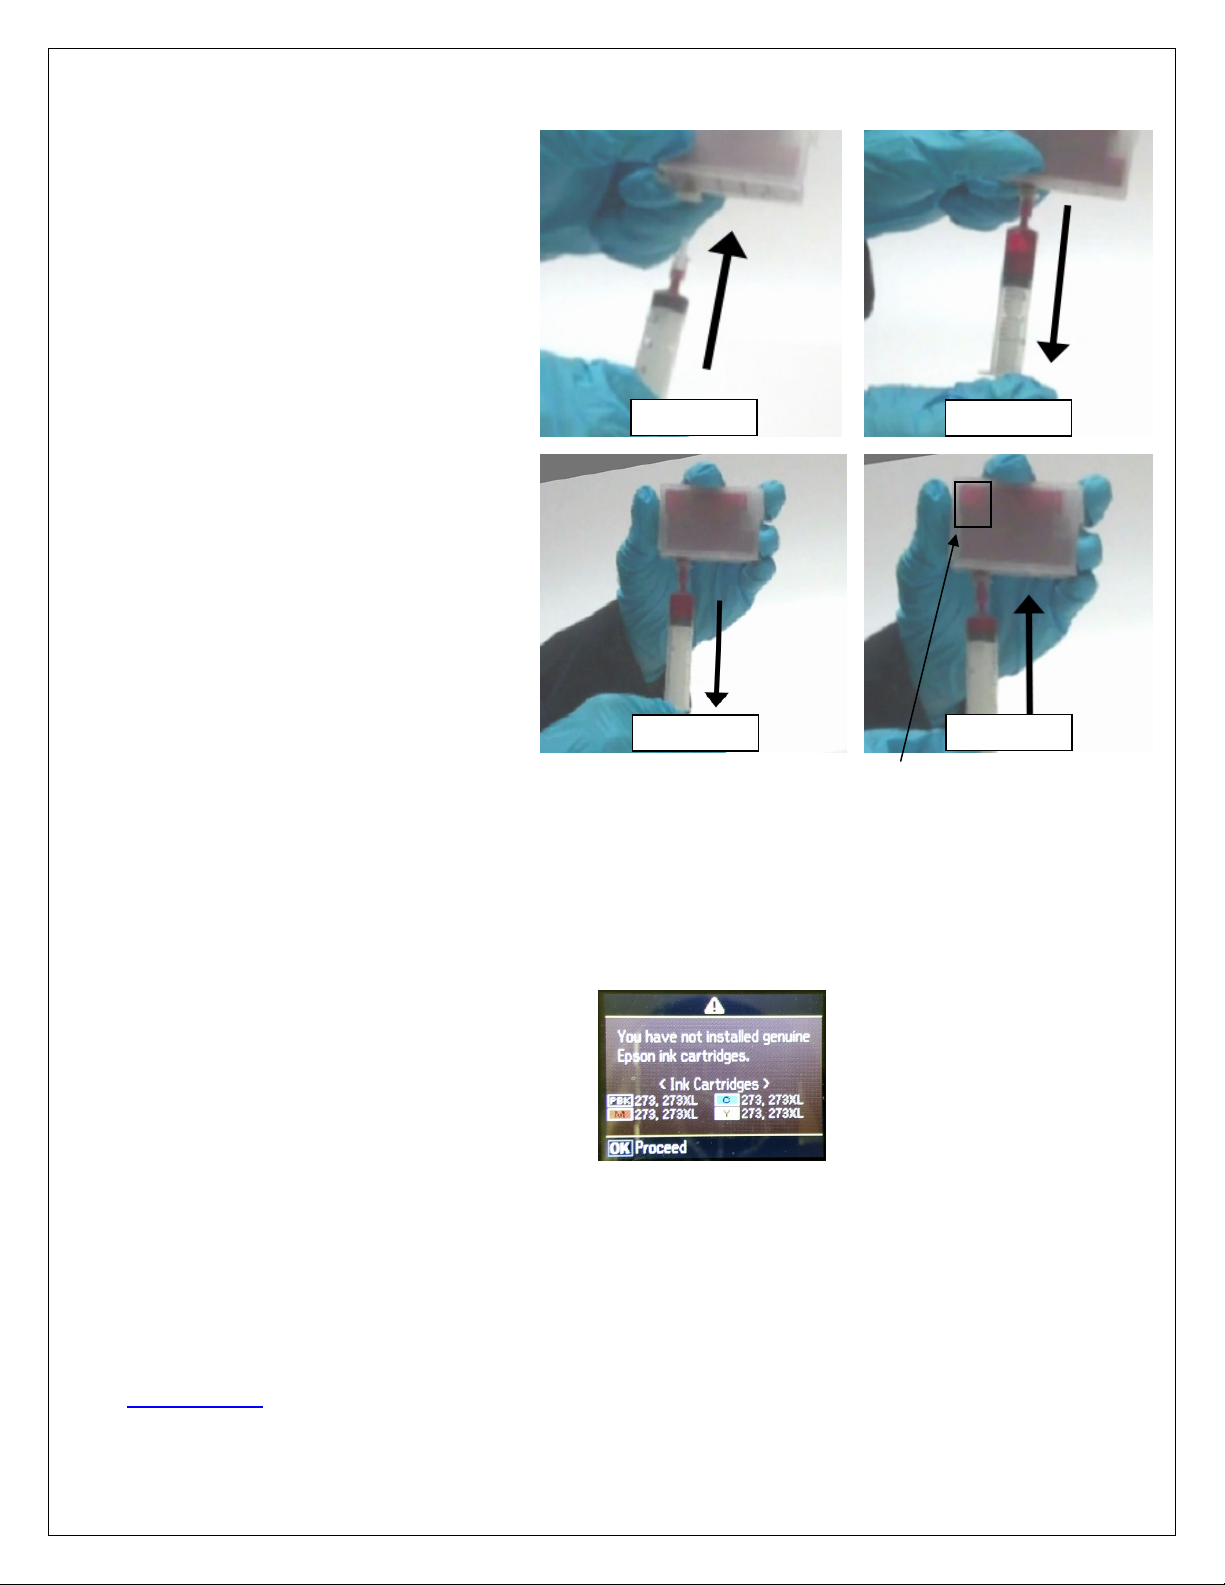
2.6 Hold the cartridge in the upright p
osition.
Force the syringe with priming tip through the
exit port membrane
and insert, pushing gently
until the tip is flush with the exit port. (You can
use a sharp object
to poke a hole in the
plastic membrane first, to make the tip easier
to insert.) (image 4)
2.7 At this point, withdraw (image 5)
. You will
notice that air will enter into the syringe,
followed by ink. Withdraw approximately 5mL
of ink/air. Then, dump the contents of the
syringe back into the bottle.
Do not inject the
ink/air mixture back into the cartridge.
2.8
Force the now empty syringe with priming tip
back into the exit port. Withdraw 3mL
of ink.
This time, no air should enter into the syringe
as you do this, only ink. Do not remove the
syringe. (image 6)
2.9 Force the removed i
nk back into the cartridge
through the exit port. This action will fill the
damper. (image 7)
2.10
Repeat steps 2.8 and 2.9 two more times.
This should completely fill the damper.
2.11
Attach the long needle back to the syringe
and inject more ink into the fill hole as in
step 2.4 so as
to completely fill the cartridge
with ink.
2.12 Seal the fill hole with its plug.
2.13 Gently wipe the exit port with a clean paper towel.
REPEAT steps 2.1 to 2.13 for all the cartridges in your refilling system. Be sure to clean the needle and syringe thoroughly with
water (or use a different clean syringe/needle) when switching between colors.
2.14 Remove the original cartridges from the printer. We recommend not discarding your Epson-
brand cartridges, for future
reference.
2.15 Install the refillable cartridges. As mentioned previously, the full set of cartridges should be installed to guarantee
proper
functionality.
2.16 Upon installation, the printer may warn you that the
cartridges you just installed are not genuine Epson
cartridges. Follow the onscreen instructions to accept
the use of the InkOwl
®
refillable cartridges.
Image 6 Image 7
Image 4 Image 5
Damper
Rev W4.00D
4. How to use auto-reset chips
Your InkOwl
®
Refillable Cartridge System comes with auto-reset chips. The ink levels that are in the chips' memory will be displayed
by the printer, just like with original Epson cartridges.
The ink levels displayed on the printer will start at “full” and then decrease normally to “empty”. When the chip level displays as
“empty” and the printer stops printing, removing and reinstalling the cartridge will reset the chip. If the cartridge was totally filled, the
printer should reach “empty” just as the cartridge empties out.
However, to avoid any risk of a cartridge running totally dry, which can cause printhead damage, it is
recommended that you physically check the ink levels often, and refill well before a cartridge becomes empty.
•Please note that if you refill the cartridge while the ink level is not reading “empty”, then the displayed ink level will not change.
This is not a problem at all. In fact, this is recommended as mentioned above, in order to avoid any risk of the cartridge actually
running dry. Later on, when the chip's stored ink level will finally reach empty, you can remove and reinstall the cartridge to reset
the displayed level back to full.
•Conversely, if the ink level resets to full but the cartridge is not refilled, the printer will simply continue printing, eventually running
totally dry. Therefore, always refill to full whenever an ink level is reset.
How to Refill the Cartridges:
After the first installation, all you have to do to refill the cartridges is remove the plug, add ink, and replace the plug. See
steps 2.2 - 2.4 for details. There is no need to repeat the priming steps on subsequent refills.
Chip Resetter (optional):
If you wish to be able to reset the chips' ink levels to full at any time, an optional "chip resetter" is available and recommended. For
5. Troubleshooting
5.1 The displayed ink level does not reset to full:
•Make sure the entire refillable cartridge set is installed in the printer.
•If you can still print (paper is coming out), then the chip’s ink level has not yet reached empty. The chip’s ink level will not be able to
reset until this occurs. Continue printing, and then reset the chip when the displayed ink level reaches empty (0%).
5.2 Printer does not recognize or accept the cartridge:
•Try removing and reinstalling the cartridge. Note that doing so may reset the ink level. If you notice that upon reinstalling the
cartridge, the ink level has reset to full, you should fill the cartridge right away.
•Make sure that a good contact is made between the printer and the chip on the cartridge.
•Make sure that the unrecognized cartridge is well plugged in. You may need to remove it and put it back or wiggle it to ensure it is
sitting well in the printer. You can also clean the chip contacts with a damp paper towel if you suspect they may be dirty.
•Make sure that you have the entire cartridge set installed. Do not mix these cartridges with other types in the printer. These
cartridges are designed to work as a set.
5.3 Poor print quality (horizontal lines on printouts):
•Perform a cleaning cycle, followed by a nozzle check.
•If the nozzle check is not perfect at this point, perform additional cleaning cycles and try again.
•If after 3 cleaning cycles, the nozzle check is not perfect, wait 12-24 hours before performing additional cleanings.
•If you continue to see no improvement, contact us for support.
5.4 Nothing is printing out or a color is missing on the nozzle check:
•Remove the cartridge. Make sure that there is ink in the cartridge with minimal air bubbles and that the cartridge is not leaking. Also
double-check that the air vent is free of obstruction as described in step 2.1.
•Perform a cleaning cycle, and then perform another nozzle check. Repeat if necessary. After attempting 3 cleaning cycles, wait 24
hours and try again.
•If the printer has not been operating for a while or if a cartridge has run completely dry, several cleaning cycles may be required to
restore full quality.
5.5 Visit http://www.inkowl.com/?p=spongeless for the latest instructions and troubleshooting procedures.
5.6 Contact us for any other issue: e-mail: [email protected]
6. RECOMMENDATIONS
6.1 Keep the printer turned on at all times.
6.2 When you do not use your printer for a long time, always perform a nozzle check prior to use.
6.3 Print at least one color page or perform a nozzle check weekly to keep your printer clean and operational.
6.4 Always disable automatic updates of the printer software (see step 1.2) on every Windows computer
using this printer. If ever the printer or computer prompts you for an update, you must refuse.
6.5 If you install the printer software on a new computer, be sure to refuse any prompts for updates
during installation and disable automatic updates (see step 1.2) once the installation is complete.
Table of contents
Popular Printer Accessories manuals by other brands


Star Micronics
Star Micronics TSP800 Series install guide

Citizen
Citizen CBM-202PC Series user manual

Canon
Canon Color imageCLASS MF8170c installation instructions

Codonics
Codonics Virtua 1VCX-LR833 Technical brief

Roland
Roland DU2-64 Supplementary manual

TonerRefillKits
TonerRefillKits ReChargX RX126 instructions