Inland IT-16 User guide

1
INLAND TECHNOLOGY INCORPORATED IT-16™ / IT-30™
ASSEMBLY and INSTRUCTIONMANUAL February 9, 2022
Inland Technology Incorporated
Pollution Prevention By Design
IT-16™/ IT-30™
PARTSWASHER CLEANER / RECLAMATION SYSTEM
Assembly and Instruction Manual

2
Inland Technology Incorporated
Introduces the
IT-16™/ IT-30™
PARTSWASHER CLEANER / RECLAMATION SYSTEM
Inland Technology Incorporated enjoys an enviable reputation within the Defense Community as
the leader in solvent substitution and waste reduction technologies. Most of Inland Technology
Incorporated products and systems are Type Classified, have National Stock Numbers, and are
in the Defense Supply System.
These machines are designed as remote reservoir partswashers. They both meet or exceed
most air quality requirements for remote reservoir solvent cleaning.
Both the IT-16™ and IT-30™ are equipped with the Inland Technology Incorporated
EDGE TEK™ Filtration System, a unique element that filters down to .01 of a micron nominal.
When properly managed, this system used with Inland Technology Incorporated
BREAKTHROUGH®, SKYSOL®, or SKYSOL®100 solvents, generally extends solvent life for
several years. Documented waste reduction in DoD averages 99% per installation for this waste
stream.
BREAKTHROUGH®, SKYSOL®, or SKYSOL®100, as opposed to other cleaning compounds,
are environmentally compliant and have been given a toxicity clearance from the U.S. Army
Center for Health Promotions and Preventative Medicine (CHPPM). Installations and units who
currently use Inland Technology Incorporated products have frequently been nominated for and
have received a variety of prestigious awards.
Enjoy your IT-16™ and IT-30™ Partswasher/Weapons Cleaning System using either
BREAKTHROUGH®, SKYSOL®, or SKYSOL®100 solvents.

3
TECHNICAL DATA:
IT-16™ Partswasher Cleaner / Reclamation System NSN 4250-01-381-8061:
Inland Technology Incorporated developed the IT-16™ for high-volume usage. This machine
was designed as a smaller version of our IT-30™ Partswasher / Reclamation System for limited
space restrictions.
Specifications: Overall dimensions: 31” l x 22” w x 53” h
Inside tub dimensions: 26” l x 17” w x 7” h
16 gauge steel tub
1 drain baskets
Heavy-duty steel work tray
One flow-thru brushes
One hydraulic lid assists
Solvent capacity: 14 gallons
Electrical requirements 120V, 60Hz, 1.7A
110 volt 500 GPH pump
IT-30™ Partswasher Cleaner / Reclamation System NSN 4250-01-381-8078:
Inland Technology Incorporated developed the IT-30™ for high volume-usage. This system
provides a motor pool partswasher that has a handier size requiring less solvent for operations
and making acquisition more cost effective. It is equipped with Inland Technology EDGE TEK™
Filtration System, a unique element which filters down to .1 of a micron nominal. When properly
managed, this system usually extends solvent life for several years. It is designed as a remote
reservoir partswasher and meets or exceeds most air quality requirements for remote reservoir
solvent cleaning.
Specifications: Overall dimensions: 37” l x 27” w x 63” h
Inside tub dimensions: 32” l x 20” w x 8” h
14 gauge steel tub
1 drain basket
1 flow-thru brush
One hydraulic lid assist
Solvent capacity: 25 gallons
Work light
Electrical requirements 120V, 60Hz, 1.7A
110 volt 500 GPH pump

4
Assembly Instructions for Barrel Mounted Washer:
1. Remove all items and packing material frombox.
2. Set the partswasher top on two supports with the bottom
of the unit a minimum of thirty (30) inches above the
floor. Do Not place the partswasher sink overthe
barrel before completing the assembly instructions.
3. Install the pump-motor assembly including the pump
inlet screen and hang it under the partswasher sink.
(Figure 1)
Be sure to slide the pump hanger hook through the
channel located on the bottom of the partswasher.
Do not force. It will be necessary to tilt the assembly
slightly to the front to slide the hook through the channel.
The pump inlet should face the front side of the sink.
Note that the pump should draw fluid from the center
of the solvent drum.
4. Bolt the filter assembly to the partswasher lip. Normal
installation is on the left side of the upper lip of the unit.
Hold in position and secure. (Figure2)
5. Install 6 ft. hose on pump assembly using clamps
provided. Pick up tank and put on barrel with pump
hanger into hook. Put hose and electric cord through hole
in back of partswasher. The electrical cord goes to the
electric box plug. Install hose from chrome filter (out) to
bushing in back of partswasher. (Figure3)
6. Install the hose coming from the pump to the “IN” port
on the pre-filter canister housing head. Tighten the hose
clamp.
For the IT-30™ Only:
7. Place the fluorescent bulb in the protective sleeve. Place
the two (2) round tube end covers over the pins and insert
the tube into position on the partswasher lid. (Figure4)
Plug the power cord for the fluorescent light into the back
of the master switch box located on the lower right front of
the sink. (Figure 5)
Figure 1
Figure 2
Figure 3
Figure 4

5
8. Plug the power cord for the pump-motor into the back of
the master switch box located on the lower right front of
the sink.
9. Plug the cord from the master switch box into any
standard grounded, 110 VAC, 60 Hertz, fused power
source. Warning, do not turn the master switch on until
the solvent has been added to the solvent reservoir
barrel; damage may result to the pump.
10. Add the solvent to the solvent reservoir barrel by pouring
it into the partswasher. The reservoir barrel should be
approximately 2/3/full.
11. Turn the master power switch on (Figure 6) and verify that
the light and pump come on. Check for leaks at all hose
fittings and filters. If leaks are detected, shut off master
power switch and correct. Verify that the solvent flows
into both the goose neck and flow thru cleaning brush by
changing the valve at the base of the goose neck in the
bottom of the sink. Always run pump at least 45 minutes
each day.
SERVICING:
Figure 5
Figure 6
Routine maintenance and servicing of the EDGE TEK™ Partswasher units is a very simple
and can be normally accomplished within five minutes per unit. It is suggested that routine
maintenance be accomplished at fixed intervals such as once per month. At this schedule
time, the following should be accomplished.
1. Turn partswasher off.
2. Visually inspect exposed electrical wiring for damage. Repair ifrequired.
3. Verify that works light and pump-motor are securely plugged in. Verify that the
partswasher primary power cord is securely pluggedin.
4. Remove partswasher strainer and observe solvent level in the barrel. Add solvent
so level is approximately two-thirds (2/3) of the barrel. DO NOT OVER FILL.
Replace parts washer strainer.
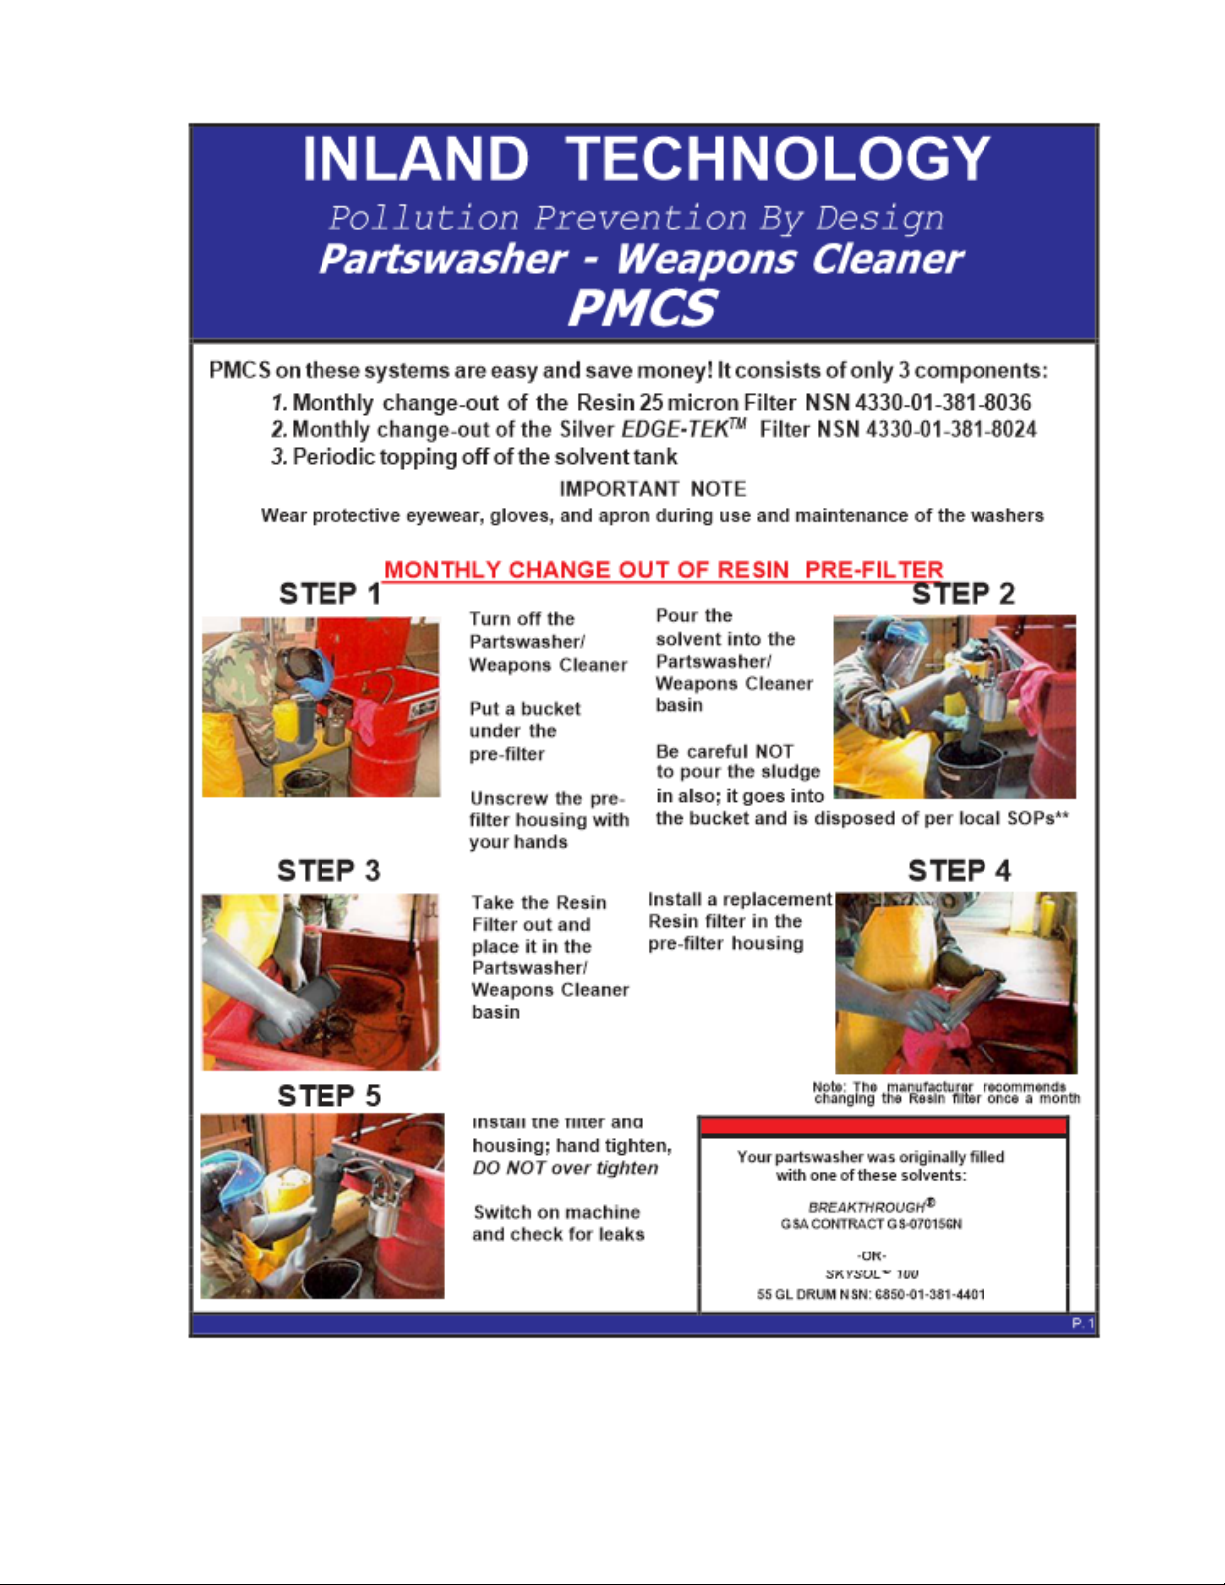
5. Remove pre-filter canister. Pour excess solvent into the partswasher. Remove filter
element. If stainless steel element is used, remove debris from the element and
canister into the satellite collection drum. If Resin element is used, remove and set
inside of partswasher to drain. Replace cleaned stainless steel element or new
Resin element into canister and screw canister on filter head. DO NOT OVER
TIGHTEN.

6
6. Remove the EDGE TEK™ filter canister by removing retaining strap. Pour excess
solvent in partswasher. Remove wire retaining ring from inside of canister. Remove
EDGE TEK™ filter by pulling on the wire loop in the center of the filter element.
Remove wire loop from filter element. Set EDGE TEK™ element in partswasher to
drain. Place wire loop in center of new filter. Slide new EDGE TEK™ filter into
canister with wire loop facing out. Replace wire retaining ring. Set canister on filter
head, replace retaining strap and tighten. DO NOT OVER TIGHTEN. Direct solvent
flow away from draining element. Turn pumpon.
7. Observe full solvent flow from flex hose.
8. Turn manual flow valve to nylon flow-thru brush. Observe flow through flex hose is
stopped. Observe full flow through brush. Return manual flow valve to flex hose.
Observe full through flexhose.
9. Verify fluorescent light is operational. If not, turn unit off, remove primary power to
the unit and replace bulb. Observe that white end caps are in place at both ends of
fluorescent bulb.
10. Observe that power switch is lighted. If not, and unit is on, turn unit off, remove
primary power to the unit and replace electricalassembly.
11. Verify that the lid fully closes. Verify that the proper fusible link isused.
DRAINING AN DESLUDGING:
It is recommended It is recommended to drain and desludge your partswasher / weapons
cleaner at least annually to remove any water condensation that will fall to the bottom of
the tank. If the water condensation is not removed, rust pitting will begin on the bottom of
the tank, which will cause leaks from the bottom of the tank. In high humidity areas or
where the machine is stored outside under a canopy this procedure should be done
every six months.
Step1: Acquire a cleanand empty 15-gallondrum.

7
Step 2: Place both flow-thru brushes into the large opening on the drum.
Step 3: Turn valve on the gooseneck off
Step 4: Turn the systemon.
Step 5: Whensolvent stopsflowingout of the brushes, turn machine off.
Step 6: Turnmachine on and continue todrain until pumploses suction.
Step 7: There will be solvent left in the tank.
Step 8: Using a dustpan or canister, remove remaining solvent. Scoopout any
sludge in the tankand dispose of IAW your local HAZMAT SOP.
Step 9: Wipe the interior of the drum with a clean dry rag.
Step 10: Refill to above the second rung with new solvent. Ensure that the solvent level is
the pump.

8
NOTE: DISPOSE OF ALL SLUDGE AND USED RAGS IN ACCORDANCE WITH YOUR
LOCAL HAZMAT AND ENVIRONMENTAL SOP’S.
AUTHORIZED REPLACEMENT SOLVENTS & FILTERS:
BREAKTHROUGHand SKYSOLSolvent:
You can now order either BREAKTHROUGH, SKYSOL, or SKYSOL®100 solvents direct
from GSA Advantage by typing the link below. After connecting to the link, type in the Contract
Number GS-07F0156N in the search box and you will be directed to Inland Technology
Incorporated’s products.
http://www.gsa.advantage.gov
Contract Number GS-07F0156N
BREAKTHROUGHMIL-PRF-680C Type II Solvent
GSA Advantage:
Gallons: Part#:
5 BT05
30 BT30
55 BT55
SKYSOL®MIL-PRF-680C Type IV Solvent:
Gallons:
Part #:
5
SKY05
30
SKY30
55
SKY55
SKYSOL100MIL-PRF-680C Type IV Solvent:
GSA Advantage:
Gallons Part#
5 SKY10005G
DLA:
5
Gallon Can
NSN: 6850-01-381-4423
55
Gallon Drum
NSN: 6850-01-381-4401

9
EDGE TEKTM Filters:
DLA: Box (12x1 each) NSN: 4330-01-381-8024
Industrial case (144 x1 each) NSN: 4330-01-455-6903
GSA Advantage:
Box (6x1 each) ETRK06
Resin Filters
DLA: Box (12x1 each) NSN: 4330-01-381-8036
GSA Advantage:
Box (6x1 case) RESRK06
Air Force EESOH-MIS System to Order Solvents:
This system allows authorized Air Force and Air National Guard units to order
BREAKTHROUGH®if it is authorized on their installation. BREAKTHROUGH®is listed in the
following sizes withinthis system:
BREAKTHROUGH®
55
Gallon Drum
6850PHM00002540
BREAKTHROUGH®
30
Gallon Drum
6850PHM00010318
WARRANTY:
In the interest of maintaining the highest possible customer satisfaction with our equipment and
technology, Inland Technology Incorporated offers the following warranty on all of our equipment:
“Both the IT-16™ or IT-30™ parts washers comes with a one-year warranty if only
BREAKTHROUGH®, SKYSOL, or SKYSOL100 and our filters are used in the machine.
Mixing or use of other brands of solvents can be detrimental to the system and will void the
warranty.”
CUSTOMER SERVICE:
Should you have any questions, comments, or concerns, our customer service line is open from
0800 –1700 Pacific Daylight / Standard Time, Monday –Friday.
Please contact us toll free at (800) 552-3100 or via email at inl[email protected]
10

11
This manual suits for next models
1


