InnerSpace Ventaire Manual

Instruction Guide for
Scope Drying Unit
Ventaire™Endoscopy System
888-435-2256 | innerspacehealthcare.com

2
Introduction
System Overview ........................................................................3
System Specifications..................................................................4
Replacement Information.............................................................4
InnerSpace Barcodes ..................................................................4
• Using InnerSpace Scope Barcodes ........................................4
• Using Embedded Manufacturers’ Scope Barcodes ................4
• Using InnerSpace User Barcodes ..........................................4
InnerSpace Support .....................................................................4
System Administrators
Setup ..........................................................................................5
Settings ......................................................................................5
• Exporting Data .....................................................................6
• Drying ..................................................................................6
• Sound ..................................................................................7
• Filters and Tubes .................................................................7
• Attaching Barcode Stickers ..................................................7
• Importing Users....................................................................8
• Importing Scopes .................................................................8
• Wi-Fi ...................................................................................8
• Factory Reset .......................................................................8
System Operators
Status Indicators .........................................................................9
Drying a Scope .........................................................................10
Pausing a Drying Cycle .............................................................10
Removing a Scope ....................................................................11
Restarting Scope Drying Unit ....................................................11
Appendix
Care and Maintenance ..............................................................12
Product Ordering and Replacement Information ........................12
Instructions ...............................................................................13
• Removing and Replacing Tubes ..........................................13
• Removing and Replacing Air Filter ......................................13
• Connecting Scope Drying Unit to Building’s Air Supply ........13
• Mounting a Scope Drying Unit to IV or Scope Pole ..............14
• Mounting a Scope Drying Unit to Wall .................................15
Instruction Guide for Scope Drying Unit
Table of Contents

3
System Overview
Healthcare-associated infections (HAIs) affect one out of every 31
hospital patients at any given time, according to the Department
of Health and Human Services’ Agency for Healthcare Research
and Quality. Over one million HAIs occur every year in the US,
leading to loss of life and rising healthcare costs. A drying device
that forces air through the interior lumens of the endoscope can
reduce the level of moisture inside the scope and, therefore, the
chance of contamination and infection.
InnerSpace’s Ventaire Endoscopy System includes products that
assist endoscopy staff in the safe and thorough drying, tracking,
and storage of reprocessed scopes, including scope drying and
tracking cabinets and scope drying units. Both products provide
consistent and continuous delivery of HEPA-filtered, pressurized
air into endoscope channels to keep scopes dry.
The scope drying unit offers a flexible solution for thoroughly
drying the interior lumens of endoscopes. The compact size of
the drying unit contributes to its flexibility – it can be placed on
a counter or other surface, including carts, or mounted on a wall,
IV pole, or scope pole. Scope drying units are available in two
versions: one version has a compressor that supplies air, and the
other version connects to a building’s air supply. The scope drying
unit’s compressor is balanced for low-vibration operation.
Once the unit’s drying cycle is complete, the endoscope can be
placed in a scope drying and tracking cabinet for continued drying
and venting or stored in an endoscope cabinet. The drying unit
works with all major endoscope brands.
A scope drying unit includes a barcode scanner. Disposable
tubes and connector kits are needed to operate the unit and are
purchased separately. See Appendix for order information.
Instruction Guide for Scope Drying Unit
Introduction
• Easy-to-read touchscreen and intuitive interface
• Notifies operator when tubes and filters need replacement
• Barcode scanning streamlines operation
• Can dry two scopes at the same time
• Uses disposable connectors
• Collects scope drying activity, including date and time of
operation, the operator, and scope identification. Customizable
settings ensure drying process complies with organization's
guidelines
• Compatible with InnerSpace Cloud platform for remote
management and monitoring
• Lists of users and scopes can be uploaded and downloaded
via USB or InnerSpace Cloud

4
System Specications
Dimensions (nominal)
• Exterior: 7.5"w x 8"d x 10"h
• Display screen: 5" diagonal length
Unit with compressor
• Air output:
·Compressor output: 5 PSI (maximum PSI)
·LPM: 1.65 CFM (46.7 LPM)
• Decibels:
·71 dB
• Weight: 14.3 lb
• Electrical requirements: 115 VAC (less than 2 amps)
• Power cord length: 10 feet
Unit without compressor
• Compressor output: Not to exceed 10 PSI
• Weight: 8.1lb
• Electrical requirements: 115 VAC (less than 2 amps)
• Power cord length: 10 feet
Replacement Information
The scope drying unit includes a disposable filter and tubes
that will need to be replaced (filter every 6 months, tubes every
24 hours). Connectors are single use. To find the connector
kit compatible with your endoscope or to order replacement
products, call InnerSpace Customer Service at 888-435-2256 or
innerspacehealthcare.com/Ventaire
InnerSpace Barcodes
A drying unit can read one dimensional (1D) barcodes, including
most endoscope manufacturers’ barcodes. Depending on the
administrator’s setup of the scope database, a scope can be
scanned using the InnerSpace endoscope barcode stickers
provided or the endoscope manufacturers’ barcode.
A set of InnerSpace barcode sticker sheets for ID badges and
endoscopes is included with the scope drying unit. Scanning
badges and scopes saves time for both administrators and
system operators compared to manually entering information
into the system.
InnerSpace Support
For questions about your scope drying unit, call InnerSpace
Customer Service at 888-435-2256.
Instruction Guide for Scope Drying Unit
Introduction
5
Setup
Administrators have access to the settings menu and can add
and remove user and administrator profiles; add, edit, and delete
scope inventory; and view system details. Users can connect
scopes and manage drying cycles.
Most of the steps that system administrators complete in the
initial setup will not need to be repeated, but administrators
can continue to add, edit, and delete existing information,
such as users, scopes, and scope drying times. Users will see
information and interact with the system interface based on the
administrator’s setup.
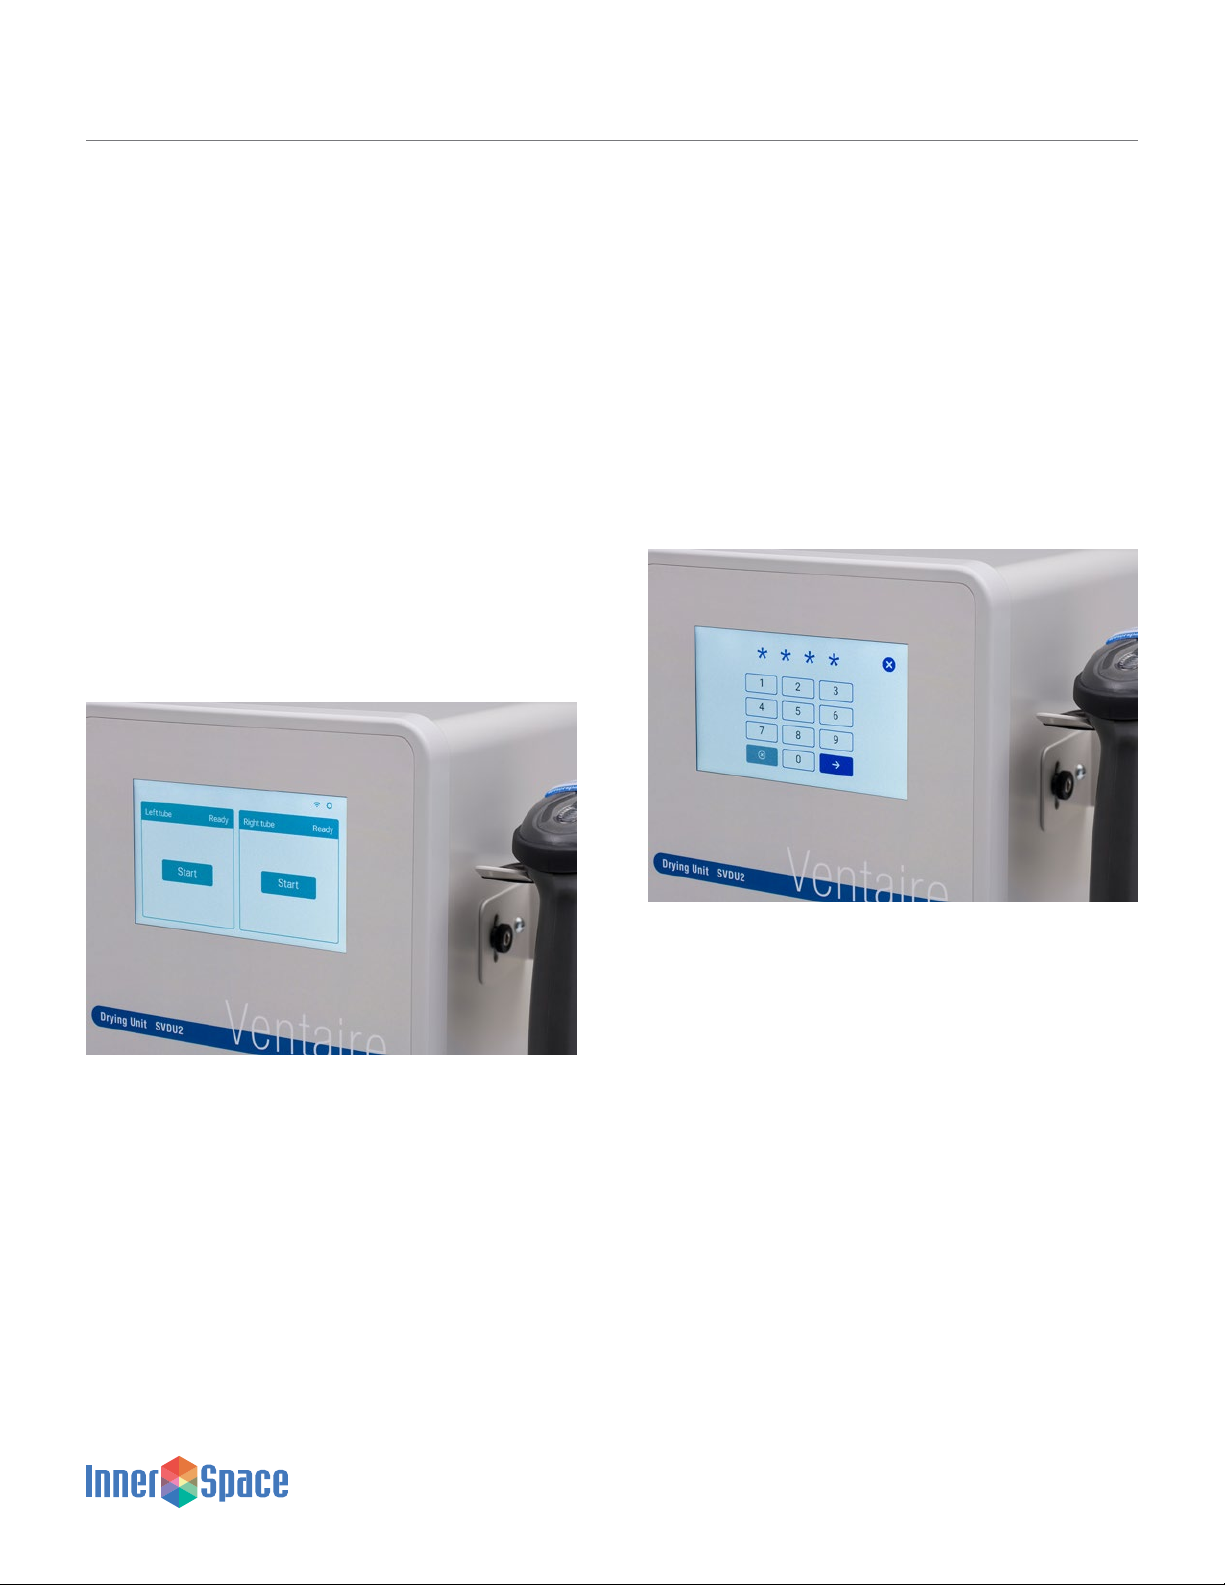
After the Ventaire drying unit is powered, the main screen
will be displayed.
Settings
Settings allows administrators to set up system defaults, export a
report, input a list of users and scopes, connect to network, and
reset tubing and filter replacement notifications.
To access the settings menu, select the settings icon at the top
right corner of the screen. A screen prompting the administrator
to enter a PIN will appear. Enter the default admin PIN of 0001 to
access the system and take you to the Settings menu.
Instruction Guide for Scope Drying Unit
System Administrators
6
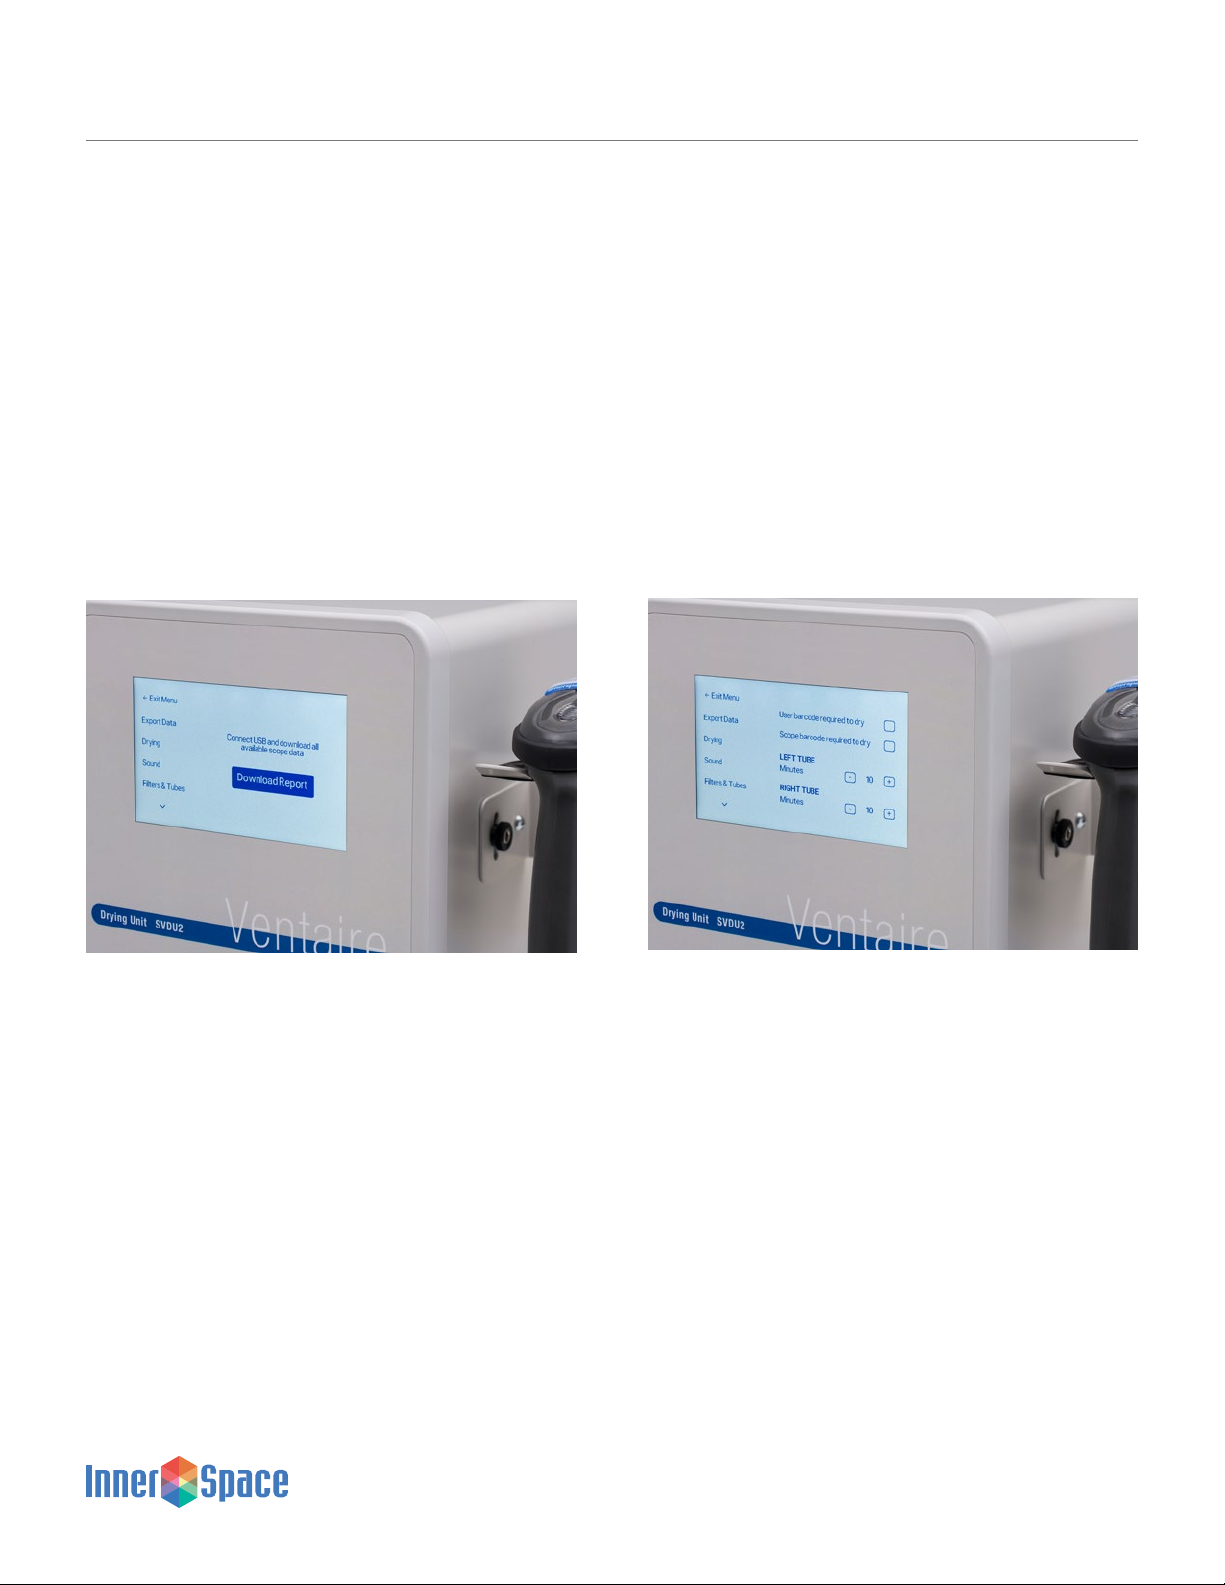
Exporting Data
Allows the administrator to download a report of all available
scope data, including dates and times scopes were dried, scope
activity, user and scope information, scope drying time, and when
tubes and filters were replaced.
To generate a report, select Settings and then Export Data. Insert
a USB into the port on the drying unit. After the system registers
that a USB has been inserted, select Download Report. When the
report is downloaded, remove the USB from the drying unit and
insert it into a computer to view the report.
Drying
Allows the administrator to change the steps that users follow to
dry a scope and to change scope drying durations.
The system default requires users to scan the InnerSpace
barcode on their ID badge, but administrators can edit the steps
to include scanning barcodes on both an ID badge and a scope
to initiate drying.
To change the steps that users will follow, select or deselect the
boxes that apply to your process.
The drying unit is preconfigured with default settings for drying
durations, but it is the responsibility of those using the system to
determine drying durations based on the organization’s guidelines
and/or the guidelines provided by the endoscope manufacturer.
The drying default of 10 minutes is based on tests that tracked
the amount of moisture in the air within the channels of an
endoscope through a 10-minute drying cycle. Humidity probes
were attached to an endoscope at the air/water port, the suction
port, and the distal tip. After 10 minutes of continuous drying, the
moisture level dropped until it reached ambient humidity levels.
To change the drying cycle default, choose the right or left drying
port and then tap “+” or “–” until you reach the desired duration.
Instruction Guide for Scope Drying Unit
System Administrators
7
Sound
Allows the administrator to adjust the sound settings when a
barcode is scanned and when a drying cycle is complete.
To change sound settings, select or deselect the sound setting boxes.
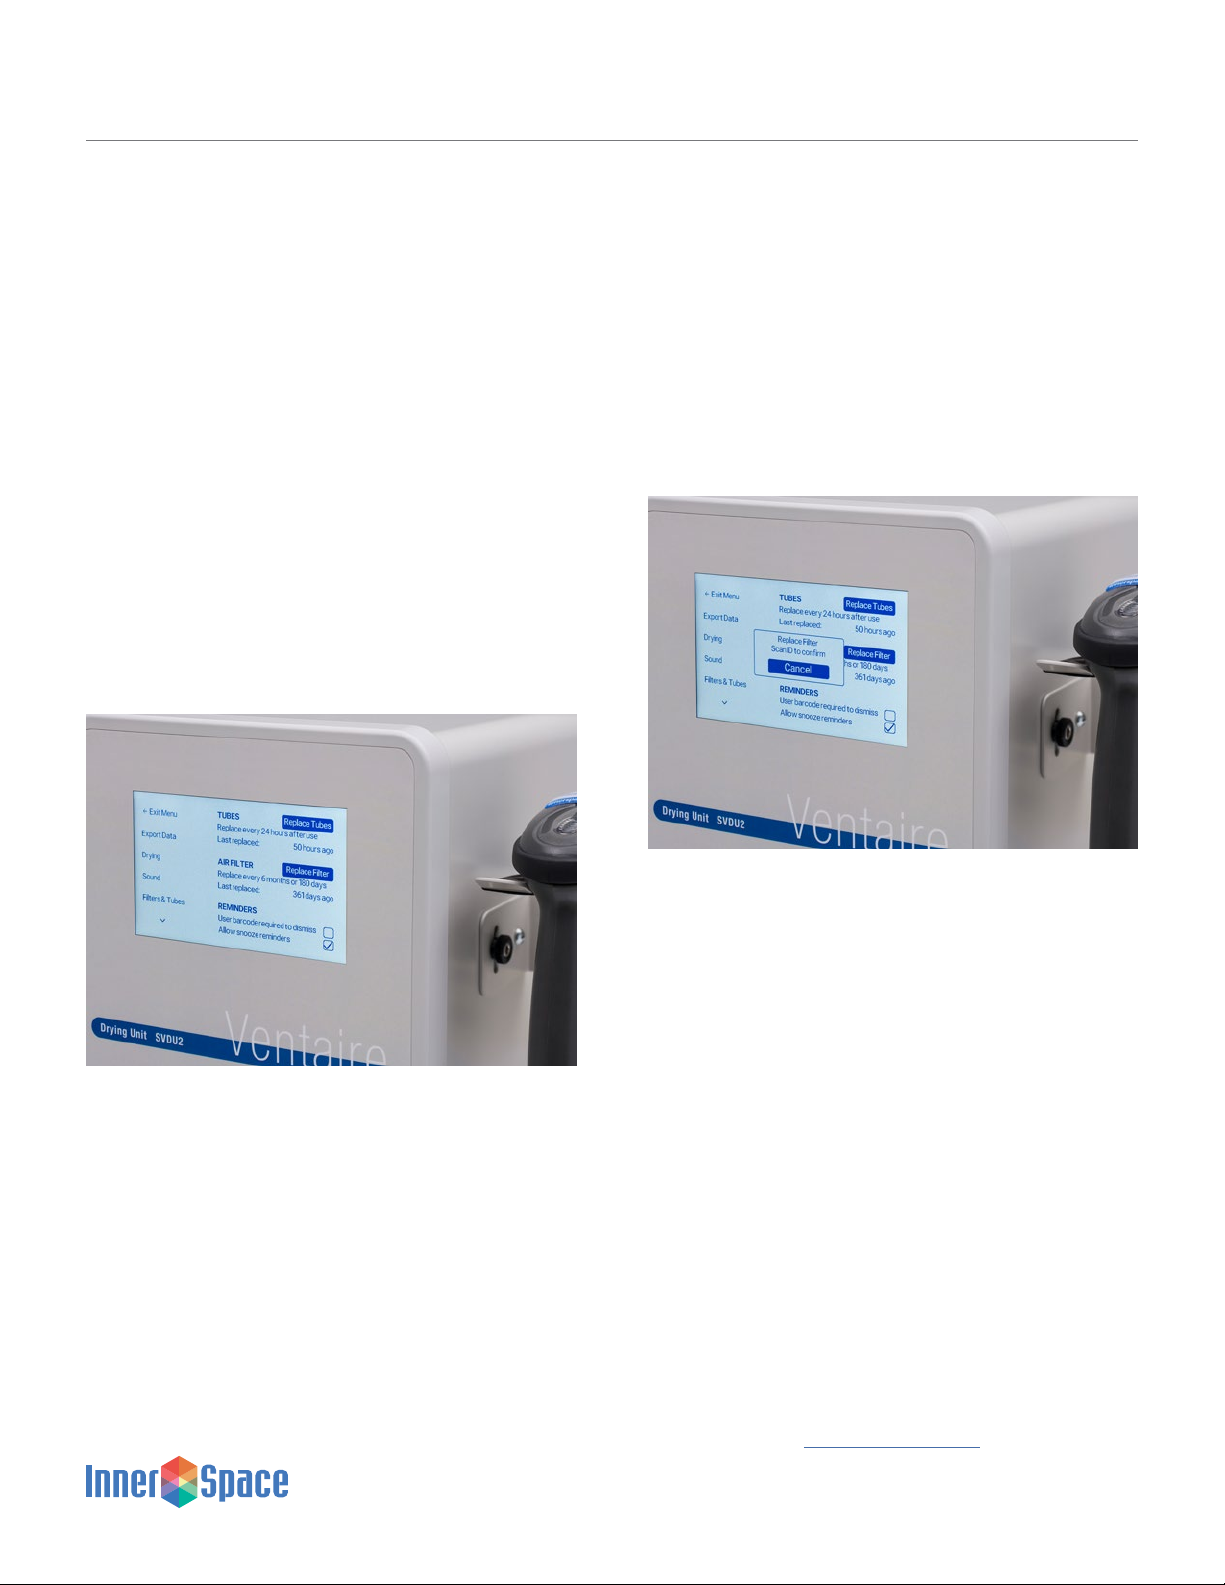
Filters and Tubes
Allows the administrator access to the drying unit’s air filter and
tube settings. It notifies when each should be replaced as well as
when they last were replaced. When it is time to replace the tube
or air filter, select Replace Tubes or Replace Filter. Replace air
filters every 6 months (180 days) and tubes every 24 hours.
See page 13 for replacement instructions.
The drying unit will display reminders to replace the tubes and
air filter. To change the reminder notification screens, select Filter
& Tubes. Administrators can require that users scan the barcode
on their ID badge to dismiss a reminder notification and/or set
the snooze option for the notification, which allows the user to
complete one additional drying cycle.
To snooze a notification, select “Allow snooze reminders.” To
require users to scan the barcode on their ID badge to dismiss the
notification screen, select “User barcode required to dismiss.”
Attaching Barcode Stickers
Follow these instructions to attach barcode stickers to ID badges
and endoscopes:
ID badge barcode stickers
• Scan barcode to identify a user. Peel and affix sticker firmly to
their ID badge
Endoscope barcode stickers
• Scan barcode to identify an endoscope. Peel and affix sticker
firmly to the endoscope
After an InnerSpace ID badge or scope barcode sticker is affixed,
administrators can scan the barcode to add a user or scope to the
drying unit system.
To reorder sticker sheets, contact InnerSpace Customer Service at
Instruction Guide for Scope Drying Unit
System Administrators

8
Importing Users
User names are added to the system by importing them using
a USB device. To add a user, the user’s name, email address,
department, and PIN will need to be entered. The PIN needs to
match the PIN on the ID badge barcode sticker assigned to
that user.
To add a user, download a CSV file to a USB from the settings
menu under Import Users. Insert the USB into the side port on the
drying unit. Once the system registers a USB has been inserted,
Download Template will appear. Select to download to the USB.
Remove the USB and insert into a computer to view and add
user information.
Add user information to the CSV file, save it, and then reinsert the
USB into the port on the drying unit. Select Import Users to upload
the user information.
Importing Scopes
Scopes are added to the system by importing them using a USB
device. To add a scope, the scope serial number, brand, model
number, internal ID, description, and barcode need to be entered.
The barcode will need to match the barcode on the InnerSpace
endoscope barcode sticker sheet for that scope or match the
endoscope manufacturer’s barcode.
To add a scope, download a CSV file from the settings menu
under Import Scopes. Insert the USB into the side port on
drying unit. Once the system registers a USB has been inserted,
Download Template will appear. Select to download to the USB.
Remove the USB and insert into a computer to view and add
scope information.
Add scope information to the CSV file, save it, and then reinsert
the USB into the port on the drying unit. Select Import Scopes to
upload scope information.
Wi-Fi
Allows the administrator to connect to a wireless network.
InnerSpace Support Technicians will provide the service needed to
connect a device to Wi-Fi and can be reached at 888-435-2256.
Factory Reset
To reset, select Reset Device. The system will shut down and
reboot. All preexisting data will be erased and will need to be
uploaded again.
Instruction Guide for Scope Drying Unit
System Administrators
9
System Operators
A system operator checks scopes in, connects scopes, and
manages the drying process.
For questions or help with the scope drying unit, contact
InnerSpace Customer Service at 888-435-2256.
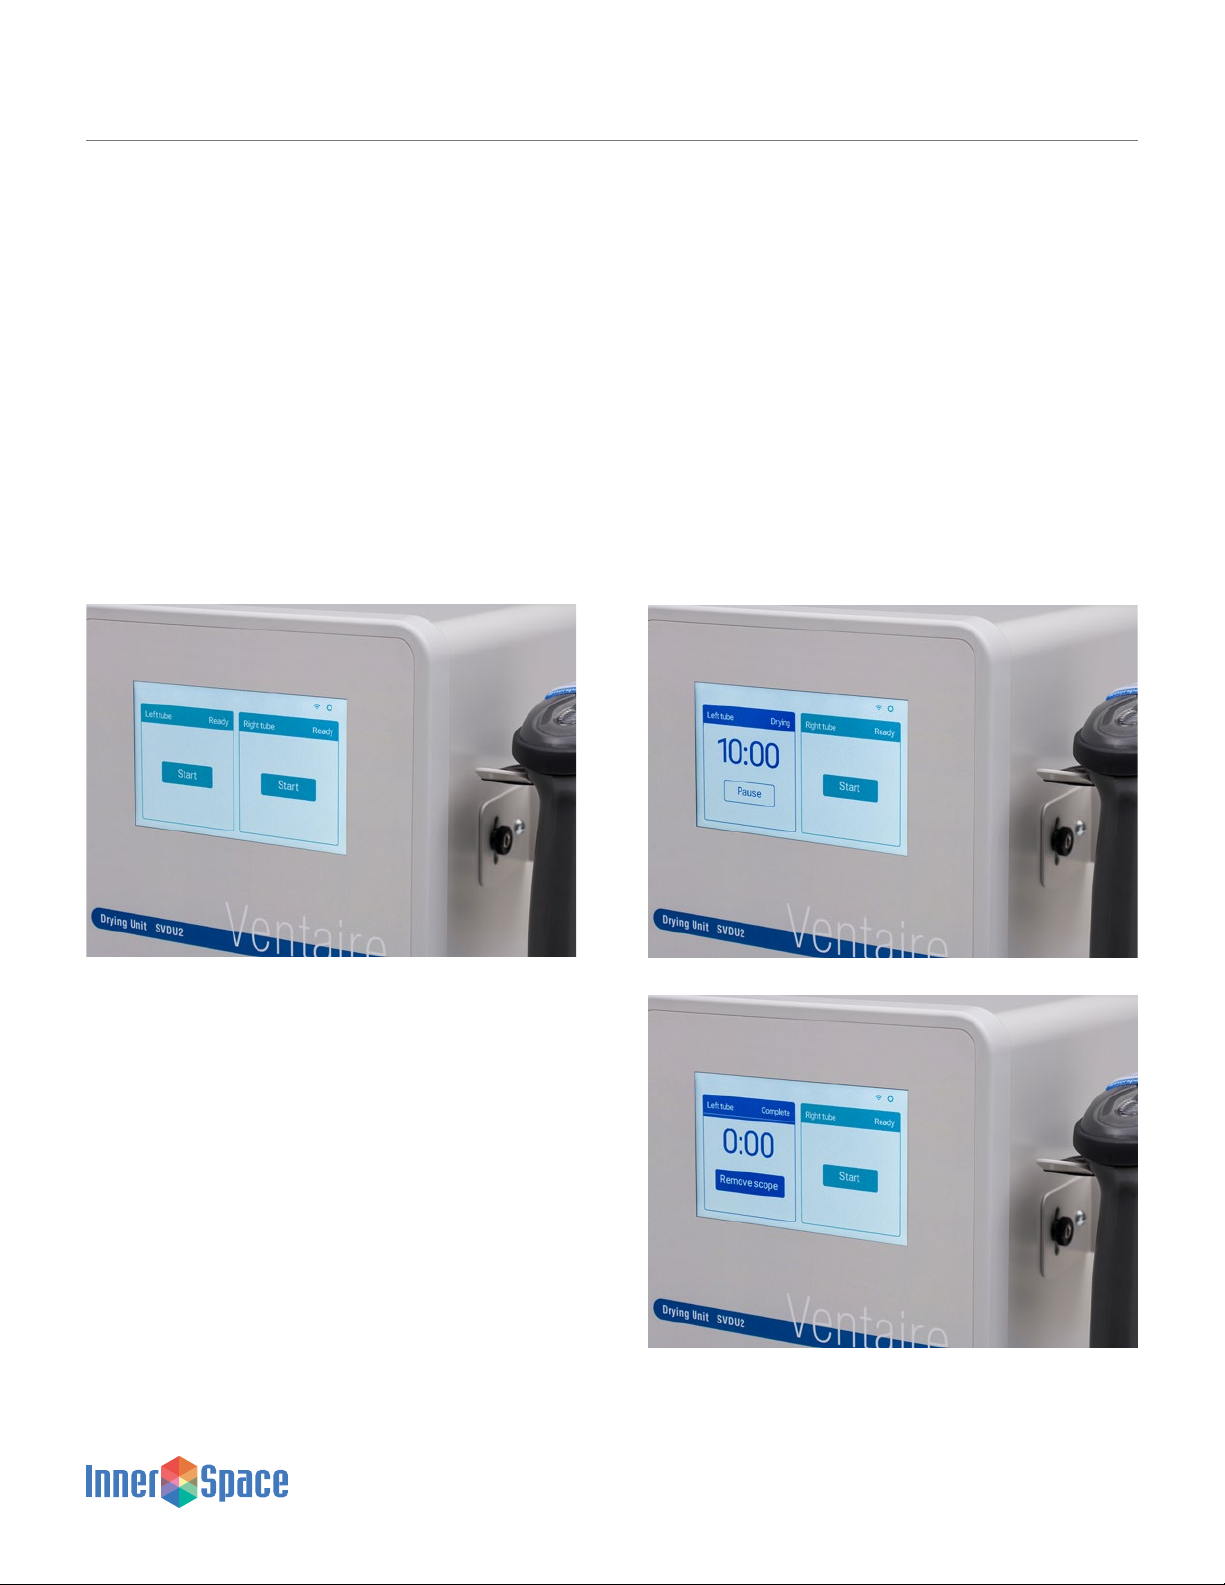
Status Indicators
Operate the system from the main screen.
The main screen uses color and a timer to show the drying process.
Green: The right or left port is available and ready for a scope to
be connected and dried.
Blue: The right or left port is in use and drying a scope. The timer
indicates minutes left in drying cycle. When timer is at 0:00, the
right or left drying port has completed the drying cycle, and the
scope can be removed.
Instruction Guide for Scope Drying Unit
System Operators
10
Drying a Scope
Before initiating the drying process, a scope must be attached
to a connector and tube. How the connector is connected to the
scope depends on the type of connector you are using. Go to
innerspacehealthcare.com/Ventaire for connector kit instructions.
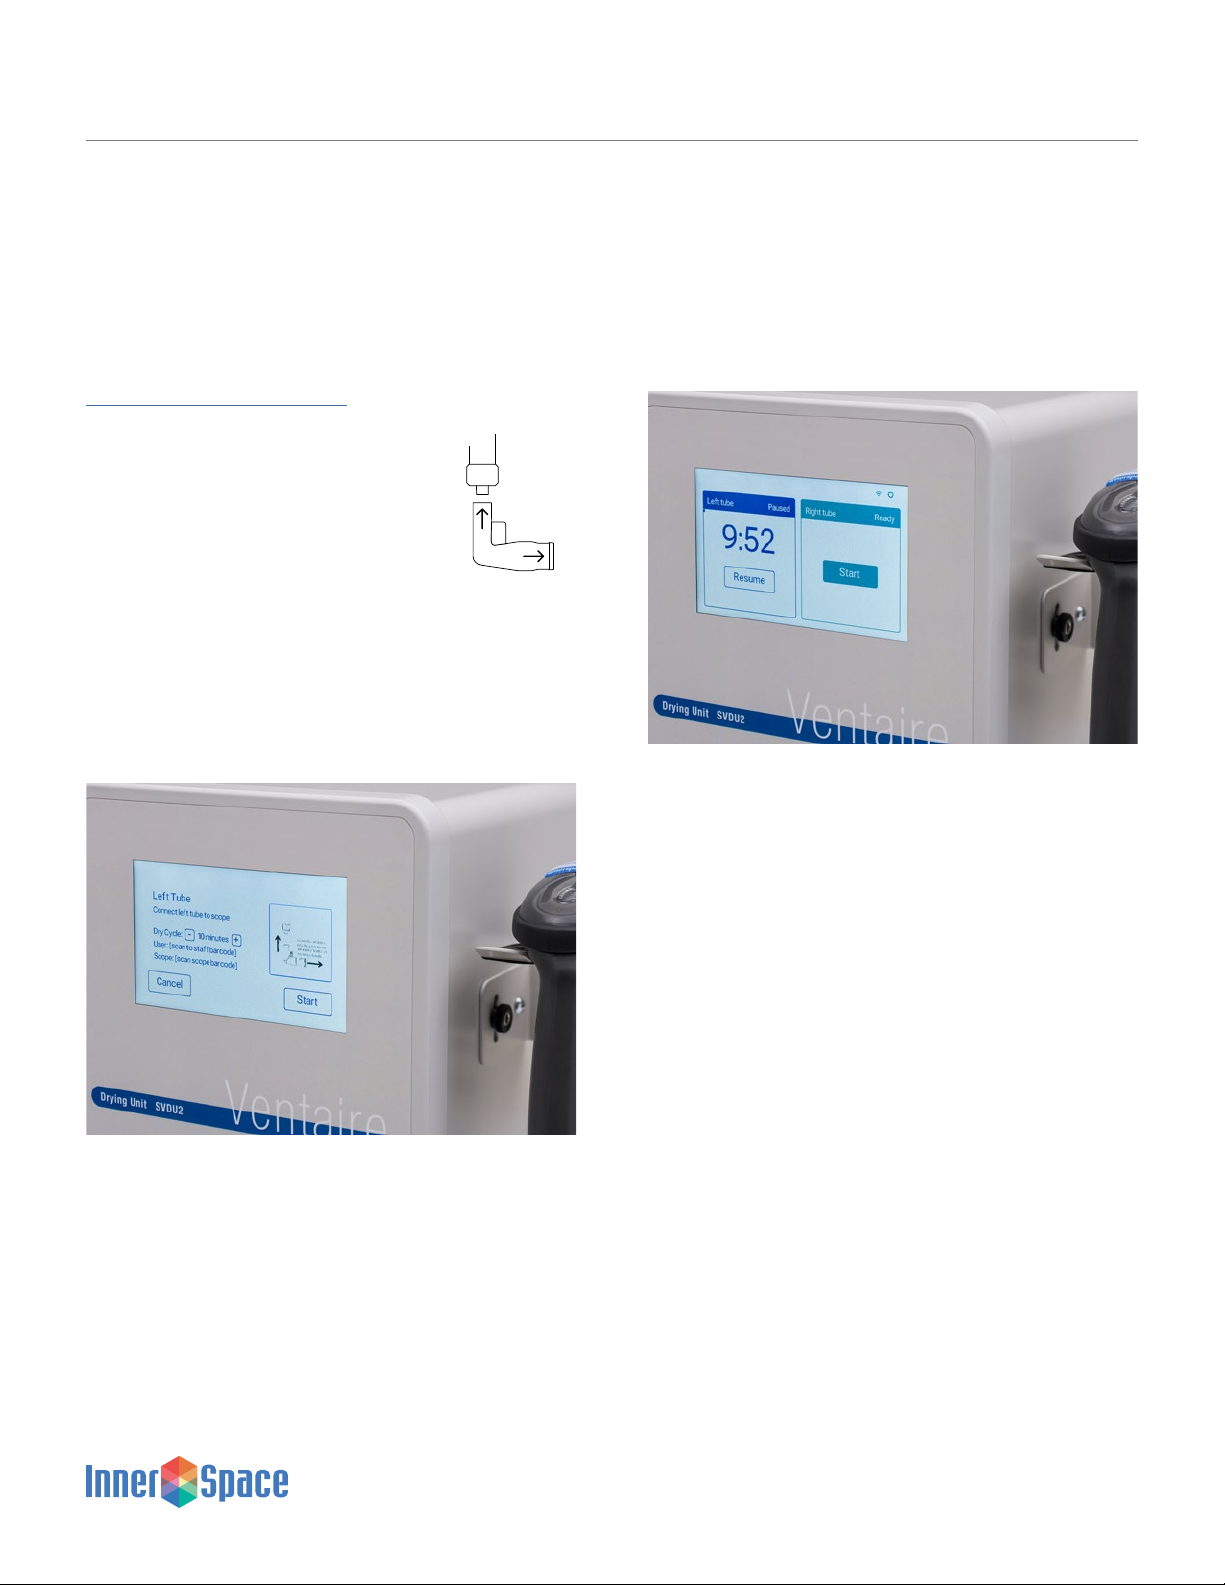
To begin a drying cycle:
Select Start for port that tube is attached to.
The display prompts the user to connect the
tube to a connector and then to the scope.
Depending on your administrator’s system setup, you may either
be required to scan the barcode on your ID badge or to scan both
the barcode on your ID badge and the barcode on the endoscope.
All scanned information will appear on the display.
The user can change the drying cycle duration by selecting “+” or
“-” until the desired duration is reached, and then select Start or
make an additional scan of either the barcode on an ID badge or
scope to initiate drying.
The main screen appears with a blue banner identifying the right
or left port, displaying Drying, and a timer showing time left in the
drying cycle.
Pausing a Drying Cycle
To pause a drying cycle, select Pause. To resume drying,
select Resume.
Instruction Guide for Scope Drying Unit
System Operators
11
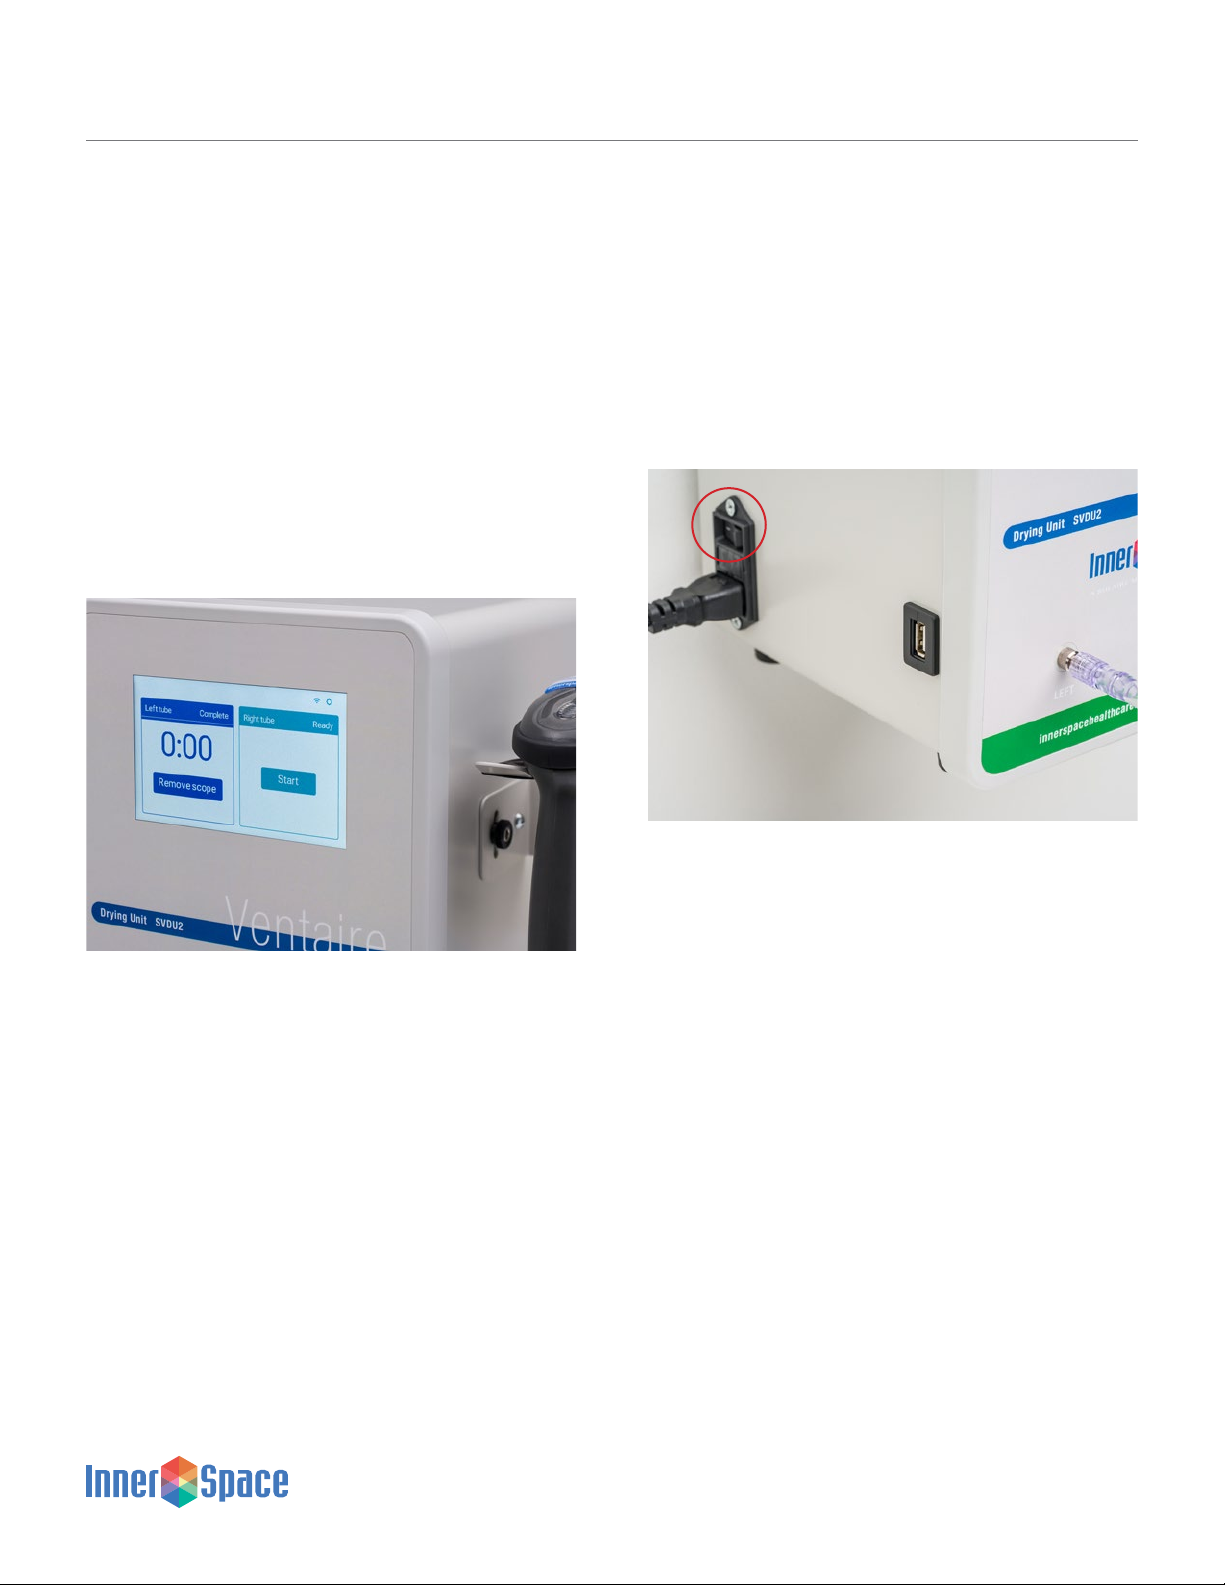
Restarting Unit
You may need to restart the system if it freezes or has another
issue that can’t be resolved. To turn off unit, flip the switch above
the plug on the bottom left side of the scope drying unit. When
turned back on the system will reboot. All information previously
entered and saved repopulates.
Instruction Guide for Scope Drying Unit
System Operators
Removing a Scope
When the drying cycle is complete, the blue banner displays
Complete, and the user can remove the scope.
Select Remove Scope, and then disconnect the connector from
the scope and tube.
Before discarding connector, inspect it to ensure it is fully intact
and that there are no broken pieces remaining in the suction and
air water valves. The connectors and all connector kit parts can
then be thrown out.

12
Care and Maintenance
The drying unit’s air tubes must be replaced every 24 hours,
and the unit’s air filter every 6 months (180 days). See page 13
information on tube and air filter replacement.
Follow these recommendations to disinfect, clean, and care for
your scope drying unit.
Cleaning materials:
• The best choices for disinfection are compounds that contain
quaternary ammonium
• Use a 10%-50% isopropyl alcohol solution as an option when
quaternary ammonium compounds aren’t available
• Don’t use abrasive cleaning pads
• Don’t leave cleaning compounds on the surface; wipe surfaces
dry after cleaning
• A 10% (or less) mixture of active bleach and water can be used
though not recommended
Recommended disinfectant/cleaning products:
• Hepacide Quat®II virucidal disinfectant cleaners
• PDI® Sani-Cloth®cleaner
• CaviWipes™ disinfectant cleaner
• Virox®disinfectant cleaner
Tubing should be cleaned with Sani-Cloth®wipes after every use.
Product Ordering and Replacement
Information
To order replacement parts, contact InnerSpace Customer Service
at 888-435-2256 or innerspacehealthcare.com
Replace the HEPA air filter (SVDUAF) every 6 months.
Manifold and manifold auxiliary water tubes connect to the scope
drying unit to effectively vent HEPA-filtered air through endoscope
channels. Manifold tubes are for endoscopes without water jet
ports; manifold auxiliary water tubes are for endoscopes with
water jet ports.
Replace the tubing every 24 hours:
• Manifold Tube, pack of 1: SVDMT1
• Manifold auxiliary water tube, pack of 1: SVDWAT1
Connector kits should be replaced after every use. All connector
kits come in packages of 100. For connector kit product numbers,
go to innerspacehealthcare.com/Ventaire
Instruction Guide for Scope Drying Unit
Appendix
13
Instructions
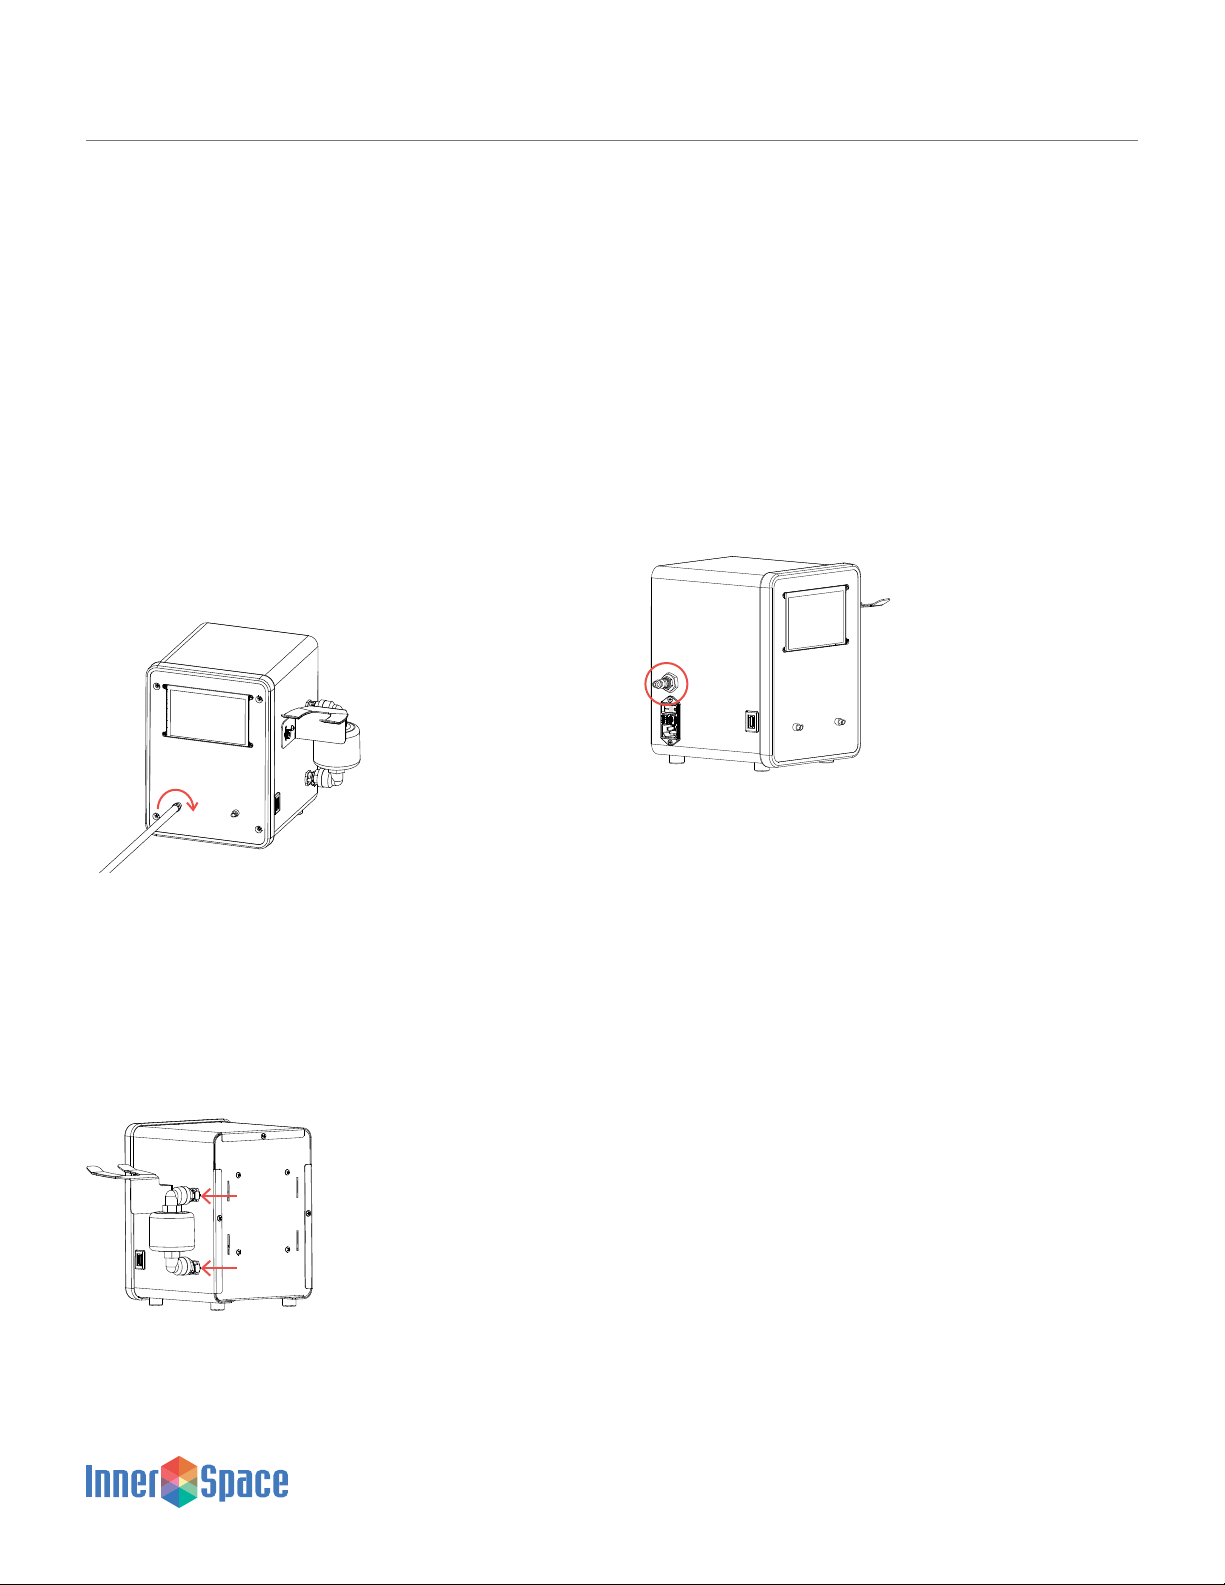
Removing and Replacing Tubes
Follow these instructions to remove and replace drying tubes.
To remove:
Turn the tube fitting to the left to loosen and remove the tube from
the port on the scope drying unit
To replace:
Connect a new tube to the port by turning the tube fitting to the
right until tube is firmly attached
Removing and Replacing Air Filter
Follow these instructions to remove and replace the air filter on
the scope drying unit.
To remove:
Press the quick release buttons on the top and bottom of the air
filter, and pull out and discard the filter
To replace:
Insert the new air filter. The quick release buttons will reset once
the filter is attached
Connecting Scope Drying Unit
to Building’s Air Supply
Follow these instructions to connect a scope drying unit to a
building’s air supply.
Make sure the scope drying unit is off
Connect a ¼” quick-disconnect hose to the air valve on the unit
Turn unit on. Air is now ready to flow through unit
Caution: Make sure air is regulated to 10 PSI maximum.
Pressure exceeding 10 PSI can damage endoscopes.
Instruction Guide for Scope Drying Unit
Appendix

14
Instructions
Mounting a Scope Drying Unit
to IV or Scope Pole
Follow these instructions to mount a scope drying unit to an IV or
scope pole.
Included:
• Mounting bracket
• 2 U-bolts
• 4 nuts
Tools needed:
• Flat-head screwdriver
• Wrench
Step 1
Position bracket so the arrow faces up
Step 2
Place bracket against the pole at desired height. Typical height of
unit is approximately 4’ 9” (57”) from the floor to the center of the
unit’s screen
Step 3
Place U-bolts over the pole and through the center holes in the
back of the bracket. Insert and turn the 4 nuts clockwise with
wrench until firm and the U-bolts are tightly in place
Step 4
Line up the 4 tabs on the bracket with the 4 channels on the back
of the unit. Push down gently on the scope drying unit until firmly
in place
Step 5
Use the flathead screwdriver to tighten the cam lock on each side
of the mounting bracket, making sure the arrow on the cam lock
is pointed up or down when the lock is tight
Instruction Guide for Scope Drying Unit
Appendix
UNLESS OTHERWISE SPECIFIED
DIMENSIO NS ARE IN INCHES[MILLIMETERS]
TOLERANCES ARE:
ANGLES: 1/2
.X .050[1.27]
.XX .030[0.76]
.XXX .015[0.38]
Part free of burrs & sharp edges2.
Notes:
Min bend radius required1.
813000213
14ga Plain Carbon Steel
Reference
Validation/Verification
Inspection
Definition
Symbol
B11
1:2
POWDER COAT GREY PC316
Material
Sheet
Scale
Description Part No
Finish
Mount, Wall, Tabletop
( )
Sheet Size
BT
www.solairem edical.com
Drawn By:
Office: 888.4 35.2256 PO Box 2 808
Fax: 616. 743.5944 Grand Rapids, M I 49501
OF
FLAT PATTERN
UP 90° R .03
UP 90° R .03
6.91 175.58
5.00 127
27.301.075
2.22.088
3.000 76.20
.775 19.68
.300 7.62
REVISIONS
REV. DESCRIPTION DATE ENG.
CHANGE #
A Release for Prototype 7/21/2022
B Added Arrow and "UP" 11/18/2022
88.903.500
88.905.00 127
5.000 127
.75 19.05
.75 19.05
3.50
.18 4.50
1.250 31.75 1.000 25.40
15
Instructions
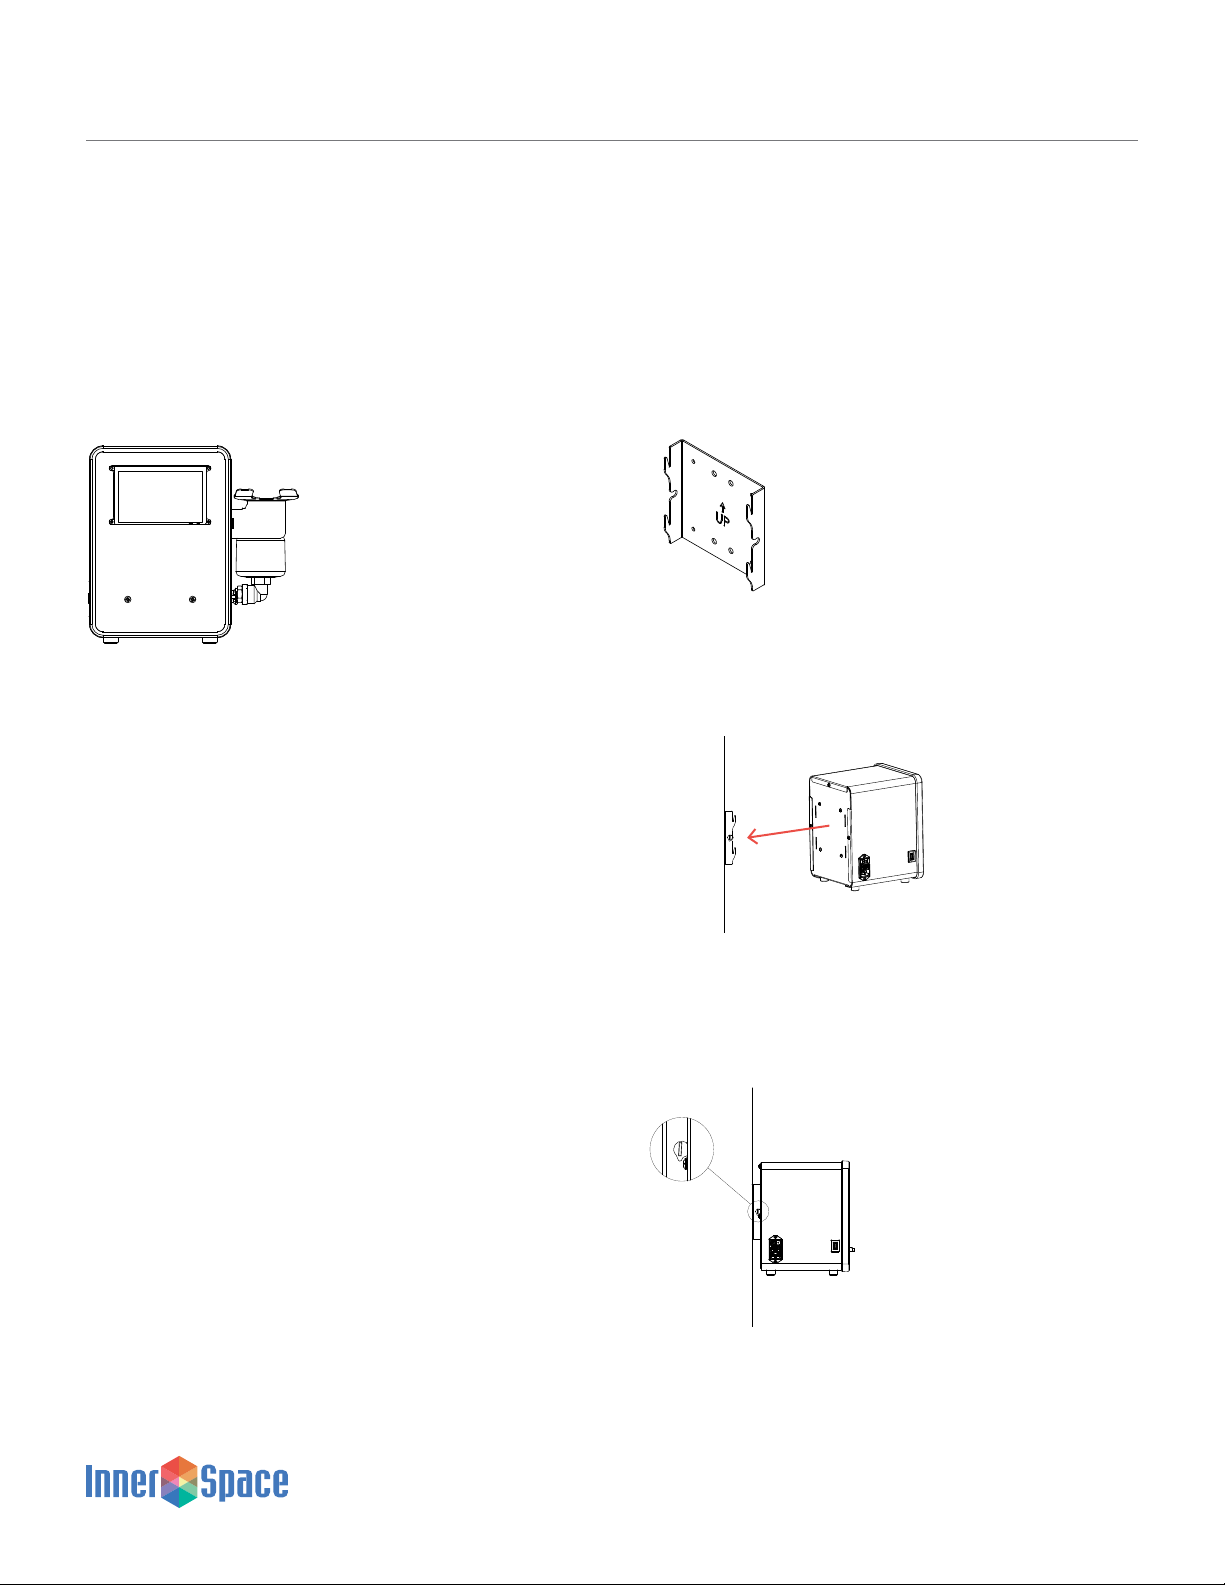
Mounting a Scope Drying Unit
to a Wall
Follow these instructions to mount a scope drying unit to a wall.
Included:
• Mounting bracket
• 4 wall anchors
• 4 screws
• Mounting template
Note: Use wall anchors when mounting unit to a hollow wall. If
mounting to wall studs, you will not need the wall anchors.
Tools needed:
• #8 Phillips head screwdriver
• Drill with 5/16” drill bit
Step 1
Place template at desired location on wall. Typical height of unit is
approximately 4’ 9” (57”) from the floor to the center of the unit’s
screen
Step 2
Drill 5/16” diameter hole into the 4 locations. Discard template
Step 3
Fold anchor in the middle. Insert anchor in hole and tap until it is
flush with wall. Only ¾” clearance is needed behind wall
Step 4
Position bracket so the arrow faces up and place it over the
anchors. Insert screws and tighten with screwdriver until screws
are flush with bracket face. Do not overtighten screws
Step 5
Line up the 4 tabs on the bracket with the 4 channels on the back
of the unit. Push down gently on the scope drying unit until firmly
in place
Step 6
Use the flathead screwdriver to tighten the cam lock on each side
of the mounting bracket, making sure the arrow on the cam lock
is pointed up or down when the lock is tight
Instruction Guide for Scope Drying Unit
Appendix
WALL
WALL
UNLESS OTHERWISE SPECIFIED
DIMENSIO NS ARE IN INCHES[MILLIMETERS]
TOLERANCES ARE:
ANGLES: 1/2
.X .050[1.27]
.XX .030[0.76]
.XXX .015[0.38]
Part free of burrs & sharp edges2.
Notes:
Min bend radius required1.
813000213
14ga Plain Carbon Steel
Reference
Validation/Verification
Inspection
Definition
Symbol
B11
1:2
POWDER COAT GREY PC316
Material
Sheet
Scale
Description Part No
Finish
Mount, Wall, Tabletop
( )
Sheet Size
BT
www.solairem edical.com
Drawn By:
Office: 888.4 35.2256 PO Box 2 808
Fax: 616. 743.5944 Grand Rapids, M I 49501
OF
FLAT PATTERN
UP 90° R .03
UP 90° R .03
6.91 175.58
5.00 127
27.301.075
2.22.088
3.000 76.20
.775 19.68
.300 7.62
REVISIONS
REV. DESCRIPTION DATE ENG.
CHANGE #
A Release for Prototype 7/21/2022
B Added Arrow and "UP" 11/18/2022
88.903.500
88.905.00 127
5.000 127
.75 19.05
.75 19.05
3.50
.18 4.50
1.250 31.75 1.000 25.40

16
Instruction Guide for Scope Drying Unit
Appendix
Template for Mounting a Scope
Drying Unit to a Wall
Drill 5/16” diameter hole into the 4 locations. Discard template
Table of contents


