Biocontrol Assurance GDS PPMX User manual
55240.R003.082016
ASSURANCEGDS®PPMX
USERMANUAL
12822SE32ndStreet
Bellevue,WA,USA98005
Phone425.603.1123
Fax425.603.0070
www.biocontrolsys.com

ASSURANCEGDS®PPMXUSERMANUAL1
TableofContents
I. Safety .................................................................................................................... 4
Voltage
SafetyInterlock
PipetteHeads
TipWasteContainer
Tray
Liquids
ReplacementParts
II. Introduction .......................................................................................................... 6
StandardEquipment
Documentation
Protocols
Disposables
TechnicalSpecifications
III. Setup/Operation................................................................................................... 9
Unpacking
RemovableTray
RearPanelConnections
FrontPanelConnections
UPSBatteryPowerandLineConditioner
PowerOnandStartUp
LogIn
UserManagement
TouchscreenOverview
AlignmentProtocol
AddPipetteandPickPenHead(s)
SetDate&Time
InstallChimeSoundBox
RunaProtocol
Step‐by‐stepWizard

ASSURANCEGDS®PPMXUSERMANUAL2
PauseorStopaRunningProtocol
ViewResults
RunReport
LogOut
LIMSCompatibility
ImportProtocol
ExportProtocol
DeleteProtocol
ChangePPMXSerialNumberinSoftware
IV. Troubleshooting.................................................................................................. 23
CommunicationLoss
Re‐startingaProtocolafterCommunicationLoss
HoodOpen
ReportinganError
TechnicalServices
V. Maintenance....................................................................................................... 25
Cleaning
PipetteHeadCalibration
AlignmentCalibration
PreventativeMaintenance
Warranty
InstrumentReturnProcedure
VI. AppendixA.......................................................................................................... 27
PartsList
VII. AppendixB.......................................................................................................... 29
BeforeYouCallUs
VIII. AppendixC.......................................................................................................... 30
MaintenanceLog
IX. AppendixD...........................................................................................................31
WarrantyTerms
X. AppendixE.......................................................................................................... 32
PipetteVerification
DeckLayoutforR‐StandardLowMicroCalibration
Verification
XI. AppendixF.......................................................................................................... 34

ASSURANCEGDS®PPMXUSERMANUAL3
BestPractices
XII. AppendixG.......................................................................................................... 35
PackUp
XIII. AppendixH.......................................................................................................... 39
OrderingInformation
ASSURANCEGDS®PPMXUSERMANUAL 4
Safety
ReadthissectionbeforeinstallingandoperatingtheAssuranceGDS®PPMX.
Thisinstrumentisintendedtobeusedinalaboratoryenvironmentbytrainedtechnicalpersonnel.
Forsafeandproperuseofthisinstrument,itisrequiredthatbothoperatingandservicepersonnelfollowthe
instructions
containedinthisguidewheninstalling,operating,cleaning,andmaintainingtheinstrument.
Thefollowingsafetyprecautionsmustbeobservedduringallphasesofoperation,service,andrepairofthe
instrument.Failure
tocomplywiththeseprecautionsorwithspecificwarningselsewhereinthisuser’sguide
violatessafetystandardsofdesign,
manufacture,andintendeduseoftheinstrument.BioControlSystems
assumesnoliabilityforthecustomer’sfailuretocomplywiththese
requirements.
ThePPMXhasbeencertifiedtosafetystandardsrequiredinCanada,Europe,andtheUnitedStates.Refertothe
instrumentrearpanellabelandtheDeclarationofConformitydocumentforthecurrentstandardstowhichthe
instrumenthas
beenfoundcompliant.
Thefollowingelectronicandhazardsymbolsmayappearontheinstrument:
Thefollowingsafetynoticesmayappearinthisdocument:
Voltage
Accesstotherearpanelisnecessarybecausetheinstrumentmustbedetachedfromallvoltagesourcesbefore
service,repair,
orexchangeofparts.
Operatetheinstrumentusingtheapprovedpowersupplyprovidedandonlyatthevoltagespecifiedontherear
panellabelof
theinstrument.

ASSURANCEGDS®PPMXUSERMANUAL 5
SafetyInterlock
ThePPMXisconfiguredwithasafetyinterlock,whichisusedwhentherotatingcoverisinstalledonthe
instrument.
Thesafetyinterlockpreventstheinstrumentfromoperatingwhentherotatingcoverisopen.
PipetteHeads
Theinstrumentiscapableofgeneratingsignificantforcesthatcouldcausepotentialinjurytotheuser.Foran
instrumentwith
therotatingcoverinstalled,thesafetyinterlockinthecoverwilldisabletheinstrumentmovement
ifthecoverontheinstrument
isopen.Foraninstrumentinstalledinahood,theexternalsafetyinterlocksensor
mountedontheinstrumentwilldisablethe
instrumentmovementifthehooddoorisopen.
TipWasteContainer
Thetipwastecontainershouldbeemptiedinaccordancewithnationalandlocalsafetyregulations.
Tray
Themovingtrayiscapableofcausinginjurybypinching.Foraninstrumentwiththerotatingcoverinstalled,the
safetyinterlock
inthecoverwilldisabletheinstrumentmovementifthecoverontheinstrumentisopen.
Liquids
Observesafelaboratorypracticeswhenhandlingliquids.Ifworkingwithbiologicalsamplesorchemicalsubstances,
ensurethat
thereisproperventilation,andwearpersonalprotectiveequipment(PPE),suchassafetyglasses,
gloves,andprotectiveclothing
atalltimes.
RefertotheSafetyDataSheetsforsolventsbeforeuse.
ReplacementParts
Besuretouseonlyreplacementpartsspecifiedinthisusermanual.Donotrepairorchangepartswhicharenot
listedinthis
usermanual.Ifitisnecessarytochangepartsnotlisted,pleasecontactBioControlSystems
technicalservices.

ASSURANCEGDS®PPMXUSERMANUAL 6
Introduction
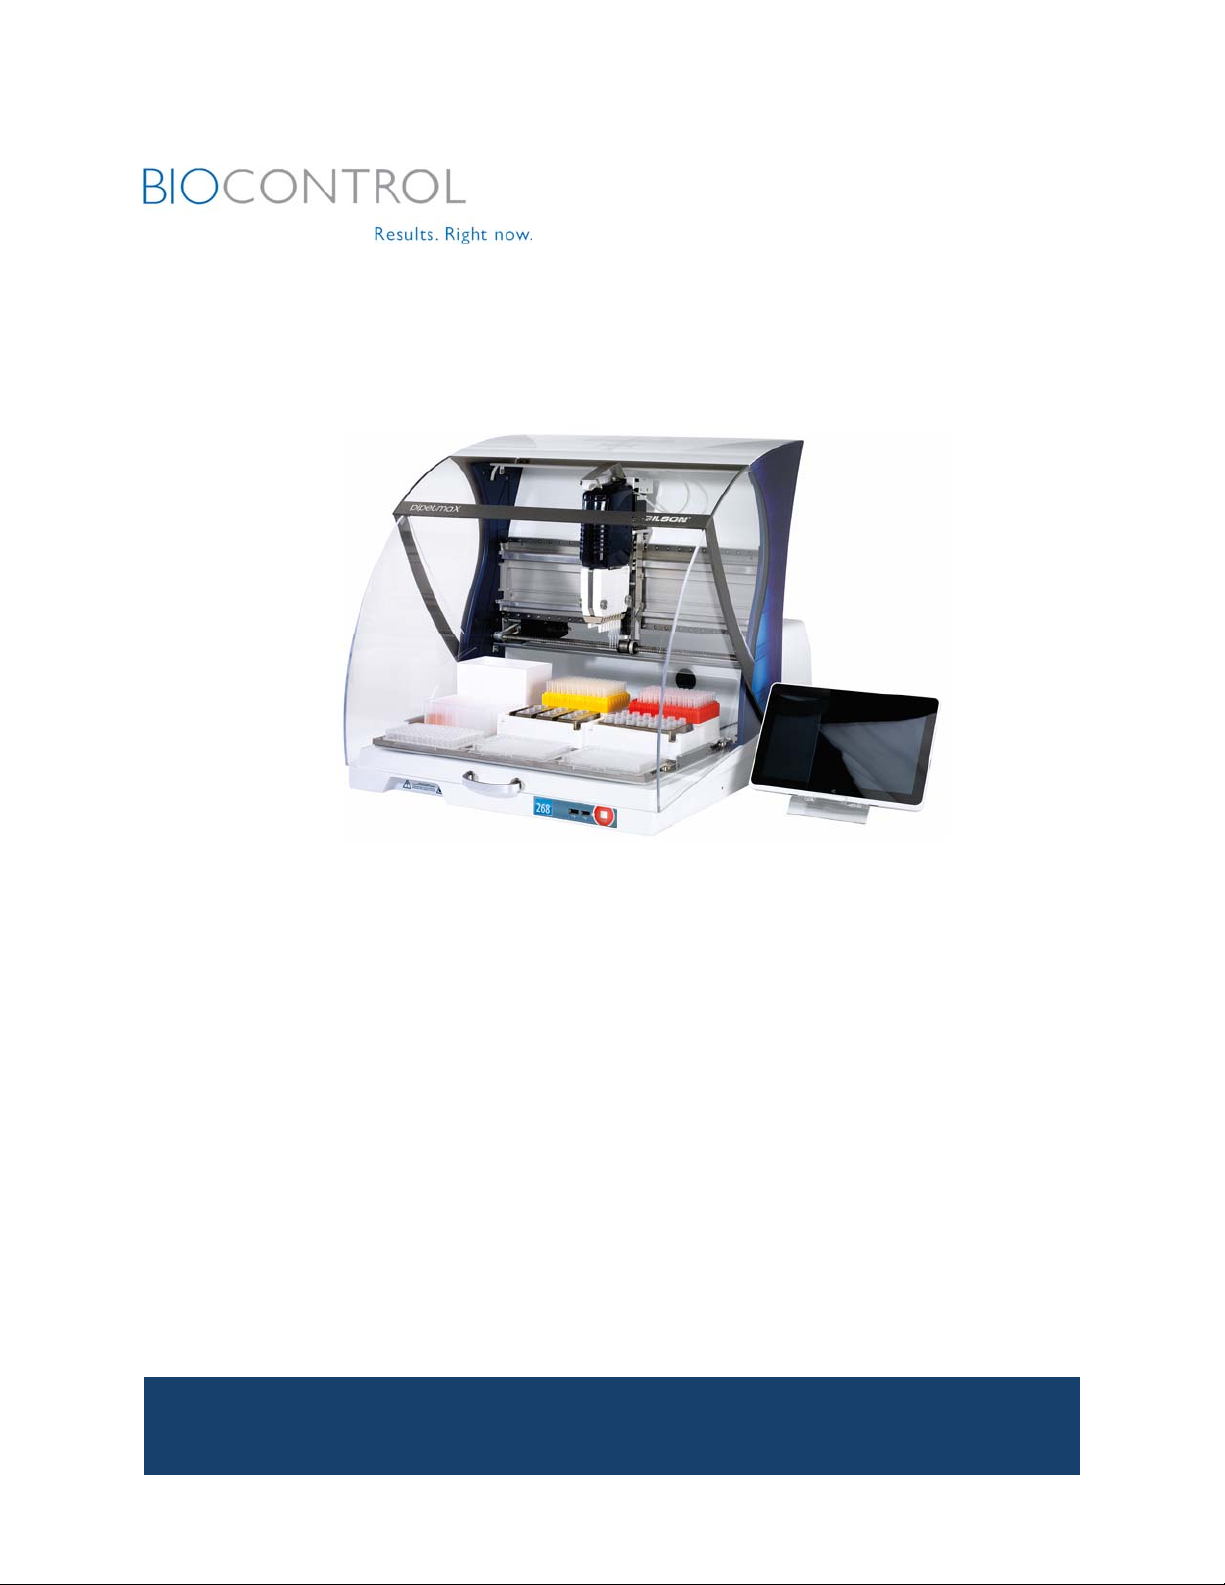
TheAssuranceGDSPickPen®PIPETMAX®(PPMX)isanautomatedmagneticparticlesandliquidhandler.Itis
capableofdispensingAssuranceGDSreagentswhichinclude,ConcentrationReagent,WashSolution,
ResuspensionBufferandselectmedia(BHI/DFB).ReagentdispenseprotocolshavebeencreatedforallAssurance
GDSassays.Inaddition,thePPMXhasalsobeenprogrammedtoautomateAssuranceGDSPickPen
ImmunomagneticSeparation(IMS)procedures.ThisusermanualisintendedtoassistPPMXuserswithsystem
start‐up,basicoperation,maintenanceandservice.
StandardEquipment
AfterthePPMXandaccessoriesareunpacked,thefollowingitemsshouldbepresent:
•
PPMXInstrumentwithrotatingcover
•
AlignmentHead
•
RemovableTray96well
•
PipetteTipReloadRack
•
PickPenTipReloadRack
•
TipDisposalBin
•
PowerSupply(110V/220V)
•
Power/USBCablingkit
•
PowerCords(USandEU)
•
USBCable
•
BackPlug,Black
•
AllenWrench,5mm
•
MAX8x200PipetteHead
•
AssuranceGDSPickPenMagneticHead
•
AssuranceGDSReagentHolder
•
TipMoverwithTipBoxHolder
•
ConcentrationReagentBottleFillLevelSleeve
•
ChimeSoundBoxwithhardware
•
GelCoolingBlock(2/cs)

ASSURANCEGDS®PPMXUSERMANUAL 7
Systemalsocomeswitheither:
•
ControlTabletwithTRILUTIONmicrosoftwarepre‐loaded+ChargerandTabletholder
or
•
MicrosoftSurfacelaptopwithTRILUTIONmicrosoftwarepre‐loaded+ChargerandKeyboardcover/Pen
TheseitemscomewithUSplugsonly.Forpartnumbers,refertoAppendixA,PartsList.Forordering
information,refertoAppendixH,OrderingInformation.
Documentation
ThefollowingdocumentsareincludedwiththePPMX:
•
PPMXUserManual
•
GilsonQuickSetupGuide
•
GilsonInstallationandOperationalQualification(IQ/OQ)Procedures
•
GilsonDeclarationofConformity
•
GilsonValidationCertificateforTRILUTIONmicro
•
GilsonQualityControlReportPipetteHead
Protocols
•
AlignmentProtocol
•
AssuranceGDSReagentDispenseprotocols(R‐)
•
AssuranceGDSPickPenIMSprotocols(IMS‐)
•
AssuranceGDSCombinedReagentandIMSprotocols(C‐)
Disposables
Theitemsbelowaresoldseparatelybutarerequiredforuse:
•
200µLSterileBlisterFilterTipPacks
•
ReagentReservoirs
•
AssuranceGDSPickPenTips
•
AdhesiveFilmSheets&Strips
•
AssuranceGDSSampleWells&Bases
•
ResuspensionPlates
Forpartnumbers,refertoAppendixA,PartsList.Fororderinginformation,refertoAppendixH,Ordering
Information.

ASSURANCEGDS®PPMXUSERMANUAL 8
TechnicalSpecifications
PleasebeawareofthefollowingbeforeoperatingthePPMX.
ChangesormodificationstothisdevicenotexpresslyapprovedbyBioControlSystems
couldvoidthewarranty.
Theinstrumentcomplieswithpart15oftheFCCRules.Operationissubjecttothefollowingtwoconditions:(1)
Thisinstrument
maynotcauseharmfulinterference,and(2)thisinstrumentmustacceptanyinterference
received,includinginterferencethat
maycauseundesiredoperation.
ShieldedcablesmustbeusedwiththeinstrumenttoensurecompliancewiththeFCCClassAlimits.
TechnicalSpecificationDefinition
CommunicationsUSB
ConnectionsThreeUSBhostportsandoneUSBdeviceport
Twoinputs(contactclosure,TTL),tworelayoutputs,andoneswitched+12VDC1Aoutput
NOTICE:Switchingvoltageshigherthan30Vorgreaterthan1Aofcurrentmaydamagethe
instrument.
Dimensions&WeightW54.4XD65.5XH53.1cm(21.4X25.8X20.9in),24.9kg(55lbs.)
EnvironmentalConditionsIndooruse
Altitude:upto2000m
Temperaturerange:5°C–40°C
Humidity:Maximumrelativehumidity80%fortemperaturesupto31°C,decreasinglinearity
to50%relativehumidityat40°C
PowerRequirementsExternalPowerSupply
VoltageInput
Frequency:50to60Hz
Voltage:100–240VAC
VoltageOutput
Voltage:24VDC
CurrentRating:6.25A,150W
FrontPanel&Control
TwoUSBhostportsandSTOPbutton,Touchscreentabletorlaptop
XYZMotion(Speed)1‐500mm/secinXdimension
1‐550mm/sec(350mm/secdefault)inYdimension(tray)
1‐140m/secinZdimension
IMSHead
PickPenmagnetichead
IMSTips
PickPentipcovers
LiquidContactMaterials
Tips–100%VirginPolypropylene
TipDisposalBin–Polypropylenewithcolorant(Pro‐fax6523)
LiquidHandlingHead&
Tips
MAX8x200,DIAMONDfiltertips(DF200)
RemovableTrayCapacity
9‐position
Safety&ComplianceCertifiedtosafetystandardsspecifiedforCanada,EuropeandtheUnitedStates.Refertothe
instrumentrearpanellabelandtheDeclarationofConformitydocumentforthecurrent
standardstowhichtheinstrumenthasbeenfoundcompliant.
ASSURANCEGDS®PPMXUSERMANUAL 9
Setup/Operation
TheAssuranceGDSPPMXanditscomponentsshouldbesetupintheorderdescribedinthissection.Gilson
TRILUTION®micro
providessoftwarecontrolofthePPMXduringsetupandoperationasdescribedinthissection.
Formoreinformation
aboutTRILUTIONmicro,viewthehelpinformationinthesoftware,accessiblefromthe
button.
Unpacking
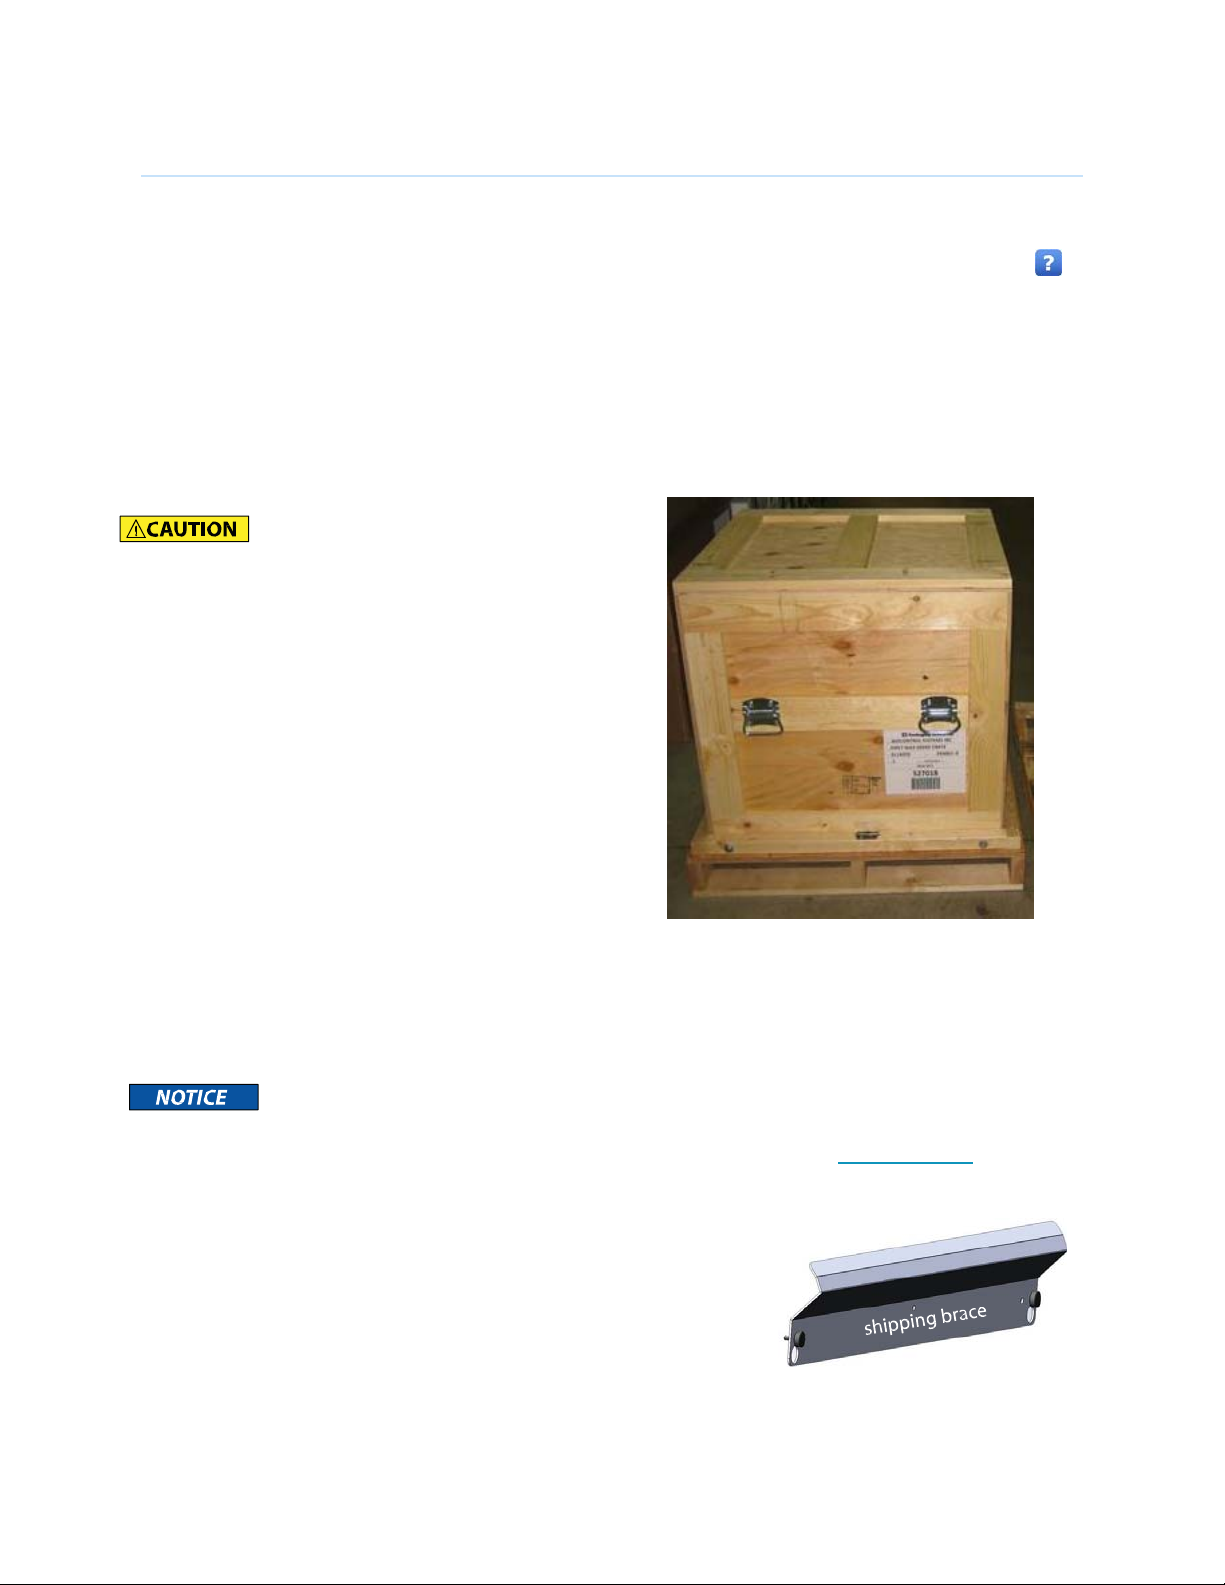
ThePPMXisdeliveredwithmostmajorcomponentsalreadyassembled.Pleasekeeptheoriginalpackaging
(bothinternalboxesandtheexternalcrate)incasethePPMX
needstobereturnedtoBioControlSystemsfor
repair.
Itisrecommendedthattwo
peopleliftthePPMXout
ofthe
box,asitweighsapproximately55
lbs.(24.9kg).
1
Openthecratebyunscrewingthe4boltsatthebottom
ofthecrate(locatedjustabovethepallet).Usea9/16”
wrenchifneeded.Liftstraightupusinghandleson
bothsides.
2
Removethetwogreyfoampieces.
3
Removetheclosedandopen‐endedcardboard
accessoriesboxesbyslidingthemoutfromthebungee
cords.Becarefulnottodroptheboxeswhile
disassemblingthecords.
4
RemovetheplasticbagcoveringthePPMX.
5
GripthePPMXattherecessesnearthebase.Thereis
onerecessin
thefront,oneintheback,andoneon
eachside.Usetheserecesses
whenliftingthePPMX
outofthefoam‐linedtray.
DonotattempttoliftthePPMXfromthecoveror
fromtheX‐arm(thehorizontalarm).Alwayslifttheinstrumentfromitsbase.
6
PlacethePPMXonastable,levelsurfacesuchasalabbench,labcart.RefertoSection1:Safety.
7
Removethebluefilmorlabtapeprotectingtherotatingcover.
8
Removetheshippingbracefromtherearoftheinstrument.
Loosen
thethumbscrewssecuringtheshippingbracetothe
PPMX.After
removingtheshippingbrace,replaceandtightenthe
thumbscrews
onthebackoftheinstrument.

ASSURANCEGDS®PPMXUSERMANUAL 10
9
Removetheshippingbracketthatattaches
thearmtotheinsideoftheunitusingthe
allenwrench(5mm)provided.
Note:Someolderunitshave2cleartubing
piecesthatarewrappedaroundthelead
screwinstead,theseshouldberemovedand
saved.
10
Removethewhitefoamblockpreventingthe
trayfrommoving.
11
Placeallpackagingmaterialsinsidethecrateforlong‐
termstorage.DONOTTROWAWAYtheinterior
cardboardboxesasthesearecustommadeforthe
PPMX.
Keeptheshippingbrace,shipping
bracket,allenwrenchandfoam
blockwiththepackaging.
RemovableTray
Aremovabletrayforplacementoflabwareandtipracksis
required.Whileholdingthehandlesonthesidesofthetray,
lowerthetrayonto
themetalcarrier.Itiskeyedandwillonly
mountoneway.Observethat
thetrayislevelandfully
seatedonthemetalcarrier.
RearPanelConnections
Refertothediagramsonthenextpagewhenmakingthe
connectionsdescribedinthissection.
Theinput/outputcontactsontherearpanelareusedfor
communicationbetweenthealignmentheadandTRILUTION
micro
andforcommunicationbetweentheexternalsafety
interlocksensorandTRILUTIONmicro.Thecontactscanalso
beusedto
controlperipheraldevices.Refertothediagramfor
thelocationoftheinput/outputports.
ContactInputs–ThebottomterminalblockonthePPMXhas
twopairedinputcontactsthatarelabeled4and5.Never
connectvoltageshigherthan5VDCtoaninput.Whenusing
TTLsignals,besuretomatchGROUNDconnections.
ContactOutputs–ThebottomterminalblockonthePPMX
hastwopaired,isolated‐relaycontactclosuresthatare
labeled1and2.

ASSURANCEGDS®PPMXUSERMANUAL 11
DCPowerOutput–Thetopterminalblockhasone+12VDCoutput,whichislabeled.
ThePPMXhasonefunctionalUSBhostport(themiddleport)ontherearpanel.Thetopportontherearpanelis
not
supported.TheUSBportscanbeusedtoconnectUSBdrives(whichcanalsobeseenbythetabletwhen
pluggedintothePPMX),
keyboard,mouse,oranyothercompatibledevice(heater/chiller,barcodescanner,or
shaker,forexample).
TheUSBdeviceportisusedforcommunicationbetweenthePPMXandthetabletorcomputer.AUSBcableis
providedasastandardaccessory.RefertothediagramforthelocationoftheUSBdeviceport.
TheEthernetPort,RS‐232andHDMIarenotsupported.
1
Input/Output(Green)
2
USBhost(NotSupported)
3
USBhost
4
Ethernet(NotSupported)
5
USBdevice
6
RS‐232(NotSupported)
7
HDMI(NotSupported)
8
Powerreceptacle
9
Powerswitch(MAINS)
Usethepowercordontheexternalpower
supplytomaketheconnectionbetweenthe
powerreceptacleonthe
PPMXandthe
externalpowersupply.Theconnectionfromtheexternalpower
supplytothePPMXusesa
connectorwith
alockingcollar.Checkthealignmentofthe
pinsandthenpushitinuntilitclicksandlocks
in
place.Todisconnect,pullbackonthe
lockingcollarandthendisconnectthecable
fromtherearpanelofthe
PPMX.Locatetheappropriatepowercordforyourlinevoltageandthenmaketheconnectionbetweenthe
externalpowersupplyand
theACpowersource.InstallthePower/USBCablingkitbyfollowingthesupplied
instructions.
ASSURANCEGDS®PPMXUSERMANUAL 12
FrontPanelConnections
ThePPMXhastwofunctionalUSBhostportsonthefrontpanel.TheUSBportscanbeusedtoconnectUSB
drives(whichcanalsobeseenbythetablet/laptopwhenpluggedintothePPMX),
keyboard,mouse,orany
othercompatibledevice(heater/chiller,barcodescannerorshaker,forexample).
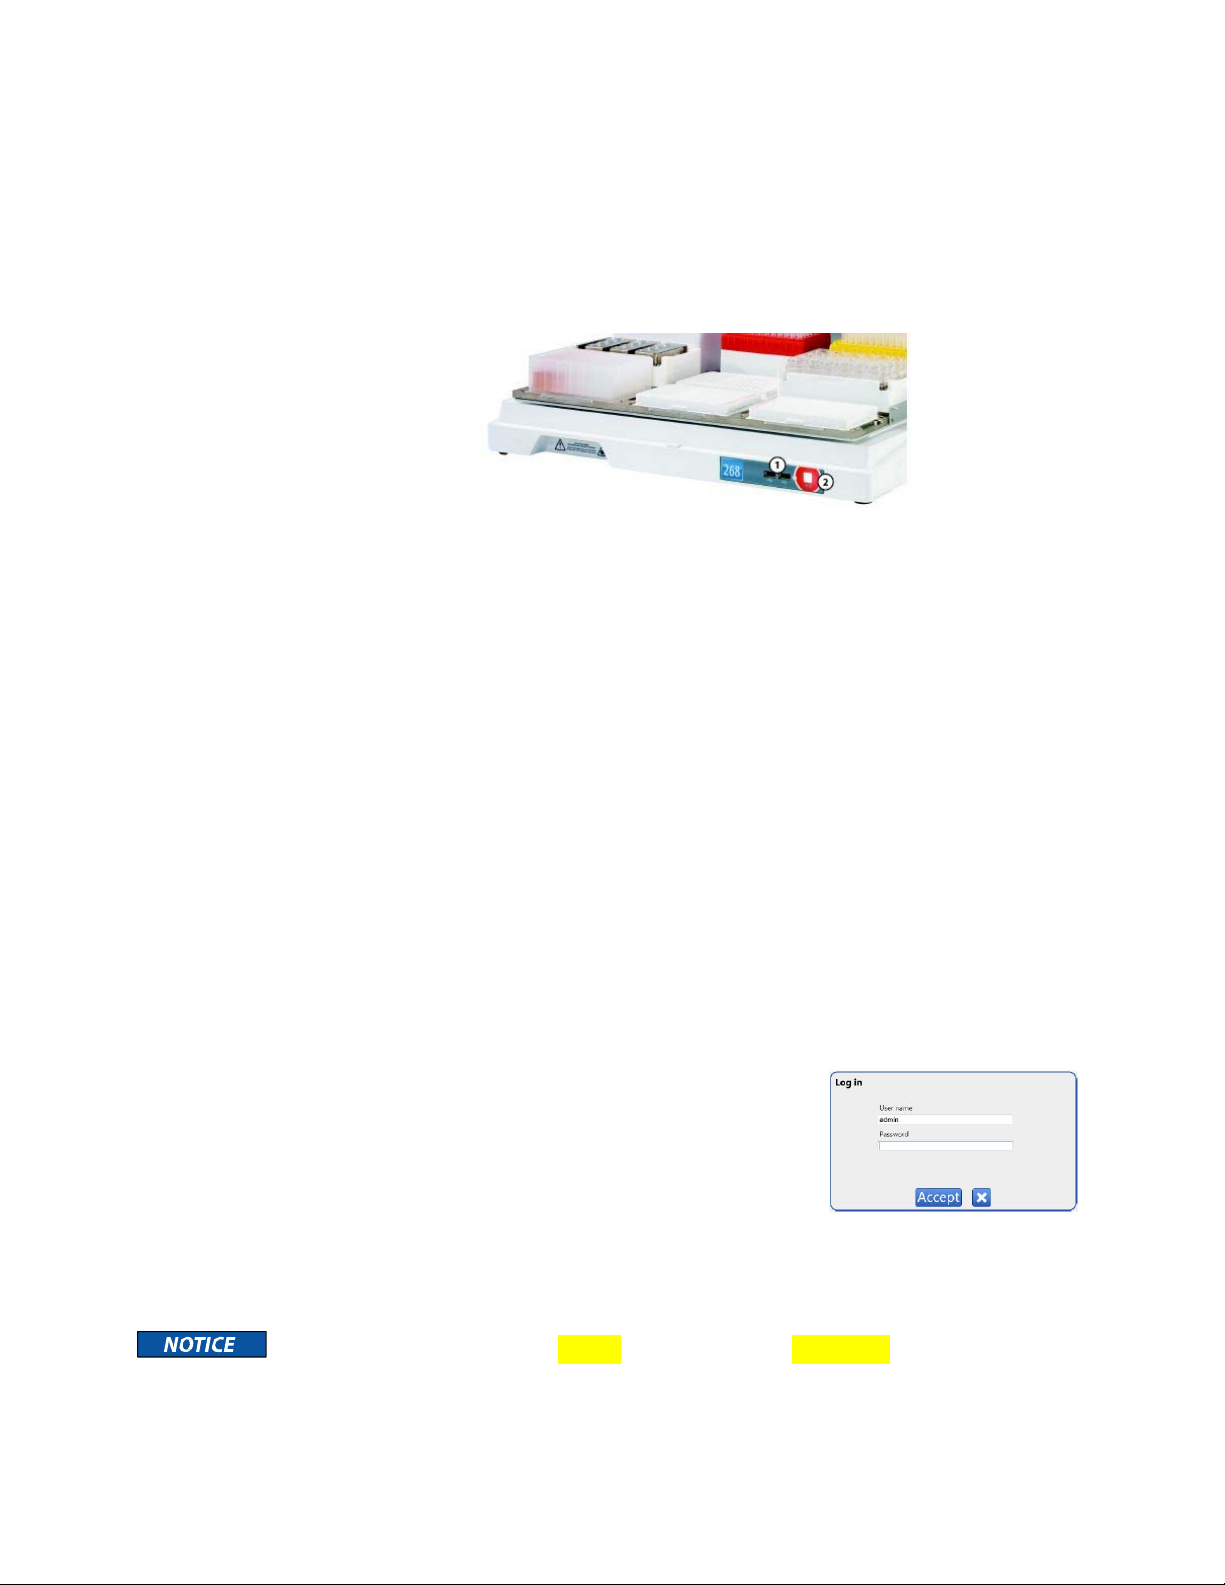
Inasituationwhereanemergencystopisrequired,pressingtheSTOPbuttonstopsthePPMXimmediately.The
protocol
stopsandresultsaredisplayed(aftertouchingOKontheprompt).
1
USBhost
2
STOP
UPSBatteryPowerandLineConditioner
TopreventfluctuationsinpowertothePPMXandtablet/laptop,itisrecommendedthatthefollowingUPS
batterybackupbeusedwiththesystem:
TrippLiteSU750XL or equivalent
Additionally,itisrecommendedthatthePPMXbeplacedonaseparatecircuitfromotherequipment.
PowerOnandStartUp
TostartthePPMX:
1
MakesurethatthePPMXisconnectedtotheexternalpowersupplyandthattheexternalpowersupplyis
connected
toapowersource.
2
Turnpoweronattheexternalpowersupply(Oisoff,Iison).
3
TurnthePPMXpoweronusingtheMAINSpowerswitchlocatedontherearpanel.Theindicatorlighton
thefrontpanel
will
illuminategreen.
4
Connectthecontroltablet/laptoptothePPMXandpoweriton.
5
Closetherotatingcoverdoor.ThePPMXwillnotoperatewiththecoveropen.
LogIn
Whenprompted,enterthe“Username”and“Password”,andthenselectAccept
(ortheXtocancel).Passwordiscase‐sensitive.Itisrecommendedtochangethe
passwordforthedefaultAdministrator(admin).
1Selectthe“Username(Fullname)”insoftwaretogotothe“User
properties”screen.
2EnteranewPasswordfortheuser,andthenenterthepasswordagaininthe“Passwordconfirm”
field.
3SelectSave,orBacktoreturntothepreviousscreenwithoutsaving.
ThedefaultUsernameis
adminandthePasswordisGilson268

ASSURANCEGDS®PPMXUSERMANUAL 13
UserManagement
TheusermanagementfeatureinTRILUTIONmicroprovidesawayfor
administratorstograntorrestrictusersaccesstoprogramsand
featuresinthesoftware.Usermanagementisaccessiblefromthemain
screenshownwhenthesoftwarestarts.
1SelectManageUsersinsoftwaretogotothe“User
management”screen,whichdisplaysalistofusers.
2Selectauserfromthelist.
3SelectEdit.The“Userproperties”screenappears.
4Editanyorallpropertiesshown.
•
“Username”maynotbemodifiedfortheloggedin
user.
•
Forthedefaultadministrator(admin),only“Password”
and“Featurepermissions”maybemodified.
5SelectSave,orBacktoreturntothepreviousscreenwithout
saving.
Toaddauser(Administratorsonly),selectAddandthe“Newuser”screenappears.
1
EnteraUserName.
•
Theusernamecannotbethesameasanyotherusername.
•
Theusernamecanbefrom1to50charactersinlength,mustbeginwithanEnglishletteror
numberandmaycontainthefollowingspecialcharacters:_()‐@.and,.Spacesarevalid.
2
EntertheFullnamefortheuser.
•
Thefullnamecanbefrom1to100charactersinlength,mustbeginwithanEnglishletteror
numberandmaycontainthefollowingspecialcharacters:_()‐@.and,.Spacesarevalid.
3
Optionally,entera“Password”fortheuser.Theusercanchangethepasswordatanytime.
•
Itcanbefrom1to50charactersinlength,mustbeginwithanEnglishletterornumberandmay
containthefollowingspecialcharacters:_()‐@.and,.Spacesarevalid.
•
Itiscase‐sensitive,butitisnotrequired(passwordcanbeblank).
•
Ifapasswordwasentered,re‐enterthepasswordinthe“Passwordconfirm”field.
4
Select“Isadministrator”toassignadministratoraccesstotheuser.Bydefault,“Isactive”isselected.Clear
thecheckboxtodenytheuseraccesstothesoftware.Theuserremainsinthelistandcanbechangedto
activebyanAdministratoratanytime.
5
Under“Featurepermissions”,clearthecheckboxforanysoftwaretowhichtheusershouldnothaveaccess.
Bydefault,anewuserhasaccesstoallsoftware.
6
SelectSave,orBacktoreturntothepreviousscreenwithoutsaving.
Todeleteauser(Administratorsonly),selectauserfromthelistandselectDelete.Amessagewillappear
askingifyouwishtodeletetheuser.SelectYestodelete,orNotoclosemessagewithoutdeletingtheuser.

ASSURANCEGDS®PPMXUSERMANUAL 14
TouchscreenOverview
ThefollowinginformationprovidesanexplanationofuniquesoftwareinteractionswhenrunningTRILUTION
microonthe
touchscreencontroltablet.Itisrecommendedtokeepthetabletpluggedintoapowersource
wheneverpossible.CommunicationerrorscanoccurbetweenthePPMXandcontroltabletifthebatteryruns
toolow.
Refertothetablebelowforadescriptionoftheiconsusedinthe
on‐screenkeyboard.
ThefollowingiconsappearonseveralscreensinTRILUTIONmicro.
Toviewtheoptionstoshutdownthecontroltabletand/orTRILUTIONmicro,touchonthemainmenu:
•
TouchShutdowntocloseTRILUTIONmicroandshutdownthecontroltablet.
•
TouchRestartTRILUTIONmicrotorestartonlythesoftware,andnotthecontroltablet.
•
TouchCanceltogobacktothemainmenu.

ASSURANCEGDS®PPMXUSERMANUAL 15
AlignmentProtocol
RuntheAlignmentProtocoltoensureproperalignmentofthePPMX.Itisonlynecessarytorunthisprotocol
whensetting
uptheinstrumentforthefirsttimeafteramoveorifanalignmentissueissuspected.
1
Passtheendofthealignmentcablecordwithpre‐wired
connectorthroughthe
outletatthebackofthePPMX.Besure
togoundertheleadscrewtoallowforthefullrangeofmotion.
2
TheconnectorislabeledBOTTOMbecauseitconnectstothe
bottomsetof
green
input/outputportsontherearpanelof
thePPMX.Maketheconnection.
3
Theclipstosecurethetipracksonthetraycan
interferewiththealignment.Ensure
thattheclips()arepositionedasshownin
thediagrambelow,andthatthe
thumbscrews
havebeentightened.
4
Closetherotatingcover.
5
ThetabletstartsTRILUTIONmicroautomatically
onpowerup.Ifusingalaptop,doubleclickthe
TRILUTIONmicroicontostartthesoftware.
6
SelectRun/manageprotocols.Ignorethe“Createprotocol”and
“Startutility”bars.
7
SelectRunaprotocol.
8
SelectAlignmentProtocolandthenselectNext.
9
TheScanningdialogappearswhilethesoftwarechecksthat
the
PPMXis
connected.Ifconnected,thesoftwaregoestothenext
screen.Ifnotconnected,a
messagewillappearsuggesting
possiblesolutions.
10
SelectSkipsetuponLabwaresetupguide.
11
SelectRunprotocol.
12
Waitapproximately3minwhiletheAlignmentProtocolruns.
13
AnotificationappearswhentheAlignmentProtocoliscomplete.
ASSURANCEGDS®PPMXUSERMANUAL 16
14
SelectContinue.
15
SelectHometogotothemainmenu
AddPipetteandPickPenHead(s)
Eachheadthatmaybeusednow,orinthefuture,mustbeaddedpertheinstructionsthatfollow.
1
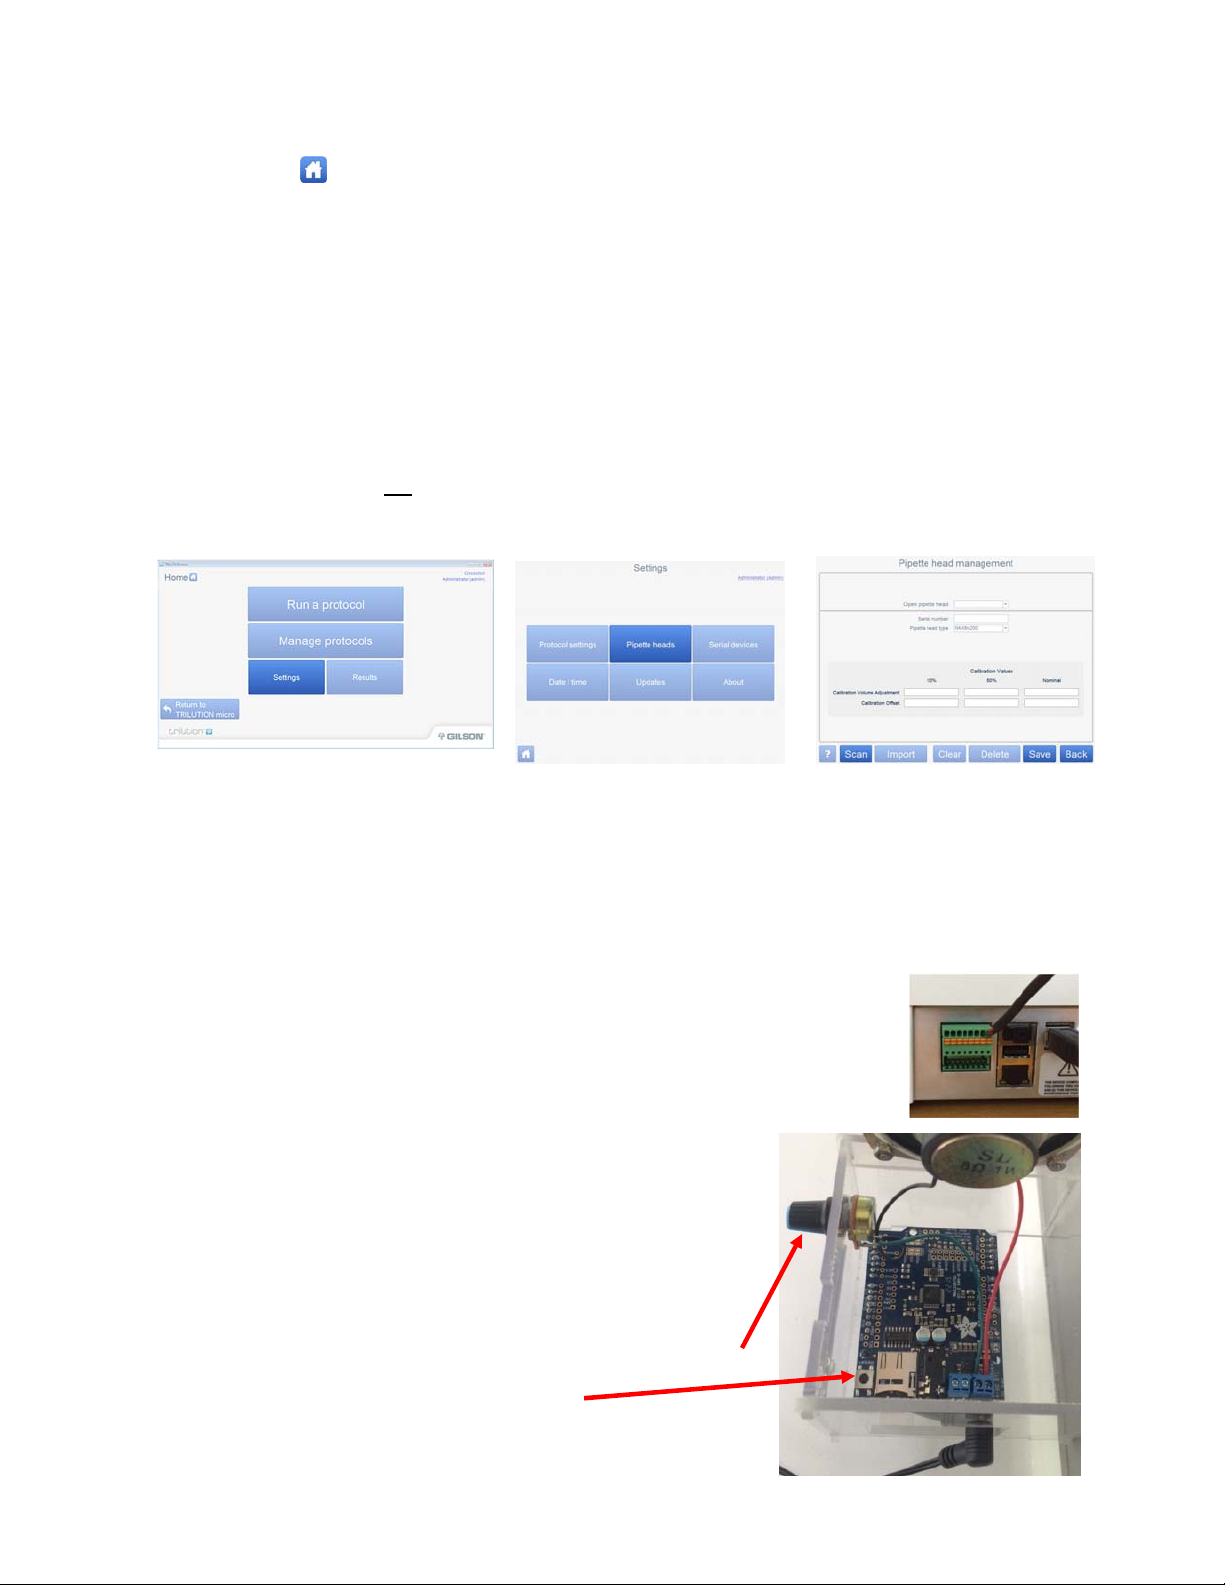
OntheTRILUTIONmicromainmenu,selectSettings.
2
OntheSettingsmenu,selectPipetteheads.
3
Entertheserialnumberlocatedonthepipetteheadandthepipettetype(i.e.8x200).
4
ThePickPenheadisaddedthesamewayusingserialnumberHN12017.AllPickPenheadsusethissame
serialnumberinthesoftware(theyarephysicallyserializedonthebackfortrackingpurposes).Choose
PickPenIIasthetype.
5
SelectSave.Therewillnotbeamessagethatthesettingsweresaved.
6
Repeatsteps3–5foradditionalheads.Whenfinishedaddingheads,
selectBack.
SetDate&Time
Setthedateandtimetoensureacorrectdate/timestamponprotocol
runs.Thisshould
onlyhavetobedoneonce.OntheSettingsmenu,select
Date/time,andthensetthedate,time,andtimezone.
InstallChimeSoundBox
ToenablesoundonthePPMX,aseparatechimesoundboxcanbeaddedtothebackofthe
instrumentpertheinstructionsthatfollow:
1
Plugthegreenphoenixconnectorintothetopgreeninput/outputportonPPMXrear
panel.
2
Positionthesoundboxonthebackcenter,abovetheshelfportionof
thePPMXandsecuretheplasticholderusingtheprovidedhardware
(theshorterscrewsareusedonthetopholes).Iftherearealready
screwsinthelocationsspecified,removethesefirst.
3
Adjustthevolumeusingthevolumedial.
4
Thereisalsoaresetbuttonontheinsideofthespeaker.Touse,push
andthenrebootthePPMXsystem.
Volumedial
Resetbutton
ASSURANCEGDS®PPMXUSERMANUAL 17
RunaProtocol
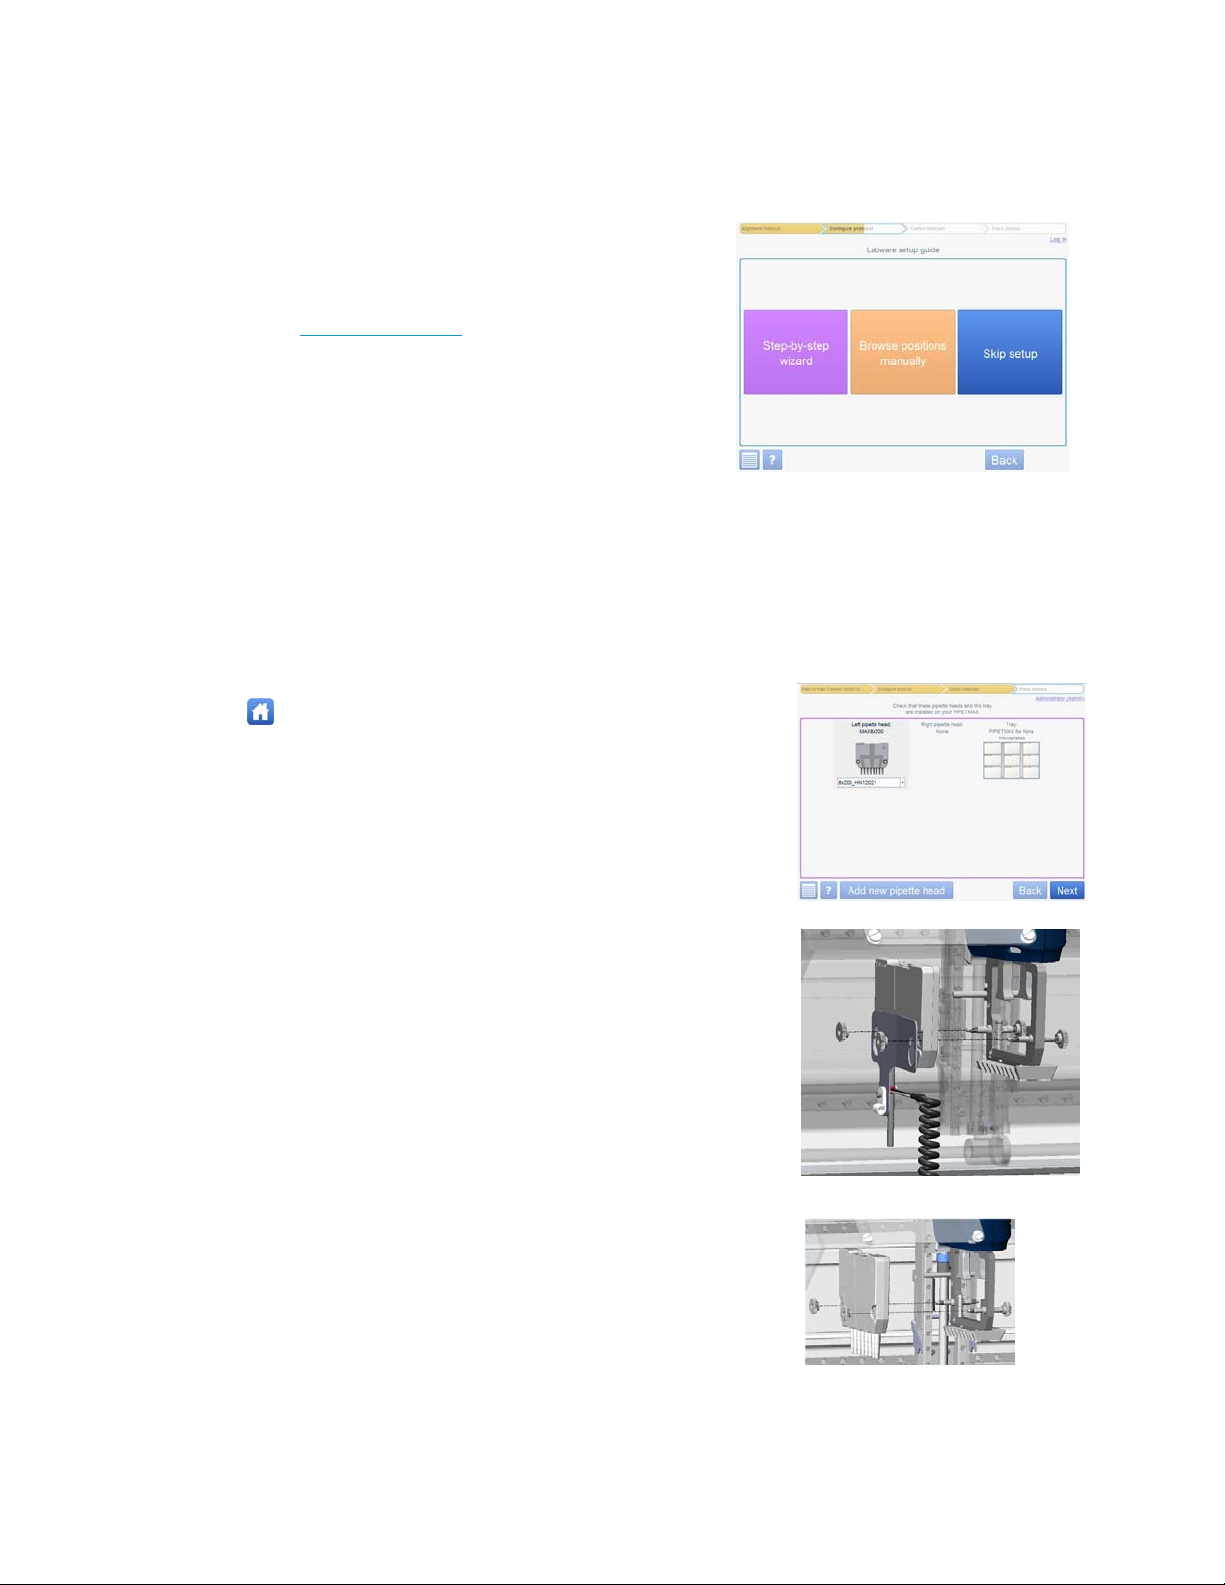
TheLabwaresetupguidescreendisplaystheoptionsforconfirmingtheinstrumentsetup.
SelectStep‐by‐stepwizardtodoallofthefollowing(intheordershown):
•
Reviewalistofthematerials.
•
Reviewthelayoutofthetrayandsetuppipettehead.
•
Setupthepipette,tiprackandadditionallabware.
•
Reviewprotocol/deck.
Fordetails,refertoStep‐by‐stepWizardonthenextpage.
SelectBrowsepositionsmanuallytodoanyofthefollowing:
•
Reviewthelayoutofthetrayandreviewpipettehead.
•
Selectandsetupspecificlabware.
•
Reviewprotocol/deck.
SelectSkipsetuptoskipsetupinstructionsandgototheWizardcompletescreen.Protocolwillbesettothe
default
valuesorthevaluesusedthelasttimetheprotocolwasrun.Thisincludesthenumberofsamplesand
tipsinthereloadblock.
Step‐by‐stepWizard
1
Selecttogotothemainmenu.
2
SelectRunaprotocol.
3
Selectyourprotocol,andthenselectNext.
4
TheScanningdialogappearswhilethesoftwarechecksthatthe
PPMXis
connected.Ifconnected,thesoftwaregoestothenext
screen.Ifnotconnected,a
messagewillappearsuggesting
possiblesolutions.
5
Entersamplenumber,kitandreagentinformationmanuallyor
usingabarcodereaderandthenselectNext.
6
SelectStep‐by‐stepwizard.
7
GatherthematerialsintheMaterialsListandthen
selectNext.
8
Waitforthesoftwaretofinish“Preparingpipettehead”andthen
opentherotatingcover.
Steps9–11onlyneedtobecompletedduringinstallationorafter
runningthealignmentprotocol.
9
Removethealignmentheadbydisconnectingtheterminalblock
connectorfromtherear
panel,andthenremovingthethumbnuts
securingittotheupperpipetteheadassembly.
10
Installthepipetteheadontheleftupperpipetteheadassembly
usingthe
thumbnuts.Ensureproperalignmentofthepipettehead
againsttheupper
pipetteheadassemblybeforetighteningthe
thumbnuts.
11
Selecttheserialnumberthatmatchestheinstalledpipettehead
fromthedrop‐downlist.
12
InstallthePickPenheadontherightupperpipetteheadassembly
bypushingitontothetwoprongs.Ensureproperalignmentofthe
PickPenheadagainsttheheadassembly,nogapsshouldbevisible.

ASSURANCEGDS®PPMXUSERMANUAL 18
NOTE:ThePickPenheadshouldnotbeusedwhenrunningtheR‐
protocols.
13
SelecttheserialnumberofinstalledPickPenheadfromthedrop‐
downlist,close
therotatingcover,andthenselectNext.
14
ProceedthroughtheTipsetupandLabwaresetupscreensbyreviewingthe
information,makinganydesired
changes,andthenselectingNext.Thescreens
indicatethelabwaretouseandwheretoplaceitonthetray.
Eachtiprackconsistsofatippackandatipreloadblock.
To
assemblethetiprack:
1
Openthesealedblisterpack.
2
Liftthetippackoutoftheblisterpack.
3
Setthetippackonthetipreloadblock.Ensurethatthe
tippackisfullyseatedon
thetipreloadblock.
4
MarktheclearcoverwithanXandremove.
5
Savetheclearplasticboxandcoveronhandforunusedtips.
Toinstallthetiprack:
1
Loosentheelbowthumbscrewforeachclip.
2
Placethetiprackontheremovabletraywiththebeveled
cornerinthe
backleftcorner.
3
Rotateeachclipsothatitwilleffectivelysecurethetiprack
onthetrayasshown
intheimagebelow.
4
Tightentheelbowthumbscrewforeachclip.
5
Pipettetipsareusedfromthebottomrightand
movingupthecolumn.
UsetheTipMovertoloadthePickPentipsfromthetip
racks(thetipmovercanalsobeusedtorefillpipettetip
racks).PickPentipsareusedfromthetopleftand
movingdownthecolumn.
NOTE:AlwaysrefillthepipetteandPickPentipsoffthe
decktopreventtipsfromfallingintotheopeninstrument
tracks.
PlaceSampleBlock(s)withtheBioControllabelontheleftside,stripsarefilledstartinginthetopleftwell
movingdownacolumn.PlacetheResuspensionPlate(s)withtheA1inthetopleftcorner,columnsare
filledstartinginthetopleftwellmovingdownacolumn.RSPlatecolumnsarefilledinaskippedpattern
similartothemanualprocess.Thereservoir(s)shouldalsobeplacedsothattheA1isinthetopleft
corner.

ASSURANCEGDS®PPMXUSERMANUAL 19
PlacetheAssuranceGDSReagentHolderonthedecksothatthesmaller
holeisonthetopleftside
StandardConcentrationReagentbottle(a)
HighThroughput(HT)Reagentbottle(b)
Ifusingthestandardbottle,selectFalse.IfusingtheHTbottle,selectTrue.
ThereareindentationsfortheCRbottlelidsontheholder.
PlacetheGelCoolingBlocksothatthebrandnameistothe
frontrightside.PlacetheHTAmplificationTubeBlockwiththe
slidebarontheleftside.Slicetheamptubesandexpandthe
platepriortoaddingthelid.
15
IfindividualsampleIDsneedtobeenteredforeachsamplein
thesampleblock,thiscanbedonemanuallyorusingabarcode
reader.
Selectthesamplethatmatchesthelocationonthesampleblock,highlighttheinformationinthefieldand
eithermanuallytypethesampleIDorusethebarcodereadertoimporttheinformationforeachwell.
Thesampleselectedwillbehighlightedonthesampleblock.SamplesarelistedinrowsstartingwithA1.
16
Reviewprotocol/deckandthenselectNext.
17
SelectRunprotocol.
18
Whenprompted,Skipsimulationrequest.
a
b
Other manuals for Assurance GDS PPMX
1
Table of contents
Other Biocontrol Laboratory Equipment manuals


Popular Laboratory Equipment manuals by other brands

Thermo Scientific
Thermo Scientific FOCUS GC Site preparation and installation manual

Takara Bio
Takara Bio Thermal Cycler Dice Real Time System III Instrument manual

Plasmapp
Plasmapp Sterlink FPS-15s Plus user manual

9dot
9dot 8INJ manual

Safelab
Safelab XP4 Operator's manual

Buchi
Buchi V-300 Operation manual

TSE
TSE PhenoMaster Hardware operating instructions

IKA
IKA ULTRA-TURRAZ UTL 1000/10 operating instructions

Endress+Hauser
Endress+Hauser analytikjena Biometra TOne Short manual

Philips
Philips UVCC200 80W instructions

Diesse
Diesse cube 30 touch user manual

Keithley
Keithley 4200-SCS-PK3-903-01 quick start guide


