INNO 320 User manual

1
INNO 320 User Manual
Contents
Product Specification.............................................................................................................. 2
Packaging List.......................................................................................................................... 3
Important Notice (Must Read) ............................................................................................... 4
Usage Instructions................................................................................................................... 6
Screen Information.......................................................................................................... 6
Introduction of Other Parts........................................................................................... 10
Key Pressing Operation................................................................................................ 11
Start record mode.................................................................................................. 11
Display content of the instrument........................................................................ 11
Reset Max and Min values................................................................................... 14
Instrument Working Mode............................................................................................ 16
Wait mode............................................................................................................... 16
Record mode.......................................................................................................... 16
End mode................................................................................................................ 17
Measurement mode.............................................................................................. 17
Other introduction.......................................................................................................... 18
PC connection........................................................................................................ 18
Smart phone connection....................................................................................... 19
LED alarm............................................................................................................... 20
LCD backlight......................................................................................................... 20
LCD screen performance at low temperature................................................... 21
Status indication when display is lost................................................................. 21
Battery replacement.............................................................................................. 22
How to make the battery more durable.............................................................. 24

2
Product Specification
Measuring range: -45 °C to 60 °C
Temperature accuracy: ±0.3 °C (-15 °C ~ 60 °C)
±0.5 °C (-45 °C ~ -15 °C)
Resolution: 0.1 °C
Operation range: -45 °C ~ 60 °C
Time accuracy: 2 mins / year
Memory: 130,599 temperature values
Battery type: 1 pcs CR2 Li battery 3V
Battery life: 5 years (15 mins measurement rate)
Protection class: IP67
Size: 77.0 x 51.0 x 23.0 (mm)

3
Packaging List
1. 1 pcs INNO 320 instrument
2. 1 pcs INNO 320 wall holder
3. 1 pcs CR2 Li battery
4. 1 pcs type C / Micro USB OTG adapter
5. 1 pcs double-sided adhesive tape

4
Important Notice (Must Read)
1. For batteryreplacement, it is a must to use a new and highquality CR2
lithium battery for replacement. Otherwise the instrument cannot
correctly estimate the battery life.
2. During replacing the battery, after the old battery is removed, the
instrument still has residual power. Wait until the residual power of the
instrument is completely exhausted, that takes about 5 seconds, and
you can see the whole LCD screen is off. Then you can install a new
battery. Otherwise the instrument will not recognize if a new battery
has been replaced. If the remaining battery power is not exhausted
and a new battery is installed, you can remove the battery again, and
wait until the LCD screen is completely off, and install the new battery
again.
3. After replacing the new battery, the first time connect the instrument to
the application software, the software will remind the user that the
battery has been replaced. Be sure to use a brand new battery.
4. After installing the battery, do not remove the battery, unless the
battery is exhausted or the remaining battery capacity is too low that
cannot complete the scheduled task.
5. The action of removing the battery and then putting the removed
battery back is equivalent to replacing the battery. The instrument will
assume that a new battery has been replaced and the battery life is
estimated with the new battery's power. In this case, the estimated
battery life is not accurate.
6. Do not replace the battery in a humid environment, because high
humidity air can enter the instrument through the battery compartment.
The moisture inside the instrument may affect the operation of the
electronics or cause rusting of the components.

5
7. When the instrument has just been used at low temperature
environment, do not replace the battery when the temperature of the
instrument has not returned to room condition. It is because the
relatively warm outside air will enter the instrument from the battery
compartment, which can produce moisture when the warm air meet
the cold parts inside the instrument that will adversely affect the
instrument. Therefore, before replacing the battery, wait until the
instrument returns to room temperature and remove the water from
the surface of the instrument.
8. The instrument has a built-in magnet that can be used to attach the
instrument to the flat iron surface. Do not place the instrument next to
the items, tools, or magnetic cards, etc. those will be affected by the
magnetic field.

6
Usage Instructions
Screen Information
1.When the symbol is displayed, it means that the measured temperature is
higher than or equal tothe pre-set upper temperature limit.When the symbol
flashes, it indicates that the value displaying on the screen now is the pre-set
upper temperature limit value.

7
2.When the symbol is displayed, it means that the measured temperature is
lower than or equal to the pre-set lower temperature limit. When the symbol
flashes, it indicates that value displaying on the screen now is the pre-set lower
temperature limit value.
3.When the symbol is displayed, it indicates that the instrument is in
Recording Mode and the temperature is being recorded.
4.When the symbol is displayed, it indicates that the instrument is in Wait
Mode. If the symbol is also displayed at the same time, it means that the
instrument has been set to temperature-rise start recording method. When the
measured temperature is higher than the pre-set value, it will change to
Recording Mode and start temperature recording. If the symbol is displayed
at the same time, it means that the instrumenthas been set to temperature-drop
start recording method. When the measured temperature is lower than the pre-
set value, it will change to Recording Mode. If both the symbol and the
symbol are displayed at the same time, it means both the temperature-rise and
temperature-drop start recording method are enabled.
5.When the symbol is displayed, it indicates that the instrument is in
Wait Mode, and the instrument has been set to time start recording method. As
soon as the pre-set time has been reached, it will change to Recording Mode
and start temperature recording.
6.When the symbol is displayed, it indicates that the instrument is in
Wait Mode. The instrument has been set to key start recording method. As long
as the button of the instrument is pressed and hold for longer than 3 seconds,
it will change to Recording Mode and start temperature recording.
7.When the symbol is displayed, it means that the temperature unit is
Fahrenheit.

8
8.When the symbol is displayed, it means that the temperature unit isCelsius.
9.It is the numerical display area.
10.The symbol displays, that the symbol is flashing, that indicates
the value displaying is the number of days the battery still can be used.
11.When the symbol is displayed, it indicates that the instrument is in the
End Mode, the instrument has completed the scheduled recording task.
12.The symbol is flashing, and the symbol is displaying at the same
time, that indicates the currently displaying value is the number of recorded
temperatures which is higher than or equal to the pre-set upper temperature
limit. The symbol is flashing, and the symbol is displayed at the
same time, that indicates the currently displaying value is the number of
recorded temperatures which is lower than or equal to the pre-set lower
temperature limit.
13.It is the remaining battery capacity symbol.
i. The remaining battery capacity is available for more than 500
days.
ii. The remaining battery capacity is available for 300 to 499 days.
iii. The remaining battery capacity is available for 100 to 299 days.
iv. The remaining battery capacity is available for 30 to 99 days.
v. The remaining battery capacity is available for less than 29 days,
the user should replace the battery.
vi. When there is only a symbol on the screen, the button does not
respond, that indicates the battery is too low and the instrument stops
working.
14.When the symbol is displaying, it means that the displaying numbers
are the month and the day, the left two digits are the month, and the right two
digits are the days.

9
15.When the symbol is displaying, it means that the displaying number is
the year.
16.When the symbol is displaying, it means that the displaying time is the
morning time.
17.When the symbol is displaying, it indicates that the displaying value is
the highest temperature that has been recorded. If the instrument is in the
Measurement Mode, then the displaying value is the highest measured
temperature value. If the maximum temperature value is higher than the
operating temperature range of the instrument, it will display the the
symbol.
18.When the symbol is displaying, it means that the displaying time is the
afternoon time.
19.When the symbol is displaying, it indicates that the displaying value is the
lowest temperature that has been recorded. If the instrument is in the
Measurement Mode, then the displaying value is the lowest measured
temperature value. If the lowest temperature value is lower than the operating
temperature range of the instrument, it will display the symbol.

10
Introduction of Other Parts
20.Ambient light intensity sensor. For the measurement of the ambient light
intensity and to work with the automatic backlight function.
21.Red light LED.
22.Green light LED.
23.LCD screen.
24.Key.
25.Build in magnet.
26.Battery compartment cover.
27.USB Type C socket.

11
Key Pressing Operation
Start record mode
When key start recording mode is set, the user can press and hold the key for
more than 3 seconds, the instrument will enter the recording mode and start
recording temperature.
Wait mode Record mode
Display content of the instrument
Users can have different display content of the instrument by pressing the key.
Current
temperature

12
Max
temperature
Min
temperature
symbol flashes, it
shows the upper
temperature limit.
The max temperature
value is outside the
measurement range.
The min temperature
value is outside the
measurement range.

13
symbol
flashes, it shows the
number of recorded
values which are above
or equal to the upper
temperature limit.
symbol flashes, it
shows the lower
temperature limit.
symbol
flashes, it shows the
number of recorded
values which are lower
than or equal to the
upper temperature limit.
symbol flashes,
it shows the number of
days the battery can be
used.
Time
14
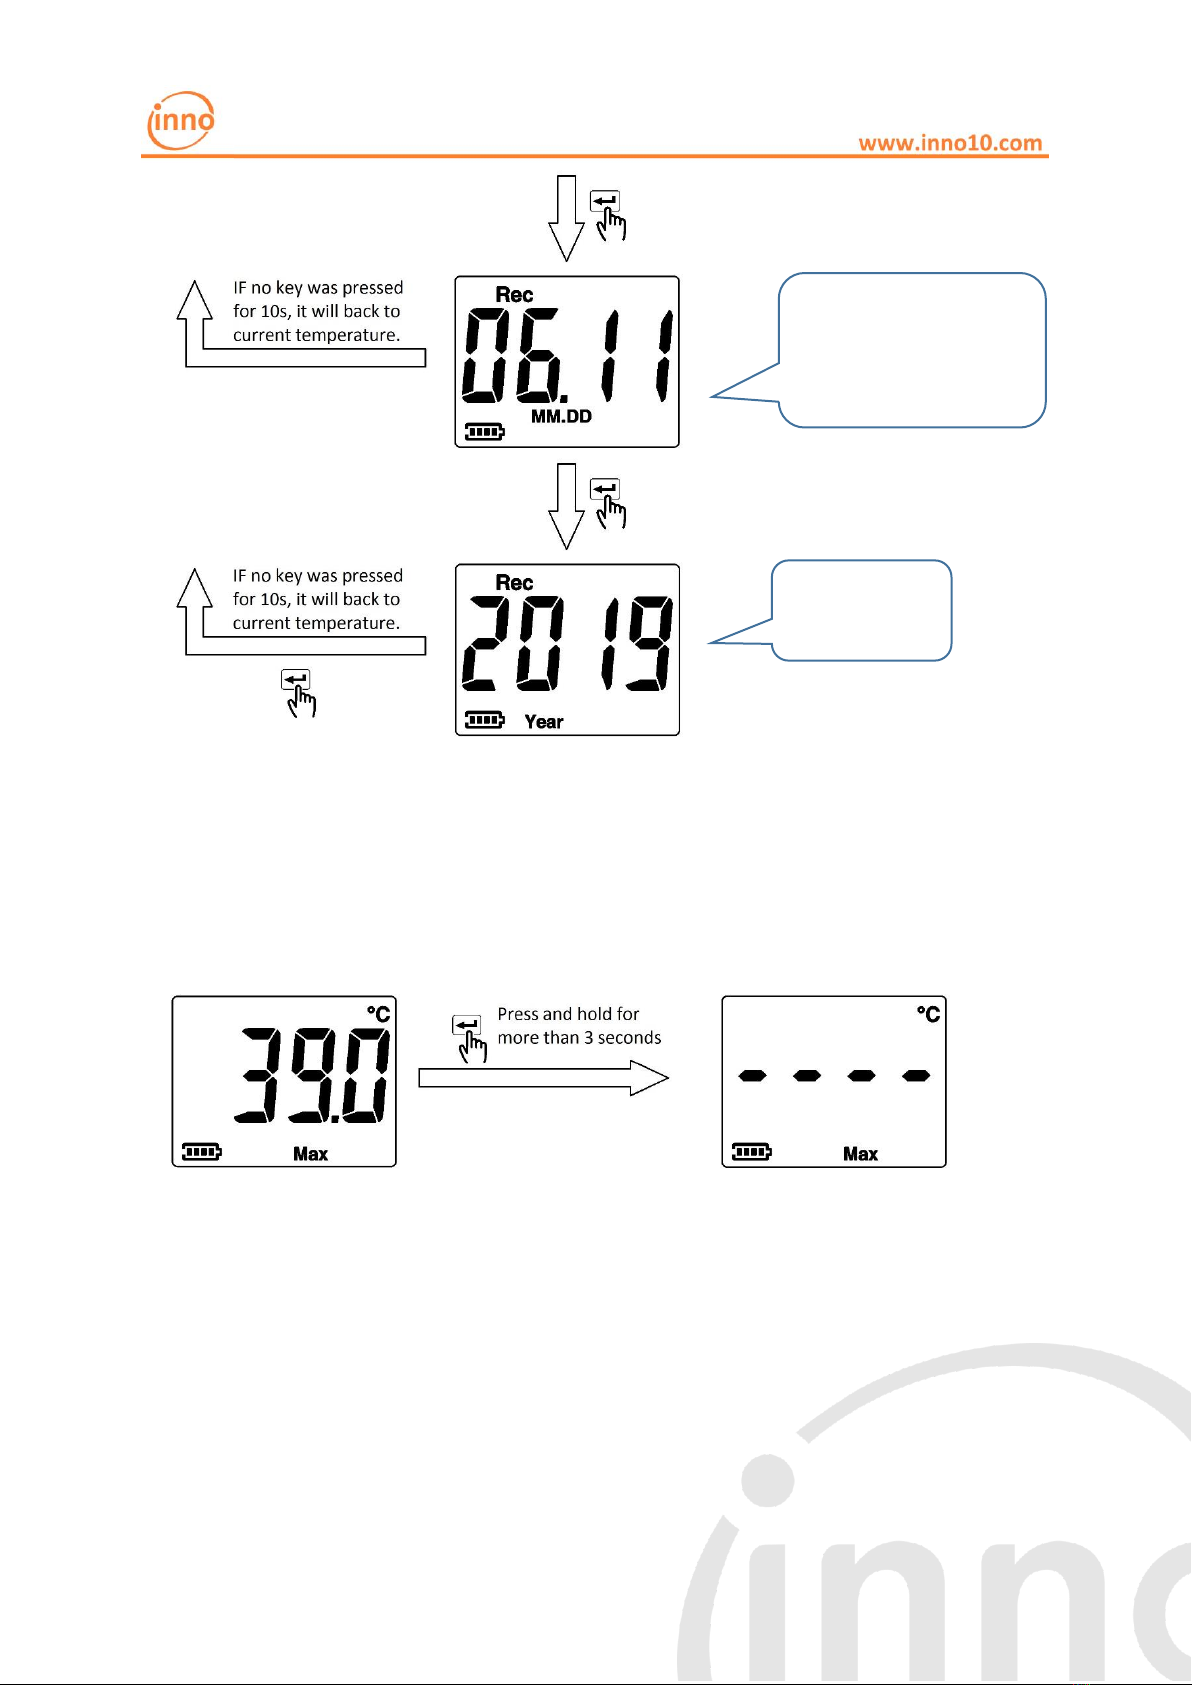
Reset Max and Min values
At measurement mode, maximum and minimum values can be reset.
When the maximum temperature value is displayed, press and hold the key for more
than 3 seconds to reset the maximum value. The digital zone will not display the
temperature value at this time, and the instrument will recalculate the maximum
value from the next measurement and display it again.
Showing date, left side
is the month, right
side is the day.
Year

15
When the minimum temperature value is displayed, press and hold the key for more
than 3 seconds to reset the minimum value. The digital zone will not display the
temperature value at this time, and the instrument will recalculate the minimum
value from the next measurement and display it again.
Note:
The instrument does not calculate the maximum and minimum values in wait
mode ( symbol displaying).
In the record mode ( symbol displaying) and in the end mode (
symbol displaying), the maximum and minimum values cannot be reset. The
maximum and minimum values in these modes refer to the highest and lowest
values ever recorded, which are part of the recorded data and cannot be reset.

16
Instrument Working Mode
INNO 320 has 4 working modes:
Wait mode
In wait mode, the instrument has been scheduled to record temperature. It is
waiting to enter to record mode and start temperature recording. The
symbol is displaying on the screen.
Users can set 3 methods to start recording:
1. Key start: Press and hold the key for 3 seconds, instrument will enter
record mode.
2. Time start: Set the time to start temperature recording. When the pre-
set time is reached, the instrument will enter record mode.
3. Temperature start: With temperature-rise start method, when the
measured temperature is higher than or equal to the pre-set value, then
the instrument will enter record mode. Similarly, with temperature-drop
start method, when the measured temperature is lower than or equal to
the pre-set value, then the instrument will enter record mode. In addition,
temperature-rise start and temperature-drop start method can be
enabled simultaneously.
Record mode
In record mode, instrument will record the measured temperature,
symbol is displaying in this mode.
The recording interval can be set between 10 seconds to 24 hours.
The instrument can stored up to 130,599 temperature values.
The upper and lower limit alarm functions can be set. When the recorded
temperature reaches the upper limit or reaches the lower limit, the
corresponding or symbol is displayed. If both the upper and lower
limits have been reached, both the and symbols will be displayed

17
simultaneously. If the LED alarm function is enabled, the red LED will flash
every 10 seconds after alarm was triggered.
Three recording method can be set:
1. Set a number of temperature values to be recorded, when the recording
amount was reached,recording will stop, instrument will enter end
mode.
2. Set a time period for recording,the recording start time and end time
should be set. When end time was reached, recording will stop,
instrument will enter end mode.
3. Cycle recording. Instrument will keeping recording data, when the
memory was full, the latest measured value will be recorded, and the
oldest value will be discarded. User can stop the recording by the
application software.
Note: If cycle recording method was used, the maximum and minimum
temperature values displayed on the instrument screen refer to the
highest and lowest values recorded by the instrument, not just the
highest and lowest values among the 130,599 temperature values
stored in the instrument. Therefore, the maximum and minimum values
displayed may no longer exist in the instrument's record.
End mode
In this mode, symbol is showing on the screen. Instrument was
completed the scheduled recording task, recording was stopped, but it will
still measure temperature and display it on the screen.
Measurement mode
In this mode, instrument will no record data, it is used as an accurate
temperature measuring instrument instead.
In this mode, when displaying maximum temperature value, the Max value
can be reset by pressing and hold the key for more than 3 seconds.
In this mode, when displaying minimum temp0erature value, the Min value
can be reset by pressing and hold the key for more than 3 seconds.

18
Other introduction
PC connection
1. Users can use USB Type C cable to connect INNO 320 to the PC. When it
was connected, symbol will show on the screen.
2. Users can use innoware (a PC software for INNO 320) to setup the
instrument.
3. The data recorded by the instrument can be downloaded by using innoware
and for analyzing. Saving and printing the data are also available. Users can
also export the recorded data to an Excel file.
4. innoware also provides the online measurement function.

19
Smart phone connection
1. With an OTG adapter, a USB Type C cable, users can connect INNO 320 to
an android OS smart phone (android 5.0 or above). symbol will be
show on the screen when connecting.
2. Users can use inno APP (an android APP for INNO 320) to setup the
instrument.
3. The data recorded by the instrument can be downloaded by using inno APP
for analyzing and saving as a backup.
4. Inno APP also provides the online measurement function.

20
LED alarm
If the LED alarm function is enabled, the red LED will work in different flashing
pattern in every 10 seconds according to different alarm items.
Alarm item
Flashing pattern in every 10s
Higher or lower limit triggered
Flash once
Battery capacity less than 30 days
Flash twice
Both of the above
Flash 3 times
If LED alarm function was not enabled, user can observe whether or
symbol appears on the display to determine whether the upper and lower limit
values have been reached. If symbol appears, it means the battery is
running out.
LCD backlight
INNO 320 display has backlight function.
The backlight can be set to 3 working mode
1. Backlight function always enabled. Whenever the key is pressed,
backlight will be on for 10 seconds, so the display contents can be
clearly seen in a dark environment.
2. Auto backlight function. If the environment is dark, the backlight will be
on for 10 seconds when the key was pressed, so users can see the
display clearly. However, if it is under a well-lit environment, the
backlight will not be turned on even the key was pressed. This can avoid
unnecessary turning on of the backlight and save battery power.
3. Backlight function disabled. The backlight will not be turned on under
any circumstances.
Note: When the temperature is below -30 °C, the backlight function will be
Table of contents
Other INNO Measuring Instrument manuals


