INNOCN 40C1R User manual
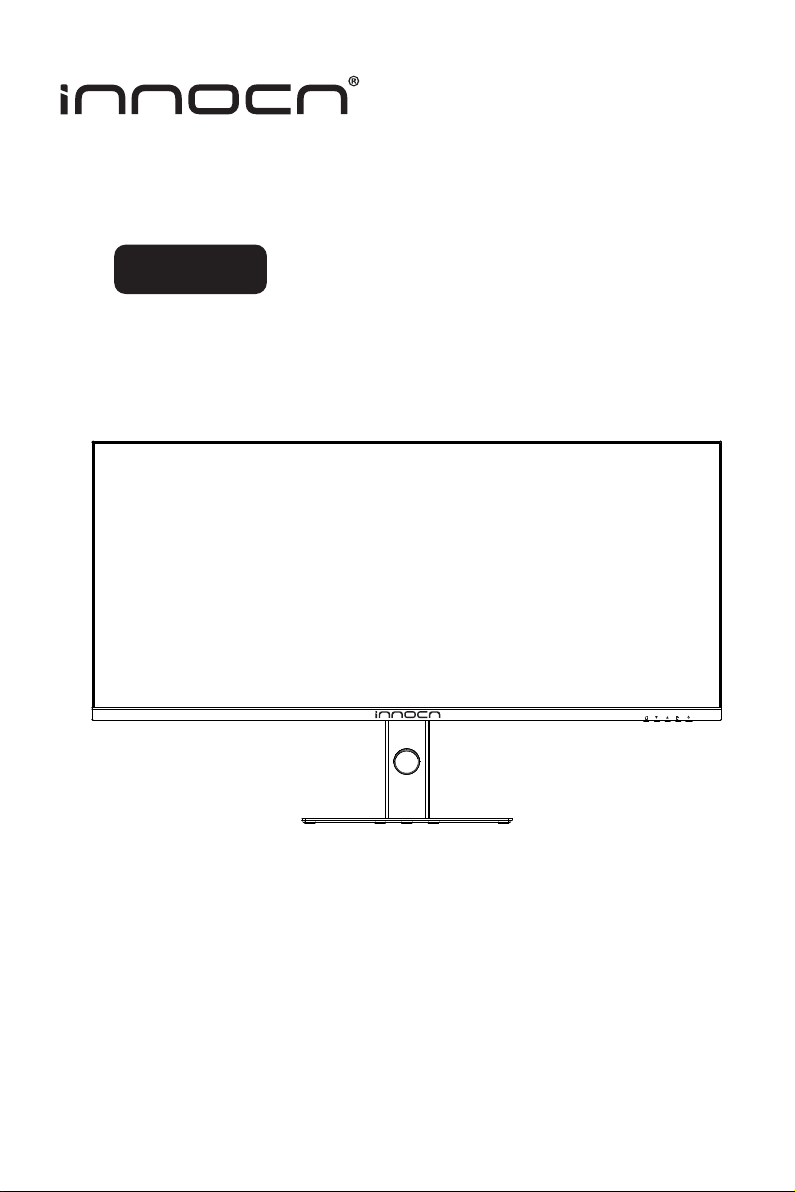
40C1R User Manual for Art Monitor


Contents
English
2
3
4
7
12
Precautions
Package Content
Installation
6
Adjustment of monitor
Instructions for use
Specification
9
OSD menu
13
14
Common troubleshooting
Warranty Information
15
German Rhine TÜV Low Blue Light Certfication
15
Contact us

2
English
Precautions Before using this product, please read this User Manual carefully and keep it well
Please use a reliable grounded socket, Do not overload the socket, or it may cause fire or
electric shock.
Do not cover or block the vent hole in the rear casing, and do not use the product on a bed,
sofa, blanket or similar objects.
The range of the supply voltage of the monitor is printed on the label on the rear casing.
If it is impossible to determine the supply voltage, please consult the distributor or local
power company.
If the monitor will not be used for a long period, please cut off the power supply to avoid
electric shock in rainy days and damage due to abnormal supply voltage.
Keep the monitor away from water sources or damp places, such as bath rooms, kitchens,
basements and swimming pools.
Make sure the monitor is placed on a flat surface. If the monitor falls down, it may cause
human injury or device damage.
Store and use the monitor in a cool, dry and well ventilated place, and keep it away from
emission and heat sources.
Do not put foreign matters into the monitor, or it may cause short circuits resulting fire or
electric shock.
Do not disassemble or repair this product by self to avoid electric shock. If faults occur,
please contact the after-sales service directly.
Do not pull or twist the power cable forcedly.
There is a polarizer layer (not a protective film) on the surface of the screen. Do not peel
it off, or the product may be damaged and the warranty will be invalid.

2
3
Package Content
English
Packing list
Please check that the package of the monitor contains all parts. If any part is lost, please contact
the distributor.
The color and shape of parts may vary with models. Figures in this User Manual are for reference only.
Cables supplied may vary with purchased products. Figures in this User Manual are for reference only.
Display screen
DP cable Power cable
Color calibration report
User Manual
Stand
40C1R User Manual for Art Monitor
4
Installation
English
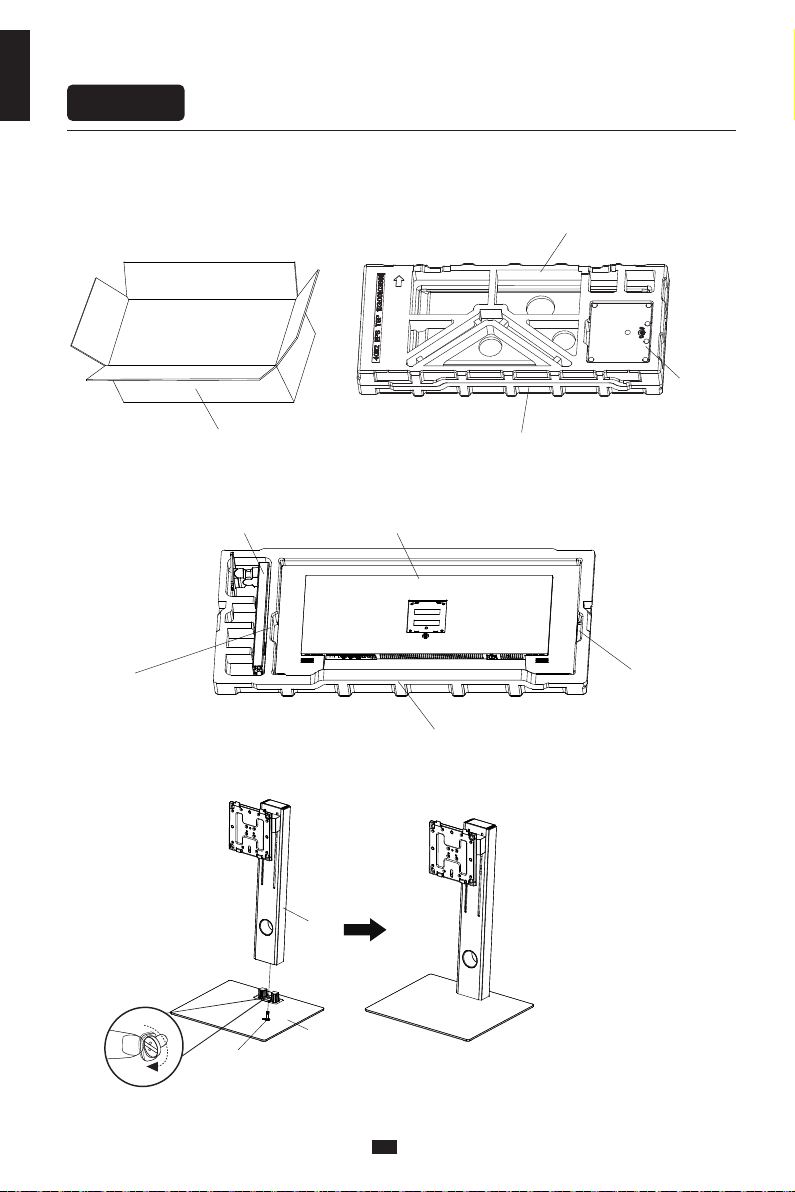
nstallation of base
1. Open the carton package, take out the upper and lower foam covers and put them flat on
the table top.
2. Remove the upper foam cover and put it aside, take the monitor out from the film bag and put it in
the chamber of the lower foam cover.
3. Take out the stand and the base and lock them with a 1 M6 thumb screw (see the figure below).
Carton
Base
Upper foam cover
Lower foam cover
Lower foam cover
M6 thumb screw
MonitorStand stem
Notes: Hold the underneath
square groove to take out
the monitor
Notes: Hold the underneath
square groove to take out
the monitor
Base
Stand

5
English
4. As shown in the figure below, put the base component assembled in Step 3 into the slot of the rear
casing, slightly press the stand to clip the rotary shaft component into position, and hold the middle
of the stand with hand to lightly lift the monitor twice to ensure that the monitor cannot loosen and
the clip can lock the base component firmly; during disassembly, perform these steps reversely.
Simply hold the stand with hand to stand the monitor upright.
monitor
Base component
Do not press the LCD
Note: During standing of the monitor, do not take out the monitor from foams, and do not
pinch the liquid crystal screen with hand to avoid damage to the screen.
6
Adjustment of monitor
English
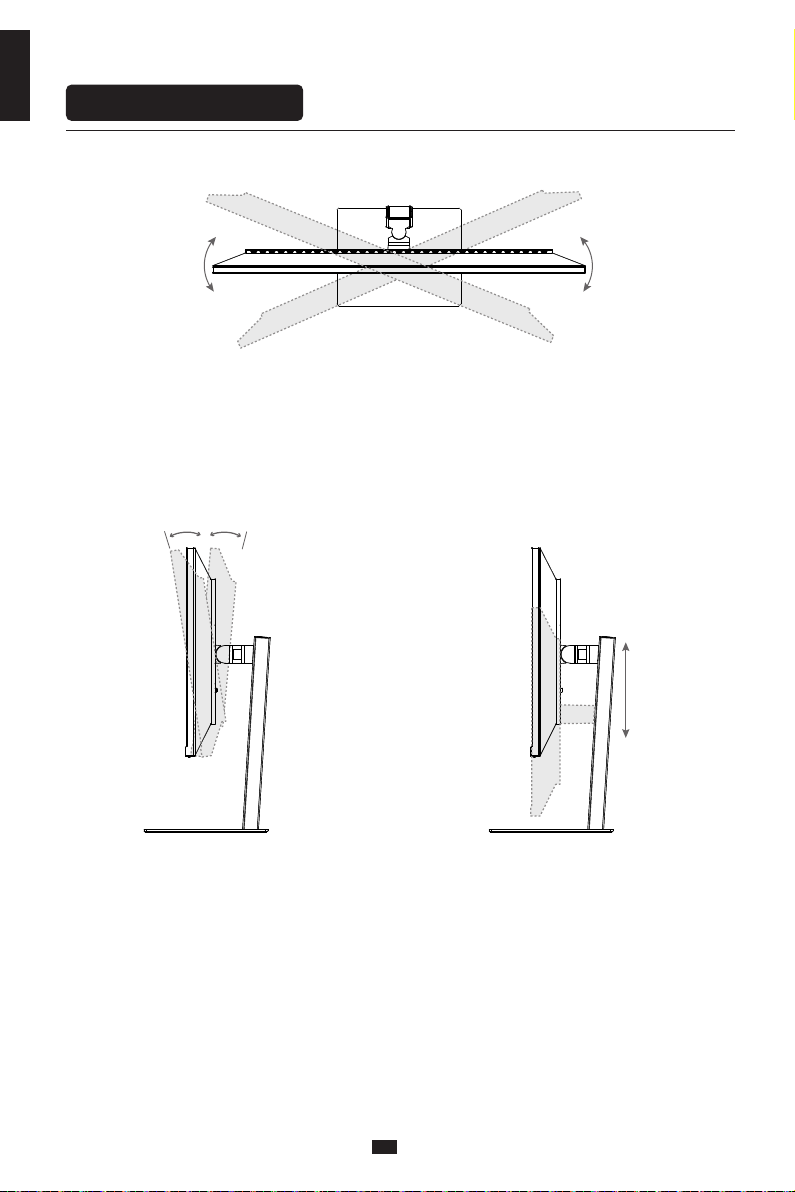
Rotation angle
-30°- +30°
Height adjustment
0- 120mm
Tilting angle
-5.°- +15°
-5° 15°
120mm

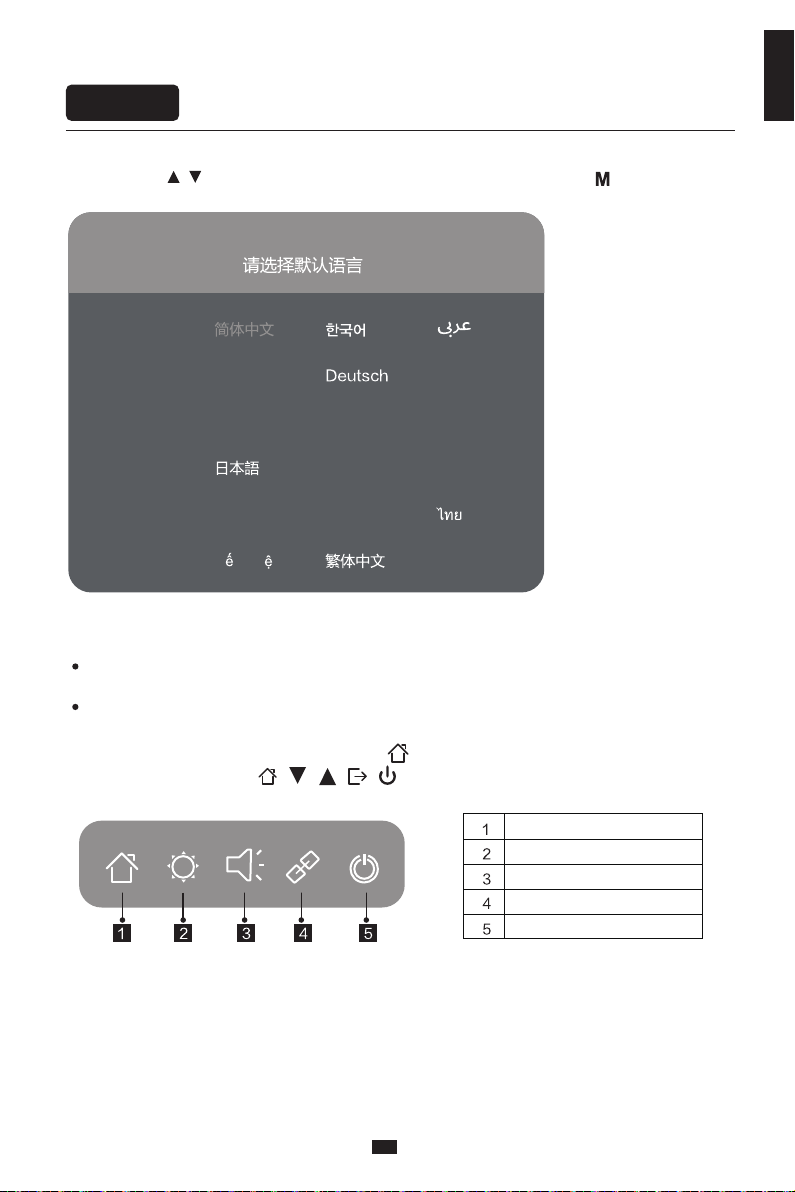
Description of buttons
Explanation of indicator light
Instructions for use
6. Indicator light: Steady blue light indicates the power is on and the monitor runs normally. Flashing
red light indicates no video signal detected or low voltage. Please make sure that your computer is
turned on and all video cables are fully plugged in and/or connected.
7
English
1 2 3 4 5
6
Menu button: Press to enter sub-menus/ quickly enter the main menu
Down button: Press to move down in the menu/quickly adjust the brightness
Up button: Press to move up in the menu/quickly adjust the volume
Exit/hot key: Press to return to the previous menu/quickly switch input signals of the port
Power button: Press to turn on/off the monitor
Button Function

Cable connection
8
English
* The bottom interface configuration at the back of the monitor
varies with products.
* Note: If the power cable or signal cable is damaged, you must
replace it with special soft cables or special components purchased
from the manufacture or maintenance department.
HDMI interface
OR
Please connect the power cable
plug to the corresponding port
of the monitor, and connect the
other end to a properly
grounded power outlet.
Use the HDMI cable to connect the HDMI IN
port of the product to the HDMI OUT port of a
PC.
Use the HDMI-DVI cable (not included) to
connect the HDMI IN port of the product to the
DVI OUT port of a PC. (In general, PCs do not
transfer video signals to the monitor through the
DVI OUT interface , and it is necessary to connect
a loudspeaker box additionally to play sounds of
PCs.)
DP interface AUDIO OUT
Use the DP cable to
connect the DP IN port of
the product to the DP
OUT port of a PC.
Connect audio outputting
devices such as earphones
to the AUDIO OUT port.
Type-C interface
AC IN interface
A Type-C line can be used
to connect to data ports of
machines and external
terminals.
Menu description
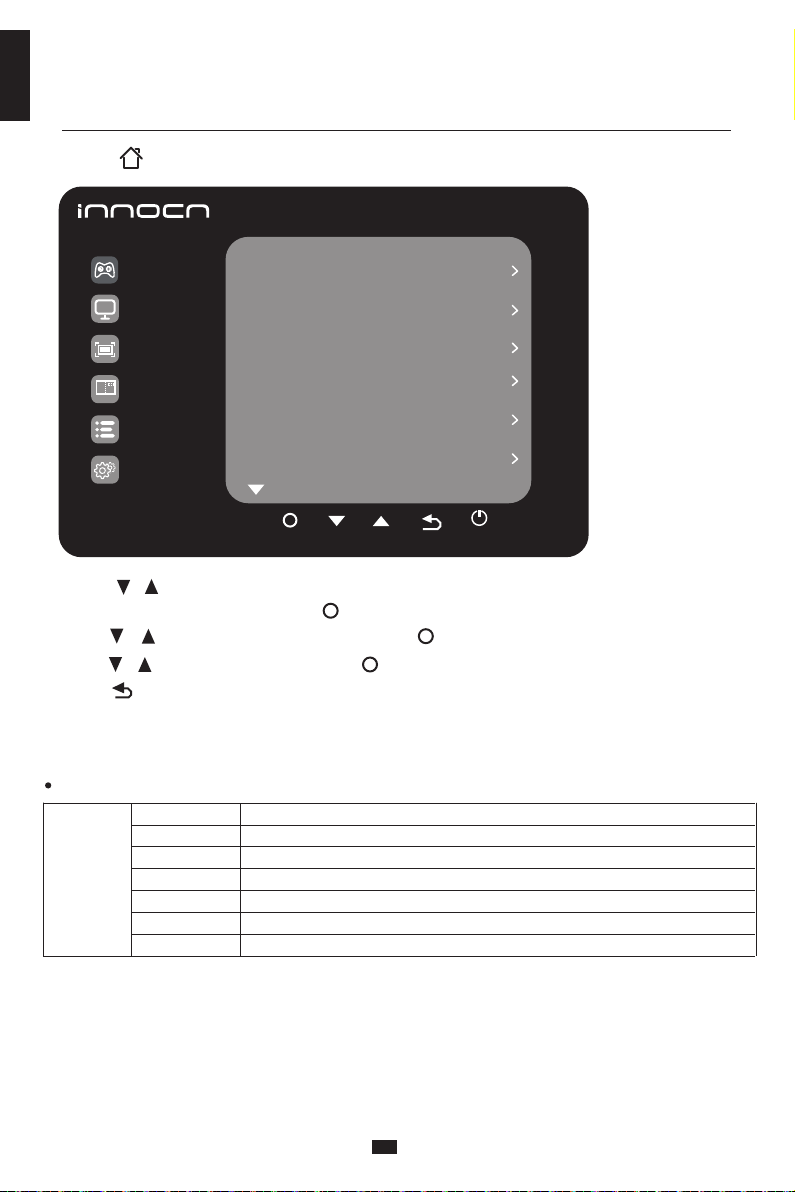
OSD menu
When booting for the first time, you need to set the default language of the monitor menu.
Press buttons ( ) to select the language to be set, and press the OK button( ) to confirm.
9
English
The color and shape of the OSD menu of the actual computer may be slightly different from them
shown in the figure.
Specifications of the OSD menu may change with improvements of functions without prior notice.
The screen display (OSD) menu can be used to adjust settings of the monitor and is shown on the
screen after the monitor is powered on and the button is pressed.
1. Press one of the buttons ( ) to activate the browser screen.
Portugues do Brasilazil Nederland
English
Suomi Français Ελληνικά Indonesia
Українська Ti ng Vi t Türkçe
Italiano Malaysia Polskie
Português Pусский Español
Please select the default language
Enter the main menu
Adjust the brightness
Adjust the volume
Switch port input signal
Power ON/OFF
10
English
2. Press to enter the OSD screen.
3. Press or to scroll through the functions.
- Select the desired function, and press to enter the sub-menu.
- Press or to scroll through sub-menus, and press key to select and confirm the desired function.
- Press or to select one option, and press to confirm settings and exit from the current menu.
4. Press to exit from the menu screen
Professional
Game Settings
Picture Sttings
PIP/PBP
OSD Settings
Other Settings
RTS/RPG Mode
FPS Arena Mode
MOBA Arena Mode
FreeSyncPremium
Response Time
Refresh Rate
Fast
Off
Off
Off
Off
Off
Functions of the monitor vary with models, and the functions in this manual are for reference only
Game Settings
Off/On
Off/On
Off/On
Off/On
Off/Normal/Fast/Ultrafast
Off/On/Position
Off/Crosshair 1/Crosshair 2/Crosshair3/Crosshair 4/Crosshair 5/Crosshair6
RTS/RPG Mode
FPS Arena Mode
MOBA Arena Mode
FreeSyncPremium
Response Time
Refresh Rate
Game Crosshair

11
English
Input Source: HDMI2/ Resolution: 3440x1440@50Hz/Mode: Standard Mode/ HDR Ver:SDR/ SN:0000000000000
Professional
Picture Sttings
PIP/PBP
OSD Settings
Other Settings
Standard Mode N/A
N/A
N/A
N/A
1.6/1.8/2.0/2.2/2.4/2.6/2.8/S.curve
Natural/Design/Warm/Cool/User C.T1/User C.T2/User C.T3
Off/Movie mode/Reading mode/Night mode/Care eyes mode
Off/HDR Standard/HDR Movie/HDR Design
0-5
0-100
0-100
R/G/B/C/M/Y
sRGB Mode
Adobe Mode
Uniformity Mode
Gamma
C.T settings
Sharpness
Shadow Balance
Low blue light
Hue
Saturation R/G/B/C/M/Y
Dynamic Brightness Off/Standard/Expert/Elaboration
0-100
0-100
Off/On
Wide Screen/4:3/1:1/Auto
Brightness
Contrast
DCR
Contextual model
HDR
Aspect ratio
PIP/PBP Mode Off/PIP Mode/PBP 2win 1:1/PBP( Phone1)/PBP( Phone2)
Type-C/DP/HDMI1/HDMI2
Auto/Type-C/DP/HDMI1/HDMI2
Top Right/Top Left/Bottom Right/Bottom Left
Small/Medium/Large
N/A
5-100
0-100
0-100
0-5
0-100
Brightness/Contrast/Volume/Mute/Shadow Balance/
Game Crosshair/Refresh Rate
/
Contextual model/
PIP/PBP Mode/Input Signal/Dynamic Brightness/HDR
Sub-Singal Source
Audio source
PIP Position
PIP Size
Window Swap
Language
OSD Time Out
OSD H-Position
OSD V-Position
OSD transparency
Hotkey1 Setting
Hotkey2 Setting
Hotkey3 Setting
Input Sinal Auto/Type-C/DP/HDMI1/HDMI2
Volume
Mute Off/On
Off/On
Off/On
Auto Power
Eyeshield Remind
Reset
Information
English/ / / /Portugues do Brasilazil/ Deutsch/Nederland/ Suomi/
Français/Ελληνικά/Indonesia/Italiano/ /Malaysia/Polskie/Português/Pусский/
Español/ /Українська/Ti ng Vi t/ /Türkçe
Functions of the monitor vary with models, and the functions in this manual are for reference only.

Specification
40B2R
40C1R
40inch 101cm
178°(H) / 178°(V)
0.08975(H)× 0.26925(V)mm
1200:1 TYP
16.7M
21:9
3440x1440
120mm
-30°/+30°
N/A
Forward tilting-5°/Backward tilting+15°
100-240V~ 50/60Hz, 3.0A
144Hz
The standard voltage and power supply may vary with countries, please
refer to the label at the back of the product.
LCD Monitor
12
English
Product Model
Product Code
Screen Size
Viewing Angle
Pixel pitch
Contrast ratio
Color
Aspect Ratio
Resolution
Power Input
Refresh Rate
Product Name
Product
Dimentions Without base
With base
Tilting angle
Height range
Rotation angle
Vertical angle
Environmental
conditions
Action
Storage
Temperature: 0°C~ 40°C (32°F ~ 104°F)
Humidity: 10%~90% RH (non-condensing)
Temperature: -20°~ 60° (-4°F ~ 140°F)
Humidity: 5%~95% RH (non-condensing)
The terms HDMI and HDMI High-Definition Multimedia Interface, and the HDMI Logo are
trademarks or registered trademarks of HDMI Licensing Administrator, Inc. in the United
States and other countries.
This device complies with Part 15 of the FCC Rules. Operation is subject to the following two
conditions:(1)This device may not cause harmful interference, (2)This device must accept any
interference received,including interference that may cause undesired operation.
Pour en savoir plus:
www.quefairedemesdechets.fr
(with Height
range)
944.1x418.5x56.8mm approx. 8.78kg
944.1x572.2x221.5mm approx. 11.56kg

13
English
Common Symptoms Possible Solutions
The following table contains general information about common monitor problems you might encounter
and the possible solutions.
• Ensure that the video cable connecting the monitor and the computer is properly connected
and secure.
• Make sure if the operating system had entered hibernation, sleep or power-save mode. Press
any key (Enter key / Power key) or move the mouse to wake it up.
• Check for bent or broken pins in the video cable connector.
• Ensure that the correct input source is selected in the Input Source menu.
• Replace other identical signal cable (HDMI / DisplayPort) to take cross-test.
No display after turning monitor
ON (screen is black but power s
upply lights is ON)
• Verify that the power outlet is functioning properly using any other electrical equipment.
• Make sure the power button on the front panel is normal for boot and pressed fully.
• Check for bent or broken pins in the video cable connector.
No display after turning monitor
ON (not boot, black screen & no
power lights)
• Eliminate video extension cables.
• Reset the monitor to factory settings.
• Change the video resolution to the correct resolution and aspect ratio.
• If the words are still blurry, please try enabling or disabling CLEAR TYPE function from windows
Poor Focus. Picture is fuzzy,
blurry, or ghosting
• Cycle power On-Off.
• Pixel that is permanently Off is a natural defect that can occur in LCD technology.
• For more information on Dell Monitor Quality and Pixel Policy, see INNOCN Support site
at: http://www.innocn.com
Missing Pixels. LCD screen has
spots
• Do not perform any troubleshooting steps.
• Contact INNOCN immediately.
Safety Related Issues
(Visible signs of smoke or sparks)
• Check the resolution setting in your PC
• Reset the monitor to factory settings.
• Make sure the device was not set to “Care Eyes mode”
• Check here: OSD Picture Setting Contextual mode Care Eyes mode
• Press only one key at a time.
• Restart the computer
• Make sure to have a valid video signal going through the monitor before
you can turn on the OSD
• Make sure the “contextual mode”is OFF before setting brightness and contrast ratio.
• Check here: OSD Picture Setting Contextual mode off
The screen appears yellow
Control panel keys do not work
I cannot adjust the brightness/
contrast ratio through OSD
• Make sure your video card supports that feature.
• Also make sure you are using DisplayPort to connect from your computer to your monitor.
• Not every computer/phone ‘s USB Type-C port will support video out signals. Please check
your cable and your computer/phone to make sure those will support a video signal.our monitor.
• Check to see if you plugged a USB-B uplink cable(included in the package) from your computer
to the monitor’s USB-B port. Without an uplink cable to the computer, the USB ports on the back
of the monitor will not work.
• Check that your monitor is turned On.
• Reconnect the uplink cable to your computer.
• Reconnect the USB peripherals(downstream connector).
• Switch Off and then turn On the monitor again.
• Reboot the computer.
• Some USB devices like external portable HDD require higher electric current; connect the device
directly to the computer system.
I cannot get higher refresh rate
on my monitor
After plugged in USB Type-C
from computer to monitor,
there is no video
USB interface is not working
• Check the Aspect Ratio setting in the Display menu OSD.Image is centered on screen, but
does not fill entire viewing area

14
English
Warranty Information
1.What is covered in your warranty?
2.Contact us
3.Members only
Signing up to become our members, to exchange new one without repair in one year.
4. This Warranty is not applicable:
1.The product is not purchased from an Authorized Innocn dealer.
2.The product is not used according to instructions given in the instruction manual.
3.Defects caused by improper use as determined by company personnel.
4.Modification or alteration of any nature is made in the electrical circuitry / or physical construction of
the set.
5.Installation / repair work is carried out by persons / agency other than authorized by the company.
6.The original serial number is removed, obliterated or altered from the machine or cabinet.
7.Accidents, Acts of God, lightning, water, fire, public disturbances, improper ventilation, voltage
fluctuations or any cause beyond the control of Innocn.
Item
Monitor
Warranty term
1 Years
Service Email
Service Website
http://www.innocn.com
Register website
QR code
https://www.innocn.com/user/register
15
English
Contact us
German Rhine TÜV Low Blue Light Certification
Thank you for choosing Innocn®!
We hope the Innocn®product you purchased will serve you well. To ensure safety and trouble-free
operation of your device, please read the user guide carefully and keep it for future needs.
We recommend you go online to our homepage for the most up-to-date guidance for your product.
registering Innocn membership; refering to warranty information.
http://www.innocn.com
Blue light may cause eye fatigue and discomfort. Joint Innovation
The light the screen radiates contains a blue component, which
may lead to fatigue and discomfort in the eye. The "low blue light"
function tunes down the radiation of blue lights from the screen
and thus reduces eye fatigue arising from the intensive use of the
screen.
now offers the screen that passes German Rhine TÜV Low Blue Light
certification to ensure the comfort and health of users' eyes.
Please follow the instructions below operate the screen to reduce
symptoms caused by prolonged exposure to blue light on the
screen.
1. Place the screen 20-28 inches (50-70 cm) away from the eyes, with the center of the screen slightly
below the line of sight.
2. When you need to use the screen for a long time, blinking consciously from time to time will help
reduce eye fatigue.
3. Take a 20-minute break every 2 hours.
4. Take your eyes away from the screen when you rest and stare at distant objects for at least 20 seconds.
5. Stretch moderately during rest to relieve physical fatigue or pain.
6.After factory setting, when the low blue light function is set to 50,70,100, it conforms to TUV Rheinland's
low blue light certification
Low Blue Light
(Software
Solution)
www.tuv.com
ID 0217008683


40B2R
108.007.19141
INNOCN 销美
梁丽
40C1R
20220707
封面105g哑粉纸,内页80g书写纸,单色骑马钉
140x210mm
V01
Table of contents
Other INNOCN Monitor manuals

INNOCN
INNOCN PF15-PRO User manual

INNOCN
INNOCN 44C1G User manual

INNOCN
INNOCN PU15-PRE User manual

INNOCN
INNOCN N2F User manual

INNOCN
INNOCN 13A1F User manual

INNOCN
INNOCN 27G1G User manual

INNOCN
INNOCN 29C1F-D User manual

INNOCN
INNOCN 34C1Q User manual

INNOCN
INNOCN 27C1U-D User manual

INNOCN
INNOCN 27G1G User manual


