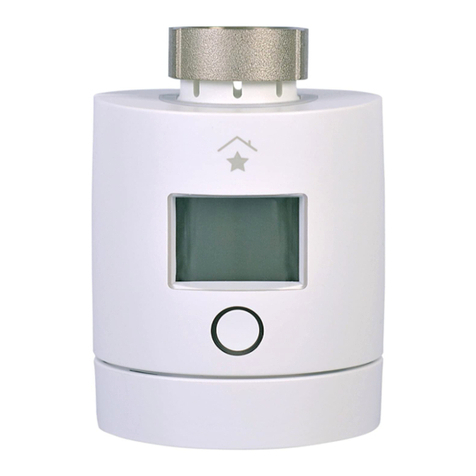
Innogy SmartHome RST 2.0 User manual

DE Heizkörperthermostat Seite 2
EN Radiator thermostat Page 12
FR Thermostat de radiateur Page 22
NL Radiatorthermostaat Pagina 32

2
DE
Herzlichen Glückwunsch!
Mit dem innogy Heizkörperthermostat haben Sie ein
bewährtes Gerät für Ihr SmartHome erworben. Anhand
dieser Anleitung können Sie das Thermostat schnell und
leicht montieren und in Betrieb nehmen.
Noch schneller geht‘s allerdings über die innogy
SmartHome App, erhältlich per Download im App Store
von Apple oder im Google Play Store.
Besitzen Sie bereits die App, klicken Sie auf dem
Homescreen einfach auf das Plus-Zeichen oben
rechts und warten, bis das eingeschaltete Gerät
in der Suche auftaucht. Sie können aber auch unter
dem Menüpunkt Geräte das Raumthermostat
manuell einbinden – animierte Grafiken zu Montage
und Einbindung unterstützen Sie dabei.
Inhalt
Gefahrenhinweise 4
Funktion 5
Montieren und Einbinden 6
Bedeutung der Symbole 7
Funktionstest 8
Zurücksetzen in den Auslieferungszustand 8
Technische Daten 9
Allgemeiner Hinweis 10
Entsorgungshinweis 10

3
DE
Wir sind für Sie da!
Wenn Sie bei der Installation weitere Informationen oder
Unterstützung benötigen, haben wir für Sie die passende
Hilfe:
Online-Hilfe
https:/service.startsmarthome.de
Kostenfreie Hotline
T 0800 1234060
Allgemeine Fragen rund um innogy SmartHome
(Mo– Fr 8–20 Uhr · Sa 8–14 Uhr)
SmartHome Community
https://innogy.com/community
Facebook
https://facebook.com/innogysmarthome
Helfer vor Ort: innogy friends von mila
Erfahrene und geprüfte SmartHome User kom-
men zu Ihnen und helfen bei Montage und
Einrichten Ihre SmartHome
Weitere Infos: https://innogy.mila.com

4
Gefahrenhinweise
Bei Sach- oder Personenschäden, die durch unsachgemäße Hand-
habung oder das Nichtbeachten der Sicherheitshinweise verur-
sacht werden, übernehmen wir keine Haftung. In solchen Fällen
erlischt jeder Gewährleistungsanspruch! Für Folgeschäden über-
nehmen wir keine Haftung!
Öffnen Sie das Gerät nicht. Es enthält keine durch den Anwender zu
wartenden Teile. Im Fehlerfall nehmen Sie bitte Kontakt mit unse-
rem Service auf.
Das Gerät nicht verwenden, wenn es von außen erkennbare Schä-
den z. B. am Gehäuse, an Bedienelementen oder an den Anschluss-
buchsen bzw. eine Funktionsstörung aufweist. Im Zweifelsfall das
Gerät von unserem Service prüfen lassen.
Aus Sicherheits- und Zulassungsgründen (CE) ist das Verändern
des Produkts nicht gestattet.
Betreiben Sie das Gerät nur in trockener, staubfreier Umgebung,
setzen Sie es keinem Einfluss von Feuchtigkeit, Vibrationen, stän-
diger Sonnen- oder anderer Wärmeeinstrahlung, Kälte und keinen
mechanischen Belastungen aus.
Das Gerät ist kein Spielzeug, erlauben Sie Kindern nicht, damit zu
spielen. Lassen Sie das Verpackungsmaterial nicht achtlos liegen.
Plastikfolien/-tüten, Styroporteile etc. könnten für Kinder zu einem
gefährlichen Spielzeug werden.
Das Heizkörperthermostat ist ausschließlich zur Regelung von
durch Wärmeträger erhitzten Heizkörpern (Radiatoren, Konvekto-
ren, Heizleisten) geeignet. Eine anderweitige Verwendung, z.B. an
Kühlanlagen, Fußbodenheizungen etc., ist nicht zulässig und kann
zu schweren Schäden führen.
Bei erkennbaren Schäden am vorhandenen Thermostat, am Ventil
oder an den Heizungsrohren konsultieren Sie bitte einen Fachmann.
DE

5
Achten Sie darauf, sich nicht die Finger zwischen den Adapterhälf-
ten einzuklemmen!
Reinigen Sie das Gerät mit einem trockenen Tuch, das bei starken
Verschmutzungen leicht angefeuchtet sein kann. Verwenden Sie
zur Reinigung keine lösemittelhaltigen Reinigungsmittel. Achten
Sie darauf, dass keine Feuchtigkeit in das Geräteinnere gelangt.
Jeder andere Einsatz als in dieser Bedienungsanleitung beschrie-
ben ist nicht bestimmungsgemäß und führt zu Gewährleistungs-
und Haftungsausschluss. Dies gilt auch für Umbauten und Verän-
derungen. Das Gerät ist ausschließlich für den privaten Gebrauch
gedacht.
Batterien dürfen niemals aufgeladen werden. Batterien nicht ins
Feuer werfen. Batterien nicht übermäßiger Wärme aussetzen. Bat-
terien nicht kurzschließen. Es besteht Explosionsgefahr!
Funktion
Das Heizkörperthermostat dient zum Regeln der Heizkör-
per, um die gewünschte Temperatur zu erreichen. Diese
Zieltemperatur kann entweder in der SmartHome App in
einem Szenario oder direkt am Heizkörperthermostat bzw.
Raumthermostat eingestellt werden.
Über eine verschlüsselte Funkverbindung wird die Zieltem-
peratur an das Gerät übermittelt. So lässt sich bei geöffne-
tem Fenster oder Abwesenheit die Heizung automatisiert
herunterregeln.
DE

6
Montieren und Einbinden
1. Drehen Sie das mechanische Thermostat bis zum
Endanschlag nach links. Schrauben Sie die Über-
wurfmutter vollständig vom Gewinde.
2. Legen Sie die Batterien (Typ AA) polrichtig ein. War-
ten Sie, bis der Stift ganz zurückgefahren ist. In die-
ser Zeit erscheint im Display A1.
3. Wenn der Stift ganz zurückgefahren ist, erscheint im
Display A2. Montieren Sie nun das Heizkörper-
thermostat. Es passt auf alle handelsüblichen Ven-
tile mit M30 x 1,5 mm Anschlussgewinde. Für einige
Heizungsventile benötigen Sie Adapter. Für die Ven-
tile der Firma Danfoss liegen Adapter für die Serie
RAV, RA und RAVL bei.
4. Drücken Sie am Heizkörperthermostat kurz die
Taste, um die Selbstjustierung zu starten. Im Display
erscheint A3. Dieser Vorgang kann bis zu drei Minu-
ten dauern. Wird der Vorgang abgebrochen,
erscheint F2. Mit einem erneuten Tastendruck kön-
nen Sie den Vorgang neu starten.
5. Nachdem im Display eine Temperatur angezeigt
wird, können Sie das Gerät über die SmartHome App
in Ihr SmartHome einbinden.
DE
Tipps und Tricks zur Montage finden Sie unter:
https://service.startsmarthome.de/heizkoerperthermostat/montage

7
DE
Bedeutung der Symbole
Im Display werden neben der Temperatur auch Status-
symbole angezeigt. Sie informieren über die aktuelle
Situation des Heizkörperthermostats.
Symbol Bedeutung
Zeigt an, dass die Batterien erschöpft sind.
Bitte wechseln Sie umgehend die Batterien.
Zeigt ein offenes Fenster an. Dieses Symbol
erscheint, wenn der Tür- und Fenstersensor
eine geöffnete Fensterstellung registriert
hat.
Zeigt die aktivierte Betriebsart an
(Manuell / Automatik)
Zur Erleichterung der Montage wird der
Steuerstift ganz zurückgefahren.
Der Steuerstift ist ganz zurückgefahren und
das Heizkörperthermostat kann montiert
werden.
Es findet eine Ermittlung des Regelbereichs
und die Selbstjustierung für den vollen
Funktionsumfang statt.
Weitere Hinweise zu den Symbolen finden Sie unter:
https://service.startsmarthome.de/heizkoerperthermostat/symbole

8
DE
Funktionstest
Nach dem polrichtigen Einlegen der Batterien erscheint
im Display entweder ein Symbol oder die Zieltemperatur.
Wird im Display nichts oder F4 angezeigt, sind die Batte-
rien leer bzw. nahezu entladen und müssen ausgetauscht
werden. Eine rot blinkende LED bei gleichzeitiger Anzeige
von F2 signalisiert einen zu großen Abstand zwischen
Steuerstift und Ventil. Prüfen Sie den festen Sitz der Ver-
schraubung. F1 im Display bedeutet, dass das Ventil zu
schwergängig oder der Ventilantrieb blockiert ist. In die-
sem Fall überprüfen Sie Ventil und Adapter.
Zurücksetzen in den Auslieferungszustand
1. Öffnen Sie das Batteriefach und entfernen Sie eine
Batterie.
2. Halten Sie die Taste unter dem Display gedrückt.
Legen Sie zugleich die Batterie wieder ein.
3. Halten Sie die Taste für weitere 10 Sekunden
gedrückt. Die LED leuchtet in dieser Zeit dauerhaft.
4. Sobald die LED fünfmal aufblinkt, lassen Sie die
Taste los.
Das Gerät ist nun zurückgesetzt und kann neu eingebun-
den werden.
Weitere Hinweise zum Test finden Sie unter:
https://service.startsmarthome.de/heizkoerperthermostat/test

9
Technische Daten
Gerätebezeichnung RST-2
Stromversorgung 2 x LR06 (Mignon/AA)
Batterielebensdauer bis zu 2 Jahre
Funkfrequenz 868,3 MHz
Max. Sendeleistung 10 mW
Freifeldreichweite ca. 100 m
Empfängerklasse SRD category 2
Wirkungsweise Typ 1
Anschluss M30 x 1,5 mm
Display LCD
Schutzart IP20
Umgebungstemperatur 0 °C bis +55 °C
Verschmutzungsgrad 2
Abmessungen 81,5 x 69,7 x 69,7 mm
(B x H x T)
Gewicht 210 g (ohne Batterien)
DE
Technische Änderungen vorbehalten.

10
DE
Allgemeiner Hinweis
Hiermit erklärt die eQ-3 AG, dass sich dieses Gerät in
Übereinstimmung mit den grundlegenden Anforderun-
gen und den anderen relevanten Vorschriften der Richtli-
nie 2014/53/EU befindet. Die vollständige Konformitäts-
erklärung finden Sie unter:
www.eq-3.de/service/downloads.html
eQ-3 AG,
Maiburger Str. 29
26789 Leer
Deutschland
Entsorgungshinweis
Gerät nicht im Hausmüll entsorgen!
Elektronische Geräte sind entsprechend der Richt-
linie für Elektro- und Elektronik-Altgeräte über die
örtlichen Sammelstellen zu entsorgen. Ver-
brauchte Batterien gehören nicht in den Hausmüll!
Bitte entsorgen Sie diese in der örtlichen Batterie-
sammelstelle.
DE

11
4. Ausgabe Deutsch 03/2019
Dokumentation © 2011-2019 innogy SE, Deutschland.
Alle Rechte vorbehalten. Für Fehler technischer oder
drucktechnischer Art und ihre Folgen übernehmen wir
keine Haftung. Alle Warenzeichen und Schutzrechte wer-
den anerkannt.
Änderungen im Sinne des technischen Fortschritts kön-
nen ohne Vorankündigung vorgenommen werden.
innogy SE
Freistuhl 7
44137 Dortmund
Deutschland
DE

12
Congratulations!
With the innogy radiator thermostat you have purchased
a proven device for your SmartHome. These instructions
will help you mount and commission the thermostat
quickly and easily.
Even faster is the innogy SmartHome App, available for
download from Apple‘s App Store or the Google Play
Store.
If you already own the app, simply click on the plus
sign in the upper right corner of the Home screen
and wait for the device to show up in the search.
However, you can also manually integrate the radia-
tor thermostat under the menu item Devices – ani-
mated graphics formounting support you in this.
Content
Safety note 14
Function 15
Installing and integrating 16
Meaning of the symbols 17
Function test 18
Resetting the device to factory settings 18
Technical data 19
General information 20
Information about disposal 20
EN

13
We are here for you!
If you require further information or support during
installation, we have the perfect help for you:
Online help
https:/service.startsmarthome.de
Free Hotline
T 0800 1234060
General questions about innogy SmartHome
(Mo– Fr 8 o‘clock - 20 o‘clock
Sa 8 o‘clock - 14 o‘clock)
SmartHome Community
https://innogy.com/community
Facebook
https://facebook.com/innogysmarthome
On site helper: innogy friends of mila
Experienced and qualified SmartHome users
come to you and help you install and integrate
your SmartHome.
Further information: https://innogy.mila.com
EN

14
Safety note
We accept no liability for material damage or personal
injury caused by improper handling or by disregarding
safety instructions. In such cases any warranty claims shall
lapse. We accept no liability for consequential damage.
Do not open the device. It does not contain any parts to be
serviced by the user. If a fault occurs, please contact our
Customer Service.
Do not use the device if you can see from the outside that
it is damaged e.g. on the housing, control elements or con-
nection sockets or if it malfunctions. If you have any
doubts, have the device checked by our Customer Service.
For safety and accreditation reasons (CE) arbitrary adapta-
tions or other alterations to the product are not permitted.
Only operate the device in a dry, dust-free environment
and keep it away from humidity, vibrations, constant sun-
light or other heat radiation and mechanical loads.
This device is not a toy; do not allow children to play with
it. Do not leave the packaging materials lying around. Plas-
tic foils and bags, polystyrene parts etc. can be dangerous
in the hands of children.
The radiator thermostat is only suitable for regulating
heaters (radiators, convectors, hot strips) heated by heat
carriers. Using it for other purposes (e.g. on cooling sys-
tems, floor heaters etc.) is not permitted and can lead to
severe damage.
EN

15
If damage is discovered on the existing thermostat, the
valve or the heating pipes, please consult a specialist.
Make sure that your fingers do not get caught between the
adapter halves!
Clean the device with a dry linen cloth, which you can
moisten slightly to remove stubborn dirt. Do not use any
solvent-based cleaning agents for cleaning. Prevent mois-
ture from entering the device.
Any use other than that described in this operating manual
is improper and results in the exclusion of warranty and
liability. This shall also apply to adaptations or other alter-
ations. The device is designed solely for private use.
The batteries must never be charged. Do not throw the
batteries into a fire. Do not expose the batteries to exces-
sive heat. Do not short-circuit the batteries. Risk of explosion!
Function
The radiator thermostat is used to regulate the desired
temperature delivered by the radiators. This target tem-
perature can either be used in a scenario in the
SmartHome App or set manually on the radiator thermo-
stat or room thermostat. The target temperature is trans-
mitted to the device via an encrypted radio connection.
This means that the heating can be automatically lowered
when the window is open or when the user is absent.
EN

16
Installing and integrating
1. Disassemble the mechanical thermostat by turning
it to the left as far as it will go. Unscrew the union
nut until you can remove it from the thread.
2. Wait until the pin is fully retracted and A1 appears
on the display. When the pin is fully retracted A2
appears on the display.
3. Now install the radiator thermostat. It fits all stand-
ard valves with an M30 x 1.5 mm connection thread.
You will need adapters for some heater valves.
Adapters for Danfoss valves in the RAV, RA and
RAVL series are included.
4. Briefly press the button on the radiator thermostat
to start the self-adjustment process. A3 will appear
on the display. This procedure can take up to three
minutes. If the procedure is aborted, F2 will appear
on the display. You can restart the procedure by
pressing the button again.
5. Integrate the device via the search mode of the user
software in the SmartHome.
EN
You can find tips and tricks for installation at:
https://service.startsmarthome.de/radiator-thermostat/installation

17
EN
Meaning of the symbols
In addition to the temperature, status symbols are also
shown in the display. They inform about the current situ-
ation of the radiator thermostat.
Symbol Meaning
Shows that the batteries are worn out.
Please change the batteries immediately.
Displays an open window. This appears if a
window contact is open or if there is a dra-
matic fall in temperature (e.g. open win-
dow).
Shows which operating mode has been
activated (manual / automatic)
The control pin is fully retracted to make
installation easier.
The control pin has fully retracted and the
radiator thermostat can be installed.
The control range is identified and self-ad-
justment for the complete range of func-
tions takes place.
For more information on the symbols, see:
https://service.startsmarthome.de/radiator-thermostat/symbols

18
EN
Function test
After the batteries have been inserted with the correct
polarity, either a symbol or the target temperature
appears on the display.
If the display shows nothing or F4, the batteries are
empty or nearly discharged and must be replaced. A red
flashing LED with simultaneous display of F2 indicates
too large a distance between control pin and valve.
Check the tightness of the screw connection. F1 in the
display means that the valve is too stiff or the valve drive
is blocked. In this case, check the valve and adapter.
Resetting the device to factory settings
1. Open the battery compartment and remove a battery.
2. Press and hold the button below the display. Insert
the battery at the same time.
3. Press and hold the button for another 10 seconds.
The LED lights up permanently during this time.
4. As soon as the LED flashes five times, release the
button.
The device is now reset and can be re-integrated.
For more information on the test, see:
https://service.startsmarthome.de/radiator-thermostat/test

19
Technical data
Name of device RST-2
Batteries 2 x LR06 (Mignon/AA)
Battery service life up to 2 years
Radiofrequency 868,3 MHz
Max. transmission power 10 mW
Free field range approx. 100 m
Receiver class SRD category 2
Mode of operation Type 1
Connection M30 x 1,5 mm
Display LCD
Protection class IP20
Ambient temperature 0 °C to +55 °C
Contamination level 2
Dimensions 81,5 x 69,7 x 69,7 mm
(L x W x D)
Weight 210 g (without batteries)
EN
Technical changes reserved.

20
General information
eQ-3 Entwicklung GmbH hereby declares that this device
meets the basic requirements and the other relevant reg-
ulations laid down in Directive 2014/53/EC.
You can find the complete declaration of conformity at:
www.eq-3.de/service/downloads.html
eQ-3 AG,
Maiburger Str. 29
26789 Leer
Germany
EN
Information about disposal
Do not dispose of the device in the household waste! Elec-
tronic devices are to be disposed of via the local collection
points for old electronic devices in accordance with the
Waste Electrical and Electronic Equipment Directive. Used
batteries do not belong in the household waste! Please take
them to your local battery collection point for disposal.
Other manuals for SmartHome RST 2.0
1
Table of contents
Languages:
Other Innogy Thermostat manuals
Popular Thermostat manuals by other brands
Bryant
Bryant TSTAT Installation and start-up instructions

Honeywell
Honeywell Chronotherm IV manual
Trane
Trane Thermostats Product data sheet
Friedrich
Friedrich WRT1 PTAC Installation and operation instructions
Sygonix
Sygonix 2250409 operating instructions
Emos
Emos T80 Operating instructions and installation


