InnoMedia 6308 Service manual

1
InnoMedia, Inc. All Right Reserved
Administrator Guide
for InnoMedia SIP Devices
Models covered: 6308, 6328-2Re, 6328-4, 6328-8, 6628, 6528
Doc rev. 1.0
September, 2007

2
InnoMedia, Inc. All Right Reserved
Table of Contents
About This Document ................................................................................................................... 4
Chapter 1........................................................................................................................................ 5
SIP Device Internal Port Setup.................................................................................................... 5
Overview.................................................................................................................................... 5
Hardware Installation Steps .................................................................................................... 5
Setting up Your Computer....................................................................................................... 6
Configuring the Internal Port.................................................................................................. 6
Chapter 2........................................................................................................................................ 8
SIP Device Configuration ............................................................................................................. 8
Overview.................................................................................................................................... 8
Configuring SIP Device Via Web User Interface................................................................... 8
Logging In .............................................................................................................................. 8
Configuring IP Addresses for SIP Device.............................................................................. 9
Configuring Provisioning Settings........................................................................................ 10
Configuring SNMP Settings................................................................................................. 11
Configuring NAT Port Mapping (for Router Device Only)................................................. 12
Configuring Voice QoS Setting............................................................................................ 14
Configuring Access Filtering options (for Router Device Only).......................................... 14
Configuring DHCP Server Information................................................................................ 19
Configuring MAC Cloning................................................................................................... 21
Configuring DMS Setting..................................................................................................... 22
Configuring VLAN Setting .................................................................................................. 23
Changing Administrator ID and Password........................................................................... 24
Changing End User ID and Password................................................................................... 25
Rebooting SIP Device........................................................................................................... 27
Restoring Default Values...................................................................................................... 27
Configuring Page Permission ............................................................................................... 28
Configuring VoIP Settings ................................................................................................... 28
Viewing SIP Device Information ......................................................................................... 31
Configuring SIP Device via Telnet Interface........................................................................ 35
Before You Begin................................................................................................................. 35
Logging In ............................................................................................................................ 35
Viewing Current Configuration Information (Cf)................................................................ 36
Configuring IP Information (Ci)........................................................................................... 37
Changing your User Name and Password (Cw)................................................................... 43
Voice Volume Control.......................................................................................................... 44
Information about the System............................................................................................... 44
Configuring PPPoE Functions (N) ....................................................................................... 47
Other Commands..................................................................................................................59
Provisioning.......................................................................................................................... 79
System Information ..............................................................................................................86
Restoring System Default..................................................................................................... 86
Chapter 3...................................................................................................................................... 88
SIP Device Firmware Updates ................................................................................................... 88
Overview.................................................................................................................................. 88
Manually Uploading SIP Device Firmware via Web Interface .......................................... 88

3
InnoMedia, Inc. All Right Reserved
Auto-Updating the SIP Device via a Provisioning Server................................................... 89
Appendix A - HTTP Provisioning for SIP Device.................................................................... 90
Appendix B - Troubleshooting for 6328-2Re............................................................................ 96
Installation Problems.............................................................................................................. 96
Quality of Service Concerns................................................................................................... 97
Appendix C – ADSL Configuration (MTA 6628)................................................................... 100
Web User Interface............................................................................................................... 100
ADSL Link Status............................................................................................................... 100
Configure ATM Settings .................................................................................................... 100
Telnet/ HyperTerminal Interface ........................................................................................ 101
ADSL Setting (Pd).............................................................................................................. 101

4
InnoMedia, Inc. All Right Reserved
About This Document
Welcome to the InnoMedia SIP Device Administrator’s Guide. The purpose of this manual
is to give system integrators and service operators detailed reference information on
configuring and administering InnoMedia's MTA line of products running the SIP
protocol.
The commands necessary for unit’s configuration and provisioning are covered in this
document for InnoMedia's SIP-based voice CPE. For conciseness, all examples reference
configuration of a 2-port device, but are applicable to the rest of InnoMedia's SIP-based
voice CPE as well.
Any device-specific variances can be found within the appendices of this document.
Therefore, it is advisable to refer to the appendix if the information you require is not
found within the general documentation.
This document has the following chapters:
Chapter 1, SIP Device Internal Port Setup, provides step-by-step instructions for installing
the SIP Device system and setting up the IP addresses of your computer.
Chapter 2, SIP Device Configuration, describes how to configure SIP Device via a web
interface and Telnet/HyperTerminal interface.
Chapter 3, SIP Device Firmware Updates, describes the procedure for uploading SIP
Device Firmware through a web interface, or an external provisioning server to the unit.
Appendix A - HTTP Provisioning for SIP Device, lists the provisioning tags for SIP
devices.
Appendix B - Troubleshooting for 6328-2Re
5
InnoMedia, Inc. All Right Reserved
Chapter 1
SIP Device Internal Port Setup
Overview This chapter provides step-by-step instructions for setting up the SIP Device via Telnet and
Web User Interfaces.
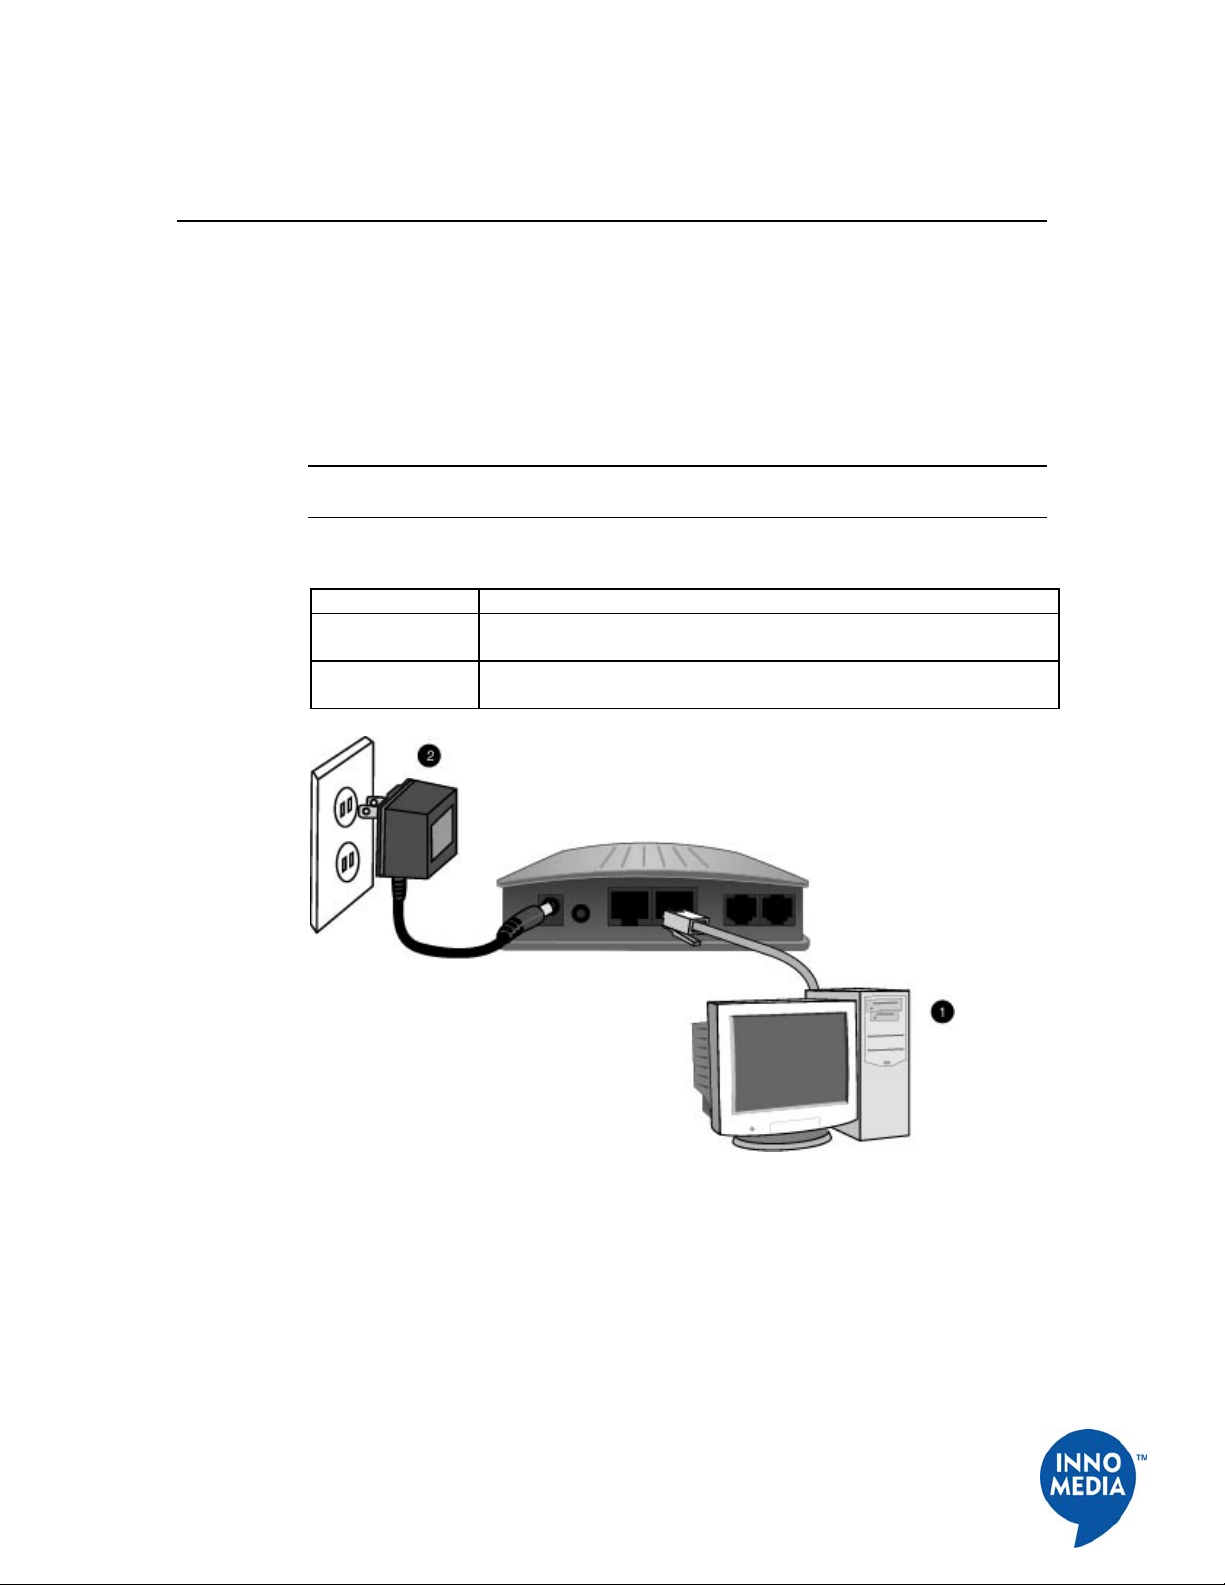
Hardware Installation Steps
Do the following steps to connect your SIP Device with a PC:
NOTE: You will need to use a PC that has an Internet browser and a network interface
card (NIC) properly installed.
Table 1. Hardware Installation Steps
Step Action
1 Using a network cable, connect your PC's NIC to the SIP Device's
LAN port
2 Connect the included power adapter to the port marked 7.5V DC/1A
on the SIP Device.
Figure 1. Hardware Installation Steps

6
InnoMedia, Inc. All Right Reserved
Setting up Your Computer
Configuring the Internal Port
Your SIP Device's LAN side is factory set to a static IP address of 192.168.99.1. Hook up a
PC to your SIP Device and follow these steps to configure the IP settings. This will
configure the LAN port which communicates to your PC through a network cable.
We recommend that you refer to your Operating System manual to do this. An example of
how to do this with Windows XP appears below:
NOTE: The procedure may be different because of your computer settings.
Table 2. Procedure for Setting up Your Computer
Step Action
1 Click Start on your Taskbar.
2 Click Settings.
3 Click Control Panel.
4 Click Network Connections.
5 Right mouse click on Local Area Connection (See Figure 2).
6 Choose Properties.
7 Double Click on TCP/IP (See Figure 3 Setting up Your Computer
- Local Area Connection Properties).
8 Write down the current settings before making any changes in case
you need to restore your original settings.
9 Enter an IP address that is within the same subnet as your SIP
Device. The SIP Device has a default of 192.168.99.1 so if you
enter 192.168.99.5, you should have no problem connecting to the
SIP Device.
10 Enter 255.255.255.0 as your subnet mask.
11 Enter 192.168.99.1 as your default gateway IP.
12 Leave the DNS information as is.
13 Click OK.
14 Verify this by typing "ipconfig" at the command prompt. Your PC
should have an IP address 192.168.99.5.
Figure 2. Setting up Your Computer - Network and Dial-up Connections
7
InnoMedia, Inc. All Right Reserved
Figure 3. Setting up Your Computer - Local Area Connection Properties
Figure 4. Setting up Your Computer - Using Static IP Address
8
InnoMedia, Inc. All Right Reserved
Chapter 2
SIP Device Configuration
Overview Setup and configuration of the SIP Device can be managed via a Web Browser interface or
a command line interface. In order to access these interfaces, your PC must be configured
properly as outlined previously in Chapter 1. If you have not completed the steps outlined
in Chapter 1, please do so before proceeding the following.
The SIP Device needs two IP addresses, one is for WAN (External Port) and one is for
LAN (Internal Port). The internal port has already been configured. The IP address used by
the "WAN" is the IP assigned by your ISP. This address may be assigned in either DHCP
or Static IP.
At this point you need to know which method is used for your connection. You will need
to know this before you can proceed with configuring the SIP Device.
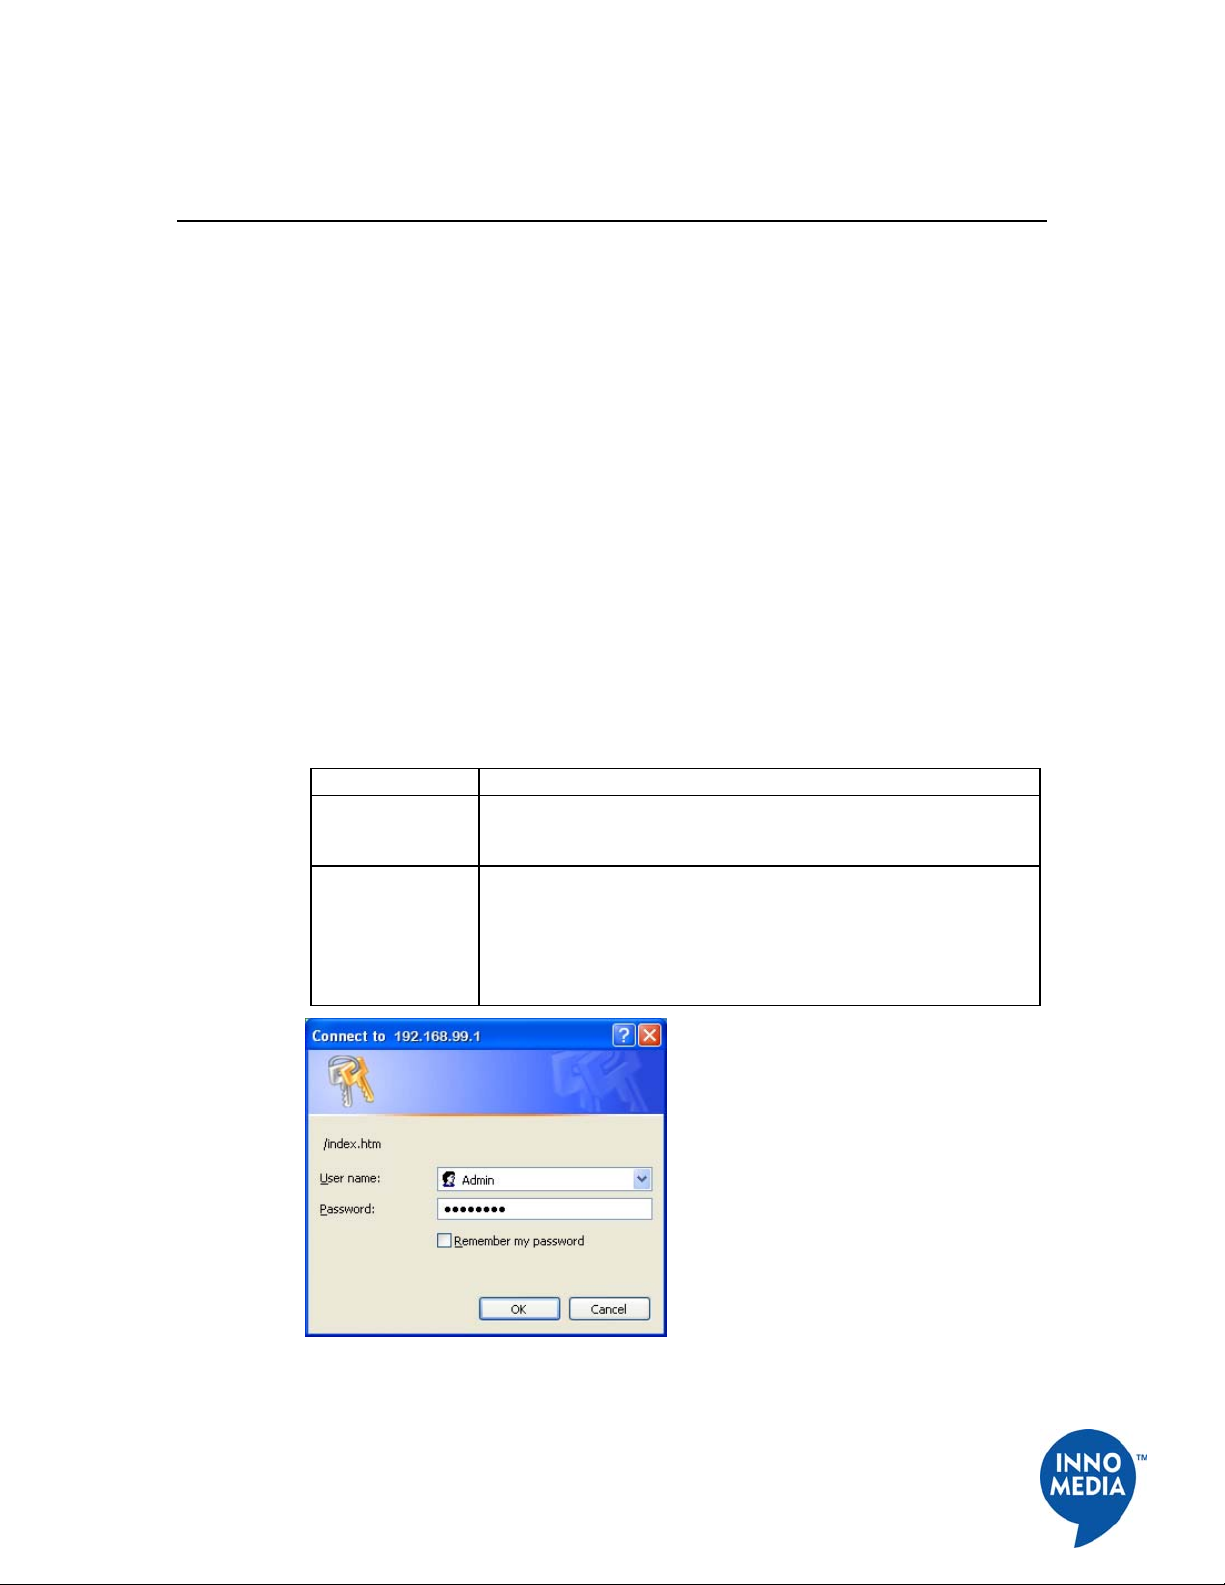
Configuring SIP Device Via Web User Interface
Logging In To login the Web User Main page, follow these steps:
Table 3. Web User Interface - Logging in
Step Action
1 Open your web browser and enter the IP address of the SIP
Device. 192.168.99.1 is the default address. The Login Dialogue
Box as shown in Figure 5 appears.
2 Enter your Username and Password.
NOTE: The default User Name is "Admin" and Password is
"password". For security reason, it is recommended to change the
default Administrator ID and Password after initial login. See
Changing Administrator ID and Password on page 24 for details.
Figure 5. SIP Device Login Dialogue Box

9
InnoMedia, Inc. All Right Reserved
Figure 6. SIP Device Web User Interface - Main Page
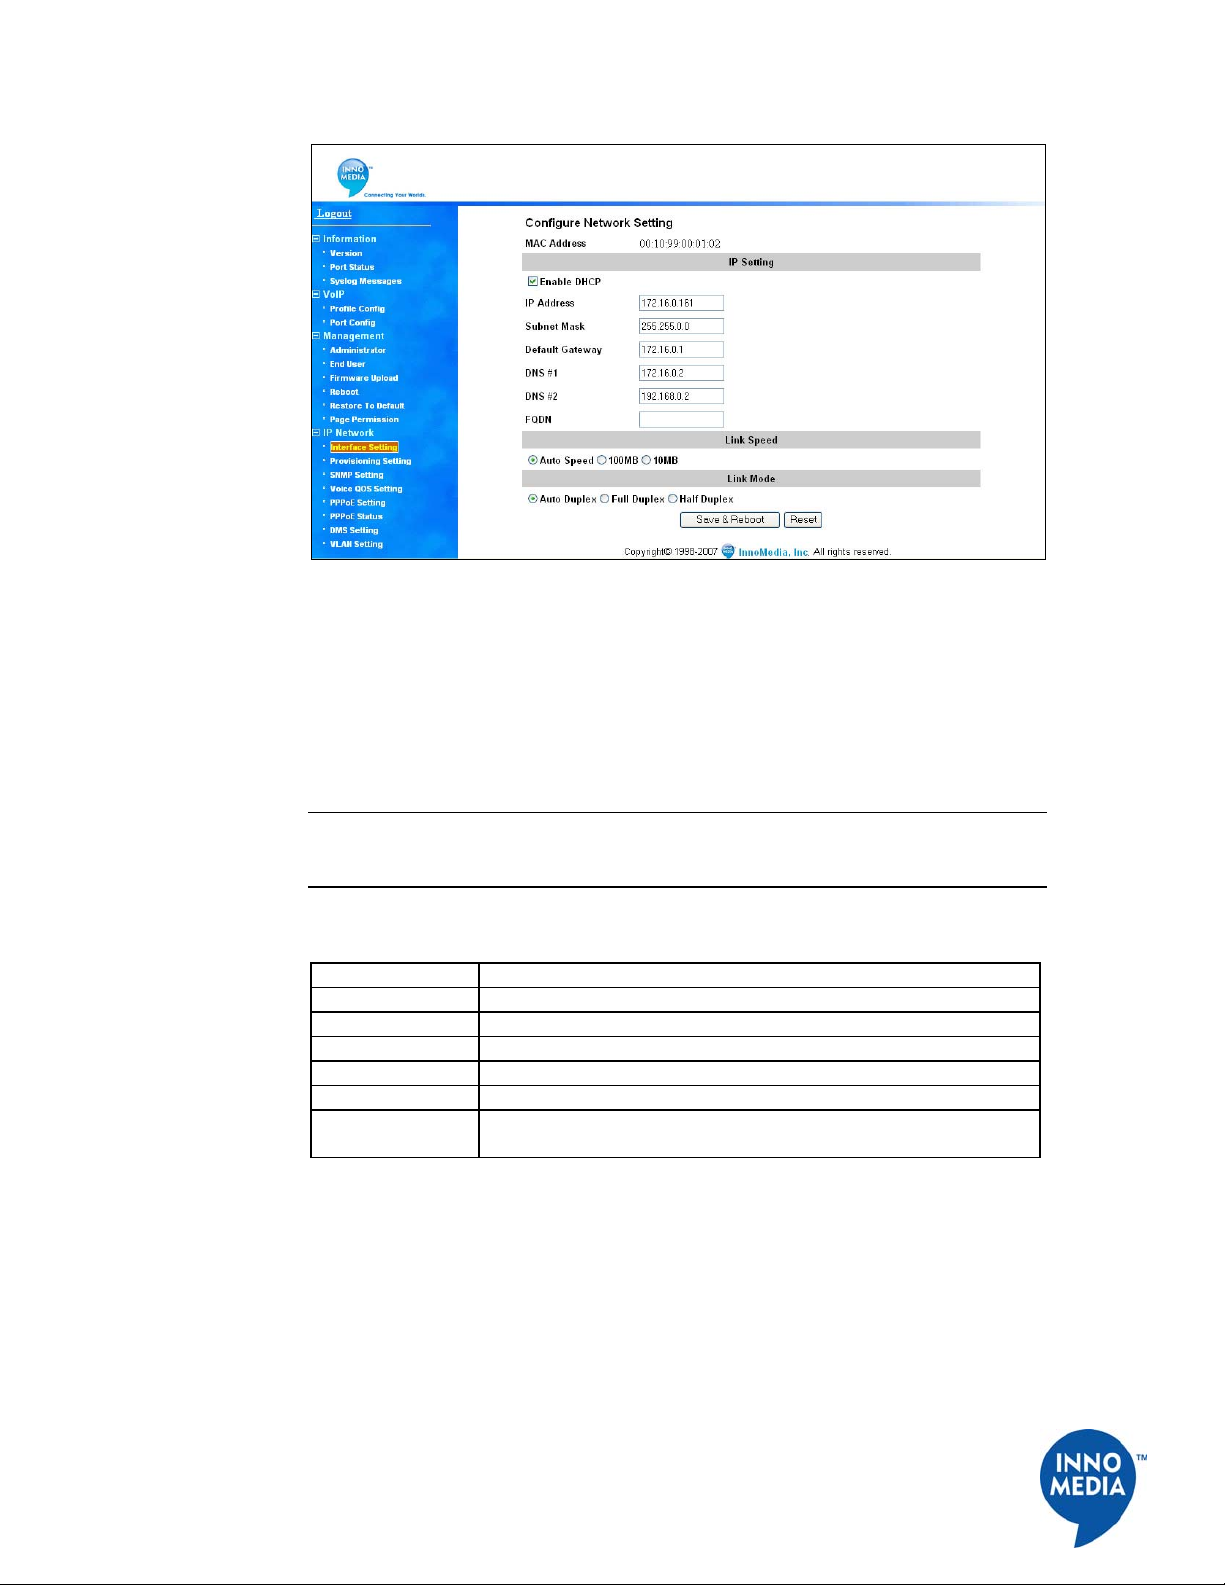
Configuring IP Addresses for SIP Device
To configure the IP Address for the SIP Device, follow these steps:
Table 4. Configuring External IP Address
Step Action
1 Open your web browser and connect to your SIP Device at
http://192.168.99.1.
2 Click on IP Network, then Interface Setting.
3 If you choose to use DHCP, then click the check box. Otherwise,
enter your IP address, Subnet Mask, Default Gateway, DNS (if
available), and FQDN (Fully Qualified Domain Name). This
information should be supplied by your ISP or network
administrator.
4 Select the Link Speed based on the device you connected to by
clicking the appropriate radio button. Auto speed enables devices
to automatically exchange information over a link and negotiate
the speed based on the connection to the other end.
5 Select the Link Mode by clicking the appropriate radio button.
Auto duplex enables devices to automatically exchange
information over a link and negotiate the mode based on the
connection to the other end.
6 Click Save & Reboot to save your changes and take into effect, or
click the Reset button to undo your changes.
10
InnoMedia, Inc. All Right Reserved
Figure 7. Configuring IP Addresses
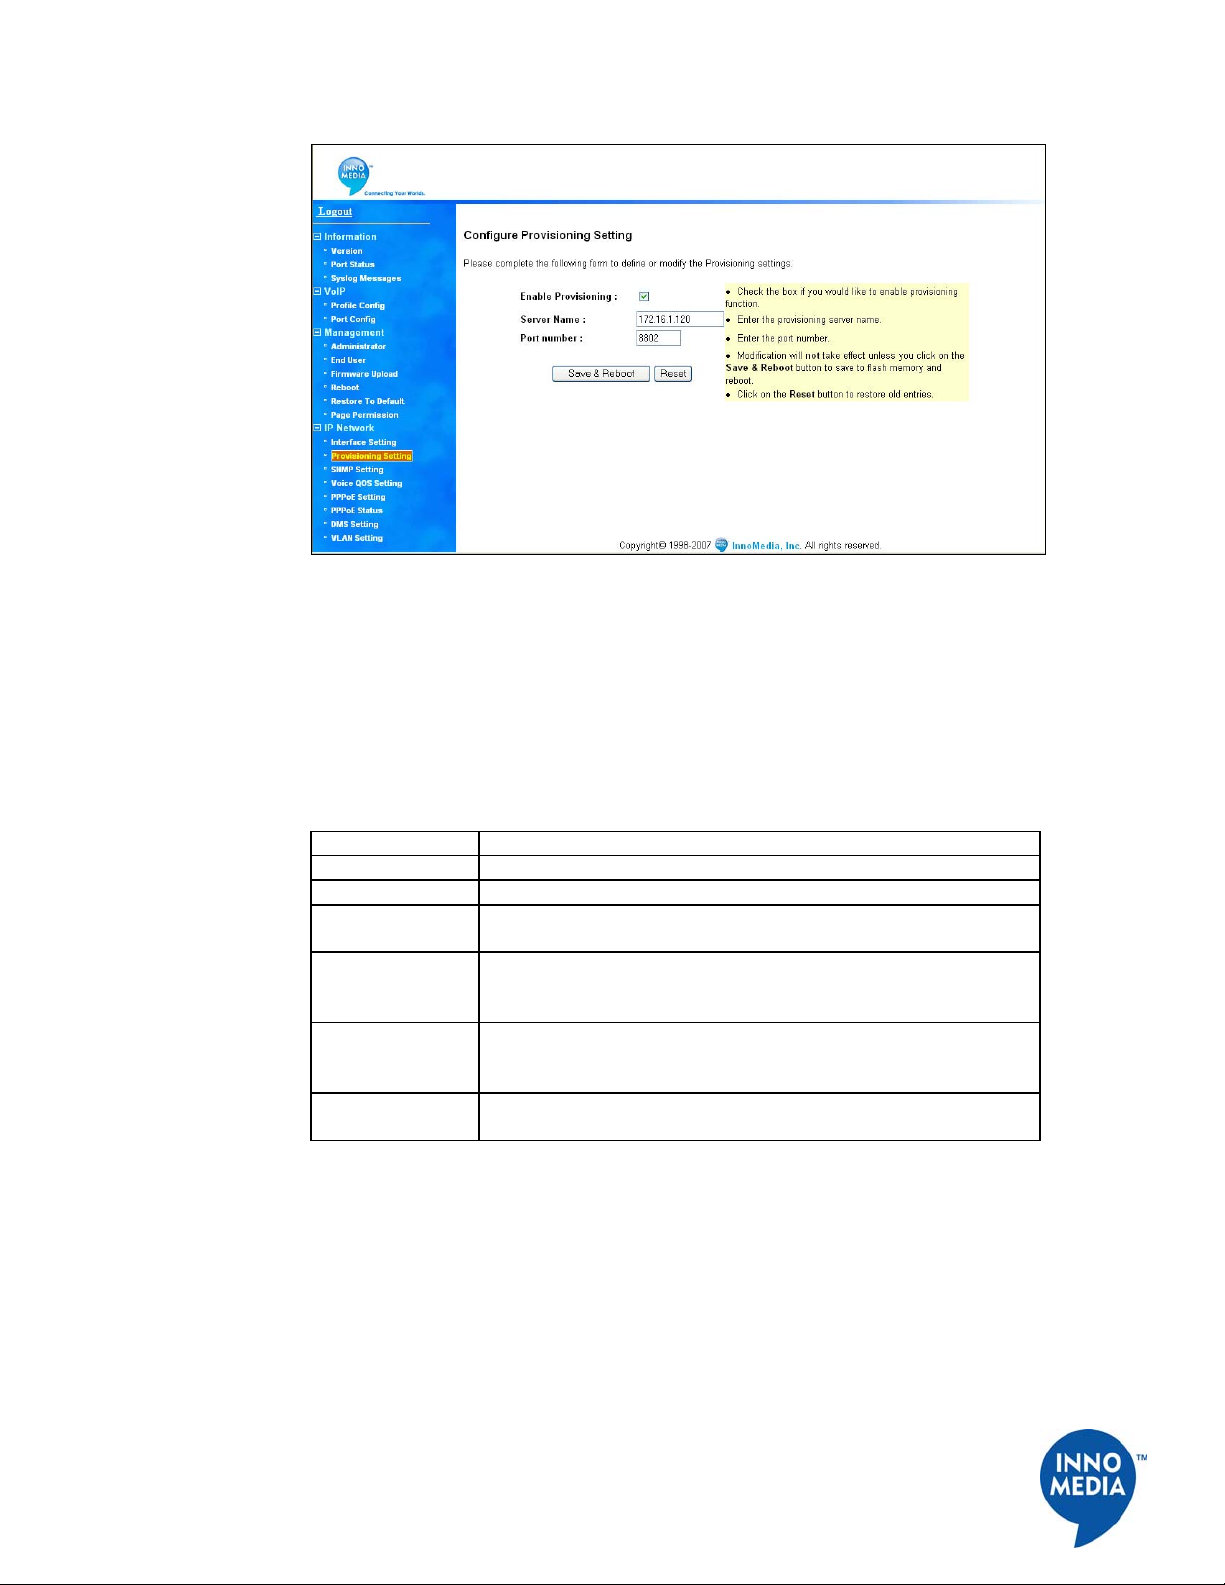
Configuring Provisioning Settings
If you would like to use a provisioning server to provision your SIP Device, you will need
to configure the provisioning settings. To configure the provisioning settings, follow these
steps:
NOTE: Web interface only allows you to configure some basic provisioning settings.
Please refer to the Telnet interface section to finish configuring the provisioning settings
for your SIP Device.
Table 5. Configuring Provisioning Settings
Step Action
1 Open your web browser and connect to your SIP Device.
2 Click on IP Network, then Provisioning Setting.
3 Check the option box to enable the provisioning function.
4 Enter the DNS or the IP address of your provisioning server.
5 Enter the port number of your provisioning server.
6 Click Save & Reboot to save your changes and take into effect, o
r
click the Reset button to undo your changes.
11
InnoMedia, Inc. All Right Reserved
Figure 8. Configuring Provisioning Settings
Configuring SNMP Settings
To use a SNMP Manager to monitor your SIP Device, configure the SIP Device SNMP
setting. Follow these steps for configuration of SNMP Settings:
Table 6. Configuring SNMP Setting
Step Action
1 Open your web browser and connect to your SIP Device.
2 Click on IP Network, then SNMP Setting.
3 Enter the SNMP Manager Address where the SNMP software is
installed.
4 Enter the SNMP Community Name #1. It must match the string
configured on your SNMP server. By default, SNMP community
#1 is read-only community string for SNMP Get- request.
5 Enter in the SNMP Community Name #2. It must match the string
configured on your SNMP server. By default, SNMP community
#2 is read-write community string for SNMP Set-request.
6 Click Save & Reboot to save your changes and take into effect, or
click the Reset button to undo your changes.

12
InnoMedia, Inc. All Right Reserved
Figure 9. Configuring SNMP Setting
Configuring NAT Port Mapping (for Router Device Only)
Port mapping is an advanced configuration in which the router forwards incoming
protocols to computers on your local network. You will need to determine which type of
service, application or game you’ll provide and the IP address of the computer that will
provide each service. To configure the NAT Port Mapping, follow these steps:
NOTE: For best results, a port should only be mapped to an Internal Source IP that is
static. Therefore, you should assign a static IP address to the PC or PCs that will be
forwarded any traffic by the port maps above.
Table 7. Configuring NAT Port Mapping
Step Action
1 Open your web browser and connect to your SIP Device.
2 Click on IP Network, then NAT PortMap.
3 Enter External Source Port number that you want to redirect to
another unit.
4 Choose either TCP/IP or UDP protocol.
5 Enter the IP address of the PC that is running the application or
game that uses this source port and protocol.
6 Enter the Internal Source Port you want to send it to. If the
application or service only uses one port, then the Internal Source
Port will be the same as the External Source Port.
7 Click the Save button to save your changes, or click the Reset
button to undo your changes.


14
InnoMedia, Inc. All Right Reserved
Configuring Voice QoS Setting
Voice QoS Settings allow the user to designate the amount of bandwidth available on the
uplink and downlink. When the QoS is enabled, the voice packets have higher priority over
data packets. To configure the Voice QoS Settings, follow these steps:
Table 8. Configuring Voice QoS Setting
Step Action
1 Open your web browser and connect to your SIP Device.
2 Click on IP Network, then Voice QoS Settings.
3 Check the box to enable Data Bandwidth Control.
4 Enter the Max. WAN Uplink and Downlink Speed.
5 Enter the DSCP values based on your Network settings.
6 Click Save & Reboot to save your changes and take into effect, or
click the Reset button to undo your changes.
Figure 12. Configuring Voice QoS Settings
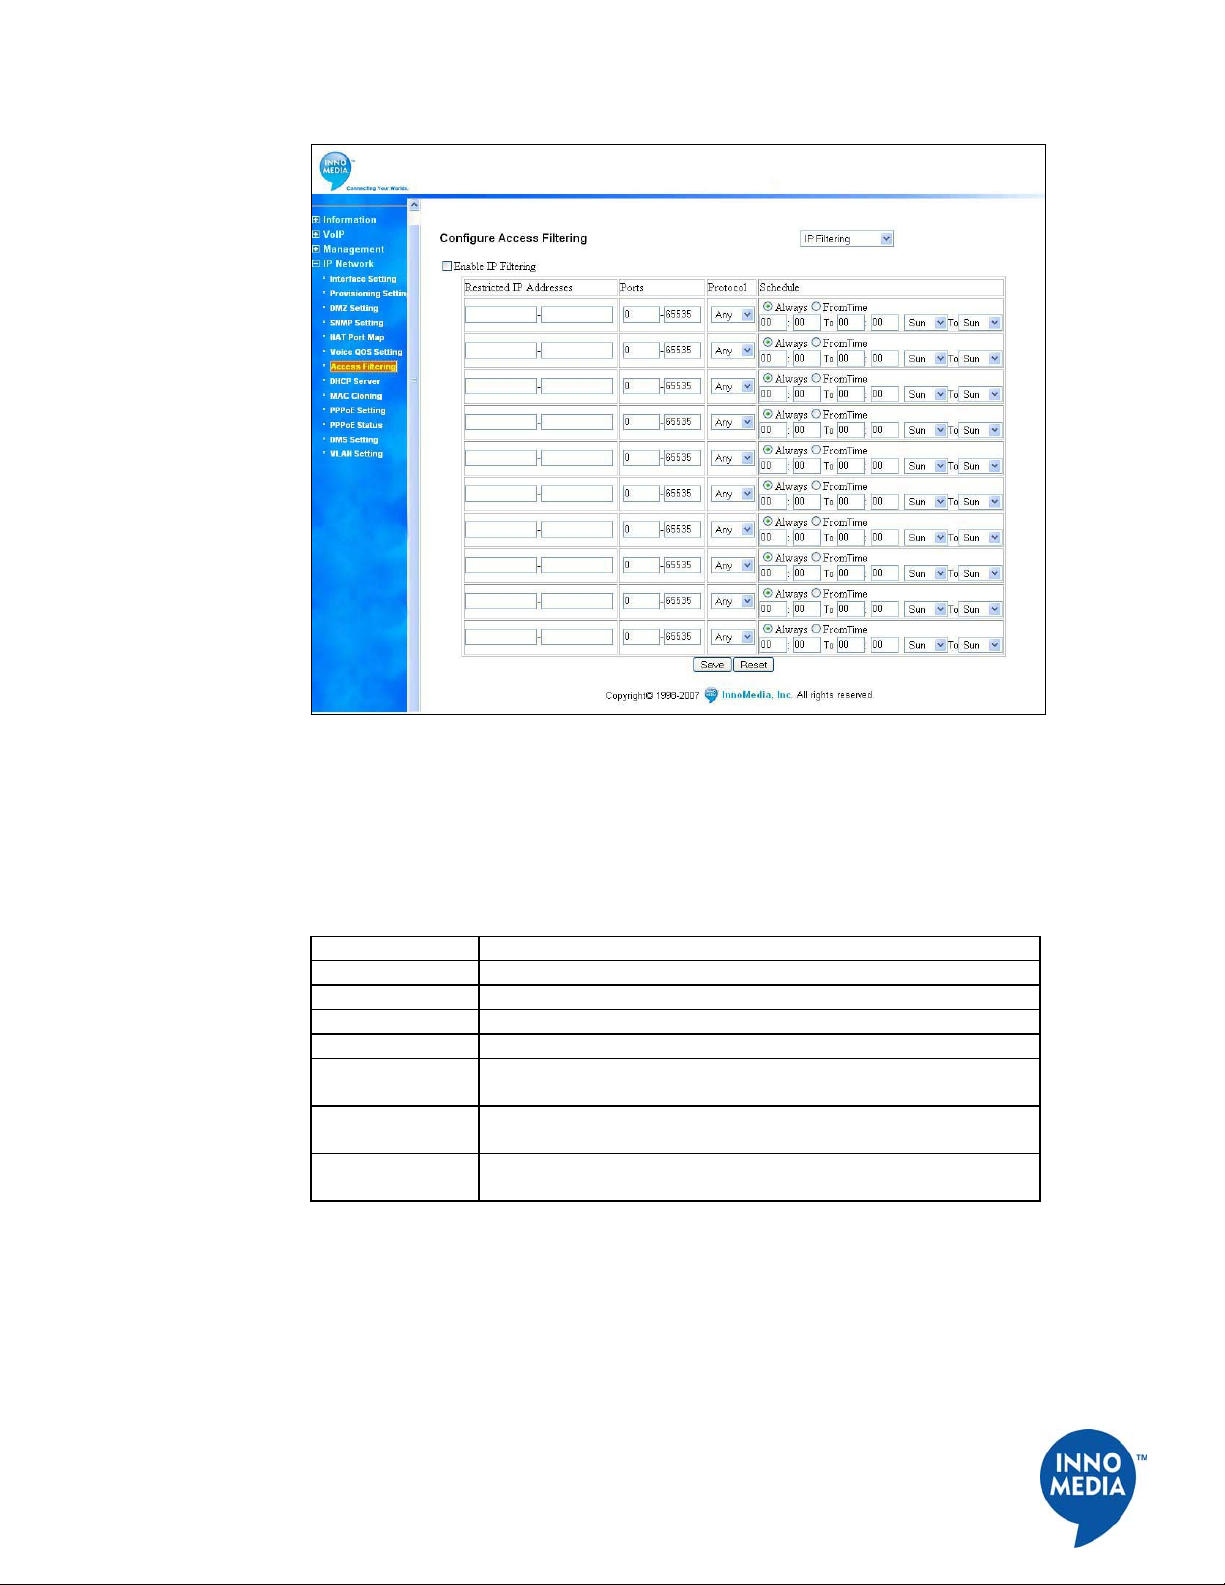
Configuring Access Filtering options (for Router Device Only)
Access filtering is a feature designed to help you regulate the access of internal PCs to the
outside Internet. It is useful when you wish to block access to certain websites or
addresses for individual PCs that are connected to the SIP Device.
The SIP Device offers four ways to control the access available to your internal PCs:
1 IP Filtering – Allows you to control what IP, port, and protocol traffic to allow or
disallow going out of SIP Device.
2 Domain Filtering – Allows you to block access to specific domains and websites.
This is useful for controlling access to certain web addresses. This filtering is a global
setting that applies to all PCs connected to your SIP Device.

15
InnoMedia, Inc. All Right Reserved
3 URL Filtering – Allows you to block access to specific URLs. This is useful for
controlling access to certain URLs. This filtering is a global setting that applies to all
PCs connected to your SIP Device.
4 MAC Filtering –allows you to prevent certain MAC addresses from accessing the
Internet. It will also allow certain MAC Addresses to access the Internet and deny all
others. This filtering is assigned per MAC address.
IP Filtering
To configure the IP Filtering, follow these steps:
Table 9. Configuring IP Filtering
Step Action
1 Open your web browser and connect to your SIP Device.
2 Click on IP Network, then Access Filtering
3 Select IP Filtering from the pull-down menu
4 Check the box to Enable IP Filtering
5 In the ‘Restricted IP Addresses’ field, enter the IP addresses or an
IP range.
6 In the ‘Ports’ field, specify the port or a range of ports you wish to
block.
7 In the ‘Protocol’ field, specify the protocol. If you are unsure,
choose Any.
8 In ‘Schedule’ fields, select “Always” to always block the restricted
internal IP addresses to access outside Internet, or select “From
Time” and enter a blocking time range.
9 Click the Save button to save your changes, or click the Reset
button if you want to undo your changes.
16
InnoMedia, Inc. All Right Reserved
Figure 13. Configuring Access Filtering – IP Filtering
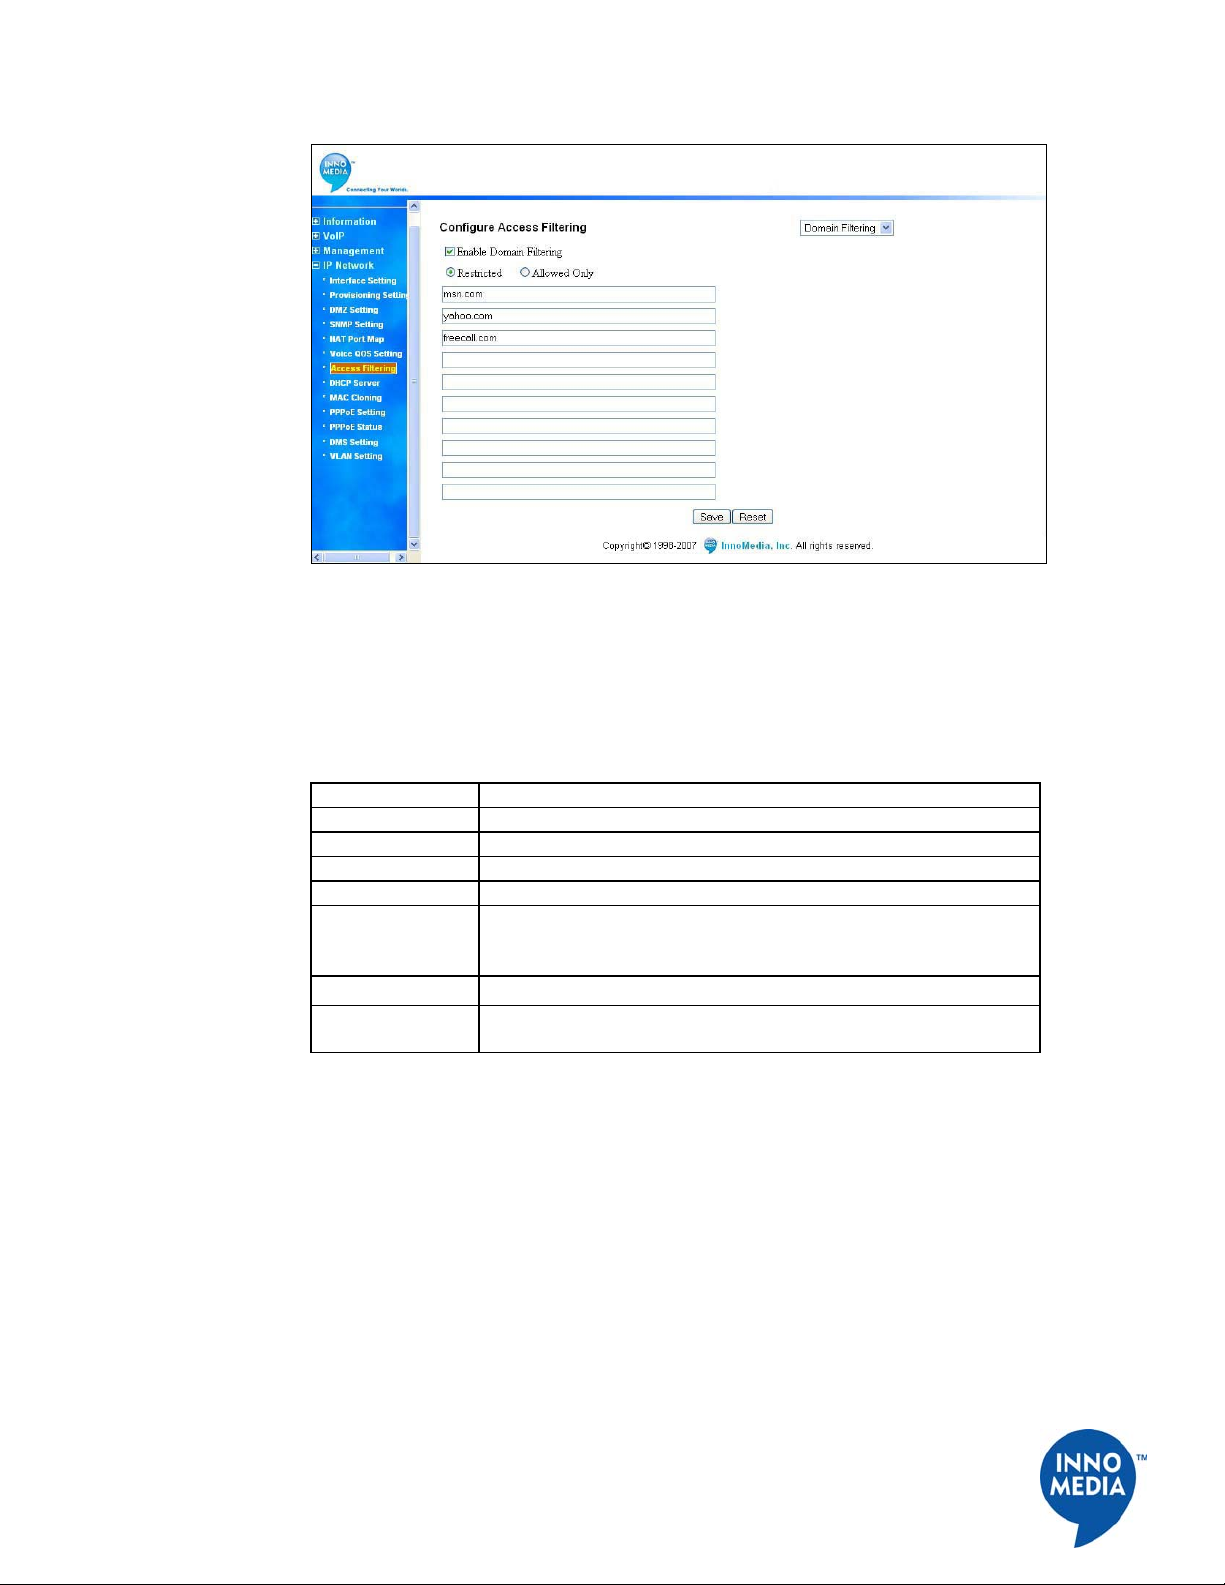
Domain Filtering
To configure the Domain Filtering, follow these steps:
Table 10. Configuring Domain Filtering
Step Action
1 Open your web browser and connect to your SIP Device.
2 Click on IP Network, then Access Filtering
3 Select Domain Filtering from the pull-down menu
4 Check the box to Enable Domain Filtering
5 Select Restricted to block access to specific domains/websites, or
select Allowed only to allow access to specific domains/websites.
6 Enter the domain names in the fields. You can enter up to 10
domains.
7 Click the Save button to save your changes, or click the Reset
button if you want to undo your changes.
17
InnoMedia, Inc. All Right Reserved
Figure 14. Configuring Access Filtering – Domain Filtering
URL Filtering
To configure the URL Filtering, follow these steps:
Table 11. Configuring URL Filtering
Step Action
1 Open your web browser and connect to your SIP Device.
2 Click on IP Network, then Access Filtering
3 Select URL Filtering from the pull-down menu
4 Check the box to Enable URL Filtering
5 Select “Restricted” to block accessing to specific URLs entered in
the fields, or select “Allowed only” to allow access to specific
URLs.
6 Enter the URLs in the fields. You can enter up to 10 URLs.
7 Click the Save button to save your changes, or click the Reset
button if you want to undo your changes.

18
InnoMedia, Inc. All Right Reserved
Figure 15. Configuring Access Filtering – URL Filtering
MAC Filtering
To configure the MAC Filtering, follow these steps:
Table 12. Configuring MAC Filtering
Step Action
1 Open your web browser and connect to your SIP Device.
2 Click on IP Network, then Access Filtering
3 Select MAC Filtering from the pull-down menu
4 Check the box to Enable MAC Filtering
5 Select “Restricted” to restrict the MAC addresses entered in the
fields from accessing outside Internet, or select “Allowed only” to
allow only those MAC addresses to access the outside Internet.
6 Enter the MAC addresses in the fields. You can enter up to 10
MAC addresses.
7 Click the Save button to save your changes, or click the Reset
button if you want to undo your changes.

19
InnoMedia, Inc. All Right Reserved
Figure 16. Access Filtering – MAC Filtering
Configuring DHCP Server Information
The SIP Device has a DHCP Server function to connect to multiple PCs via a hub or direct
connection. To configure the DHCP Server function, follow these steps:
Table 13. Configuring DHCP Server Information
Step Action
1 Open your web browser and connect to your SIP Device.
2 Click on IP Network, then DHCP Server.
3 Click on Enable DHCP Server to enable the feature.
4 Enter the IP address ranges, Subnet Mask, Default Router address,
and DNS (if available) information. The DNS addresses must be
supplied by your ISP.
5 You may also change how long your PC may keep its current IP
address. For most users, the default time (one week) is appropriate
and do not need to be modified. When the lease expires, the DHCP
client will automatically renew the IP.
The DHCP Leasing Information is displayed at the bottom of the
screen.
6 Click the Save and Reboot button to save your changes, or click
the Reset button to undo your changes.

This manual suits for next models
5
Table of contents
Other InnoMedia Gateway manuals


Popular Gateway manuals by other brands

Honeywell Home
Honeywell Home RedLINK THM6000R7001 installation instructions

AT&T
AT&T U-verse TV Self-installation guide

ProMinent
ProMinent DULCOnneX quick start

ICP DAS USA
ICP DAS USA GW-7553-B user manual

Rosslare
Rosslare AC-020 Hardware installation and user's guide

RTA
RTA 460MRSQT-NNA4 Product user guide


