Innova AirLeaf ECA644 User manual

ECA644 - ECA647 - EWF644 - EWF647 - ESE645 - ESE648
EDA649 - EDB649 - EWG649 - EWW649
E4T643 - E2T543 - B3V137
B4V642 - B3V151- B3V152 - B10642
DC Inverter
EN
Installation manual

2
Innova S.r.l
We would first of all like to thank you for having chosen one of our products.
We are sure you will be happy with it because it represents the state of the art in the technology of
home air conditioning.
By following the suggestions contained in this manual, the product you have purchased will operate
without problems, giving you optimum room temperatures with minimum energy costs.
The pictograms in the next chapter provide the necessary
information for correct, safe use of the appliance in a rapid,
unmistakable way.
Symbols
U
User
Refers to pages containing instructions or information for
the user.
I
Installer
Refers to pages containing instructions or information for
the installer.
S
Service
Refers to pages containing instructions or information for
the CUSTOMER TECHNICAL ASSISTANCE SERVICE
installer.
Editorial pictograms
Safety pictograms
Warning
The operation described may cause physical harm if not
carried out in accordance with safety regulations.
Dangerous electrical current
Make personnel aware that the operation described may
lead to electrical shocks if not carried out in accordance
with safety regulations.
High temperature danger
Of safety regulations, the risk of burns caused by contact
with components with high temperatures.
Prohibition
Refers to prohibited actions.

3
1
2
3
4
5
6
7
8
9
EN
General table of contents
GENERAL
1.1 General warnings ..............................................................................5
ECA644 - ECA647 - ESE645 - ESE648
2.1 Assembly, set-up and connection of on-board control panels ECA644, ESE645, ECA647, ESE648 . . . . . . . . . . . . . . . . .6
2.2 Assembly ....................................................................................6
2.3 Set-up of auxiliary dip-switch functions B and C........................................................7
2.4 CP presence contact input connection (only for ECA644 and ECA647 models) ................................7
2.5 Air temperature probe assembly (only for models ECA644, ECA647) ........................................8
2.6 Cooling/Heating automatic settings (only for 4-tube units).................................................8
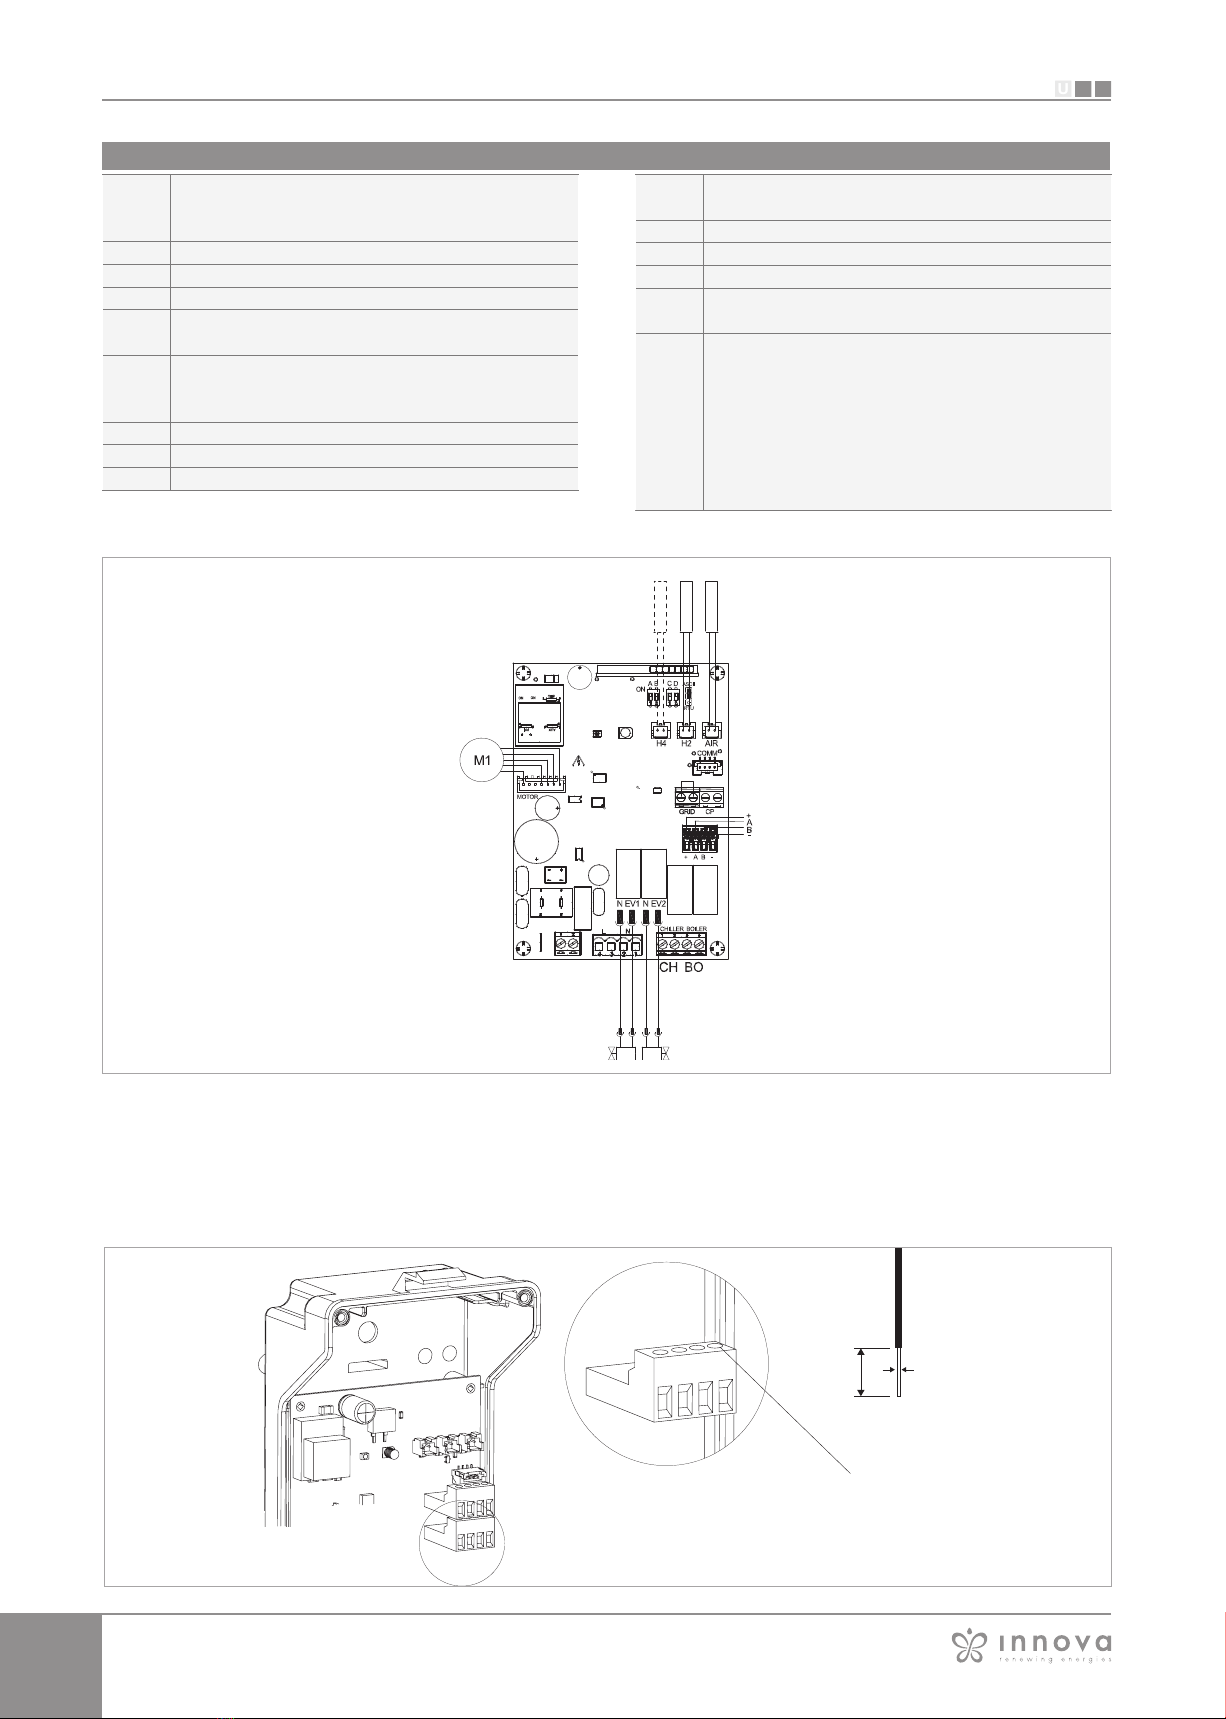
2.7 ECA644 and ECA647 connections .................................................................9
2.8 ESE645 and ESE648 connections ................................................................10
2.9 Continuous modulation circuit board for connecting remote thermostat (only for models ESE645 - ESE648) 11
2.10 LED Indications (Ref. A) (only for models ESE645 - ESE648) .............................................11
EDA649 - EDB649
3.1 Wall-mounted remote control panel assembly EDA649 - EDB649 .........................................12
3.2 Spring-loaded terminal connections -AB+ and CP .....................................................12
3.3 CP occupancy contact input connection ............................................................13
3.4 EDA649 - EDB649 Connections ..................................................................13
EWW649 - EWG649
4.1 Wall-mounted remote control panel assembly EWW649 - EWG649 ........................................14
4.2 Spring-loaded terminal connections -AB+ and CP .....................................................15
4.3 CP occupancy contact input connection ............................................................15
4.4 EWW649 - EWG649 Connections ................................................................16
E4T643
5.1 Assembly and connections for on-board control panel E4T643 ...........................................17
5.2 Assembly ...................................................................................17
5.3 Air temperature probe assembly ..................................................................18
5.4 E4T643 Connections ..........................................................................18
SETTINGS MENU ECA644 - ECA647 - EWF644 - EWF647 - EDA/EDB649 - EWG/EWW649 - E4T643
6.1 Setup menu .................................................................................19
E2T543
7.1 Assembly and connections for on-board control panel E2T543 ...........................................22
7.2 Assembly ...................................................................................22
7.3 Air temperature probe assembly ..................................................................23
7.4 E2T543 Connections ..........................................................................23
7.5 Water probe kit management E2T543 ..............................................................23
B3V137
8.1 Assembly and connections for on-board control panel B3V137 ...........................................24
8.2 Assembly ...................................................................................24
8.3 B3V137 Connections ..........................................................................25
8.4 Warnings table ...............................................................................25
B4V642
9.1 Assembly and fitting of fan control for remote control B4V642 ............................................26
9.2 Assembly ...................................................................................26
9.3 Connection diagram B4V642 with 3-speed thermostat .................................................27
9.4 B4V642 connections with 3-speed thermostat .......................................................27
9.5 LED signals .................................................................................28
9.6 Water probe management with 3-speed thermostat....................................................28

4
10
11
12
13
14
B4V642 + B3V151
10.1 B4V642 + B3V151 Connection Diagrams ..........................................................29
10.2 B4V642 + B3V151 Connection Diagrams with seasonal switching ........................................30
B4V642 + B3V152
11.1 B4V642 + B3V152 Connection Diagrams ...........................................................31
11.2 B4V642 + B3V152 Connection Diagrams with seasonal switching .........................................32
B10642
12.1 Assembly and fitting of fan control for remote control B10642. ............................................33
12.2 Assembly ...................................................................................33
12.3 LED signals ........................................................................33
12.4 Connection diagram B10642 with 0-10V DC thermostats / signals.........................................34
12.5 B10642 connections with 0-10V thermostats ........................................................34
ED RS FULL FLAT VERSIONS
13.1 Full flat version connections .....................................................................35
13.2 RS version connections ........................................................................35
VERSIONS WITH CONNECTIONS ON THE RIGHT
14.1 Motor connection in versions with hydraulic connections on the right BB0646 .................................36

5
S
I
U
1.1
EN
General warnings
- This instruction is an integral part of the booklet of
the appliance on which the kit is installed. Please consult
this booklet for general warnings and fundamental safety
rules.
- This manual is designed only for the qualified
and authorised installation technician, who must be
sufficiently trained and in possession of all psycho-
physical requirements as per the law.
- All operations must be carried out with care and
according to best practices, and in compliance with
workplace safety regulations.
- After unpacking, check that the contents are intact
and that all parts are included. If not, contact the agent
who sold the appliance to you.
- It is forbidden to modify the safety or adjustment
devices without authorisation from and indications of the
manufacturer.
- It is forbidden to dispose of, or leave in the reach of
children, the packaging materials which could become
a source of danger.
- Repairs or maintenance must be performed by the
Technical Assistance Service or by qualified personnel
in accordance with this manual. Do not modify or tamper
with the appliance as this could create dangerous
situations and the manufacturer will not be liable for any
damage caused.
GENERAL

6
S
I
U
A
D
E
C
H
I
L
B
G
M
N540022B
2.1
2.2
ECA644 - ECA647 -EWF644 - EWF647 - ESE645 - ESE648
Assembly
Assembly, set-up and connection of on-board control panels ECA644, ESE645,
ECA647, ESE648
The controllers have two independent clean contacts
for controlling a refrigerator unit, a boiler and a presence
input. The 2 tube versions have a 230V output to power
the summer and winter solenoid valve whereas the 4-tube
versions have two independent 230V outputs for controlling
a summer solenoid valve and a winter valve.
The 10 kΩ water temperature probe positioned in the
compartment on the battery regulations the minimum level
when heating (30°C) and the maximum level when cooling
(20°C).
The board also has a function when there is no water
probe, in such cases the fan stop thresholds are ignored.
Slide the control panel into its housing in the upper part
of the device and fix it with the two fixing screws (ref. A).
To install the connection box:
- open the box (ref. B);
- lock the lower tooth into its hole (ref. C) on the side of
the device;
- hook the upper part of the box to the side (ref. D);
- fix it with the two fixing screws (ref. E);
- connect the grounding cable to the fan coil body (ref. M)
using the fixing screws (the minimum force that must be
applied for tightening screws must be around 2N);
- connect the fast connector of the MOTOR to the other
on the board (ref. I) *;
- on the two GRID block terminals (ref. L) there is a bridge
that allows SLI and RSI versions to work without a
microswitch.
- For other versions, remove the bridge and connect the
two terminals originating on the grill safety microswitch*;
- connect the water probe to the H2 connector on the
device.
The water temperature probe controls the temperature
inside the batteries and determines when the fan starts
according to pre-set parameters (minimum operation
in winder and maximum in summer).** Check that
they are correctly inserted into the compartment on
the battery.
- Connect the electrics, tidy cables and fix them with
the three clevises supplied (ref. G);
- close the box with the 4 screws (ref. H);
- refit the vanity plate on the side of the unit;
- tighten the upper screws on the control panel;
- place the screw head covers in their housing on the
control panel;
* For versions with hydraulic connections on the right,
refer to the relevant paragraph
** The regulation also works without a water probe
connected

7
S
I
U
2.1
2.3
2.4
B
A
C
N540022B
EN
There are two dip switches on the controller circuit board
for configuring unit operation as per requirements.
- The night-time heating operation logic is modified by
using dip switch C:
- in the ON position, the fan is always off, and heats the
room using radiation and natural convection, as with
traditional radiators; in the off position it operates as a
normal fan.
- By positioning dip switch B to ON, when cooling, the
fan operates at the minimum speed even after having
reached the set point, to allow for more uniform
operation of the temperature probe and to avoid
layering in the air. With the cursor in the OFF position,
the functions are cycled (4 minutes ON, 10 minutes
OFF).
On closing the contact connected to the CP input (ref. A)
the panel is placed in stand-by mode.
If the contact is open the unit is active, if the contact is
closed it is deactivated when a key is pressed the
symbol flashes.
The input cannot be connected in parallel to that of other
electronic boards (use separate contacts).
Set-up of auxiliary dip-switch functions B and C
CP presence contact input connection (only for ECA644 and ECA647 models)

8
S
I
U
B
C
D
A
A
C
B
AUTO
C
2.5
2.6
- To position the temperature probe (ref. A):
- pass the probe through the hole on the shoulder (ref. B)
- insert the probe into the lower hole (ref. C)
- fix the probe on the relevant hook (ref. D)
By regulating these settings, the system can select either
heating or cooling automatically, excluding normal manual
selection. This setting is particularly suitable for 4-tube
versions. This regulation system can only be activated by a
qualified and authorised installer. To activate this function,
press the summer/winter key (ref. A) for 10 seconds until
both the cooling (ref. C) and heating (ref. B) symbols come
on together. To return to the cooling only or heating only
setting, press and hold the summer/winter key (ref. A) for
10 seconds until the cooling (ref. C) and heating (ref. B)
symbols switch off. Press the key again to select winter
mode. Check the heating symbol is working (ref. B) (on
when set point is higher than ambient temperature, both
are off when the set point is lower. Press the summer/
winter key once to select summer mode. Check the
cooling symbol is working (ref. B) (on when set point is
lower than ambient temperature, both are off when the set
point is higher). This selection is saved even if the power
is turned off.
Air temperature probe assembly (only for models ECA644, ECA647)
Cooling/Heating automatic settings (only for 4-tube units)

9
S
I
U
2.7
ECA644, ECA647, EWF644, EWF647
H2H4 AIR
N540022B
DISPLAY N591810D
EN
ECA644 and ECA647 connections
H2* water temperature probe (10 kΩ)
H4* water temperature probe 4 pipes (10 kΩ) (only
for ECA 647)
AIR air temperature probe (10 kΩ)
M1 DC inverter fan motor
Y1 water solenoid valve (230V/ 50Hz 1A output
voltage)
Y2
4 pipe water solenoid valve (ECA647 only) or
mobile flap connection (ECA644 only).
230V/ 50Hz 1A output voltage.
L-N
230V/50Hz electrical power supply
UV
UV lamp connection
BO boiler consent output (free contact max 1A)
CH chiller consent output (free contact max 1A)
CP presence input sensor (if closed, the fan coil unit
is placed in standby).
HRS RS water probe (10 kΩ) (ECA644 only)
RS RS version cabling (ECA644 only)
*If after switching the power on the board
detects the H2 probe, start-up occurs in normal
conditions with the minimum water temperature
when heating (30°C) and maximum when
cooling (20°C).
The board also has a function when there is no
probe, in such cases the fan stop minimum and
maximum thresholds are ignored.

10
S
I
U
2.8
8mm0.2-1mm2
+
A
B
-
ESE645, ESE648
A
H2H4 AIR
N540022B
ESE645 and ESE648 connections
+AB-
serial connection for wall-mounted remote
control EDA/EDB649 - EWG/EWW649
(respect AB polarity)
H2** hot water temperature probe (10 kΩ)
H4** cold water temperature probe (10 kΩ) (648 only)
M1 DC inverter fan motor
Y1 water solenoid valve (230V/ 50Hz 1A output
voltage)
Y2
4 pipe water solenoid valve (ESE648) or mobile
flap (ESE645).
(230V/ 50Hz 1A output voltage)
L-N
230V/50Hz electrical power supply
BO boiler consent output (free contact max 1A)
UV UV lamp connection
CH chiller consent output (free contact max 1A)
HRS RS water probe (10 kΩ) (ESE645 only)
AIR Air probe optional (*)
RS RS version cabling (ESE645 only)
*Alternatively, connect the wall-mounted controller
EDA/EDB649 - EWG/EWW649 to the air probe
** If after switching the power on the board
detects the H2 probe, start-up occurs in normal
conditions with the minimum water temperature
when heating (30°C) and maximum when
cooling (20°C).
The board also has a function when there is no
probe, in such cases the fan stop minimum and
maximum thresholds are ignored.
Rigid or flexible wires with a 0.2 to 1 mm² cross-section
(0.75 mm² if two wires are connected to the same terminal
block) can be inserted in the 4 terminal blocks (ref. A) for
connection of the wall-mounted controller EDA/EDB649
- EWG/EWW649. If the wires have wire end ferrules with
a plastic collar, the maximum cross-section is 0.75 mm².
Strip 8 mm of the wire, then if the wire is rigid, you can
insert it easily whereas, if it is flexible, it is advisable to use
long nose pliers.
Push the wire completely in and check that it is anchored
by pulling it gently.
To disconnect the cables, press the
corresponding white indent (ref. A) with a
screwdriver and remove the conductor.

11
S
I
U
2.10
H2H4 AIR
N540022B
A
2.9
EN
Continuous modulation circuit board for connecting remote thermostat
(only for models ESE645 - ESE648)
LED Indications (Ref. A) (only for models ESE645 - ESE648)
The circuit board for remote control is for all functions of
the fan coil system from the wall-mounted remote control
EDA/EDB649 - EWG/EWW649.
A remote control can be connected to a maximum of
30 fan coils that will be controlled in broadcast mode
(simultaneous commands to all fan coils).
It can be installed on all versions, the board has a green
LED that indicates the operational state and any anomalies.
The main operational parameters, the set point and the
room temperature are transmitted from the wall-mounted
remote control EDA/EDB649 - EWG/EWW649 to all
terminals connected to the network, allowing unified
operation.
Refer to the instructions for this control for use of the fan
coils.
The 10 kΩ water temperature probe positioned in the
device battery regulations the minimum level when heating
(30°C) and the maximum level when cooling (20°C).
Green LED: Indicates that the unit is
operational. Flashing indicates an anomaly. LED off: unit is off or has no power.
Segnalazioni d'errore
Error Display
Communication error. The circuit board expects continuous information exchange on the serial line
with the wall-mounted control EDA/EDB649 - EWG/EWW649. If this exchange is lost for more than
5 minutes, an error warning is displayed and the unit deactivated.
6 flashes + pause
Problem with fan motor (e.g. blockage caused by foreign objects, faulty rotation sensor). 2 flashes + pause
Water temperature probe fault for 2-tube versions (H2).
In this case, ensure that the probe installed is 10 kΩ. 3 flashes + pause
Cold water temperature probe fault for 4-tube versions (H4).(Only for ESE648) positioned on the
main battery. 5 flashes + pause
GRID contact open Continuous rapid
flashing
Water demand detected by probe H2 insufficient (above 20°C when cooling, below 30°C when
heating). Stops the fan until the temperature returns to a suitable level to satisfy the demand*. 1 flashes + pause
Only for board ESE648 (4-tube machines): cold water demand detected by probe H4 insufficient
(above 20°C). Stops the fan until the temperature returns to a suitable level to satisfy the demand*. 4 flashes + pause
* If after having powered the board the water probe is
detected, start-up takes place with the minimum and
maximum water temperature thresholds.
The board also has a function when there is no probe, in
such cases the fan stop thresholds are ignored.

12
S
I
U
8mm0.2-1 mm 2
3.2
A
3.1
B
A
A
EDA649 - EDB649
Rigid or flexible wires with a 0.2 to 1 mm² cross-section
can be inserted in the spring-loaded terminal blocks for
the serial connection. If the wires have wire end ferrules
with a plastic collar, the maximum cross-section reduced
to 0.75 mm².
For correct and safe connection, carry out the following
operations:
- Strip back the wires by 8mm as shown below;
- if the cable is rigid the end of the wire can be inserted
easily, whereas with flexible cable it may be easier to
use a long pointed pair of pliers to insert correctly.
- Push the wire completely in and check that it is
anchored by pulling it gently.
- To disconnect the cables, press the corresponding
white indent (ref. C) with a screwdriver and remove
the conductor.
Spring-loaded terminal connections -AB+ and CP
The wall-mounted remote control EDA/EDB649 is an
electronic thermostat (fitted with an optional temperature
probe which can be remotely installed in one of the fan
coils connected to it) with the possibility to control one
or more units (up to max. 30) fitted with an electronic
controller for remote control ESE645 or ESE648.
- Install the wall-mounted remote control EDA/EDB649
away from doors and/or windows and from heat
sources (radiators, fan coils, hobs, direct sunlight), on
internal walls and around 1.5m from the floor.
The wall-mounted remote control is inside the pre-
assembled package, therefore prior to affixing to the wall,
the two parts should be separated by unhooking the two
protruding teeth on the rear (A).
Use the base of the controller (ref. B in diagram) to trace
the fixing points on to the wall (use two opposing holes).
Then proceed with the following operations:
- drill holes in the wall;
- pass the cables through the window on the base;
- fix the base of the controller to the wall using suitable
screws and wall plugs;
- make the electrical connections then close the
controller taking care not to crush the conducting
wires.
Wall-mounted remote control panel assembly EDA649 - EDB649

13
S
I
U
3.4
3.3
N540022B N540022B
CP
L
N
+A B -A A B B -
A
B
-
A
B
EN
CP occupancy contact input connection
On closing the contact connected to the CP input (ref.
A) the panels are placed into stand-by. If the contact is
open the units are active, if the contact is closed they are
deactivated when a key is pressed the symbol flashes.
- The input cannot be connected in parallel to that
of other electronic boards (use separate contacts).
Connect the RS485 line of the wall-mounted remote control
to one or more (up ot a maximum of 30) devices fitted with
electronics for remote control ESE645 or ESE648 using
a suitable two-core cable for serial connections RS485
keeping the power supply cables separate.
- Chase out the wall in order to minimise the length of
the leads;
- complete the line with the supplied 120 Ω heating
element;
- do not make "star" connections;
- The RS485 cable connection is polarised, respect the
"A" and "B" indications on every periphery connected
(for connecting, it is preferable to use a shielded two-
core cable with a minimum thickness of 0.35 mm2);
- connect the + and - power terminals on the wall
mounted terminal block, 12 V DC, to one of the
boards ESE645 or ESD 648, respecting polarity.
EDA649 - EDB649 Connections
contact CP
contact -
remote control terminal block
auxiliary relay

14
S
I
U
4.1
B
A
A
EWG649 - EWW649
The wall-mounted remote control EWG/EWW649 is an
electronic thermostat (fitted with an optional temperature
probe which can be remotely installed in one of the fan
coils connected to it) with the possibility to control one
or more units (up to max. 30) fitted with an electronic
controller for remote control ESE645 or ESE648.
- Install the wall-mounted remote control EWG/
EWW649 away from doors and/or windows and
from heat sources (radiators, fan coils, hobs, direct
sunlight), on internal walls and around 1.5m from the
floor.
The wall-mounted remote control is inside the pre-
assembled package, therefore prior to affixing to the wall,
the two parts should be separated by unhooking the two
protruding teeth on the rear (A).
Use the base of the controller (ref. B in diagram) to trace
the fixing points on to the wall (use two opposing holes).
Then proceed with the following operations:
- drill holes in the wall;
- pass the cables through the window on the base;
- fix the base of the controller to the wall using suitable
screws and wall plugs;
- make the electrical connections then close the
controller taking care not to crush the conducting
wires.
Wall-mounted remote control panel assembly EWW649 - EWG649

15
S
I
U
8mm0.2-1 mm 2
4.2
A
4.3
A
B
-
A
B
EN
Rigid or flexible wires with a 0.2 to 1 mm² cross-section
can be inserted in the spring-loaded terminal blocks for
the serial connection. If the wires have wire end ferrules
with a plastic collar, the maximum cross-section reduced
to 0.75 mm².
For correct and safe connection, carry out the following
operations:
- Strip back the wires by 8mm as shown below;
- if the cable is rigid the end of the wire can be inserted
easily, whereas with flexible cable it may be easier to
use a long pointed pair of pliers to insert correctly.
- Push the wire completely in and check that it is
anchored by pulling it gently.
- To disconnect the cables, press the corresponding
white indent (ref. C) with a screwdriver and remove
the conductor.
Spring-loaded terminal connections +AB- and CP
CP occupancy contact input connection
On closing the contact connected to the CP input (ref.
A) the panels are placed into stand-by. If the contact is
open the units are active, if the contact is closed they are
deactivated when a key is pressed the symbol flashes.
- The input cannot be connected in parallel to that
of other electronic boards (use separate contacts).
contact CP
contact -
remote control terminal block
auxiliary relay

16
S
I
U
4.4
N540022B N540022B
CP
L
N
+A B -A A B B -
EWW649 - EWG649 Connections
Connect the RS485 line of the wall-mounted remote control
to one or more (up ot a maximum of 30) devices fitted with
electronics for remote control ESE645 or ESE648 using
a suitable two-core cable for serial connections RS485
keeping the power supply cables separate.
- Chase out the wall in order to minimise the length of
the leads;
- complete the line with the supplied 120 Ω heating
element;
- do not make "star" connections;
- The RS485 cable connection is polarised, respect the
"A" and "B" indications on every periphery connected
(for connecting, it is preferable to use a shielded two-
core cable with a minimum thickness of 0.35 mm2);
- connect the + and - power terminals on the wall
mounted terminal block, 12 V DC, to one of the
boards ESE645 or ESD 648, respecting polarity.

17
S
I
U
A
D
E
C
H
B
G
M
N276620D
5.1
5.2
F
L
I
E4T643
EN
Slide the control panel into its housing in the upper part
of the device and fix it with the two fixing screws (ref. A).
To install the connection box:
- open the box (ref. B);
- lock the lower tooth into its hole (ref. C) on the side of
the device;
- hook the upper part of the box to the side (ref. D);
- fix it with the two fixing screws (ref. E);
- connect the grounding cable to the unit structure (ref.
M) using the fixing screws (the minimum force that
must be applied for tightening screws must be around
2N);
- connect the fast connector of the MOTOR to the other
on the board (ref. I) *;
- on the two GRID block terminals (ref. L) there is a
bridge that allows in-built SLI and RSI versions to work
without a microswitch.
For versions in-built into the formwork, follow the
microswitch connection instructions on the instruction
sheet of the vanity panel.
For other versions, remove the bridge and connect
the two terminals originating on the grill safety
microswitch*;
- connect the water probe connector (ref. F) on the unit.
The water temperature probe controls the temperature
inside the batteries and determines when the fan starts
according to pre-set parameters (minimum operation
in winter and maximum in summer).**
Check that they are correctly inserted into the
compartment on the battery.
- Connect the electrics, tidy cables and fix them with
the three clevises supplied (ref. G);
- close the box with the 4 screws (ref. H);
- refit the vanity plate on the side of the unit;
- tighten the upper screws on the control panel;
- place the screw head covers in their housing on the
control panel;
*N.B.: * For versions with hydraulic connections on the
right, refer to the relevant paragraph
** If after switching the power on the board detects the
H2 probe, start-up occurs in normal conditions with the
minimum and maximum functions.
The board also has a function when there is no H2 probe,
in such cases the fan stop thresholds are ignored.
The on-board controller is a panel with 8 capacitative keys
and amber display that contains the AUTO function (step
ventilation adjustment).
The E4T643 thermostat can be set from 5 to 40°C,
has a winter and summer selector and the 10 kΩ water
temperature probe positioned in the compartment on the
battery regulations the minimum level when heating (30°C)
and the maximum level when cooling (20°C). It is suitable
for installing on board and has a 230V output for controlling
a solenoid valve.
It can furthermore control the 4 tube versions, any resistance
outputs or the full flat actuator for mobile grills via a relay fitted
to the board.
The board also has a function when there is no H2 probe,
in such cases the fan stop thresholds are ignored.
Assembly and connections for on-board control panel E4T643
Assembly

18
S
I
U
B
C
D
A
H4 H2 AIR
N276620D
DISPLAY N594823E
E4T643
5.3
5.4
To position the temperature probe (ref. A):
- pass the probe through the hole on the shoulder (ref. B)
- insert the probe into the lower hole (ref. C)
- fix the probe on the relevant hook (ref. D)
Air temperature probe assembly
E4T643 Connections
H2* water temperature probe (10 kΩ)
H4 water temperature probe 4 pipes (10 kΩ)
AIR air temperature probe (10 kΩ)
M1 DC inverter fan motor
Y1 water solenoid valve (230V/ 50Hz 1A output
voltage)
Y2 Mobile flap connection.
230V/ 50Hz 1A output voltage.
L-N
230V/50Hz electrical power supply
UV UV lamp connection
HRS RS water probe (10 kΩ)
RS RS version cabling
*If after switching the power on the board
detects the H2 probe, start-up occurs in normal
conditions with the minimum water temperature
when heating (30°C) and maximum when
cooling (20°C).
The board also has a function when there is no
probe, in such cases the fan stop minimum and
maximum thresholds are ignored.

19
S
I
U
6.1
Ad
uu
EN
SETTINGS MENU ECA644 - ECA647 - EWF644 - EWF647 - EDA/
EDB649 - EWG/EWW649 - E4T643
Through the remote control, the access to Setup menu will
be available from display off:
Use the icons to move inside the menu.
Use the icon to select menu items and to confirm changes
made.
Pressing and confirming the change will switch to the next
item.
To exit from menu:
- press the icon for 10 sec.
- or wait 30 sec. for automatic shutdown
After 30 seconds from the last action, the control goes
off and the settings is memorised.
Setup menu
Key Operation Display
- press the key "ON" for 10 sec.
- the device turns on and the temperature appears
- continue to press until "Ad" appears
Menu items
Ad Address
uu Wifi
Ub Adjust buzzer volume
br Adjust the brightness
di Digital input
rZ Radiant zone
rb Modbus reset
Fr Factory reset
ot Offset probe T
oh Reserved
Sc Scale
rE Reserved
Display Operation
- the setting range is from a minimum of 01 to a maximum of 99
- increase or decrease the number with the icons
Set the modbus address
To set the address:
Display Operation
- select "YS" to enable the wifi
- select "rs" to reset the settings
- select "no" to disable the wifi
Enable or disable WiFi
This function can only be used for controls with
integrated wifi card (EWF644 - EWF647 - EWG649 -
EWW649)
By default, wifi is enabled.

20
S
I
U
rZ
rb
To change the volume:
The volume changes after you confirm the modification.
Display Operation
- the volume setting range is from 00 (min) to 03 (max)
- Increase or decrease the volume with the icons
Adjusting buzzer volume
To adjust the brightness:
The brightness changes after confirming the modification.
You can also reduce the brightness of the display through
the control's key. From the display off, press the icon for
20 sec. The message "01" will appear. Press to decrease
brightness "00". Wait 30 sec. for the correct settings to be
verified.
Display Operation
- the brightness adjustment range is from 00 to 01
- increase and decrease the brightness with the icons
Adjusting the brightness of the display
To change the digital input, select "di" menu:
By default, digital input is set to CP.
By selecting one of the other inputs (CO,CC) the
seasonality is locked. It is not possible to modify it through
the key of the control.
For return to the default settings, set the digital input to
"CP".
Display Operation
- CP / clean contact (default)
- CO / cooling open
- CC / cooling close
Settings of the digital input
Display Operation
- select "no" to keep the current settings
- select "YS" to reset the settings
Reset modbus
Display Operation
- select "no" to disable the radiant zone
- select "YS" to enable the radiant zone
Enable the radiant zone
This function can only be used for wall controls
(EDA649 - EDB649 - EWG649 - EWW649) combined
with the EF1027 board.
By default the radiant zones are disabled.
Other manuals for AirLeaf ECA644
2
This manual suits for next models
16
Table of contents
Popular Control Panel manuals by other brands

Visonic
Visonic POWERART installation instructions

Raven
Raven SCS 450 Installation & service manual

urmet domus
urmet domus 2VOICE MIKRA2 1784 INSTALLATION AND USE BOOKLET

SBC
SBC PCD7.L630 instruction manual

Mitsubishi Electric
Mitsubishi Electric PAC-YT34STA Instruction book

EDWARDS SYSTEMS TECHNOLOGY
EDWARDS SYSTEMS TECHNOLOGY FCCA Series installation manual