Innovative Marine RFS-22 User manual


Welcome to the Innovative Marine NUVO Reef Filtration Series. The Most
advanced and complete Innovative Marine Sump system to date. Read through
the manual for all safety and installation instructions prior to use.
Your NUVO RFS oers a wealth of features designed to save you time and keep
you safe so you spend less time cleaning up and more time diving into your
aquarium. If you have questions about your setup, give us a call at
866-368-7941 or email: info@innovative-marine.com and we will gladly walk
you through it.
Let’s get started.
________________________________________________________________
Drain Installation
Insert the aquarium’s siphon drain pipe into the Primary Siphon Drain
bulkhead. Make sure to have a gate valve above this bulkhead to adjust the
siphon drain rate.
Insert the aquarium's secondary drain pipe into the Secondary Drain bulkhead.
The aquarium’s emergency drain is inserted into the Emergency Drain
bulkhead.
*Note: When the Emergency Drain is in use, there will be a gurgling sound. This
is to alert you that the Primary and Secondary drains are impeded or clogged.
Ready Set Reef!
Step by Step Guide

Designated Vertical Heater Chamber
Place your heater, vertically, into the designated heater chamber after the
siphon drain chamber.
Use the cord management hook to secure the heater/heating element cord.
Conduct proper schedule maintenance (by following the heater’s instruction
manual) on your heating element / heater to ensure it remains at optimum
performance.
*Innovative Marine is not responsible for any damages that may be caused by
improper maintenance, malfunction, or misuse of other manufacturers
products, including heating elements and or heaters.
Step by Step Guide

Drain Chamber - Silencing Plates, Sponges, &
Acrylic Filter Media Cups
The Drain Silencing Plates and Filter sponge keep your aquarium clean and
quiet. The acrylic lter media cups hold ltration media. Fiber balls are
included in the media cups which trap oating detritus & other toxic particles
in the water.
Maintenance:
At least once a week, clean the lter sponge, silencing plates, and ber
balls by rinsing them with RO/DI water.
Replace the sponge and ber balls at least once a month to maintain
optimal ltration and water clarity.
Step by Step Guide
Step by Step Guide

Step by Step Guide
Acrylic Filter Media Cups | 4”Filter Socks
The acrylic lter media cup or 200 micron 4“ lter socks can be used in the drain
chamber. Choose to use either or both. 4” Filter socks not included.
High Performance Fiber balls are easy to remove & replace. You can upgrade
your ltration media to a trio combo of Fiber balls, ROX carbon (removes
chemicals and odor) and Ferric oxide phosphate remover. Phosphate is a
nutrient that nuisance algae uses to grow. Combo set sold separately, item#
0003. Make sure allow proper water ow by not over packing the lter media
cups.
200 micron 4” lter sock (*sold separately, item # 9001) also ts into the acrylic
media cup holder. It provides mechanical ltration, keeping your aquarium
crystal clean and clear from free oating debris and detritus.
*Rinse all lter media in RO/DI water prior to usage.
Maintenance:
At least once a week, rinse your lter sock and or ber balls. Change
both once a month or sooner depending on the bio-load of your
aquarium system.

Step by Step Guide
Protein Skimmer Placement
Remove the polycarbonate protein skimmer cover plate.
Place Protein skimmer inside protein skimmer chamber..
Move skimmer pump power cord next to cord management hook.
Put polycarbonate cover plate back in place and adjust skimmer to t through
the cover.
Secure the skimmer pump power cord with cord management hook.
Skimmer Size Compatibility:
Refer to the dimensions section of each RFS sump model to determine
the opening of each sump.
Note: For Models RFS-22 and RFS-27 this chamber can be used for either a
protein skimmer or refugium.
Step by Step Guide

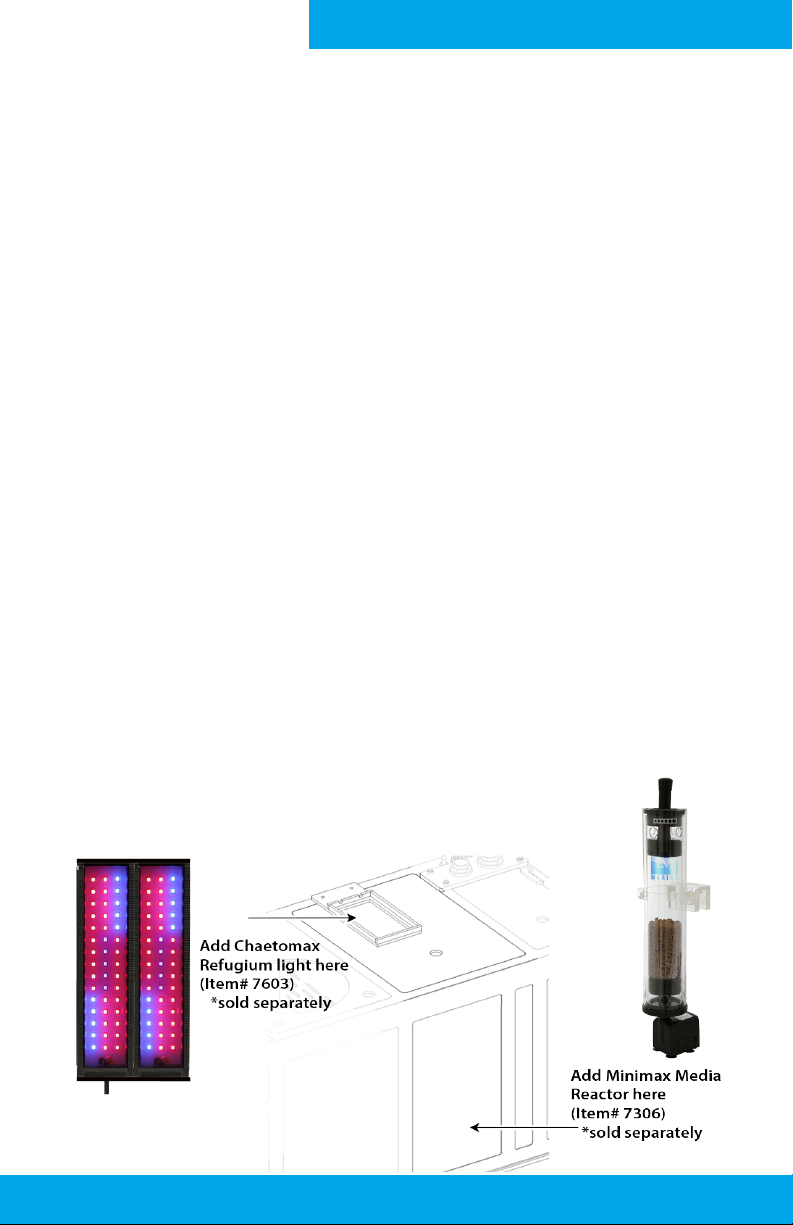
Refugium / Media Reactor Chamber
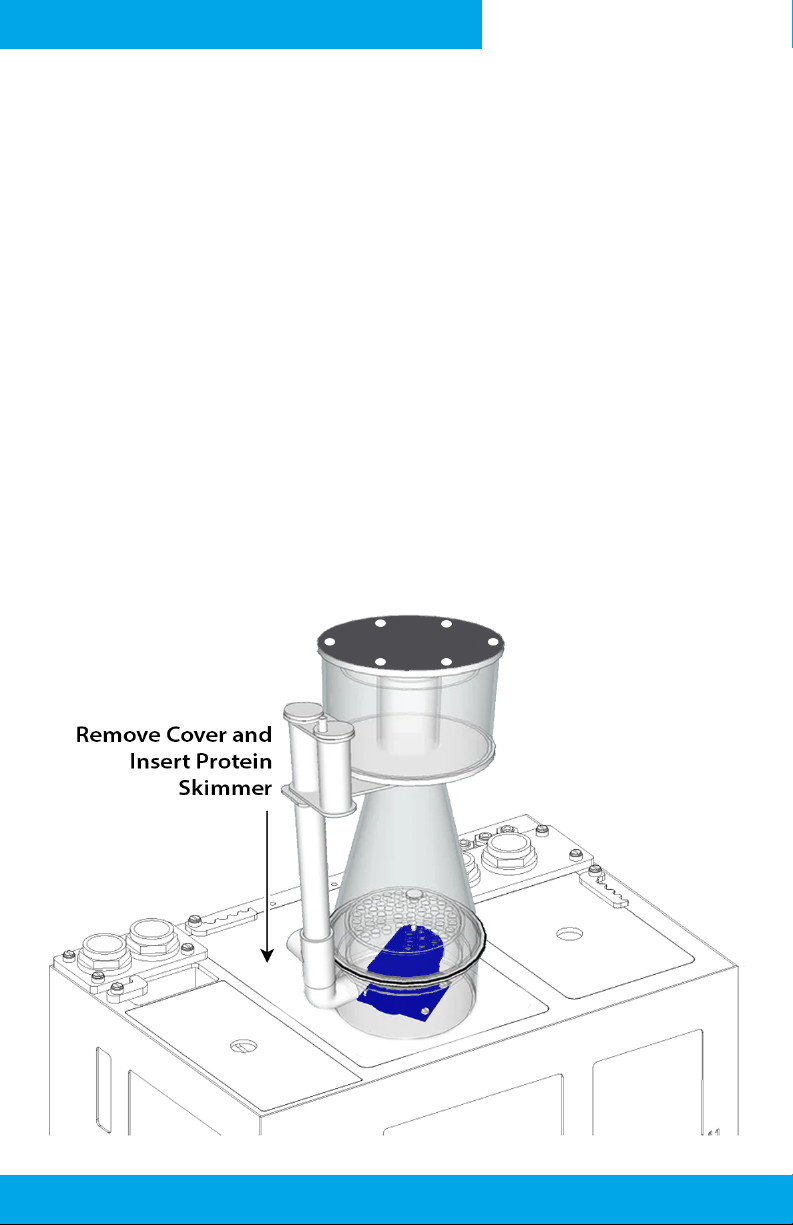
Note: Models RFS-22 and RFS-27 have one chamber to be used for a protein
skimmer or refugium/media reactor chamber.
Create a refugium or media reactor chamber in this section.
Refugium - An area where large macro algae or plants grow by absorbing
nutrients that would otherwise be used by nuisance algae i.e. green
hair algae or brown lm diatoms. Nuisance algae grows on your glass
and live rock.
How to - Add macro algae i.e. chaetomorpha and or mangroves. Use the
Chaetomax Refugium Light (*Sold separately, item# 7603)
inside the bracket.
Note: Chaetomax Light Holding Bracket comes included.
Media Reactor - An area where lter media is held by reactor(s) that absorb toxic
chemicals and algae growing nutrients. The reactor(s)
percolate media which increases surface area contact, thus
making them more ecient.
How to - Add media reactor(s) i.e. Minimax Media Reactor Pro (*Sold
separately, item #7306). Add your preferred media inside
the reactor(s).
Step by Step Guide

6"
10.4"
Adjust Bae Wall Height
Adjust the water level of your RFS sump in the protein skimmer/refugium
chamber/s. On the adjustable bae wall, turn the two plastic screws counter
clockwise to loosen the wall. Adjust the height of the wall to your preferred
height and turn the plastic screws clockwise to lock in the desired height.
This wall is located in the protein skimmer/refugium chamber for models:
RFS-22 and RFS-27. And located in the refugium chamber for models: RFS-39
and RFS-50.
If you are using a protein skimmer please see the next page.
Step by Step Guide

Adjust Bae Wall for a Protein Skimmer
If you are using a protein skimmer: Reference your protein skimmer manual for
the optimal water level height and use the laser etched water level indicators,
located on the front of the sump, to set the water level height.
*Innovative Marine is not responsible for any damages that may be caused by
improper maintenance, malfunction, or misuse of other manufacturers
products, including protein skimmers.
Step by Step Guide

Black RO/DI Push Fit Fittings
If you are using a chemical dosing unit or other rigid tubing output devices, you
may attach up to four rigid tubing lines to the black RO/DI Push Fit Fittings
To insert: push in the 3/16” rigid tubing into the push t tting.
To remove: Push in the tube and hold down the inner part of the tting. While
holding down the inner part of the tting, pull the tube to remove.
_______________________________________________________
Step by Step Guide

The adapter is two sided to accommodate hoses with an inner diameter of 1/4”
or 1/2”. Use hose clamps to secure the hose if needed.
*Hose clamps not included.
_______________________________________________________
Step by Step Guide

Install the Return Pump
-Place the return pump inside the return pump chamber and measure the
length of hose needed to connect the return pump to the 3/4“ hose barb
located underneath the 3/4”PVC return bulkhead.
- Cut the included 3/4“ hose.
- Attach the 3/4”hose to 3/4“ hose barb.
-Attach your return pump to the 3/4” hose. Return pump needs to have a
barbed 3/4” adapter on the outlet.
Step by Step Guide

• Make sure your RFS Sump is set on a level surface to prevent undue stress on
the sump from stress and leaks.
• Please pay special attention when leveling your sump.
• Before lifting your sump, make sure your stand is in position and properly
leveled and secured.
• Lifting the sump into the stand may require more than one person. Please
use proper lifting techniques when lifting all products.
• Lift from the bottom of the sump. DO NOT lift using the sump’s edges as this
will cause stress on the panels and seals and may cause damaged.
• Once you have placed your sump inside your stand, make sure the sump,
stand, and aquarium are all level and in proper secure positions.
• Place a level on edge of sump, if necessary readjust and reposition tank and
stand using composite shims.
If you have any additional questions, give us a call.
We have customer service sta that can answer any questions that you have.
866-368-7941 | info@innovative-marine.com
Placing & Leveling Your RFS Sump

Find a place for your RFS Sump
• Find a location that can handle the weight of your RFS sump
• Do not install or store the sump where it will be exposed to the weather or to
temperatures below freezing. For indoor use only.
• Do not place sump in direct sunlight or near heater vents.
• We recommend ambient room temperature around 25° C/ 77° F.
• Place sump so the weight is evenly distributed across the entire sump.
• Make sure surrounding appliances are waterproof and move anything that
might be damaged by salt creep.
• Failure to follow all safety procedures will result in the warranty being voided.
• Innovative Marine is not responsible for any and all damages not related from
the usage of Innovative Marine products.
• Innovative Marine is not responsible for any and all damages from improper
usage of products.
Find a place for your RFS Sump

Leak Testing and Filling your RFS Sump
• Find a good location to test your sump.
• A at/level garage or covered patio is ideal to test in case of an unforeseen
leak.
• Slowly ll your sump and let the water naturally ow through the bae walls.
• Check every 8 hours over the next 24 hours for leaks. If any leaks have been
detected please contact your authorized Innovative Marine Dealer
immediately.
Leak Testing and Filling Your RFS Sump

NUVO RFS 22
25 Gallon Capacity

NUVO RFS 22
Top View
Protein skimmer
cover plate
Opening - 7.5”
Diameter
4.3"

NUVO RFS 22 NUVO RFS 22
Plastic Screw x 13
Chaetomax Holder
Drain Chamber Cover Plate
Filter Sponge
Drain Silencing Plate x 2
Acrylic Filter Media Cup x 2
082201
082202
082203
082204
082205
082206
1
2
3
4
5
6
# Description Item Code
Protein Skimmer/Refugium Cover Plate
Refugium Chamber Cover Plate
Return Pump Chamber Cover Plate
1” PVC Bulkhead (Slip x Slip) x 3
082207
n/a
082209
082210
7
8
9
10
3/4” PVC Bulkhead (Barb x Slip)
Drain Reinforcement Plate
Drain Pipe x 2
Heater Cord Management Hook
Cord Management Hook x 2
Return Reinforcement Plate
082211
082212
082213
082214
082215
082216
11
12
13
14
15
16
# Description Item Code
ATO Return Hose Barb 1/4” and 1/2”
Black RO/DI Push Fit Fitting x 4
Black Adhesive Cord Holder x 5
Sump Body
082217
082218
082219
082220
17
18
19
20
x 2
x 4
x 2
x 4
20
1
1
1
1
1
2
3
4
5
6
7
9
10
310
x 2
11
12
13 x 2 14
15
15
16
17
18
14
19

NUVO RFS 27
39 Gallon Capacity

NUVO RFS 27
Top View
Protein skimmer
cover plate
Opening - 9”
Diameter
4.3"
This manual suits for next models
3
Table of contents
Popular Water Filtration System manuals by other brands

Lenze
Lenze Global Drive 54 A Mounting instructions

Watts Premier
Watts Premier RO-TFM-4SV Installation, operation and maintenance manual

JRC
JRC NSVS1127 manual

Aquafine
Aquafine RBE Series Installation, maintenance and operation manual

Kinetico
Kinetico ERGO RO BLUE Instructions for use

GOSUN
GOSUN FLOW user manual

Osmio
Osmio Ecopure Eco-8 installation instructions

Adey
Adey MagnaClean Professional2 Installation and servicing

Aquapure
Aquapure AP1610SS quick start guide

Einhell Royal
Einhell Royal TF 2200 operating instructions

amiad
amiad TEQUATIC PLUS F-75 Installation, operation and maintenance manual

Hidrotermal
Hidrotermal Filtration Combo Series user manual