Insignia NS-SCR120FIX19W User manual

Before using your new product, please read these instructions to prevent any damage.
ASSEMBLY GUIDE
Fixed Frame
Projector Screen
NS-SCR120FIX19W / NS-SCR100FIX19W

www.insigniaproducts.com
2
Contents
IMPORTANT SAFETY INSTRUCTIONS . . . . . . . . . . . . . . . . . . . . . . . . . . . . . . . . . . . . . 2
Features . . . . . . . . . . . . . . . . . . . . . . . . . . . . . . . . . . . . . . . . . . . . . . . . . . . . . . . . . . . . . . . . 3
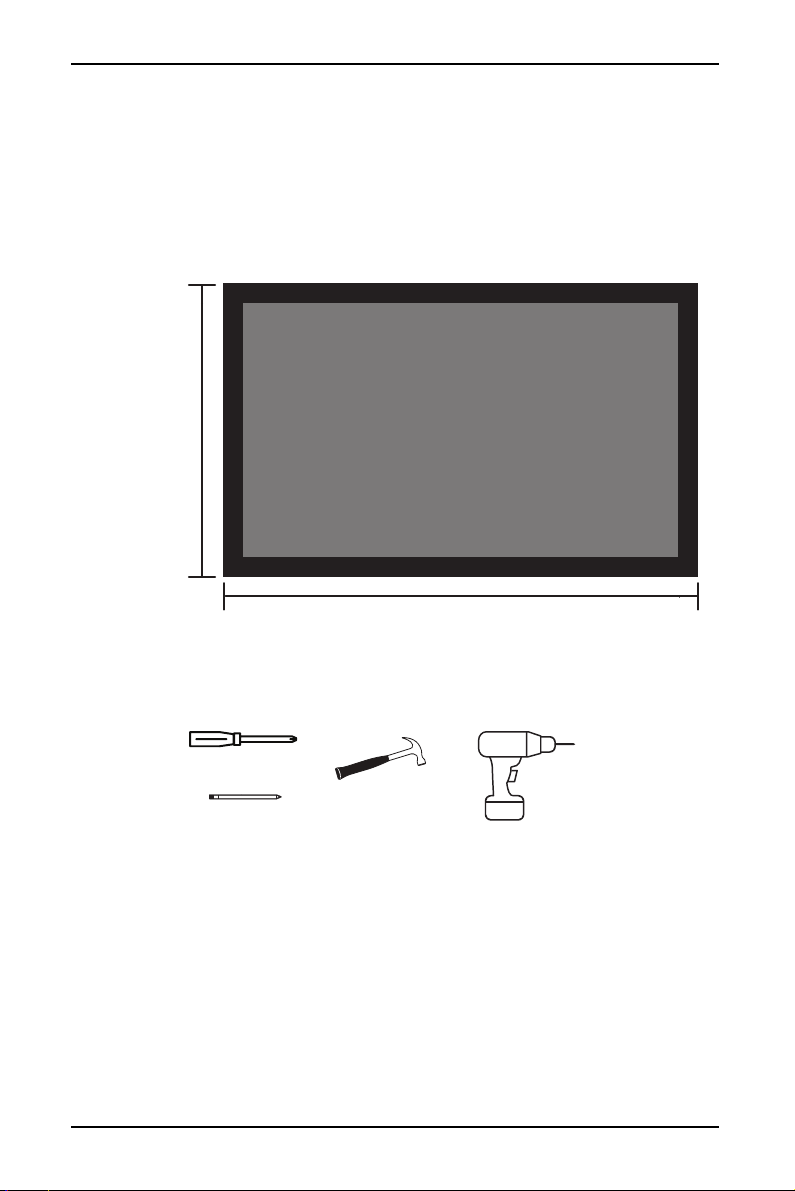
Dimensions . . . . . . . . . . . . . . . . . . . . . . . . . . . . . . . . . . . . . . . . . . . . . . . . . . . . . . . . . 3
Tools needed. . . . . . . . . . . . . . . . . . . . . . . . . . . . . . . . . . . . . . . . . . . . . . . . . . . . . . . . . . . . 3
Package contents . . . . . . . . . . . . . . . . . . . . . . . . . . . . . . . . . . . . . . . . . . . . . . . . . . . . . . . 4
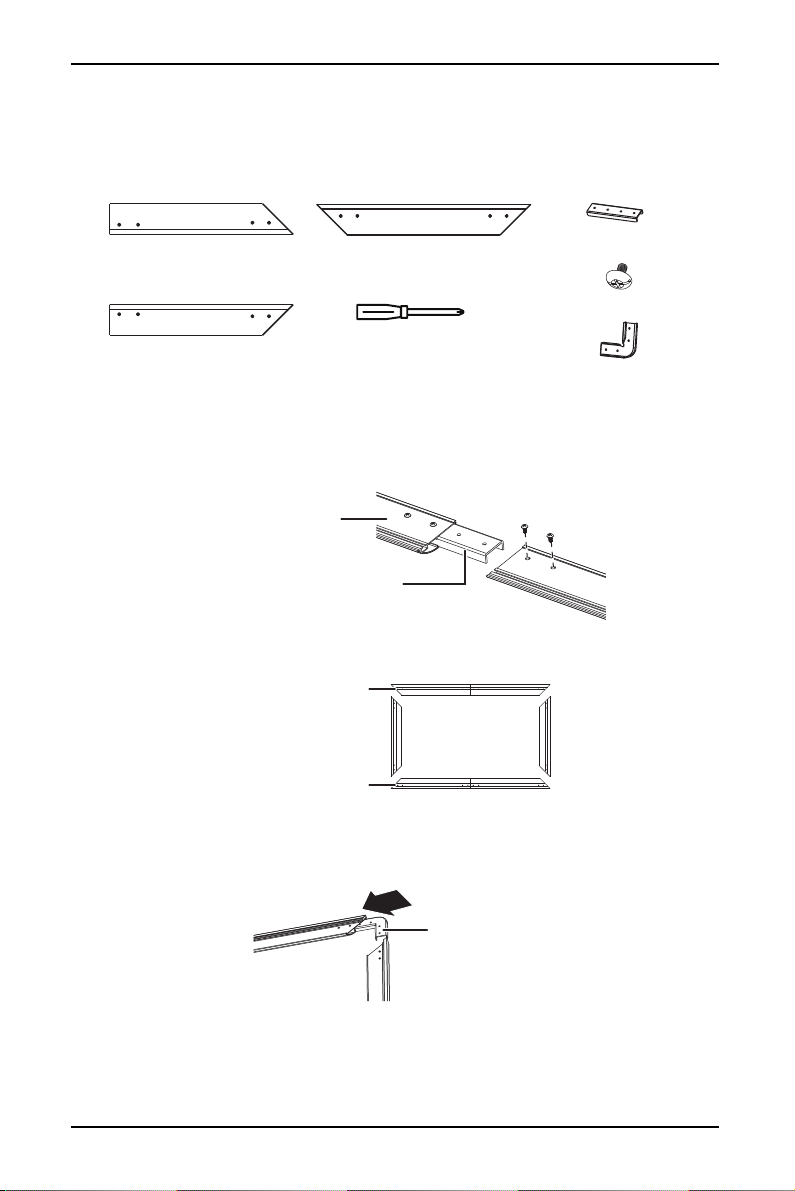
Parts. . . . . . . . . . . . . . . . . . . . . . . . . . . . . . . . . . . . . . . . . . . . . . . . . . . . . . . . . . . . . . . . 4
Hardware . . . . . . . . . . . . . . . . . . . . . . . . . . . . . . . . . . . . . . . . . . . . . . . . . . . . . . . . . . . 4
Assembly instructions . . . . . . . . . . . . . . . . . . . . . . . . . . . . . . . . . . . . . . . . . . . . . . . . . . . 5
Step 1 – Assemble the frame . . . . . . . . . . . . . . . . . . . . . . . . . . . . . . . . . . . . . . . . 5
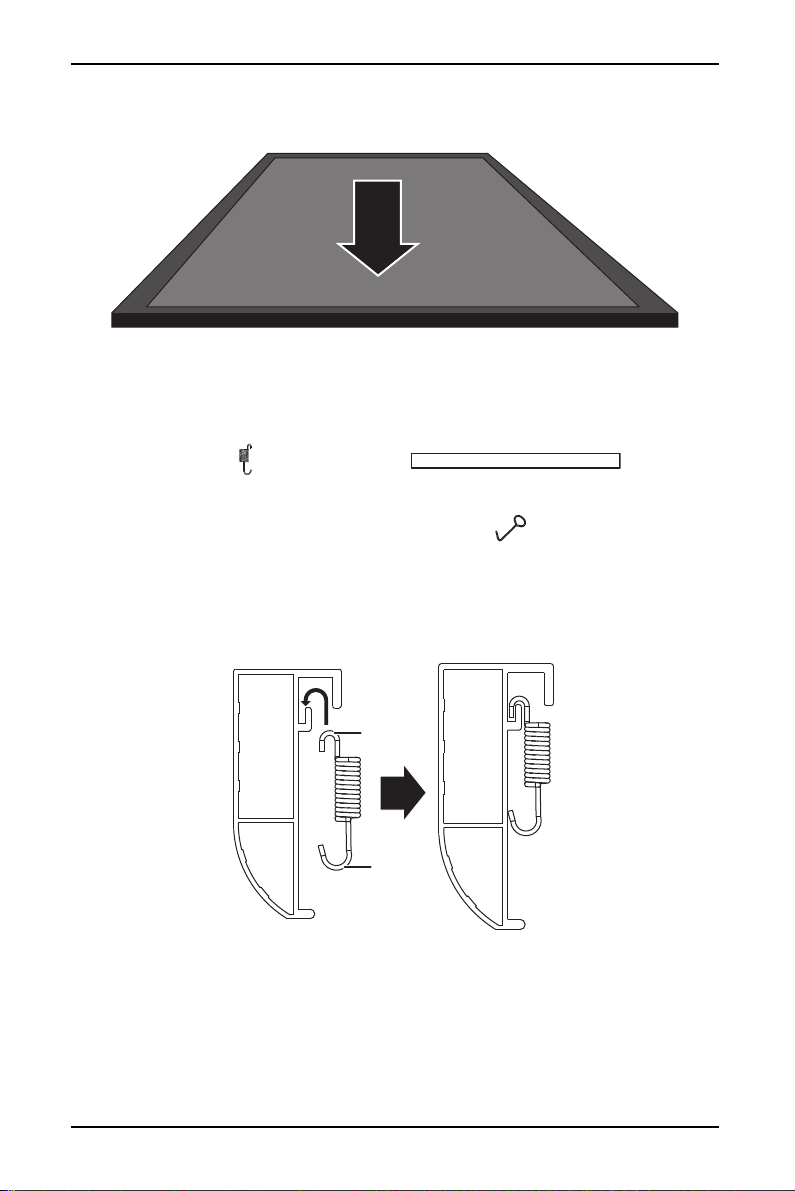
Step 2 – Assemble the screen. . . . . . . . . . . . . . . . . . . . . . . . . . . . . . . . . . . . . . . . 6
Step 3 – Attach the screen to the frame . . . . . . . . . . . . . . . . . . . . . . . . . . . . . . 7
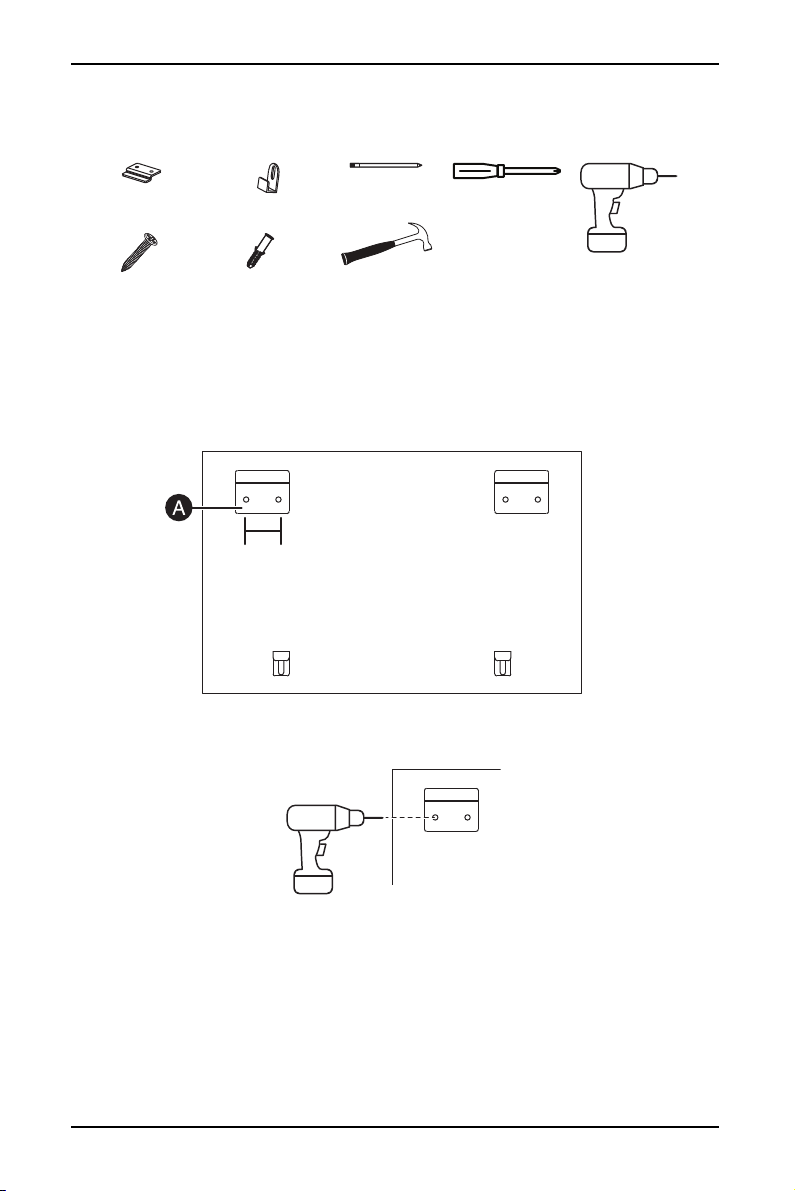
Step 4 – Hang your projector screen . . . . . . . . . . . . . . . . . . . . . . . . . . . . . . . . . 9
Maintaining your screen . . . . . . . . . . . . . . . . . . . . . . . . . . . . . . . . . . . . . . . . . . . . . . . .10
Moving your screen . . . . . . . . . . . . . . . . . . . . . . . . . . . . . . . . . . . . . . . . . . . . . . . . . . . .10
Storing your screen. . . . . . . . . . . . . . . . . . . . . . . . . . . . . . . . . . . . . . . . . . . . . . . . . . . . .11
Specifications . . . . . . . . . . . . . . . . . . . . . . . . . . . . . . . . . . . . . . . . . . . . . . . . . . . . . . . . . .11
ONE-YEAR LIMITED WARRANTY . . . . . . . . . . . . . . . . . . . . . . . . . . . . . . . . . . . . . . . . .12
IMPORTANT SAFETY
INSTRUCTIONS
• Don’t install the product on a plasterboard surface. You can mount it on a
brick surface, concrete surface, and wooden surface (wooden thickness is
more than 0.5 in. [12 mm]).
• Be careful of the burrs and sharp cuts in the aluminum frames when installing.
• Use two people to assemble this product.
• After assembly, you’ll need two people to carry your frame.
• Make sure that you install the projection screen in a horizontal position.
• We suggest that you use the product indoors. Using your screen outdoors for
an extended time can make the screen surface turn yellow.
•WARNING: Take care when installing this product. Installation faults, incorrect
operation, and any natural calamities that cause damage to your screen or
injuries to persons is not covered by the Warranty.
• Do not touch the screen surface with your hand.
• Do not clean the screen surface with corrosive detergent.
• Do not scratch the screen surface with a hand or sharp object.

3
Projector Screen
www.insigniaproducts.com
Features
• A simple solution for your home theater needs
• High-quality matte white screen supports resolutions as high as 4K Ultra HD
• Rigid and durable aluminum frame keeps the screen flat and taunt
• Black velvet frame gives the screen an elegant, theatrical look with a 152°
viewing angle
Dimensions
Tools needed
You need the following tools to assemble your projector screen:
100 in. model:
54 in. (137 cm)
120 in. model:
64 in. (163 cm)
100 in. model: 92 in. (234 cm)
120 in. model: 110 in. (280 cm)
Phillips screwdriver
Drill with 8 mm bit
Pencil
Hammer or mallet

4www.insigniaproducts.com
Package contents
Make sure that you have all the parts and hardware needed to assemble your new
projector screen.
Parts
Hardware
HARDWARE # HARDWARE #
42
26 2
26
26
38/
48 2
Left horizontal frame piece (2)
Screen fabric (1 roll)
Short fiberglass tube (4)
Right horizontal frame piece (2)
Vertical frame piece (2)
Long fiberglass tube (2)
Support rod (1)
Corner bracket
Joint bracket
Screw (24 + 2 spares)
Installation hook
Hanging bracket A
Bakelite screw
Hanging bracket B
Plastic anchor
Spring (100 in. model: 38 + 4 spares)
(120 in. model 48 + 4 spares)
Fiberglass tube joint

5
Projector Screen
www.insigniaproducts.com
Assembly instructions
Step 1 – Assemble the frame
You’ll need
1Connect a left horizontal frame piece to a right horizontal tube with a joint
bracket and four screws to create a long horizontal tube. Repeat to connect
the other left and right horizontal frame pieces.
2Place the four frame pieces on the ground to form a rectangle.
3Slide a corner bracket into a horizontal frame piece and into a vertical frame
piece. Repeat for the other three frame sides.
Left horizontal frame piece (2)
Screw (24)
Phillips screwdriver
Right horizontal frame piece (2)
Joint bracket (2)
Corner bracket (4)
Vertical frame piece (2)
Horizontal frame piece
Joint bracket
Top assembled
horizontal frame piece
Bottom assembled
horizontal frame piece
Corner bracket

6www.insigniaproducts.com
4Adjust the four frame pieces to create a rectangle. The outer corners of the
frame should be 90° angles.
5Lock the frame pieces into place using four screws for each corner.
Step 2 – Assemble the screen
You’ll need
1Connect two of the short fiberglass tubes with a fiberglass joint to create one
extra long fiberglass tube. Repeat to connect the other two short fiberglass
tubes.
2Insert the long fiberglass tubes vertically and the extra long fiberglass tubes
horizontally into the tube slots on the screen fabric.
Note: If there’s a big gap between the frame pieces, adjust the tightness of the
screws to reduce the gap.
Short fiberglass tube (4) Fiberglass joint (2) Screen fabric (1 roll)
Long fiberglass tube (2)
Fiberglass joint
Short fiberglass tube Short fiberglass tube
Screen fabric
Fiberglass tube

7
Projector Screen
www.insigniaproducts.com
3Make sure that the white side of the fabric is facing down, then place the
screen flat into the frame.
Step 3 – Attach the screen to the frame
You’ll need
1On the back of the frame, insert the small hook on a hook into the grove near
the outer edge of the frame. Repeat this step to install 37 (100 in. model) or
47 (120 in. model) springs.
Spring
(100 in. model: 38)
(120 in. model 48)
Note: Each model comes with
4 spare springs
Support rod (1)
Spring hook (1)
Small hook
Large hook

8www.insigniaproducts.com
2Use the installation hook to pull the large hook toward the center of the frame,
then insert the large hook into the hole in the screen fabric. Repeat with all the
remaining springs.
3Locate the springs in the middle of the top and bottom of the frame, then
insert the top of the support rod into the notch groove on the spring. Repeat
to install the bottom of the rod. The rod should snap into place.
Top notch
Support rod
Bottom notch

9
Projector Screen
www.insigniaproducts.com
Step 4 – Hang your projector screen
You’ll need
1Align one of the hanging brackets Aon the wall where you want to install the
top of your projector screen. Make sure that the top of the bracket is level on
the wall.
2Drill pilot holes through the screw holes on the bracket and into the wall with
a drill with an 8 mm bit.
3Insert a plastic anchor into each screw hole you drilled. Make sure that the
anchor is flush with the wall. If needed, tap the anchors with a hammer or
mallet.
4Secure the bracket to the wall with two of the Bakelite screws.
5Install the other hanging bracket A. Make sure that the tops of both brackets
are level with each other.
6Hang the top of the your projector screen on the Abrackets.
Phillips screwdriver
Drill with 8 mm bit
Pencil
Hanging bracket A (2) Hanging bracket B (2)
Bakelite screws (6) Plastic anchors (6) Hammer or mallet
The distance between the hanging brackets Ashould be
100 in. model: More that 4.8 (1.45 m) and less than 5.9 ft. (1.8 m).
120 in. model: More than 5.7 ft. (1.75 m) and less than 6.6 ft. (2 m).
1.2 in.
(3 cm)

10 www.insigniaproducts.com
7Hang the hanging brackets Bon the bottom of the aluminum frame, then
slide the brackets so they align with the Abrackets. The distance between the
brackets Bshould be the same as the distance you used for the brackets A.
8Mark the screw holes in the brackets B, then drill pilot holes through the screw
holes on the brackets and into the wall with a drill with an 8 mm bit.
9Insert a plastic anchor into each screw hole you drilled. Make sure that the
anchor is flush with the wall. If needed, tap the anchors with a mallet or
hammer.
10 Secure the brackets Bto the wall with one screw per bracket.
Maintaining your screen
• Use soft brush or wet cloth to clean the screen surface.
• Don't clean the screen surface with corrosive detergents. Wipe the screen
surface with a non-corrosive detergent.
Moving your screen
• Have two people move your projector screen, one on
each side.
• Make sure that the screen stays level during moving.
• Don’t twist the frame.
Note: Make sure that you attach the brackets Bto the aluminum frame first,
then secure the brackets to the wall.

11
Projector Screen
www.insigniaproducts.com
Storing your screen
1Remove the screen from the brackets B.
2If you want to roll the fabric, remove the springs. Roll the fabric into a tube to
prevent damage.
3Do not disassemble the frame. You can damage the frame pieces.
Specifications
Note: To protect the screen, cover it with a piece of cloth or plastic.
Dimensions (H × W × D) 100 in. model:
54 × 92 × 1.4 in. (137 × 234 × 3.6 cm)
120 in. model:
64 × 110 × 1.4 in. (163 × 280 × 3.6 cm)
Weight 100 in. model: 17.4 lbs (7.9 kg)
120 in. model: 21.1 lbs: (9.6 kg)
Screen gain 1.05
Viewing angle 152°
Screen material PVC

12 www.insigniaproducts.com
ONE-YEAR LIMITED WARRANTY
Definitions:
The Distributor* of Insignia branded products warrants to you, the original purchaser of this
new Insignia-branded product (“Product”), that the Product shall be free of defects in the
original manufacturer of the material or workmanship for a period of one (1) year from the
date of your purchase of the Product (“Warranty Period”).
For this warranty to apply, your Product must be purchased in the United States or Canada
from a Best Buy branded retail store or online at www.bestbuy.com or www.bestbuy.ca and
is packaged with this warranty statement.
How long does the coverage last?
The Warranty Period lasts for 1 year (365 days) from the date you purchased the Product.
Your purchase date is printed on the receipt you received with the Product.
What does this warranty cover?
During the Warranty Period, if the original manufacture of the material or workmanship of
the Product is determined to be defective by an authorized Insignia repair center or store
personnel, Insignia will (at its sole option): (1) repair the Product with new or rebuilt parts; or
(2) replace the Product at no charge with new or rebuilt comparable products or parts.
Products and parts replaced under this warranty become the property of Insignia and are
not returned to you. If service of Products or parts are required after the Warranty Period
expires, you must pay all labor and parts charges. This warranty lasts as long as you own your
Insignia Product during the Warranty Period. Warranty coverage terminates if you sell or
otherwise transfer the Product.
How to obtain warranty service?
If you purchased the Product at a Best Buy retail store location or from a Best Buy online
website (www.bestbuy.com or www.bestbuy.ca), please take your original receipt and the
Product to any Best Buy store. Make sure that you place the Product in its original packaging
or packaging that provides the same amount of protection as the original packaging.
To obtain warranty service, in the United States and Canada call 1-877-467-4289. Call agents
may diagnose and correct the issue over the phone.
Where is the warranty valid?
This warranty is valid only in the United States and Canada at Best Buy branded retail stores
or websites to the original purchaser of the product in the country where the original
purchase was made.
What does the warranty not cover?
This warranty does not cover:
• Customer instruction/education
•Installation
•Setupadjustments
• Cosmetic damage
• Damage due to weather, lightning, and other acts of God, such as power surges
• Accidental damage
•Misuse
•Abuse
•Negligence
• Commercial purposes/use, including but not limited to use in a place of business or in
communal areas of a multiple dwelling condominium or apartment complex, or
otherwise used in a place of other than a private home.
• Modification of any part of the Product, including the antenna
• Display panel damaged by static (non-moving) images applied for lengthy periods
(burn-in).
• Damage due to incorrect operation or maintenance

13
Projector Screen
www.insigniaproducts.com
• Connection to an incorrect voltage or power supply
• Attempted repair by any person not authorized by Insignia to service the Product
• Products sold “as is”or “with all faults”
• Consumables, including but not limited to batteries (i.e. AA, AAA, C etc.)
• Products where the factory applied serial number has been altered or removed
• Loss or Theft of this product or any part of the product
• Display panels containing up to three (3) pixel failures (dots that are dark or incorrectly
illuminated) grouped in an area smaller than one tenth (1/10) of the display size or up to
five (5) pixel failures throughout the display. (Pixel based displays may contain a limited
number of pixels that may not function normally.)
• Failures or Damage caused by any contact including but not limited to liquids, gels or
pastes.
REPAIR REPLACEMENT AS PROVIDED UNDER THIS WARRANTY IS YOUR EXCLUSIVE REMEDY
FOR BREACH OF WARRANTY. INSIGNIA SHALL NOT BE LIABLE FOR ANY INCIDENTAL OR
CONSEQUENTIAL DAMAGES FOR THE BREACH OF ANY EXPRESS OR IMPLIED WARRANTY ON
THIS PRODUCT, INCLUDING, BUT NOT LIMITED TO, LOST DATA, LOSS OF USE OF YOUR
PRODUCT, LOST BUSINESS OR LOST PROFITS. INSIGNIA PRODUCTS MAKES NO OTHER
EXPRESS WARRANTIES WITH RESPECT TO THE PRODUCT, ALL EXPRESS AND IMPLIED
WARRANTIES FOR THE PRODUCT, INCLUDING BUT NOT LIMITED TO ANY IMPLIED
WARRANTIES OF AND CONDITIONS OF MERCHANTABILITY AND FITNESS FOR A PARTICULAR
PURPOSE, ARE LIMITED IN DURATION TO THE WARRANTY PERIOD SET FORTH ABOVE AND
NO WARRANTIES, WHETHER EXPRESS OR IMPLIED, WILL APPLY AFTER THE WARRANTY
PERIOD. SOME STATES, PROVINCES AND JURISDICTIONS DO NOT ALLOW LIMITATIONS ON
HOW LONG AN IMPLIED WARRANTY LASTS, SO THE ABOVE LIMITATION MAY NOT APPLYTO
YOU. THIS WARRANTY GIVES YOU SPECIFIC LEGAL RIGHTS, AND YOU MAY ALSO HAVE OTHER
RIGHTS, WHICH VARY FROM STATE TO STATE OR PROVINCE TO PROVINCE.
Contact Insignia:
1-877-467-4289
www.insigniaproducts.com
INSIGNIA is a trademark of Best Buy and its affiliated companies.
*Distributed by Best Buy Purchasing, LLC
7601 Penn Ave South, Richfield, MN 55423 U.S.A.
©2020 Best Buy. All rights reserved.

www.insigniaproducts.com
1-877-467-4289 (U.S. and Canada) or 01-800-926-3000 (Mexico)
INSIGNIA is a trademark of Best Buy and its affiliated companies.
Distributed by Best Buy Purchasing, LLC
©2020 Best Buy. All rights reserved. V1 ENGLISH
20-0294
This manual suits for next models
1
Table of contents
Other Insignia Projector Accessories manuals
Popular Projector Accessories manuals by other brands

Grandview
Grandview Prestige PP R1 Series user manual

Premier Mounts
Premier Mounts PBC-FCTA Brochure & specs

ViewSonic
ViewSonic PJ-CART-001 datasheet

Da-Lite
Da-Lite Dual Masking Electrol Instruction book

Elite Screens
Elite Screens Lunette 2 Series user guide

Navitar
Navitar 567MC500 installation instructions