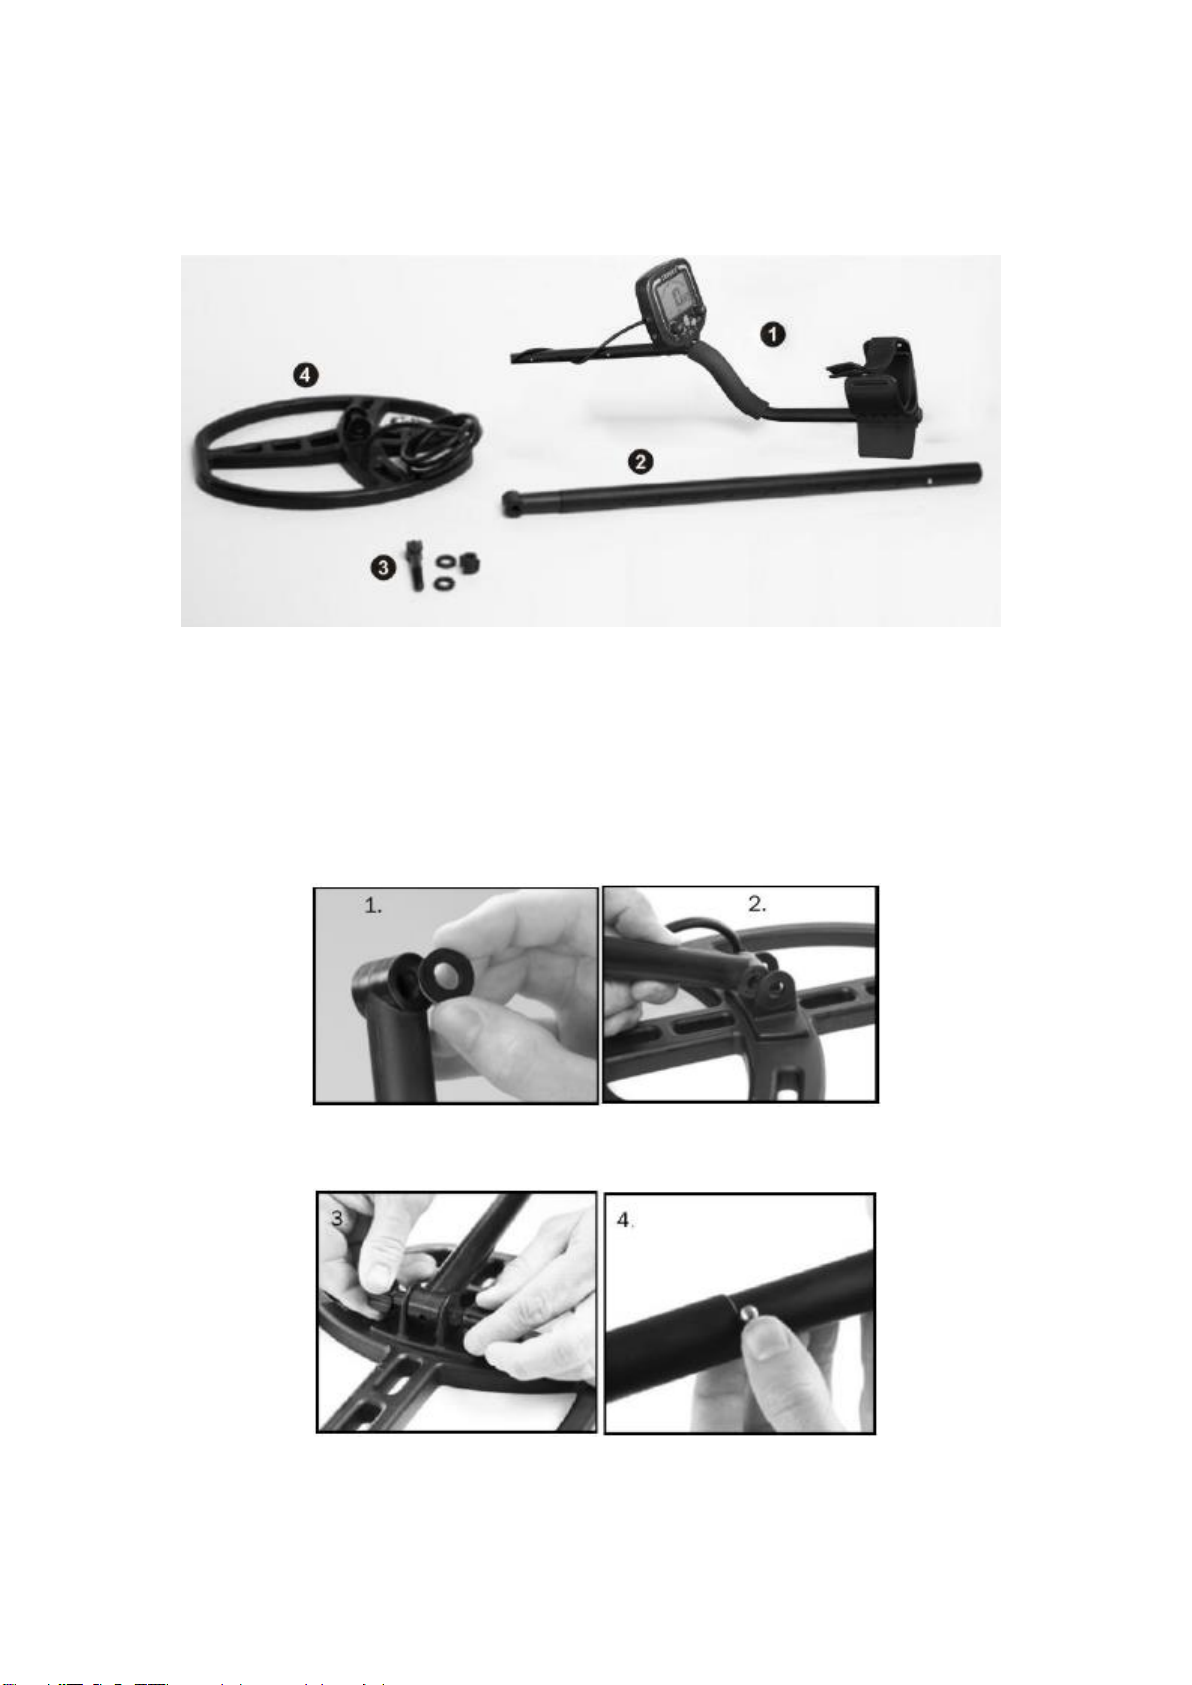
Insportline Skagway User manual

USER MANUAL –EN
IN 22123 Metal detector inSPORTline Skagway

2
CONTENTS
SAFETY INSTRUCTIONS....................................................................................................................... 3
PRODUCT DESCRIPTION..................................................................................................................... 3
TEST........................................................................................................................................................ 7
BASICS OF METAL DETECTING........................................................................................................... 8
OPERATION AND CONTROL................................................................................................................ 9
BUTTONS.......................................................................................................................................... 10
TOUCH CONTROL............................................................................................................................ 11
CONTROL IN ALL METAL MODE .................................................................................................... 11
CONTROL IN DISCRIMINATION MODE.......................................................................................... 12
READING THE DISPLAY .................................................................................................................. 13
SOIL COMPOSITION............................................................................................................................ 14
OBJECT IDENTIFICATION ON DISPLAY AND AUDIO SIGNAL..................................................... 17
GOLD SEARCH .................................................................................................................................... 18
ELECTRICAL INTERFERENCE ........................................................................................................... 18
PINPOINTING ....................................................................................................................................... 18
SPECIFICATIONS................................................................................................................................. 19
ENVIRONMENT PROTECTION ........................................................................................................... 19
TERMS AND CONDITIONS OF WARRANTY, WARRANTY CLAIMS................................................. 19

3
SAFETY INSTRUCTIONS
•For outdoor use only.
•Powered by a 9V alkaline battery.
PRODUCT DESCRIPTION
1.
Coil
2.
Rod
3.
Pin
4.
Console
5.
LED display
6.
Buttons
7.
Handle
8.
Arm rest
TERMINOLOGY
ELIMINATION
The term metal being eliminated means that the detector will not emit an audible signal, nor will the
LED display specified metal that is under the coil.
DISCRIMINATION
The function where the detector emits different sound signals for different types of metals and
eliminates specified types of metals, which is called discrimination.
Discrimination is an important feature of all professional metal detectors because it allows the user not
to detect unwanted objects.

4
RELIC
The relic is item of interest because of its age or historical value. Many relics are made of iron, but also
of bronze or other precious metals.
IRON
Iron is a common metal of low quality, which is an undesirable item. Common examples of this ferrous
scrap are old cans, pipes, screws, and nails.
In some cases, an iron object may be the target of a find, e.g., valuable relics may be made in part of
iron, cannonballs, ancient weapons, and parts of ancient structures and tools.
FERROUS
Metals that are made of iron or contain iron.
PINPOINTING
Pinpointing is a function that allows you to find the exact location of hidden objects. Deep hidden metal
objects can look like soil and can therefore be badly detected.
PULL-TABS
Discarded eyelets from beverage cans are unwanted items for treasure hunters. They come in many
different shapes and sizes. Although these eyelets can be discriminated, with this discrimination
setting you can also lose valuable objects that have a similar surface conductivity.
V.C.O. (VOLTAGE CONTROLLED OSCILLATOR)
V.C.O. is a sound method that causes both sound intensity and volume to increase as signal strength
increases. V.C.O. improves the user's ability to determine target size and depth. Very weak signals
(small or very deep hidden objects) have the lowest volume and lowest intensity. Large objects and
objects close to the coil will be announced by loud tones of high intensity.
GROUND BALANCE
This is the detector's ability to ignore common minerals in the soil and respond only to hidden metal
objects. The device has its own circuits that reduce the possibility of false signals in highly mineralized
soils.

5
ASSEMBLY
No special tools are required for assembly.
SEZNAM ČÁSTÍ
1.
Console and arm rest
2.
Rod
3.
Two washers, nut and bolt for the coil
4.
Coil 8.5“x11“
1. Attach the nuts to the holes on the stem on the bottom of the rod.
2. Align the stem and coil holes.
3. Align the stem and coil holes. Connect the coil and stem with a bolt and nut.
4. Use the pin to connect the upper and lower rods.
5. Adjust the total length of the bar using the pin and holes.
6. Wrap the coil cable around the stem and then along the rod.

6
7. Connect the cable to the console and tighten by hand.
8. Adjust the armrest with the bolt.
BATTERY
The detector is powered by a 9V alkaline battery.
•Use only alkaline batteries.
•Rechargeable batteries can be used, but we do not recommend using them.
•To replace the battery, remove the battery cover on the back of the console.
•Battery life: Classic battery: 15 –20 hours
Rechargeable battery: ca. 8 hours
•If the battery level is low, the speaker volume will decrease.
•Battery indicator:
3 segments
more than 8.4 volts
2 segments
more than 7.5 volts
1 segments
more than 6.8 volts
1 segments –flashing
less than 6.8 volts
*Values are for a 9 volt alkaline battery.
*If the last segment starts flashing, expect the switch-off within 10 minutes.
*If you use rechargeable batteries, the effective use is for 3 - 2 segments.

7
TEST
Position the detector so that the coil is over the edge of the wooden table or ask another person to
hold the detector so that the probe is above the ground.
Keep the probe away from walls, floors, and iron objects.
Remove all jewelry, watches, rings, etc.
If possible, switch off all electrical appliances that may disturb the test by the electromagnetic field.
Set the left knob (GAIN) to 12:00.
Set the right (DISC) knob to the left.
Move the nail in front of the coil. Press the + button repeatedly while moving the nail before the coil.
Notice the change in the beep. The sound changes from high to low.
Move the coins in front of the coil. Coins are the most frequently sought-after find. Notice the tones
and the 2-digit number. The object must be moving for the coil to detect it.
Set the DISC value to 60. If you now try to detect a nail, the coil will ignore it.
Press and hold button and place nickel in front of the coil. Note that no movement is required.
An object without movement is announced by a humming sound. Note the different intensity and
volume of the sound. Move the nickel in front of the probe, notice the changing depth.
Use the MODE knob. The detector switches to the mode where it detects all metals. Set the GAIN
knob to 12:00 o'clock. Slowly turn the THRESHOLD knob counterclockwise.
You will not hear any sound at low setting.
In the middle setting, there will be a transition between no sound and low sound.
At full setting, you will hear a constant loud sound. You may hear the effect of the electromagnetic
field.
HEADPHONES
The detector is provided with a 1/4 "jack. Use stereo headphones. Use headphones to extend battery
life. You can hear better small changes in tones with the headphones.
WARNING: Do not use headphones near roads or in high-traffic areas.

8
BASICS OF METAL DETECTING
GROUND MINERALS
All soils contain minerals. Signals caused by minerals can interfere with signals from metal objects you
want to look for. Soils are different and can vary significantly in the type and amount of minerals
contained. Always set the detector according to your requirements for the objects and location you are
looking in. The detector has the ability of automatic and manual adjustment of the tuning of the
influence of soil minerals and thus the elimination of false signals caused by most soil types. If you
want to maximize the detector's ability to identify targets and depths, use the GROUND GRAB feature
to adjust the detector to the soil you are in. For more information, read the chapter SOIL
COMPOSITION.
TRASH
If you are looking for coins, you want to ignore objects such as nails and aluminum foils, etc. These
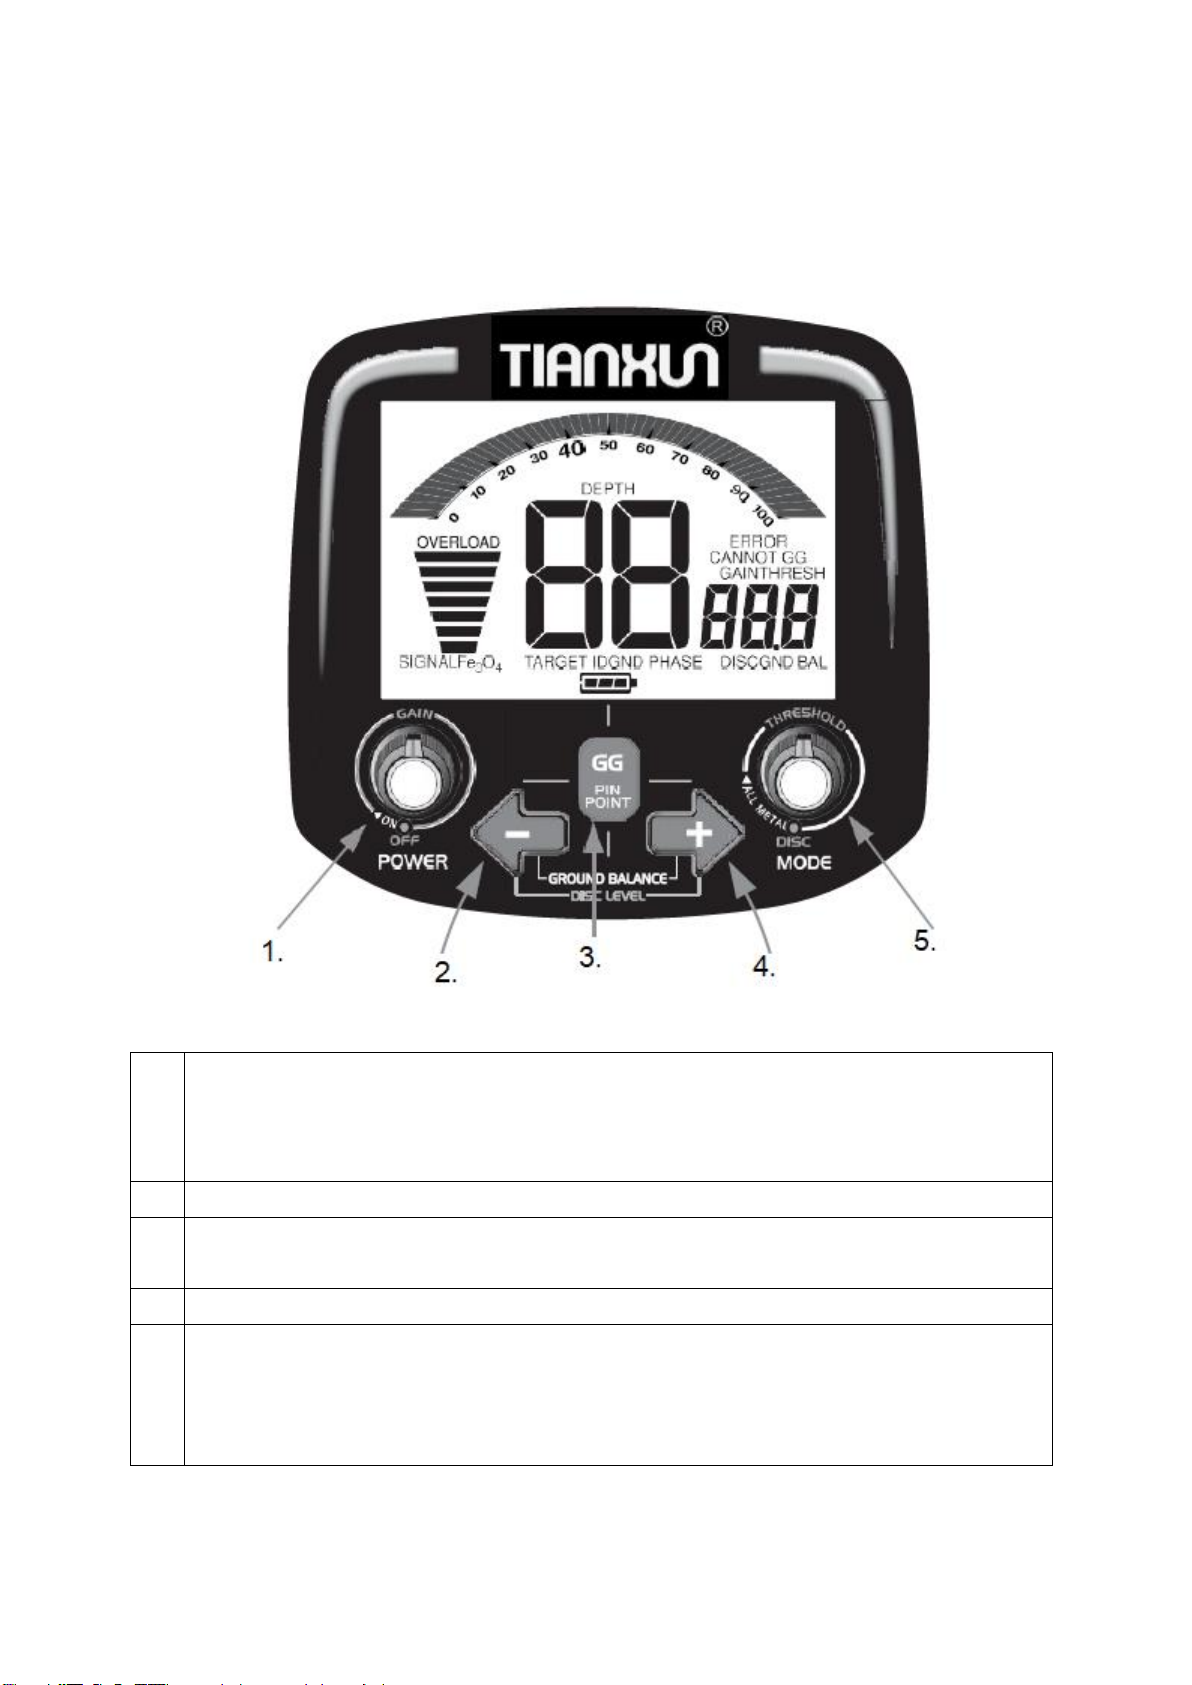
unwanted objects are generally detected with a lower number on a scale of 0 - 100. The two-digit
number in the center of the display will also help you better identify the metal in DISCRIMINATION
mode.
IDENTIFICATION OF BURDEN OBJECTS
Different metals are divided according to type on a two-digit scale 0 - 100 which is in the middle of the
display. The two-digit number will help you better identify the metal in DISCRIMINATION mode.
SIZE AND DEPTH OF BURIED OBJECTS
In DISC mode, the probable depth of the object is displayed. The depth is shown on the left side of the
display next to the SIGNAL STRENGT). Use the PONPOINT mode for more accurate determination.
PINPOINT displays the current depth in inches. It is not necessary to move the coil in PINPOINT
mode. The ability to search for objects without the need for constant movement will allow you to find
the object more precisely.
ELECTROMAGNETIC INTERFERENCE (EMI)
Electromagnetic interference can cause various metal detection faults, spontaneous signal
interruptions or sudden sounds. Common sources of electromagnetic influences are electro-
communication objects such as mobile phones, lamps, radars, computers, or other detectors.
The best protection against EMI is to reduce GAIN or THRESHOLD. Decreasing the sensitivity will
result in a reduction in depth detection but will also reduce the effect of EMI on the coil.

9
OPERATION AND CONTROL
Use the left knob to turn on the detector. Then use the knob to increase the sensitivity in DISC mode
or GAIN in ALL METAL mode. We recommend that you keep the GAIN below 70 until you gain the
necessary knowledge and experience.
1.
ON / OFF / GAIN
Start / stop: turn the knob in the direction of the arrow to start the device, you will feel a click. To
switch off, turn in the direction of the arrow, you will feel a click again
DISC mode: turn to set GAIN (sensitivity) from 1 to 100.
2.
Navigation arrow or decrease setting value
3.
DISC mode: press and hold to start PINPOINT mode
ALL METAL mode: Press and hold to adjust the balance of the soil composition
4.
Navigation arrow or increase value
5.
Metal detection mode and settings
Turn the knob to the left for DISCRIMINATION mode
Turn the knob to the right for ALL METAL mode
Turn the knob in ALL METAL mode to set the metal detection sensitivity from -40 to 40.

10
BUTTONS
OFF / ON / GAIN
Turn the knob to the right to start / turn to the left to turn it off
Turning the knob clockwise will increase the sensitivity of the detector, the
higher the sensitivity, the greater the chance of finding a smaller object or
an object that is deeper. However, with higher sensitivity, there is a greater
chance of signal interference by the electromagnetic field
Turning the knob increases the GAIN value on the bottom right of the
display
DISC sensitivity: the left knob is labeled GAIN and controls the sensitivity in
DISCRIMINATION mode
GAIN in ALL METAL mode: In ALL METAL mode, GAIN is increased by
turning clockwise
THRESHOLD is controlled independently by the right knob
DISC / ALL METAL /
THRESHOLD
Use the left DISC knob to enter DISCRIMINATION mode
Use the right button to enter ALL METAL mode
In ALL METAL mode, turn the knob to increase the THRESHOLD value
from -40 to 40
In ALL METAL mode, TRESHOLD can be set in two directions
GAIN vs THRESHOLD
GAIN –controls the signal strength, increase the signal to detect deeper objects or small objects
THRESHOLD –controls the audio signaling of the detector, positive values increase the volume of the
audio signal for worst detected objects, negative values decrease the volume of audio signals
For searching for objects with maximum sensitivity: First, reduce the GAIN value to a low value.
Then set THRESHOLD to a positive value with comfortable audio signal volume. Then slowly increase
the GAIN value to the limit where you will not be disturbed by a constant audio signal.
To search for objects in silent mode: Set the THRESHOLD value to negative values and, if
necessary, decrease the GAIN. Searching in silent mode is likely to reduce sensitivity.

11
TOUCH CONTROL
GG / PINPOINT
The button has two functions according to the mode of operation:
a. In DISC mode, press and hold the PINPOINT start button
PINPOINT temporarily starts searching for objects without having to move
the coil. Any metal detected by the coil will make a sound. PINPOINT is
generally used to verify a finding that you found in DISCRIMINATION
mode.
b. In ALL METAL mode, press and hold the GROUND GRAB button
GROUND GRAB allows you to adjust the sensitivity of the detector to
metals and minerals contained in the soil. Different soil types have
different compositions.
+ and -
In DISCRIMINATION mode, you can adjust the sensitivity of the coil to various
metals
In ALL METAL MODE you can set different sensitivity to soil composition
CONTROL IN ALL METAL MODE
This mode is more sensitive than DISCRIMINATION mode and is used to find all metal objects in the
soil. The coil must be in motion to find objects.
GROUND GRAB (GG)
Naturally occurring minerals in the soil appear as metals for the coil.
Before using the detector, set the ALL METAL mode and start the automatic detection of the soil
composition. Press and hold the GG button as you move the coil up and down. Release the button as
soon as the sound stabilizes. The GND BAL value is displayed in the lower right corner of the screen.
Different soils require different values, so always run the GROUND GRAB function first before
searching.
SETTINGS
During settings, the values in the lower right corner of the screen change.
If you are familiar with the detector, set GAIN and THRESHOLD to lower values so that you do not
hear loud noises or unwanted noises. Set GAIN to 12:00 or less. Adjust THRESHOLD so that you can
hear soft sounds in the background or to a position where there is no steady sound.
UNWANTED SOUND NOTIFICATIONS
This device is very sensitive, unwanted notifications can be caused by electromagnetic interferences
caused by electrical devices.
COIL MOVEMENT
Move the coil parallel to the ground and in one level. Avoid lifting the coil while searching for objects.
READING THE DATA ON THE DISPLAY
Most objects are found using sound signals, where the object is distinguished by sound signal.
Notice the Fe3O4scale on the left side of the display.
This scale indicates the values of minerals in the soil. Most black sand is made up of magnetite.
Golden nuggets are most often found in concentrated black sand deposits.
For the best results for finding objects in highly mineralized soils, we recommend setting the ALL
METAL mode. For the most accurate measurement of Fe3O4, we recommend adjusting the soil
composition of GROUD GRAB. As the coil moves, notice the GND PHASE value in the center of the
display. GND PHASE indicates the type of minerals in the soil. If the GND PHASE and GND BAL
(GROUND GRAB) values are significantly different, we recommend performing a GROUD GRAB
again.

12
If you do not set any value using the knobs, the GND BAL value will always be displayed in the lower
right corner.
GND BAL is an internal setting for soil composition and is shown in the lower right corner of the
display. The original value is 82.9 which is the best starting point.
After performing GROUND GRAB, the GND BAL value changes according to the soil composition.
You can also set the GROUND BAL using the + and - buttons. See the SOIL COMPOSITION chapter
for more information. Experienced users prefer to set GND BAL to a value where they receive only a
weak steady signal and thus be able to better distinguish a possible item. Adjust the value above with
the + button.
TARGET SCALE
The arc scale at the top of the display classifies metal objects. Each time an object is detected, the
scale indicators light up. The segments will be displayed for 3 seconds. Identification shows the
probable composition of the object. For more information, read the METAL IDENTIFICATION chapter.
The obejct is identified by an ID number. If you find an object in ALL METAL mode, we recommend
switching to DISCRIMINATION mode for more accurate identification using a two-digit ID number.
CONTROL IN DISCRIMINATION MODE
This mode is used to eliminate objects that are not the target of the findings, such as nails, foils, and
other scrap metal. The coil must be in motion for detection. DISCRIMINATION mode is less sensitive
to small objects or objects that are deeper.
GROUND GRAB (GG)
This function cannot be set in DISCRIMINATION mode. To set GG, you must switch the detector to
ALL METAL mode. The settings are also transferred to DISCRIMINATION mode.
SETTINGS
During setup, the values in the lower right corner of the screen change.
GAIN
If you are a beginner, start with a lower value so that you do not hear any sounds as the coil moves.
Set the knob position to 12:00 or less.
In this mode, GAIN sets the sensitivity. The higher the value, the deeper hidden objects can be found
and the more the detector responds to small objects.
MODE
This knob is not used in this mode. Turn the knob counterclockwise as far as it will go. Turn the knob
to change the mode from DISCRIMINATION to ALL METAL.
DISC
Use the + and - buttons to adjust the DISC value to eliminate unwanted metal objects. Using the
buttons changes the value by 1, holding it increases the values faster. A higher value eliminates
unwanted metals, a lower value includes more metals.
See the METAL IDENTIFICATION chapter for more information.
UNWANTED SOUND NOTIFICATIONS
This device is very sensitive, unwanted notifications can be caused by electromagnetic interferences
caused by electrical devices.
COIL MOVEMENT
Move the coil parallel to the ground and in one level. Avoid lifting the coil while searching for objects.
PINPOINT
Press and hold the PINPOINT button to narrow the area of the found object. PINPOINT is a detection
mode that does not need a moving coil.

13
As soon as an object is found and the coil is not moving, the detector will make a humming sound, the
volume and tone will change with the distance of the found object.
The approximate depth in inches appears on the display. The depth is calibrated depending on the
coin-sized items.
When you release the button, you return to the DISCRIMINATION mode, where you need to move the
coil. If you hold down the PINPOINT button for a long time, the sound may be more distorted. If you
plan to search for objects using PINPOINT mode, we recommend that you release and press the
button repeatedly. More information can be found in the chapter PINPOINT. This feature is important
because some metal objects can be detected as soil minerals due to oxidation and can be more
difficult to identify.
READING THE DISPLAY
TARGET ID
Each time the detector detects metal in the soil, a two-digit number appears in the center of the
display. At the same time, the metal type is displayed using the three identification segments on the
upper indicator. See the METAL IDENTIFICATION chapter for more information.
TARGET SCALE
The top arc indicator identifies the type of metal. Each time a metal is identified in the soil, the type of
metal is identified using three segments. The segments are displayed for 3 seconds. Identification is
for guidance only. See the METAL IDENTIFICATION chapter for more information.
SIGNAL
Each time metal is detected, the signal strength is displayed by 7 segments on the signal indicator. If
the signal is strong, it may mean that it is a larger object or object close to the surface.
If the signal is weak, it may mean that the object is smaller or deep below the surface.
If the object is deep and probably smaller in size, you can narrow the identification using the
PINPOINT function.
In DISCRIMINATION mode, you can use the + and - buttons to change the parameters:
1. Tone Identification
2. Target Elimination
If you change the DISCRIMINATION value, the color of the segments on the display changes.
1. Blank (no segment displayed)
2. Gray
3. Black
The segments will be displayed if you set them using the + and - buttons. The setting will be displayed
with a pointer. During the search, you can view the settings in two ways:

14
1. The DISC value is always displayed in the lower right corner. This value is the lowest allowed
value for metal detection.
2. Press the + or - button to display the currently set parameters. Press the + or - buttons to
change the value by 1.
As soon as an object is detected, the segments light up according to the probable type of metal.
DISC values up to 40:
•Metal detection is only audio, no objects are eliminated from the search
•TARGET ID is lower than the DISC value, a low sound, metals are displayed on a gray scale.
•TARGET ID is higher than the DISC value, a high sound, metals are displayed on a black
scale.
DISC values from 41 to 79:
•Objects in empty segments are not detected
•Items with a TARGET ID value less than the DISC value is indicated by a low sound, metals
are displayed on a gray scale.
DISC values 80 and higher:
•All detected objects emit a high tone, only objects on a black scale are displayed. The detector
does not emit any low tones and targets with a value less than 80 are not detected.
Example:
Objects with a value
less than 20 will not
be detected
Values from 20 to 49 will
emit a low tone
Values from 50 to 100
will emit a high tone
Values higher than
50 will emit a high
tone
SOIL COMPOSITION
All soil types contain minerals. Minerals in soils can cause false signals or make it impossible to find
objects.
The detector therefore has a function that can adjust the soil composition according to the location and
thus eliminate the effect of minerals on the detection of objects.
If the detector is properly calibrated for soil composition, the higher the depth of detection, the sound
signals will be more pronounced, and the identification of the metals will be more accurate.
How to set the soil composition:
1. Start the detector and set GAIN to 12:00 o'clock.
2. Start ALL METAL mode using the right MODE knob.
3. Turn the THRESHOLD knob so that you hear a slight hum.

15
4. Find a place where the soil will be clean, and you will not detect any metal.
5. Press and hold the GG button and move the coil up and down, see. picture. Move the coil from
1 inch to 6-8 inches high.
6. When the GND PHASE value stabilizes at 1 or 2 numbers, release the GG button. Note that
the sound will stabilize when you release the button. After setting, you can stay in ALL METAL
mode or switch to DISCRIMINATION mode.
You can get the most accurate soil values by moving the probe up and down in a metal-free area.
The detector displays two values of soil composition:
1. Type of mineral composition –GND PHASE
2. Amount of mineralization Fe3O4–higher amounts of minerals reduce the ability to detect
objects, their depth, ID, etc. These losses are even higher in DISCRIMINATION mode.
The goal of soil composition is to balance the GND BAL value to the PHASE number
PHASE –measured soil values (two-digit number)
GND BAL –internal value of the detector which calibrates the soil composition (three-digit
number with a decimal point)
The GND BAL value is measured more accurately, and therefore the value may be different than the
PHASE value.
After finding the value and releasing the GG button, the measured values are transferred to the GND
BAL setting.
The two-digit PHASE number on the display indicates the probable type of mineralization:
0 –10: Wet sand and alkaline soil
5 –25: Iron, little soil, you probably moved the coil over an iron object
26 –39: Little soil, most often beaches, saltwater sand
40 –75: Red, yellow, and brown iron bearing clay minerals

16
75 –95: Magnetite and other minerals of black iron
The goal of determining soil composition is to eliminate constant audio signals while searching for
objects. In some cases, the sound cannot be eliminated. After automatic soil composition, some users
may want to adjust the sensitivity to their own needs.
For manual adjustment:
•Switch the detector to ALL METAL mode.
•Move the coil up and down, as with automatic soil composition detection.
•Use the + and - buttons to set the desired value.
If the soil composition is set incorrectly, you will hear different tones as the coil moves up and down.
•If the tones are louder as you move the coil up, increase the value.
•If the tones are louder as you move the coil down, decrease the value.
Note: Experienced users prefer a setting where they get a low response when lowering the coil.
POSITIVE AND NEGATIVE RESPONSE
The reason to set good values for soil composition is so that you are not disturbed by minerals in the
soil. If the setting is not correct, the minerals in the soil will announce positive or negative tones
according to the incorrect value.
POSITIVE RESPONSE
If the GND BAL number is too high, the response to soil minerals will be positive. This means that if
you move the coil down in PINPOINT or ALL METAL mode, the tone will be louder as the coil
approaches the ground. The tone will be weaker as you lift the probe off the ground.
NEGATIVE RESPONSE
If the GND BAL number is too low, the response to soil minerals will be negative. This means that if
you move the probe down in PINPOINT or ALL METAL mode, the tone will not be heard as the probe
approaches the ground. The tone will be louder as you lift the probe off the ground.
Fe3O4 PANEL
This panel shows the amount of Fe3O4mineralization. This information is updated every second. The
data is sensitive to movement and gives the most accurate reading if the coil up and down several
times.
Indicator
Mineralization
%Fe3O4
Sensitivity
7 segments
High
Over 1
Over 2500
2–6 segments
Medium
.026 –1.0
61 –2,500
1 segment
Very low
0.006 - .025
15 –60
None
--
Lower than.006
Lower than 15
Magnetic susceptibility is expressed in micro-cgs units. In a saltwater environment without iron
minerals, the bar graph shows the relative electrical conductivity.
In soils where the value is higher than 10,000 micro-cgs, the device will be overloaded and will not be
usable. A possible solution is to hold the detector a few inches above the ground. Listen to the device
so that you can better detect how high you need to hold the coil.
High magnetic susceptibility is commonly found in soils that are composed of igneous rocks, in
floodplain black sand streaks on beaches, and in red clay soils of humid climates.
Low magnetic susceptibility is usually found in the white beach sands of tropical and subtropical areas
and soils above limestone.

17
OBJECT IDENTIFICATION ON DISPLAY AND AUDIO SIGNAL
SIGNAL INDICATOR
The lower left bar graph shows the signal strength when the device is in DISCRIMINATION mode.
Signal strength shows the size of an object hidden in the ground or how close it is.
If all segments are displayed, the found object is large or close to the surface.
If one or two segments are displayed, the found object is small or deep below the surface.
DEPTH INDICATOR
If you are using DISCRIMINATION MODE, you can check the position and size using the PINPOINT
function. Press PINPOINT to temporarily find an object without having to move the coil.
When you press PINPOINT, the DEPTH indicator appears. The displayed value shows the depth of
the object in inches. The distance is measured from the coil to the object. The PINPOINT function is
calibrated for coin-sized items. For larger objects, the numerical value is relative to the depth.
AUDIO SIGNAL
•If an object is detected, two types of sound signals are emitted:
•V.C.O
•Deep tone
In DISCRIMATION mode, objects are announced using V.C.O tones and shaded objects by deep
tones. Users can adjust the sensitivity using the + and - buttons.
In ALL METAL mode, all items are announced using V.C.O.
V.C.O tones change depending on the depth of the subject. A stronger signal emits louder and higher
tones. A weak signal emits a quiet and deeper tone. Therefore, it is advisable to use headphones to
find smaller items.
TWO DIGIT IDENTIFICATION
In DICRIMINATION mode, a two-digit identification will help you identify a hidden object. Through
practice, you will learn to better identify objects by codes. The number changes each time you find an
object, depending on its depth and size.
Reference table (values and objects are for guidance only):
foil from gum wrapper
47 –48
U.S. nickel (5¢ coin)
58
aluminum pull-tab
60 –75
aluminum screwcap
70 –80
zinc penny (dated after 1982)
78
aluminum soda pop can
75 –85
copper penny, clad dime
83
U.S. quarter (25¢ coin), clad
85
50¢ coin, modern clad
87
old silver dollar coin
89
US silver Eagle $1 coin
91
WARNING: Values, objects, and their composition are for guidance only. The detection and
determination of metals depends on their depth, size, age, and degree of oxidation.

18
GOLD SEARCH
Finding gold nuggets is difficult, mainly because it is found in highly oxidized minerals. Therefore, we
recommend setting the detector to high sensitivity and setting the ALL METAL mode correctly with the
correct soil composition.
We recommend using headphones if their use does not endanger your safety.
The Fe3O4indicator shows iron mineralization in the soil. Gold nuggets are most found in these soils
and are often displayed as iron minerals. Most often, gold nuggets are represented by high values or
high deviations.
ELECTRICAL INTERFERENCE
SIGNS
The detector will make sound spontaneously.
COMMON SOURCES OF ELECTRICAL INTERFERENCE
The most common sources are: overhead power lines, underground lines, other metal detectors,
telephone lines carrying electronic data, computer systems, electric fences, old CRT TVs, mobile
phones, radio receivers for emergency and communication communications, thunderstorms,
fluorescent lamps, metal lamps, electric motors , VLF military communication systems and car ignition
systems. Several different sources of electrical interference may be present at home, in a store, or in
an urban environment.
USE WHEN UNDER ELECTRICAL INTERFERENCE
It is best to adjust the sensitivity with GAIN and THRESHOLD cups. THRESHOLD can only be
adjusted in ALL METAL mode.
In DISCRIMINATION mode, setting 60 - 70 reduces the effect of electrical influences.
USE
After you find the item, you must determine its exact location:
1. Walk around the object.
2. Move the coil across the area in the circle.
Move the coil every 30 ° - 40 ° of the circle.
If neither the tone nor the subject ID changes, you have probably identified the exact location.
If the tone and ID change, it is possible that the object is irregularly shaped, or you have found more
objects.
If the tone or ID disappears, you may have found a junk or unwanted object.
PINPOINTING in DISCRIMINATION mode
1. Move the coil from side to side.
2. Visually imagine the location where you noticed the sound signal.
3. Stand 90 ° to the intended location.
4. Move the coil on the same surface, 90 ° from the first location.
5. This will pinpoint the target location using a cross.
PINPOINTING
After finding an object in DISCRIMINATION mode, hold down the PINPOINT button and slowly
approach the location with tones.
Holding the PINPOINT button for a long time loses its sensitivity. Therefore, we recommend releasing
and pressing the button regularly.

19
SPECIFICATIONS
Weight: 2 lbs, 8 oz with battery installed
Standard search coil: 11-inch search coil
Battery: One 9-volt rectangular alkaline battery
Function principle: inductive VLF
Operating frequency: 19 kHz
Reactive overload: 10,000 micro-cgs (with standard search probe)
Resistance overload: 1,200 micro-cgs (with standard search probe)
Ground balance range: from ferrite to salt water inclusive
Battery life: 15+ hours (depending on battery)
Operating temperature range: -10 to +50 ° C
Operating humidity range: 0 - 90% non-condensing
ENVIRONMENT PROTECTION
After the product lifespan expired or if the possible repairing is uneconomic, dispose it according to the
local laws and environmentally friendly in the nearest scrapyard.
By proper disposal you will protect the environment and natural sources. Moreover, you can help
protect human health. If you are not sure in correct disposing, ask local authorities to avoid law
violation or sanctions.
Don’t put the batteries among house waste but hand them in to the recycling place.
TERMS AND CONDITIONS OF WARRANTY, WARRANTY CLAIMS
General Conditions of Warranty and Definition of Terms
All Warranty Conditions stated here under determine Warranty Coverage and Warranty Claim
Procedure. Conditions of Warranty and Warranty Claims are governed by Act No. 89/2012 Coll. Civil
Code, and Act No. 634/1992 Coll., Consumer Protection, as amended, also in cases that are not
specified by these Warranty rules.
The seller is SEVEN SPORT s.r.o. with its registered office in Strakonická street 1151/2c, Prague 150
00, Company Registration Number: 26847264, registered in the Trade Register at Regional Court in
Prague, Section C, Insert No. 116888.
According to valid legal regulations it depends whether the Buyer is the End Customer or not.
“The Buyer who is the End Customer” or simply the “End Customer” is the legal entity that does not
conclude and execute the Contract in order to run or promote his own trade or business activities.
“The Buyer who is not the End Customer” is a Businessman that buys Goods or uses services for the
purpose of using the Goods or services for his own business activities. The Buyer conforms to the
General Purchase Agreement and business conditions.
These Conditions of Warranty and Warranty Claims are an integral part of every Purchase Agreement
made between the Seller and the Buyer. All Warranty Conditions are valid and binding, unless
otherwise specified in the Purchase Agreement, in the Amendment to this Contract or in another
written agreement.
Warranty Conditions
Warranty Period

20
The Seller provides the Buyer a 24 months Warranty for Goods Quality, unless otherwise specified in
the Certificate of Warranty, Invoice, Bill of Delivery or other documents related to the Goods. The legal
warranty period provided to the Consumer is not affected.
By the Warranty for Goods Quality, the Seller guarantees that the delivered Goods shall be, for a
certain period of time, suitable for regular or contracted use, and that the Goods shall maintain its
regular or contracted features.
The Warranty does not cover defects resulting from (if applicable):
•User’s fault, i.e. product damage caused by unqualified repair work, improper assembly,
insufficient insertion of seat post into frame, insufficient tightening of pedals and cranks
•Improper maintenance
•Mechanical damages
•Regular use (e.g. wearing out of rubber and plastic parts, moving mechanisms, joints, wear of
brake pads/blocks, chain, tires, cassette/multi wheel etc.)
•Unavoidable event, natural disaster
•Adjustments made by unqualified person
•Improper maintenance, improper placement, damages caused by low or high temperature,
water, inappropriate pressure, shocks, intentional changes in design or construction etc.
Warranty Claim Procedure
The Buyer is obliged to check the Goods delivered by the Seller immediately after taking the
responsibility for the Goods and its damages, i.e. immediately after its delivery. The Buyer must check
the Goods so that he discovers all the defects that can be discovered by such check.
When making a Warranty Claim the Buyer is obliged, on request of the Seller, to prove the purchase
and validity of the claim by the Invoice or Bill of Delivery that includes the product’s serial number, or
eventually by the documents without the serial number. If the Buyer does not prove the validity of the
Warranty Claim by these documents, the Seller has the right to reject the Warranty Claim.
If the Buyer gives notice of a defect that is not covered by the Warranty (e.g. in the case that the
Warranty Conditions were not fulfilled or in the case of reporting the defect by mistake etc.), the Seller
is eligible to require a compensation for all the costs arising from the repair. The cost shall be
calculated according to the valid price list of services and transport costs.
If the Seller finds out (by testing) that the product is not damaged, the Warranty Claim is not accepted.
The Seller reserves the right to claim a compensation for costs arising from the false Warranty Claim.
In case the Buyer makes a claim about the Goods that is legally covered by the Warranty provided by
the Seller, the Seller shall fix the reported defects by means of repair or by the exchange of the
damaged part or product for a new one. Based on the agreement of the Buyer, the Seller has the right
to exchange the defected Goods for a fully compatible Goods of the same or better technical
characteristics. The Seller is entitled to choose the form of the Warranty Claim Procedures described
in this paragraph.
The Seller shall settle the Warranty Claim within 30 days after the delivery of the defective Goods,
unless a longer period has been agreed upon. The day when the repaired or exchanged Goods is
handed over to the Buyer is considered to be the day of the Warranty Claim settlement. When the
Seller is not able to settle the Warranty Claim within the agreed period due to the specific nature of the
Goods defect, he and the Buyer shall make an agreement about an alternative solution. In case such
agreement is not made, the Seller is obliged to provide the Buyer with a financial compensation in the
form of a refund.
CZ
SEVEN SPORT s.r.o.
Registered Office: Strakonická 1151/2c, Praha 5, 150 00, ČR
Headquaters: Dělnická 957, Vítkov, 749 01
Warranty & Service: Čermenská 486, Vítkov 749 01
This manual suits for next models
1
Table of contents
Other Insportline Metal Detector manuals
Popular Metal Detector manuals by other brands

Fisher Research Labs
Fisher Research Labs Gold Bug-2 operating manual

Bounty Hunter
Bounty Hunter DISCOVERY 2200 owner's manual

C-SCOPE
C-SCOPE EVO6000 user manual

Whites
Whites Spectra V3 Complete owner's omplete owner's guide

Whites
Whites Coinmaster classic III instructions

Whites
Whites Coinmaster 6000/Di Series 2 owner's manual