InstantPot Pro 60 User manual

INSTANT POT®PRO
MULTI-COOKER
TM

2| support@instantpot.com.au | 1800 251 643
TABLE OF CONTENTS
IMPORTANT SAFEGUARDS 3
Special cord set instructions 8
Product specifications 8
Product, parts and accessories 9
Get started 11
Initial set up 11
Initial test run (water test) 12
Pressure Cooking 101 14
Control panel 18
Status messages 20
Settings 21
Pressure control features 23
Cooking 28
Smart Programme overview 29
Pressure Cook and Rice 31
Steam 33
Sauté 35
Deglazing 36
Slow Cook 37
Sous Vide 38
Yogurt 43
Bake 46
Keep Warm 47
Using Favourite Programmes 48
Care, cleaning and storage 49
Troubleshooting 53
Warranty 56
Contact 58
WARNING
Read this manual carefully and completely and retain for future reference. Failure to
adhere to safety instructions may result in serious injury or damage.
instantpot.com.au | 3
IMPORTANT
SAFEGUARDS
At Instant Brands™your safety always comes first. The Instant Pot®Pro was
designed with your safety in mind.
As always, be cautious when using electrical appliances and follow basic safety
precautions.
1. READ ALL INSTRUCTIONS, SAFEGUARDS AND WARNINGS BEFORE USE.
FAILURE TO FOLLOW THESE SAFEGUARDS AND INSTRUCTIONS MAY
RESULT IN INJURY AND/OR PROPERTY DAMAGE.
2. Use only the Instant Pot Pro lid with the Instant Pot Pro multicooker base.
Using any other multicooker lids may cause injury and/or damage.
3. For household use only. Not for commercial use. Do not use the appliance for
anything other than its intended use.
4. For countertop use only. Always operate the appliance on a stable, non-
combustible, level surface.
• Do not place on anything that may block the vents on the bottom of
the appliance.
• Do not place on a hot stove.
5. Heat from an external source will damage the appliance.
• DO NOT place the appliance on or close to a hot gas or electric burner,
or a heated oven.
• DO NOT use the appliance near water or flame.
• DO NOT use outdoors. Keep out of direct sunlight.
6. DO NOT touch the appliance’s hot surfaces. Only use the side handles for
carrying or moving.
• DO NOT move the appliance when it is under pressure.
• DO NOT touch accessories during or immediately after cooking.
• DO NOT touch the metal portion of the lid when the appliance is in
operation; this could result in injury.
• Always use proper hand protection when removing hot accessories,
and to handle the hot inner pot.
• Always place hot accessories on a heat-resistant surface or cooking plate.
WARNING
Read this manual carefully and completely and retain for future reference. Failure to
adhere to safety instructions may result in serious injury or damage.
4| support@instantpot.com.au | 1800 251 643
IMPORTANT
SAFEGUARDS
7. The removable inner pot can be extremely heavy when full of ingredients.
Care should be taken when lifting the inner pot from the multicooker base to
avoid burn injury.
• Extreme caution must be used when the inner pot contains hot food, hot
oil or other hot liquids.
• Do not move the appliance while it is in use and use extreme caution
when disposing of hot grease.
8.
CAUTION
Overfilling may cause a risk of clogging the steam release pipe
and developing excess pressure.
• DO NOT fill over the Max PC Fill line as indicated on the inner pot.
• DO NOT fill the inner pot over the Half Fill line (as indicated on the inner
pot) when cooking foods that expand during cooking such as rice or dried
vegetables.
9.
WARNING
This appliance cooks under pressure. Any pressure in the
appliance can be hazardous. Allow the appliance to depressurise naturally or
release all excess pressure before opening. Inappropriate use may result in
burns, injury and/or property damage.
• Make sure the appliance is properly closed before operating. Refer to
Pressure control features: multicooker lid.
• DO NOT cover or obstruct the steam release valve and/or float valve with
cloth or other objects.
• DO NOT attempt to open the appliance until it has depressurised, and all
internal pressure has been released. Attempting to open the appliance
while it is still pressurised may lead to sudden release of hot contents and
may cause burns or other injuries.
• DO NOT place your face, hands or exposed skin over the steam release
valve or float valve when the appliance is in operation or has residual
pressure.
• DO NOT lean over the appliance when removing the lid, as heat and
steam escape when the lid is removed.
• Turn the appliance off if steam escapes from the steam release valve
and/or float valve in a steady stream during Pre-heating or Cooking,

WARNING
Read this manual carefully and completely and retain for future reference. Failure to
adhere to safety instructions may result in serious injury or damage.
instantpot.com.au | 5
IMPORTANT
SAFEGUARDS
for longer than 3 minutes.
• If steam escapes from the sides of the lid, turn the appliance off and
make sure the sealing ring is properly installed. Refer to Pressure
control features: sealing ring.
• DO NOT attempt to force the lid off the Instant Pot multicooker base.
Refer to Releasing pressure.
10. When cooking meat with skin (e.g. sausage with casing), the skin can swell
when heated. Do not pierce the skin while it is swollen; this could result in
scalding injury.
11. When pressure cooking food with a doughy or thick texture, or a high fat/oil
content, contents may splatter when opening the lid. Follow recipe instructions
for pressure release method. Refer to Releasing pressure.
12. Oversized foods and/or metal utensils must not be inserted into the inner pot
as they may cause risk of fire and/or personal injury.
13. Proper maintenance is recommended before and after each use:
• Check the steam release valve, steam release pipe, anti-block shield and
float valve for clogging;
• Before inserting the inner pot into the multicooker base, make sure both
parts are dry and free of food debris;
• Let the appliance cool to room temperature before cleaning or storage.
14. Do not use this appliance for deep frying or pressure frying with oil.
15. To disconnect, touch Cancel, then remove plug from power source. Always
unplug when not in use, as well as before adding or removing parts or
accessories, and before cleaning. To unplug, grasp the plug and pull from the
outlet. Never pull from the power cord.
16. Regularly inspect the appliance and power cord. Do not operate the appliance
if the power cord or plug is damaged, or after the appliance malfunctions or is
dropped or damaged in any manner. For assistance, contact Customer Care by
email at support@instantpot.com.au or by phone at 1800 251 643 or (02)
9317 1000.
17. Spilled food can cause serious burns. A short power-supply cord is provided to
reduce the hazards resulting from grabbing, entanglement and tripping.

WARNING
Read this manual carefully and completely and retain for future reference. Failure to
adhere to safety instructions may result in serious injury or damage.
6| support@instantpot.com.au | 1800 251 643
IMPORTANT
SAFEGUARDS
• DO NOT let the power cord hang over edges of tables or counters, or
touch hot surfaces or open flame, including the stovetop.
• DO NOT use below-counter power outlets, and never use with an
extension cord.
• Keep the appliance and cord away from children.
18. Do not use any accessories or attachments not authorised by Instant Brands
LLC. The use of parts, accessories or attachments not recommended by the
manufacturer may cause a risk of injury, fire or electric shock.
• To reduce the risk of pressure leakage, cook only in an authorised
stainless steel Instant Pot inner pot made for this model.
• DO NOT use the appliance without the removable inner pot installed.
• To prevent personal injury and damage to the appliance, only replace the
sealing ring with an authorised Instant Pot sealing ring.
19. DO NOT attempt to repair, replace or modify components of the appliance, as
this may cause electric shock, fire or injury, and will void the warranty.
20. Do not tamper with any of the safety mechanisms, as this may result in
injury or property damage.
21. The multicooker base contains electrical components. To avoid electrical
shock:
• DO NOT put liquid of any kind into multicooker base;
• DO NOT immerse power cord, plug or the appliance in water or other
liquid;
• DO NOT rinse the appliance under tap.
22. Do not use the appliance in electrical systems other than
220-240V~ 50-60Hz. Do not use with power converters or adapters.
23. This appliance is NOT to be used by children or by persons with reduced
physical, sensory or mental capabilities. Close supervision is necessary when
any appliance is used near children and these individuals. Children should
not play with this appliance.
24. Do not leave the appliance unattended while in use. Never connect this
appliance to an external timer switch or separate remote-control system.
WARNING
Read this manual carefully and completely and retain for future reference. Failure to
adhere to safety instructions may result in serious injury or damage.
instantpot.com.au | 7
IMPORTANT
SAFEGUARDS
25. Do not store any materials in the multicooker base or inner pot when not
in use.
26. Do not place any combustible materials in the multicooker base or inner pot,
such as paper, cardboard, plastic, Styrofoam or wood.
27. Do not use the included accessories in a microwave, toaster oven,
or outdoor grill.
SAVE THESE INSTRUCTIONS
WARNING
To avoid injury, read and understand instruction manual before using this machine.
WARNING
Electrical shock hazard. Use grounded outlet only.
• DO NOT remove ground.
• DO NOT use an adapter.
• DO NOT use an extension cord.
Failure to follow instructions can cause electrical shock and/or serious injury.
WARNING
THE FAILURE TO FOLLOW ANY OF THE IMPORTANT SAFEGUARDS AND THE
IMPORTANT INSTRUCTIONS FOR SAFE USE IS A MISUSE OF YOUR APPLIANCE THAT
CAN VOID YOUR WARRANTY AND CREATE THE RISK OF SERIOUS INJURY.
WARNING
Read this manual carefully and completely and retain for future reference. Failure to
adhere to safety instructions may result in serious injury or damage.
8| support@instantpot.com.au | 1800 251 643
IMPORTANT
SAFEGUARDS
SPECIAL CORD SET INSTRUCTIONS
Per safety requirement, a short power supply cord is provided to reduce the hazards
resulting from entanglement and tripping.
This appliance has a 3-prong grounding plug. To reduce the risk of electric shock, plug the
power cord into a grounded electrical outlet that is easily accessible.
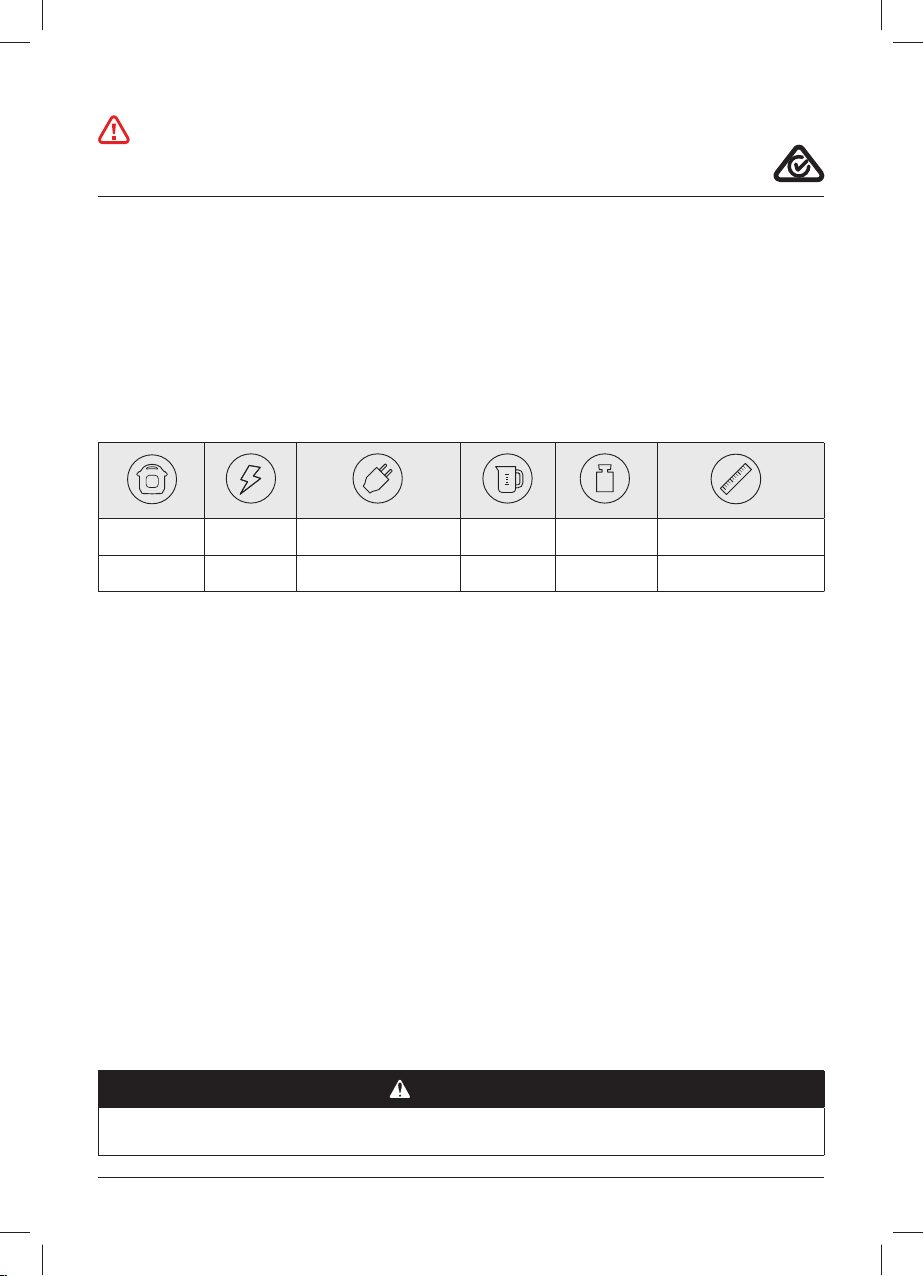
PRODUCT SPECIFICATIONS
Model: Pro 60 1000-1200W 220-240V~ 50-60Hz 5.7 Litres 5.9 kg cm: 33.1 x 32.2 x 32.5
Model: Pro 80 1200-1400W 220-240V~ 50-60Hz 8 Litres 7.18 kg cm: 36.5 x 35.3 x 36.0
Find your model name and serial number
Find the model name on the silver rating label on the back of the multicooker base, near
the power cord. The serial number is located on a white sticker beside the rating label.

instantpot.com.au | 9
PRODUCT, PARTS AND ACCESSORIES
Before using your new Instant Pot Pro, make sure everything is accounted for, then see
Care, cleaning and storage: Removing and installing parts to find out how everything
fits together.
Top of multicooker lid
Bottom of multicooker lid
Instant Tip: Stand the multicooker lid up to keep
it off your countertop. Insert the left or right lid
fin into corresponding lid holders on the base to
stand it up and save some space!
Illustrations in this document are for reference only and may differ from the actual product.
Always refer to the actual product.
Steam release
assembly
Float valve
Steam release cover
Steam release valve
Steam release pipe
Lid fin
Lid position markers
Lid handle
Lid fin
QuickCool™ protective cover
Sealing ring rack Silicone cap
(bottom of float valve)
Anti-block shield
Steam release pipe
(beneath the anti-block shield)
Locking pin
Sealing ring
Quick release switch

10 | support@instantpot.com.au | 1800 251 643
Lid holder
Condensation collector
(rear)
Cord holder
(rear)
Power cord
(rear)
Outer pot
Condensation rim
Control panel
Stainless-steel exterior
Heating element
(interior)
Multicooker base handle
PRODUCT, PARTS AND ACCESSORIES
Instant Tip: Stove top and
oven-friendly up to 232°C!
The inner pot features
a cookware-grade
impact bonded tri-ply
bottom, which sounds
complicated, but really
just means you can use
it just about anywhere —
from the multicooker base
to any electric, ceramic,
gas or induction cooktop.
Illustrations in this document are for reference only and may differ from the actual product.
Always refer to the actual product.
Inner pot
Multicooker base
ACCESSORIES
Steam rack Extra sealing ring
Fill line indicators
Easy Grip silicone
handles
Flat bottom

instantpot.com.au | 11
GET STARTED
WARNING
Read the Important
safeguards before using the
appliance. Failure to read and
follow those instructions for
safe use may result in damage
to the appliance, property
damage or personal injury.
Do not place the
appliance on a stovetop
or upon another
appliance. Heat from
an external source will
damage the appliance.
Do not place anything on
top of the appliance, and
do not cover or block the
steam release valve or anti-
block shield, located on the
appliance lid to avoid risk
of injury and/or property
damage.
INITIAL SET UP
01 Pull that Instant Pot Pro out of the box!
02 Remove the packaging material and accessories from in and around the multicooker
and make sure all the parts are accounted for. See Product, parts and accessories
for a full parts breakdown.
Make sure to check under the inner pot!
03 Wash the inner pot in a dishwasher or with hot water and dish soap. Rinse it well with
warm, clear water and use a soft cloth to thoroughly dry the outside of the inner pot.
04 Wipe the heating element with a soft, dry cloth to make sure there are no stray
packaging particles left in the multicooker base.
Don’t remove the safety warning stickers from the lid (unless specified on the
sticker!) or the labels from the back of the multicooker base.
05 You may be tempted to put the Pro on your stovetop — but don’t do it! Place the
multicooker base on a stable, level surface, away from combustible material and
external heat sources.
Is something missing or damaged?
Get in touch with Customer Care by email at support@instantpot.com.au or by phone at
1800 251 643 or (02) 9317 1000.
Feeling keen?
• While you’re doing the Initial test run (water test), read over Pressure cooking 101
to find out how the magic happens, and read through Pressure control features for an
in-depth look.

12 | support@instantpot.com.au | 1800 251 643
GET STARTED
INITIAL TEST RUN WATER TEST
Do you have to do the water test? No — but getting to know the ins and outs of your new
Pro prepares you for success in the kitchen! Take a few minutes to get to know how this
tireless kitchen hero works.
Stage 1: Setting up the Pro for pressure
cooking
01 Remove the inner pot from the
multicooker base and fill it to the first
line (1) with water.
02 Insert the inner pot into the
multicooker base.
03 Connect the power cord to a 220-
240V power source.
The display shows OFF.
04 Place and close the lid as described
in Pressure control features:
Multicooker lid.
The lid automatically seals for
pressure cooking.
Stage 2: “Cooking” (…but not really,
this is just a test!)
01 Touch Pressure Cook.
02 When Custom flashes, press the dial
to select it and go to the next field.
03 When the pressure level flashes, press
the dial to select High pressure and go
to the next field.
04 When the time flashes, turn the dial
to adjust the cook time to 5 minutes
(00:05).
Press the dial to confirm the change
and go to the next field.
Customisations are saved to the
Smart Programme when cooking
begins.
05 When Reminder flashes, turn the
dial to toggle between vent reminder
options. Select Off and press the dial
to confirm. See Control panel for
more information.
06 Select Off and press the dial to
confirm.
07 Touch Start to begin.
The display shows On and the cooking
progress bar shows Pre-heating.
Keep Warm turns on automatically
after some Smart Programmes finish.
Touch Keep Warm to turn the setting
off for this test.
Stage 3: Releasing pressure
01 When Cooking finishes, the display
shows End.
02 If you have set a 5 or 10 minute vent
reminder, the reminder timer begins
to count down.
03 Follow instructions for a Quick Release
in Releasing pressure: Venting
methods.
04 Wait for the float valve to drop, then
carefully open and remove the lid
as described in Pressure control
features: Multicooker lid.
05 Using proper hand protection, remove
the inner pot from the multicooker
base, discard the water and
thoroughly dry the inner pot.
That’s it! You’re good to go :)
Instant tip: While the multicooker does
its thing, read Pressure cooking 101 to
find out how the magic happens.

instantpot.com.au | 13
DANGER
DO NOT attempt to remove the lid while the float valve is up and NEVER
attempt to force the lid open. Contents are under extreme pressure. Float valve must
be down before attempting to remove the lid. Failure to follow these instructions may
result in serious personal injury and/or property damage.
CAUTION
Pressurised steam releases through the top of the steam release valve. Keep exposed
skin away from the steam release valve to avoid burn injury.
CAUTION
The inner pot will be hot after cooking. Always use appropriate heat protection when
handling a hot inner pot to avoid burn injury.

14 | support@instantpot.com.au | 1800 251 643
PRESSURE COOKING 101
Pressure cooking uses steam to raise the boiling point of water above 100ºC.
These high temperatures allow you to cook some foods way faster than normal.
Behind the magic curtain
When pressure cooking, the Instant Pot goes through 3 stages.
Pre-heating
What you see What you don’t see Tips
The cooking
progress bar shows
Pre-heating.
The display
shows On.
While the multicooker
pre-heats, it vaporises
liquid to create steam.
Once enough steam has
built up, the float valve
pops up and locks the lid
in place.
The time it takes the multicooker
to pressurise depends on things
like food and liquid temperature
and volume.
Frozen foods have the longest pre-
heating time. For the fastest results,
thaw your food before cooking it.
Cooking
What you see What you don’t see Tips
The cooking progress
bar moves over to
Cooking.
The display switches
to the cooking
countdown timer.
When the Instant Pot reaches
the required pressure level,
cooking begins.
The multicooker automatically
maintains High or Low
pressure throughout cooking.
A higher pressure means
higher temperature.
Smart Programme settings
(e.g., cooking time,
pressure level, etc.) can
be adjusted at any time
during cooking.
Depressurisation
What you see What you don’t see Tips
If Keep Warm is on
after cooking, the
cooking progress bar
moves over to Keep
Warm, and the timer
counts up from 00:00.
If not, the multicooker
returns to standby and
displays End.
Although food has
finished cooking, the
multicooker is still
pressurised and hot.
Venting the pressure
lowers the temperature
and allows you to safely
remove the lid.
Follow your recipe instructions
when choosing a venting method.
See Releasing pressure:
Venting methods on the next
page for information on safe
venting techniques.
Instant tip: The Instant Pot cools
faster if Keep Warm is turned off!

instantpot.com.au | 15
RELEASING PRESSURE
You must release pressure after pressure cooking before attempting to open the lid.
Follow your recipe’s instructions to choose a venting method, and always wait until the
float valve drops into the lid before opening.
WARNING
Steam ejected from the steam release
valve is hot. DO NOT place hands, face, or
any exposed skin over the steam release
assembly when releasing pressure to avoid
injury.
Do not cover or obstruct the steam release
valve or cover to avoid injury and/or
property damage.
DANGER
DO NOT attempt to remove the lid while the float valve is up and NEVER
attempt to force the lid open. Contents are under extreme pressure. Float valve must
be down before attempting to remove the lid. Failure to follow these instructions may
result in serious personal injury and/or property damage.
VENTING METHODS
• Natural Release (NR or NPR)
• Quick Release (QR or QPR)
• Timed Natural Release
Pressurised Depressurised

16 | support@instantpot.com.au | 1800 251 643
RELEASING PRESSURE
Natural release (NR or NPR)
Cooking stops gradually. As the temperature within the multicooker drops, the Instant Pot
Pro depressurises naturally over time.
What to do What to expect
After cooking finishes, leave
the quick release switch in the
Seal position until the float
valve drops into the lid.
Your meal continues to cook even after the Smart
Programme ends.
Instant tip: This is called “carryover cooking” or
“resting”, and it’s great for large cuts of meat.
The depressurisation time may vary based upon
the volume, type and temperature of food and liquid.
Unless you use QuickCool™ technology, NR can take
up to 40 minutes with some dishes, so plan ahead —
it’s well worth the wait!
See QuickCool to find out how to naturally release
pressure faster than ever before!
NOTICE
Use NR to depressurise the multicooker after cooking high-starch foods (like soups,
stews, chilis, pasta, oatmeal and congee) or after cooking foods that expand when
cooked (like, beans and grains).
Quick Release (QR or QPR)
Stops cooking quickly and prevents overcooking. Perfect for quick-cooking vegetables and
delicate seafood!
What to do What to expect
Move the quick release switch from
Seal to Vent and wait until the float
valve drops into the lid. When the steam release cover is installed
properly, you’ll hear a muffled hiss as
steam hits the cover and disperses.
If the cover is not installed properly, a
loud jet of steam will eject through the
top of the steam release valve.
Seal
Vent
Seal
Vent
Seal position
Vent position
instantpot.com.au | 17
RELEASING PRESSURE
NOTICE
Do not use QR when cooking fatty, oily, thick or high-starch foods (e.g., stews, chilis,
pasta and congee) or when cooking foods that expand when cooked (e.g., beans and
grains).
Timed Natural Release
The carryover cooking continues for a specific amount of time, then stops quickly when
you release the remaining pressure. Perfect for cooking rice and grains.
What to do What to expect
Leave the quick release switch
in the Seal position for a few
minutes (according to your
recipe) then move it from Seal
to Vent and wait until the float
valve drops into the lid.
When the steam release cover is installed properly,
you’ll hear a muffled hiss as steam hits the cover
and disperses.
If the cover is not installed properly, a loud jet of
steam will eject through the top of the steam release
valve.
The temperature within the multicooker drops, so the
steam release may not be as powerful as a normal QR.
If you see a lot of spatter while releasing pressure, move the quick release switch back from
Vent to Seal, and wait a few minutes before trying to release pressure again. If spatter
continues, use NR to safely release the remaining pressure.
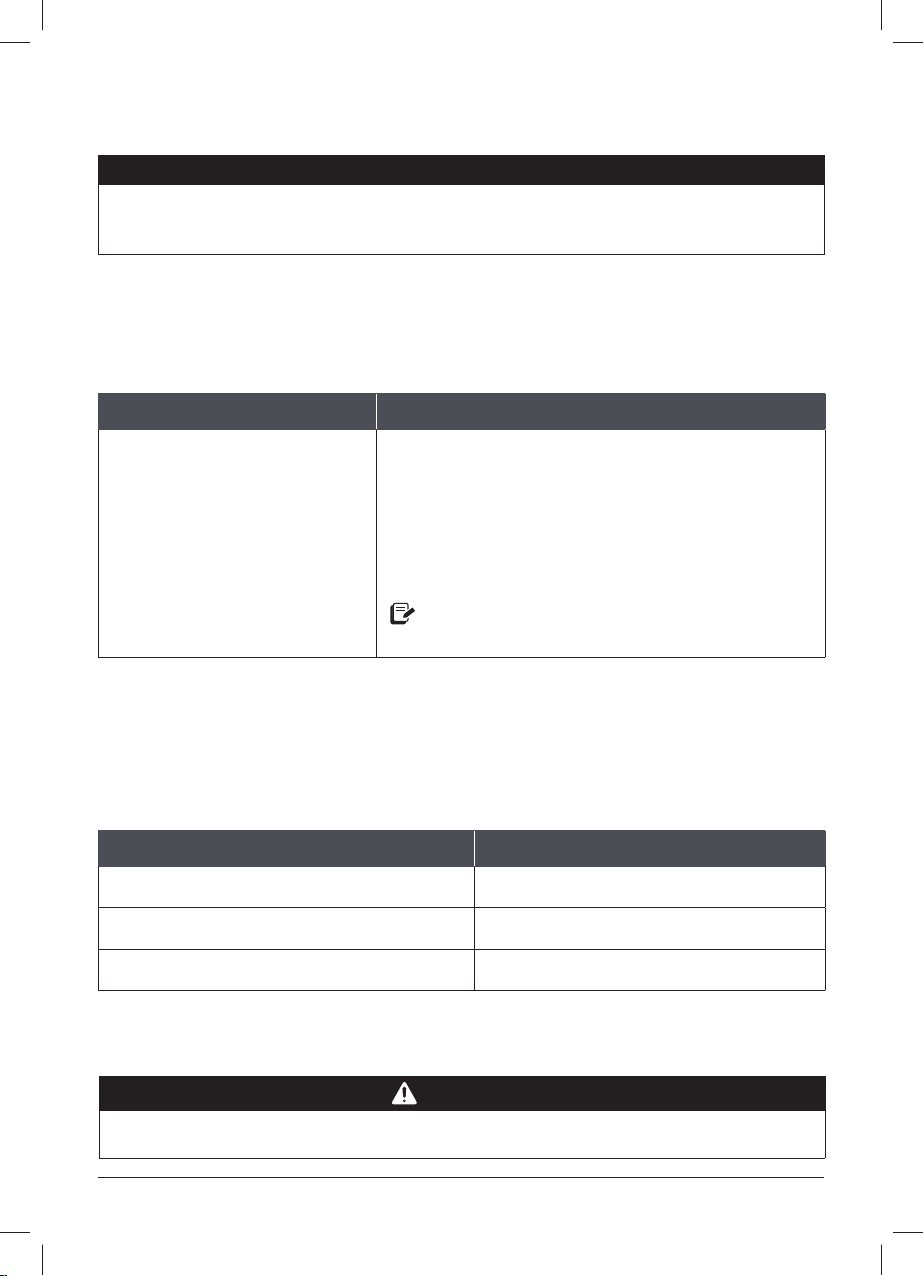
Vent reminder
Set a reminder for your Timed Natural Release so you can step away and own your day.
Recipe call for... Use this reminder!
Quick Release Off
5 minute Timed Natural Release 5 min
10 minute Timed Natural Release 10 min
CAUTION
Steam ejected from the steam release valve is hot. DO NOT place hands, face, or any
exposed skin over the steam release assembly when releasing pressure to avoid injury.
18 | support@instantpot.com.au | 1800 251 643
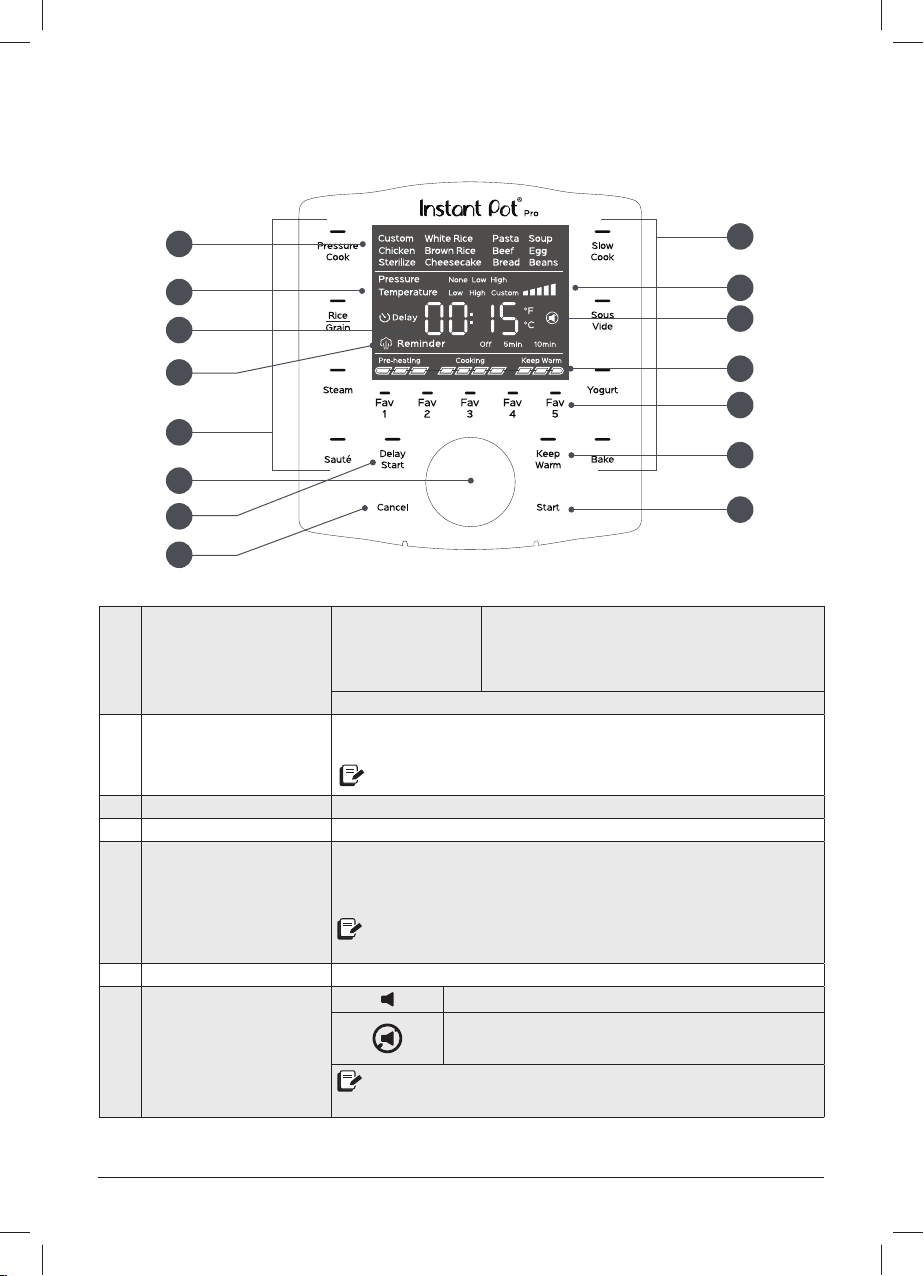
CONTROL PANEL
1 Smart Programmes
• Pressure Cook
• Rice/Grain
• Steam
• Sauté
• Slow Cook
• Sous Vide
• Yogurt
• Bake
See Cooking for details.
2 Preset cooking options
After selecting a Smart Programme, choose from a variety of
popular presets.
All preset cooking options are customisable.
3 Pressure Choose between None,Low and High.
4 Temperature Choose between Low,High, and Custom.
5 Time display
In standby, shows OFF.
For Smart Programmes the display counts down and for Keep
Warm, the display counts up.
Some Smart Programmes display the temperature in ºC (Celsius) or
ºF (Fahrenheit).
6 Vent reminder Only used when pressure cooking.
7 Sounds
Sounds are on.
Sounds are off.
Audible safety and error message alerts cannot be turned off.
See Control panel: Settings for more information.
1
1
10
11
13
2
3
5
6
4
7
8
9
12
14
instantpot.com.au | 19
CONTROL PANEL
8 Cooking progress bar
Shows when the multicooker is in Pre-heating, Cooking and
Keep Warm.
See Control panel: Cooking progress bar for more information.
9 Fav 1 to 5 One-touch access to 5 of your favourite recipes.
See Cooking: Fav 5 for more information.
10 Control dial
Turn the dial to scroll through Smart Programmes, modify status
icons, and adjust the time, temperature, and pressure levels.
The dial is also a button. Press the dial to confirm your selections.
11 Delay Start
Delay the start of cooking. Doubles as a kitchen timer!
Icon appears when Delay Start timer is counting down.
12 Keep Warm
Turns Keep Warm on or off.
Can only be used with Pressure Cook, Rice and Slow Cook, or as a
standalone programme when in standby.
13 Cancel Stops a Smart Programme at any time and returns the multicooker
to standby.
14 Start Begins the selected Smart Programme.
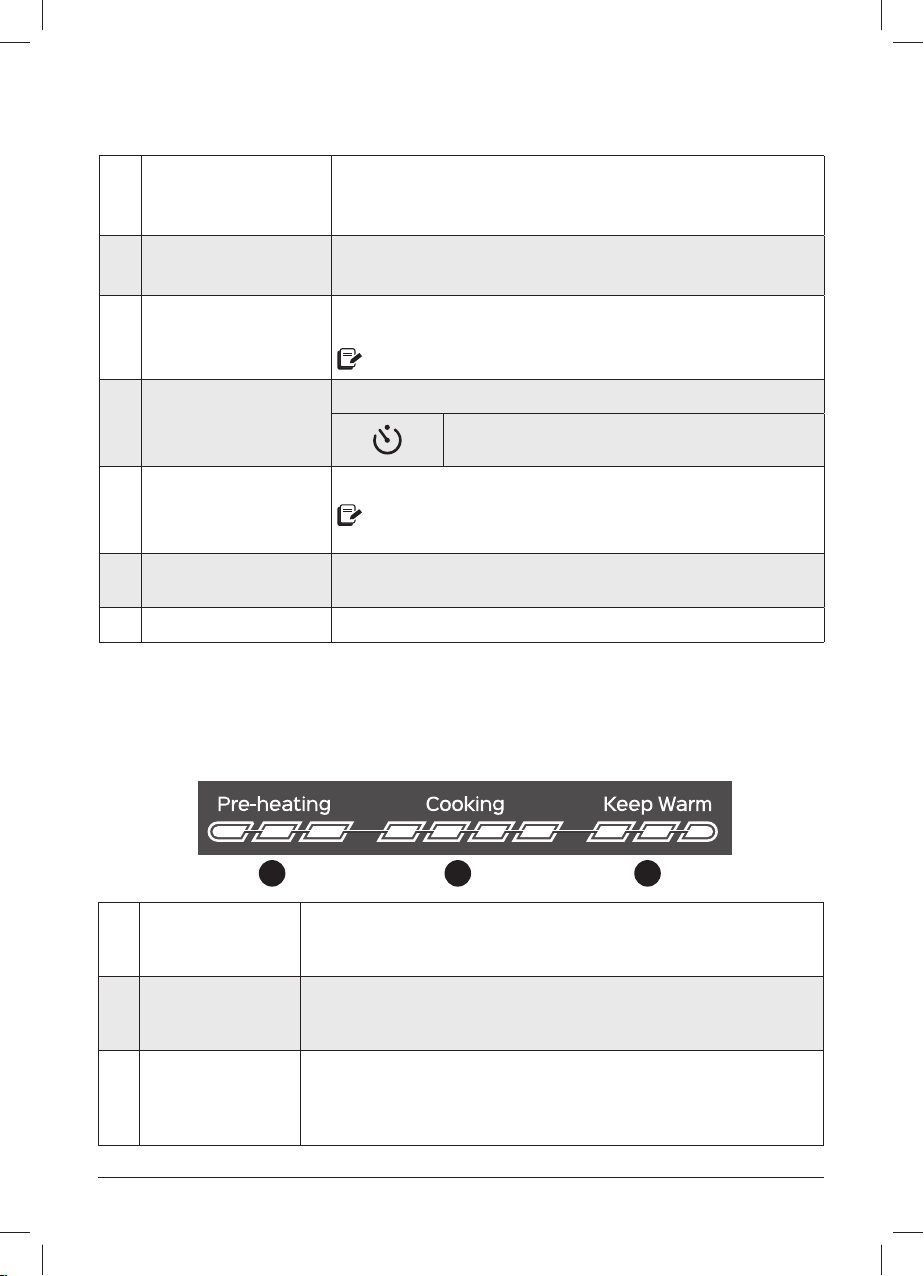
COOKING PROGRESS BAR
1 2 3
1 Preheating
Pre-heating is in progress. The display shows On during the pre-
heating stage to let you know that it’s working on getting up to
temperature.
2 Cooking
Cooking starts after the Pro reaches the target pressure or
temperature required by the Smart Programme. The display counts
down the remaining cooking time.
3 Keep Warm
Keep Warm comes on automatically after cooking finishes to keep
your meal at serving temperatures. The timer counts up the elapsed
time to a maximum of 10 hours (10:00). When Keep Warm completes,
the display shows End.
20 | support@instantpot.com.au | 1800 251 643
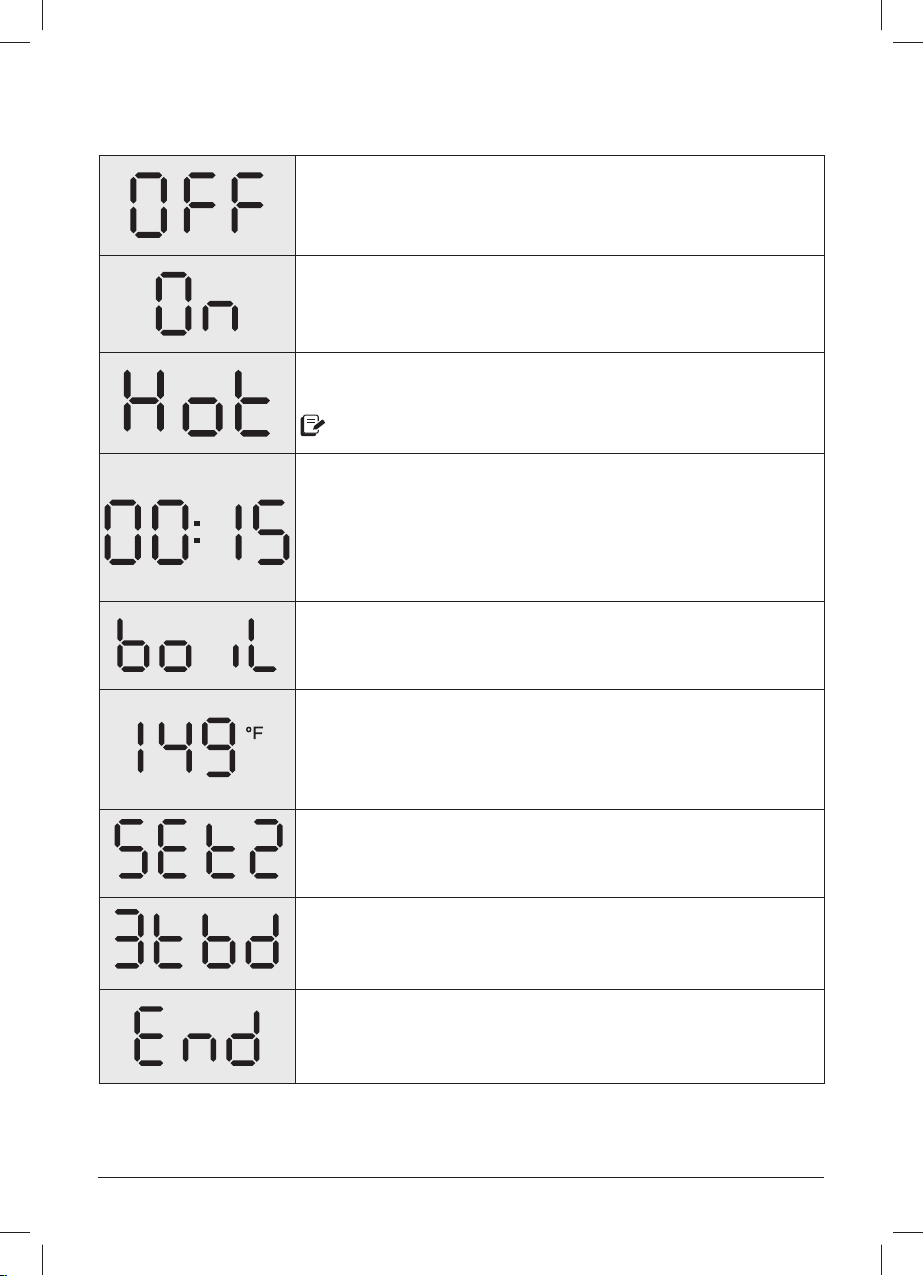
The Pro is in standby mode, ready to make your next
favourite meal.
The multicooker is Pre-heating.
The inner pot has reached the perfect cooking temperature
and food can be added.
Only applies to Sauté and Sous Vide.
The display shows one of the following:
• The remaining Cooking time when a Smart Programme is
running,
• The Delay Start countdown,
• How long food has been in Keep Warm.
The Yogurt Smart Programme is set to pasteurisation mode.
See Cooking: Yogurt for more information.
Displays when you’re setting up Sous Vide cooking to show the
default temperature setting.
To set a custom cooking temperature, turn the dial when the
temperature flashes. Then press the dial to make your selection.
Displays when you press a Fav key to save a Favourite recipe.
Displays when you press a Fav key that hasn’t been saved as
a Favourite. Number will change between 1-5 depending on the
missing Fav setting selected.
When cooking finishes, the display shows End until you remove
the lid or touch Cancel.
Do you see something else? See Troubleshooting for more information.
STATUS MESSAGES
Other manuals for Pro 60
2
This manual suits for next models
1
Table of contents
Other InstantPot Kitchen Appliance manuals

InstantPot
InstantPot Accu Slim User manual

InstantPot
InstantPot DUO60 User manual

InstantPot
InstantPot Max Series User manual

InstantPot
InstantPot Aura User manual

InstantPot
InstantPot duo plus User manual

InstantPot
InstantPot DUO CRISP+ AIR FRYER User manual

InstantPot
InstantPot DUO CRISP + AIR FRYER Guide

InstantPot
InstantPot IP-DUO60 User manual

InstantPot
InstantPot Max Series User manual

InstantPot
InstantPot DUOTM NOVA Guide


