InstaShade ECLIPSE v2 User manual
prem i um outdoor liv i n g
1
ECLIPSE v2 Cantilever Umbrella
OWNER MANUAL
www.instashade.co.uk
Eclipse v2

2
Congratulations on purchasing your Eclipse v2 cantilever umbrella. The Eclipse is manufactured
using the best materials and fabrics and is designed to give you many years of use and enjoyment.
The following information is to inform you of how to operate your Eclipse umbrella to ensure
trouble-free use and ease of operation.
Please follow these instructions as they are designed to assist you in operating the umbrella and
prolong the life of the various parts.
GENERAL INFORMATION
Your Eclipse Umbrella is principally intended for use in low to moderate wind conditions and will
provide you with many hours of protection from the sun and light rain. You will get maximum
benefit from your umbrella when you use it in accordance with our instructions and in the weather
conditions for which it was designed.
•Do not leave umbrella open when unattended, particularly in windy conditions.
•Umbrella should be closed and securely strapped in strong winds and adverse weather
conditions.
•Any modifications to your umbrella, except those made by Instashade may invalidate the warranty.
•Make sure your umbrella is dry and clean prior to storing away for extended periods of time to
prevent mould from developing.
•Inspect the installation fitting / base periodically and tighten if required.
ECLIPSE v2 CANTILEVER UMBRELLA
Eclipse v2

3
Simple maintenance instructions:
(1) If you have a cover bag it is recommended to use it whenever the umbrella is closed. This will
greatly extend the life of the canopy.
(2) In coastal or metropolitan environments it is beneficial to periodically wash your umbrella using
fresh water from a hose. This includes the canopy and frame.
(3) Should the 16 rotating mechanism stop pin holes become filled with sand or dust etc. then
remove the umbrella and take out the spigot. Clean out the 16 rotational locking holes and
apply some grease or lubricant. This will be a two man job.
(4) When the umbrella will be closed for longer periods of time, then it is best to fold the acrylic
canvas canopy, as shown in “To close Eclipse umbrella (pg7)”. This will prolong the new look of
the canvas and prevent marking caused by “pinching” in the aluminium frame over time.
CARE & CLEANING OF ACRYLIC CANVAS FABRIC
• Proper care and cleaning should be taken to ensure the life of outdoor fabrics. For regular
care and maintenance, excessive dirt should be brushed from the fabric using a soft brush;
the fabric should then be sprayed with water (i.e. garden hose) and air-dried. Periodically
the fabric should undergo a more thorough cleaning, again, brush fabric with a soft bristled
brush, spray with water (not exceeding 100°F / 40°C), then apply a gentle natural soap,(i.e.
Morning Fresh). Rinse thoroughly and air-dry.
• Fabric should never be stored while wet, always ensure fabric is thoroughly dried before
storing for extended periods.
• Any early signs of mould and mildew must be removed immediately.
ECLIPSE v2 CANTILEVER UMBRELLA
Eclipse v2

4
ECLIPSE v2 PARTS IDENTIFICATION
23 Mast cap 24 Mast wall pulley
22 Top braket
13 Top hub pulley
11 Top hub
10 Tube holder
2 Arrow head
end fitting
NOTE:
When the Eclipse is closed, the swivel
connection is near the top of the mast.
When the Eclipse is open, swivel connection
is lower down inside the mast.
39 Stop closure
button on 4 arms
only
4 Canopy
buttons
1 Arms
5 Struts
40 Knurl pins
6 Bottom hub
7 Tube locator
17 Barrel bolts
15 Barrel
bolts
32 Internal
winder unit
30 Winder
handle
8 3mm
SS Cable
18 Top stay
14 Main arm
20 Slider car tilt knob
38 Stabiliser arm block
37 Lift off pin
33 Spigot
34 Spigot
acetal ring
35 Rotating mechanism
27 Mast
29 Winder
cord
19 Slider car
26 Swivel
connection 16 Large
strop
21 Bottom stay
3 Small strops
9 Hub tube
Eclipse v2

5
ECLIPSE v2 PARTS IDENTIFICATION
1 Arms
2 Small end fittings for canopy screw
3 Small strops (knurl pin not included)
4 Canopy buttons
5 Struts
6 Bottom hub
7 Tube locator
8 3mm Stainless Steel cable
9 Hub tube
10 Tube holder
11 Top hub
13 Top hub pulley
14 Main arm
16 Large strop (aluminium)
17 Barrel bolts
18 Top stay
19 Slider car
20 Slider car tilt knob
21 Bottom stay
22 Top bracket
23 Mast cap
24 Mast wall pulley
26 Swivel connection
27 Mast
29 Winder cord
30 Winder handle
32 Internal winder unit (including rope)
33 Spigot
34 Spigot acetal ring
35 Rotating mechanism (completed set)
37 Lift off pin
38 Stay block (black slider fitting in mast)
39 Spacer buttons with screw (4 arms only)
40 Knurl pin
Eclipse v2
66
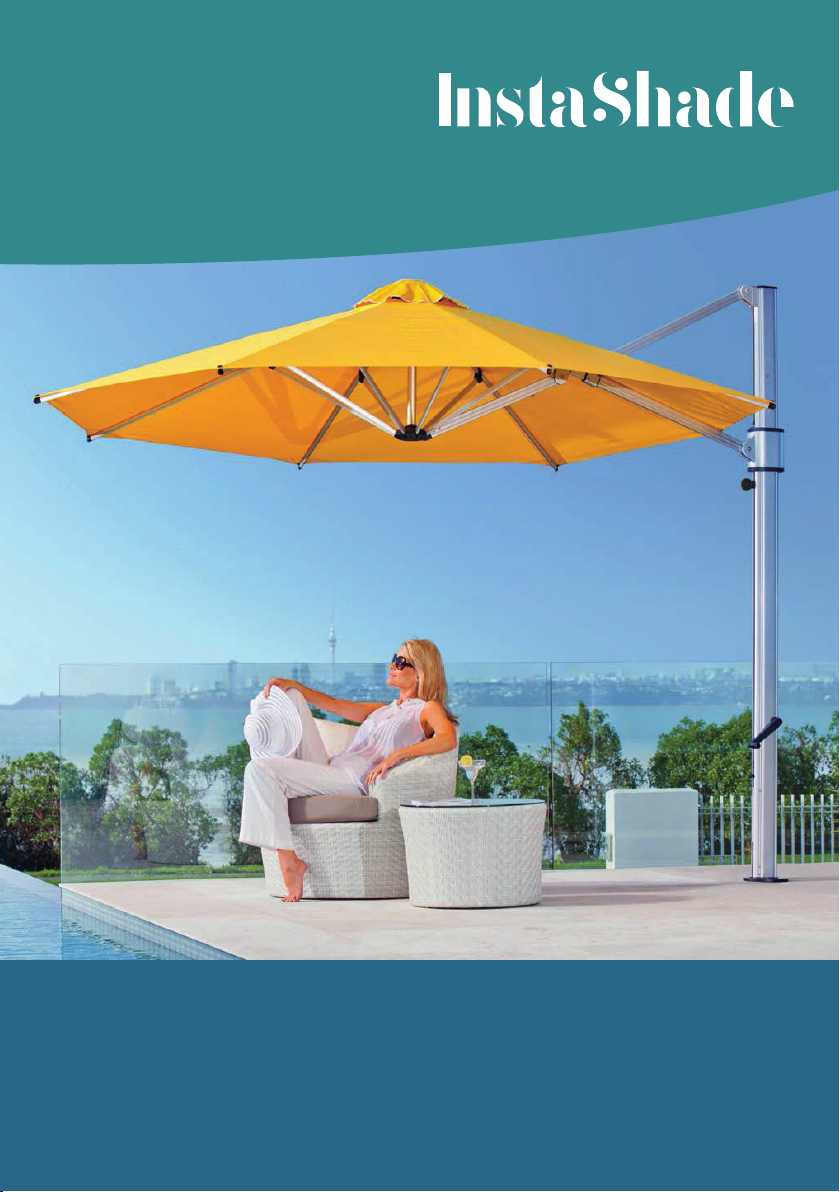
TO OPEN THE ECLIPSE v2 UMBRELLA
1Remove the strap from the canopy.
2Gently spread the canopy arms open with your
hands (refer Figure A).
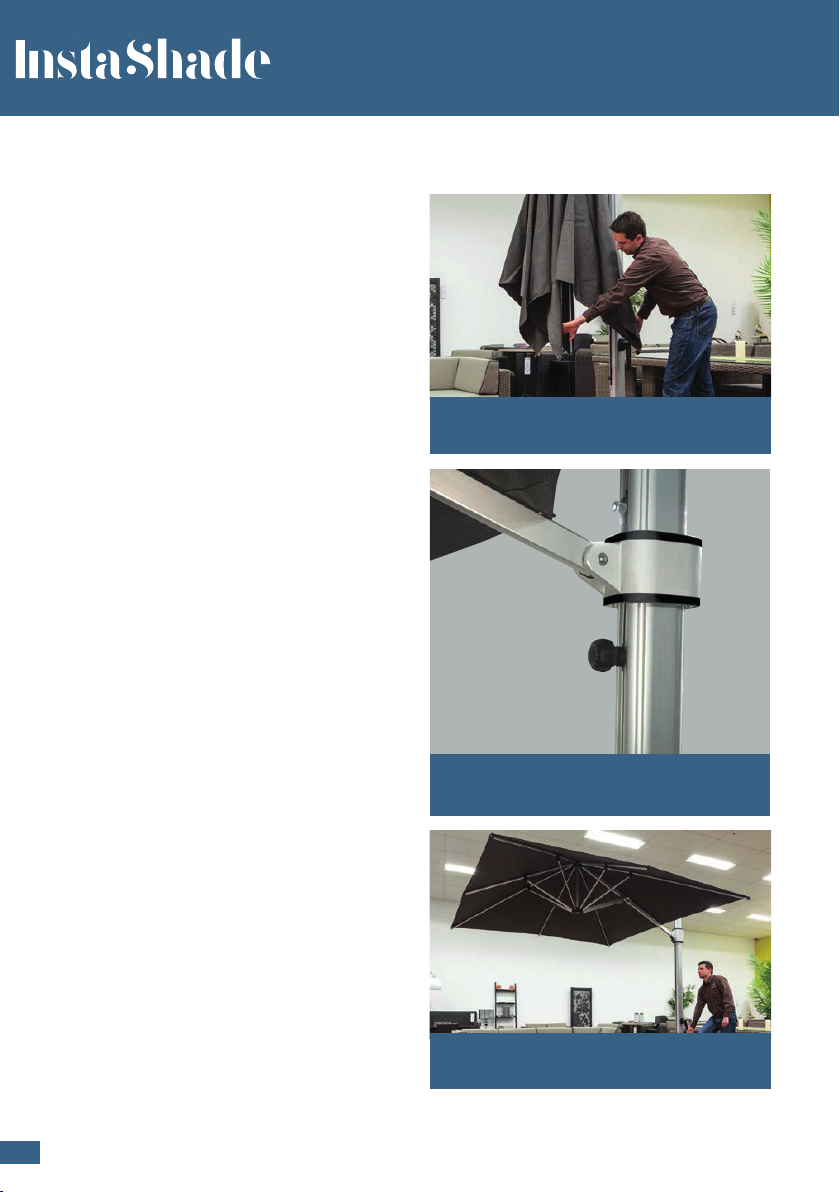
3Ensure the slider car knob is loose
and slider car can move freely (refer
Figure B). Insert the winder handle (30) into
the hole on the side of the mast and rotate in
a clockwise direction.
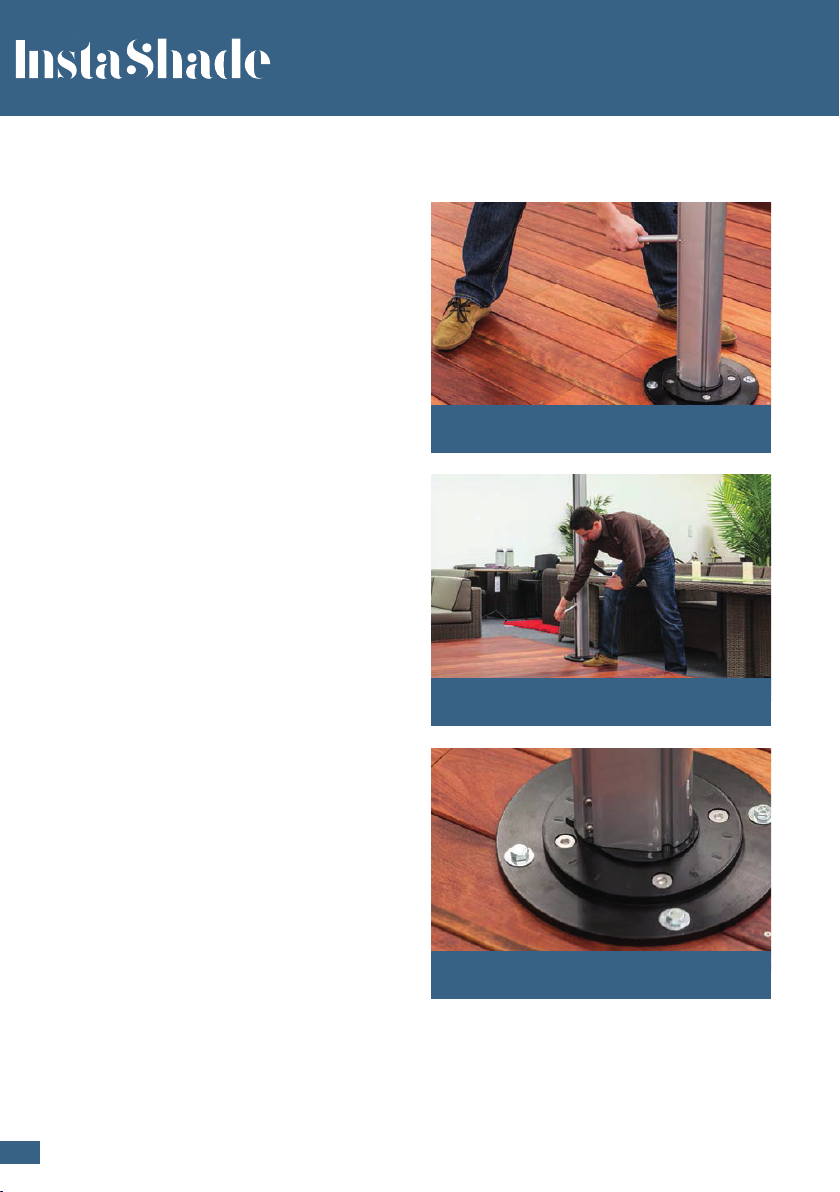
4Continue winding until the canopy is
fully open. The bottom hub (6) will be
seated into the hub tube (9) and the
edge of the canopy should betight
(refer Figure C).
Note: The winder handle will become a
little harder to wind as the umbrella
nears fully open. This is normal
particularly when the canopy is new.
5Once the canopy is fully opened hold the
slider car knob (20) and push the
slider car up until the canopy is
at the desired tilt angle. Tighten slider car
knob (20) clockwise to secure the umbrella
at that angle.
6The tilt angle of the canopy can be adjusted
as required at any time by loosening the
slider car knob (20) and sliding the slider car
up and down the mast.
IMPORTANT: The slider car knob (20) must
be done up tightly, especially when used in
higher winds.
NOTE: The optimum strength of the
umbrella is reached onlywhen the slider
car is at its maximum height and the
umbrellacanopy edgeis horizontal to the
ground. The strength of the umbrella is
lessened when the canopy is in an
angled position.
Figure A
Gently spread the canopy arms open
Figure B
Ensure tilt knob is loose (turn anti-clockwise) when opening
and closing umbrella
Figure C
Edge of canopy should be tight
Eclipse v2

7
TO CLOSE THE ECLIPSE v2 UMBRELLA
1Turn the sider car tilt knob (20) anti-clockwise
until loose.
2Rotate the winder handle (30) in an anti-
clockwise direction. The canopy will begin to
collapse. Continue winding in an anti-clockwise
direction until the canopy is mostly closed and
the canopy arms are pointing almost vertically
down to the ground.
3Hold the slider car tilt knob and pull the slider
car down the mast towards the ground. The
canopy should now be fully closed. Reach
around with one arm and pull the canopy back
towards the mast to complete closing.
4Fold the canopy neatly when storing for a longer
period of time to reduce the risk of getting marks
on the canvas from rubbing against the umbrella
frame. To do this stand in front of the canopy
and find the front four panels of fabric. Pull these
together towards your body and then roll all
four panels together back towards the umbrella
frame. Hold the rolled panels with one hand,
while grabbing the fifth panel folding it over
the roll to hold it in place. Alternate folding over
remaining panels from left to right with the sixth,
seventh and eighth panel.
5Secure folded panels in place with the canopy
strap, wrapping it around the mast and canopy.
Gently push the folded canopy back against the
mast so that it is compact.
6FITTING THE OPTIONAL COVERBAG: Stand
in front of the folded canopy and open the
coverbag zip completely. Use the handle rod to
lift the coverbag behind the mast and up as high
as possible to clear the top of the umbrella. Pull
the coverbag down over the top of the mast and
canopy. Zip the coverbag closed. The zip should
be on the front side of the canopy, not at the
back of the mast.
Figure A
Ensure tilt knob is loose (turn anticlockwise) when closing
umbrella.
Figure B
Fit the cover bag over mast and frame and zip up
Eclipse v2
8
TO ROTATE THE ECLIPSE v2 UMBRELLA
There are 16 rotational locking holes in the spigot.
These location holes are found at every 22.5 degree
interval around the spigot plate. They are located
where indicated on the top of the spigot base and are
under the nylon indexing shield (34) which acts as a
dust cover for the holes not in use.
1Pull the rotation lift handle(35) out from the mast
cavity (refer Figure A).
2Lift up on the handle and feel the resistance
from the spring that houses the rotating lock pin.
WARNING: In lifting this handle you are not
attempting to lift the whole umbrella, rather
just the spring on the rotating lock pin that
locates the rotation lock pin.
3By using the rotating lift handle (35) as a lever you
may rotate the umbrella on the base (refer Figure
B) until you arrive at the new required position.
4Each position is marked by a notch on the spigot
plate. Align the indicator arrow with a notch
(refer Figure C). Once aligned with a notch, lower
the rotating handle down to locate the rotating
lock pin.
WARNING: Do not force the rotating handle
down if the indicator arrow is between notch
positions. The rotating handle should close
down easily. If any resistance is encountered
do not force it, rotate the umbrella further
slightly to locate the correct hole position.
Figure A
Lift rotation handle
Figure B
Rotate theumbrella by using the handle
Figure C
Align theindicator arrow with a notch
Eclipse v2
9
TO USE YOUR (OPTIONAL) STABILISER BARS KIT
Your Eclipse cantilever umbrella can be fitted with an optional
“stay kit” to assist its performance in a wider range of wind
conditions.
Note: The Eclipse umbrella does not need to be fitted with
the stay kit for normal operation in calm to moderate wind
conditions. However for higher wind environments or for
commercial applications it is advisable to fit the stay kit to
add stability to the umbrella.
To install stay kit:
1Slide the stabiliser arm block (38) up the internal mast
housing to a height roughly the same as the height of the
stabiliser bars when standing vertical (refer Figure A).
2Attach the threaded stainless screw (with the two
aluminium stays attached) to the stay block in the mast
and tighten the screw sufficiently for the stay block to
remain in position without sliding down the mast (refer
Figure B).
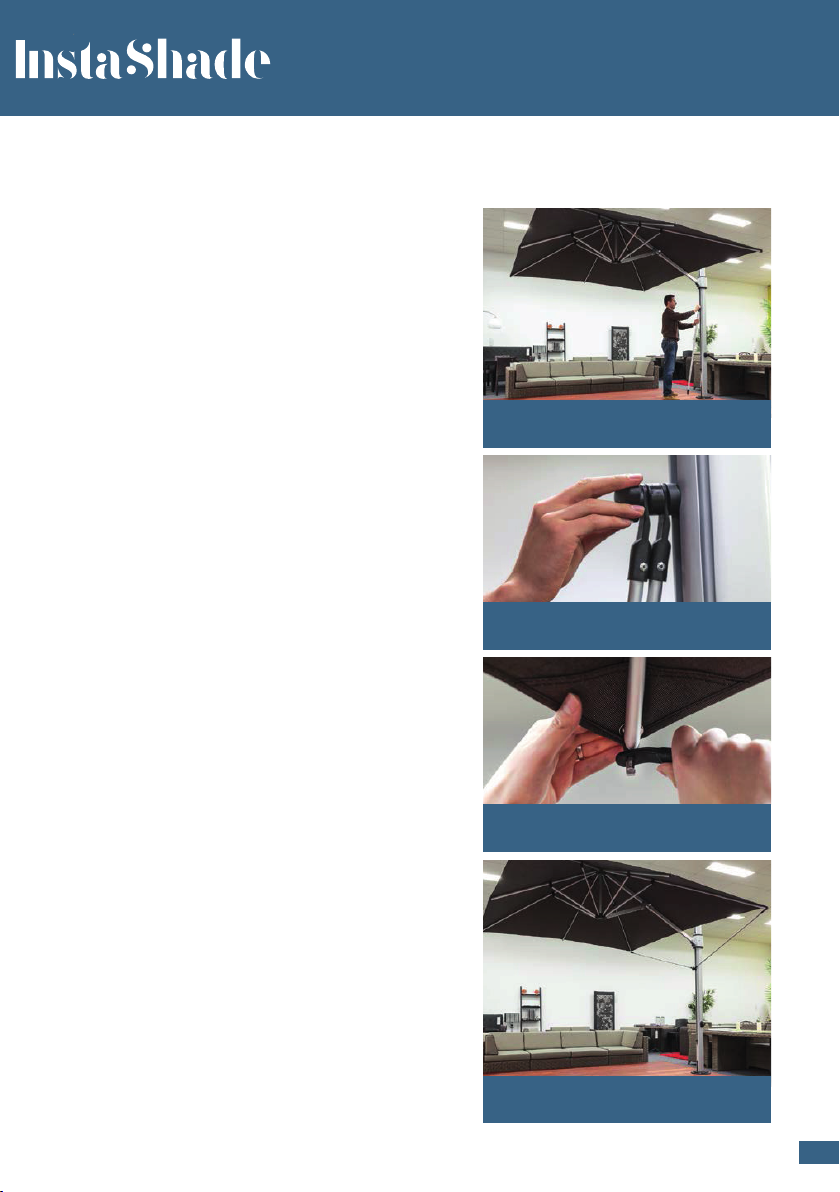
3Swing either aluminium stay arm off the ground and
attach to the umbrella arm using the “T-lock”. Position
the T-lock to vertical and slide it through the hole in the
plastic fitting at the end of the stabiliser bar (refer Figure
C). Set the T-lock to horizontal to lock the bar in place
(refer Figure D). You can use the black “screw in” fittings
that are supplied as an alternative to the “T-lock” fixings if
you prefer.
5You may need to loosen the central threaded stainless
screw and adjust up or down the mast for the stabiliser
arms to reach the “T-locks” on both sides of the umbrella.
Once both stabiliser arms have been attached then
tighten the central threaded stainless screw to lock in
position. (refer Figure E - stay kit correctly fitted).
CAUTION: Do not over tension as this may distort the
umbrella arms. Reverse the process to remove the stay kit.
The stay kit must be removed to close the umbrella or tilt the
canopy. IMPORTANT: Your Eclipse umbrella, even when fitted
with the stay kit, is not a permanent, all-weather structure.
The umbrella should be closed and folded when not in use
and never left open when unattended or in strong winds.
Figure E
Umbrella with stays attached
Figure B
Screw stays into stay block
Figure C
Slide end of stay arm over T-lock
Figure A
Slide stay blockup mast
Eclipse v2

1010
INSTALLATION PROCEDURE
Your Eclipse umbrella comes fully assembled in the box that it is delivered in. There are three different ways to
install your Eclipse umbrella:
1. Installing on a timber deck using a base plate.
2. Installing on an existing concrete slab using a base plate.
3. Installing into the ground (ie into a lawn, garden or paved patio) using an in-ground fitting.
Prior to installing your installation fittings please read the important information below.
Correct alignment of installation fittings
Your Eclipse umbrella can rotate 360 degrees and be locked in 16 different locations. This means that every
22.5 degrees of rotation there is provision to lock the umbrella. In most situations there will be a preferred
area over which you will predominantly want shade. To ensure you have the ability to shade your preferred
location you must have one of the 22.5 degree rotation locking holes in line with this position. Please have a
look at the underside of your spigot to see these 16 locking holes.
There is a locking hole in line with each of the 4 spigot bolt holes in the spigot plate. There are also three
intermediate holes between each of the spigot bolt holes and these are marked with an indicator mark on the
top of the spigot plate.
To point your umbrella in the perfect direction or to have a symmetrical installation (especially when installing
square umbrellas) it is very important to make sure you install the base plate or in-ground fitting square to the
direction that you predominantly want the umbrella to point.
Installing your base plate or in-ground fitting
There a three different ways to install your Eclipse umbrella. Select the installation method from the following
pages for the relevant instructions.
Base Plate In-ground fitting
Preferred direction
for umbrella to point
Eclipse v2
11
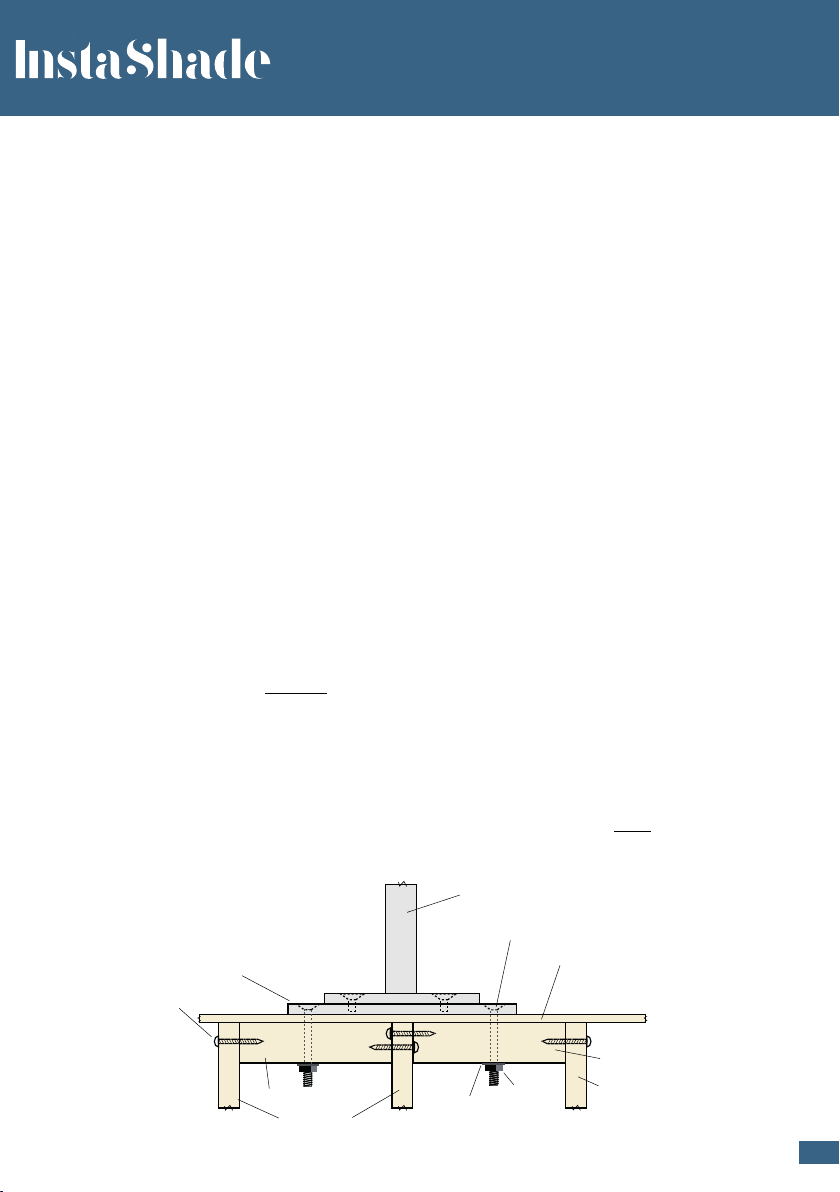
1. INSTALLING ON A TIMBER DECK USING A BASE PLATE:
To install your Eclipse umbrella onto a timber deck the following installation instructions should be followed.
To install a Eclipse onto a timber deck you will need a base plate and deck bolts, a decent drill, scrap timber to
use to make a reinforcing “nog” and suitable fixings to secure the nog to the deck joists.
Your umbrella must be bolted down into a reinforced “nog” that is fixed under the deck planks to the deck
joist. The umbrella must not only be fixed to the deck planking as this will likely result in the deck planks
“pulling up” and the umbrella falling over in high winds.
Once you have decided on the location of the umbrella/base plate (IMPORTANT: Please ensure you have
first read “correct alignment of installation fittings” on page
10)
then use the 4 x outer holes in the base
plate as a template to start drilling each of the holes in the deck. Make sure each of the 4 x holes go through
decking and miss the joists.
Using the 4 x holes drilled in the deck as a guide, you now need to install a reinforcing nog/brace hard up
under the decking for the base plate bolts to be fixed into. It is recommended that two timber “nogs” or
“braces” be secured between the deck joists or bearers that form the structural frame of the deck. Ideally
the nog/brace should be two short lengths of 100 x 100mm timber posts side by side, or alternatively two
pieces of 200 x 50mm timber joists sandwiched together to form a 200mm wide x 100mm deep nog/brace
for the umbrella base plate to bolt through to. The nog/brace must then be securely fixed to the deck frame/
joists using suitable fixings. These may be large galvanised nails, coach screws or builders brackets etc. If the
installation is in a sea spray zone or coastal environment then stainless steel fixings should be used.
You can now use the 4 x holes already drilled in your decking and drill them all the way through the
newly installed nog/brace under the decking. Then put the base plate in place and install the 4 x supplied
10x150mm stainless steel bolts through plate, decking and nog. Put the washer and nut on the bolt under the
deck and wind on the nut until very tight.
After the base plate has been securely fixed to the deck you should now remove the 4 x “grub bolts” that are
installed in the 4 x spigot bolt holes. The purpose of these grub bolts is to keep dirt out of the threaded holes
when not in use. Then lift the Eclipse umbrella and spigot up and on top of the base plate. It will take two
people to complete this. One person can hold the umbrella in the upright position while the second person
finds and locates the 4 x holes for the spigot bolts. Start off by putting in all 4 x spigot bolts loosely by hand.
Once all 4 x spigot bolts are in then you can use the supplied allen key to do them up tightly.
Now you can carefully open your umbrella for the first time.
20mm Deck Panels
200 x 50mm Deck
Timber Bearer
Riviera Spigot
Base plate to
deck installation
Riviera Base Plate
Washer Nut
Counter Sunk
Bolts & Nuts
200 x 50mm Deck
Timber Bearer
100mm
thick Nogs
100mm thick Nogs
Suitable fixings
like coach screws
Base pla
slab install
10mm c
Recommended length 100mm
Eclipse v2

1212
2. INSTALLING ON AN EXISTING CONCRETE SLAB USING A BASE PLATE:
To install a Eclipse onto an existing concrete slab you will need a base plate, suitable concrete bolts, a drill with
masonry drill bits, a socket set and a level. You will also need the concrete to be about 100mm deep.
Once you have decided on the location of the umbrella/base plate (IMPORTANT: Please ensure you have
first read “correct alignment of installation fittings” on page
10)
then use the 4 x outer holes in the
base plate as a template to start drilling each of the holes in the concrete. Drill each of the four holes using
a hammer drill with an 8mm masonry drill bit down to a depth of about 110mm. This allows space for the
100mm bolt if dust falls to the bottom of the hole.
Once all 4 x holes have been drilled, put down the base plate over the holes ready to put the bolts in, then
use a level to ensure the base plate is as level as possible. Use galvanised or stainless steel washers to pack
up the base plate until it’s level. Then use a socket set or spanner to wind in each of the four 8mm x 100mm
concrete screws through the base plate and washers until they are fully wound in and very tightly holding the
base plate.
After the base plate has been securely fixed to the concrete you should now remove the 4 x “grub bolts” that
are installed in the 4 x spigot bolt holes. The purpose of these grub bolts is to keep dirt out of the threaded
holes when not in use. Then lift the Eclipse umbrella and spigot up and on top of the base plate. It will take
two people to complete this. One person can hold the umbrella in the upright position while the second person
finds and locates the 4 x holes for the spigot bolts. Start off by putting in all 4 x spigot bolts loosely by hand.
Once all 4 x spigot bolts are in then you can use the supplied allen key to do them up tightly.
Now you can carefully open your umbrella for the first time. Open up the umbrella part way and get up inside
the umbrella to remove any protective packaging. Once the packaging is removed then your Eclipse umbrella
is fully installed and ready to use. Now you can sit back, relax and enjoy!
200 x 50mm Deck
earer
100mm
thick Nogs
Riviera Spigot
Base plate to
slab installation
Riviera 315mm Base Plate
10mm concrete screw or dyna bolt
Recommended length 100mm
Concrete slab minimum depth 100mm
no screw or fixing to be within 150mm of
closest edge of concrete slab
Eclipse v2

13
20mm Deck Panels
200 x 50mm Deck
Timber Bearer
Riviera Spigot
te to
deck installation
ase Plate
Washer Nut
Counter Sunk
Bolts & Nuts
200 x 50mm Deck
Timber Bearer
100mm
thick Nogs
100mm thick Nogs
Riviera Spigot
Base plate to
slab installation
Riviera 315mm Base Plate
10mm concrete screw or dyna bolt
Recommended length 100mm
Concrete slab minimum depth 100mm
no screw or fixing to be within 150mm of
closest edge of concrete slab
Riviera Spigot
Inground fitting
installed in clay soil
Concrete
Patio surface
Soil
Recommended
to try and flare out
bottom of hole 700mm
500mm
400mm
3. INSTALLING INTO THE GROUND USING AN IN-GROUND FITTING:
When installation is required in-ground into soil or sand etc. then an in-ground fitting must be used. This is a
galvanised steel fitting which must be concreted into position.
Once you have decided on the location of the umbrella/in-ground fitting (IMPORTANT: Please ensure you have
first read “correct alignment of installation fittings” on page 10) then you will need to dig a hole in that
location for a concrete footing to be installed.
Where terrain differs from thick clay to sand or fine soil then a different sized footing hole must be prepared and
a different volume of concrete used. As a guide only; a hole 40cm wide by 70cm deep is recommended for heavy
clay terrain. If installing the fitting into topsoil or sand you will need a larger hole and more concrete. We would
recommend doubling the volume of the hole, however it’s best that you seek appropriate advice from a builder for
your specific circumstances.
Before you get started with the concrete we recommend that you ensure the small “grub bolts” are installed into the
4 x spigot bolts holes on the in-ground fitting and also put tape over the top and bottom of the 4 x holes to ensure
that no concrete slurry gets into the threaded holes.
When pouring the concrete it is advisable to insert a few lengths of reinforcing steel into the concrete to prevent any
possibility of the concrete cracking in the future. Remember the depth of hole is more important than width, and it is
much easier to make the hole large at the time of installation than to try and re-stabilise the in-ground fitting should
it start to move at a later date.
If installing into a paved patio, then you may need to remove some pavers/tiles to facilitate the in-ground fitting and
then have them cut and reinstalled back around the round in-ground fitting plate to give a tidy and flush installation.
When setting the in-ground fitting into concrete the top surface of the fitting should be at the same level as your
patio surface so that if the umbrella is removed or relocated then the face of the fitting is flush. Also it’s very
important that the in-ground fitting plate is level. Use concrete to fill up the inside cylinder section of the in-ground
fitting to avoid it from filling up with water later on.
After the in-ground fitting has been installed and
the correct amount of time has gone by for
the concrete to harden and “cure” then you
can finally stand up your Eclipse umbrella on
the fitting. Firstly you will need to remove the
4 x “grub bolts” that are installed in the 4 x
spigot bolt holes in the in-ground fitting. Then
lift the Eclipse umbrella and spigot up and
on top of the fitting. It will take two people
to complete this. One person can hold the
umbrella in the upright position while the
second person finds and locates the 4 x
holes for the spigot bolts. Start off by putting
in all 4 x spigot bolts loosely by hand. Once
all 4 x spigot bolts are in then you can use
the supplied allen key to do them up tightly.
Now you can carefully open your umbrella
for the first time.
Eclipse v2

14
WARRANTY
Thank you for your purchase from InstaShade
The benefits given by this warranty are in addition to all other rights and remedies in respect of the product
which the purchaser has under Consumers Guarantees Act. Nothing in this warranty will exclude, restrict or
modify any conditions, warranty rights or liability implied in this purchase or protected by law where to do so
would render this warranty void.
Warranty Terms:
The warranty on a Eclipse v2 umbrella frame is three years, and on the acrylic fabric canopy it is five years.
The warranty covers faulty materials and faulty workmanship only. Wind damage is not covered by this
warranty.
1. This warranty applies to the original purchaser only.
2. This warranty does not cover damage caused by wind or adverse weather conditions, fair wear and tear,
accidents or misuse.
3. The umbrella must be installed as per the instructions provided in this manual.
4. In the case of installations, the owner is to ascertain position of all underground pipes and electrical wires
and notify the installer of any obstacles. Although all care will be taken, no responsibility can be accepted
for any damage during installation.
5. The warranty is valid only if the umbrella is opened and collapsed as per the instructions in this manual.
It is highly recommended that you close and tie your umbrella when strong winds are expected. If strong
winds are expected for a long period of time it is recommended that the umbrella be removed from its
base and stored. When closing the umbrella for extended periods of time, the canopy must be folded in
such a way as to avoid “pinching” of the fabric in the umbrella ribs/arms (refer to page 7). Wear and tear
caused by “pinching” of the fabric by the umbrella framework is not covered under this warranty.
6. If the umbrella is to be transported, without the original packaging, then the canopy should be removed
from the frame to avoid damage during transit.
7. This is a back-to-base warranty. In the case of repairs to the umbrella being required (regardless of
whether the repairs are covered under warranty) the cost of transportation to/from InstaShade for any
repairs is to be paid by the claimant.
8. This warranty is the only express warranty given by InstaShade. No person has the authority to change or
Eclipse v2

15
add to these obligations and liabilities without InstaShade approval in writing.
9. InstaShade reserves the right to determine whether or not fault is caused by faulty workmanship or
material or that any part is defective. Where fault is determined, we reserve the right to repair or replace
products at our discretion.
10. InstaShade or its authorised agent may offer advice, but accepts no responsibility as to the ultimate
positioning of the umbrella.
Our premium fabrics are manufactured from 100% solution dyed acrylic canvas and are
guaranteed to:
•Protect against rot, mildew and colour discoloration in normal conditions. It does not apply against any
deterioration of any kind due to wind or weather related damage, misuse, burns, negligence, vandalism,
perforations or stains due to environmental pollution, and fair wear and tear.
• Retain a colour-fastness rating of 7-8 on a 1-8 scale (meaning minimum fading) for a period of 5 years.
Eclipse v2

InstaShade Parasols
Unit 7 Tatton Court,
Kingsland Grange, Warrington,
Cheshire. WA1 4RR
01925 819608
EXCLUSIVELY IMPORTED &
DISTRIBUTED BY:
This manual suits for next models
1
Table of contents
Other InstaShade Patio Furniture manuals


Popular Patio Furniture manuals by other brands


L.L.Bean
L.L.Bean HOME 9’ Aluminum Collar Tilt Umbrella quick start guide

GoodHome
GoodHome Mallorca 5059340125893 quick start guide

FIM
FIM X5 Instructions for assembly and recommendations for use

Frontgate
Frontgate Kingston 166188A NAT Assembly instructions

Kettler
Kettler TORRENT operating instructions

UNIPRODO
UNIPRODO UNI UMBRELLA SQ250CR N user manual