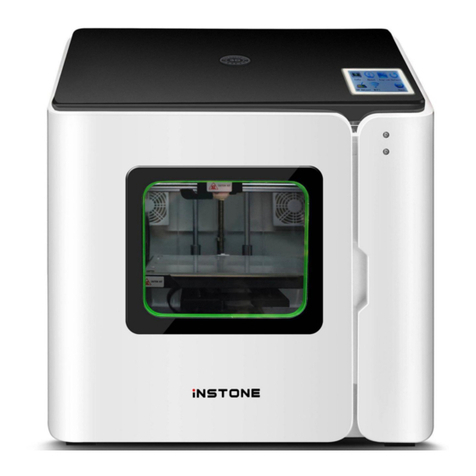
Instone EASIER User manual

www.instone3d.com
Copyright@iNSTONE 3D
User Manual
for Mini 3D Printer

www.instone3d.com
1
Content
Content............................................................................................................................................... 1
Technical Parameters........................................................................................................................2
Packing List........................................................................................................................................3
Installation......................................................................................................................................... 4
Instructions........................................................................................................................................ 5
I. Installation and Operating Guide of Slicing............................................................................7
II. Use of Slicing Software:.......................................................................................................10
1. Understand and Know Well About Software Interface:............................................... 10
2. Machine Settings:..........................................................................................................11
3. Load Model File:...........................................................................................................12
4. Process and Edit Model Files:.......................................................................................12
5. Basic Parameter Setting of Slicing:.............................................................................. 14
6. Senior Parameter Setting of Slicing:.............................................................................15
7. Additional Parameter Setting of Slicing:...................................................................... 16
8. Browse slicing file:....................................................................................................... 18
9. Export of slicing file:.................................................................................................... 18
Online Printing and Updating Firmware..................................................................................... 20
I. Online Printing:......................................................................................................................20
II. Update Firmware:.................................................................................................................20
Tips....................................................................................................................................................21
Service support................................................................................................................................ 22

www.instone3d.com
2
Technical Parameters
Name
Mini 3D Printer
Model
EASIER
Consumable
PLA
Printer size
195*210*275mm
Build volume
110*110*125mm
Printing accuracy
0.1mm(Max)
Printing principle
FDM
Printing temperature
210℃
X, Y, Z axis position accuracy
0.1mm
N.W.
2.4kg
G.W.
4kg

www.instone3d.com
3
Packing List
MINI 3D Printer *1
Power Adapter *1
Power Cable *1
Printing plate *1
TF card *1
Card Reader *1
Glue Stick *1
PLA Filament (280g) *1
Note:Once you received the parcel, please check all the parts; if anything missed,

www.instone3d.com
4
Installation
I. Remove the protecting clip on the plain shaft
II. Install the Feed Pipe
1. Press down the feeding coupling aside the radiator, then insert the white feed pipe
2. Insert the other end of the feed pipe into the socket of the remote extruder
III. Place the printing plate
IV. Feed
1. Unpack the PLA filament from the package, and find out the end of it
2. Bend the head material straightly, and trim the end of the material with scissor
3. Press the spring of the extruder by hands, then insert the filament from the hole on
the bottom of the extruder to the other end of the Feed Pipe (until you can’t insert
anymore). Then hang the filament tray on the hook on side of the printer (Note:
Arrange the filament neatly and DO NOT in a mess).
V. Inserting the TF Card
VI. Plug in and Power on

www.instone3d.com
5
Instructions
Ⅰ.Printing
1. The LCD screen will display the home page after starting up
2. Press the control knob to enter into the main menu; rotate the knob to select the
option “Print from SD card”, and press the knob to enter into the submenu
3. Rotate the knob, and select the option “print file”; press the knob to enter into the
submenu
4. Rotate the knob, select the file to be printed, then press the knob to begin printing
II. Taking down the finished printing models
Take down the printing plate after printing finished, then take down the finished
printing model by a slight bending. After that, clean the surface of the printing plate
(washable).
III.Pause printing
1. During the printing process, press the control knob, and the control menu pops up
on the display screen;
2. Rotate the knob, select the option “pause print”, and press the knob to pause
printing.
IV.Continue printing
☆This function is only applicable to continue printing after pausing in
condition of continuous power on
1. Press the control knob, and the operation menu pops up on the display screen;
2. Rotate the knob, select the option “continue print”, and press the knob to continue
printing.
V. Stop print
☆It is not available to continue printing after stopping printing, so please BE
CAUTIOUS when using this function
1. During the printing process, press the control knob, and the control menu pops up
on the display screen;
2. Rotate the knob, select the option “stop print”, and press the knob to stop printing.
Note: It’s IMPOSSIBLE to continue printing after “stop print”.
VI. Retract/reload the filament
This printer has been equipped with the function of automatic retract of
filament, which can be utilized in condition that the consumable is to be used up
or it is necessary to change to different colors

www.instone3d.com
6
1. At the home page, press the control knob, then the main menu pops up on the
display screen
2. Rotate the knob, select the option “Auto-stripper”, and press the knob to enter into
the operation
3. “Processing...” will show on the interface, and please wait patiently
4. When the automatic retract of material ends up, the display screen will return to
the home page, and the printing head’s temperature will fall, then the operation is
finished
Note
I. Clogs & Clear the nozzle
In normal conditions, there’s no need to worry about this issue as high quality
printing filaments are selected for this printer. If you select other consumables,
the nozzle may be blocked due to impurities in the material or other reasons, in
which condition the following steps may help you.
1. Press the control knob at the home page, press the control knob, and the main
menu pops up on the display screen;
2. Rotate the knob, select the option “heating print head”, and press the knob to enter
into the operation;
3. “Processing” appears on the interface; at this time, the printer is heating the nozzle,
and please wait patiently;
4. When the heating is finished, and the display screen returns back to the home page,
it shows that the temperature of the nozzle is 230℃;
5. Insert hard the filament into the nozzle to clear, until you can feed smoothly.
6. Power off for cooling down after clearing
II. Adjust the height of the nozzle
Too high or too low position of the nozzle will influence the printing (too high, the
printing material cannot stick on the bottom plate; too low, the nozzle will pin the
bottom plate, and the filament cannot be extruded). Adjust the positioning knob
properly as per the following figure, to adjust the distance between the nozzle and the
bottom plate:

www.instone3d.com
7
I. Installation and Operating Guide of Slicing
1. Double click the
file
in TF card to enter
software
installation
interface. User can
select installation
catalog in the red
frame, then single
click [Next]
2.Installation
option, Click
[Install] for
installation.

www.instone3d.com
8
3. Installation is
processing.
4. Single click
[Next] to
install drive

www.instone3d.com
9
5.After
installing drive,
single click
[Finish]
6. Single click
[Next] to
complete
installation.

www.instone3d.com
10
II. Use of Slicing Software:
1. Understand and Know Well About Software Interface:

www.instone3d.com
11
Import model
View model
Transparent
Save Gcode file
Normal
X-Ray
Overhang
Layers
Rotate
Scale
Mirror
Lay flat
To max
Mirror X
Reset
Reset
Mirror Y
Mirror Z
2. Machine Settings:
Select corresponding machine for setting, click the “Machine” and select
“2Um1+Normal Print”, as shown in the following picture;

www.instone3d.com
12
3. Load Model File:
Open the model file, it supports file in the format “stl,obj,dae,amf,bmp,jpg,jpeg,
png,g,gcode”. There are three ways of opening the model file: (1) click “file”, select
“load model file”, open the catalog where the model file is stored and select the file;
(2) click Load icon in the window directly to open the model file; (3) Drag the model
file to be opened in the blue region as shown in the picture directly.
4. Process and Edit Model Files:
User can rotate, zoom, mirror the model according to the demand.
⑴Rotate model
Y axis rotation
X axis rotation
Z axis rotation
⑵Zoom
model
Single click left key of mouse to select corresponding operation point,
Operation instruction:
Single click left key of mouse for
selecting corresponding rotation
line, drag the mouse to rotate the
model with the unit of 15°(press
Shift+ left key of mouse to rotate
model with the unit of 1° )

www.instone3d.com
13
drag them to zoom out the corresponding axial size. Meanwhile, the model center
hints the value. User can input specific figure in the dialog box. Please operate the
model as per the following picture.
X axis scaling rate
Y axis scaling rate
Z axis scaling rate
X axis size value
Y axis size value
Z axis size value
Proportion lock
⑶Mirror model
⑷Function introduction of right key menu
Move the mouse on the model, single click right key, then the menu pops up, as
shown in the following picture:
Put the model in the middle of print
plate.
Delete model
Copy multiple models (quantities can
be set manually)
Split the model into separate component
Delete all the models on the platform
Reload the model to software
(initialize)
Reset the position of all the models
Reset the changes of all the models
Z axis scale
Y axis scale
X axis scale
Overall zoom
Z axis mirror
Y axis mirror
X axis mirror
Single click the icon, three sub-options pop
up, which are Z axis mirror image, Y axis
mirror image and X axis mirror image from
top to bottom. Single click corresponding
option to realize transformation.

www.instone3d.com
14
5. Basic Parameter Setting of Slicing:
⑴Quality
Layer height: it is usually set as 0.2,
Setting range: 0.1-0.3. The lower the
value is, the printing is smoother and the
corresponding printing time is longer.
Shell thickness: it is usually set as
integral multiple of nozzle aperture. The
common value is 0.8.
Enable retraction: when retraction is
enabled, the nozzle rolls back filament
automatically and improves the filament
drawing.
⑵Fill
Bottom/top thickness: the thickness of
top layer and bottom layer for the model
is usually 1.2mm.
Fill density: the fill density of the model
is 10%, if the intensity is not required to
be high. The higher the value is, the
higher the intensity is, and the longer the
corresponding printing time is.
⑶Speed and temperature
Print speed: it is the default overall
speed and usually set as 60. Too high
speed results in bad effect of model
formation.
Printing temperature: nozzle temperature. Usually PLA consumable is set as 200. It
depends on the physical property of printing consumables.
Thermal bed temperature: refers to the temperature of printing platform. The machine
doesn’t support platform heating, so the parameter is invalid.
⑷Support
Support type: three options: ①None; ②Touching build-plate; ③Everywhere;
usually select②, establish support according to the demand.
Platform adhesion type: three options: ①None; ②Brim; ③Raft. Usually select②,
Option ②and ③makes the base layer of model adhere to printing platform better,
Brim can solve edge warping problem effectively. however, when the bottom surface
is big, it increase the difficulty of taking out the model. When Raft can make model
on the print plate easier to take out, but the bottom surface of model is not smooth,
user can select correspondingly.
⑸Filament
Diameter: the diameter of filament for nozzle is 1.75mm.

www.instone3d.com
15
Flow: percentage of consumable usage amount is usually set as 100%.
⑹Machine
Aperture of nozzle: 0.4mm.
6. Senior Parameter Setting of Slicing:
(It is applicable to professional printing effect contrast. The common printing just
adopts the default value without entering this setting)
Click next tab control “Advanced” to enter advanced printing setting.
⑴Retraction
Speed: corresponds to retraction
function of basic parameter for
detailed setting.
Distance: the length of filament for
retract.
⑵Quality
Initial layer thickness: thickness of the
bottom layer. If the bottom layer is
thick, it is good for increasing
adhesive force.
Initial layer line width: line width
when printing the initial layer
Cut off object bottom: subsidence
model. The subsidence part will not be
printed.
Dual extrusion overlap: the
overlapping length of consumables at
the joint when double-color nozzle
prints.
⑶Speed
Travel speed: the movement speed of
nozzle in non-printing.
Bottom layer speed: the speed of printing the first layer. When it is low, the adhesive
force is increased.
Infill speed: the speed of printing the internal infill part.
Top/bottom speed: speed of printing top/bottom layer.
Outer shell speed: speed of printing the outer shell of the model.
Inner shell speed: speed of printing the inner shell of the model.
⑷Cool
Minimal layer time: minimum time consumed for printing each layer
Enable cooling fan: turn on fan in the process of printing
Special notes:

www.instone3d.com
16
⑴Dual extrusion overlap (the machine doesn’t support this function, so the
parameter is invalid): it is used for double-color printing to make the fusion of two
colors more natural.
⑵Minimal layer time: ensure PLA to have full cooling time and make the printing
effect perfecter.
⑶Enable cooling fan: please check this option when printing with PLA filament.
7. Additional Parameter Setting of Slicing:
(It is applicable to professional printing effect contrast. The common printing just
adopts the default value without entering this setting)
Select menu bar “Expert” -> “Open expert setting” to enter the expert printing
setting.
⑴Retraction
Minimum travel: the movement distance that triggers
retraction.
Enable combing: if user turns off the function, when
the nozzle moves, it keeps retract.
Minimum extrusion before retracting: there should be
a certain quantity of extrusion before retract.
Z hop when retracting: when starting retract, Z axis
raises slightly so as to improve the filament drawing.
⑵Skirt
Line count: print a round of filament surrounding
model at the bottom layer.
Start distance: the distance between the skirt and the
first layer of model.
Minimal length: the minimal length of skirt.
⑶Cool
Fan full on at height: height triggered when the fan
runs at full speed.
Fan speed min: the lower limit rate of rotation of fan.
Fan speed max: the upper limit rate of rotation of fan.
Minimum speed: minimal filament feeding speed,
avoid too slow printing speed causes consumable
overflow.
Cool head lift: when the minimal extrude speed is
cooled too slowly, withdraw the nozzle to cool for a
while.
⑷Infill
Solid infill top: check whether the printing model is
capped.
Solid infill bottom: check whether the bottom of
printing model is covered.
Infill overlap: if the overlapping value of internal
packing and outer wall is bigger, the better they are
connected, but more consumables are needed in this
case.

www.instone3d.com
17
⑸Support
Structure type: the type of support structure.
Overhang angle for support: minimum angle triggering the printing support.
Fill amount: fill rate of support.
Distance X/Y: the distance between support and model subject on X/Y axis.
Distance Z: distance between support and model subject on Z axis.
⑹Black magic
Spiralize the outer contour: after it is enabled, it can print the surface in a spiral shape
and eliminate the interface of each layer.
Only follow mesh surface: after it is enabled, it only prints the surface layer, without
printing top, bottom and internal support.
⑺Brim
Brim line amount: the bigger the number of brim is, the adhesion effect between it
and platform is better, but it reduces the printing size.
⑻Raft
Extra margin: additional round of edge on the periphery of raft.
Line spacing: the distance of each line when the raft prints.
Base thickness: thickness of raft printing.
Base line width: base layer lines width of raft
Interface thickness: thickness of the interface layer, which connected the raft and the
model.
Interface line width: line width of interface layer.
Airgap: the gap between the raft and model.
First layer airgap: gap between the last layer of the raft and the first printing layer.
Surface layers: amount of surface layers put on top of the raft.
Surface layer thickness: thickness of each surface layer.
Surface layer line width: width of the lines for each surface layer
⑼Fix horrible
Combine everything(Type-A): namely integrate all the separate parts of the model
into one, Type-A is dependent on the model normal and tries to keep some internal
holes intact.
Combine everything(Type-B): namely integrate all the separate parts of the model
into one, Type-B ignores all internal holes and only keeps the outside shape per layer.
Keep open faces: software will repair some small damaged surfaces automatically.
Extensive stitching: repair the damaged surface at a higher level.

www.instone3d.com
18
8. Browse slicing file:
Click the icon on the top right corner and select Layers. The layer number bar occurs
on the right side of interface. Move up and down to view the printing path. Click
Normal to restore normal model view.
9. Export of slicing file:
After completing all the settings, please click the button indicated in the following
pictures or select “file” —“Save GCode...” to save GCode printing file after slicing.
(if SD card has been inserted to computer, the file will be saved to SD card
automatically)
GCode file in the cache Printing time and used quantity Click to save
Gcode
of filament

www.instone3d.com
19
Table of contents
Other Instone 3D Printer manuals
