InstroTek CoreDry User manual

www.InstroTek.com
OPERATING MANUAL
innovators in instrumentation technology
Rapid Asphalt Drying System
CORE
DRY
®

© 2018 InstroTek, Inc.
CoreDry
Operation Manual Version 8

Important
CoreDry units are shipped within the Continental
United States with oil in the pump –the additional oil
shipped with the unit is for your next oil change.
CoreDry units shipped outside the Continental United
States are WITHOUT oil in the pump. An extra bottle is
shipped with the unit for filling before use.
************************************************************
PRECAUTIONS WHEN USING THE COREDRY
1. There is an air heater located inside the
CoreDry to maintain the sample at room
temperature. The heat is on during flow cycle.
THE BOTTOM OF THE DRYING CHAMBER MAY BE
VERY HOT DURING AND AFTER COMPLETION OF
THE TEST.
2. Be aware that the vapor trap reaches
temperatures below freezing.
3. Voltage of 120V is present inside the CoreDry
cabinet. DO NOT PROBE INTO THE MAIN
CABINET WITH CONDUCTIVE MATERIALS, TOOLS,
FINGERS OR HANDS. IF COVER MUST BE
REMOVED CONTACT INSTROTEK FIRST.

4. Do not attempt to repair this unit. Maintenance
on this unit must be done by trained
technicians.
5. Change your vacuum pump oil after 80 hours
of use (the indicator in the software will prompt
you to do this). Only use recommended
vacuum oil (InstroTek part number 419.0005).
6. Change your Tank Filters every 1 to 2 months
depending on usage (InstroTek part number
977.1004 package of 12 filters).
7. Change your exhaust filter on the vacuum
pump once a year (InstroTek part number
977.1002, 977.1005, or 977.1006 depending on
pump model).
8. Call InstroTek at (919) 875-8371 if you have any
questions.

InstroTek
1
1. Table of Contents
****************************************
1. INTRODUCTION 2
2. GETTING STARTED 5
3. MENU FUNCTIONS 10
4. AGGREGATE TESTING 12
5. EMULSION TESTING 15
6. MAINTENANCE 20
7. TROUBLESHOOTING 26
8. INDEX 28
9. WARRANTY 30

InstroTek
2
1. Introduction
Congratulations on the purchase of your CoreDry Unit. The
CoreDry is a new, innovative device used for rapid vacuum
drying of samples, while maintaining the sample at room
temperature. Keeping the sample cool during drying process
ensures that the characteristics of the sample have not
changed.
This product is the result of industry demand for rapid testing
results in the road paving industry in which previous drying
methods took many hours. Although the results are the same,
drying with rapid vacuum technology provides the user with
samples that can be tested in a few minutes. Now you can
use the dry weight from the CoreDry to measure your core
density in minutes or get a quick measure of your stockpile
aggregate moisture content.
The CoreDry uses high vacuum in conjunction with a
thermoelectric cold trap to first draw the water out from every
pore of a sample, quickly evaporate the drawn out water by
lowering the vapor pressure and then trap and condense the
vapor in a separate chamber. The vapor trap serves two
purposes in the system: first it prevents much of the vapor from
entering the pump which keeps the pump efficiency high and
secondly it improves the efficiency of the drying process by
increasing the vacuum of the system by causing condensation
to occur.
InstroTek
3
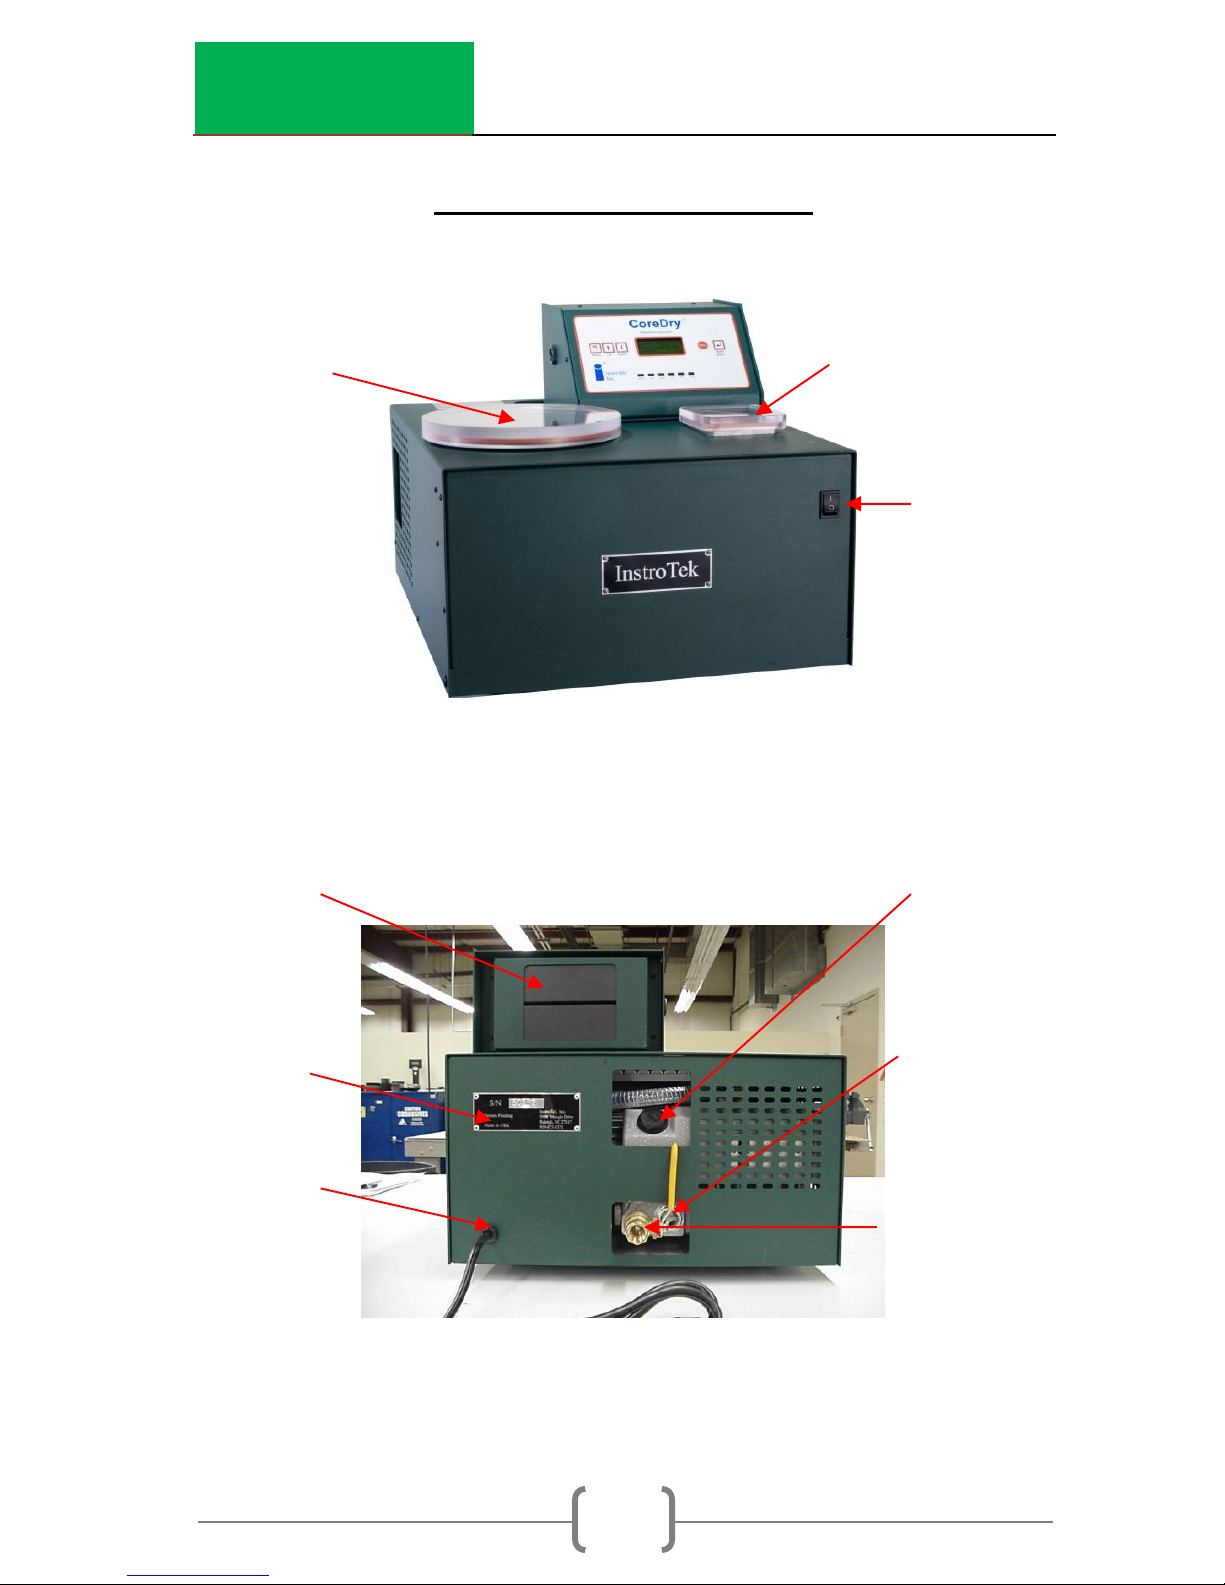
CoreDry Components
CoreDry Front View
CoreDry Back View
Cold Trap
with Lid
Sample
Chamber with
Lid
On/Off
Switch
Oil Fill Plug
Oil Level
Site Glass
Glass
Drain Valve
Power Modules
Serial Number
Plate
Power
Cable
InstroTek
4
Flow Plate &
Wire Mesh
Sample
Flow Plate
and Sample
Holder
Installed in
Sample
chamber
Tank Filters

InstroTek
5
2. Getting Started
Setup and Quick Start
1. Remove from shipping box: Remove foam protection from
box and remove CoreDry unit, covers and accessories. Place
CoreDry close to 120V outlet on a flat bench surface. Leave
at least 6” of space on both sides of the CoreDry for air
circulation. DO NOT PLACE NEXT TO ANY HEAT GERNERATING
DEVICES.
2. Pump oil: In continental United States, the pump oil bottle
sent with the unit inside the drying chamber is for a future oil
change after approx. 80 hours of use. IMPORTANT –For
international units, use the oil to fill the vacuum pump, before
the first use. Please refer to maintenance section of this
manual for filling and replacing the vacuum pump oil.
3. Lids and Flow Plate: Remove the Sample Chamber lid, which
is located next to the CoreDry unit inside the box. The Flow
Plate/Mesh holder is in the bottom of the large tank along
with extra tank filters, the Cold Trap lid, a bottle of oil, and
the CoreDry CD. Remove all packing material from the large
tank. Place the wire mesh sample support in the bottom of
the large sample tank on top of the flow plate. Place the lids
on the large and small tanks.
4. Turn on CoreDry: Plug the unit in a wall outlet and flip on the
on/off switch to the ON position. The display will indicate the
software version once turned on. Next it will pressurize the
system. Then the display will prompt for the user to dry the
cold trap. After the Cold Trap is dry the CoreDry will cool the
Cold Trap. Once all the initial steps have been completed
the system is ready to for use.
Note: Always plug the CoreDry directly into the wall socket. Do
not use extension cords or power strips.

InstroTek
6
Turn Unit On: Initialization and prep flow chart.
Place the sample in the chamber, place the lid firmly on the
chamber and the unit starts cycling (after pushing the start key):
CoreDry
Version X.X.X
CoreDry
Version X.X.X
System
Pressurizing XX
CoreDry
Version X.X.X
Dry Cold Trap
T= XX
CoreDry
Version X.X.X
Cold Trap
Cooling = XX
System Ready
P1
Start to Begin
Auto Mode
Program #X
Cycle = XX T = XX
Pressure = XXX mmHg
Auto Mode
Program #X
Flow Cycle
Cycle= XX T=XX
Auto Mode
Auto Mode
Program #X
Flow Cycle
Cycle= XX T=XX
Auto Mode
Program #X
Flow Cycle
Cycle= XX T=XX
Auto Mode
Program #X
Flow Cycle
Cycle=XX T=XX
Unit cuts off when sample is dry or a message will prompt the
user to rotate the sample, when sample is not completely dry.

InstroTek
7
5. Daily Test:
a) Every day before starting operation, dry the cold trap
and the sample chamber using a lint free cloth. Do not
use paper towel as pieces of paper can get left in the
system and subsequently be pulled into the vacuum
pump.
b) Place the appropriate lids on the sample chamber and
the cold trap. Press start to begin a test without any
samples. The vacuum reading on the display should be
6 mmHg or less when complete. If the vacuum without
a sample is higher than 6 mmHg, refer to the trouble
shooting section or call InstroTek for service information.
Note: When you receive the CoreDry or after transport to
other locations, you might have to run the CoreDry several
cycles to achieve 6 mmHg. Moisture from humidity might
build up within the vacuum lines. By running the unit several
times, the CoreDry eliminates the moisture in the pipes and
reduces the pressure within the chamber to 6 mmHg.
Sample is Dry
Dry Trap Press Enter
when Done.
mmHg XX
Cycles XX
Sample is Not Dry
Rotate Sample!
Dry Cold Trap!
Press Start
Note: This indicates sample is
dry. Do not press enter until you
are ready for another sample.
Note: This indicates the number
of cycles and the vacuum of
the last cycle.
Note: This screen indicates
sample is not dry. Rotate the
sample 180°, dry cold trap and
press enter to continue drying.

InstroTek
8
6. Drying Samples:
Note: To speed up the drying process for multiple samples,
dry one sample in the CoreDry and place all other samples
in front of a fan.
a) Make sure the sample is at room temperature or higher.
Higher sample temperatures will speed up the drying
time and is preferable (temperature not to exceed
110F). Conversely, cooler than room sample
temperatures will significantly lengthen the drying time.
b) Towel dry the surface of your wet asphalt sample to
remove as much of the free water as possible. Place
the sample on its side, then on the wire mesh sample
support (as shown below), place the lid on sample
chamber and press start. When sample is dry, unit will
automatically stop and pressurize so that lids can be
freely removed.
Important note for drying extremely wet samples- If the
sample is not dry after 45 cycles, remove the sample and
place at room temperature for 15 minutes. After 15 minutes it
is ok to put the sample back in the sample chamber and
complete the drying with the CoreDry.
Note: STOP button can be pressed at any time to stop the
operation and release pressure in the chambers.

InstroTek
9
7. Cold Trap: Liquid and/or ice will accumulate in the cold trap
as samples are drying. Between samples, during rotations,
and for faster drying, it is best to remove the cold trap lid and
the divider plate and wipe out the moisture. Be sure to
always replace the divider before drying the next sample.
Caution: Use a lint free cloth to remove moisture from the
cold trap and the sample chamber. Do not use paper towel
as pieces of paper will be left in the system and
subsequently be pulled into the vacuum pump.
For best
results,
place the
sample on
its side.

InstroTek
10
3. Menu Functions
To access the Menu press the ‘Menu’ Button on the CoreDry
Keypad. To cycle through the different menu settings press the
Up or Down key to change the menu options. To view or
change a menu press ‘Enter’ when a particular menu option is
displayed. To exit out of the Menu press ‘Stop’ or press the
‘Down’ key until the main display is reached.
1. Program #: This menu function allows you to program up
to 5 different settings for drying cores or other samples.
Press the ‘UP’ and ‘DOWN’ keys to cycle between
Programs 1 through 5. Once the desired program is
selected press ‘Enter’ to Store.
2. Oil Change: Displays the amount of time until your next
oil change is required. Time is displayed in hours.
3. Run Hours: Displays the amount of time the CoreDry unit
has operated. Time is displayed in hours.
4. Max Cycles: This menu function shows the maximum
number of cycles the CoreDry will run until the sample
needs to be rotated. Default setting is 10.
5. Check Cal: This will display the current status of the
Calibration. It will show either “Calibrated” or “Not
Calibrated.”
6. Cool Time: Displays the amount of time that the Cold
Trap will cool at initialization and in between samples.
Default setting is 60.
7. Self-Test: Before using Self-Test place both lids on sample
tank and Cold Trap. The Self-Test switches between the
individual parts of the CoreDry to isolate and determine
the operational status of each part. The Self-Test will
switch between the valves, relay, pump, +Line, and
Power Supplies. Once the Self-Test is completed the
CoreDry will display the results of the Self-Test as well as

InstroTek
11
all of the current settings. The screen will scroll every 5
seconds or the Up and Down arrows can be used to
navigate through the results. NOTE: Units with serial
numbers 499 and below that have been upgraded do
not include a Self-Test feature. Menu item “7. Sys
Settings” will display the current system settings.
8. Oil Reset: Resets the timer in between oil changes back
to 80 hours. After each oil change it is important to go
into this menu function and reset the timer.
9. Tank Filter: Resets the timer for the tank filters. After the
tank filters have been changed it is important to go into
this menu function and reset the timer.
10. Exh Filter: Resets the timer for the Pump Exhaust filter.
After the Pump Exhaust filter has been changed it is
important to go into this menu function and reset the
timer.
11. Beeper Vol.: Adjusts the volume of the beeper between
four settings Off, Low, Med, or High. Default setting is
Med.

InstroTek
12
4. Aggregate Testing Using the InstroTek
CoreDry™
The CoreDry can be used for determination of aggregate
moisture content. Use the following procedure to dry
aggregates and to determine moisture content:
1. Set the CoreDry to program 2 (PR2) by pressing the
Menu key. Change the program number to program 2.
2. Remove the wire mesh sample holder and the flow
plate from the sample chamber.
3. Place the bottom portion of the aggregate fixture on a
scale capable of reading to 0.1 gram and tare the
scale.
4. Place approximately 100-500 grams of aggregates in
the aggregate fixture. Please refer to the following
table for aggregate quantities to use in the fixture.
Record weight.
5. When you determine the sample weight, re-tare the
scale.
6. Replace the lid and tighten the fasteners on the
aggregate fixture.
7. Weight the entire fixture with the aggregate on the
scale. Record this as weight A. This is the weight of the
entire fixture with wet aggregates.
8. Place the aggregate fixture in the chamber. The fixture
will be in direct contact with the bottom of the sample
chamber.
9. Place the chamber lid on top of the sample chamber
and press Enter.
10. The unit will start the drying operations.
11. When the unit stops, remove the aggregate fixture and
place on the scale. Record this weight as weight B. This
is the weight of the fixture and the dry aggregate.
Caution: The aggregate fixture might be hot to the
touch, when it’s removed from the sample chamber.

InstroTek
13
Note: If the maximum number of cycles (20) is reached
and the aggregate is still not dry, the unit will display a
message prompting the user to turn the sample and
restart the drying operations. At this point remove the
fixture from the chamber, shake the fixture to re-orient
the aggregates and replace inside the sample
chamber. Close the lid and press Enter. The unit will
continue until the sample is completely dry.
12. Determine the moisture content by the following
equation
Moisture Content= Weight A –Weight B
Aggregate Type
Sample Weight
Crushed fine aggregates
and sand
100-150 grams
Rounded fine aggregates
300-400 grams
Coarse aggregates
400-500 grams
Note: The above estimates on sample weights are based
on saturated aggregate samples.
If the aggregate is not saturated, higher sample
weights can be used.

InstroTek
14
Aggregate
Sample Fixture
Aggregate
Fixture with one
fastener and lid
removed

InstroTek
15
5. Emulsion Testing
Introduction
The eDryTM is an accessory kit designed to be a simple and
effective way of drying asphalt emulsions in less than 30 minutes
using the CoreDryTM. It enables laboratories to recover the
residual asphalt of emulsion to determine the percent residual
asphalt without changing the binder properties. The residual
binder can be tested using test standard methods, such as the
shear strength using DSR and the flexibility using BBR.
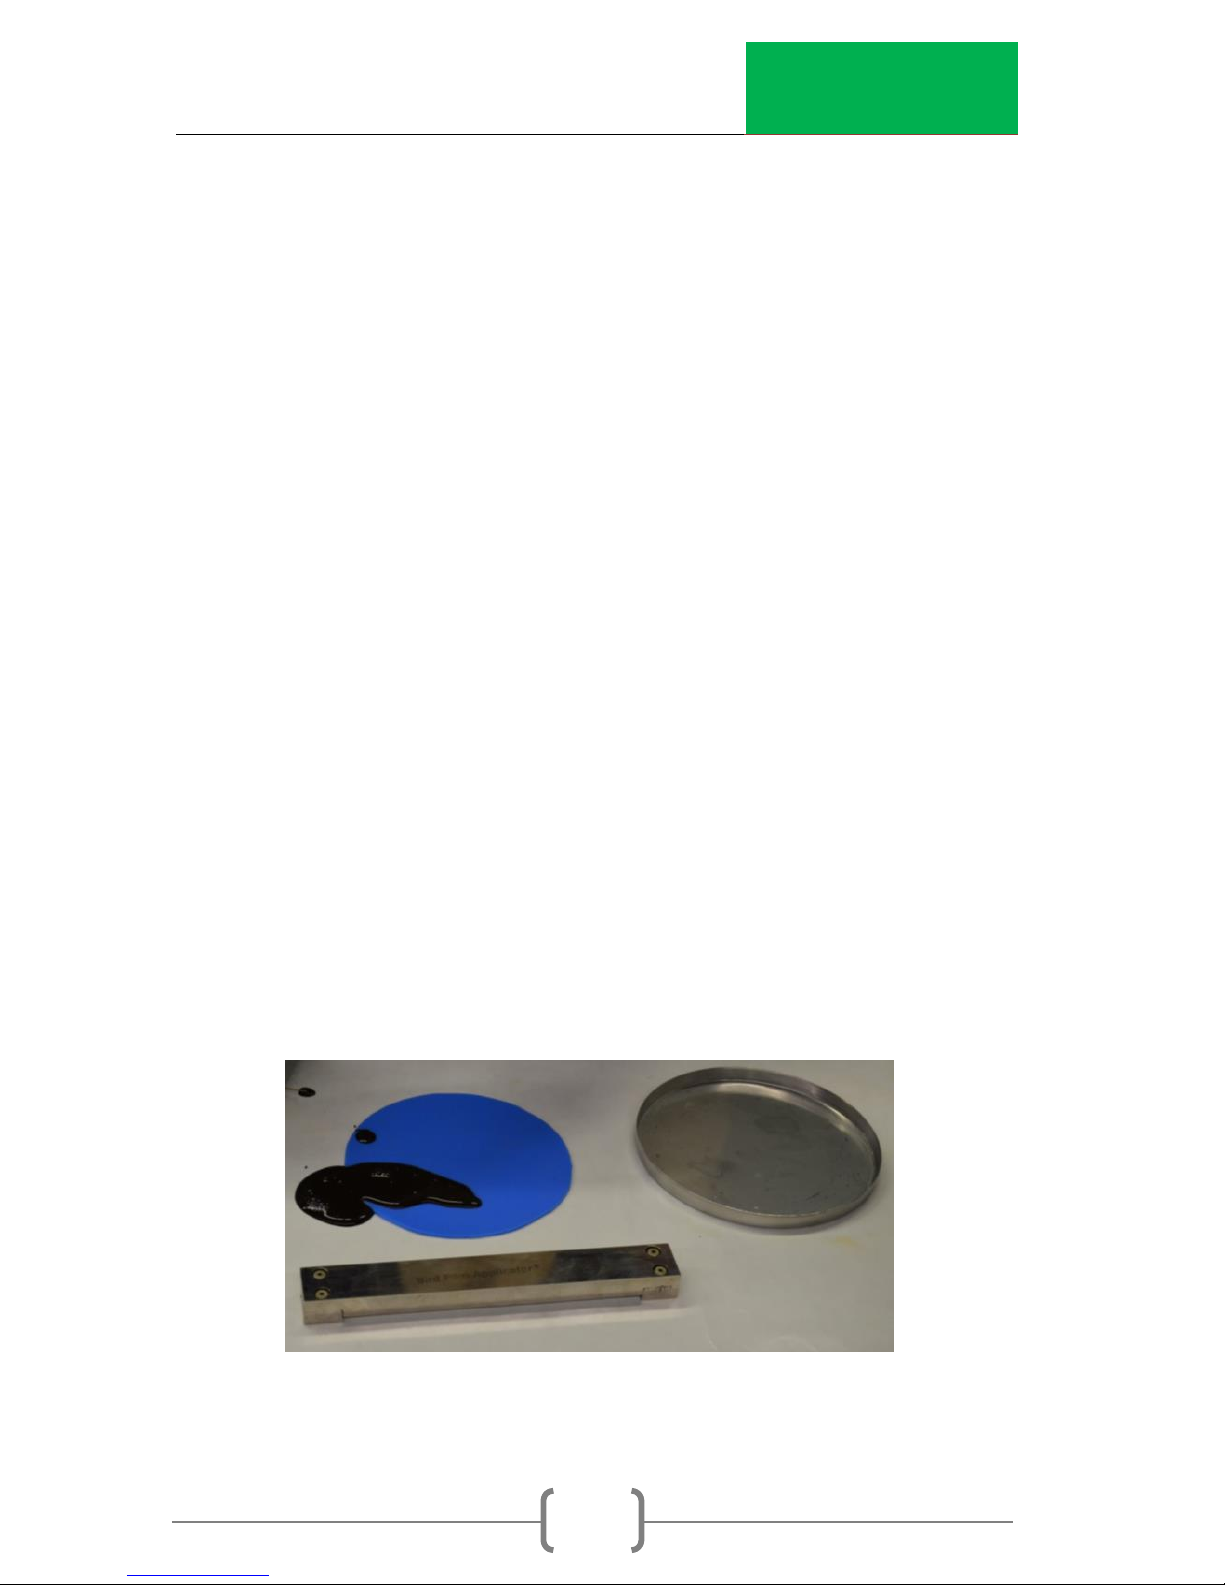
Equipment
Thin film
applicator
Metal Pan
Silicone Sheet
Rack
Rack
Thin Film
Applicator
InstroTek
16
The eDry kit includes the following:
1 thin film spreader
1 rack with 5 shelves
10 metal pans and silicone liners (5 for testing and 5 for
preparing the next sample)
CoreDry control board (necessary for older models)
Preparing a Sample
1. Prepare a space with a protective sheet to capture any
spills of the emulsion.
2. Weigh a clean silicone sheet and metal pan to the
nearest 0.01 g.
3. Remove the silicone sheet from the metal pan. Pour
emulsion on the silicone sheets to form a circle
approximately the size of a quarter toward one edge of
the sheet.
Table of contents
Other InstroTek Laboratory Equipment manuals


