Scientific Ultra254 950 User manual

P-1004-Model 950 Operating Manual_C
Ultra254™Auto UVC Disinfector
Model 950
Operating Manual
Serial # Date
Table of Contents
Safety ....................................................................................................................................................................2
Parts......................................................................................................................................................................5
Use and Operation................................................................................................................................................7
Battery and Charging ............................................................................................................................................9
Maintenance.........................................................................................................................................................9
Specifications......................................................................................................................................................11
Troubleshooting..................................................................................................................................................12
Replacement Parts..............................................................................................................................................13
Warranty and Service .........................................................................................................................................13
Event Log.............................................................................................................................................................14
This document describes the product functions, use, maintenance, and service contact for model 950.
Contact CoScientific LLC at service@coscientific.com for questions that are not answered or unclear in
these instructions. Information and recommendations are not a guarantee of performance, safety,
results, or suitability to the user’s application by CoScientific LLC. Not for use on medical devices. For full
terms and conditions related to this sale visit coscientific.com/terms-and-conditions. Specifications are
subject to change without notice.

2
Safety
All users should be knowledgeable about the proper use and hazards of the tool by understanding the
content of this document and their company’s safety requirements before the use of the tool. Only
adults should operate the tool. Follow all instructions in the manual, labels, and tags.
Types of Hazards
Warning
•Indicates a hazardous situation which, if not avoided, could result in
death or serious injury
Ultraviolet Radiation
•Avoid exposure to the lights when they are on unless protected by a
solid object or car window glass (a few types of scientific specialty
glass are transparent to UVC light)
•Lamps emit high power UV radiation that can cause cancer and/or
severe injury to skin and eyes in less than a minute
•Use only in an enclosed vehicle that is locked from entry during the
treatment time
•Lamps are in Risk Group 3 per ANSI/IESNARP-27.3-96
•If you can see the light without a protective barrier, you are being
exposed; the closer the more dangerous
Dangerous voltage
•The lamps operate between 50-120V AC
•Disconnect battery and turn the tool OFF before servicing
•Do not disassemble the control box for service
•Do not operate the tool when wet
Lamp breakage notice
•Lamp contains mercury. Manage in Accord with Disposal Laws. See
www.lamprecycle.org or 1-800-555-0050
•A lamp breaking is unlikely to have any impact on your health
•If a lamp does break indoors, ventilate the room for 30 minutes
•Do not use a vacuum cleaner
•Remove the broken parts with latex or nitrile gloves
•Put them in a sealed plastic bag and take it to your local waste
facilities for recycling

3
UV Overexposure
Symptoms can be delayed several hours to a day and include sunburn and photokeratitis (also known as
snow blindness or welder’s flash).
•Skin irritation can vary in severity depending on the level of exposure, a person’s genetics, and
some medications. Chronic exposure to UV radiation has been linked to premature skin aging
and skin cancer.
•UV radiation can damage the cornea, which is the outer protective coating of the eye.
Photokeratitis is a painful inflammation with symptoms such as an itching feeling like sand is in
your eye that can last for several days. Chronic exposures to short term UV radiation can lead to
the formation of cataracts.
Safety Labels and Tags
UV Radiation Warning - Control Box Warning Label (Part #1059; Description: Label, Control Safety)
•Located on the side of the control box
•Positioned to warn operators of the tool to be knowledgeable of the operation and hazards
before use
•Notice to remove the battery before servicing lamps
Dangerous Voltage Warning –Dangerous Voltage Disconnect Label (Part #1074; Description: Label,
Dangerous Voltage Disconnect)
•Located inside the control
box
•Positioned to be visible if
someone were to open the
control box lid
•No user-serviceable parts
are located inside the
control box

4
UV Radiation Warning - External Vehicle Tag (Part #1058; Description: Tag, External Safety, 4x6)
•Located on both ends of the orange straps
•Printed on both sides
•Positioned to warn people from entering
the vehicle while the UV light is on
•Make sure this tag is visible during
operation
Mercury Lamp Notice - Control box instructions label (Part#1060; Description: Label, Control Box Guide)
CA Prop 65 Warnings –Shipping box label
Contact CoScientific LLC to replace missing or damaged labels.

5
Parts
Model 950 is a portable, battery-operated UVC light disinfecting tool that is designed for regular
commercial use in unoccupied vehicles.
Parts of the tool are:
A. Control box –Impact resistant, carbon fiber filler polymer that supports the two lamps and their
covers
B. Control panel –Top of the control box contains all the control functions
C. Battery holder –Click to lock mating platform for Milwaukee® M18 or compatible battery
D. Battery - Milwaukee® M18 or compatible battery, 3 A-hr or larger recommended
E. Lamp covers –(2) Lamp covering made of stainless steel grid attached to impact-resistant,
carbon fiber-filled polymer flange, and endcap
F. Lamp sockets –(2) Locking 2G11 base sockets with red release button
G. Lamps –(2) 24W germicidal UVC lamps
H. Door straps –(2) Orange poly straps with clips and warning tag
Internal parts (not shown)
•Warning buzzer –Audible beep to warn the tool is on or within 10 seconds from turning on
•Drop sensor –Sensor to detect if there was a significant movement of the tool during the
process when the lamps are on
•Fan –Cooling fan runs when the lamps are on or when the control box is above room
temperature
E
H
G
F
C
D
A
B

6
1. On/Off toggle switch –Turn on for immediate use, turn off the tool when not in use
2. Start button –One press starts the treatment process
3. Stop button –Illuminated red stop button will stop the process at any point and will reset the
system including any error codes
4. Status light –Multicolor LED to indicate the status of the tool. Red, Green, Blue
Status Light Indications
1
2
3
4

7
Use and Operation
The Model 950 is designed for air and surface disinfection of an unoccupied vehicle with closed windows
and locked doors. Inactivation of a wide variety of microorganisms is accomplished with two germicidal
lamps that emit a wavelength of light at 254 nm. The treatment time required to inactivate varies by
type of organism, humidity, and temperature. The general relationship is more energy equals more of
the microorganism population is inactivated. Energy is the light intensity multiplied by the illumination
time. The model 950 is set to a time of 12 minutes to provide the energy dose recommended by the
International Ultraviolet Association (iuva.org) of 40 mJ/cm2.
Limitations of germicidal light are shaded areas that are unlikely to be treated well enough and should
be cleaned with another method such as wiping with an EPA List N which covers disinfectants for use
against SARS-CoV-2 (COVID-19).
A good complementary approach to protect both the people cleaning the vehicle and the users would
start with UVC disinfection first to reduce the bioactivity within the vehicle followed by hand cleaning of
shaded and high touch areas such as the steering wheel and door handles.
Use Example
A use example in a typical 4 door sedan (details depend on the vehicle’s specifics)
1. Use the model 950 as directed across the front seat area
2. Use the model 950 as directed across the back-seat area (or at the same time if 2 tools are
available)
3. Remove the tool(s)
4. Hand clean the high touch areas and areas that are shaded from the light such as
oSteering wheel and controls (turn signals, lights)
oDoor handles
oGear selector
oHandles outside of the car
Operational Steps
1. Check the tool for damaged, dirty, or broken lamps –do not use a broken tool.
2. Attach battery
3. Remove trash and debris from the vehicle’s interior
4. Close all of the vehicle’s windows
5. Vehicle side 1
a. Place the tool on the seat closest to you
b. Pull out the strap and hang it over the center of the door frame as you close the door
while holding the strap
c. Pull the strap with enough tension to lift the end of the tool slightly up towards your
hands
d. Slide the cam lock (located near the warning label) up to the door frame and close the
cam lock
6. Vehicle side 2
a. Turn the tool on

8
b. Press the start button –There is a 1-minute delay before the tool turns the lamps on
c. Pull out the strap and hang it over the center of the door frame and close the door while
holding the strap
d. Pull the strap with enough tension to lift the end of the tool so it is roughly centered
between the seat and the roof
e. Slide the cam lock (located near the warning label) up to the door frame and close the
cam lock
7. Return to side 1 and adjust to center the tool if necessary.
8. Lock the doors.
9. Wait for the lamps to shut off and either the green ‘process complete’ light or the red flashing
error light to illuminate before entry
10. Turn off the tool
11. Fold up the orange straps and place them in the elastic band near the clip
12. Remove the tool from the vehicle
Helpful Information
•The tool does not have to be level –the purpose it to equally treat the vehicle’s interior by
roughly centering it in the cabin.
•Fanfolding the strap is usually the easiest method to put it back into the elastic band. Start by
holding the strap with the elastic band in your hand.
•Placing and removing the tool with the straps unclipped may be better for your work efficiency
and provide less chance of contaminating the tool.
•Keep the lamps clean by storing the tool in the provided box or covered in a clean area.
•The green light and fan will turn off after 30 minutes to conserve battery power.
•The fan will stay on until the control box temperature is below 81⁰F. It’s ok to turn the power
switch off before the fan turns off by itself, the tool will cool naturally.
•To run the process the vehicle must be above 36⁰F and below 113⁰F.
•Lamps emit a lower intensity of UVC at colder temperatures, so a sensor automatically detects
the temperature and adjusts the treatment time as needed. The maximum time is 24 minutes at
36⁰F.
See the article Basics of UV Disinfection to Reduce the Spread of COVID-19 at coscientific.com for more
information and references to scientific articles and helpful links.

9
Battery and Charging
A Milwaukee® M18™series rechargeable battery with a capacity of 5 A-hr is provided with the tool. It
should be recharged with the provided charger or another compatible charger as needed. The battery
has a built-in level indicator and should be at least at 1 bar out of 4 before starting a treatment process.
The tool will automatically detect an error if the battery
level is too low to start a process run. Charging a fully
discharged battery will take about 1.5 hours.
Using M18™ compatible replacement batteries is
acceptable. Lower or higher capacity batteries are also
acceptable but will change the number of treatments
before a recharge is needed. Extra-large capacity batteries
will fit and operate the tool, but the extra weight may
make it difficult to lift with the straps.
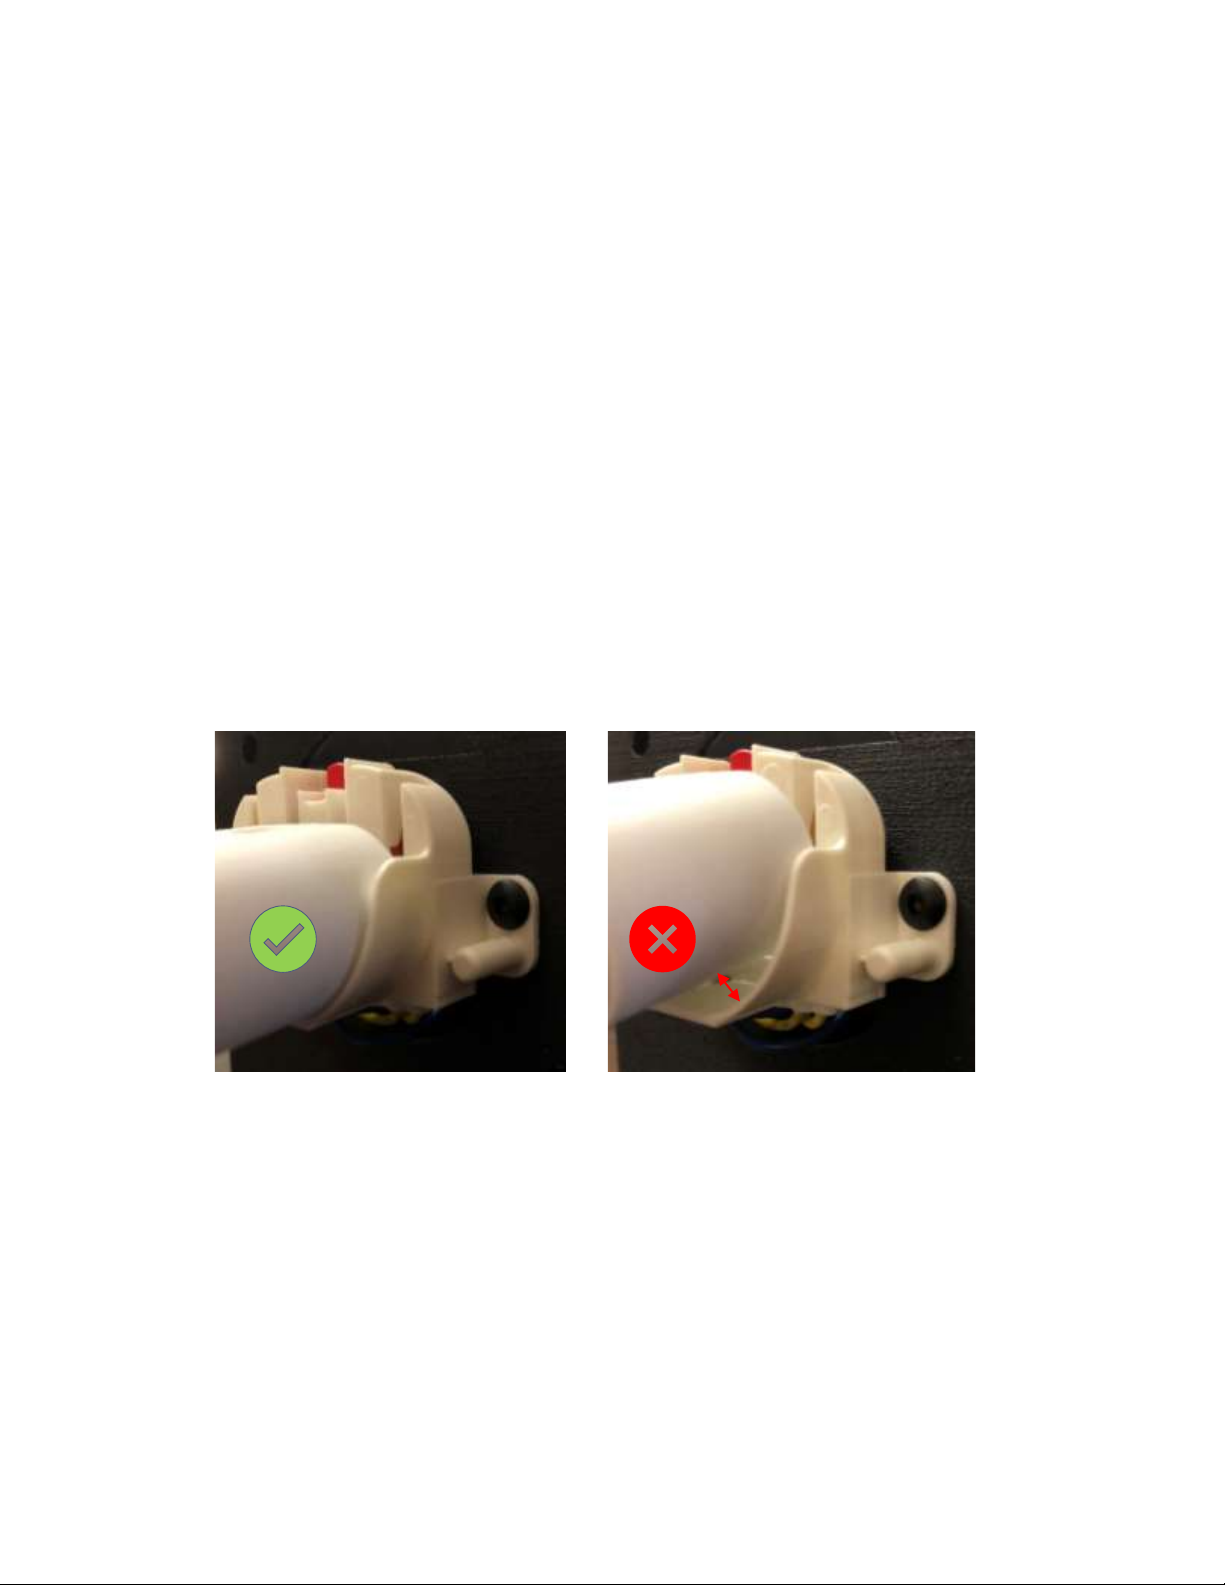
The battery needs to be slid into place until it clicks into
the locked position. Press both red tabs to release before
sliding the battery off the mount.
Maintenance
Caution: Remove the battery before all maintenance and service.
Lamp cleaning - small particulates
Use a canned air duster or compressed air nozzle with the lamp covers in place.
Lamp cleaning –heavy particulates or visible debris
1. Remove a lamp cover by removing the 4 thumbscrews and by carefully sliding the cover off the
end of the lamp
2. Wear latex or nitrile gloves to keep the lamps clean
3. Moisten a clean, lint-free cloth with isopropyl, ethyl, or denatured alcohol and wipe down the
surface of the lamp(s)
4. Replace the lamp cover by sliding in over the lamp making sure the end of the lamp is captured
by its holder in the end cap
5. Replace the 4 thumbscrews, finger tight
Lamp lifetime
Lamps are rated for 8,000 hours of continuous use, but the manufacture’s lifetime needs to be derated
due to the high number of on/off cycles relative to run time. We recommend that the lamps be replaced
after 6,000 hours of run time. As an example, one 8-hour shift of operation for a year is about 2,000
hours.

10
Lamp breakage
See the instructions in the safety section above
Lamp replacement
1. Remove a lamp cover by removing the 4 thumbscrews and by carefully sliding the cover off the
end of the lamp
2. Wear latex or nitrile gloves
3. Fully depress the red button on the top of the lamp socket and lift the lamp away from the
socket by holding its base connector
4. Hold the new lamp by the base connector with your thumb on the top of the connector and
slide the four pins down the 4 slots until it is seated. When the lamp is seated correctly it will
not pull out of the socket
5. Replace the lamp cover by sliding in over the lamp making sure the end of the lamp is captured
by its holder in the end cap
6. Replace the 4 thumbscrews, finger tight
7. Put lamp(s) in a sealed plastic bag and take them to your local waste facilities for recycling
8. Lamp contains mercury. Manage in Accord with Disposal Laws. See www.lamprecycle.org or call
(800) 555-0050

11
Specifications
Power source: Milwaukee® Tool M18™ removable battery
Charging: Charging cradle provided, 120 VAC
Battery capacity: 6 treatments
Weight: 6.4 lbs. [2.9 kg] with battery
Size: 4.3” W x 8.0” H x 34” L [11 cm x 20 cm x 86 cm]
Lamps: Two, 24-Watt, low-pressure Hg, ozone-free
Light intensity and wavelengths: 88% at 254 nm (UVC), 12% at 360-550 nm (Visible)
Treatment time: 12 minutes (time increases below 68⁰F to maintain dose)
Run time (min)
Temperature Band (⁰F)
Temperature Band (C)
12
68 - 113
20 - 45
16
46 - 67
8 - 19
20
42 - 45
6 - 7
24
36 - 41
2 - 5
Operating temperature range: 36 to 113⁰F (2 to 45C)
Storage temperature range: -40 to 120⁰F (-40 to 49C)
UVC irradiance: 0.06 mW/cm2at 30” [76 cm] (maximum effective range) for 12 min is a dose of 40
mJ/cm2
Effect of UV on Vehicle Materials
Due to the absorption of energy, plastic and fabric materials will breakdown with prolonged exposure
which shows up as yellowing, surface cracks, and ultimately mechanical failure. Most plastics that are
designed for outdoor use, have UV coatings or inhibitors added to the material to prolong the life of
materials. This was a much bigger problem in the past for car manufacturers, so UV inhibitors are now
widely added to materials that are expected to receive sun exposure.

12
Troubleshooting
Error Codes –Red flashing light with a repeating pattern of blinks and a delay
Number of
red blinks
Reason
Action
1
Lamp current out of range
Check for a loose or broken lamp
2
Drop detected
Press stop to reset and start without
motion after the delay
3
Temperature out of range
Low Temp –warm vehicle above 36⁰F
High Temp –Allow tool and vehicle to
cool below 113⁰F
4
Battery level low
Recharge battery
5
Process stopped due to low battery
Recharge battery
Problem
Possible Cause
Solution
Does not power on
Battery loose or needs charging
Remove the battery and check
the level by pressing the button
on the battery. The tool needs 1
or more bars to run the process.
Make sure battery fully ‘clicks’
into place when attaching to
mount
Fan won’t shut off
Temperature is higher than
81⁰F
It’s ok to turn the power switch
off before the fan turns off. The
tool will cool naturally.
Lamps are not operating
Loose or broken lamp
See the instructions in the
maintenance section
Tool does not shut off after 25
minutes
Controller error
Wait for the battery to
discharge or release the cam
lock on the strap to let the tool
drop to seat and shut-off.
Contact service
No green light after process run
Green light goes off after 30
minutes to save power
No action

13
Replacement Parts
Contact sales@coscientific.com for replacement parts
CoScientific
Part #
CoScientific Description
Alt
Manufacturer
Alt Part #
1020
Lamp, UVC, 24W, 2G11 Base
Osram
Sylvania
Puritec HNS L 24 W 2G11
Philips
TUV PL-L 24W/4P 1CT/25
LSE
PL-L24W/TUV/2G11
1022
Battery, Milwaukee, M18, 5Ah
Milwaukee
M18 Redlithium XC5.0, 48-11-
1850
Others
M18 compatible
1023
Battery Charger, 120VAC
Milwaukee
M18 Charger 48-59-1812
Others
M18 compatible
CAG-24
Lamp cage, SS, 24W, Black
None
STA-5
Strap Assy, 5ft
None
1053
Thumbscrews, Brass, 12-24
Other
Brass thumbscrew #12-24
1058
Tag, External Safety, 4x6
None
1059
Label, Control Safety
None
1060
Label, Control Box Guide
None
1074
Label, Dangerous Voltage
Disconnect
Safetysign.com
J5316-AF
Warranty and Service
Warranty information is available at coscientific.com/terms-and-conditions.
Contact service@coscientific.com for warranty service or additional information.
A Return Merchandise Authorization (RMA) number will be needed before returns will be accepted.
CoScientific LLC
2440 N. Coyote Dr. #130
Tucson, AZ 85745
(252) 419-1520
service@coscientific.com
GTIN/UPC 195893899708
EPA Est. No. 96844-AZ-1
Save these instructions for reference and future users

14
Event Log
Date
Problem or Event
Notes
By
Table of contents
Other Scientific Laboratory Equipment manuals