Insulet Omnipod 5 User manual

Omnipod®5 Automated Insulin Delivery System
User Guide

22
INDICATIONS FOR USE
The Omnipod 5 Automated
Insulin Delivery System is a
single-hormone insulin delivery
system intended to deliver U-100
insulin subcutaneously for the
management of type 1 diabetes in
persons aged 2 and older requiring
insulin.
The Omnipod 5 System is intended
to operate as an automated insulin
delivery system when used with
compatible Continuous Glucose
Monitors (CGM).
When in Automated Mode, the
Omnipod 5 System is designed
to assist people with type 1
diabetes in achieving glycaemic
targets set by their healthcare
providers. It is intended to
modulate (increase, decrease
or suspend) insulin delivery
to operate within predefined
threshold values using current and
predicted sensor glucose values to
maintain blood glucose at variable
target glucose levels, thereby
reducing glucose variability. This
reduction in variability is intended
to lead to a reduction in the
frequency, severity and duration
of both hyperglycaemia and
hypoglycaemia.
The Omnipod 5 System can also
operate in a Manual Mode that
delivers insulin at set or manually
adjusted rates.
The Omnipod 5 System is intended
for single-patient use. The
Omnipod 5 System is indicated for
use with NovoLog®/NovoRapid®,
Humalog®and Admelog®U-100
insulin.
CONTRAINDICATIONS
The Omnipod 5 System is NOT
recommended for people who:
• Are unable to monitor glucose
as recommended by their
healthcare provider
• Are unable to maintain contact
with their healthcare provider
• Are unable to use the Omnipod5
System according to the
instructions
• Are taking hydroxyurea, as it
could lead to falsely elevated
sensor glucose values and
result in the over-delivery of
insulin, which can lead to severe
hypoglycaemia
• Do NOT have adequate hearing
and/or vision to allow recognition
of all functions of the Omnipod 5
System, including alerts, alarms
and reminders
Device components including
the Pod, Sensor and Transmitter
must be removed before Magnetic
Resonance Imaging (MRI),
Computed Tomography (CT)
scan or diathermy treatment. In
addition, the Controller should be
placed outside of the procedure
room. Exposure to MRI, CT or
diathermy treatment can damage
the components.
COMPATIBLE INSULINS
The Omnipod 5 Automated
Insulin Delivery System is
compatible with the following
U-100 insulins: NovoLog®/
NovoRapid®, Humalog®and
Admelog®.

3
New Omnipod 5 User
Receiving training and understanding the Instructions for Use are needed
BEFORE using your new Omnipod 5 System. Follow these steps to get
started:
1. Receive Training
Learning how to use your Omnipod 5 System the correct way is
important for safe and eective use. Dierent training methods to
learn how to use your system are available based on your and your
healthcare provider’s preferences. Your healthcare provider can help you
to coordinate and set up appropriate training.
2. Freedom Is Yours!
You’ll then be ready to enjoy the benets and exibility of your new
Omnipod 5 System.
If you have questions, please contact Customer Care.
WELCOME TO OMNIPOD®5
3

4

5
Contents
Section 1: Omnipod 5 System Overview ............................ 6
Section 2: Set Up Your Omnipod 5 App ..............................8
Section 3: Set Up a New Pod ......................................10
Prepare...............................................................10
Fill the Pod ............................................................11
Apply the Pod .........................................................12
Section 4: Connect the Pod and Sensor .............................14
Section 5: Omnipod 5 System Modes ...............................15
System Modes, System States ...........................................15
Switch to Automated Mode..............................................19
Section 6: Get to Know the App....................................20
Omnipod 5 App Home Screen ...........................................20
Glucose Trends and Indicators, View Sensor Graph .........................21
Alarms and Notifications ................................................22
Hazard Alarms.........................................................22
Advisory Alarms .......................................................23
Notifications ..........................................................24
Section 7: Key Insulin Delivery Actions .............................25
Deliver a Bolus ........................................................25
Start the Activity Feature ................................................27
Cancel the Activity Feature ..............................................28
Pause Insulin Delivery ..................................................30
Editing a Basal Programme..............................................31
Additional Basal Programmes ...........................................32
Set a Temporary Basal Rate .............................................33
Temp Basal Preset .....................................................34
Section 8: Clinical Evidence for Omnipod 5 ..........................35
Section 9: Settings and Technical Specifications .....................45
Section 10: Staying Safe while Using the Omnipod 5 System ..........61
Warnings .............................................................61
Precautions ...........................................................67
Taking Care of Your Controller and Pod ...................................72
Device Complaints .....................................................74
Emergency Kit .........................................................75
To access the complete Omnipod 5 System Technical User Guide
At any time while using Omnipod 5, you can access or request the Omnipod
5 Technical User Guide.
1. Download or print a digital copy:
• Scan this QR code with your smartphone
• Visit omnipod.com/guides
2. Request to receive a free printed copy:
• Online request form at omnipod.com/guides
1
6
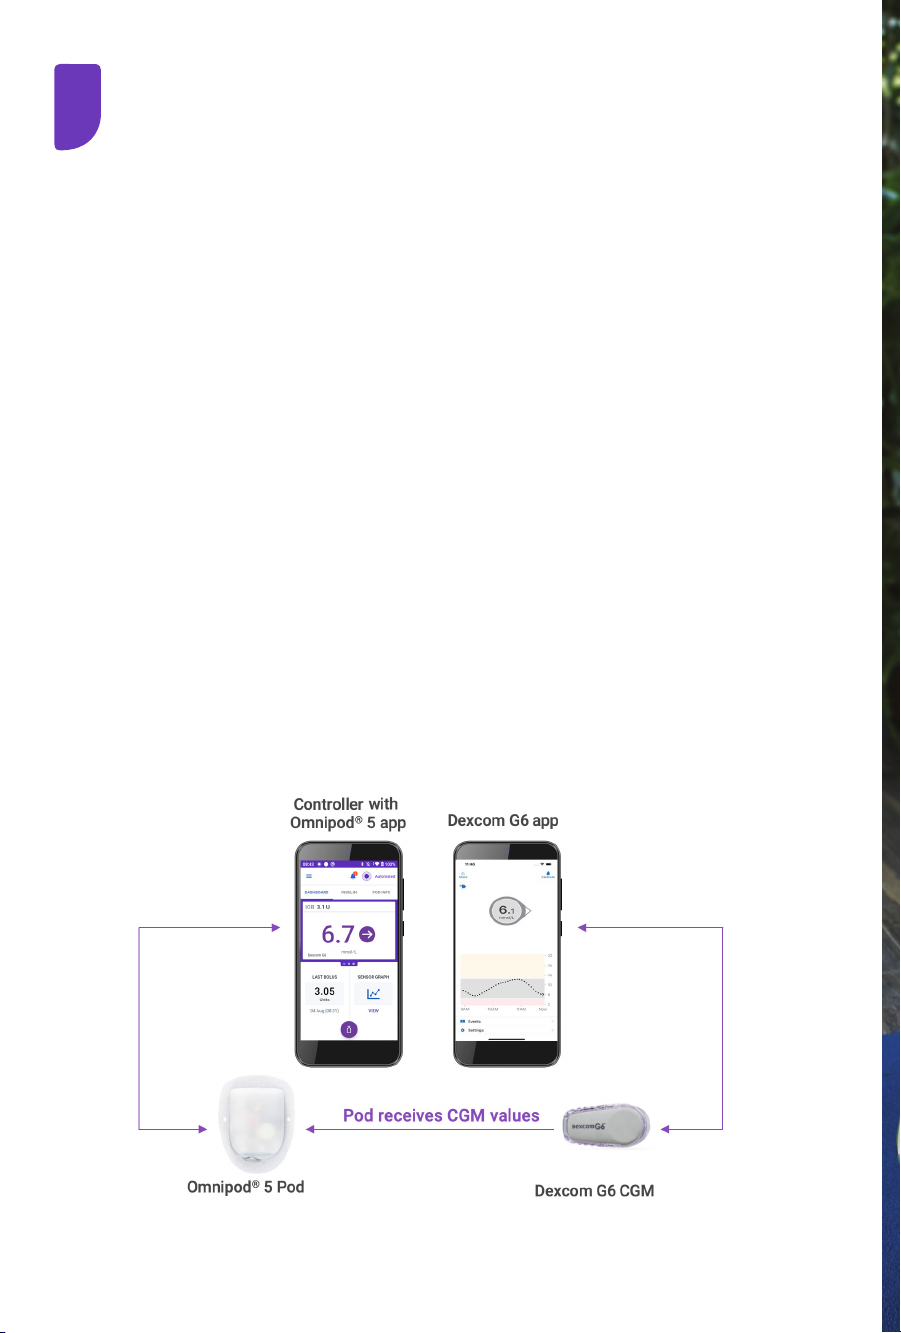
Omnipod 5 System Overview
The Omnipod 5 App
• on the Controller provided
• sends commands to the Pod
• displays glucose and insulin information from the Pod
• used to issue meal and correction boluses
The Pod
• delivers insulin to your body
• receives commands from the Omnipod 5 App
• receives sensor glucose values from the Dexcom G6 Sensor
• sends sensor glucose values to the Omnipod 5 App
• automatically adjusts insulin delivery in Automated Mode
The Dexcom G6 Sensor
• sends sensor glucose values to the Pod and to the Dexcom G6 app
• does not communicate directly with the Omnipod 5 App
• cannot communicate with a Dexcom G6 receiver while paired
with a Pod
For Sensor-specific information, refer to your Dexcom G6
CGM System Instructions for Use.
Omnipod 5 App screens are for educational purposes only. Consult your healthcare
professional before using these features and for personalised recommendations.

77

8
Omnipod 5 App screens are for educational purposes only. Consult your healthcare
professional before using these features and for personalised recommendations.
2
88
Omnipod 5 App Setup
The Omnipod 5 App comes installed on the Controller provided.
Connectivity to mobile data or Wi-Fi is important when using the
Omnipod 5 System. Make sure to connect to your home or work Wi-Fi
network.
Initial pump therapy settings, provided by your healthcare provider, are
needed to set up your Omnipod 5 App.
Set Up Your Omnipod 5 App
The Omnipod 5 App will guide you through setup. Make
sure to read each screen and carefully enter information.
An Omnipod ID is needed for setup. You will be
prompted to sign in or be directed to create a new ID.
Setup is complete after entering your personalised
initial pump therapy settings (provided by your
healthcare provider).
• Hold down the
Power button
to turn it on
Dexcom G6 not included
You can set up & start your Dexcom G6 before or after setting up
your Omnipod 5 App. You must use the Dexcom G6 mobile app and
cannot use a Dexcom G6 receiver. Please consult the Dexcom G6 CGM
System Instructions for Use for more information.

9
Omnipod 5 App Security on Your Controller
After you set up your provided Controller, the Lock and PIN screens appear
whenever you wake up your Controller.
The Lock screen displays:
• Your selected background image
• Today’s date and time
• Your customised message
• The current system mode
• The amount of insulin on board
• Any alarm or notification messages
Unlock your Controller
Instructions to “wake up” or “unlock” the Controller mean doing the following:
1. Press and release the Power button.
2. Unlock the Lock screen by either swiping left to right or by swiping up
from the bottom. The PIN screen appears.
3. Enter your 4-digit PIN.
4. Tap OK. The Home screen or your most recent screen appears.
Lock your Controller
To lock your Controller when you are finished using it:
▶Press the Power button briefly. This locks the Controller by putting it to
sleep.
Note: Keep your Controller in a safe, accessible location.
Forgotten your PIN?
If you have problems with your PIN, contact Customer Care. For contact
information, see your Contact Card.

10
Omnipod 5 App screens are for educational purposes only. Consult your healthcare
professional before using these features and for personalised recommendations.
2
Set Up a New Pod
3
• After rst-time
setup, tap SET
UP NEW POD
• From the POD
INFO tab on the
Home screen, tap
SET UP NEW POD
OR
Prepare
Gather the following supplies:
• Omnipod 5 Controller
• Unopened Omnipod 5 Pod
• Alcohol prep swabs
• A vial of room-temperature rapid-acting U-100 insulin approved
for use with Omnipod 5
Wash your hands with soap and water
Clean the top of the insulin vial with an alcohol prep swab
On the Omnipod 5 App, locate the Pod activation screen

11
Omnipod 5 App screens are for educational purposes only. Consult your healthcare
professional before using these features and for personalised recommendations.
2
Fill the Pod
Prepare the ll syringe
• Remove the fill needle and syringe from the Pod’s tray.
Keep the Pod in its tray during setup. Twist the needle
clockwise onto the top of the syringe for a secure fit.
Do not use any other type of needle or filling device
besides the syringe provided with each Pod.
• Remove the protective needle cap by carefully pulling
it straight off the needle.
Fill the syringe
• Gently pull back on the
plunger to draw air into the
syringe equal to the amount of
insulin you will use. You must
fill the syringe with at least 85
units of insulin (MIN fill line).
Insert the needle into the vial
and push the plunger in to
inject the air.
• With the syringe still in the vial,
turn the vial and syringe upside
down. Slowly pull the plunger to withdraw the insulin.
Tap or flick the filled syringe to remove any bubbles.
Fill the Pod
• Remove the needle from the
vial and insert it straight down
into the fill port. An arrow on
the white paper backing points
to the fill port. Slowly push the
plunger down to completely fill
the Pod.
• The Pod will beep twice to
indicate the Omnipod 5 Pod
is ready to proceed.
SET UP A NEW POD (continued)
MIN
ll
line
12
Omnipod 5 App screens are for educational purposes only. Consult your healthcare
professional before using these features and for personalised recommendations.
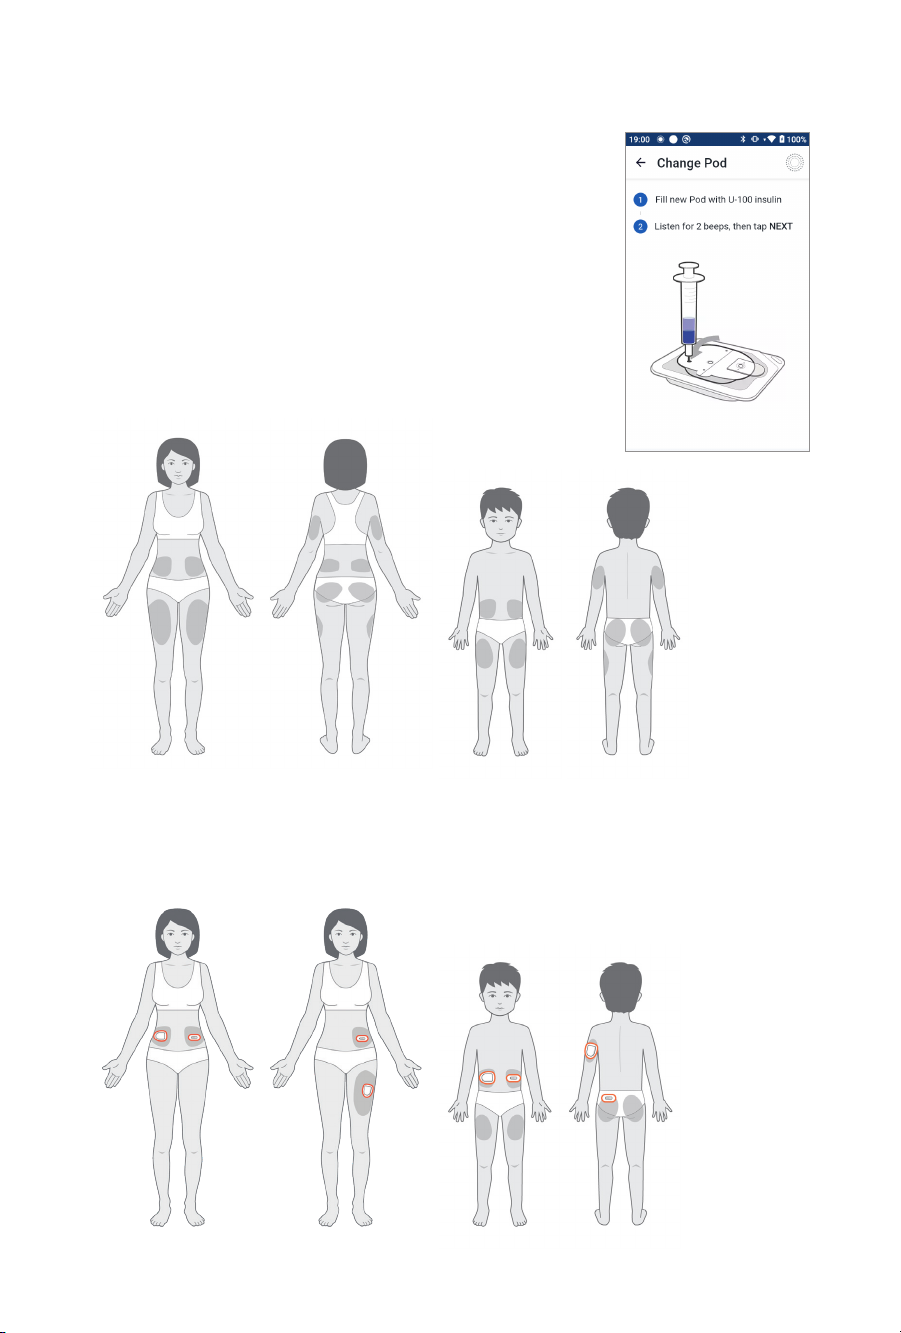
Activate the Omnipod 5 Pod
• With the Pod still in its tray, place it next to
and touching the controller to ensure proper
communication. Tap NEXT on the controller.
The system will perform a series of safety
checks and automatically primes the Pod.
Pod Placement
Adults and Children
SET UP A NEW POD (continued)
Sensor Placement
The Pod and Sensor should be worn within the line of sight, which means
worn on the same side of the body in such a way that the two devices can
“see” one another without your body blocking their communication.

13
Omnipod 5 App screens are for educational purposes only. Consult your healthcare
professional before using these features and for personalised recommendations.
Apply the Pod
Your Pod is now ready for application and insertion.
• Carefully follow the on-screen instructions. For more
information, please refer to “Activating and Changing
Your Pod” in your Omnipod 5 System Technical User
Guide.
• Check the infusion site after insertion to ensure that
the cannula was properly inserted.
Guidelines for Pod Site Selection
• Place at least 8 cm (3 inches) from your Sensor site, as indicated in your
Dexcom G6 System Instructions for Use.
• Place within the line of sight of the Sensor for the best connectivity.
Note: Line of sight means that the Pod and Sensor are worn on the
same side of the body in a way that the two devices can “see” one
another without your body blocking their communication.
• Ideal sites have a layer of fatty tissue.
• Ideal sites offer easy access and viewing.
• The site should be at least 2.5 cm (1 inch) away from the previous site to
avoid skin irritation.
• The site should be at least 5 cm (2 inches) away from your navel.
• Avoid sites where belts, waistbands or tight clothing may rub against or
dislodge the Pod.
• Avoid sites where the Pod will be affected by folds of skin.
• Avoid placing the Pod over a mole, tattoo or scar, where insulin absorption
may be reduced.
• Avoid areas of the skin with an active infection.
14
4
Omnipod 5 App screens are for educational purposes only. Consult your healthcare
professional before using these features and for personalised recommendations.
14
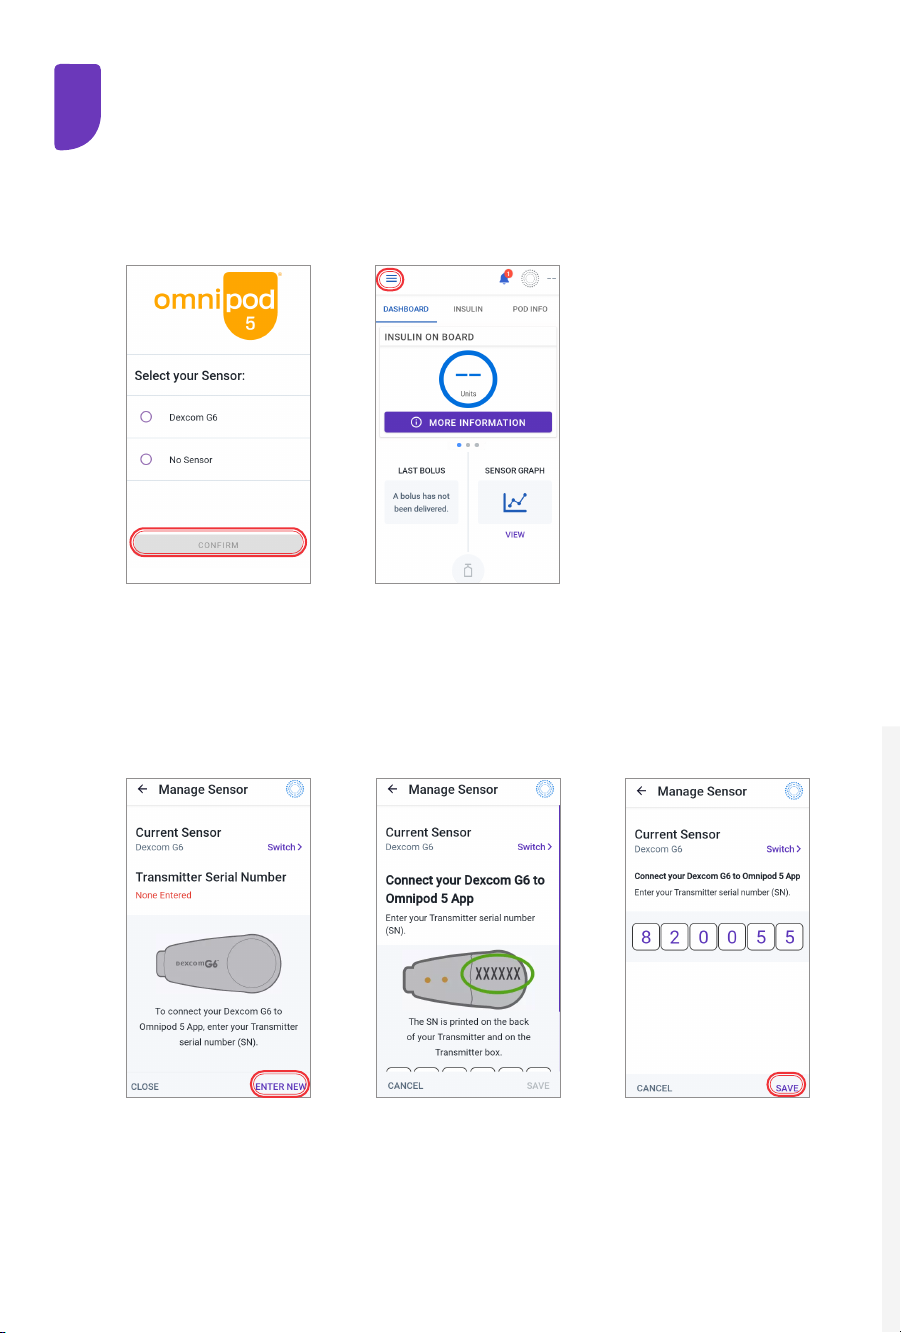
Connect the Pod and Sensor
Locate your Dexcom G6 Transmitter Serial Number (SN)
from the back of the Transmitter OR from the Transmitter box
Step 1: Locate Manage Sensor Screen
Step 2: Enter & Save New Transmitter Serial Number (SN)
OR
From first-time setup
after Pod activation
• Tap the rst
box to enter the
Transmitter serial
number (SN)
• Tap SAVE
From the Home screen
• Tap the Menu button
• Tap Manage Sensor
• Tap ENTER NEW

1515
System Modes
The Omnipod 5 System has two operating modes:
Automated Mode and Manual Mode
Automated Mode
• Adjusts every 5 minutes
• Adapts by updating your total daily
insulin with every Pod change
Manual Mode
• Uses your Basal Programme
System States
Automated Mode: Limited
• Pod is not receiving sensor
glucose values
• System constantly compares
Automated Adaptive Basal Rate
with Manual Basal Programme and
uses whichever is lower
No Pod Communication
• Pod status is unknown
• Bring Controller closer
to Pod
Omnipod 5 System Modes

16
Manual Mode Automated Mode
How it works
Basal Insulin
Delivery
Insulin is delivered
according to the active
Basal Programme
Insulin is delivered and adjusted
automatically based on sensor
glucose values and 60-minute
prediction.
When sensor glucose values are
not available for adjustments, in
Automated: Limited, the System
constantly compares Automated
Adaptive Basal Rate and Manual
Basal Programme and uses
whichever is lower
Bolus Insulin
Delivery
Insulin is delivered using
the SmartBolus Calculator
or entered manually
Insulin is delivered using the
SmartBolus Calculator or
entered manually
Connected
Sensor
Not required. If connected,
sensor glucose values
are displayed, stored in
history, and available
for use in SmartBolus
Calculator
Required. Sensor glucose values
used for automated insulin
delivery are displayed, stored in
history, and available for use in
SmartBolus Calculator

17
Manual Mode Automated Mode
What you can do
Basal
Programmes
Edit, create new, and activate
Basal Programmes. Does not
impact Automated Mode
Edit Target Glucose to
impact automated insulin
delivery. Cannot modify
Basal Programmes in
Automated Mode
Basal Insulin
Delivery
Start and cancel Temp
Basal rate, create Temp
Basal Presets
Start and cancel the
Activity feature
Bolus Calculator
Settings
Edit Bolus Settings Edit Bolus Settings
Bolus Insulin
Delivery
Deliver and cancel Immediate
and Extended Boluses
Deliver and cancel
Immediate Boluses
Pod Changes Activate and
Deactivate Pods
Deactivate Pods.
When a Pod is deactivated, the
System switches to Manual
Mode. After you activate a new
Pod, you’ll be prompted to
switch to Automated Mode
Manage Sensor View and modify Transmitter
serial number (SN)
View Transmitter
serial number (SN)
Pause and
Start Insulin
Manually pause insulin
for a specied duration
of up to 2 hours. Manually
start insulin
System automatically
pauses automated insulin
delivery based on sensor
glucose value/prediction. Switch
to Manual Mode to manually
pause insulin delivery
History Details Review History Details Review History Details.
Auto Events tab shows
microbolus deliveries from
Automated Mode
BG Entry Enter blood glucose readings
to save in History Details
Enter blood glucose readings
to save in History Details
How you will
be notied
Refer to Sections 2 & 5 of the Omnipod 5 System Technical User
Guide for a detailed list of alarms and notications
Note: In Automated Mode, your Adaptive Basal Rate will be updated with every Pod change.
Adaptive Basal Rate is a continuous baseline that the System can adjust up or down every 5
minutes in response to your sensor glucose values.
For your first Pod, since the System doesn’t have any history yet, your total daily insulin and
initial Adaptive Basal Rate are estimated from the Basal Programme you entered during setup.
17

1818
19
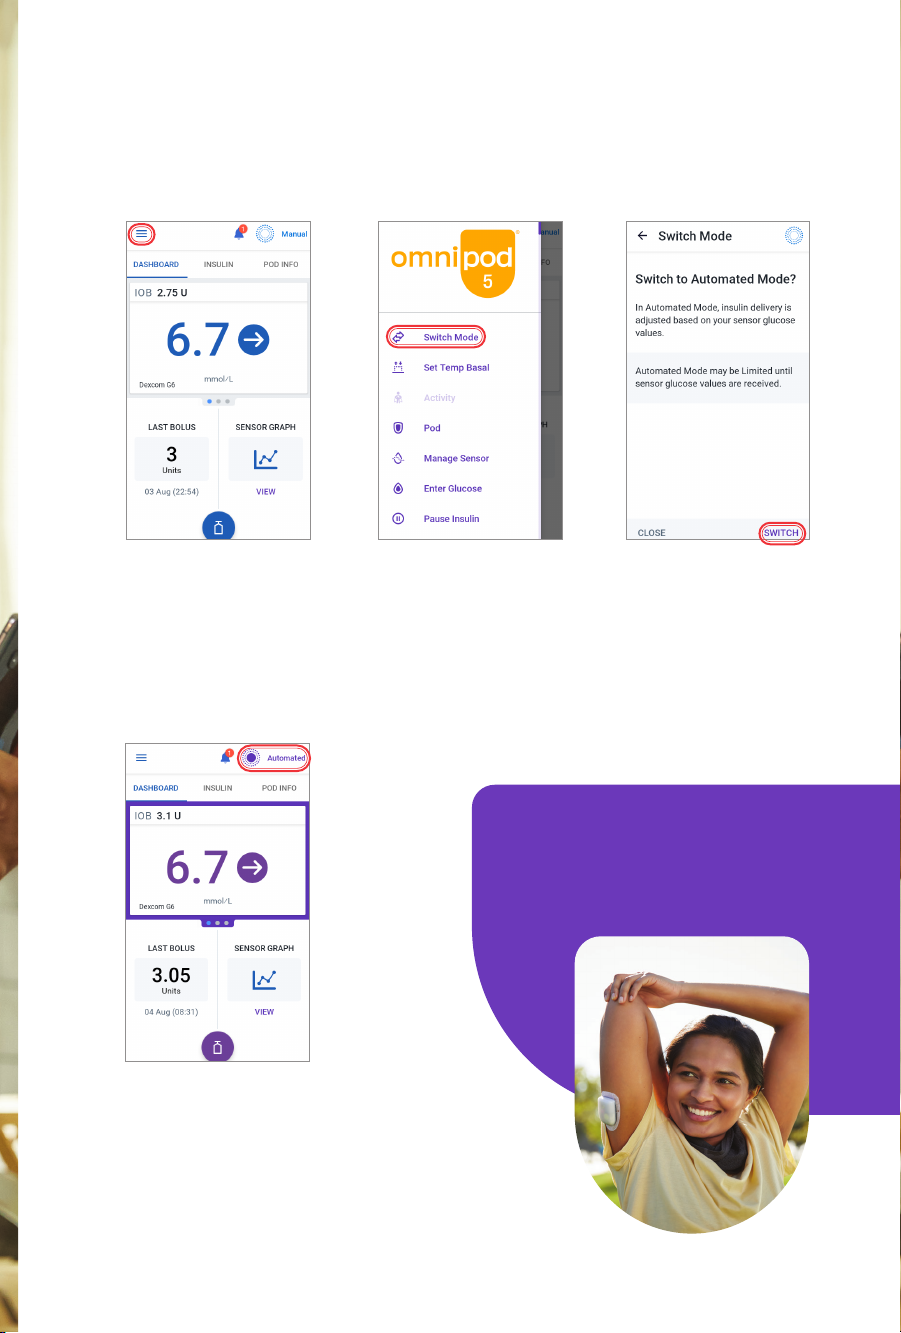
Switch to Automated Mode
• Tap the Menu
button on the
Home screen
1
• Tap Switch Mode
2
• Tap SWITCH
• An active Pod
and a saved
Transmitter
serial number
(SN) within the
Omnipod 5 App
are required
3
4
• Conrm that the mode
switched. Automated
should be indicated
at the top right of
the screen.
Note: Before switching to
Automated Mode, an active temp
basal, extended bolus or insulin
pause must first be cancelled.

8Get to Know the App
Omnipod 5 App Home Screen
Omnipod 5 App screens are for educational purposes only. Consult your healthcare
professional before using these features and for personalised recommendations.
20
6
Menu
Button
Sensor Glucose
Value and
Trend Arrow
Current
System Mode
Tab Views:
• DASHBOARD
• INSULIN
• POD INFO
Alarms and
Notications
Insulin on
Board (IOB)
Last Bolus
Bolus
Button
Sensor Graph
Other manuals for Omnipod 5
4
Table of contents
Other Insulet Personal Care Product manuals


