INTEGRA Biosciences VacuSafe User manual

Operator‘s Manual ●Bedienungsanleitung ● Mode d’emploi
VacuSafe
Aspiration system
Absaug-System
Système d’aspiration English
Deutsch
Français

2
Declaration of Conformity
INTEGRA Biosciences (Switzerland) hereby confirms that the product
VacuSafe
is in accordance with the following directives and standards:
73/23/EEC Low voltage equipment
89/336/EEC Electromagnetic compatibility
IEC/EN 61010-1:2001-02
IEC/EN 61326-1+A1:1998+A2:2000
Standards for Canada, USA and Australia:
CAN/CSA-C22.2 No. 1010.1-92
UL Std. No. 3101-1
FCC, Part 15, class A
February 21, 2003 Elmar Morscher Thomas Neher
CEO Quality Manager
This equipment has been tested
and found to comply with the
limits for a Class A digital device,
pursuant to both Part 15 of the
FCC Rules and the radio interfer-
ence regulations of the Canadian
Department of Communications.
These limits are designed to
provide reasonable protection
against harmful interference when
the equipment is operated in a
commercial environment.
This equipment generates, uses
and can radiate radio frequency
energy and, if not installed and
used in accordance with the
instruction manual, may cause
harmful interference to radio
communications.
Operation of this equipment in a
residential area is likely to cause
harmful interference in which
case the user will be required to
correct the interface at his own
expense.
ENGLISH

3
Edition 8/2003
© Copyright
INTEGRA Biosciences AG - Switzerland
All rights reserved. This manual may not be copied or
reproduced in whole or in part in any way without the prior
express written permission of INTEGRA Biosciences.
The company reserves the right to make alterations without
prior notice.
Notwithstanding the above statements, INTEGRA
Biosciences accepts no liability for possible mistakes or
their consequences arising from this manual.
Manual article number: 468126_V01
Manual is valid as of Software Version 150
ENGLISH

Contents
1. Safety precautions . . . . . . . . . . . . . . . . . . . . . . . . . . . 5
2. Abridged description . . . . . . . . . . . . . . . . . . . . . . . . 8
2.1 Overview – front panel . . . . . . . . . . . . . . . . . . . . . 9
2.2 Display / keyboard . . . . . . . . . . . . . . . . . . . . . . . 10
2.3 Overview – rear panel . . . . . . . . . . . . . . . . . . . . 11
3. Operating instructions . . . . . . . . . . . . . . . . . . . . . . 12
3.1 Equipment provided . . . . . . . . . . . . . . . . . . . . . . 12
3.2 Location . . . . . . . . . . . . . . . . . . . . . . . . . . . . . . . 13
3.3 Connecting to power supply . . . . . . . . . . . . . . . . 13
3.4 Connecting the foot switch . . . . . . . . . . . . . . . . 13
4. Aspirating . . . . . . . . . . . . . . . . . . . . . . . . . . . . . . . . 14
5. Dispensing . . . . . . . . . . . . . . . . . . . . . . . . . . . . . . . . 16
6. Combined aspirating and dispensing . . . . . . . . . . 18
7. Setting pressure, vacuum and hysteresis . . . . . . . 21
8. Level monitor . . . . . . . . . . . . . . . . . . . . . . . . . . . . . 23
8.1 Operation and instructions on use . . . . . . . . . . . . 23
8.2 Activation and calibration of
level monitor . . . . . . . . . . . . . . . . . . . . . . . . . . . . 24
8.3 Deactivation of level monitor . . . . . . . . . . . . . . . 24
9. Maintenance and cleaning . . . . . . . . . . . . . . . . . . . 25
9.1 Maintenance . . . . . . . . . . . . . . . . . . . . . . . . . . . . 25
9.2 Cleaning . . . . . . . . . . . . . . . . . . . . . . . . . . . . . . . 25
9.3 Autoclaving . . . . . . . . . . . . . . . . . . . . . . . . . . . . . 26
10. Trouble-shooting / technical instructions . . . . . . . 27
10.1 Trouble-shooting . . . . . . . . . . . . . . . . . . . . . . . . 27
10.2 Changing fuses . . . . . . . . . . . . . . . . . . . . . . . . . 29
10.3 Setting the power voltage . . . . . . . . . . . . . . . . . 30
10.4 Calibrating the pump to a new sensor cable . . . 31
10.5 Display of current software
version number . . . . . . . . . . . . . . . . . . . . . . . . . 31
11. Technical data . . . . . . . . . . . . . . . . . . . . . . . . . . . . . 32
12. Accessories . . . . . . . . . . . . . . . . . . . . . . . . . . . . . . . . 33
13. Manufacturer and service addresses . . . . . . . . . . . 33
14. VACUBOY hand operator accessories . . . . . . . . . 34
4
ENGLISH

1. Safety precautions
Conditions of use
VacuSafe is an instrument for the controlled,
contamination-free aspiration and dispensing of liquids in a
laboratory.
The instrument should not be used for any other purpose.
Dangers involved when safety precautions
are not observed
VacuSafe is a state-of-the-art instrument with respect to
current technology and is safe to use. Some danger may
exist if the instrument is used by untrained personnel. Any
person given the task of operating VacuSafe must first read
the operating and safety instructions and understand them
fully or be thoroughly trained by a superior in the use of the
instruments before operating the instrument.
Other possible dangers
Throughout the manual, the following symbols will be used
to indicate general precautionary measures:
NB: information on the correct use of VacuSafe.
Warning: Warning that, if safety precautions are not
observed, damage may result to the instrument.
Danger: Warning that, if safety precautions are not
observed, injury to personnel may result.
Independent of any precautionary information given above,
potential dangers with respect to the aspiration and dispens-
ing of liquids should be assessed prior to carrying out and
appropriate safety precautions taken.
5
ENGLISH

Safety at work
Independent of any safety precautions listed here, all other
relevant safety aspects - e.g. GLP, GMP, and those issued
by professional trade associations, the Department of
Health and trade supervisory authorities must be observed.
Qualification of operating personnel
Normally, a technical qualification is required. Specialist
knowledge is required when using VacuSafe for aspirating
or dispensing liquids if all danger is to be avoided. This
particularly applies to the selection of liquids to be aspirat-
ed or dispensed with respect to potential danger involved
and the decision as to whether VacuSafe should be used for
such procedures.
Personnel with no formal laboratory qualification do not, as
a rule, possess the degree of specialist knowledge required
and must hence be trained by qualified personnel and
subsequently supervised.
Safety aspects for the user company
The supervisors of operating personnel must have read and
understood all the safety precautions involved and must
ensure that these are adhered to. They must also ensure that
operating personnel also understand and observe all safety
rules.
Prior to operating VacuSafe, the supervisor must ensure that
no other dangers exist, especially if other instruments and
systems are also being used and if the liquids to be aspirat-
ed or dispensed represent additional potential danger.
If necessary, additional safety instructions must be
compiled by the supervisor. The user company must, if nec-
essary, in order to exclude all possible danger, compile
explicit safety instructions and have these signed by the
staff responsible. In addition, clear competences must be
established as to who is responsible for the operation of
VacuSafe so that clear responsibilities exist for questions of
safety.
6
ENGLISH

Changes in configuration / design by user
No changes may be made to VacuSafe. Any parts that
become defective must be replaced by original INTEGRA
Biosciences parts. Repairs must be carried out by
INTEGRA Biosciences service personnel.
VacuSafe may not be altered in design or in any of their
safety aspects without the express written permission of
INTEGRA Biosciences. In particular, no alterations may be
made to any of the protective functions. Any alteration
made releases INTEGRA Biosciences from any liability for
damage caused.
7
ENGLISH

2. Abridged description
VacuSafe is a controllable aspiration device with integrated
pump and controller and a vacuum/pressure bottle. It is
designed for laboratory use, for aspirating and dispensing
liquids with presettable vacuum and pressure. In
combination with the VACUBOY handoperator or tubing
fitted with a pipette tip, liquids can be aspirated or
dispensed completely contamination-free.
The operating modes "aspirate" and "dispense" can be
selected either individually or in combination.
In the combination mode, a second bottle must be connect-
ed to the pump so that both a vacuum and a pressure source
can be used simultaneously. The MODE key or foot switch
(optional) can be used to switch between the aspirating and
dispensing modes.
Tubing connectors are self-closing. The bottles can thus be
separated, contamination-free, from tubing and pump for
autoclaving or disposal.
8
ENGLISH
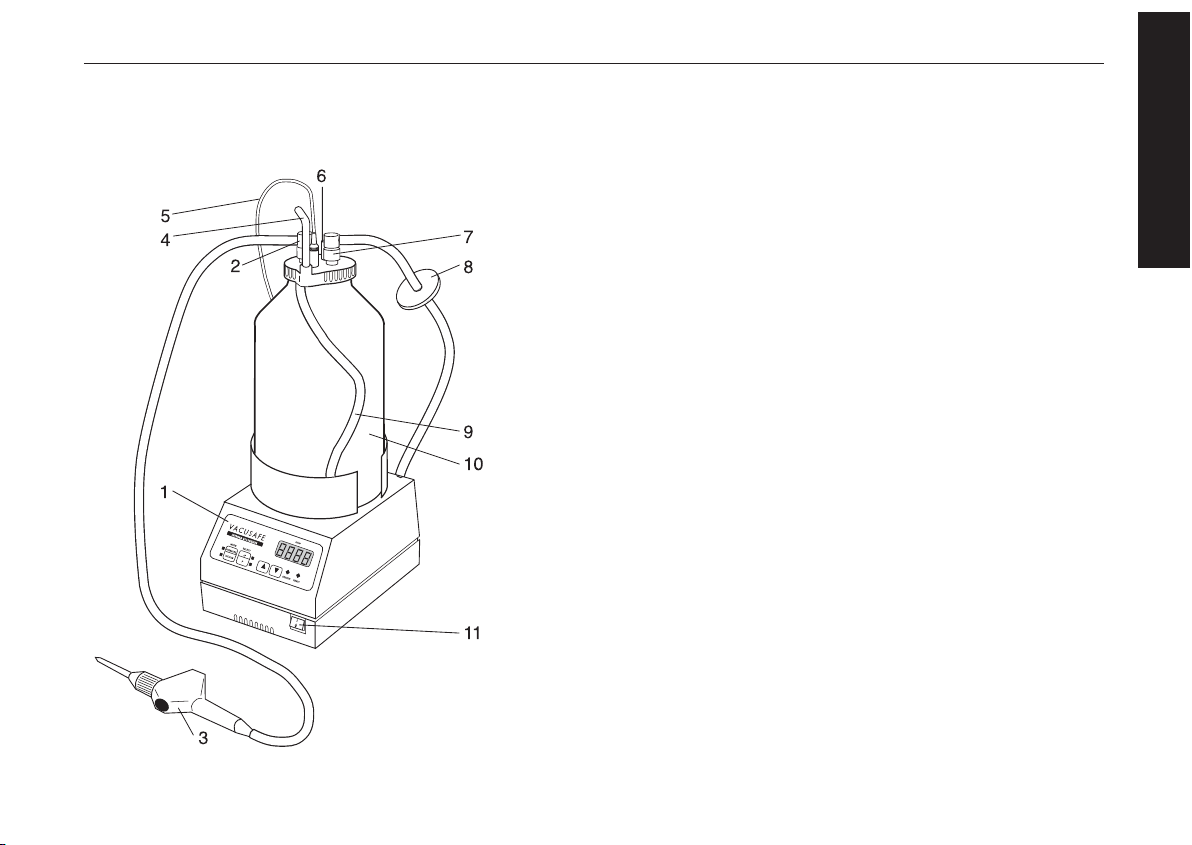
2.1 Overview – front panel 1 Keyboard/display, on/off
2 Tube connector, media side (red)
3 VACUBOY handoperator
(not delivered with system)
4 Grip
5 Sensor cable
6 Venting screw
7 Tube connector, pump side (blue)
8 Pump tubing with filter
9 Siphon tubing
10 Pressure/vacuum bottle
11 Power switch
9
ENGLISH

2.2 Display / keyboard 1 Display pressure/vacuum in mbar (minus sign in
the case of vacuum)
2 LED READY: lights when set pressure/vacuum in
the bottle is within set range
3 LED SENSOR: active only (blinks) in aspiration
mode (VACUUM):
●when medium reaches maximum level in the
bottle and the bottle has to be emptied
●when the sensor cable is not properly connected
4 Keys UP and DOWN for setting hysteresis and
pressure/vacuum and switching off level monitor
5 SELECT key: for setting hysteresis (∆P) or
pressure/vacuum (P) and calibration level monitor
6 MODE key: for switching between the modes
"aspirate" (VACUUM) and "dispense"
(PRESSURE).
10
PRESSURE
MODE SELECT
VACUUM P
∆
P
READY
SENSOR
mbar
ENGLISH

2.3 Overview – rear panel 1. Fuse housing containing 2 fuses
2. Power voltage display
3. Socket for power cable
4. Socket for sensor cable
5. Socket for foot switch
6. Tubing nipple for "dispense" mode (PRESSURE)
7. Tubing nipple for "aspirate" mode (VACUUM)
11
ENGLISH

3. Operating instructions
3.1 Equipment provided
The equipment provided comprises:
1 VacuSafe pump
2 Pressure/vacuum bottle
3 Lid, complete
4 Tube, pump side, complete with filter and tube
connector
5 Sensor cable
6 Power cable
7 Foot switch (option)
8 Tube media side with connector
9 Siphon tubing
Operator’s Manual
Please check the items delivered for completeness. Should
any of the items be missing, contact INTEGRA
Biosciences.
12
ENGLISH

3.2 Location
VacuSafe is intended for use in a laboratory environment.
The instruments may not be located:
●Near a source of UV-radiation
●In a place susceptible to water spray or where con-
tact with chemicals is possible.
●In a place where explosion potential is present.
The proper location:
●Has a stable, flat base
●Has adequate space for fitting a second bottle for
combined mode aspirate/dispense and for a foot
switch.
●is ventilated sufficiently
3.3 Connecting to power supply
Checking the voltage
Check the local voltage; it must be compatible with the
voltage indicated on VacuSafe.
The instrument voltage is indicated on the rear panel of
VacuSafe.
Warning: Connecting to the wrong voltage may
damage electrical components of VacuSafe.
Connection to power supply
Connect VacuSafe to the power supply using the power
cable provided.
3.4 Connecting the foot switch
Using the foot switch, one can switch between the
"aspirate" and "dispense" modes. It is available as an
optional accessory. The foot switch cable should be
connected to the socket labelled FOOT SWITCH at the rear
of VacuSafe.
13
ENGLISH

4. Aspirating Danger: Aspiration may not be carried out:
●With substances that are potentially explosive
●Aggressive liquids which can attack silicone tubing
●With substances with a temperature in excess of
80°C.
1. Prepare the vacuum bottle
Procedure:
●Switch off the pump with the power switch
●Ensure that no siphon tubing is connected to the
lid.
2. Set "aspirate" mode (VACUUM)
Procedure:
●Switch on the pump with the power switch
●Press the MODE key until the LED for VACUUM
lights.
14
ENGLISH

NB: When aspiration is carried out using a siphon
tube, air bubbles will rise through the medium
during the aspiration process.
●Place lid (1) on the vacuum bottle and ensure that
it fits tightly.
NB: Always keep the lid tight – otherwise a vacuum
cannot be generated in the bottle!
●Connect lid (1) and pump (VACUUM connection)
with tube (4) on the pump side (blue, with filter).
●Ensure that:
- The blue tube connector is fitted to the blue
socket
- The rapid-action connector is properly fitted
(it must click).
NB: Always use the integrated sterile filter on the
pump side (blue). This prevents medium from enter-
ing the pump and causing damage.
●Connect the VACUBOY hand operator tube or
other tube (2) to the tube connector on the red
rapid-action connector
●Connect sensor cable (3) between lid (1) and pump
(SENSOR).
3. Aspiration
●Check that the venting screw is closed
●Switch on the pump with the power switch
●Set values for vacuum and hysteresis if necessary
●The pump will begin to function
●Once the bottle is full, the level indicator will be
activated – the LED SENSOR will blink and an
acoustic alarm starts. The pump stops. The bottle
must be emptied before proceeding further.
NB: For proper operation of the level indicator, and
to prevent the build-up of foam, we recommend the
use of normal commercial anti-foaming agents (for
example Antifoam A from Fluka or Sigma)
15
ENGLISH

5. Dispensing Danger: Dispensing may not be carried out:
●With substances that are potentially explosive
●Aggressive liquids that can attack silicone tubing
●With substances with a temperature in excess of
80°C.
1. Prepare the pressure bottle
Procedure:
●Switch off the pump with the power switch
●Ensure that the siphon tubing (1) is connected
●Place lid (2) on the pressure bottle.
2. Set "dispense" mode (PRESSURE)
Procedure:
●Switch on the pump with the power switch
●Press the MODE key until the LED for
PRESSURE lights.
Ensure that the lid is tightly fastened.
16
ENGLISH

NB: Always keep the lid tight – otherwise a
pressure cannot be generated in the bottle!
●Connect lid (2) and pump (PRESSURE
connection) with tube (4) on the pump side (blue,
with filter)
●Ensure that:
- The blue tube connector is fitted to the blue
socket
- The rapid-action connector is properly fitted
(it must click).
NB: Always use the integrated sterile filter on the
pump side (blue). This prevents medium from enter-
ing the pump and causing damage.
●Connect the VACUBOY hand operator tube or
other tube (3) to the tube connector on the red
rapid-action connector.
3. Dispensing
●Check that the venting screw is closed.
●Switch on the pump with the power switch
●Set values for pressure and hysteresis if necessary
●The pump will begin to function.
17
ENGLISH

6. Combined aspirating
and dispensing
In this combined mode, a vacuum and a pressure bottle are
required.
Danger: Aspiration or dispensing may not be
carried out:
●With substances that are potentially explosive
●Aggressive liquids which that can attack silicone
tubing
●With substances with a temperature in excess of
80°C.
1. Prepare the pressure bottle
Procedure:
●Switch off the pump with the power switch
●Ensure that the siphon tubing (1) is connected
●Place lid (2) on the pressure bottle and ensure that
it fits tightly.
18
ENGLISH
NB: Always keep the lid tight – otherwise pressure
cannot be generated in the bottle!
●Connect lid (2) and pump (PRESSURE
connection) with tube (4) on the pump side (blue,
with filter)
●Ensure that:
- The blue tube connector is fitted to the blue
socket
- The rapid-action connector is properly fitted
(it must click).
NB: Always use the integrated sterile filter on the
pump side (blue). This prevents medium from enter-
ing the pump and causing damage.
●Connect the VACUBOY hand operator tube or
other tube (3) to the tube connector on the red
rapid-action connector.
2. Prepare the vacuum bottle
●Ensure that no siphon tubing is connected to the
lid.
NB: When aspiration is carried out using a siphon
tube, air bubbles will rise through the medium
during the aspiration process.
●Place lid (5) on the vacuum bottle and ensure that
it fits tightly.
NB: Always keep the lid tight – otherwise a vacuum
cannot be generated in the bottle!
●Connect lid (5) and pump (VACUUM connection)
with tube (8) on the pump side (blue, with filter)
●Ensure that:
- The blue tube connector is fitted to the blue
socket
- The rapid-action connector is properly fitted
(it must click)
19
ENGLISH

NB: Always use the integrated sterile filter on the
pump side (blue). This prevents medium from enter-
ing the pump and causing damage.
●Connect the VACUBOY hand operator tube or
other tube (6) to the tube connector on the red
rapid-action connector.
●Connect sensor cable (7) between lid (5) and pump
(connection SENSOR).
3. Aspirating and dispensing
Procedure:
●Connect foot switch (9) to the FOOTSWITCH
socket of the pump
●Ensure that the venting screw on both bottles are
closed
●Switch on the pump with the power switch
●If necessary, set values for pressure and vacuum
●The pump will begin to function
●Either the foot switch or the MODE key can be
used to switch between "aspirate" and "dispense"
●Once the bottle is full, the level indicator will be
activated – the red LED SENSOR will blink. The
bottle must be emptied before proceeding further.
NB: For proper operation of the level indicator, and
to prevent the build-up of foam, we recommend the
use of normal commercial anti-foaming agents (for
example Antifoam A from Fluka or Sigma)
20
ENGLISH
Table of contents
Languages:
Popular Medical Equipment manuals by other brands


Getinge
Getinge Arjohuntleigh Nimbus 3 Professional Instructions for use

Mettler Electronics
Mettler Electronics Sonicator 730 Maintenance manual

Pressalit Care
Pressalit Care R1100 Mounting instruction

Denas MS
Denas MS DENAS-T operating manual

bort medical
bort medical ActiveColor quick guide

AccuVein
AccuVein AV400 user manual


