Intel EP110 User manual

User Guide
Intel 4.7-inch Smartphone
Model: EP110

PAGE : 2
CONTENTS
1 Getting Started............................................................................................. 3
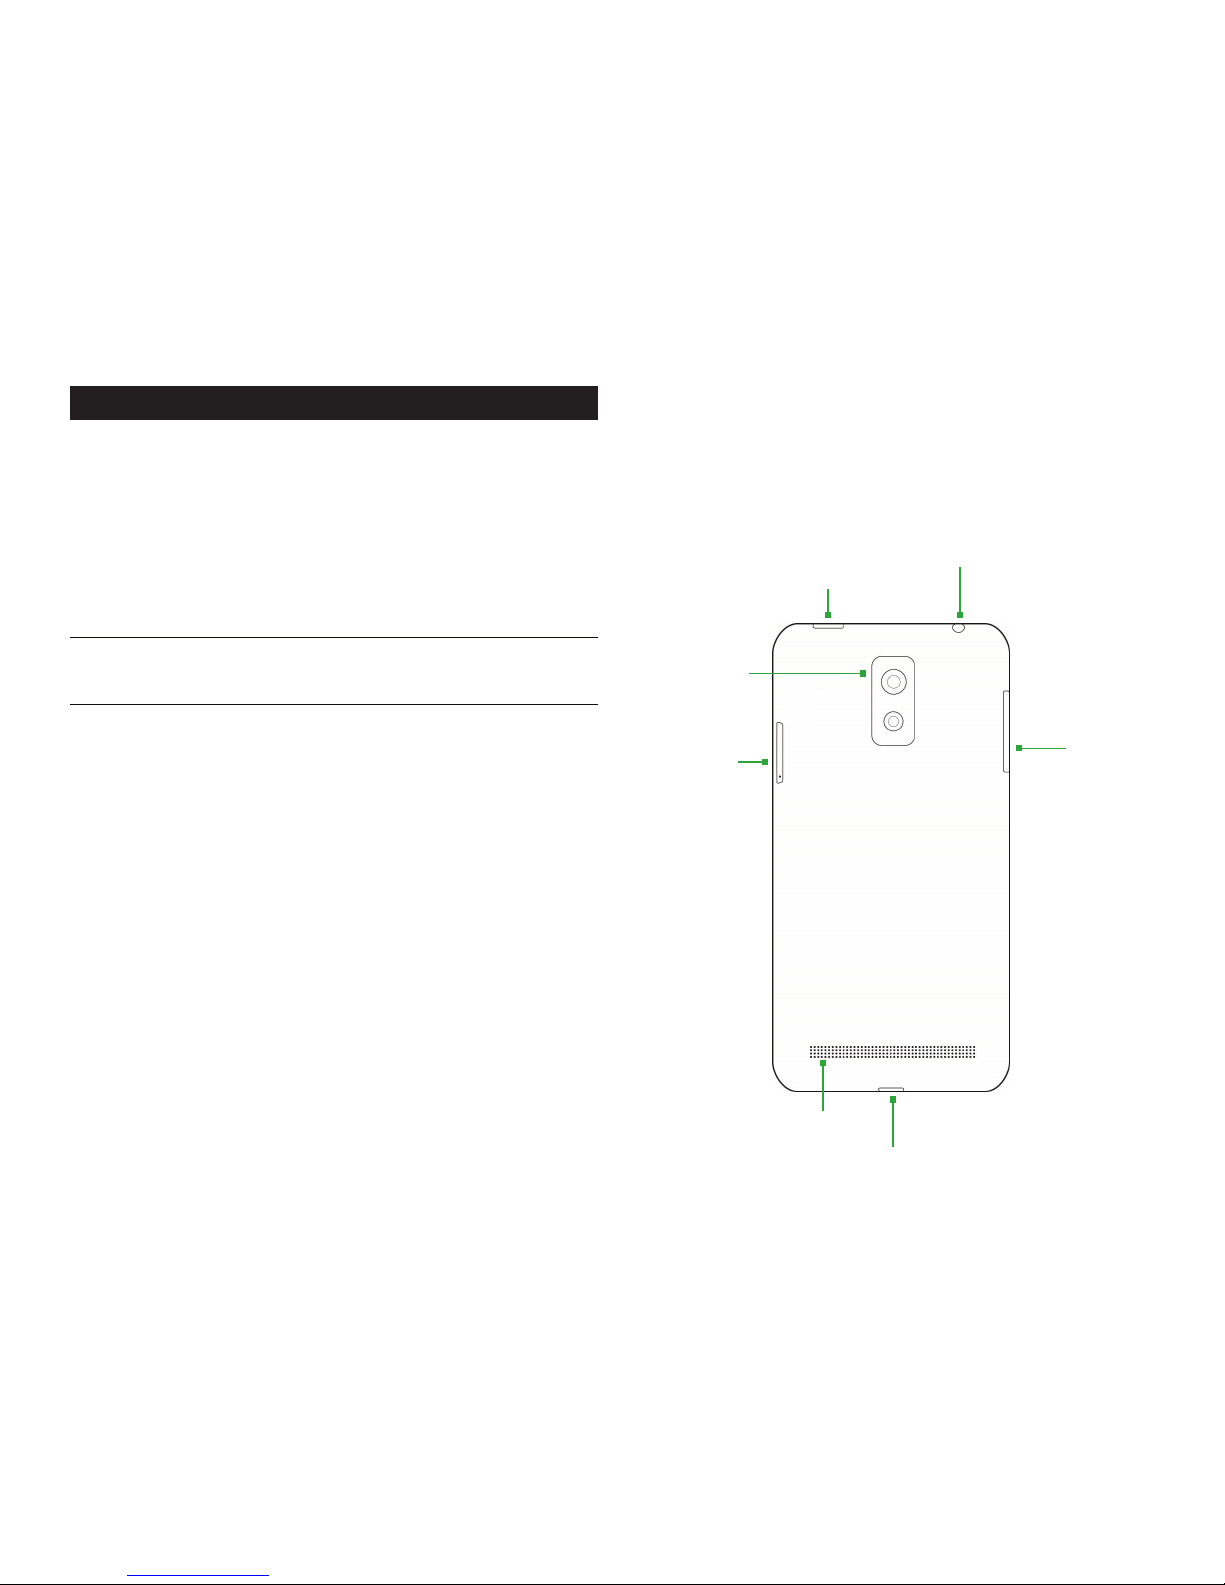
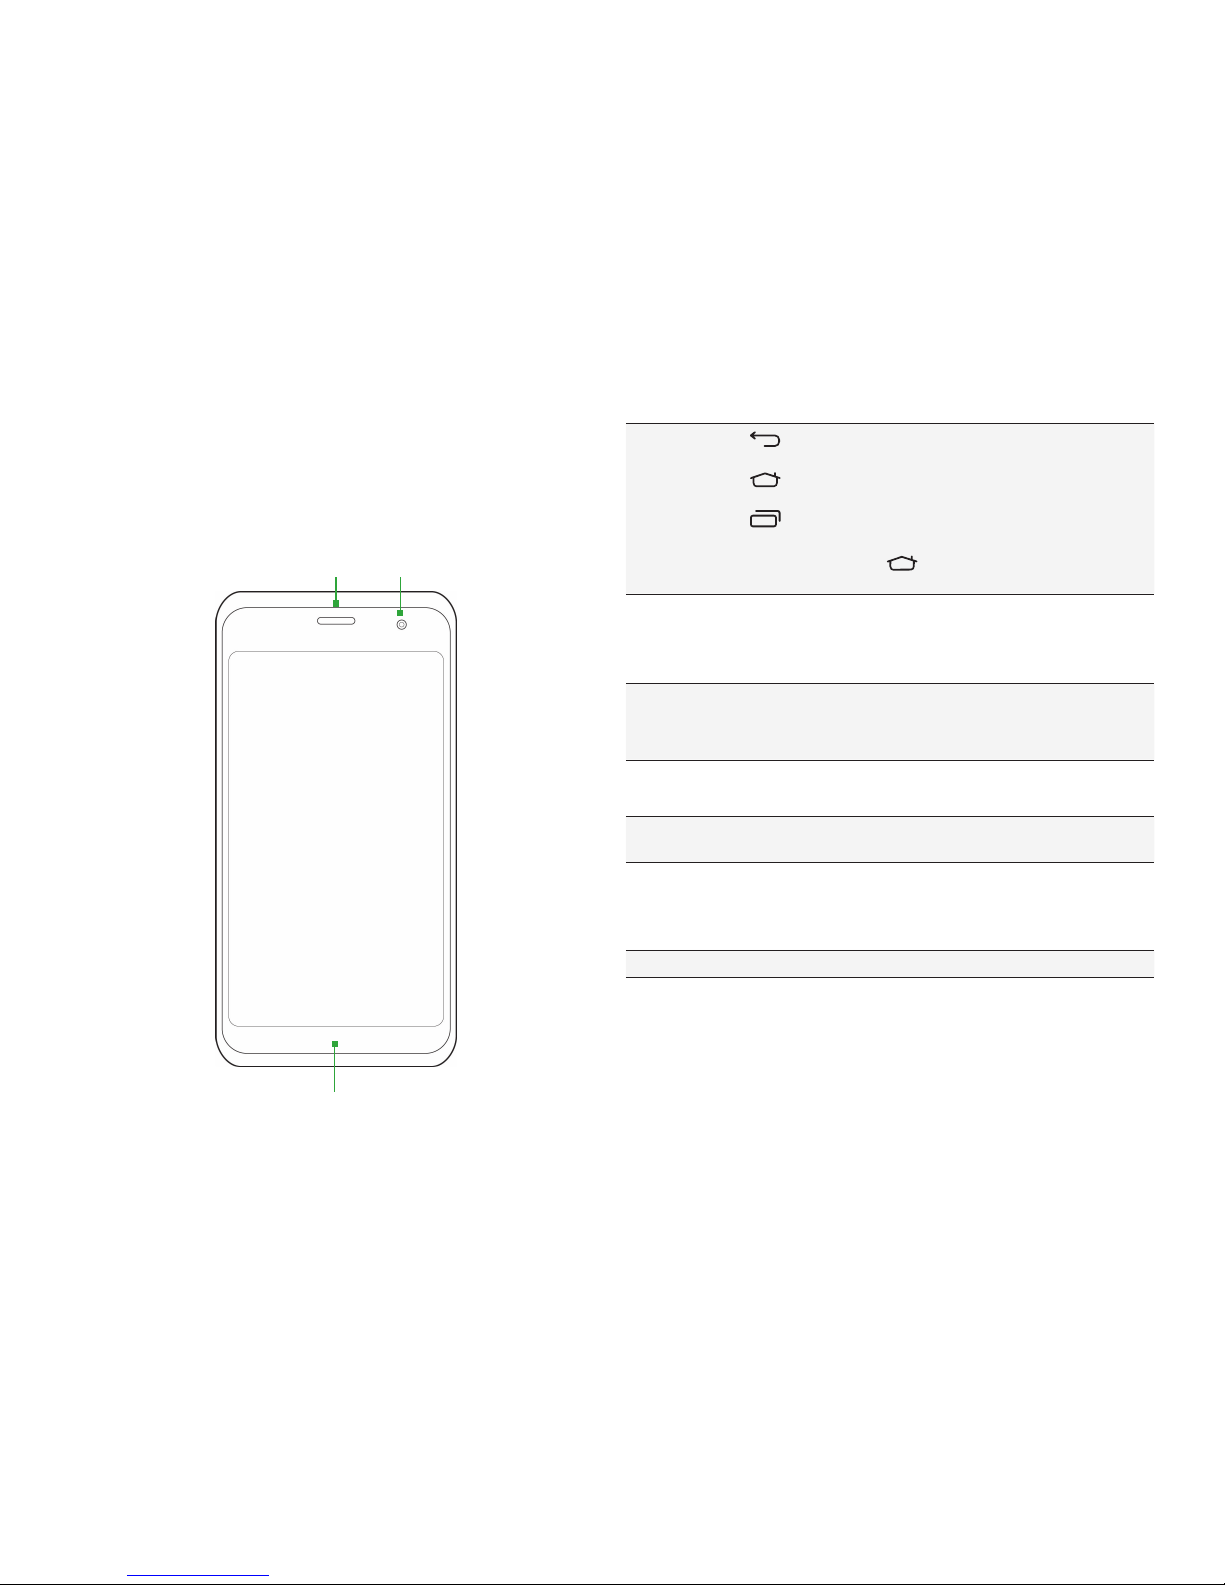
1.1 Your Phone.................................................................................3
1.2 Phone Buttons ............................................................................4
1.3 Phone Slots, Ports & Jacks...........................................................4
1.4 Charge the Battery.......................................................................5
1.4.1 Battery Tips.............................................................................................. 5
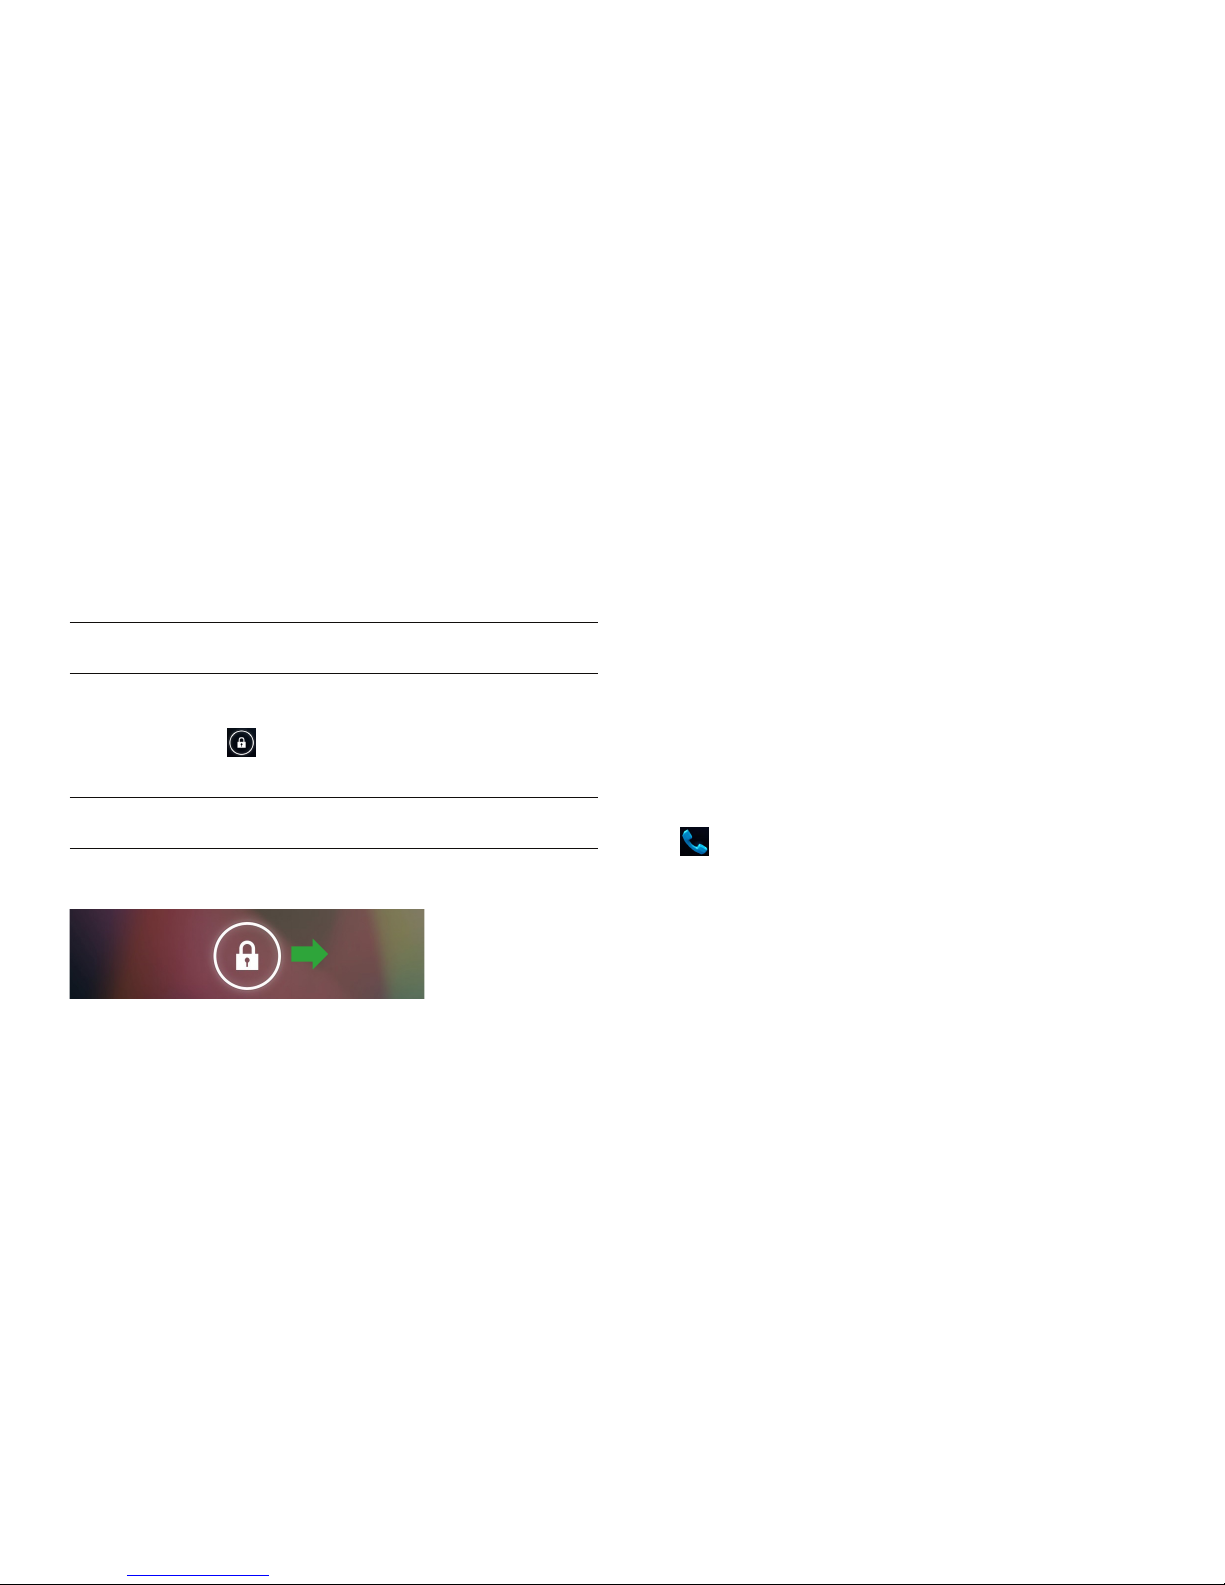
1.5 Turn on the Phone.......................................................................5
1.7 Touchscreen ...............................................................................6
2 Home Screen & Basic Features..................................................................... 7
2.1 Customizing Your Home Screen ....................................................8
2.2 Status & Notification Icons...........................................................9
2.2.1 Quick Settings.......................................................................................... 9
2.2.2 Status Icons ........................................................................................... 10
2.2.3 Notification Icons.................................................................................... 10
2.3 Search .....................................................................................11
2.3.1 Search Settings ...................................................................................... 11
2.4 Securing your Phone..................................................................11
2.5 Using the App Launcher ............................................................12
2.6 Using the Play Store..................................................................12
2.7 Viewing Recently Used Apps ......................................................12
3 Making & Answering Calls ......................................................................... 13
3.1 Using the Phone Tab .................................................................13
3.1.1 Call Waiting............................................................................................ 14
3.1.2 Call Forwarding....................................................................................... 14
3.1.3 Working with Multiple Calls...................................................................... 15
3.1.4 Voicemail ............................................................................................... 15
3.2 Answering & Rejecting Calls.......................................................16
3.3 Using the Call Log Tab...............................................................16
3.4 Using the Contacts Tab..............................................................17
3.4.1 Contact Synchronization .......................................................................... 17
4 Sending & Receiving Messages.................................................................. 19
4.1 Sending messages.....................................................................19
4.2 Managing Messages...................................................................20
4.3 Message Settings ......................................................................20
4.4 Additional Messaging Features ...................................................21
5 Taking Photos & Videos ............................................................................. 22
5.1 View Your Pictures & Video.........................................................23
6 Connections .............................................................................................. 24
6.1 Using Wi-Fi .............................................................................24
6.2 Wireless Bluetooth®Connection..................................................24
6.2.1 Share Files via Wireless Bluetooth®Connection.......................................... 25
6.3 Transferring Files between your Phone & Computer.......................25
6.4 Connecting to Virtual Private Networks ........................................25
6.5 Sharing Your Phone’s Data Connection Via USB Tethering .............25
6.6 Share your Phone’s Data Connection as a Wi-Fi Hotspot................26
6.7 Connecting to a Wireless Display (WiDi).......................................26
6.8 Control Your Phone from a PC.....................................................26
7 Accounts................................................................................................... 27
8 Changing Phone Settings............................................................................ 28
8.1 Wireless & Networks ..................................................................28
8.2 Device......................................................................................29
8.3 Personal...................................................................................29
8.4 System.....................................................................................30
9 Safety, Regulatory & Legal ......................................................................... 31
Safety Guidelines ............................................................................31
Operational and Legal Guidelines......................................................32
WEEE (Waste Electrical and Electronic Equipment) Statement ............32
FCC Statements ..............................................................................32
RF Exposure (Specific Absorption Rate) Information ...........................33
Industry Canada Statements.............................................................33
Notice............................................................................................34

PAGE : 3
1.1 YOUR PHONE
1 GETTING STARTED
Congratulations on your new phone purchase.
This guide will help you quickly come up to speed on the important features
of your phone.
In-box Contents:
• Phone
• Charger
• USB 2.0 cable
Rear-Facing
Camera
3.5mm
Audio Jack
1.0 GETTING STARTED
NOTE: Screen images and icons are simulated for the purpose of this guide. Actual
displays may vary. Instructions in this guide may change depending on the software
version on your device.
Speaker
USB/Power Port
Volume
Power Button
SIM Card Tray

PAGE : 4
1.2 PHONE BUTTONS
Buttons Press to go back to the previous screen or to close a
menu or dialog box.
Press to return to the center panel of the Home
screen.
Press to display shortcuts to the most recently used
apps.
TIP: Press and hold and then swipe upward to quickly
launch Google in your browser.
Power button Press and hold to turn your phone on. To turn the phone
off, press and hold, then follow the onscreen instructions.
When your phone is on, press to wake your phone or put it
into sleep mode.
Volume Press on the top to increase the volume or on the bottom
to decrease the volume.
TIP: Press either top or bottom to silence an incoming call.
1.3 PHONE SLOTS, PORTS & JACKS
3.5 mm
audio jack
Plug in headphones or other audio device.
USB/Power port Connect USB cord to phone and power adapter to charge
the phone.
NOTE: You can plug the USB cord to phone and connect
to your PC.
SIM Card Tray Insert a SIM card.
Earpiece
1.0 GETTING STARTED
Microphone
Front-Facing Camera

PAGE : 5
1.5 TURN ON THE PHONE
To turn on the phone:
• Hold down the power button to turn the phone on.
TIP: One press puts your phone into Sleep mode. Pressing and holding allows
you to choose Airplane mode, Silent mode, or Vibrate.
To turn the phone off:
• Hold down the power button and touch Power Off.
1.4 CHARGE THE BATTERY
Before using your phone for the first time, charge the phone for three hours.
To charge the battery:
1. Attach one end of the USB cord to the phone’s USB/Power port and the
other end to the plug.
2. Plug the phone into the wall.
1.4.1 BATTERY TIPS
For the best battery life, let your battery drain down until the battery very low
icon appears in the status bar (usually below 15% charge) before recharging,
and do not leave your phone plugged in after it is fully charged.
To make your charge last as long as possible:
• Change the screen timeout rate and display brightness
(see Display under Device).
• Disable Wi-Fi when not in use (see Wireless & Networks).
NOTE: For optimal charging, please use the USB cable and charger provided
with the phone.
1.0 GETTING STARTED
Connect this
end to phone’s
USB port.
Plug into wall.
Connect this
end to plug.
Hold down the power button,
then touch Power off to turn
the phone off.
Power Button

PAGE : 6
1.7 TOUCHSCREEN
Use your fingers on the touchscreen to perform actions, open objects, slide
the screen, and more.
Below are the different ways of interacting with your touchscreen.
• Drag: Touch and hold an object then drag the object to a new location. For
example, drag any icon on the Home screen to a new location.
• Double-tap: Quickly touch the screen twice to zoom in when using the
Gallery or on zoomed-out Browser pages. For example, double-touch a news
site to zoom in on the text.
• Pinch: When using Gallery or zoomed-out Browser pages, place two fingers
on the screen at once, then move your fingers together to zoom out or move
them apart to zoom in. For example, pinch your fingers apart to zoom out of
a news site in the Browser.
• Slide: Quickly move your finger from one edge of the screen to the opposite
edge to scroll the display up, down, left or right. For example, quickly move
your finger from the left side of the Home screen to the right to scroll the
Home screen to a different panel.
• Touch: Touch an object on the screen to select or open it. For example,
touch on the Home screen to open the Phone app.
• Touch and hold: Touch an object on the screen and continue to hold it to
reveal other options. For example, touch and hold an empty spot on the
Home screen to reveal options for adding items to the screen.
•1.6 SLEEP & WAKE
When your phone is on, you can put the phone in sleep mode and lock your
phone. To save battery life, your phone will go into sleep mode if left idle.
You can wake and unlock your phone when you are ready to use it.
To put the phone in sleep mode:
• Briefly press the Power button.
Your phone goes into sleep mode, without disrupting any running
applications, downloads, or phone calls.
NOTE: If you press the power button for too long, you will see the power off
menu.
To wake the phone:
1. Press the Power button.
2. Place your finger on and slide it all the way to the right.
3. Your phone’s screen will resume display.
NOTE: If your phone is secured, you must enter your password, pin, or pattern
to wake it. See Securing your Phone for more details.
1.0 GETTING STARTED
When the phone is
in sleep mode, and
you want to wake the
phone, press the power
button and then drag
the lock to the right.

PAGE : 7
2 HOME SCREEN & BASIC FEATURES
The Home screen is a gateway to all of your phone’s applications and
features, and displays whenever you turn on your phone.
TIP: To move an icon, touch and hold the icon, then drag it to a
new location.
To open the Home screen:
• Open the Home screen at any time by pressing the button.
The Home screen is split into five panels, with the center panel displayed
when the Home screen opens.
2.0 HOME SCREEN & BASIC FEATURES
Touch to view all
apps.
Touch to make
a call.
Touch to browse
the web.
Swipe left or
right to see more
panels.
Touch Google to
search the web via
text input tray.
Touch and hold
to change the
wallpaper.
Touch an app to
open it.
Touch to send a
text message.
Touch to view
contacts.
To scroll the Home screen:
• Slide the screen to the left or right.
TIP: The bar at the bottom of the screen indicates which one of the five
panels is displayed.
To quickly access your phone’s main functions:
• Touch to make a call. For more information on calling, see Making &
Answering Calls.
• Touch to see your contacts. For more information on contacts, see
Making & Answering Calls.
• Touch to choose an app from the App Launcher. For more information
on apps and the App Launcher, see Using the App Launcher.
• Touch to send a message. For more information on Messaging, see
Sending & Receiving Messages.
• Touch to browse the web.

PAGE : 8
2.0 HOME SCREEN & BASIC FEATURES
TIP: Rearrange items on your screen by touching and holding them and then
dragging them to a new location. You can also delete them by touching and
holding and then dragging them to the trash.
You can perform the following actions with folders.
To open a folder Touch the folder. To make a new folder, stack
apps on top of each other in the home screen.
To add items to a folder Drag an item on your Home screen into the
folder.
NOTE: You cannot put shortcuts in a
contact folder.
To remove items from a
folder
Touch and hold an item in the folder,
then release it on the Home screen or on
the trash icon.
To rename a folder Open a folder, then touch and hold the title bar
and enter a new folder name.
2.1 CUSTOMIZING YOUR HOME SCREEN
You can easily customize your Home screen by changing the background
picture (or wallpaper).
To customize your Home screen:
• Touch and hold an empty space on the Home screen, then touch the type of
item you want to add and follow the prompts.
The following types of items are available:
• Gallery allows you to choose photos on your phone to set as the background
image for your screen.
• Social Gallery also allows you to choose photos on your phone.
• Live Wallpapers are animated background images for your screen.
• Wallpapers are static background images for your screen.

PAGE : 9
2.0 HOME SCREEN & BASIC FEATURES
2.2.1 QUICK SETTINGS
Quickly access many of your phone’s settings from the Notifications screen.
Owner (Your Name): View the quick contact info for the phone’s owner.
Brightness: Adjust the screen’s brightness automatically or select the desired
brightness. For the longest battery life, use the lowest comfortable brightness.
Settings: Access your phone’s settings.
Wi-Fi: Turn on Wi-Fi and configure any desired settings under Advanced Wi-Fi.
3G/4G Service: View the strength of your current 3G/4G connection and your
data usage statistics.
Battery: View the percentage of battery life remaining, along with battery usage
by individual apps.
Airplane Mode: Disable all wireless connections, including Bluetooth wireless
technology and 3G/4G.
Bluetooth: Turn on Bluetooth wireless technology and access settings.
2.2 STATUS & NOTIFICATION ICONS
The status bar at the top of the screen displays important information about
your phone.
To open the notifications panel:
• Drag the status bar to the bottom of the screen.
To respond to a notification:
• Touch a notification in the panel to open its application. For example,
touching a new email notification opens the Email app’s inbox.
To close the notifications panel:
• Drag the status bar back to the top of the screen.
Touch a
notification to
respond.
Drag down
to display
notifications.
Notification icons Status icons
Touch to clear
notifications.
Touch to launch
quick settings.

PAGE : 10
2.0 HOME SCREEN & BASIC FEATURES
2.2.3 NOTIFICATION ICONS
New text or
multimedia message
More notifications
Problem with text
or multimedia
message delivery
Call in progress
New voicemail Call in progress using a
Bluetooth headset
Upcoming event Missed call
Data syncing Call forwarding on
Problem with sign-in or
sync
Song playing
USB storage full Uploading data
Phone connected via
USB cable
Downloading data
System update available Download finished
Phone sharing its
data connection via
USB tethering
Connected to or disconnected
from virtual private network
(VPN)
Phone sharing its data
connection as a Wi-Fi
hotspot
Application update available
Connected to Wireless
Display (WiDi)
Wi-Fi direct on
2.2.2 STATUS ICONS
Below are the status and notification icons you can expect to see.
NOTE: Installed apps may use their own unique notification icons.
Connected to mobile
network Alarm set
Mobile network in use Vibrate mode
Mobile network strength Ringer silenced
Roaming Battery very low
No signal Battery low
No SIM card installed Battery partially drained
Connected to Wi-Fi network Battery full
Bluetooth wireless
technology on Battery charging
Connected to wireless
product featuring
Bluetooth technology
GPS on
Airplane mode Receiving location data from
GPS
Headset plugged in

PAGE : 11
2.0 HOME SCREEN & BASIC FEATURES
2.3 SEARCH
Search on your phone and on the web with the built-in Search function.
To run a search:
1. Touch the Google search box at the top of the Home screen.
2. Type a search term. As you type, Search displays matching results.
3. Touch a matching result to open it.
2.3.1 SEARCH SETTINGS
You can change the default Search settings.
To change Search settings:
• From the Search screen, press Settings.
Google Now Toggle Google Now On or Off.
Voice Display options for setting language, SafeSearch, and
blocking offensive words.
Phone Search Select which applications to search by default.
NOTE: Only the selected applications will display and be
searched within the Search application.
Privacy and
accounts
Set your location and manage your Google search history.
2.4 SECURING YOUR PHONE
You can configure your phone to require a password, PIN, or pattern to turn it
on or wake it up. Securing your phone can help keep its contents private.
To secure your phone:
1. From the Home screen, touch Security.
2. Touch Screen lock to change the current security lock.
3. Select one of the following settings:
• None disables screen locking.
• Slide lets you drag an icon across the screen to unlock your phone.
• Face Unlock lets you use facial recognition to unlock your phone.
• Voice Unlock lets you use voice recognition to unlock your phone.
• Pattern lets you draw a custom pattern to unlock your phone.
• PIN lets you use a 4- to 16-digit number combination to unlock
your phone.
• Password lets you use a 4- to 16-character password to unlock your
phone. (Password must contain at least one letter.)
NOTE: Once you have selected a lock for your phone, you will need to enter
this lock each time you turn on or wake up your phone.

PAGE : 12
2.0 HOME SCREEN & BASIC FEATURES
2.5 USING THE APP LAUNCHER
Apps are small programs that add features to your phone. Many apps come
preinstalled, and additional apps can be purchased in the Play Store.
Widgets are apps that run directly on your Home screen, such as a music
player, newspaper, or clock.
You can use the App launcher to easily access all of your installed apps.
To use the app launcher:
• Touch , then touch an app to open it.
To add an app shortcut to the Home screen:
• Touch and hold an app. Once the Home screen displays, drop the app
onto an empty spot on the Home screen.
2.6 USING THE PLAY STORE
Almost any app you can imagine is available for purchase (and often for free)
in the Play Store.
To use the Play Store:
• Touch , then touch .
Search or browse for apps. You will be able to confirm that you want to
purchase an app and see the permissions it requires before installing it on
your phone.
TIP: Google™Play Store can be used only when Google account is activated.
2. Touch an app to open it.
1. Touch to open the App tray.
2.7 VIEWING RECENTLY USED APPS
You can use the Recent button to easily access all of your recently used apps.
To view recently used apps:
• Touch , then touch an app to open it.

PAGE : 13
3.0 MAKING & ANSWERING CALLS
The following actions are available while you are on a call:
To hold a call Touch to hold or resume the current call.
To mute a call Touch to mute or unmute the call.
To use speakerphone Touch to turn speakerphone on or off.
Warning! To avoid damage to your hearing, do not
hold the phone against your ear when speakerphone
is turned on.
To use a Bluetooth
headset
Touch to automatically transfer your calls to a
connected Bluetooth headset. For more information,
see Wireless Bluetooth Connection.
To end a call Touch .
3 MAKING & ANSWERING CALLS
The Phone app allows you to make calls and store and find your contacts.
You can move between the phone dialer, call history, contacts, and favorites
by touching the tabs at the top of the Phone app.
3.1 USING THE PHONE TAB
To make a call:
1. From the Home screen, touch .
2. Touch the numbers on the dial pad to dial a number, using to make
corrections.
3. Touch to dial the number.
NOTE: For international calls, first touch and hold 0to enter +and then dial
the number.
NOTE: You can switch to any application without ending the call. Return to
the phone screen by expanding the notifications bar and touching .

PAGE : 14
3.0 MAKING & ANSWERING CALLS
3.1.2 CALL FORWARDING
You can set the forwarding behavior of your phone when receiving calls.
To set up incoming call forwarding:
1. From the Phone app, press Settings Call forwarding.
2. Touch Always forward to enable or disable.
3. Touch the following options to input a phone number to which each type of
call will be forwarded:
• Always forward
• Forward when busy
• Forward when unanswered
• Forward when unreachable
NOTE: Once set, Call Forward conditional is active will appear on-screen.
3.1.1 CALL WAITING
The Call Waiting feature will notifiy you if the person you are calling is already
on another call.
Outgoing call waiting:
When you call someone who has Call Waiting activated on their phone,
and that person is already on the line in another call, you will see a “Call
waiting...” notification on the screen.

PAGE : 15
3.0 MAKING & ANSWERING CALLS
The following options are available when on a conference call:
To drop a
participant
Touch Manage, then touch .
To talk privately
to a participant
Touch Manage, then touch . When you are done
talking privately, touch Merge Calls to add the participant
back to the conference call.
To end the call Touch to end the conference call and disconnect
all callers.
3.1.4 VOICEMAIL
When you receive voicemail, the message notification icon appears in the
notifications panel.
To check voicemail:
• Within the Phone app, press and hold the 1 key. (May vary by carrier.)
TIP: You can also open the notifications panel and touch the message
notification.
3.1.3 WORKING WITH MULTIPLE CALLS
You can make another call while on a call.
To add a call:
• While on a call, touch and dial another number.
To move between calls:
• Touch to move between calls.
• To merge calls into a conference call:
• Touch to join two or more calls together into a single conference call.

PAGE : 16
3.0 MAKING & ANSWERING CALLS
3.3 USING THE CALL LOG TAB
The call log lists calls you have made, missed, and received. You can also call
entries, send messages, and add caller information to contacts.
To use the call log:
• From the Phone app, touch .
The following options are available from the call log.
To see more details Touch an entry.
To call the entry Touch .
To send a text
message
Touch the entry to see more details, then touch
.
For more information on messaging, see Sending &
Receiving Messages.
To add to contacts Touch the entry to see more details, then touch .
For more information on adding contacts, see Using
the Contacts Tab.
To remove an entry
from the call log Touch the entry to see more details, press , then
touch Remove from call log.
To remove all entries
from the call log Press Clear Call Log.
3.2 ANSWERING & REJECTING CALLS
When receiving a call, you will see the following at the bottom of the screen:
To accept a call:
• Drag the circle to .
If you are already in a call, that call will be placed on hold while you answer
the new call.
To reject a call:
• Drag the circle to .
The rejected call will automatically be directed to your voicemail.
To reject a call with a text message:
• Drag the circle to .
The call will be rejected, and the caller will recieve the automated text
message reply of your choice:

PAGE : 17
3.0 MAKING & ANSWERING CALLS
To communicate with contacts:
• Touch the contact, then touch one of the following icons:
Touch the phone number to call a contact.
Touch to send a text message.
Touch the email address to send an email.
To add a contact:
1. From the Contacts tab, touch .
2. Enter contact information, filling in as many or as few of the fields
as desired.
3. Touch Done to create a new contact, or press Discard to discard
the new contact without saving.
NOTE: If you have multiple accounts, select the account to which you want to
add the new contact.
3.4 USING THE CONTACTS TAB
The Contacts tab displays the contacts from your accounts along with any
contacts you have added.
3.4.1 CONTACT SYNCHRONIZATION
By default, contacts in your accounts and on your phone will be synchronized,
so that any changes to the contacts on your phone will be matched in your
accounts, and vice versa. See Accounts for more information.
Depending on your account settings, information you add or remove from your
phone will be synchronized with your external accounts. See Accounts for
more information.
To find a contact:
1. From the Phone app, touch the Contacts tab.
2. Scroll up and down to view all contacts.
3. Touch a name to call that contact.

PAGE : 18
3.0 MAKING & ANSWERING CALLS
TIP: Use the following controls to add information about the contact:
• Touch the arrow at the end of the name field to view more name fields.
• Touch and follow the prompts to choose or take a photo for your
contact’s icon.
To edit a contact:
1. From the homescreen, touch the Contacts icon and then touch a contact.
Press Edit.
2. Modify the contact information, as described above.
3. Touch Done.
To delete a contact:
1. From the homescreen, touch the Contacts icon and then touch a contact.
Press Delete.
2. Touch OK to confirm.
TIP: Log into your Google account to manage your contacts online. Add, edit,
or remove contacts, and they will automatically sync to your phone.
NOTE: Read-only contact information, such as that from an external app, will
only be hidden, not deleted.

PAGE : 19
4.0 SENDING & RECEIVING MESSAGES
4 SENDING & RECEIVING MESSAGES
The Message app allows you to send and receive text and multimedia
messaging threads (groups of sent and received messages).
To open the messaging app:
• From the Home screen, touch .
To view a message:
• Within the Message app, touch a message thread. The messages inside the
thread will be displayed, with the newest message at the top of the screen.
TIP: Threads with new messages are displayed in bold.
To view a multimedia attachment:
• If the message has a multimedia attachment, touch the attachment.
4.1 SENDING MESSAGES
To send a message:
1. From the Message app, touch .
2. Enter a recipient in the To field or touch .
Matching numbers and contacts appear as you type.
3. Touch a matching contact or number to select it or enter a new number to
message a new contact.
4. Touch the Type message field and enter a message.
5. Touch to send your message.
TIP: You can add smileys, subject headings, and more. See Message Options
below for more information.
TIP: You can send messages to groups.

PAGE : 20
4.0 SENDING & RECEIVING MESSAGES
To attach multimedia to a message:
1. Press Attach.
2. Select the desired type of attachment (for example, a music file or a
captured picture), then follow the prompts to send the message.
MESSAGE OPTIONS
The following actions are available while composing a message:
Save message as a draft Press .
ALTERNATE: Exiting the Message app will also
save any draft messages.
Resume working on a draft Touch the message thread you were composing
and resume entering your message.
Discard a draft Clear the message text.
Enter a smiley Press Insert Smiley and touch the smiley
you want to insert.
ALTERNATE: Touch and hold :-) on the onscreen
keyboard and select a smiley.
ALTERNATE: Enter the characters that make up
the smiley.
Add a subject heading to
your message Press Add subject and enter the subject
heading.
4.2 MANAGING MESSAGES
To delete a messaging thread:
• Open the messaging window, touch and hold a messaging thread,
then touch .
To forward a message:
1. Open the messaging window and touch a messaging thread.
2. Press Forward.
3. Enter a recipient and then touch Send to forward the message.
To delete all messaging threads:
1. Open the messaging window, then touch and hold a messaging thread.
2. Touch all other messaging threads to select them.
3. Touch .
4.3 MESSAGE SETTINGS
To specify message settings:
• From the main Messaging window, press Settings.
The following settings are available:
NOTIFICATION SETTINGS
Delete old messages Toggle on/off to delete old messages as limits are
reached.
Text message limit Touch to set number of text messages to save.
Multimedia message limit Touch to set number of multimedia messages to
save.
TEXT (SMS) MESSAGES
Delivery reports Request a delivery report whenever you send a
text message.
MULTIMEDIA (MMS) MESSAGES
Delivery reports Request a delivery report whenever you send a
multimedia message.
Read reports Request reports when your multimedia messages
are read or deleted.
Auto-retrieve Automatically download attachments from
incoming multimedia messages.
Roaming auto-retrieve Turn on auto-retrieve even when on another
carrier’s network.
NOTE: Turning this option off prevents data
roaming costs.
NOTIFICATION SETTINGS
Notifications Set to show message content, to only show
sender, or to not show notification.
Sound Choose a ringtone to play whenever a new
message is received.
Vibrate Toggle on/off to cause phone to vibrate whenever
a new message is received.
Table of contents
Other Intel Cell Phone manuals