ENGLISH
WARNING: To avoid the risk of electric shock,
switch off the mains power before mounting
the 2-Port USB Wall Outlet. Always switch
off the circuit breaker in the fuse box.
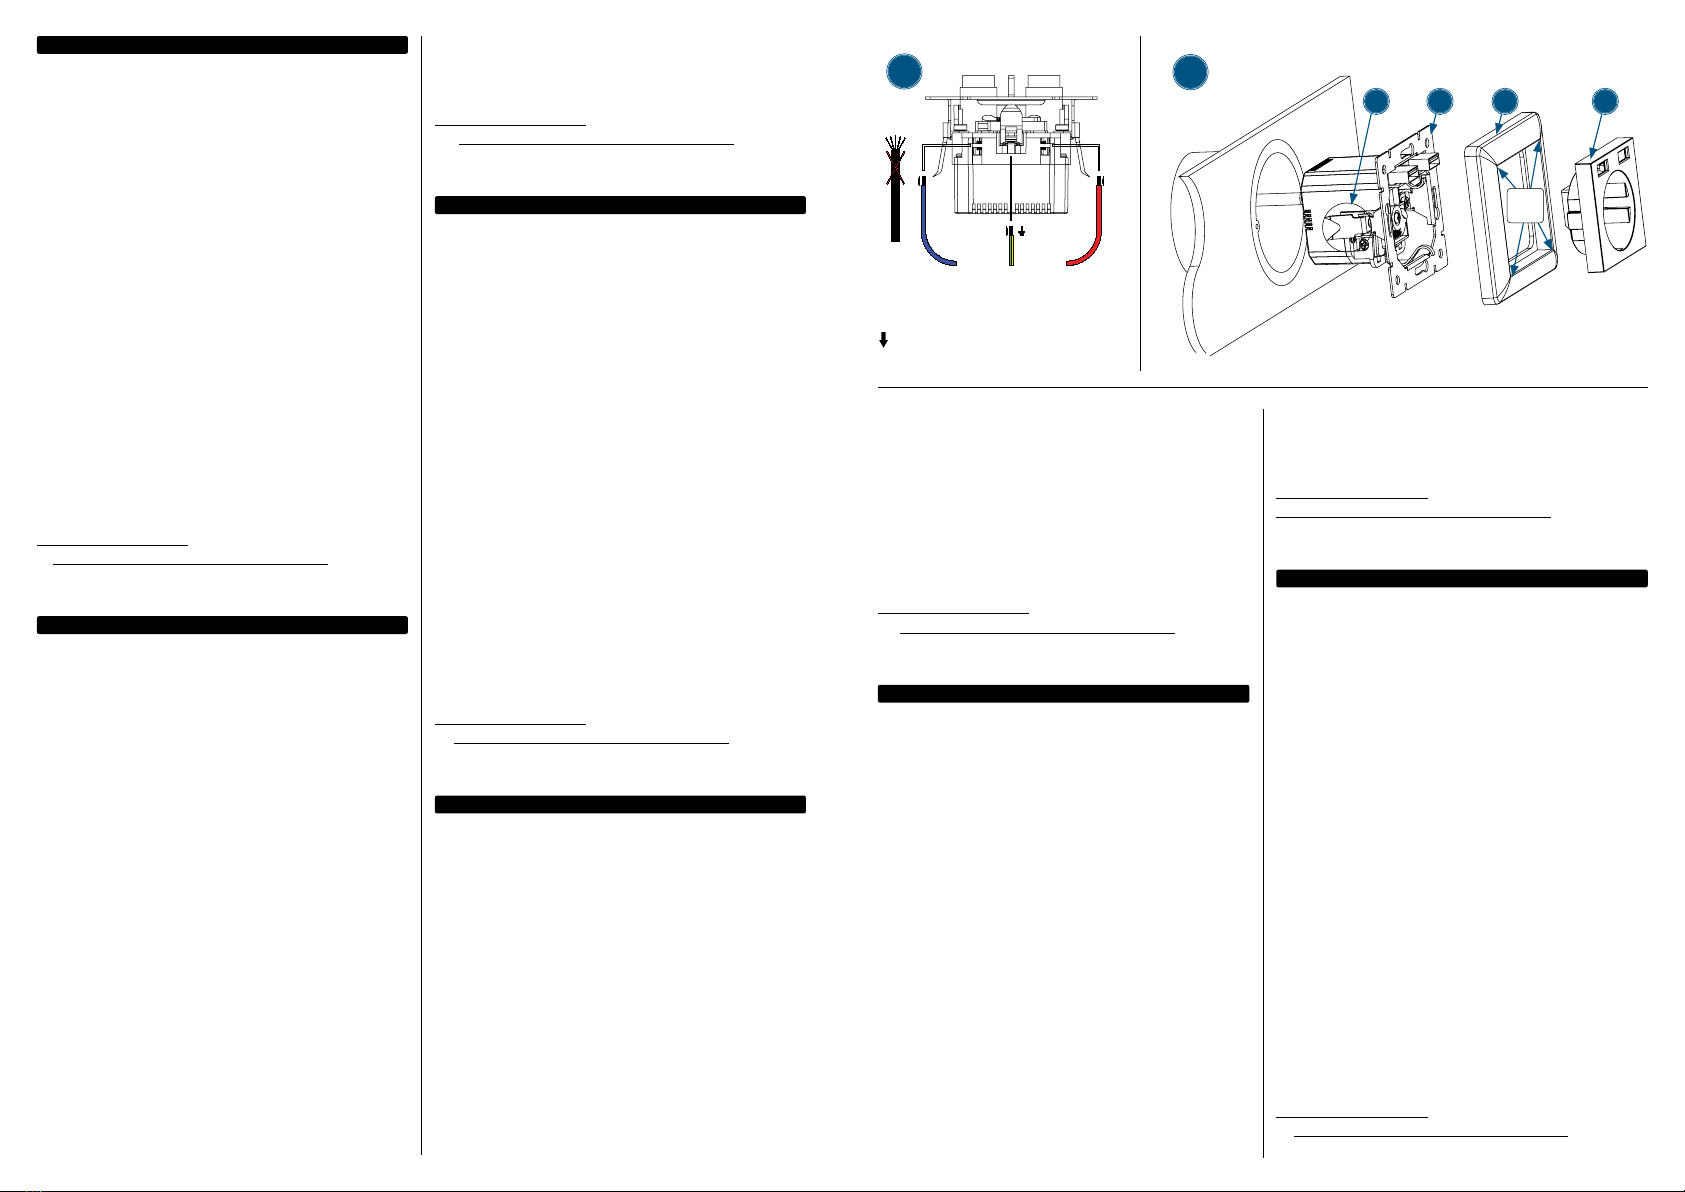
1 Use a wire-stripper to remove 10 mm (0.4 in.) of the
outer insulation of the three power wires: ground,
neutral and phase. Ensure that each copper wire is
not damaged. Only use wires with a solid core of
maximum 2.5 mm. Insert each copper core in the
corresponding cage clamp of the 2-Port USB Wall
Outlet. Make sure they are securely fastened.
2 Fix the 2-Port USB Wall Outlet in a flush mount
junction box using either claws (a) or the mounting
frame (b). lf you choose the latter method, remove
the claws (a) before mounting. Push the power
wires back in the intake pipe or an adjacent
wall box as far as possible. Carefully mount the
2-Port USB Wall Outlet in the wall box. Fix it using
either the claws (a) or the mounting frame (b).
Mount the cover frame (c) and gently tighten
the central cover (d) using the included screw.
For specifications, visit
intellinetnetwork.com. Register your product
at register.intellinet-network.com/r/772174
or scan the QR code on the cover.
DEUTSCH
ACHTUNG: Um das Risiko eines Stromschlags
zu vermeiden, schalten Sie vor der Montage der
2-Port USB-Steckdose die Hauptstromversorgung
ab. Schalten Sie dazu immer den Leistungsschalter
in Ihrem Sicherungskasten ab.
1 Verwenden Sie eine Abisolierzange um ca. 10 mm
der jeweiligen Aderummantelung (Isolierung)
der Einzeldrähte (Schutzleiter, Neutral und
Phase) zu entfernen. Achten Sie darauf, dass
die Kupferdrähte nicht beschädigt werden.
Verwenden Sie nur Kabel mit Massivdraht (kein
Litzendraht) und maximalem Drahtdurchmesser
von 2,5 mm. Führen Sie die Kupferadern in die
entsprechenden Federkraftklemmen der Steckdose
ein. Stellen Sie sicher, dass diese fest fixiert sind.
2 Die Steckdose kann entweder mit den Krallen
(a) oder mit dem Montagerahmen (b) in einer
Unterputzdose montiert werden. Falls Sie Option b
nutzen, dann entfernen Sie die Krallen (a) vor dem
Einbau. Drücken Sie die drei Drähte so weit wie
möglich zurück in die Unterputzdose und montieren
Sie die Steckdose sorgfältig in der Unterputzdose.
Wie bereits erwähnt kann die Steckdose entweder
mit den Krallen (a) oder mit dem Montagerahmen
(b) befestigt werden. Abschließend montieren Sie
den Abdeckrahmen (c) und die Abdeckung (d).
Schrauben Sie diese dann noch vorsichtig fest.
Die Spezifikationen finden Sie auf
intellinetnetwork.com. Registrieren Sie Ihr Produkt
auf register.intellinet-network.com/r/772174 oder
scannen Sie den QR-Code auf dem Deckblatt.
ESPAÑOL
ADVERTENCIA: Para evitar el riesgo de descarga
electrica, desconecte la red electrica antes de
montar la toma de corriente 2USB. Apague siempre
el interruptor de circuito en la caja de fusibles.
1 Utilice un cable separador para eliminar aprox.10mm
de la capa exterior aislamiento de los tres cables
de alimentacion:tierra,neutro y fase.Trabaje con
cuidadoy asegurese de que ningun cable de
cobre esta danado.iUtilice unicamente cables con
nucleo solido y diametro maximo de 2.5 mm.
2 La toma de corriente 2USB se puede fijar en
una caja de conexiones de montaje empotrado
usando pinzas (a) o la estructura de montaje
(b). Si elige este ultimo metodo, quite las pinzas
(a) antes del montaje. Empuje los cables de
alimentacion en el tubo de entrada o una caja de
pared adyacente lo maximo posible. Monte con
cuidado la toma de corriente 2 USB en la caja de
pared. Fij la toma de corriente2 USB utilizando las
pinzas (a) o la estructura de montaje (b). Monte la
estructura de cubierta (c) y apriete suavemente
la cubierta central (d) con el tornillo incluido.
Para más especificaciones, visite
intellinetnetwork.com. Registre el producto
en register.intellinet-network.com/r/772174
o escanee el código QR en la cubierta.
FRANÇAIS
ATTENTION : Pour éviter tout risque d’électrocution,
coupez l’alimentation secteur avant de monter
la Prise Murale USB 2 ports. Coupez toujours le
disjoncteur au niveau de la boîte à fusibles.
1 Utilisez une pince à dénuder pour retirer 10
mm (0,4 in.) de l’isolant présent sur les trois fils
d’alimentation : terre, neutre et phase. Vérifiez
qu’aucun des fils de cuivre n’est endommagé.
Utilisez uniquement des fils avec une âme d’un
diamètre de 2,5 mm maximum. Insérez chaque
âme en cuivre dans la cosse correspondante
de la Prise Murale USB 2 Ports. Vérifiez qu’ils
sont bien en place et correctement fixés.
2 Fixez la Prise Murale USB 2 Ports dans le boîtier
encastré à l’aide des griffes (a) ou du cadre
de montage (b). Si vous choisissez la seconde
méthode, retirez les griffes (a) avant le montage.
Repoussez les câbles d’alimentation dans la gaine
ou dans le boîtier mural aussi loin que possible.
Remontez sovigneusement la Prise Murale USB
2 ports dans le boîtier. Fixez-la en utilisant les
griffes (a) ou le cadre de montage (b). Montez la
plaque de protection (c) et serrez doucement la
plaque centrale (d) à l’aide de la vis fournie.
Vous trouvez les spécifications sur
intellinetnetwork.com. Enregistrez votre produit
sur register.intellinet-network.com/r/772174 ou
scannez le code QR figurant sur la couverture.
POLSKI
OSTRZEŻENIE: Aby uniknąć ryzyka porażenia prądem,
należy wyłączyć całą elektryczność przed montażem
2-portowego gniazdka USB. Bezwzględnie deaktywuj
wyłącznik obwodu w skrzynce bezpiecznikowej.
1 Użyj przecinacza kabli do zdjęcia 10 mm zewnętrznej
powłoki z trzech kabli: fazy, zero, oraz uziemienia.
Upewnij się, że żaden z tych miedzianych
kabli nie jest uszkodzony. Używaj tylko kabli
o objętości wewnętrznej równej lub mniejszej
niż 2,5 mm. Włóż każdy z poszczególnych kabli
do odpowiedniego zatrzasku w gniazdku USB.
Upewnij się że są odpowiednio utwierdzone.
2 Zamontuj 2-portowe gniazdo USB przy źródle
zasilania używając zakleszczeń (a) lub ramy
montażowej (b). Jeżeli wybierzesz drugą metodę,
usuń zakleszczenia przed montażem. Wsuń
kable z powrotem do rury lub do pojemnika
na ścianie najdalej jak to możliwe, tak by nie
mogły być odsłonięte. Ostrożnie zamontuj
2-portowe gniazdo USB na ścianie. Dopasuj je
używając zakleszczeń (a) lub ramy montażowej
(b). Nałóż przykrywkę (c) i delikatnie przytwierdź
gniazdko przy użyciu dołączonej śruby.
Specyfikacja techniczna dostępna jest na stronie
intellinetnetwork.com. Zarejestruj produkt na
register.intellinet-network.com/r/772174 lub
zeskanuj znajdujący się na pokrywie kod QR.
ITALIANO
AVVERTENZA: per evitare il rischio di scosse elettriche,
spegnere l’alimentazione di rete prima di montare
la presa a muro USB a 2 porte. Spegnere sempre
l’interruttore automatico nella scatola dei fusibili.
1 Utilizzare uno spelafili per rimuovere 10 mm
dell’isolante esterno dei tre cavi di alimentazione:
terra, neutro e fase. Assicurarsi che tutti i fili di
rame non siano danneggiati. Utilizzare solo fili
con un nucleo solido di massimo 2,5 mm. Inserire
ciascun nucleo di rame nel corrispondente
morsetto a gabbia della presa a muro USB a
2 porte. Assicurarsi che siano ben fissati.
2 Fissare la presa a muro USB a 2 porte in una scatola
di derivazione con montaggio a filo usando i ganci
(a) o il telaio di montaggio (b). Se si sceglie il secondo
metodo, rimuovere i ganci (a) prima di montarlo.
Spingere i cavi di alimentazione più indietro
possibile nella canalina o in una scatola a muro
adiacente. Montare con attenzione la presa a muro
USB a 2 porte nella scatola a muro. Fissarla usando
i ganci (a) o il telaio di montaggio (b). Montare il
telaio di copertura (c) e stringere delicatamente
il coperchio centrale (d) usando la vite inclusa.
Per ulteriori specifiche, visita il sito
intellinetnetwork.com. Registra il tuo prodotto
su register.intellinet-network.com/r/772174 o
scansiona il codice QR presente sulla copertina.
N: Neutral, Neutro,
Neutre, Neutralny
L : Phase, Fase, Faza
: Ground, Schutzleiter Q, Tierra,
Terre, Ziemia, Terra
1
2
a b c d
55 mm
x
55 mm


