INTER LIGHT EASYFIT IL-ED3K3D User manual

HANDLEIDING | MANUAL | ANLEITUNG
EASYFIT DOWNLIGHT
Lees voor gebruik eerst de installae instruce en bewaar deze voor eventueel toekomsg gebruik.
Lesen Sie diese Anleitung vor Gebrauch aufmerksam durch und bewahren Sie diese für einen späteren Gebrauch gut auf.
Read this manual carefully and keep it for future use.
De voedingskabels op de driver,
en de driver op
de lamp aansluiten
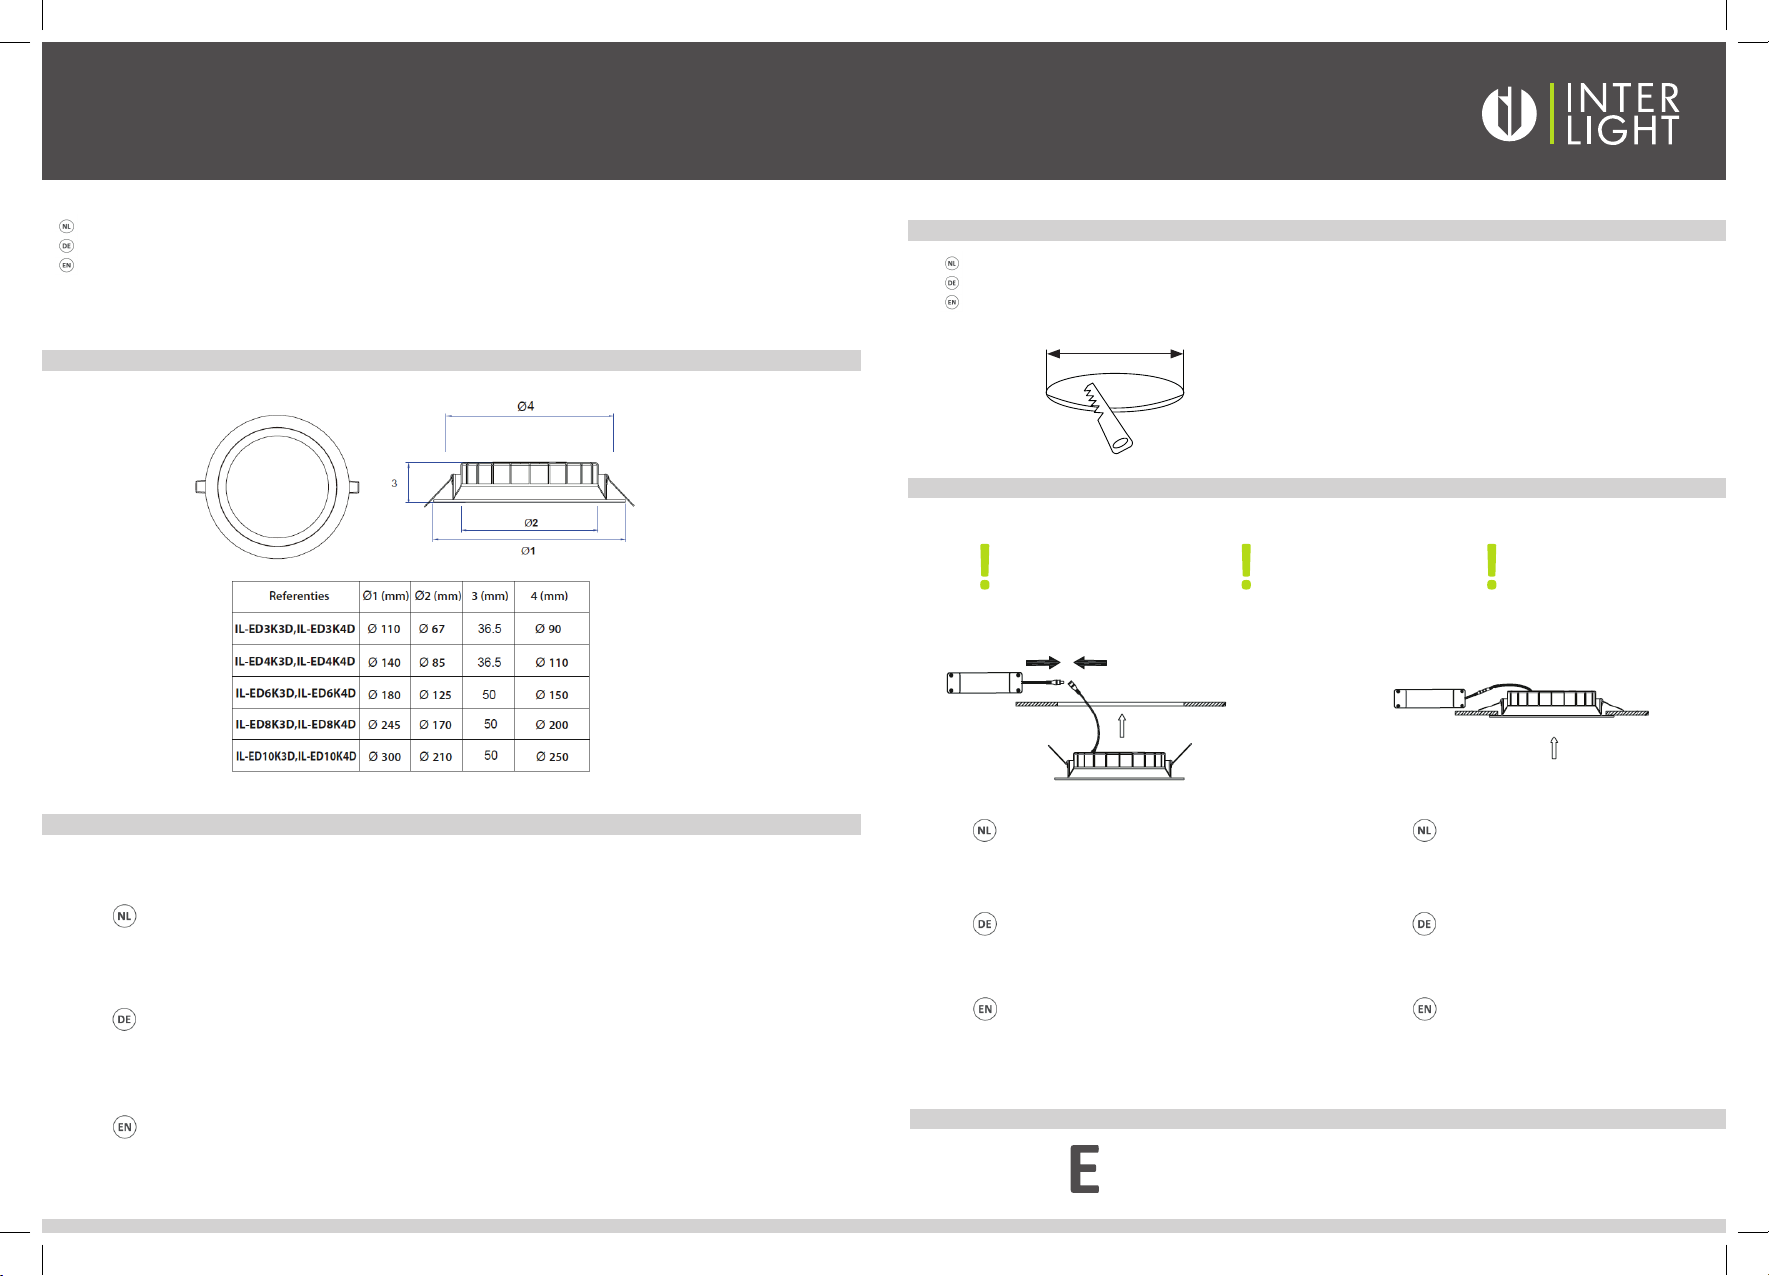
Boor een gat in het plafond en gebruik hiervoor het overzicht van de verschillende inbouwmaten.
Bohren Sie ein Loch in die Decke anhand der Übersicht über die verschiedenen Installaonsabmessungen.
Drill a suitable hole on ceiling according to below cutout size of dierent item.
De klemveren vercaal spannen
en de lamp volledig door het
gat duwen.
Die Stromkabel am Treiber und
der Treiber an
der Lampe Verbinden.
Ziehen Sie die Klemmfedern
senkrecht an und drücken Sie die
Lampe vollständig durch das Loch.
Connect the power cables on
the driver, and the driver
on the lamp.
• Voorzijde IP44, achterzijde IP20, niet waterdicht.
• Gebruik een droge of licht vochge doek voor het schoonmaken.
• Gebruik geen schoonmaakmidddelen voor het schoonmaken.
• Pas op voor elektrische schokken.
• Sluit de stroom af voor installae
• Kijk voor een lijst met compabele drivers en dimmers op koopmaninterlight.nl
• Vorne IP44, Hinten IP20, nicht wasserdicht.
• Verwenden Sie ein trockenes oder leicht feuchtes Tuch zum Reinigen.
• Verwenden Sie keine Reinigungsmiel zur Reinigung.
• Schützen Sie sich vor einem elektrischen Schlag.
• Schalten Sie die Stromversorgung aus, bevor Sie mit der Installaon beginnen.
• Eine Liste der kompablen Treibers und Dimmer nden Sie unter koopmaninterlight.nl
• Front IP44, rear IP20, not waterproof.
• Use a dry or slightly damp cloth for cleaning.
• Do not use cleaning agents for cleaning.
• Beware of electric shocks.
• Shut o power before installaon.
• For a list of compable drivers and dimmers, koopmaninterlight.nl
Tighten the clamping springs
vercally and push the lamp
completely
through the hole.
For more informaon on this product: www.koopmaninterlight.nl
This product contains a light source of energy eciency class E.
LED CEILING LIGHT SERIES
S1517/A2
Installation for recessed:
Picture 1. Turn off the power.
Picture 2. Drill a suitable hole on ceiling according to below cutout size of different item.
Picture 3. Put the silicone wire cover on the mains cable.
Picture 4. Connect the electrical supply cable to the terminal block on light fixture, and select expected CCT and watt by DIP switch.
Picture 5.
Picture 6. Slide the bracket into the fixture slot.
Picture 7. Attach the spring bracket accessories to the bracket of the lamp,the extended fan structure in the middle of the spring bracket corresponds to the
oval hole at the end of the lamp bracket.
Picture 8. Press and slide the spring bracket to adjust to proper installation position.
Picture 9. Pinch the install springs on both sides of the lamp,push the lamp body into the mounting hole,the hanging ears spring back automatically to
ensure the lamp is securely installed.
Picture 10. Double-check everything is connected well, and then turn on the power.
5
ON
678
2/3
fixed the wiring cover tightly by screwer.
505012000493
OFF
1
CUTOUT
2 3 45
678910
ON
let op: Sluit de
stroom af voor u begint met
de installae
Hinweis: Schalten Sie
vor dem Start die
Stromversorgung aus.
Note: Shut o the power
before starng with
the installaon.
This manual suits for next models
9
Other INTER LIGHT Lighting Equipment manuals


Popular Lighting Equipment manuals by other brands


LSC
LSC Smart Connect 6125000200 installation instructions

g-lites
g-lites ARCH 56 owner's manual

Century
Century REGIA LINEARE 180 RGLBI-098330 quick start guide

Heitronic
Heitronic 37072 Installation and operating instructions

Ikan
Ikan IB508-v2 quick start guide

Lightolier
Lightolier EG2-8 Specification sheet