Cineroid CL800 Instruction Manual
RGBW full range with white light / Light weight metal panel
Metal Ballast / CRI 95 or above / Ball mount bracket with 16mm spigot
Color temperature 2700ºK ~ 6500ºK / Extension up to 10 meter
100% dimming / DMX Built-in / Battery charging / Real time synchro
Custom eect / 6 Preset reserve / USB 5V output / USB Firmware update
www.cineroid.com
cL800
Safety Instructions / User's Manual
English

Cineroid CL800
FULL COLOR LED LIGHT
2
Thank you for purchasing the Cineroid CL800.
The Cineroid CL800 is high quality RGBW soft light with portable size. Light weight and thin
panel makes easy to use and getting around any type, environment. Please thoroughly read the
user manual for best operation and understanding of all of the functions of the CL800.
Test Before Operating
It is recommended to test the CL800 before operating. Check if the CL800 can be turned on once
powered, and check if the information/menu is being properly displayed on the LCD.

English
FULL COLOR LED LIGHT
Cineroid CL800
3
Safety Precautions
◎Do not use any batteries, power cord, or accessories that are not specied in this
document.
when your hands are wet. When unplugging the power cord, grasp the plug body
or adapter instead of the cord.
◎Power cords that are scratched, heavily bent or twisted can potentially be hazardous and
a source of electric shock and/or re.
◎Do not insert foreign objects into the product’s electric or cable components.
◎Do not place the power cord near sources of heat as this may melt or cause damage to
the cord potentially causing re or electric shock.
◎Do not disassemble or modify the product. This may damage the product and cause
danger due to a malfunction.
◎Please keep the product out of reach of young children. Injuries may occur due to damage
to the product.
◎When using the product in an airplane or hospital setting, it is recommended to acquire
authorization rst as signals or electro-magnetic waves from the product may cause other
equipment to malfunction.
◎Do not store the product in a dusty or humid environment as damage may occur.
◎When the product is mounted on a camera, do not lift or move the camera by grabbing
the product. This may cause damage to the product or the camera mount.
◎Do not clean the product with paint thinner, benzene, or other volatile solvents. This may
cause damage to the product and become a re hazard.
◎This product is not waterproof. If the product is dropped in water, contact the service
center immediately.
Please observe the following safety precautions as they are meant for the safe and
proper use of the product to reduce the risk of accidents. Upon reading the user
manual, keep it in a safe and available place.
Cineroid CL800
FULL COLOR LED LIGHT
4
Table of Contents
Safety Precautions
Table of Contents
Package Contents
Components of each Models
Name of each part
3
4
6
7
11
12
12
13
13
13
14
Before Using CL800
Connect LED Panel to the Ballast
Input the Power by DC
Input the Power by Battery
Power On / O
Charging the Battery
USB and D-Tap Output
Set the Soft Box
8

English
FULL COLOR LED LIGHT
Cineroid CL800
5
Operating CL800
Basic Operation
CCT Mode (White Color)
RGB Mode
Hue/Sat Mode
Preset
Eect Mode
User Eect Mode
15
16
17
18
19
20
20
System
Firmware Update
Color Unit
Master / Slave
DMX
Specications
Optional Accessoires
21
21
22
22
23
23
Cineroid CL800
FULL COLOR LED LIGHT
6
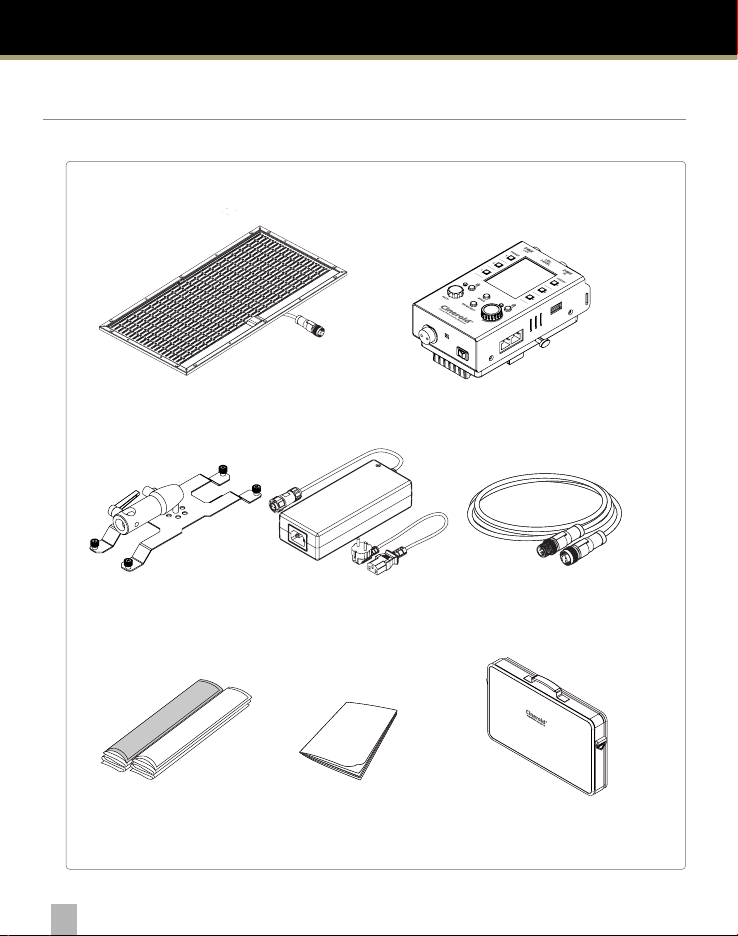
Package Contents
LED Panel Ballast
H-Bracket AC Adapter Extension Cable
Soft Diuser Manual Carrying Bag

English
FULL COLOR LED LIGHT
Cineroid CL800
7
Please ensure all parts are present after opening the box.
Components of each Models
LED Panel, Ballast(V-Battery Mount), Soft Diffuser, Bracket
with spigot, AC Adapter, Carrying Bag, Manual
LED Panel, Ballast(G-Battery Mount), Soft Diffuser, Bracket
with spigot, AC Adapter, Carrying Bag, Manual
LED Panel, Ballast(without Battery Mount), Soft Diffuser,
Bracket with spigot, AC Adapter, Carrying Bag, Manual
LED Panel x3, Ballast(V-Battery Mount) x3, Soft Diuser x3,
Bracket with spigot x3, AC Adapter x3, Carrying Bag, Manual
LED Panel x3, Ballast(G-Battery Mount) x3, Soft Diuser x3,
Bracket with spigot x3, AC Adapter x3, Carrying Bag, Manual
LED Panel x3, Ballast(without Battery Mount) x3, Soft
Diuser x3, Bracket with spigot x3, AC Adapter x3, Carrying
Bag, Manual
CL800 Single Set
CL800 3 Set
CL800V
CL800G
CL800N
CL800-3V
CL800-3G
CL800N-3N

Cineroid CL800
FULL COLOR LED LIGHT
8
Name of each part
To combine the LED panel with the bracket,
rotate the 4 screws of the bracket by pressing
and screwing them together.
Set LED Panel on the Bracket
LED Panel with Bracket
1/4” Lever
BallHeadKonb
16mmfemaleSpigot
6pinConnector
Velcro
Velcro

English
FULL COLOR LED LIGHT
Cineroid CL800
9
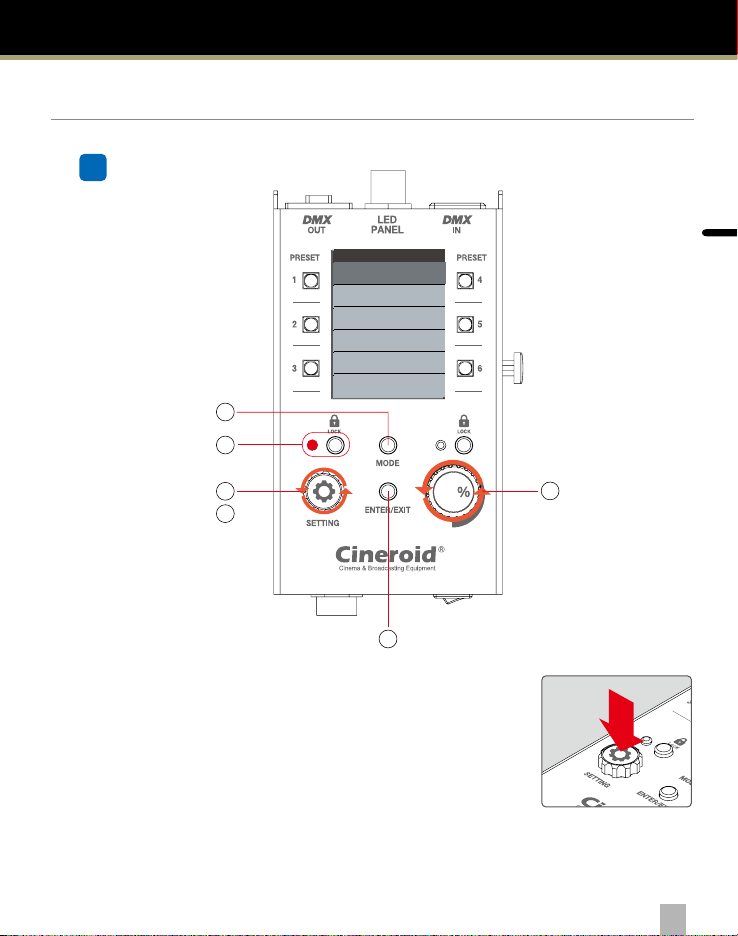
Name of each part
Ballast
Preset Buttons
DMX In
Color Display
LED Panel Port
DMX Out
D-Tap Output
1/4”Mount
USB Output
DMX Master / Slave
Battery Latch
Setting Lock Lamp
SettingWheel Button
Setting Lock Button Enter/Exit Button
Mode Button
Brightness Lock Button
BrightnessWheel Button
Brightness Lock Lamp
Battery Mount
DC Input
Battery Charge Switch
Power Switch

Cineroid CL800
FULL COLOR LED LIGHT
10
Before Using CL800
1
2
3
1

English
FULL COLOR LED LIGHT
Cineroid CL800
11
Before Using CL800
1
Connect the LED panel and ballast connectors.
And then screw the nut to tight. It can be used
extension cable between connectors.(optional)
Connect LED Panel to the Ballast
Connect the LED panel and ballast connectors.
And then screw the nut to tight.
Input the Power by DC
2

Cineroid CL800
FULL COLOR LED LIGHT
12
Before Using CL800
Insert the correct type battery to the battery port.
Turn on the power button to check the LCD.
When removing the battery, press the detach latch and
remove the battery in reverse order of mounting.
Input the Power by Battery (FL-DV/FL-DG)
Press the button to turn on the controller.
The CINEROID logo appears briefly on the
controller screen.
Power On / O
Battery Latch
3
2
English
FULL COLOR LED LIGHT
Cineroid CL800
13
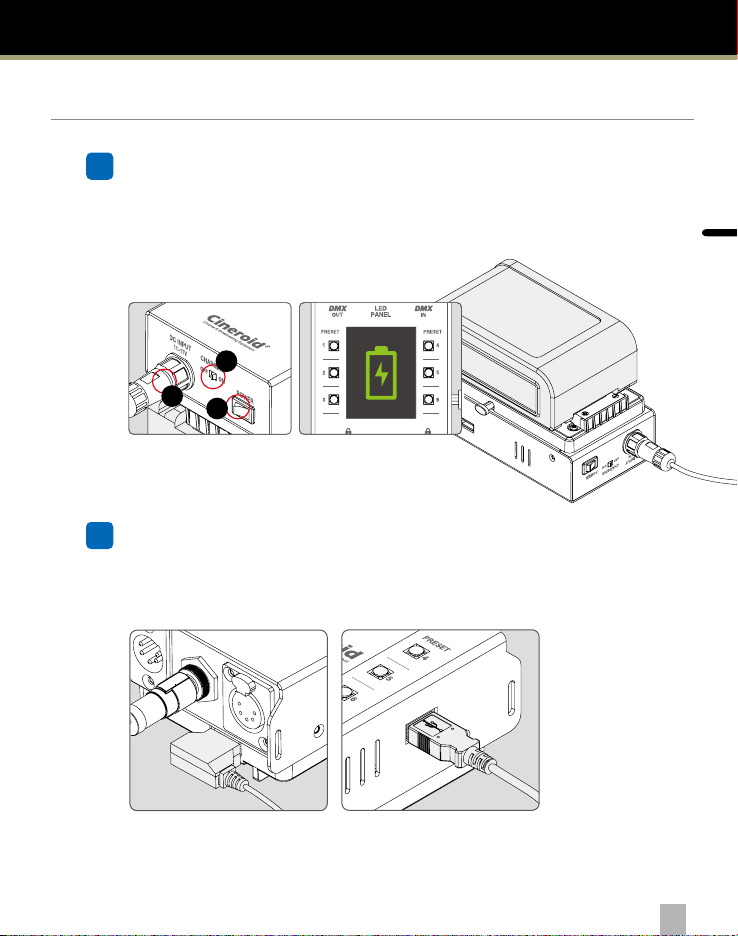
Before Using CL800
Battery Latch
Connect the battery to the ballast, turn o the power
switch while DC power is connected, and turn on the
Charging switch. When the battery is charging, a red
battery icon appears on the display. When charging is
complete, the green battery icon is displayed.
Charging the Battery
The controller can be used as USB or D tap output.
Connect the power to the controller and use it with the
switch turned on.
USB and D-Tap Output
12
3
D-Tap Output USB 5V Output
4
5

Cineroid CL800
FULL COLOR LED LIGHT
14
Before Using CL800
Install the Soft Box Body rst. Open Soft Box Body and
attach it to the Velcro on the back of the LED panel.
After installing the Soft Box Body, cover the Soft Diuser
to the Velcro outside Soft Box Body.
Set the Soft Box
Soft Box Body
6
English
FULL COLOR LED LIGHT
Cineroid CL800
15
DMX-1 Unit [%]
CCT MODE
RGB MODE
HUE/SAT MODE
EFFECT MODE
USER EFFECT
SYSTEM SET
DMX-1 Unit [%]
CCT MODE
RGB MODE
HUE/SAT MODE
EFFECT MODE
USER EFFECT
SYSTEM SET
1. Access the LED mode menu by pressing the mode button on Ballast.
2. Turn the Setting Button to set the value and press the Setting Button
to complete the setting.
3. Press Exit Button to return to the previous screen.
4. Brightness Wheel is only used to adjust the brightness.
5. You can lock the setting button and brightness respectively. When
the button is pressed, the corresponding Lock Button Lamp lights
and the button can not be operated. Press it again to release the lock.
Pressing Setting button
Basic Operation
Operating CL800
1
1
6
2
3
4
5
Cineroid CL800
FULL COLOR LED LIGHT
16
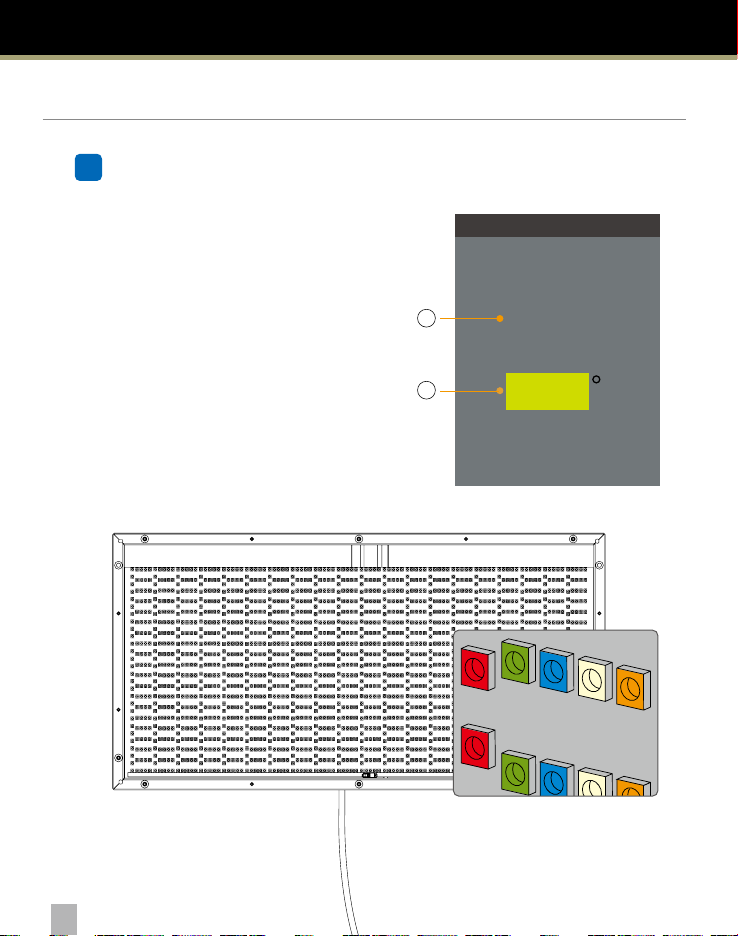
CCT Mode (White Color)
2
Operating CL800
①
Brightness
Turning the brightness wheel button to the
right to increase brightness. Turn to the left
to decrease brightness. You can adjust the
Brightness by 0~100% dimming.
②
ColorTemperature
Turn the Setting Button to the right increases
Color temperature and left decreases Color
temperature. You can adjust color temperature
from 2700°K to 6500°K by Setting Wheel
Button in CCT mode.
PN-CL800
1
2
DMX-1
[CCT MODE]
Unit [%]
48 %
4500 K
R
R
G
B
White
(Daylight/Tungsten)
English
FULL COLOR LED LIGHT
Cineroid CL800
17
Operating CL800
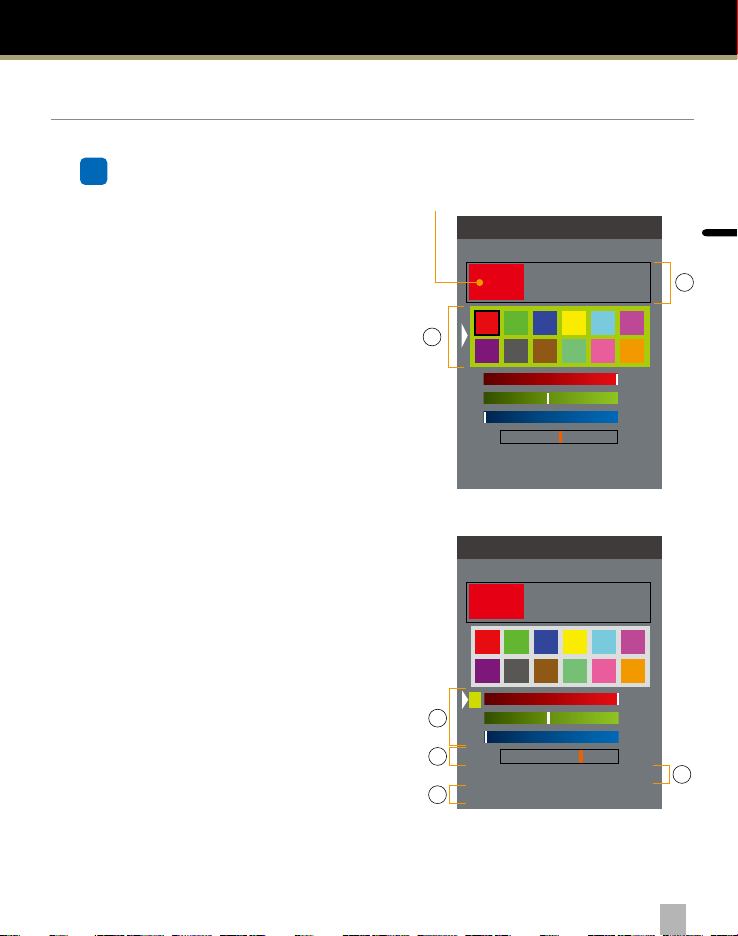
RGB Mode
①
Brightness
Turn the Brightness Wheel to adjust the
brightness. Brightness can be set from 0 to
100%. The current color is displayed next to the
brightness indicator.
②
Internal Preset Color
Select Internal Preset Color. The information of the
12 internal preset color values is displayed in the
lower RGB boxes respectively.
③
Color manual setting
You can specify RGB color values manually. Red,
Green, Blue Specify a value for each color.
④
White Color intensify
White color can be added to or subtracted from
the RGB color value. White Color Intensify Sets the
ratio values of RGB and White Color in the graph.
⑤
White Color temperature
Sets the Color Temperature of the White Color. It
can be set from 2700 to 6500K.
⑥
Color History
Please refer to
④
on next page.
3
0
Current Color
2
1
DMX-1
[RGB MODE]
>>Color History
R
G
B
RGB 50 % 50 %
Unit [RGB]
31 %
255
105
0
W
CCT 3300 K
3
4
DMX-1
[RGB MODE]
>>Color History
75 % 25 %
Unit [RGB]
31 %
255
105
0
W
CCT 3300 K
R
G
B
RGB
5
6

Cineroid CL800
FULL COLOR LED LIGHT
18
Operating CL800
Hue/Sat Mode
①
Brightness
Turn the Brightness Wheel to adjust the
brightness. Brightness can be set from 0 to
100%. The current color is displayed next to
the brightness indicator.
②
Internal Preset Color
Select Internal Preset Color. Information on the
12 internal Preset Color values is displayed in
the lower HUE and SAT boxes respectively.
③
Hue / Saturation
Set HUE and SAT values.
HUE can be set from 0 ° to 359 °,
and SAT can be set from 0 to 100%.
④
Color History
Color values executed for more than 30
seconds in RGB and HUE/SAT modes are
automatically saved up to 36 Color History.
You can check the color and information of
the saved values in Color History. You can also
select and re-use it.
4
DMX-1
[COLOR HISTORY]
Unit [%]
RGB
R[105]
G[185]
B[69]
Color Information
Seleted Color
DMX-1
[HUE / SAT]
>>Color History
Unit [%]
52 %
%82
o
SAT
Current Color
2
3
1
HUE
145
4

English
FULL COLOR LED LIGHT
Cineroid CL800
19
Operating CL800
Preset
Tip
*
Preset 6 of the RGB colors that you use often, you can conveniently use.
1 ~ 6 Press Preset Button for 1 sec. And the current value will be set in the preset.
Press briey to run.
①
Preset CCT
Mode - CCT Mode - Save or Run
②
Preset RGB
Mode -RGB Mode - Save or Run
③
Preset HUE/SAT
Mode -HUE/SAT Mode - Save or Run
Preset 1
Preset 2
Preset 3
Preset 4
Preset 5
Preset 6
DMX-1
[RGB MODE]
>>Color History
R
G
B
RGB 50 % 50 %
Unit [%]
73 %
0
80
100
W
CCT 3300 K
Save Preset
3
s
e
c
.
Cineroid CL800
FULL COLOR LED LIGHT
20
Operating CL800
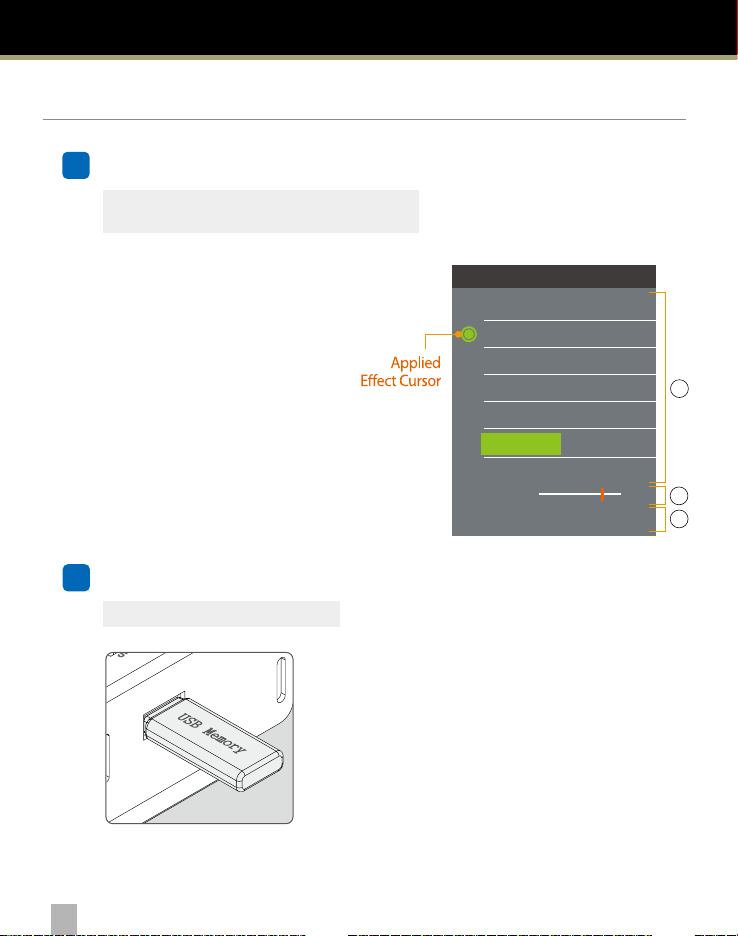
Eect Mode
Indicates lighting eects according to the situation.
Repeat with a certain pattern.
①
Select the Ecet
Green cursor appears under the effect
name you are selecting.
You can select the arrow to move to the
next or previous page.
②
Repeat Rate
Sets the repetition rate of the eect.
③
Brightness
You can adjust the brightness of the
eect by using the Brightness Wheel.
Save the set le to USB memory.
Connect to USB port and save to Ballast.
(Access : Mode-System set-Custom Data Update)
User Ecet Mode
Use the user-created eect manually.
5
6
Connecting USB Memory
SPEED
Brightness 13 %
MIN MAX
<< 1 / 2 >>
DMX-1 Unit [%]
Thunder Bolt
Night Club
Camp Fire
Mercury Lamp
Moon Light
RGB Light
1
2
3
Table of contents
Other Cineroid Lighting Equipment manuals

Cineroid
Cineroid TL120 Installation and operating manual

Cineroid
Cineroid LM400-VCe User manual

Cineroid
Cineroid L10C-VCe User manual

Cineroid
Cineroid LM400 User manual

Cineroid
Cineroid Metal Series User manual

Cineroid
Cineroid SATURN120 User manual

Cineroid
Cineroid FL1600k User manual

Cineroid
Cineroid CFL400 Instruction Manual


