Interline EV50 User manual
0
RECHARGEABLE CORDLESS CLEANER
USER MANUAL
ASPIRATEUR RECHARGEABLE SANS FIL
MANUEL D’EMPLOI
DRAADLOZE POOL EN SPA VACUUM
CLEANER (OPLAADBAAR)
HANDLEIDING
INTERLINE DRAHTLOSE POOL UND SPA
VACUUM CLEANER
BEDIENUNGSANLEITUNG

1
Table Of Contents
PARTS DIAGRAM P.5
SAFETY WARNINGS & INSTRUCTIONS P.6
GETTING STARTED P.8
Charging The Battery P.8
Set-Up Before Use P.10
Handle assembly P.10
Suction head assembly P.10
Telescopic pole (not included) assembly P.10
OPERATION P.11
EMPTYING THE FILTER P.12
MAINTENANCE & STORAGE P.13
BATTERY DISPOSAL P.14
How to remove the battery pack P.15
TROUBLESHOOTING P.17
Remark: Product/parts photos in this manual are for demonstration only.
Product/parts in photos may vary with the model purchased.

2
Table des matières
DIAGRAMME DES PIÈCES P.18
AVERTISSEMENTS DE SÉCURITÉ ET
INSTRUCTIONS
P.19
DÉBUT DES OPÉRATIONS P.21
Chargement de la batterie P.21
Réglage avant l’utilisation P.23
Montage de la poignée P.23
Montage de la tête d’aspiration P.24
Montage du manche télescopique (non inclus) P.24
FONCTIONNEMENT P.25
VIDER LE FILTRE P.26
MAINTENANCE ET STOCKAGE P.27
ÉLIMINATION DES BATTERIES P.29
Comment retirer le bloc de batteries P.29
REPÉRAGE DE PANNES P.31
Remarque : Les photos du produit/des pièces dans ce manuel sont
présentées uniquement à titre d’exemple. Le produit/les pièces peuvent
varier selon le modèle acheté.

3
INHOUD
P.32
P.33
INHOUDSOPGAVE
WAARSCHUWINGEN EN
VEILIGHEIDSAANWIJZINGEN
AAN DE SLAG P.35
De batterij laden P.35
Voorbereiding P.36
De handgreep monteren P.36
De zuigkop monteren P.37
De uitschuifbare steel monteren (niet bijgeleverd) P.37
WERKING P.38
DE FILTER LEEGMAKEN P.39
ONDERHOUD EN OPSLAG P.40
DE BATTERIJ WEGWERPEN P.41
De accu verwijderen P.42
PROBLEMEN OPLOSSEN P.44
Opmerking: de foto’s in deze handleiding zijn alleen bedoeldals
illustratie. Het product en onderdelen kunnen afwijken van het model
dat u gekocht heeft.

4
Inhalts
P.45
P.46
INHALTVERZEICHNIS
SICHERHEITSWARNUNGEN UND -
HINWEISE INBETRIEBNAHME P.48
Aufladen der Batterie P.48
Zusammenbau vor Inbetriebnahme P.50
Montage des Griffs P.50
Montage des Saugkopfes P.50
Montage der Teleskopstange (nicht im Lieferumfang) P.51
BETRIEB P.51
ENTLEEREN DES FILTERS P.53
WARTUNG UND LAGERUNG P.54
ENTSORGUNG DER BATTERIE P.56
So entfernen Sie das Batteriepaket P.56
BEHEBEN VON STÖRUNGEN P.58
Hinweis: Die Abbildungen in diesem Handbuch dienen nur zur
Veranschaulichung. Das Produkt und seine Komponenten können von
Ihrem Modell variieren.
5
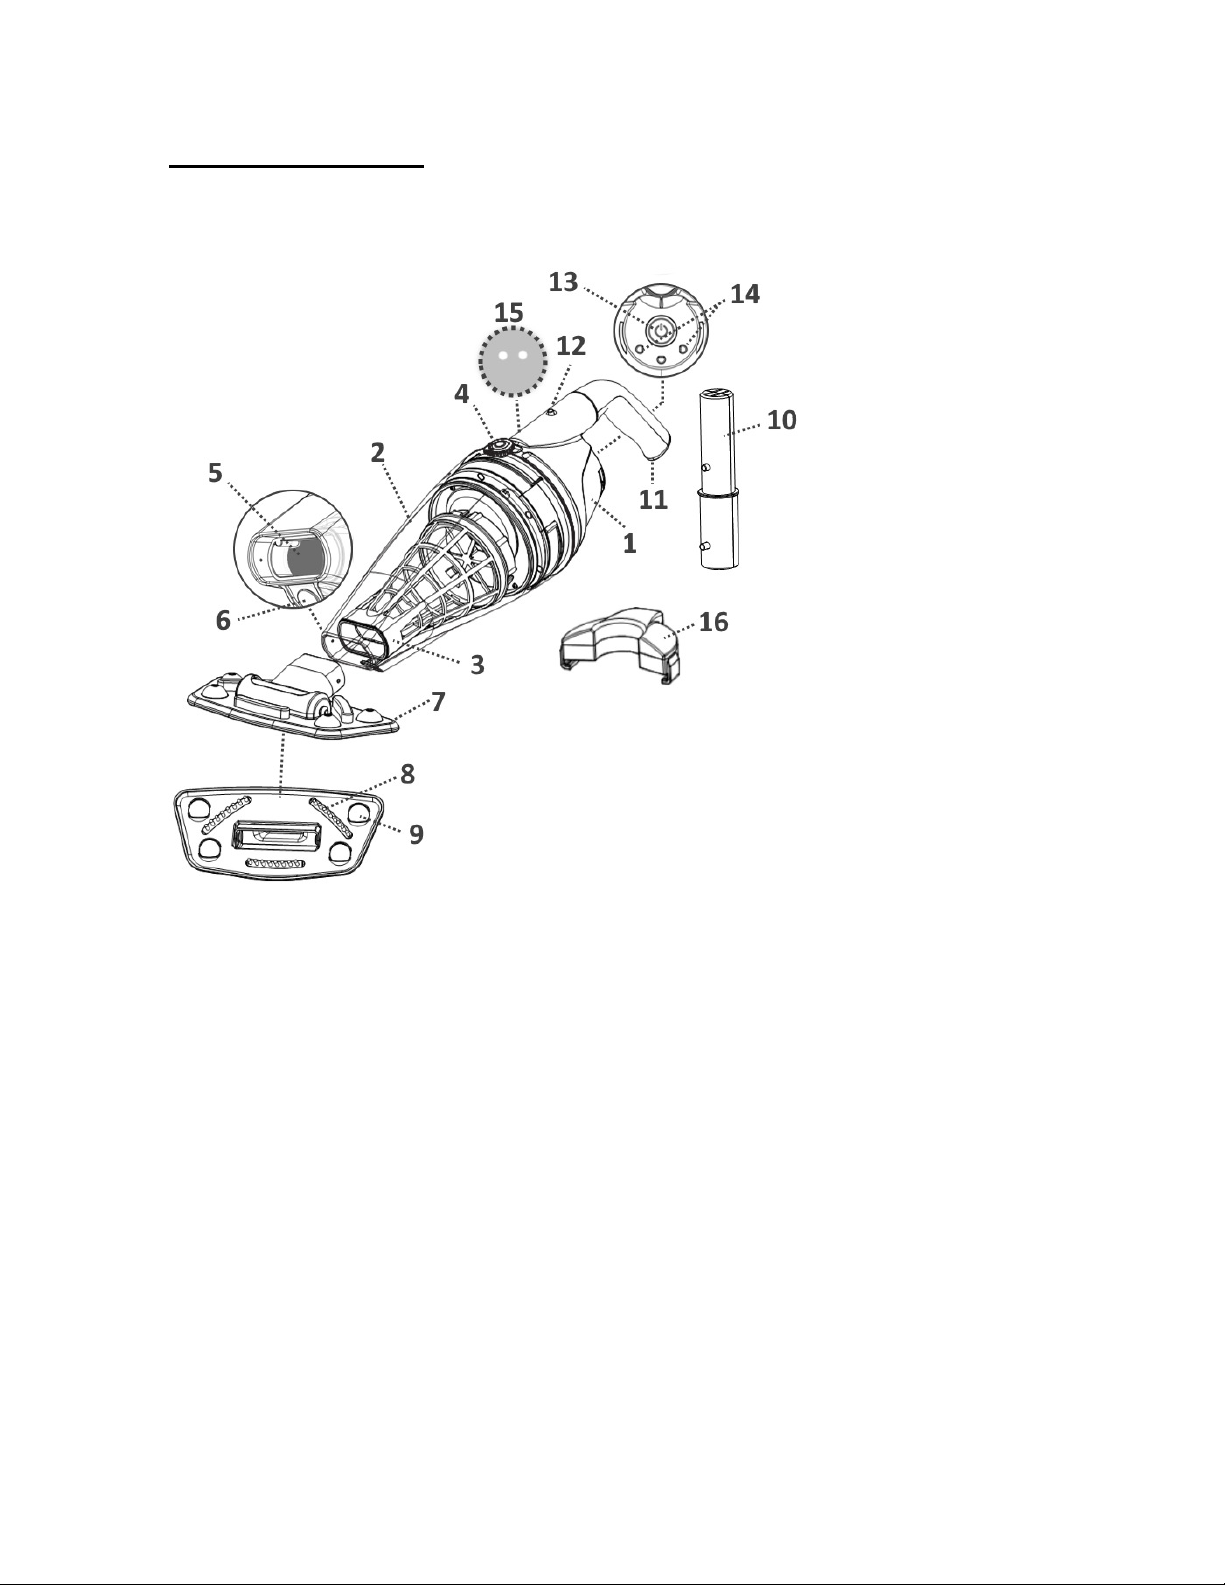
PARTS DIAGRAM
1 Rear body
2Transparent
canister
3 Filter cone
4 Locking knob (on
both side)
5 Suction nozzle flap
6 Water draining
valve
7 Suction head
8 Bristles
9 Ball wheels x 4
10
Telescopic pole
connector
11
Handle
12
Handle locking hole
13
Power ON/OFF
button
14
Charging contact
plate
15
Draining holes
(inside handle
chamber)
16
Charger base
Battery : Rechargeable Li-ion battery pack, 4000mAH, 11.1V,
44.4Wh
Charging voltage :12.6V DC, 1000mA
Motor: 12V DC

6
SAFETY WARNINGS & INSTRUCTIONS
Read and follow all instructions in this manual and on the equipment. Failure to do so
could result in severe or fatal injuries.
WARNING!
-This is not a TOY. Children should be kept out of reach from this pool vacuum and
its accessories.
-Never allow children to operate this product.
-This pool vacuum is not intended for use by someone with reduced physical,
sensory or mental capabilities or a lack of experience and knowledge unless they
have been given instructions concerning the appliance and are under supervision
of the person responsible for their safety.
-Make sure the pool vacuum is fully immersed in the water before operation. The
minimum water level required to operate the device must reach above the power
button of the pool vacuum when it is held in a vertical position. Operating the pool
vacuum when it is not immersed in the water correctly could damage the unit and
void the warranty as a result.
-Maximum operating depth in water is 3 meters (10 ft).
-Maximum water temperature: 5˚C(41˚F) –35˚C(95˚F)
-DO NOT use power extension cords.
-Connect the external adaptor to a power source through a residential current
device (RCD). If in doubt, consult a qualified professional electrician.
-Do not use this pool vacuum if any damage is detected.
-Replace damaged parts as soon as possible. Only use parts certified by the
distributor or manufacturer.
-Turn off the power, disconnect the external adaptor from the power source, and
unplug the external adaptor from the charging base before detaching the pool
vacuum from the charging base.
-Disconnect the pool vacuum from the supply mains prior to carrying out user
maintenance such as cleaning the filter.
-Detach the pool vacuum from the charging base and make sure the pool vacuum
is OFF before servicing the product.
-Battery installed is a rechargeable Li-ion battery pack. Never attempt to replace
the battery pack.
-The pool vacuum is only to be used with external adaptor delivered with this
product.
-You should not operate this pool vacuum when people/pets are present in the
water.
- DO NOT use this pool vacuum without an intact filter cone in place, as your
warranty will be voided as a result.
-Suction entrapment hazard: This pool vacuum generates suction. Do not allow
hair, body, or any loose parts of your clothing to make contact with the suction
hole of the pool vacuum during its operation.
-Never insert body parts, clothing or other objects into the openings and moving
parts of the pool vacuum.
-DO NOT use this pool vacuum to pick up any toxic substance, flammable or
combustible liquids such as gasoline, or in the presence of explosive or flammable
fumes.
-Never attempt in any way to disassemble this pool vacuum.

7
-Under no circumstances should you attempt to disassemble the pool vacuum and
replace the impeller, motor, and battery by yourself.
-Never insert any object to touch the impeller.
- External adaptor and charging base:
For indoor use only.
Never use the external adaptor and charging base for anything other than
charging the battery of the pool vacuum that is supplied in the same pack.
The external adaptor and charging base should not be used outdoors, nor
exposed to rain, humidity, any liquid or heat.
Keep the external adaptor and charging base out of reach of children.
Never use the external adaptor and charging base if any damage is
detected.
DO NOT handle the external adaptor and charging base with wet hands.
DO NOT handle the pool vacuum, external adaptor, and charging base
while charging with wet hands and without shoes.
Keep the external adaptor disconnected from power when it is not in use.
Never attempt to open the external adaptor and charging base.
If the supply cord is damaged, it must be replaced by the manufacturer, its
service agent or an equally-qualified person in order to prevent hazards of
any kind.
Make sure the pool vacuum and the charging base are completely dry
before charging.
CAUTION!
- This pool vacuum is designed for underwater use only; it is not an
all-purpose vacuum cleaner. DO NOT attempt to use it to clean anything
other than your pool / spa.
-Use only original accessories delivered with this product.
- DO NOT use this pool vacuum right after pool-shocking. It is
recommended to leave the pool circulating for at least 24-48 hours.
- It is not recommended to use this pool vacuum with another pool
vacuum/cleaner simultaneously.
- Avoid picking up hard, sharp objects with this product. They may
damage the pool vacuum and filter.
- Exercise caution when cleaning pool stairs.
- Only use the charging base for its intended purpose as outlined in this
manual.
- To avoid damaging the external adaptor and the cord, do not carry the
pool vacuum by the cord or pull the cord to disconnect it from the power
source and product.
- Charge the pool vacuum indoor in a clean, dry area with good ventilation
and an ambient temperature between 5˚C(41˚F) and 35˚C(95˚F).
- DO NOT leave the pool vacuum charged for over 20 hours.
-If the pool vacuum will not be used for an extended period, detach it from
the charging base and use a damp cloth to clean and dry the pool
vacuum and accessories. Make sure to charge the pool vacuum
completely before it is stored. Store in a well-ventilated area away from
sunlight, heat, ignition sources, pool chemicals, and children. Never
8
leave the pool vacuum plugged in for long-term storage. Recharge the
pool vacuum every three months.
Above warnings and cautions are not intended to incorporate all possible
instances for risks and / or severe injuries. Pool / spa owners should always
exercise extra caution and common sense when utilizing the product.
GETTING STARTED
IMPORTANT NOTE: Fully charge the pool vacuum before it is used for the first time.
Charging The Battery
WARNING!
Charging must be done indoors, in a well-ventilated area away from sunlight,
children, heat, ignition sources, and with an ambient temperature between 5˚C(41˚F)
and 35˚C(95˚F).
Never use the external adaptor and charging base if any damage is detected.
Use only the original external adaptor provided.
Make sure the pool vacuum and the charger base are clean and dry before set-up.
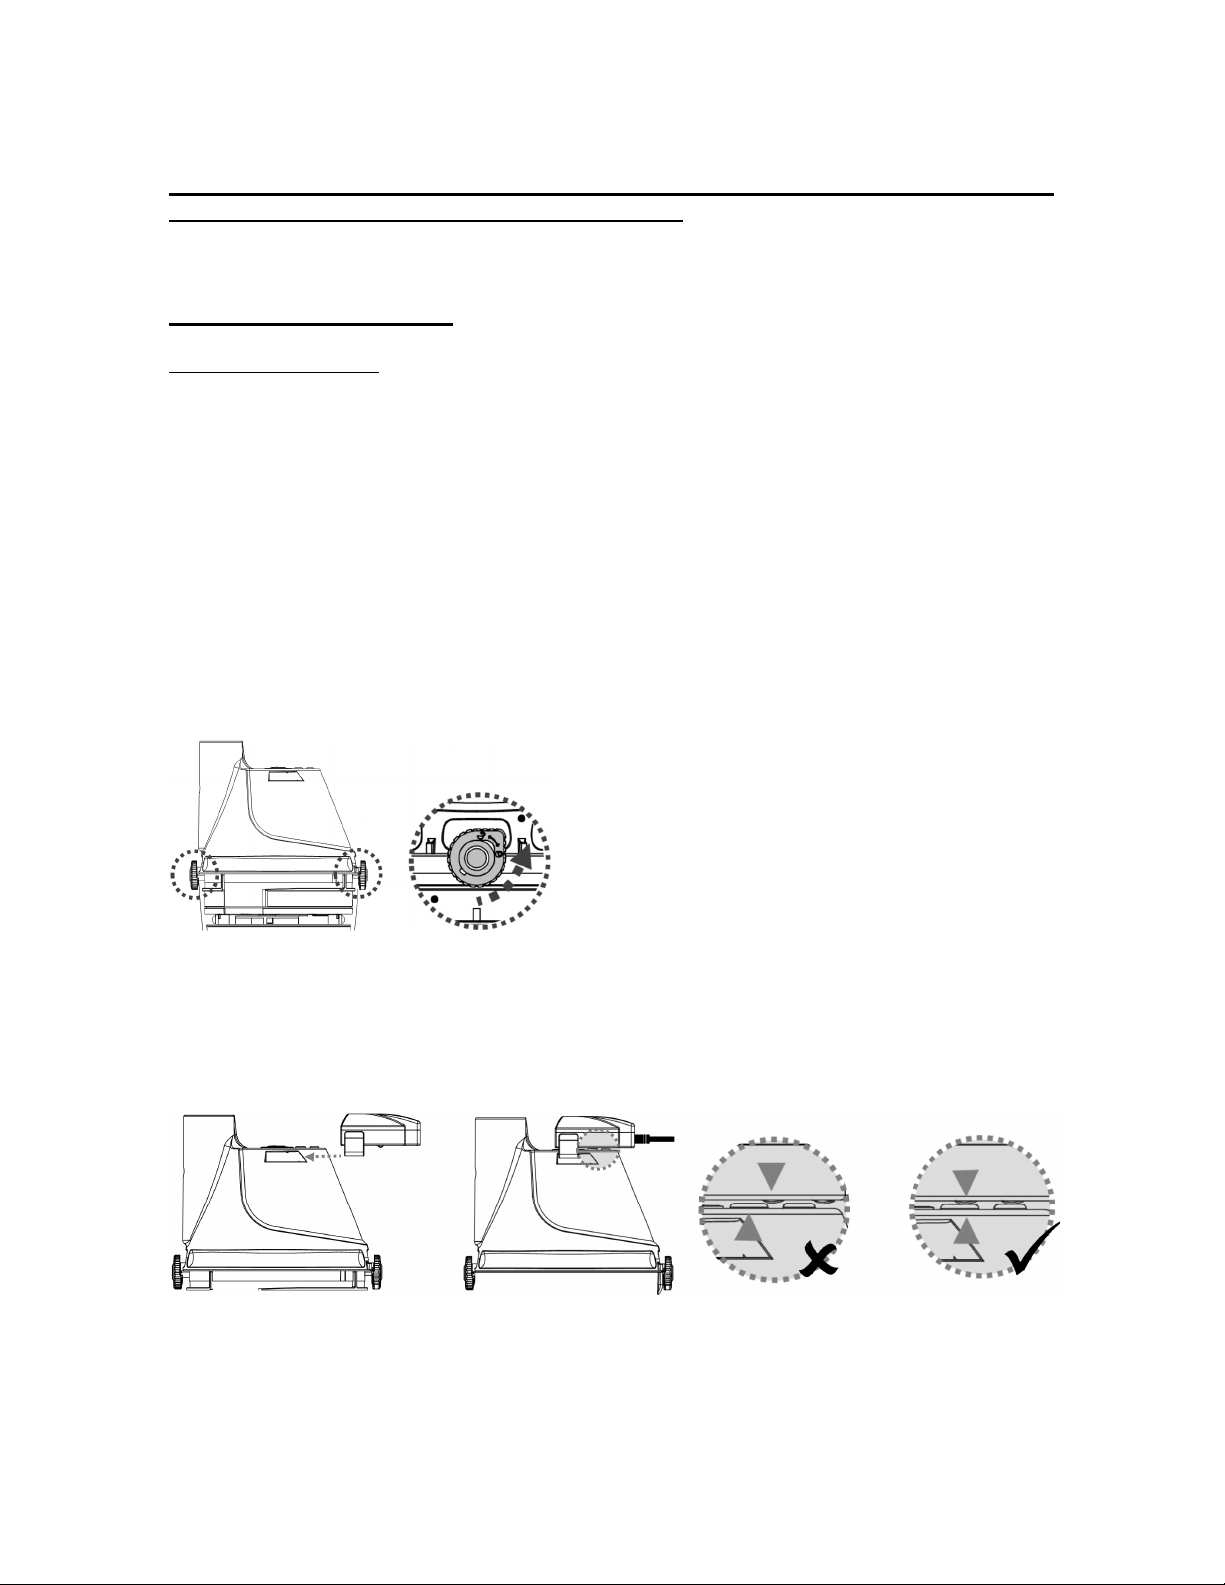
1. Turn the locking knob (on each side) anticlockwise until it points to the green dot
marking (unlock position) to unlock and release the rear body from the transparent
case.
2. Place the rear body (upside down - power on/off button face up) on a flat surface.
Align and slide the hook of the charging base onto the side notch at the bottom of the
rear body until it stops. Make sure their contact plates are properly in contact. Plug
the female jack of the external adaptor into the charging port at the end of the
charging base.
WARNING!
DO NOT handle the pool vacuum, external adaptor and charging base while it is
charging with wet hands and without shoes.

9
Connect the external adaptor to the power source through a residential current
device (RCD).
Charge the pool vacuum with the original external adaptor provided.
DO NOT use power extension cords.
Fully charge the battery before first use.
Charging must be done indoors, in a dry & well-ventilated area away from sunlight,
children, heat, ignition sources, and with an ambient temperature between 5˚C(41˚F)
and 35˚C(95˚F).
Always disconnect the external adaptor from the power source when charging is
complete.
Do not leave the pool vacuum in charge for over 20 hours.
Immediately turn the power off and disconnect the external adaptor from the power
source if you detect any of the following conditions:
- Offensive or unusual odor
- Excessive heat
- Deformation, cracks, leaks
- Smoke
1. Make sure that the pool vacuum is turned off prior to charging.
2. Connect the external adaptor to the power source. Once the pool vacuum begins
charging, the indicator light on the external adaptor will turn red. Normally, it takes
about 5-6 hours to reach a full charge. The indicator light will turn green when the pool
vacuum is almost fully charged.
Note: If the motor is generating noise, immediately turn off the device by pressing the
ON/OFF button. Otherwise, it could potentially lead to failure of the shaft seals / motor,
and the warranty will be voided as a result.
Note: Charge the pool vacuum completely (about 5-6 hours) prior to first use.
3. When charging is complete, disconnect the external adaptor from the power source
and unplug the jack from the charging base.
4. Detach the charging base from the pool vacuum.
Normally the pool vacuum can be operated up to 45 minutes on a full charge
(charged for about 5- 6 hours)
To re-position the transparent case (with the filter cone inside) to the rear body, make
sure the locking knob on both sides is turned to the unlock position. Align the raised
arch on both sides of the transparent case with the locking knobs and then turn the
knob clockwise until it points to the red marking to secure the assembly.
Attention: The case has one correct position only. The water-draining valve must be
facing the bottom when holding the cleaner horizontally by the handle.
FACT: Rechargeable lithium-Ion battery is classified as a consumable item. It has a
limited life and will gradually lose its capacity to hold a charge. Therefore, running

10
time of the pool vacuum will gradually reduce through repeated charging and
discharging in operation.
NOTE: Let the pool vacuum rest for around 30 to 40 minutes before charging it again.
Set-Up Before Use
Handle assembly
Insert the handle into the pool vacuum as shown, until the side pin on the handle is
secured to the handle’s locking hole on the rear body.
To release the handle, press down on the side pin and pull out the handle.
Suction head assembly
Insert the suction head directly into the suction mouth of the pool vacuum until. The
side tabs of transparent case will clip in the holes of the suction head’s pivot.
NOTE: To replace the brushes on the suction head, lift the end and pull it out to make
space for a new one.
WARNING! For vinyl liner and fibreglass pools, it is recommended to keep the
brushes on the suction head to avoid damaging the pool.
Telescopic pole (not included) assembly
Insert the end (with one side pin) of the pole connector into the pool vacuum as
shown until its single side pin is secured to the handle’s locking hole on the rear body.
Slide the telescopic pole into the pole connector until the side holes of the telescopic
pole are secured to the side pins of the pole connector.

11
To release the telescopic pole, press down on the two side pins simultaneously and
pull out the pole.
OPERATION
WARNING!
Do not use the pool vacuum if any damage is detected.
Oil stain could occur due to possible leakage of lubricants applied to the O-ring.
Do not operate this pool vacuum if there are people/pets present in the water.
Make sure the pool vacuum is fully immersed in the water before initiating operation.
The minimum water level required to operate the device must reach above the
power button of the pool vacuum when it is held in a vertical position. Operating the
pool vacuum when not immersed in the water correctly can damage the unit and
the warranty will be voided as a result.
Maximum operating depth in water is 3 meters (10 ft).
Maximum water temperature: 5˚C(41˚F) –35˚C(95˚F)
DO NOT use the pool vacuum without an intact filter cone in place. Using your pool
vacuum without an intact filter cone in place will VOID your warranty.
Suction entrapment hazard: This pool vacuum generates suction. Do not allow hair,
body or any loose parts of your clothing to make contact with the suction mouth of
the pool vacuum during its operation.
Never insert body parts, clothing or other objects into the openings and moving
parts.
DO NOT use this pool vacuum to pick up any toxic substance, flammable or
combustible liquids such as gasoline, or operate in the presence of explosive or
flammable fumes.
DO NOT cover the side slot of the cleaner body during operation. The
impeller/motor may be damaged as a result.
Never insert any object to touch the impeller.
CAUTION
Use only original accessories delivered with this product.
DO NOT use this pool vacuum immediately after pool-shocking. It is recommended
to leave the pool circulating for at least 24-48 hours.
It is not recommended to use this pool vacuum with another pool vacuum/cleaner
simultaneously.
DO NOT leave the pool vacuum in the water when it is not in use or when battery is
low as water leakage may occur.
1) Bring your pool vacuum to the side of your pool / spa. Immerse the pool vacuum in
water and press the power button to initiate operation.

12
CAUTION! Make sure the pool vacuum is always facing downwards when it is placed
into the pool. Otherwise it may bend the pole connector and damage it during the
process.
2) To remove the pool vacuum from the pool / spa, lift the pool vacuum while pointing
it downwards in order to allow water to escape from the outlet valve. Water is going to
escape via the handle / pole connector and draining holes inside the handle chamber
on the rear body.
CAUTION! Make sure the pool vacuum is always facing downwards when it is
removed from the pool. Otherwise, the pole connector may be bent and damage the
pool vacuum in the process.
3) Rinse the pool vacuum with fresh water after every use. DO NOT use any
detergent.
EMPTYING THE FILTER
WARNING! Using the pool vacuum without a filter cone in place will VOID your
warranty.
In order to maximize the cleaning efficiency, be sure to clean the filter cone before
and after each use.
CAUTION! If the pool vacuum is charging, disconnect the external adaptor from the
power source and detach the pool vacuum from the charging base.
Emptying filter cone
1. Place the pool vacuum on a stable surface.
2. Turn the locking knob (on each side) anticlockwise until it is pointing towards the
green marking to unlock and release the transparent canister. Remove the
transparent canister from the rear body.
3. Tilt the transparent case and make sure the smaller end is pointing upwards, then pull
out the filter cone from the transparent case. Hold the filter cone horizontally and turn its
lid clockwise to detach it from the cone.
4. Rinse the transparent case and clean out the debris inside the filter cone. It is
recommended to clean the filter cone’s net with splashing water. If brushing is deemed

13
necessary, use only a soft brush to clean it carefully and gently. DO NOT apply any
pressure to the net.
5. To lock the lid onto the filter cone, align the slot of the lid’s edge to the tab of the
bottom part of the cone. Push the lid on the cone and turn the lid anticlockwise until it
stops. Attach the filter cone to the transparent case.
CAUTION! Replace a damaged filter cone immediately with a new one before the next
operation.
6. To re-position the transparent canister (with filter cone inside) onto the rear body,
make sure the locking knob on each side is turned to the unlocked position. Align the
raised arches on both sides of the transparent canister with the locking knobs and
turn each knob clockwise until it points towards the red marking to secure the
assembly.
Attention: The case has one correct position only. The water-draining valve
must be facing the bottom when holding the cleaner horizontally by the handle.
MAINTENANCE & STORAGE
NOTE:
1. Battery discharges on its own during storage. Make sure to fully-charge the pool
vacuum before storage.
2. You must re-charge the battery at least once every three months when it is not in
use.
Unplug the external adaptor from the socket and then unplug the adapter jack from
the charging base.
Detach accessories from the pool vacuum. If necessary, rinse the pool vacuum and
accessories with fresh water. DO NOT use detergent.

14
Make sure to drain the water from the rear body through the holes located inside
the chamber that connects to the handle/ pole connector, and the hole on the rear
of the body.
Make sure to drain the water from the handle through its hole on the bottom end.
Use a damp cloth to clean and dry the pool vacuum and its accessories.
Store them in a well-ventilated area away from sunlight, heat, ignition sources, pool
chemicals and from children. Ambient temperature for storage should be 10˚C –
25˚C (50˚F – 77˚F). NOTE: A higher storage temperature may reduce the battery
life.
WARNING!
-Never attempt in any way to disassemble the pool vacuum.
-Under no circumstances should you attempt to disassemble the pool vacuum and
replace the impeller, motor and battery by yourself.
To replace a damaged ball-wheel, push it out of the cavity by inserting a tool into
the small hole at the top of ball cavity. Align and push the new rolling ball into the
cavity.
CAUTION!
Excessive heat can damage the battery and reduce its lifespan as a result.
The battery supplied with your pool vacuum lasts for about 300 charging cycles
(with proper charging and operation). Life span of battery is reduced if the following
happens:
- Battery appears damaged or will not charge fully.
- Battery operation time is noticeably reduced. Observe and note the
operation time during the first few uses (on a full charge). Use this
information as a reference point to compare operation time with older
batteries.
The battery must be removed from the pool vacuum before it is disposed of.
The pool vacuum must be disconnected from the supply mains while removing the
battery
The battery is to be disposed of safely and according to local ordinances or
regulations.
NOTE: Incorrect maintenance may reduce the battery life and affect its capacity as a
result.
BATTERY DISPOSAL
Your pool vacuum is equipped with a maintenance-free rechargeable lithium-ion
battery pack, which must be disposed of properly. Recycling is required; please

15
contact your local authority for more information.
WARNING! Never attempt to disassemble a battery pack
Remove all personal items such as rings, bracelets, necklaces and watches when
the battery pack is unwired from the pool vacuum.
A battery can produce a short circuit current high enough to weld a ring (or similar
item) to metal, causing a severe burn in the process.
Wear complete eye protection, gloves and protective clothing when the battery
pack is being removed.
Avoid touching the wires altogether and avoid allowing them to make contact with
any metal items, which could cause sparking and/or short circuit the battery.
Never smoke or allow a spark or flame in the vicinity of the battery or the pool
vacuum.
Do not expose the battery to fire or intense heat as this may result in an explosion.
CAUTION!
If a battery leak occurs, avoid contact with the leaking fluids and place the damaged
battery in a plastic bag.
-If leaking fluids come in contact with skin and clothing, wash immediately with
plenty of soap and water.
-If leaking fluids come in contact with eyes, do not rub eyes, immediately flush eyes
with cool running water for at least 15 minutes and do not rub them. Seek medical
attention as soon as possible.
How to remove the battery pack
Recommended tools (not included): Screwdriver.
1. Follow section “Emptying the Filter” for instructions on how to remove the
transparent canister and filter cone from the rear body.
2. Use the screwdriver to unscrew the 4 screws located on the top plate and then
detach it from the rear body to expose the rear body’s cover.
3. Unfasten 6 screws and detach the cover to expose the PCBA, motor assembly,
and battery pack.

16
4. To detach the battery connection wire, press the clip on the connector and then pull
it out. NOTE: Wrap the connector immediately with insulating tape in order to avoid
short circuit caused by contact of both wire terminals.
4. Unfasten the 3 screws to release the battery compartment cover. Remove battery
pack from the compartment.

17
TROUBLESHOOTING
Problem Possible Cause Solution
Pool vacuum does not capture the
debris
Battery is running out Charge the battery again.
Impeller is jammed Power off the pool vacuum and visually check the
gap in middle of the pool vacuum to see if the
impeller is jammed by larger debris. If possible,
use a small tool to remove it with intensive care &
caution. If necessary, contact your dealer for
further instructions.
WARNING! Make sure the pool vacuum is
powered off when the unit is being serviced.
Impeller is broken Contact your dealer for impeller replacement.
Filter is full Clean the filter cone if applicable.
Larger debris / large volume
of debris
Remove the pivoting suction head (not
recommended for SPAs as it could scratch the spa
surface.
Debris escapes from the filter Suction nozzle flap is
broken
Suction nozzle flap works like a door to prevent the
debris from escaping from the filter. Contact dealer
for replacement parts and instruction.
Debris goes outside the filter cone
Filter net is damaged Replace with a new filter cone.
Outlet valve comes off Without the outlet valve, the pool vacuum might
capture debris through this opening. Contact
dealer for valve replacement.
Handle / pole connector cannot be
secured in assembly
Side pin is broken Replace with a new handle / pole connector.
Pool vacuum cannot be charged /
recharged
Battery is damaged Contact dealer for battery replacement.
WARNING! DO NOT open the pool vacuum and
replace the battery by yourself. This could result in
severe or fatal injuries and the warranty will be
voided as a result.
Contact plates of the
charger base and unit are
not connected.
Make sure that the charger base is assembled on
the unit properly so that their contact plates are
touching.
External adaptor is out of
order
Contact dealer for replacement.
WARNING! Using the wrong external adaptor will
result in damaging the pool vacuum / battery and
voiding the warranty as a result.
Suction head does not move
smoothly
Ball-wheel is jammed Push the ball wheel out of the cavity by inserting a
small tool into the small hole at the top of the
cavity. Clean it out and push it back into the cavity
after cleaning.
Environmental Programmes, WEEE European Directive
Please respect the European Union regulations and help to protect the environment.
Return non-working electrical equipment to a facility appointed by your municipality that
properly recycles electrical and electronic equipment. Do not dispose them in unsorted waste
bins. For items containing removable batteries, remove batteries before disposing of the
product.
© 2015 Kokido Development Ltd.
All rights reserved. No part of this document may be reproduced or transmitted in any form or
by any means, electronic, mechanical, photocopying, recording, or otherwise, without prior
written permission of Kokido Development Ltd. (V2)
If soft copy of this instruction manual is required, please contact our customer service by email:
customerservice@kokido.com

18
DIAGRAMME DES PIÈCES
1 Corps arrière
2 Compartiment
transparent
3 Cône filtrant
4 Bouton de
verrouillage
(sur les deux
côtés)
5 Volet de
tuyère
d’aspiration
6 Purgeur eau
7 Tête
d’aspiration
8 Brosses
9 Roulettes à
bille x 4
10
Connecteur
du manche
télescopique
11
Poignée
12
Orifice
verrouillage
Poignée
13
Bouton
marche/arrêt
14
Plot de
charge
15
Orifices
d’évacuation
(à l’intérieur
de la chambre
de poignée)
16
Base de
chargeur
Batterie : Bloc de batteries à lithium rechargeables, 4000 mAH,
11,1 V, 44,4 Wh
Tension de charge : 12,6 V CC, 1000 mA
Moteur : 12 V CC

19
AVERTISSEMENTS DE SÉCURITÉ ET INSTRUCTIONS
Lire et suivre toutes les instructions figurant dans ce manuel et sur l’équipement. Ne
pas le faire pourrait donner lieu à des blessures graves ou mortelles.
AVERTISSEMENT !
-Ceci n’est pas un JOUET. Les enfants doivent être maintenus hors de la portée de
cet aspirateur de piscine et de ses accessoires.
-Ne jamais permettre aux enfants de faire fonctionner ce produit.
-Cet aspirateur de piscine n’est pas prévu pour être utilisé par quelqu’un avec ses
capacités physiques, sensorielles ou mentales diminués, ou un manque
d’expérience et de connaissances à moins d’avoir reçu des instructions
déterminées relatives à l’appareil et sous la supervision de la personne
responsable de leur sécurité.
-S’assurer que l’aspirateur de piscine est totalement immergé dans l’eau avant
l’exécution du travail. Le niveau d’eau minimum requis pour faire fonctionner le
dispositif doit dépasser le bouton d’alimentation de l’aspirateur de piscine lorsqu’il
est tenu dans une position verticale. Faire fonctionner l’aspirateur de piscine
lorsqu’il n’est pas immergé correctement dans l’eau peut endommager l’unité et
annuler de ce fait la garantie.
-La profondeur maximale de fonctionnement dans l’eau est de 3 mètres (10 pieds).
-Température maximale de l’eau : 5˚C– 35˚C
-Ne pas utiliser de rallonges de câble électrique.
-Brancher l’adaptateur externe à une source d’alimentation à travers un dispositif à
courant résiduel (RCD). En cas de doute, consulter un électricien professionnel
qualifié.
-Ne pas utiliser cet aspirateur de piscine si un dommage quelconque est détecté.
-Remplacer les pièces endommagées le plus rapidement possible. N’utiliser que
des pièces certifiées par le distributeur ou le fabricant.
-Mettre hors tension, débrancher l’adaptateur externe de la source d’alimentation,
et débrancher l’adaptateur externe de la base de chargement avant de séparer
l’aspirateur de piscine de la base de chargement.
-Débrancher l’aspirateur de piscine de l’alimentation principale avant de réaliser la
maintenance d’utilisateur telle que le nettoyage du filtre.
-Retirer l’aspirateur de piscine de la base de chargement et s’assurer que
l’aspirateur de piscine est hors tension avant la mise en service du produit.
-La batterie installée est un bloc de batteries rechargeables au lithium. Ne jamais
tenter de remplacer le bloc de batteries.
-L’aspirateur de piscine ne doit être utilisé qu’avec l’adaptateur externe livrés avec
ce produit.
-Vous ne devrez pas faire fonctionner cet aspirateur de piscine lorsque des
-personnes/animaux de compagnie sont présents dans l’eau.
- Ne pas utiliser cet aspirateur de piscine sans un cône filtrant intact en place, car
votre garantie serait annulée de ce fait.
-Danger de piégeage de l’aspiration : Cet aspirateur de piscine produit une
aspiration. Ne pas permettre que les cheveux, le corps, ou toutes parties lâches
de vos vêtements entrent en contact avec l’orifice d’aspiration de l’aspirateur de
piscine pendant son fonctionnement.
-Ne jamais introduire des parties du corps, vêtements ou autres objets dans les
ouvertures et pièces mobiles de l’aspirateur de piscine.
Table of contents
Languages:


