intermountain AC-8 User manual

Baldwin Locomotive Works
SOUTHERN PACI IC
AC-8/10/11/12
4-8-8-2 Cab orward
Articulated Steam Locomotive
Operators
Manual
AC-12 LokSound Documentation Insert - V2.3.odt
1

Operators Manual
Your Presentation Quality Collectors Box Includes:
•N Scale Baldwin Locomoti e Works Model
AC-8/10/11/12 4-8-8-2 Articulated Locomoti e
•Oil Tender with Electronics
•Operators Manual
•Warranty Information
•Traction Tire & Coupler Pack
Table of Contents:
•N Scale AC-8/10/11/12 4-8-8-2 Articulated Steam Locomoti e Features
•Oil Tender Features
•Preparing The InterMountain AC-8/10/11/12 Steam Locomoti e For Operation
•DC (Basic Analog Mode) Operation
•Digital Command Control (DCC) Operation
•Ongoing Maintenance Acti ities
•Pilot Coupler Con ersion
N Scale AC-8/10/11/12 4-8-8-2 Articulated Steam Locomotive eatures:
•Detailed cab interior
•Painted gauge faces
•Detailed boiler back-head
•Directional lighting and lighted number boards
•Highly detailed piping including flexible high
pressure piping
•Operating side rods, eccentric cranks and al e
gear
•Detailed feed-water system, air pumps, generator
and brake gear
•Formed wire railings and grab irons
•Diamond Plate patterned walkways and deck plate
•Prototypically correct articulation of the trailing
engine
•Recommend operation on 15” Radius minimum
cur e
•10 Pin NMRA Standard Plug for quick & easy
DCC Installation
•Micro-Trains® Pilot Coupler
Oil Tender eatures:
•Formed wire railings and grab irons
•Detailed trucks and brake piping
•Diamond Plate patterned deck plate
•Operating directional back-up light
•Micro-Trains® Coupler
AC-12 LokSound Documentation Insert - V2.3.odt
2

Preparing the InterMountain AC-8/10/11/12 Steam Locomotive for Operation:
E ery InterMountain AC-8/10/11/12 Steam Locomoti e is factory tested prior to release. The InterMountain
AC-8/10/11/12 Steam Locomoti e is factory lubricated on all internal dri eline components. The external
dri eline components are not factory lubricated to protect the finished model in its presentation packaging.
Once initial set-up and test run is complete the following lubrication is required prior to normal
operation of the locomotive:
•Using high quality plastic compatible lubricating oil, carefully (but sparingly) lubricate all mo ing parts of
the external side rod assemblies. InterMountain Railway recommends Labelle® 108 - Synthetic Oil Multi-
Purpose Light Weight.
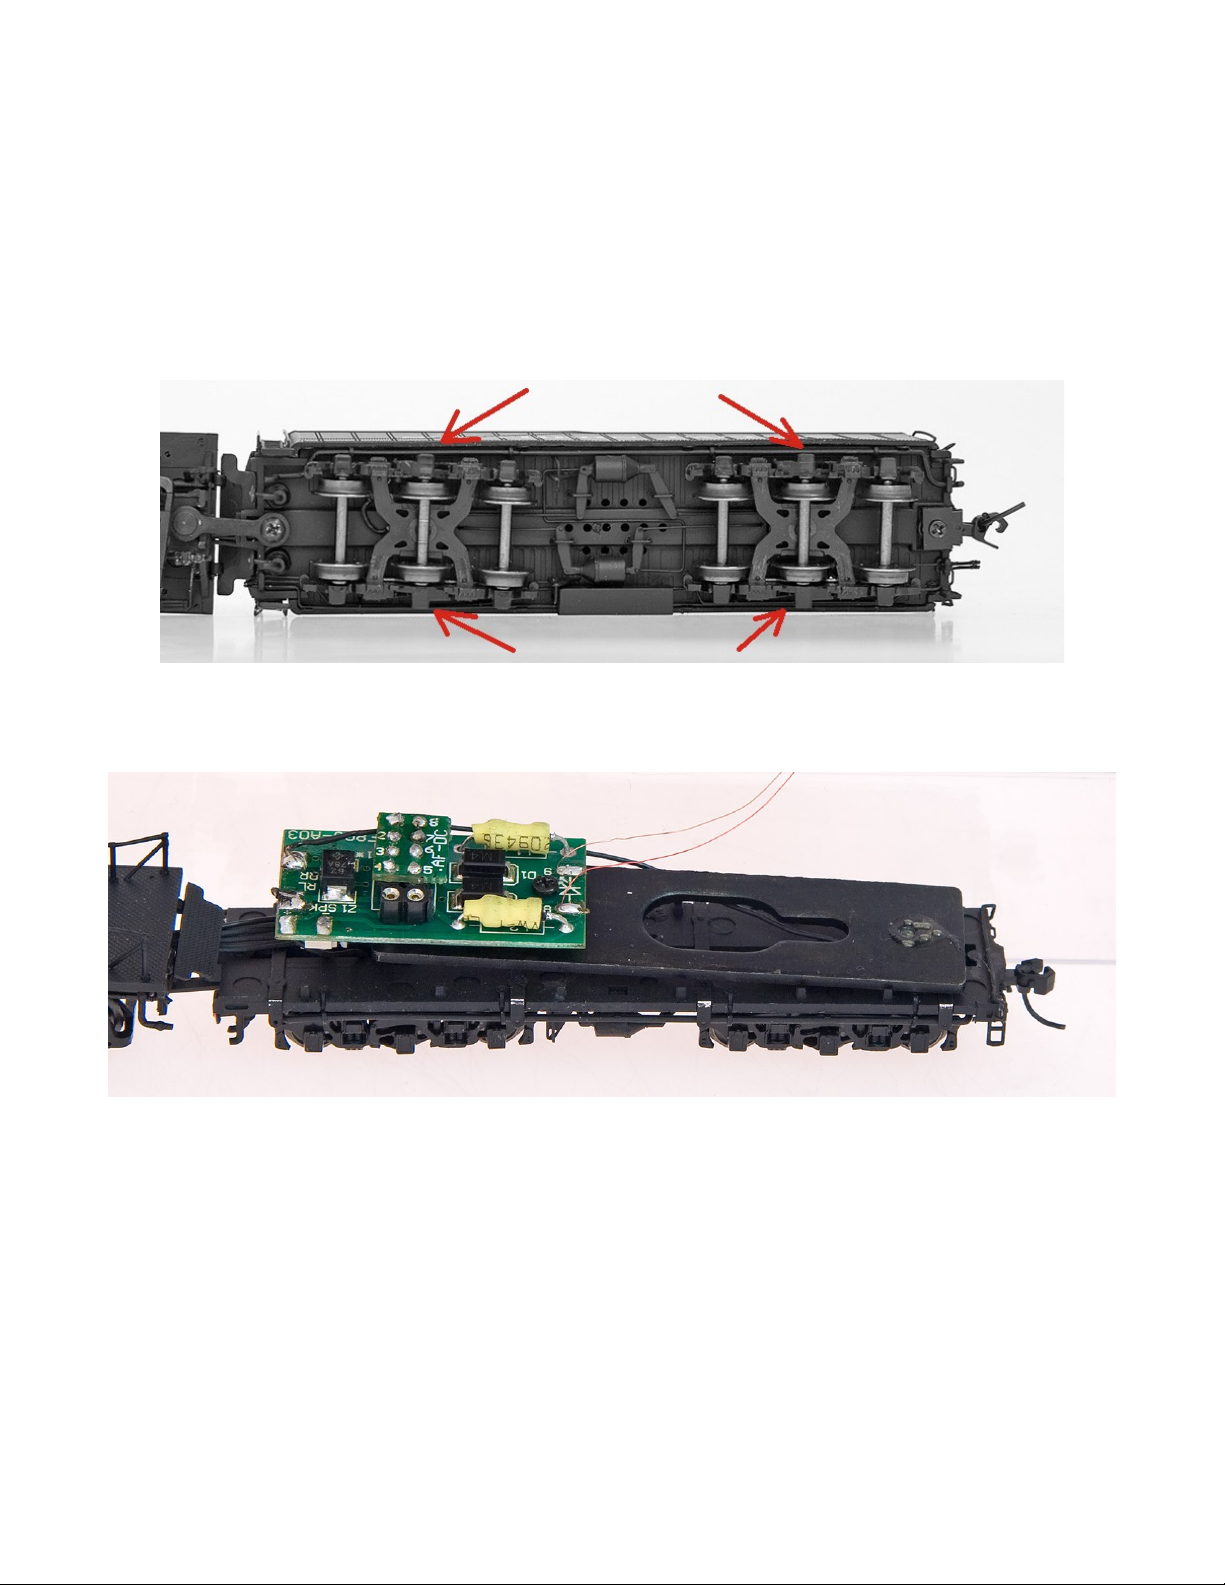
•Lubricating the dri e axles at their bearings is also recommended (see image below).
•A oid and remo e any excess oil prior to normal operation of the locomoti e.
Lubrication Locations
DC (Basic Analog Mode) Operation:
Operating the Locomotive with a standard N Scale Compatible (DC Analog) power pack:
•Set the DC Power pack direction control switch to forward.
•Set the DC Power pack throttle to Zero/Stop position.
•Turn on the N Scale Compatible DC Power pack.
•To Accelerate: Ad ance the throttle control slowly until the locomoti e mo es forward. Adjust the throttle as
required to achie e the desired speed.
•To Decelerate: Reduce the throttle control slowly. Adjust the throttle as required to achie e the desired speed.
•To Stop: Reduce the throttle control slowly to the Zero/Stop position.
•To Re erse or Change Direction: With the throttle in the Zero/Stop position, change the power pack direction
control switch to re erse or opposite position. Then accelerate, decelerate, and stop as described abo e.
Important Notes:
•NEVER Re erse or Change direction while the locomoti e is mo ing as this may damage the dri eline
components.
•A oid rapid throttle changes and abrupt stops to reduce excessi e strain on dri eline components.
AC-12 LokSound Documentation Insert - V2.3.odt
3
Digital Command Control (DCC) Installation & Operation:
Your N Scale AC-8/10/11/12 is equipped with a 10 pin NMRA compliant plug for the installation of a decoder
in your locomoti e. The following instructions will guide you in the installation of your decoder. To install a
decoder in your AC-8/10/11/12 locomoti e requires only the remo al of the tender body.
1.Prepare the locomoti e by placing it on a protected surface. The foam pad included in your presentation
package would work just fine.
2.Remo e the tender body by inserting a flat tool between the edges of the body and sliding it back and forth.
This will release the body from the base frame. You will need to do this on both sides.
3.Remo e the tender body, being careful not to pull on the tender light wires.
AC-12 LokSound Documentation Insert - V2.3.odt
4
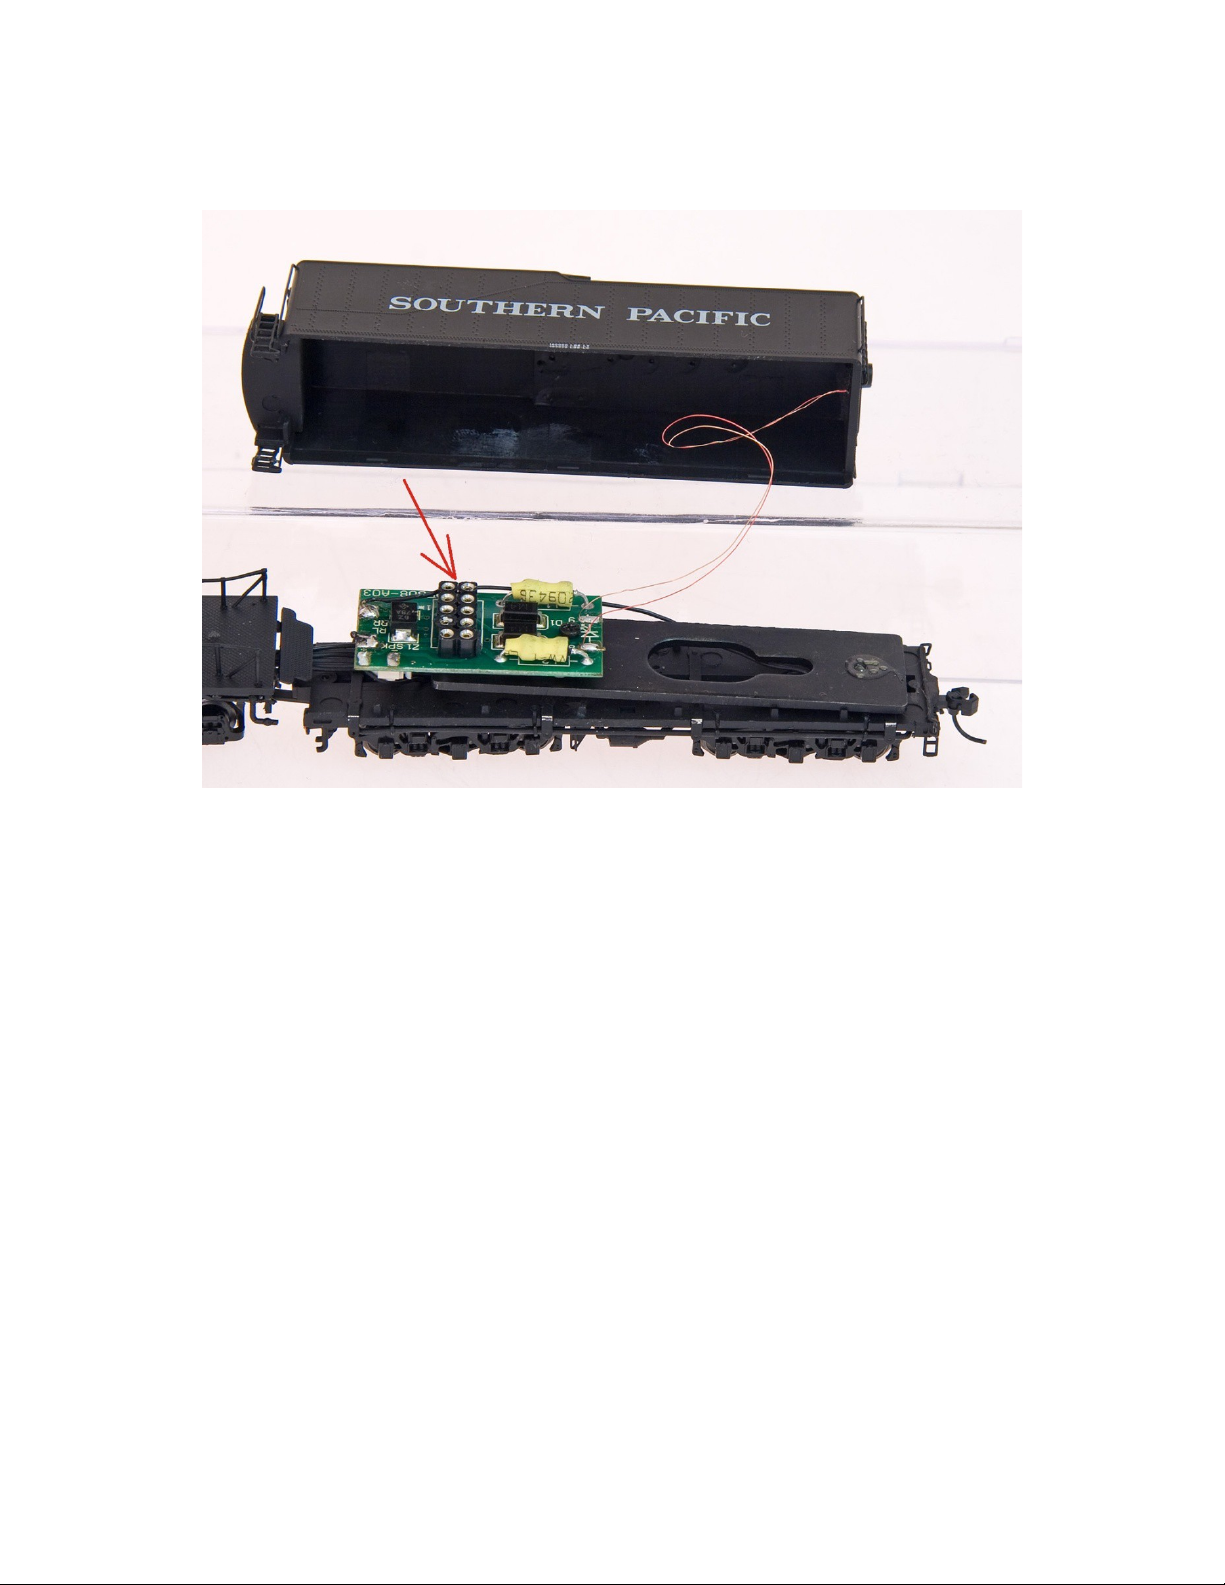
4.Remo e the NMRA dummy plug and plug in your decoder. Align Pin-1 from the decoder (orange wire) to
Pin-1 on the plug (marked with a *1). Backwards installation of the decoder is harmless and will only result
in the locomoti e operating opposite to the direction indicator on your DCC system.
5.Replace the tender body.
Operating the DCC Equipped Locomotive with a qualified NMRA Command Station:
•Select the factory default locomoti e address. (Address 3 with most brands of decoders)
•Set the controller to the preferred speed-step range.
•To Accelerate: Ad ance the throttle control slowly until the locomoti e mo es forward. Adjust the throttle as
required to achie e the desired speed.
•To Decelerate: Reduce the throttle control slowly. Adjust the throttle to achie e the desired speed.
•To Stop: Reduce the throttle control slowly to the Zero/Stop position.
•To Re erse or Change Direction: With the throttle in the Zero/Stop position, change the direction control to
re erse or opposite position. Then accelerate, decelerate, and stop as described abo e.
Important Notes:
•NEVER Re erse or Change direction while the locomoti e is mo ing to a oid damaging dri eline
components.
•A oid rapid throttle changes and abrupt stops to reduce excessi e strain on dri eline components.
AC-12 LokSound Documentation Insert - V2.3.odt
5

Operational and Decoder unctions:
Sound Equipped Locomotive Only-
Your new locomoti e comes equipped with a LokSound Select Micro DCC & DC “Dual Mode” decoder
integrating a full-featured, 8 channel sound system, and a .75A motor controller. The LokSound Select follows
all NMRA DCC standards and recommended practices. It can be used with 14, 28, or 128 speed steps,
supports two digit as well as “4-digit” addressing. Up to 29 function keys are supported.
The LokSound Select supports all DCC-programming modes including Programming on the Main Track.
Because of its unique low-power design, the LokSound Select can be programmed on the programming track
of all popular DCC systems. No programming track boosters or other circuitry is required.
•O er 20 sound effects, including the bell, playable whistle, air pump, exhaust chuff, coupler, steam release,
cylinder cocks, brake release, side rod clank, blower, injector, dynamo, firebox blower, synchronized brake
squeal, and more!
•8 channel sound: The LokSound Select can playback up to 8 sounds at a time.
•5th generation motor control with load compensation for smooth and precise operation.
Default Address = 3. Decoder Reset CV8 = 8, then interrupt track power for approximately 5 seconds and
restore power. The decoder will re ert back to address 3 after a decoder reset.
Your sound equipped locomoti e comes with the following DCC function key commands:
F0 (f) Headlight/Dynamo
F0 (r) Backup light
F1 Bell
F2 Steam Whistle
F3 Single Chime Air horn
F4 Short Steam Whistle
F5 Coupler Clank
F6 Injector
F7 Number Board Lights/Dynamo
F8 Shut Down / Mute
F10 Air Pump
F11 Oil Burner
F12 Blower
F15 Crossing Communication
F16 Rail Clank (Loco must be mo ing)
F17 Brake Release
F18 Sand Val e
F19 Headlight/Re erse Light Dimmer
Chuff Rate at speed step 1: CV57 Default 87 (Range 0-255) Lower numbers = Faster Chuff
Chuff Rate at higher speed steps: CV58 Default 40 (Range 0-255) Lower numbers = Faster Chuff
Master Volume: CV63 Default=192 (Range 0-192)
Indivdual Sound Volume Control (MUST SET CV32=1 IRST):
Chuff: CV259 Default=128 (Range 0-128)
Steam Whistle: CV275 Default=128 (Range 0-128)
Bell: CV283 Default = 99 (Range 0-128)
Dynamo: CV299 Default=128 (Range 0-128)
Air Pump: CV307 Default=120 (Range 0-128)
Air Horn: CV371 Default=128 (Range 0-128)
A complete list of the sound olume CVs can be found on our website as well as other helpful LokSound tips:
http://intermountain-railway.com/customerser ice/dccwebpage/ESU-FAQ-Page.html
AC-12 LokSound Documentation Insert - V2.3.odt
6

Ongoing Maintenance Activities:
Apply the following recommendations as needed.
Cleaning Wheels:
Use a small amount of rubbing alcohol as needed to remo e most normal build up on wheels. The
frequency of wheel cleaning can ary depending on factors such as track condition, duration of
running time, etc.
External Lubrication:
Using high quality plastic compatible lubricating oil, carefully (but sparingly) lubricate all mo ing
parts of the external side rod assembly. Lubricating the dri e axles at their bearings is also
recommended. Always a oid excessi e lubrication and remo e any excess oil prior to normal
operation of the locomoti e.
Internal Driver Set – Gear Lubrication:
After extended operational ser ice, inspect and lubricate the dri e gears in each dri er set with high
quality plastic compatible gear oil or light grease. Again, light application of the lubricant is best. An
experienced modeler or technician should perform the dri e gear lubrication as remo al and
reassembly of the dri er set co er plates and brake gear detail is required to access these components.
Drive Motor:
The Dri e Motor in this locomoti e is permanently lubricated and requires no additional lubrication.
We hope you enjoy the operation of your InterMountain N Scale AC-8/10/11/12. If you ha e any questions
about your locomoti e, or any other InterMountain product, feel free to contact us by phone at (800) 472-2530
or by e-mail at intermountain@intermountain-railway.com.
AC-12 LokSound Documentation Insert - V2.3.odt
7

Pilot Coupler Conversion
Your N scale AC-8/10/11/12 comes with a pilot coupler con ersion allowing for issue free double-headed
operation. The extended coupler can be exchanged for a short shank coupler by following these simple steps:
1.Included in your locomoti e presentation box is a packet containing replacement couplers and traction tires.
2.Remo e the coupler from the package and assemble as shown.
3.Remo e the coupler mounting screw and slide the coupler out the front of the pilot.
4.Assemble the coupler in the box and reinstall by sliding the coupler into the front. Tighten the screw to hold
the coupler in place.
AC-12 LokSound Documentation Insert - V2.3.odt
8

Traction Tire Replacement
Your locomoti e comes with traction tires on the leading dri er of each 'engine'. Each set of 4 dri ing axles is
called an 'engine'. There are two 'engines' on the Cab Forward. Should these tires need to be replaced, an extra
set of 4 tires is included. This process requires patience and the need to work extremely carefully. Do this
work on a clean work space so as not to loose any of the small parts. Please read through the steps below
before starting the work.
1. Included in your locomoti e presentation box is a packet containing replacement couplers and traction
tires. Ha e this packet handy but don't remo e the tires from the packet until you are ready to replace
them.
2. There is one traction tired dri er axle on both 'engines'. Replace the traction tires on one dri er axle at
a time. It is not required to replace more tires than necessary, howe er these instructions are the same
for the traction tired dri ers on both 'engines'.
3. Using a small pair of side cutters, slide the cutter head between the hex-head pin holding the side rod
to the dri er and the side rod. This is a press-fit hex-head pin and NOT a screw. Do not cut the pin
with the side cutters! Use a small flat blade screwdri er under the cutters. Twisting the screwdri er
while pulling STRAIGHT up on the pin with the cutters will release the pin. It is extremely important
that the pin is pulled STRAIGHT up and completely out without rocking it. If it is rocked, the hole that
the pin fits into will elongate and the pin will not hold when re-inserted. Set the pins in a safe place as
they'll be re-inserted later.
4. Do the abo e for both sides of the dri er.
5. Turn the locomoti e upside-down and gently pry the brake hanger off the bottom of the 'engine' you
are working on with a small flat blade screwdri er. Pull it straight out.
6. Remo e the two Phillips head screws and remo e the bottom plate from the dri ers. The traction tired
dri er can now be pulled out. No other dri ers should be pulled out.
7. Using a #11 X-acto blade, scrape out the old traction tire from the groo e. Be sure to clean the groo e
completely or the new traction tire will not lay flat causing the locomoti e to wobble.
8. Remo e one new traction tire from the included package. Using a round smooth pointed tool, re-install
the new traction tire. The tool will help guide the tire into the groo e. Make sure the tire is fully seated
and does not twist as it is going into the groo e. It should be completely flat in the groo e. Install one
tire completely before doing another one (if necessary).
9. Set the dri er back in the locomoti e with the hole for the pin aligned to the side rod, and re-assemble
the locomoti e in the re erse order from abo e. Do not try to turn the wheels on the axle to align the
pin holes. If the wheels get turned on the axle, they'll ha e to be re-quartered.
10. Re-insert the hex-head pins last. Be extremely careful to re-insert the pins into the side rod and dri er
completely STRAIGHT!
If you should elongate the hole in the dri er and the pin will not hold, a replacement dri er is required.
Contact us for information on a ailability of replacement dri ers. Limited supply. There is a fee for a
replacement dri er and is subject to a ailability.
AC-12 LokSound Documentation Insert - V2.3.odt
9

InterMountain N Scale Cab orward Warranty
(AC-8/10/11/12)
InterMountain Railway Company will repair or replace, at our discretion, any part which it finds faulty in
workmanship or material, pro ided these instructions are followed:
1. If you feel that you ha e a warranty issue, please contact InterMountain Railway Company to discuss the
problem at 800-472-2530 or intermountain@intermountain-railway.com. If needed, we will then ad ise you
to send your locomoti e in for ser ice.
2. Upon our instruction, send locomoti e with written note¹ to: Customer Ser ice Department, InterMountain
Railway Co., 1336 Sherman Dr., Unit C, Longmont, CO 80501-6174.
3. Please be sure to include your full name, return address, email address, telephone number, and any other
contact information should we need to reach you.
4. Please pack the locomotive in its original box to pre ent damage during shipping. Please make certain
the outer carton has enough packing material to ensure a safe shipment. Any product not returned in the
complete original packaging will be subject to a minimum $40 repair fee!
This warranty co ers defects in workmanship and materials for as long as it is in possession of the original
owner. This warranty does not co er the cost of any incon enience, transportation damage, misuse, accident
or any item that has been modified from its original configuration. This warranty also does not co er any
damage caused to the locomoti e or tender by a user installed aftermarket produced decoder. Replacement
parts for any non-warranty issues may be obtained for a fee depending on a ailability.
¹A form that can be printed, filled out, and returned with your locomoti e in lieu of the written note can be
found on our website (www.intermountain-railway.com) under the Customer Ser ice button and then the
Ser ice and Repair link.
InterMountain Railway Company
1336 Sherman Dr. Unit C, Longmont, CO 8 5 1-6174
Toll Free: (8 ) 472-253
Local: (3 3) 772-19 1 Fax (3 3) 532-2352
Web Site: http://www.intermountain-railway.com
Modeler’s Club: http://intermountain-railway.com/modelersclub/
AC-12 LokSound Documentation Insert - V2.3.odt
10
This manual suits for next models
3
Table of contents
Other intermountain Toy manuals

Popular Toy manuals by other brands

LCUT Creative
LCUT Creative B 00-34 OO quick start guide

SIG
SIG KADET LT-25 Instruction book

Fisher-Price
Fisher-Price M4042 Consumer information

Fisher-Price
Fisher-Price LittlePeople J0000 instructions

MTHTrains
MTHTrains 2-8-2 L-1 Mikado Steam Locomotive Operator's manual

Eduard
Eduard Pz.Kpfw III Ausf.M Assembly instructions

Fisher-Price
Fisher-Price FIREROCK 73610 Owner's manual & assembly instructions

Cranium
Cranium Turbo Rocket Pack instructions

Eduard
Eduard Soviet AA Missile set MiG29/Su27 quick start guide

LEGO
LEGO Jack Stone 4620 Building instructions

FREE AIR
FREE AIR Piranha Building instructions

KNEX
KNEX MARIOKART 8 manual


