Interstate GUARDIAN 4 User manual

WARNING: This product can expose you to chemicals, including
Vinyl-Chloride, Styrene and Acrylonitrile, which are known to the State of California
to cause cancer. For more information, go to www.P65Warnings.ca.gov
MULTI-PURPOSE BATTERY CHARGER + MAINTAINER
ULTIMATE CHARGE PROTECTION

23
Use a slightly dampened cloth to clean the housing and lead sets. Do not use
solvents or soaps.
11. Place the power cords where they will not be stepped on, tripped over or
subjected to stress or abuse.
12. Never attempt to charge a frozen battery. Allow the battery to return to room
temperature before connection. Suggested operation range is 32°F (0°C) to
122°F (50 °C) in ambient temperature.
13. Never use the charger in or on any boat or watercraft directly. You must remove
the battery from the boat or watercraft and charge the battery at a properly
installed location.
14. Do not expose the charger to moisture or subject it to inclement weather.
B WARNING - RISK OF EXPLOSIVE GASES
1. Working in the vicinity of a lead-acid battery is dangerous. Batteries generate
explosive gases during operation. Thus, it is of utmost importance that you
follow the instructions each time you use the charger.
2. To reduce the battery explosion risk, follow these instructions and those published
by the battery manufacturer and manufacturer of any equipment you intend to use
in the battery’s vicinity. Observe cautionary markings on these items.
3. Someone should be within your voice range or close enough to come to your
aid when you work near a lead-acid battery.
4. Wear the proper eye, face and hand protection.
5. Avoid touching eyes while working near the battery.
6. Be extra cautious about reducing the risk of dropping a metal tool onto the
battery. It could spark or short-circuit the battery or other electrical parts and
could cause an explosion.
7. Remove personal metal items such as rings, bracelets, necklaces and watches
when working with a lead-acid battery. It can produce a short circuit current high
enough to weld a ring or the like to metal, causing a severe burn.
8. This appliance is not intended for use by persons (including children) with
reduced physical, sensory or mental capabilities, or lack of experience and
knowledge, unless they have been given supervision or instruction concerning
the appliance’s use by a person responsible for their safety.
9. If battery acid contacts the skin or clothing, wash immediately with soap and
water. If acid enters the eye, immediately ood the eye by running cold water
for at least 15 minutes and get medical attention right away.
10. NEVER smoke or allow a spark or ame in the vicinity of the battery or engine.
11. Use the charger for charging lead-acid batteries only. It is not intended to
supply power to a low voltage electrical system other than in a starter-motor
application. Do not use the battery charger for charging dry-cell batteries that
are commonly used with home appliances. These batteries may burst and cause
injury to a person and damage to property.
IMPORTANT SAFETY INSTRUCTIONS - READ THESE FIRST
A SAFETY
1. This manual contains important safety and operating instructions for this battery
charger/maintainer. Please read, understand and follow these instructions and
precautions carefully.
2. Use this charger on 6V and 12V lead-acid, AGM and gelled electrolyte (gel-cell)
batteries. Do not attempt to use other voltages and types of batteries (DRY
CELL, NICKEL CADMIUM, NICKEL METAL HYDRIDE, etc.) commonly found in
small home appliances. This may cause chargers and batteries to burst, resulting
in damage or injury to person and property.
3. Do not expose this charger to direct sunlight, rain or snow.
4. If the battery is installed, please ensure that the vehicle is turned off and no
accessory loads are present before attempting to charge.
5. Do not use attachments to this charger that are not recommended.
Nonrecommended accessories may result in injury, electric shock or re and
voids the warranty.
6. To reduce the risk of damage to electric plug and cord, pull by plug rather than
cord when disconnecting charger.
7. If it is necessary to use an extension cord, it should be an adequately grounded
cord. The use of an improper extension cord could result in a risk of re and
electric shock.
a. Ensure that the pins on the extension cord’s plug are the same number,
size and shape as those of the charger’s plug.
b. Ensure the extension cord is correctly wired and in good electrical
condition.
c. Ensure that the wire size is large enough for the AC ampere rating of
charger as specied in the AWG Size of Cord Table.
8. Do not operate charger with a damaged cord or plug – replace the cable or
plug immediately.
9. Do not operate the charger if it receives a sharp blow, has been dropped or
otherwise damaged; take it to an authorized service center.
10. To prevent injury during cleaning or maintenance, disconnect all batteries and
move them to clear access for the unit. Unplug the charger from the wall outlet.
AWG SIZE OF CORD
Length of cord, feet (m)
25 50 100 150
(7.6) (15.2) (30.5) (45.6)
18 18 18 16
45
D CHARGING WHEN BATTERY IS INSTALLED IN VEHICLE
A SPARK NEAR THE BATTERY MAY CAUSE BATTERY EXPLOSION.
TO REDUCE RISK OF A SPARK NEAR BATTERY:
Position the AC and DC cables to reduce the risk of damage by the hood, door and
hot or moving engine parts.
NOTE: If it is necessary to close the hood during the charging process, ensure that the
hood does not touch the metal part of the battery clips or cut the cables’ insulation.
1. Stay clear of fan blades, belts, pulleys and other parts that can cause injury.
2. Determine which post of the battery is grounded (connected) to the chassis.
If the negative post is grounded to the frame (as in most vehicles), see step to
negative-grounded vehicle. If the positive post is grounded to the chassis, see
step to positive-grounded vehicle.
3. Check the polarity of battery posts. A POSITIVE (POS, P+) battery post usually
has a larger diameter than the NEGATIVE (NEG, N–) post.
4. When disconnecting the charger, disconnect the AC cord, remove the clip from
the vehicle chassis and then remove it from the battery terminal.
FOR A NEGATIVE-GROUNDED VEHICLE
Connect the POSITIVE (red) clip from the battery charger to the POSITIVE (POS, P+)
ungrounded post of the battery. Connect the NEGATIVE (black) clip to the vehicle
chassis or engine block away from the battery. Do not connect the clip to the vehicle
chassis or engine block sheet metal body parts. Connect to a heavy gauge metal
part of the frame or engine block.
FOR A POSITIVE-GROUNDED VEHICLE
Connect the NEGATIVE (black) clip from the battery charger to the NEGATIVE (NEG, N–)
ungrounded post of the battery. Connect the POSITIVE (red) clip to the vehicle chassis
or engine block away from the battery. Do not connect the clip to the carburetor, fuel
lines or sheet-metal body parts. Connect to a heavy gauge metal part of the frame or
engine block. Connect the AC supply cord to the electrical outlet for processing the
charging.
C PREPARATION FOR CHARGING
RISK OF CONTACT WITH BATTERY ACID.
BATTERY ACID IS A HIGHLY CORROSIVE SULFURIC ACID.
1. Be sure the area around the battery is well ventilated while the battery is being
charged.
2. Clean battery terminals with a wire brush or terminal cleaner. Be careful to keep
corrosion from coming in contact with the eyes.
3. Inspect the battery for a cracked or broken case or cover. If the battery is
damaged, do not use the charger.
4. If the battery is not sealed and maintenance-free, add distilled water in each
cell until the manufacturer’s battery acid reaches the level specied. This helps
purge excessive gas from the cells. Do not overll. For a battery without cell
caps, carefully follow the manufacturer’s recharging instructions.
5. If it is necessary to remove the battery from a vehicle to charge, always remove
the ground terminal from the battery rst. Make sure all accessories in the car
are off to ensure you do not cause any arcing.
6. Study all battery manufacturer’s specic precautions such as removing or not
removing cell caps while charging and recommended rates of charge.
7. Determine the battery’s voltage by referring to the vehicle owner’s manual and
matching the battery charger’s output rating.
8. If the battery and terminals have a white or bluish crust on them, the charging
system may have problems. These problems should be corrected before the
battery is replaced after charging.
67
E CHARGING WHEN BATTERY IS OUTSIDE VEHICLE
A SPARK NEAR THE BATTERY MAY CAUSE BATTERY EXPLOSION.
TO REDUCE RISK OF A SPARK NEAR BATTERY:
Check the polarity of battery posts. A POSITIVE (POS, P+) battery post usually has a
larger diameter than the NEGATIVE (NEG, N–) post. Attach at least 23 inches long/
6-gauge (AWG) insulated battery cable to NEGATIVE (NEG, N–) battery post.
Do not face battery when making the nal connection.
Position yourself and the cable’s free end as far away from battery as possible, then
connect the negative (BLACK) charger clip to the cable’s open end.
1. Connect the POSITIVE (red) charger clip to the POSITIVE (POS, P+) post of
the battery.
2. Connect the NEGATIVE (black) charger clip to the NEGATIVE (NEG, N–) post of
the battery.
3. Connect the AC supply cord to the electrical outlet.
4. When disconnecting the charger, do so in reverse order of connecting and
break the rst connection while as far away from the battery as possible.
NOTE: A marine battery must be removed and charged on shore. To charge it on
board requires equipment specially designed for marine use.
F CHARGER/MAINTAINER LOCATION
RISK OF EXPLOSION AND CONTACT WITH BATTERY ACID.
1. Position charger as far away from the battery as DC cables permit.
2. Never place a charger directly above the battery being charged. Gases from the
battery will corrode and damage the charger.
3. Never allow battery acid to drip on the charger when reading gravity or lling
the battery.
4. Do not operate charger in a closed area or restrict ventilation in any way.
G SETTING UP AND OPERATION
WARNING: DO NOT CHARGE BATTERY TYPES OUTSIDE
OF THE CHARGER’S WORKING CAPABILITY.
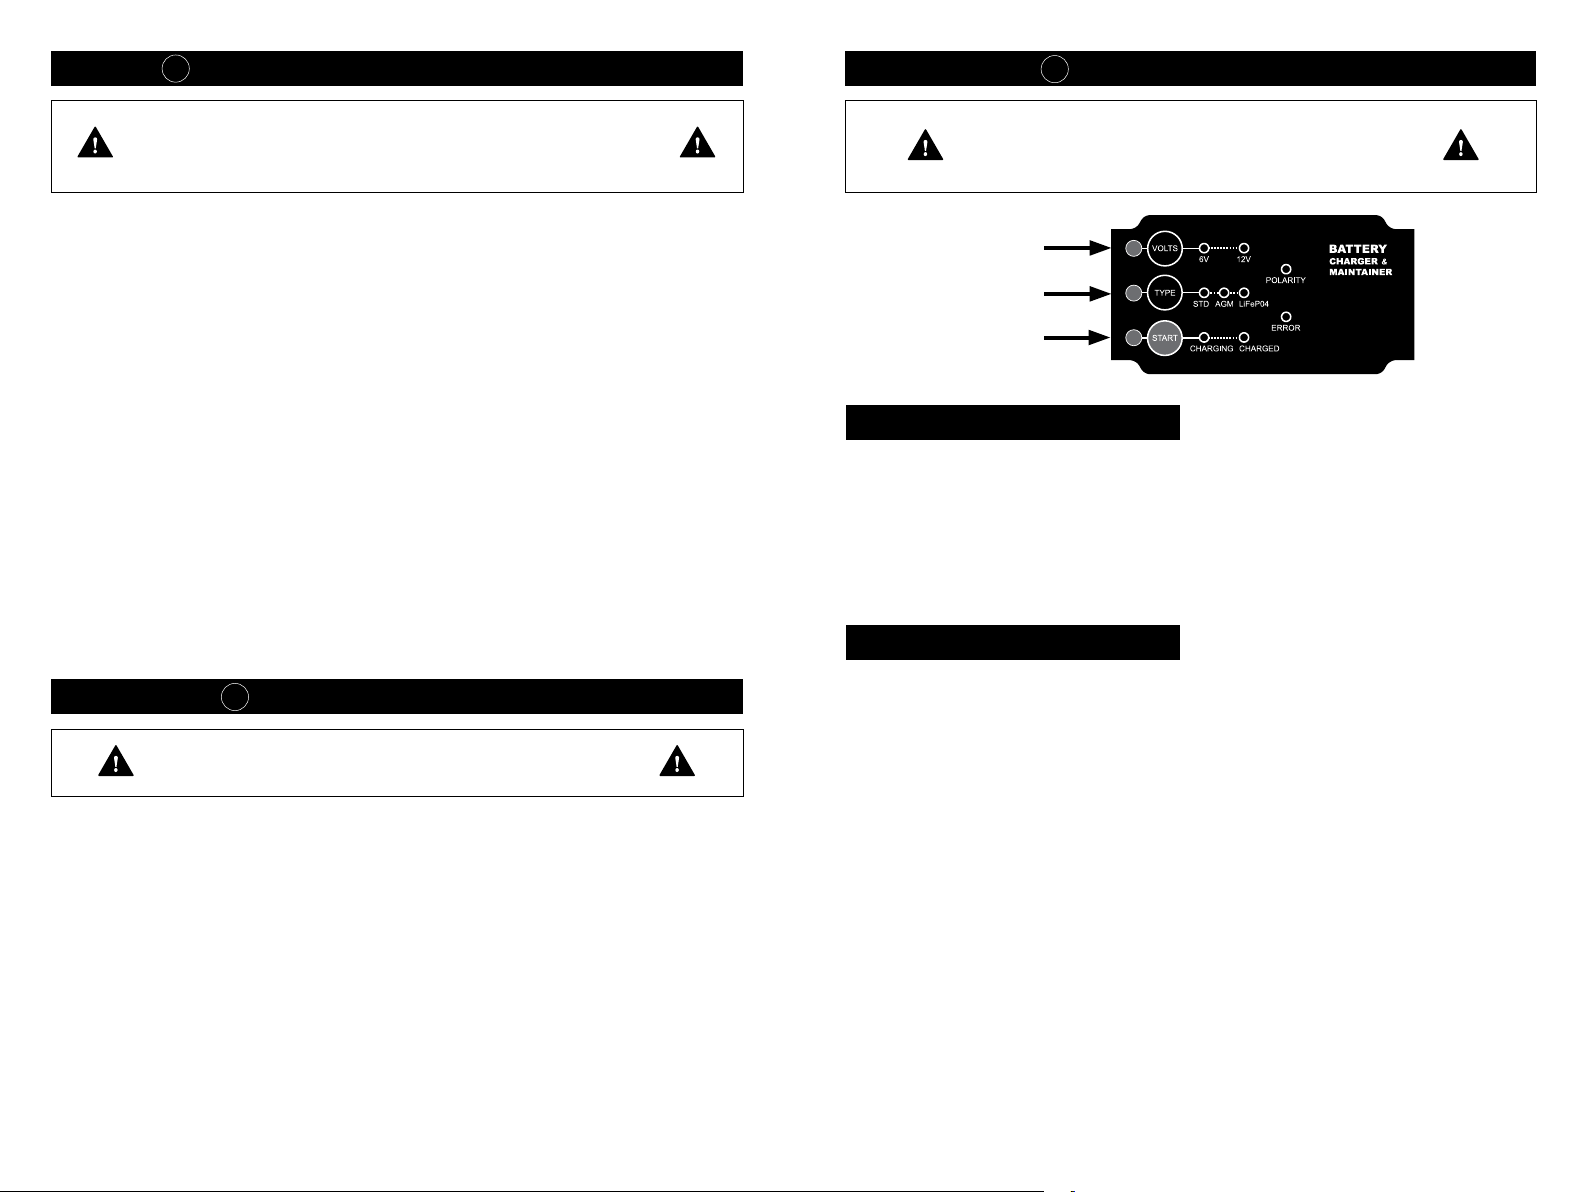
BATTERY MAINTAINER SETTINGS
Plug the AC power cord into an AC power source. All LEDs will light momentarily,
then only the LEDs corresponding to charging settings should stay lit. The charger is
in Standby Mode now.
If the ERROR LED lights, disconnect it from the AC power source immediately and
nd the error reason.
CHARGE A BATTERY
1. Choose a battery voltage charge setting.
The default setting is the 12V mode, which will apply to most charging
applications. To charge in 6V mode, push the charge setting button until the
“6V” LED is lit.
2. Choose a battery type setting.
To charge standard and maintenance free ooded-acid batteries, push the
Battery Type button until the “STD” LED is on.
To charge AGM and spiral wound batteries, push the Battery Type button
until the “AGM” LED is lit. To charge a LiFePO4 battery, push the Battery Type
button until the “LiFePO4” LED is lit.
3. Press the “START” and the charging LED will light.
The charger will automatically start and complete the charging process.
NOTE: If the battery’s open-circuit voltage is lower than 1V, the charger will indicate
a fault. Please unplug the charger, check connections and verify all settings if they
are correct. After checking, if you determine the problem is just the battery voltage
lower than 1V, you can ignore the charger’s protection by pressing the “START”
button directly for 3 seconds. The charger will restart the charging process and
assume there are no other problems that caused the fault. The charger will complete
the charging process and turn off when the battery has been fully charged.
1
2
3
Choose battery voltage
Choose battery type
Start/Stop charging

89
4. When the battery closes to full charge and goes into the completion phase, the
CHARGED LED will on, and the CHARGING LED will be ashing. At this
moment, the battery can be used immediately. To reach a 100% state of charge,
the charger must stay connected until it enters the rest phase when only the
green CHARGED is lit solid.
5. When the charging process is nished, disconnect AC power, then disconnect
DC leads from battery correctly.
H FEATURES
Multi-Stage Charging Process
The charger uses a multi-stage charging process designed to charge and maintain
the battery. The charging process includes a Soft Start mode to charge deeply
discharged batteries properly and is benecial for a battery’s long-term health. The
last procedure in the charging routine is a Maintenance Mode that allows the
charger to be connected to a battery and maintain a proper charge level.
Smart Clamp Technology
The charger will supply power to the output leads only when a correct connection
is made.
Multiple Battery Compatibility
The charger will charge different battery types, including conventional, maintenance
free, AGM gel cell, LiFePO4 and deep cycle batteries.
Multiple Output Options
The charger comes complete with DC output clamps, ring terminals and 12V
adapters to charge or maintain the battery.
Reverse Polarity Protection
Reverse Polarity LED will ash, and power will be cut off if the clamps connect
reversely.
Battery Fault Protection
Conditions that cause the fault include connecting to a battery with a voltage less
than 1V, connecting to a battery with a voltage above 16V in 12V mode (8V in 6V
mode), connecting to a battery with a shorted cell or if the charger diagnoses an
incorrect voltage selection.
Recovery Mode
The charger can protect the interruption of power (power outage). When a power
interruption occurs, all LEDs will turn off, except the Battery Type LED, which will
blink slowly. After 36 hours, to conserve the charge on the connected battery, all
LEDs will turn off. Upon resumption of power, the charger will resume regular
operation in the existing settings and status indicators will again be active. For a
limited time after the resumption of power, the CHARGED LED will blink to indicate
that Recovery Mode had been activated. If the battery’s voltage is too low (<6V) to
support Recovery Mode, while charging, the Battery Type LED will ash rapidly to
alert the user for this condition. Once the battery’s voltage increases above 6V,
Recovery Mode will again be supported, and the Battery Type LED will stop ashing.
I REGULAR MAINTENANCE
Read and follow the manual. Please clean the case and all the accessories for the
charger frequently or after every use. Do not expose the charger to rain or snow.
J WARRANTY
To replace under warranty in the U.S., call 1.800.972.4100
For limited warranty, see interstatebatteries.com/guardian.
Distributed by Interstate Batteries, Dallas, TX 75251 USA
interstatebatteries.com
Other Interstate Batteries Charger manuals


