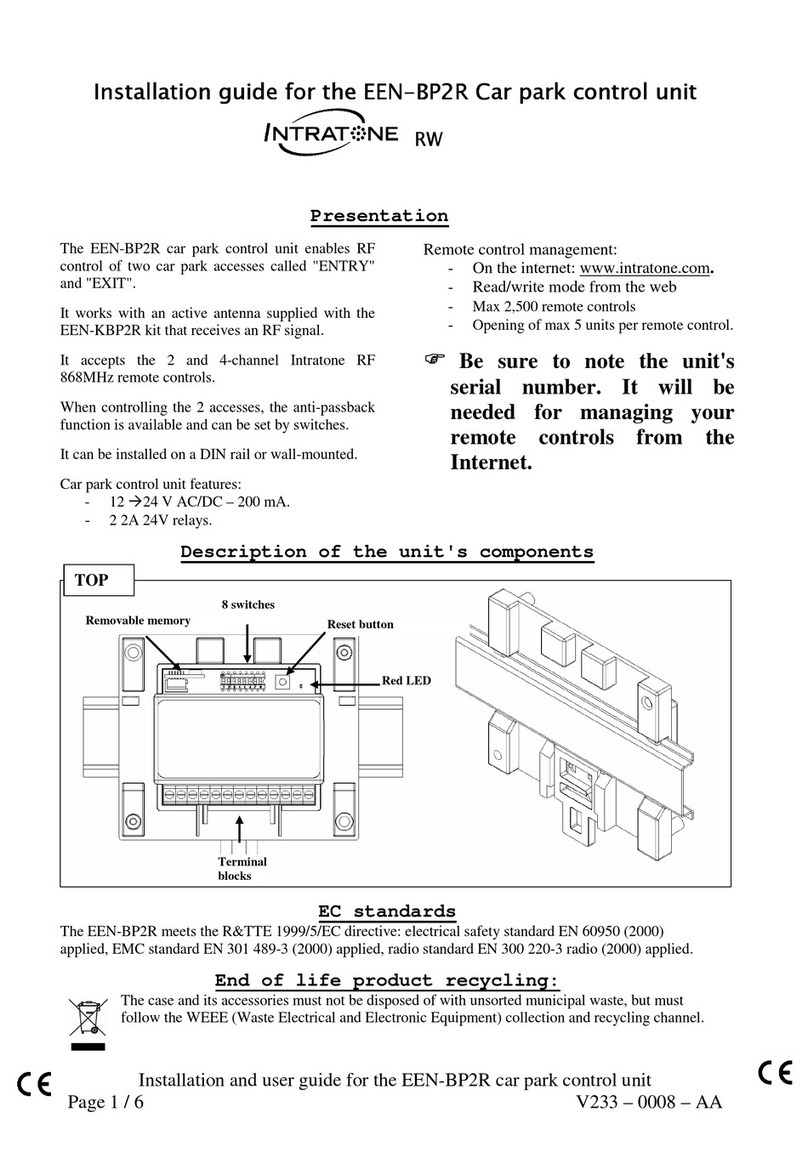
Intratone 03-0102 User manual

1/ 12 V233 - 5002 - BA
MODULE DE TRANSMISSION GPRS MINI HF
GPRS HF MINI TRANSMISSION MODULE
GPRS-FUNKÜBERTRAGUNGSEINHEIT MINI
GPRS HF MINI-VERZENDMODULE
MINI GPRS OVERFØRSELSMODUL FJERNBETJENING
GPRS HF MINI-SENDEMODUL
GPRS HF-MINILÄHETYSYKSIKKÖ
GPRS DATA ECO-MODUL FÖR ÖVERFÖRING
MODULO DE TRANSMISION GPRS RF MINI
CENTRALE 1 PORTE
DOOR CONTROLLER FOR 1 DOOR
ZENTRALE –1 TÜR
CENTRALE UNIT MET 1 DEUR
CENTRAL 1 PUERTA

2/ 12 V233 - 5002 - BA
X 1
X 4
Ø6

3/ 12 V233 - 5002 - BA
Cablage / Cabling / Verkabelung / Bekabeling / Cableado
VENTOUSE / MAGNETIC LOCK
GACHE / ELECTRIC LOCK
Ø 8/10
2m min 100m max

4/ 12 V233 - 5002 - BA
Carte Relais 12-0110 / Relay card cabling / Verkabelung der Relaiskarten /
Bekabeling van de relaiskaarten / Cableado de la tarjeta de relé

5/ 12 V233 - 5002 - BA
Gérer les alertes / Manage alerts / Alarm-Meldungen verwalten /
Beheer meldingen / Administrar las alertas

6/ 12 V233 - 5002 - BA
La centrale / Centrale Unit / Zentrale / Centrale / Central
VIGIK
S1
ON
Actif
OFF
Désactivé
NON UTILISE
S2
NON UTILISE
S3
TEMPORISATION
DE PORTE
S4
S5
ON
ON
05 sec
ON
OFF
10 sec
OFF
ON
20 sec
TYPE DE BP
S6
ON
NO
Normalement ouvert
OFF
NF
Normalement Fermé
CONFIGURATION
PAR LA PLATINE
S4
S5
S6
OFF
OFF
OFF
Le basculement de ces 3 switchs sur OFF permet la
configuration de la temporisation ainsi que le type de BP
via la platine ou le terminal de programmation.
La centrale 03-0102 est conforme au label VIGIK® (marque déposée de La Poste).
Les services VIGIK® sont gérés à l’aide du Terminal de programmation (12-0111). Reportez-vous à sa
documentation pour gérer les services VIGIK®.
ATTENTION : Afin que la centrale soit installée conformément au standard VIGIK®, la distance entre la tête de
lecture et la centrale doit être d’au moins 2 mètres.
Disabled
S1
ON
disabled
OFF
disabled
NOT USED
S2
NOT USED
S3
TIME DELAY
S4
S5
ON
ON
05 sec
ON
OFF
10 sec
OFF
ON
20
sec
PB TYPE
S6
ON
NO
“Normally Open”
OFF
NC
“Normally Closed”
MODE
CONFIGURATION
PANEL / HTTP
S4
S5
S6
OFF
OFF
OFF
Setting these 3 switches to OFF enables the time delay
to be set, along with the PB type, via the panel or
programming terminal.
CR2032 3V
RESET MEMORY
LEDS L1 - L5
SWITCHES
S1 - S6
BACK UP

7/ 12 V233 - 5002 - BA
Untauglich
S1
ON
untauglich
OFF
untauglich
NICHT VERWENDET
S2
NICHT VERWENDET
S3
VERZÖGERUNG
S4
S5
ON
ON
05 sek
ON
OFF
10 sek
OFF
ON
20 sek
DK-TYP
S6
ON
"Normal geöffnet"
OFF
"Normal
geschlossen"
MODUS
KONFIGURATION
PLATINE / HTTP
S4
S5
S6
OFF
OFF
OFF
Die Zeitverzögerung wird durch Umlegen der 3
Switchs auf OFF und der DK-Typ über die Platine
oder die Programmier-Zentrale konfiguriert.
Invalide
S1
ON
invalide
OFF
invalide
NIET GEBRUIKT
S2
NIET GEBRUIKT
S3
UITSTEL
S4
S5
ON
ON
05 sec
ON
OFF
10 sec
OFF
ON
20 sek
TYPE DK
S6
ON
“Normaal geopend”
OFF
“Normaal
gesloten”
CONFIGURATIE
MODUS
PANEEL / HTTP
S4
S5
S6
OFF
OFF
OFF
De overschakeling van deze drie schakelaars op
OFF biedt de mogelijkheid de uitsteltijd en het
type DK in te stellen op het paneel of de
programmeerterminal.
Discapacitado
S1
ON
discapacitado
OFF
discapacitado
NO SE UTILIZA
S2
NO SE UTILIZA
S3
TEMPORIZACIÓN
S4
S5
ON
ON
05 segundos
ON
OFF
10 segundos
OFF
ON
20
segundos
ek
TIPO DE PULSADOR
S6
ON
Normalmente
Abierto
OFF
Normalmente
Cerrado
MODO
CONFIGURACIÓN
INTERFONO/ HTTP
S4
S5
S6
OFF
OFF
OFF
La colocación de estos 3 interruptores en OFF
permite la configuración de la temporización, así
como el tipo de pulsador a través del interfono o
el terminal de programación.

8/ 12 V233 - 5002 - BA
Configurer la centrale par l’interphone / Configuration on the panel / Konfiguration an
der Klingelplatte / Configuratie op het paneel /Configuración en el interfono
1
Réglage de l’horloge
Réglez l’heure avec le clavier
Choisir la période été ou hiver avec
2
Paramètres porte
Réglez la tempo de porte avec le
clavier
Choisir le type NO ou NF avec
3
Régler le volume
sonore
Réglez le niveau entre 1 et 4 avec le
clavier
Un extrait sonore vous permet de
vérifier votre choix.
4
Demande de mise à
jour
L’installation doit être terminée et
déclarée dans www.intratone.info
Le module de communication doit
être connecté.
5
Vérification de
l’installation
Saisir votre N° de téléphone pour
vous appeler depuis l’interphone.
La communication établie, testez
l’ouverture porte avec la touche * de
votre téléphone.
Le module de communication doit
être connecté sur du réseau 3G
minimum pour les appels vidéo vers
l’application.
1
Clock setting
Set the time and date using the
keypad on the panel
Set the day and summer/winter mode
using the arrow
2
Door settings
The opening time is configured
using the keypad on the panel.
The pushbutton type is configured using
the arrow
3
Panel volume setting
Set the volume level (a number
from 1 to 4) using the keypad
on the panel
A sample tone will be generated to help
you choose the setting
4
Internet update
request
the central unit needs to be
registered and it must require
an update from the website.
the central unit needs to be connected on
the GSM/3G network
5
Installation checking
Enter your telephone number
to check that calls can be made
from the panel, then press .
Press to start the process.
The * key will open the panel
door by default.
The communication module must be
connected to the minimum 3G network
for video calls to the application.
Push 10 seconds
Enter serial number ( 7XXXXXX3 of the central unit)
Exit
Next
OK

9/ 12 V233 - 5002 - BA
1
Einstellung der
Zeituhr
Die Konfiguration von Uhrzeit und
Datum erfolgen über die Tastatur der
Platine.
Die Konfiguration des Wochentags
und Sommer/Winter erfolgt anhand
der Pfeiltaste .
2
Einstellung der
Türparameter
Die Konfiguration der Zeit für das
Öffnen erfolgt über die Tastatur der
Platine.
Die Konfiguration des Druckknopftyps
erfolgt anhand der Pfeiltaste .
3
Einstellung der
Lautstärke der
Platine
Den Lautstärkepegel von 1 bis 4 mit
der Tastatur der Platine eingeben
der zu vernehmende Ton entspricht
der jeweils gewählten Lautstärke
4
Internet Update-
Anforderung
Anhand dieses Menüs kann direkt von der Zentrale aus ein Update
angefordert werden. Dazu muss die Zentrale natürlich an ein GSM/3-Netz
angeschlossen, angemeldet und für Internet-Updates ausgelegt sein.
5
Überprüfung der
Installierung
Geben Sie Ihre Telefonnummer ein,
um den Anruf von einer Platine zu
prüfen, und drücken Sie dann auf .
Drücken Sie auf um den Vorgang zu
starten. Die Taste * öffnet
standardmäßig die Tür der Platine.
Das Kommunikationsmodul muss für
Videoanrufe an die Anwendung mit
dem 3G-Netzwerk verbunden sein.
1
Instelling van de
tijd
Het uur en de datum kunnen met het
klavier op het paneel worden
ingesteld
De dag en het regime (zomer/winter)
worden ingesteld met de pijltoets .
2
Instelling van de
deurparameters
De openingstijd wordt geconfigureerd
met het klavier op het paneel.
Het type drukknop wordt
geconfigureerd met de pijltoets .
3
Volumeregeling
van het paneel
Regel het volumeniveau (van 1 tot 4)
bij via het klavier op het paneel
u kunt een geluidsignaal beluisteren
om deze regeling beter te beoordelen
4
Internet update
aanvraag
De centrale moet uiteraard verbonden zijn met het GSM/3G-netwerk, ze moet
geregistreerd zijn en ze moet via updates op de website worden bijgewerkt.
5
Controle van de
installatie
Voer uw telefoonnummer in om de
oproep vanaf een paneel te testen en
druk daarna op . Druk op om de
procedure te starten. De toets * opent
standaard de deur van het paneel.
De communicatiemodule moet
worden verbonden met het minimale
3G-netwerk voor videogesprekken
met de toepassing.
1
Ajuste del reloj
La hora y la fecha se configuran con el
teclado del interfono.
El día de la semana y el horario
(verano/invierno) se configuran con la
ayuda de la flecha .
2
Configuración de
los parámetros
de la puerta
El tiempo de apertura se configura con
el teclado del interfono.
El tipo de pulsador se configura con la
ayuda de la flecha .
3
Ajuste del
volumen del
interfono
Introduzca el volumen (de 1 a 4) con el
teclado del interfono para ajustarlo
una muestra sonora le permite juzgar
mejor el ajuste
4
Solicitud de
actualización en
internet
Por supuesto, la central debe estar conectada a la red GSM/3G, estar
registrada y necesitar una actualización en el sitio internet.
5
Comprobación
de la instalación
Introduzca su número de teléfono
para probar la llamada desde un
interfono y a continuación pulse . La
tecla * abre por defecto la puerta del
interfono
El módulo de comunicación debe
estar conectado a la red 3G mínima
para llamadas de video a la
aplicación.

10 / 12 V233 - 5002 - BA
Fin d’installation / Post-Fitting checks / Überprüfung nach erfolgter Installierung /
Controle na de installatie / Comprobación posterior a la instalación
Clignotement / Blink /
blinken / knipperen
/parpadear
LED L1
LED L2
LED L3
LED L4
LED L5
Lent
Slow
Langsam
Langzaam
Lento
Led éteinte
Led Off
Led aus
Led uitgeschakeld
Led apagado
Sortie d’usine
Factory output
Werkseinstellungen
Fabrieksinstellingen
configuración de fábrica
Rapide
Fast
Schnell
Snel
Rapido
Problème de sauvegarde
Back up problem
Speicherproblem
Back-up probleem
Problema al guardar
Afin de vérifier le bon fonctionnement de votre porte, faites un pont entre la borne BP et la Masse (avec le BP
configuré en NO) et vérifiez que le relais ouvre bien la porte.
Avant la 1ère mise à jour, la centrale ouvre à tous les badges Intratone ; vous pouvez donc tester l’ouverture de la
porte avec un badge non programmé.
In order to check that your door is operating correctly, bridge the PB and Earth terminals (with the PB set to NO) and
check that the relay opens the door correctly.
Before its 1st update, the central unit will open for all Intratone fobs. You can therefore check that the door will open
using an unprogrammed fob.
Um den einwandfreien Betrieb Ihrer Tür zu prüfen, stellen Sie eine Brückenschaltung zwischen der DK-Klemme und
der Erdung her (DK auf NO konfiguriert) und prüfen Sie, dass das Relais die Tür öffnet.
Vor dem ersten Update öffnen alle Intratone-Badges die Tür; daher können Sie das Öffnen der Tür mit einem nicht
programmierten Badge überprüfen.
Om de correcte werking van uw deur te controleren, maakt u een brug tussen de DK terminal en de aarding (met de
DK geconfigureerd als NO) en controleert u of het relais de deur correct opent.
Voor de 1ste update opent de centrale voor alle Intratone-badges; u kunt de opening van de deur dus testen met een
niet-geprogrammeerde badge.
Para comprobar el buen funcionamiento de su puerta, realice un puente entre el borne del pulsador y la masa (con
el pulsador configurado en NA) y compruebe que el relé abra bien la puerta.
Antes de la 1ªactualización, la central abre con todas las tarjetas de identificación de Intratone; entonces podrá
probar la apertura de la puerta con una llave de proximidad no programada.

11 / 12 V233 - 5002 - BA

12 / 12 V233 - 5002 - BA
Warranty operating guarantees:
The DOOR CONTROLLER FOR 1 DOOR is guaranteed within a temperature range of -10°C and +45°C and at a relative humidity level
not exceeding 70%.
It must be installed according to the Top/Bottom directions given in these instructions and on the controller.
End-of-life recycling of the product:
The DOOR CONTROLLER FOR 1 DOOR and its accessories must not be discarded with unsorted municipal waste, but must be
disposed of via the WEEE (Waste Electrical and Electronic Equipment) collection and recycling system.
Simplified declaration of conformity
The undersigned, COGELEC, declares that access control type radio equipment for collective housing is in compliance with Directive
2014/53 / EU (RED).The full text of the EU declaration of conformity is available at the following internet
address:www.intratone.fr/documentation
Garanties de fonctionnement:
La centrale 1 porte est garanti dans une plage de température comprise entre -10°C et +45°C et pour une humidité relative
maximum de 70%.
Doit être posé selon le sens Haut / Bas préconisé sur la centrale 1 porte.
Recyclage du produit en fin de vie:
La centrale 1 porte et ses accessoires ne doivent pas être mis au rebut avec les déchets municipaux non triés, mais doivent suivre la
filière de collecte et de recyclage des produits DEEE (Déchets d'Equipements Electriques et Electroniques).
Déclaration de conformité simplifiée
Le soussigné, COGELEC, déclare que l'équipement radioélectrique du type contrôle d'accès pour l'habitat collectif est conforme à la
directive 2014/53/UE (RED).Le texte complet de la déclaration UE de conformité est disponible à l'adresse internet suivante :
www.intratone.fr/documentation
Funktionsgarantien:
Der Betrieb des HAUSSMANN CODESCHLOSS ist für eine Temperaturspanne zwischen -10 °C und +45°C und für eine relative
Luftfeuchtigkeit von 70 % gewährleistet.
Muss wie auf dem Modul angegeben in der Richtung Oben/Unten eingebaut codeschloss.
Entsorgung des ausgedienten Geräts:
Das HAUSSMANN CODESCHLOSS und sein Zubehör dürfen nicht mit unsortiertem Hausmüll entsorgt werden, sondern müssen an
Sammel- und Recycelstellen für Elektro- und Elektronikgeräte-Abfall abgegeben werden.
Vereinfachte Konformitätserklärung
Der Unterzeichnete, COGELEC, erklärt, dass funkgesteuerte Zugangskontrollgeräte für den kollektiven Wohnungsbau der Richtlinie
2014/53 / EU (RED) entsprechen. Der vollständige Text der EU-Konformitätserklärung ist unter folgender Internetadresse verfügbar:
www.intratone.fr/documentation
Werkingsgarantie:
Het KODET TASTATUR HAUSSMANN werkt bij temperaturen tussen -10 °C et +45 °C en bij een relatieve vochtigheid van ten hoogste
70%. Moet gemonteerd worden met de juiste zijden naar boven en onder, zoals aangegeven op het tastatur.
Recycling aan het einde van de levensduur:
Het KODET TASTATUR HAUSSMANN en zijn toebehoren mogen niet als restafval worden afgevoerd, maar moeten ingeleverd worden
bij inzamelpunten voor elektrische of elektronische apparatuur.
Vereenvoudigde verklaring van overeenstemming
Ondergetekende, COGELEC, verklaart dat radioapparatuur voor toegangscontrole voor collectieve huisvesting voldoet aan Richtlijn
2014/53 / EU (RED). De volledige tekst van de EU-conformiteitsverklaring is beschikbaar op het volgende internetadres:
www.intratone.fr/documentation
Garantías de funcionamiento:
El TECLADO NUMÉRICO HAUSSMANN está garantizado en una franja de temperatura entre los -10 °C y los +45 °C y con una
humedad relativa máxima del 70 %. Debe colocarse con el sentido Arriba / Abajo que se indica en el teclado.
Reciclaje del producto una vez concluida su vida útil:
No deseche el TECLADO NUMÉRICO HAUSSMANN, ni los accesorios que incluye, junto con los residuos municipales
orgánicos. Debe seguir el procedimiento de recogida y reciclaje dispuesto para los productos RAEE (Residuos de
dispositivos Eléctricos y Electrónicos).
Declaración simplificada de conformidad
El abajo firmante, COGELEC, declara que los equipos de radio de control de acceso para viviendas colectivas cumplen con la
Directiva 2014/53 / UE (RED). El texto completo de la declaración de conformidad de la UE está disponible en siguiente dirección de
internet: www.intratone.fr/documentation
Table of contents
Other Intratone Control Unit manuals
Popular Control Unit manuals by other brands

Texas Instruments
Texas Instruments PGA2505EVMV2 user guide

Lenz
Lenz Digital plus POWER-1 Information

SMC Networks
SMC Networks VM1000 Series instruction manual

Metal Work
Metal Work EB 80 Assembly instructions

CYBELEC
CYBELEC ModEva Pac user manual

Allen-Bradley
Allen-Bradley Kinetix 5700 installation instructions