Inverto IDL 7000m TCX User manual

Cover7000mTCX.fh10 11/7/07 18:19 Page 1
Composite
C M Y CM MY CY CMY K
IDL 7000m TCX
V110707
IDL 7000m TCX
Digital Video Recorder
FTA Communication Technologies S.a.r.l
11, rue Pierre Werner, L-6832 Betzdorf, Luxembourg
digital-labs
Sv
Fi
En

1
En•
IDL7000M TCX User Manual
Language
English
Suomi
Swedesh
Page
2
44
84

2
Safety Precautions
WEEE Consumer Notice
USB Connectivity Notice
Important information
1. Quick installation guide
1.1.Connections
1.2.Connectiontomainpowersupply
1.3.Switchingonyourreceiver
1.4.Startingtheunitforthersttime
2. Basic Operation
3. Control elements and connections
3.1.Frontpanel
3.2.RearPanel
3.3.RemoteControl
4. Graphical User Interface
4.1.Settings
4.2.Mediamanager
4.3.Programmeguide(EPG)
4.4.PersonalPlanner
4.5.Parentallock
4.6.Sleeptimer
4.7.Conditionalaccesssystem
4.8.Messages
5. Videotext/Teletext
6. Alternate Audio Channels and Subtitles
7. PiP – Picture in Picture
8. Standby mode
9. USB
9.2.ConnectingandexternalUSB2.0device
9.3.USBB(Device)
9.4.CopyinglesfromtheIDL7000toaUSBdevice
9.5.CopyinglesfromaUSBdevicetotheIDL7000
10. Specications
Troubleshooting
IDL7000M TCX User Manual
Table of Contents
3
3
4
4
5
5
7
7
7
9
10
10
10
11
12
12
21
26
28
30
31
32
32
33
33
34
34
35
35
35
36
38
40
42

3
En•
CAUTION:TOREDUCETHERISKOFELECTRICSHOCK,DONOTREMOVECOVER(ORBACK).NOUSER
SERVICEABLEPARTSINSIDE.REFERSERVICINGTOQUALIFIEDSERVICEPERSONNEL.
Warning
Toreducetheriskofreorelectricshock,donotexposethisapparatustorainormoisture.•
Toavoidexplosiondanger,donotdisposeofbatteriesinanopenre.•
Safety precautions
Thisdigitalvideoreceiverhasbeenmanufacturedinaccordancewithinternationalsafetystandards.Foryourownsafety,youshould
readthenotesonsafetyprecautionscarefully,andtakenoteofthem,beforeoperatingyournewreceiver.Foryourownsafety,
pleasebesuretofollowthesesafetyprecautions.
Thisproductisforindooruseinmoderateclimatesonly.•
Thisproductcontainsnouserserviceableparts.Theunitshouldonlybeopenedorrepairedbyqualiedservicepersonnel.•
ThesuppliedACpowercablemustbeusedtopowerthisproduct.Ifthepowercordbecomesdamaged,itmustbereplaced.•
Alwaysrefertoqualiedpersonnel.
Checktomakesureoperatingvoltageoftheproductisidenticalwithyourlocalpowersupply,priortoconnectingittothepower•
socket.
Topreventreorshockhazard,donotplacetheproductnearobjectslledwithliquids,orneardrippingorsplashingliquids.•
InstalltheproductsotheACpowercablecanbeunpluggedfrompowersocketimmediately,intheeventofaproblem.•
Theunitshouldnotbeplacednearsourcesofopename.Noopenamesources,suchascandles,shouldbeplacedonthe•
unit.
Should any solid object or liquid fall into the cabinet, unplug the product and have it checked by qualied personnel before•
operatingitanyfurther.
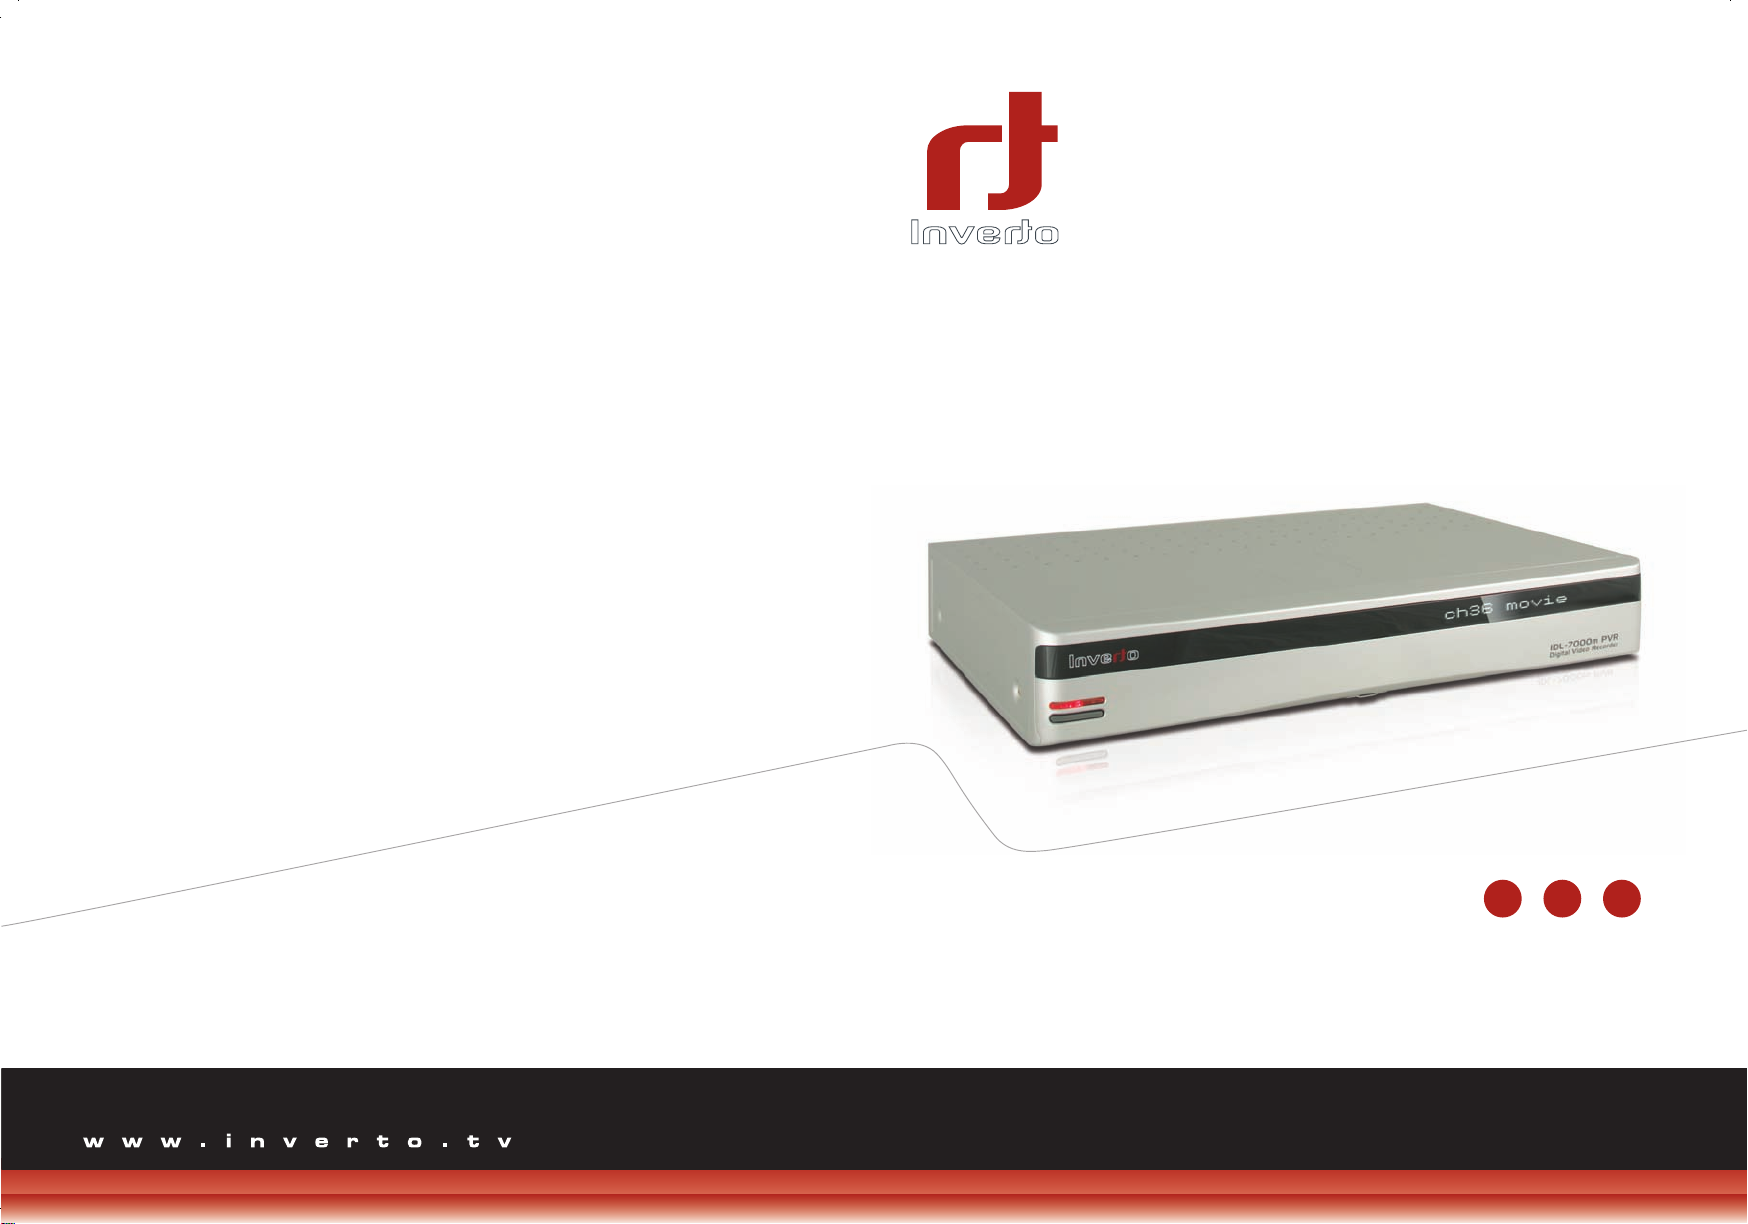
Propergrounding:Forprotectionfromlightningandstaticdischarge,theLNBandtheantennaconnectedtothisreceivermust•
beconnectedtoearthground.Thepropergroundingcanbeachievedbyconnectiontotheearthgroundsystemofyourhouse/
building,orbyaqualiedinstaller.
Donotexposetheproducttohightemperatures,suchasplacingitontopofotherproductthatproduceheatorinplacesexposed•
todirectsunlight.
Donotplacetheproductinalocationsubjecttoextremechangesintemperature.Thetemperaturegradientshouldbelessthan•
10degreesC/hour.
Placetheproductinalocationwithadequateventilationtopreventthebuild-upofheatinsidetheproduct.Theminimumventilation•
spacearoundtheunitshouldbe5cm.Theventilationshouldnotbeimpededbycoveringtheventilationopeningswithitems,such
asnewspapers,tablecloth,curtains,etc.
Power Sources
TheproductisnotdisconnectedfromtheACpowersource(mains)aslongasitisconnectedtothepoweroutletorwallsocket,•
eveniftheproductisturnedoff.
Iftheproductwillnotbeusedforalongperiodoftime,disconnectitfromtheACpoweroutletorwallsocket.•
CE MARK FOR EUROPEAN HARMONISED STANDARDS
TheCEmarkwhichisattachedtotheseproductsmeansitconformstoEMCDirective(89/336/EEC)andLowVoltage
Directive(73/23/EEC).
WEEE Consumer Notice:
TheFTACommunicationTechnologiesS.a.r.l.productyouhavepurchasedissubjecttoDirective2002/96/ECofthe
EuropeanParliamentandtheCounciloftheEuropeanUniononwasteelectricalandelectronicequipment(WEEE)
and,injurisdictionsadoptingthatDirective,ismarkedasbeingputonthemarketafterAugust13,2005,andshould
notbedisposedofasunsortedmunicipalwaste.PleaseutilizeyourlocalWEEEcollectionfacilitiesinthedisposition
ofthisproductandotherwiseobserveallapplicablerequirements.Forfurtherinformationonhowtoproperlydispose
ofyourproductandforinformationspecictoyourcountry,pleasecontactyourvendororvisitthe"Support"sectionof
ourwebsite:www.ftacom.com
Warning! Important Safety Instructions

4
USB Connectivity Notice:
Notice-IDL7000UniversalSerialBus(USB)Connectivity
USBsupportoftheIDL7000isdesignedtoallowfordatasharingbetweenmassstoragedevicesandyournewlypurchasedDigital
VideoRecorder.USBconnectivityinthisproductenablessharingofimages(JPEG)andaudioles(MP3)usingaUSBMassStorage
Device.Additionally,extractsoftransportstreamvideo(.TS)canbetransferredtoaportableMassStorageDevicelikeaUSBstick.
TheIDL7000iscompatiblewithMassStorageDevicesviaUSB.ItwillrecognizeallUSB1.1and2.0peripheralsthatsupportMass
StorageDevicemodeandareformattedasFATorFAT32lesystem.Somedevices,suchasDigitalCameras,CamcordersandMP3
playersmayuseproprietaryprotocolsorprotocolsthatarenotcompatiblewithMassStorageDevicesoftheUSBstandard.Sharing
ofdatawithsuchdevicesisnotsupported.USBconnectivityoftheIDL7000onlysupportsletransferuptoasinglele-sizeof4GB
(Fat32).Otherformatsarecurrentlynotsupported.Softwareupdateswithnewandenhancedfeaturesareregularlyprovidedby
satelliteonASTRA19.2ºandonwebsitebelow.
Please,notethatUSBconsistsofamultitudeofsub-protocols,formoreinformationonyourdesiredapplication,pleaseconsult:
www.ftacom.com/USB
Important Information
Shouldyouexperienceaproblemwiththisunit,pleaserefertothetroubleshootingsectionofthisusermanual.•
Pleaseretaintheoriginalpackaging,shoulditbenecessaryatsomestagetoreturntheunit.•
DisposalofOldElectricalandElectronicEquipment(ApplicableintheEuropeanUnionandotherEuropeancountrieswithseparate
collectionsystems)
Thissymbolontheproductoronitspackagingindicatesthatthisproductshallnotbetreatedashouseholdwaste.Insteaditshall
behandedovertotheapplicablecollectionpointfortherecyclingofelectricalandelectronicequipment.Byensuringthisproduct
isdisposedofcorrectly,youwillhelppreventpotentialnegativeconsequencesfortheenvironmentandhumanhealth,whichcould
otherwisebecausedbyinappropriatewastehandlingofthisproduct.Therecyclingofmaterialswillhelptoconservenatural
resources.Formoredetailedinformationaboutrecyclingofthisproduct,pleasecontactyourlocalCivicOfce,yourhousehold
wastedisposalservice,ortheshopwhereyoupurchasedtheproduct.
Copyrights
Televisionprogrammes,moviesvideotapes,discs,andothermaterialsmaybecopyrighted.Unauthorizedrecordingofcopyrighted
materialmaybeagainstthecopyrightlawsinyourregion.Also,useofthisproductwithcabletelevisiontransmissionsmayrequire
authorizationfromthecabletelevisionoperatorortransmitter/owner.
CAUTION: PREVENTION OF SCREEN BURN-IN
Continuousdisplayofstillimagesandgraphics,suchason-screendisplays,stockmarkettickers,pausedrecordings,andotherxed
(non-moving)patternscancausepermanentdamagetothetelevision.Plasmascreendisplays,projectiontelevisions,andCRT
televisionsareespeciallysusceptibletothis.
About this manual
Inthismanual,theinternalharddiskdriveisreferredtoasthe“HDD,”unlessspeciedotherwise.•
Instructionsinthismanualdescribetheoperationusingthecontrolsontheremote.Youcanalsousethecorrespondingcontrols•
onthefrontpanelwiththesamemarkings.
Theon-screendisplayillustrationsusedinthismanualmaynotmatchthegraphicsdisplayedonyourtelevisionexactly.•
Allrecordingtimesreferredtointhismanualareapproximationsanddependonthecontentoftherecording.Allclaimstostorage•
capacityassumeamixofprogrammingisrecordedtypes,isrecorded,suchastelevisionsandradiochannels.

5
En•
Thisshortinstructionexplainsthemostimportantfunctionstoensurethatyoucandirectlywatchtelevisionandmakerecordingswith
yournewdigitalreceiver.Pleasenote,additionaladjustmentsmayberequired.
Pleasereadthegeneralsafetyinstructionscarefully.
1.1. Connections
Note:
Donotconnectthedigitalreceivertothemainpoweryet.
1.1.1.Connection to the terrestrial
antenna
The terrestrial antenna is connected directly to a digital
receiver on the “ANT in” connector of the Tuner 1, by
means of a coaxial cable. Use two loop-through cables
(suppliedwithunit)tomakealoopthroughbetweenTuner1
andTuner2withtherstcableandbetweenTuner2andthe
RFModulatorwiththesecondcable(seepicture4)
1.1.2. Connection to the TV set
TheDigitalreceiverandTVsetareusuallyconnectedbymeansofaSCARTcable(suppliedwithunit).Simplyconnectthetwoendsof
thecablewiththemainSCARTsocketontheTVsetandwiththeTVSCARTsocketonthereceiver,respectively.TheSCARTconnection
ensuresthataudioandvideosignalsaretransmittedtotheTVsetinoptimumquality.Inaddition,useanRFantenna(coaxial)cableto
connectthe“RFOUT“onthemodulatorwiththeantennainputsocketoftheTVset.Inthisway,theterrestrialantennaconnectionislooped
throughthereceivertothe
TV set (see picture 5). If
theTVsetisnotequipped
withaSCARTsocket,itis
enoughto connectan RF
antenna(coaxial)cableas
described. The digital TV
programmecurrentlybeing
receivedisconvertedinthe
receivertoaUHFchannel
(channel selectable via
theinstallationmenu),and
istransmittedtotheTVset
viatheRFantennacable.
IncasethatyourTVsetisequippedonlywithaS-VIDEOinputsocket,youcanusetheS-Videooutputonthedigitalreceiverand
connectyourTV setviacable to
provide optimum quality of the
videosignal.Toprovideanaudio
signaltotheTVsetitisnecessary
to connect the Audio L/R output
onthe digital receiverwithaudio
inputonyourTVset.Inaddition,
useanRFantenna(coaxial)cable
to connect the “RF OUT“ on the
modulatorwiththeantennainput
socketoftheTVset.Inthisway,
theterrestrialantennaconnection
islooped through the receiverto
theTVset(seepicture6).
1. Quick installation guide
Picture4
Picture5
Picture6

6
In case your TV set is equipped only
withaCVBSinputsocket,youcanuse
theCVBSoutputonthedigitalreceiver
and connect your TV set via cable to
provide optimum quality of the video
signal.ToprovideaudiosignaltotheTV
setitisnecessarytoconnecttheAudio
L/Routputonthedigitalreceiverwiththe
audioinput on yourTV set.Inaddition,
use an RF antenna (coaxial) cable to
connectthe“RFOUT“onthemodulator
withtheantennainputsocketoftheTV
set.Inthisway,theterrestrialantenna
connectionisloopedthroughthereceiver
totheTVset(seepicture7).
1.1.3. Connection to a DVD or
video recorder
Just as the TV set, the DVD or video recorder is
connected to the receiver via a SCART connection.
Use the VCR SCART socket for this purpose (see
picture8).
If you also have a video recorder connected to the
terrestrial antenna cable, this terrestrial antenna
connection should run rst from the receiver to the
video recorder and only from there to the TV set.
Asinacasetheaudioandvideosignalshavetobe
modulatedforhigh-frequencytransmissiononaUHF
channel,signalqualityisnotasgoodcomparedtoa
connectionwithaSCARTcable.
1.1.4. Connection to a Hi-Fi system
The audio quality of digital TV and radio programmes
canbeenjoyedevenmorewhenreproducedthrougha
Hi-Fisystem.Todothis,useaRCAcinchstereocable
toconnectthesocketsmarkedAudioL/Ronthereceiver
tooneoftheinputsofyourHi-Fisystemmarkedeither
Line,Aux,SpareorExtra(seepicture9).
Picture7
Picture8
Picture9

7
En•
Ifyour Hi-Fisystem isequipped withadigital
audioinput,,youmayuseadigitalRCAcinch
cable to connect the electrical (Coax) digital
audiooutputofyourreceiver(socketDIGITAL
AUDIO COAX) to your Hi-Fi or Dolby Digital
system. The receiver is also equipped with
an optical digital output. If your Hi-Fi system
is equipped with an optical audio input, you
mayuseanopticalcabletoconnectyourHi-Fi
systemtoyourdigitalreceiver(seepicture10).
1.2. Connection to main power
supply
After all the connections are done you can
connectyourdigitalreceivertothemainpower.
Justbeforepluggingapowercableintothewall
connector put the power switch, on the rear
panel(17),inposition0.
1.3. Switching on your receiver
Switchthepowerswitch,(17)ontherearpanel,totheposition“I”.
Theterrestrialreceiverisnowswitchedonandstarting(themessage“Bootingup”isshownonthedisplay).Thiscantakearound20
seconds.Fromnowon,youcanswitchyourreceiveronortostandbyusingthe“Standby”keyontheremotecontroloronthefront
panelofthereceiver.
Note:
Behaviourofthereceiverafterswitchingonorpowerupdependsonthe“Power-upMode”settings(seechapter4.1.1.11PowerUp
Mode)
Note:
Inordertosetthecorrectvideooutputtypeofyourdigitalreceiverpress“Menu“+“Settings“+“Audio/VideoSettings“(seechapter
4.1.1.14Audio/Videosettings)
1.4. Starting the unit for the first time:
Whenyouinstallyourreceiverforthersttimeorwhenyoudoafactoryreset,youwillenterintherstinstallationmode.Theunit
willaskyoutogothroughthefollowingstepstosetuptheunitforproperoperation(torecordandwatchservices):
Step1: aftertherstpoweruporfactoryreset(inusermenu):
Thequickstartguidemenudisplayed:
Selectyourcountry:
press“select”,then“up/down”keysofyourremotecontroltoselectthe•
country,
thenpressagaintovalidateyourchoice•
Selectyourlanguage:•
press“select”,then“up/down”keysofyourremotecontroltoselectthe•
country,
thenpressagaintovalidateyourchoice•
OnceyourselectionsareOK,pressExitontheremotecontrol.
Picture10

8
Step2:
Anewmenuisdisplayed:UserPreferences–step2/3
Ingeneral,youdonotneedtomodifythesettingsinthisdisplay.
Ifyouwanttosetupspecicsettings,thenmodifythelinesaccordingto
yourpreferredsettings,usingtheremotecontrol.
OnceyourselectionsareOK,pressExitontheremotecontrol.
Step3:
TheAntennaSettingsmenuisdisplayed.
Ifyouhaveanactiveantenna,pleaseselectONwiththeremotecontrolin
theactiveantennaline.Thisoptionprovidespowerforactiveantennas,
suchasampliedantennas.
Pressexitwhennished.
Youhavenishedtheinitialconguration.Nowtheproductwillautomatically
startthechannelsearch.Thismaytakeseveralminutes.
WhentheChannelSearchiscomplete,thelistofchannelsfoundwillbe
displayed.
PressSaveandExit(greenbuttonontheremotecontrol).
CONGRATULATIONS:youhaveconguredyourproduct.Youmaystart
watchingandrecordingprograms.
Note:
Thebehaviourofthereceiverafterswitchingonorpowerupdependson
the“Power-upMode”settings(seethechapterPowerUpMode)
Note:
Inordertosetthecorrectvideooutputtypeofyourdigitalreceiverpress“Menu“+“Settings“+“Audio/VideoSettings“(seethe
chapterAudio/Videosettings)

9
En•
Changing the program on your receiver (Programme selection)
Youcanusethenumerickeys(20)onyourremotecontrol.•
Youcanusethedirectionalkeys(7)“Up”and“Down”onyourremotecontroloronthefrontpanelofthereceiver.•
YoucanusetheCh+andCh-keys(13)onyourremotecontrol•
Scrollthroughtheprogrammelistbypressingthe“TV”key(3),selectwiththenavigationkey“Up”or”Down”theprogrammelist,•
andconrmtheselectionwith“OK”key(6).
Changing volume level
UsetheVolume+/-keysontheremotecontrol.Optionally,youcanalsousethedirectionalkeys“Left”and“Right”onyourremote
controloronthefrontpanelofthereceiver,whilewatchingaTVprogramme.
Recording TV/Radio programmes:
From the Current Programme:
Torecordabroadcastprogramme,youcanpressthered“REC”(28).key.Fromthisinstant,theprogramisrecordingontothe
built-inharddisk.Youcanstoptherecordingswiththe“STOP”key(27).Amessageappearsiftherecordingends.Ifmorethanone
recordingisrunningyoucanstoponebyselectingitusingthe“Up”or“Down”keys(7)andpressing“OK“(6)toconrmit.Forthis
function,youcanusekeysonyourremotecontroloronthefrontpanelofthereceiver.
From the EPG:
Pressthe“GUIDE”key(19),theEPG(ElectronicProgramGuide)appears.Hereyoucanndalistoftheactualprogrammestobe
broadcast,ifthechannelinformationisavailable.TheavailabilityoftheEPGinformationalsodependsonhowfarintothefuturethe
broadcastersuppliesthedata.
Selectthedesiredprogrammewiththenavigationkeys“Right”,“Left”,“Up”and“Down”(7).Theselectedprogrammeishighlighted.
Bypressingthe“REC”key(28),youcanaddtheselectedprogrammeintoyourPersonalPlannerforfurtherprocessing,suchas
schedulinganautomaticrecording.
Time shift:
IfyouareinterruptedwhilewatchingaTVprogram,justpressthe“Pause/Play”key(26).Fromthismoment,yourprogrammewill
berecordedonthebuilt-inharddisk.Onthescreen,youwillseeafrozenpicture,liketheoneyouhavewhenyoupresspauseona
VCR,aswellasthetime-shiftcounter.Bypressingthe“Pause/Play”key(26)again,theprogrammewillstartagain,continuingfrom
whereyouhavestopped.
Note:
Duringrecordings,areddotwiththeprogrammenameisdisplayedontheupperpartoftheTVscreen.Themaximumnumberof
simultaneousrecordingsistwo,plusonetimeshift.Thisinformationcanberemovedfromthescreenbypressingthe“Blue”function
key(24).
Viewing recorded programmes
Pressthe“Library”key(5),alistoftherecordedprogrammesappears.Selectwiththedirectionalkeys“Up”and“Down”thedesired
programmeandpress“OK”(6)or“Pause/Play”key(26).Usethe“Exit”key(22)toexitthelibrary.
2. Basic Operation:

10
3.1. Front panel:
123456789101112131415
1. StandbyLEDindicator
2. Standbykey
3. OKkey
4. Navigation(direction)keys
5. Fastrewindkey
6. Stopkey
7. Fastforwardkey
8. Play/Pausekey
9. Recordkey
10. USB-Bconnector
11. USB-Aconnector
12. CommonInterface*-
13. Infraredsensor
14. CAInterface*
15. VFDDisplay(10digit,7x5segmentdisplay)
*optionalonlyforcertainreceivermodels
3.2. Rear Panel:
1234567891011121314151617
1. AntennainputofTuner1
2. LoopthroughoutputofTuner1
3. AntennainputofTuner2
4. LoopthroughoutputofTuner2
5. RFModulatoroutput
6. RFModulatorinput
7. RS-232DataInterface
8. Opticaldigitalaudiooutput
9. Electricaldigitalaudiooutput
10. Videooutput(CVBS,composite,FBAS)
11. Audiooutputs(L/R)
12. S-VideoOutput
13. TVScart–ForconnectiontotheTVset
14. VCRScart–ForconnectiontoaVCRorDVD-R
15. CoolingFan
16. Mainspowerconnection
17. Mainpowerswitch(On/Off)
3. Control elements and connections

11
En•
3.4. Remote Control
1. Standby:Switchingthereceiveronandstandby
2. Teletext:built-inteletextdecoder
3. TV/Radio:SwitchbetweenTVandRadiolists
4. Menu:Mainmenu
5. Library:Mediamanager
6. OK:Conrmingaselection
7. Navigation(direction)keys:Usedfornavigatingintheon-screendisplays(right,
left,up,down)
8. Redfunctionkey:Specialfunctioninon-screendisplays
9. Greenfunctionkey:Specialfunctioninon-screendisplays
10.Fast/SlowRewind(alsofunctionsasinstantreplay)
11. Fast/SlowForward
12.Volume:Whenwatchingachannel,adjustthevolume
13.CH+,CH-:Whenwatchingachannel,changechannels
14.PiP:Picture-in-Picturefunction
15.PiPToggle:Switchbetweenmainandsmallscreens
16.PiPposition:ChangingpositionofPiPonthescreen
17.Mute:Mutingtheaudio(on/off)
18.Fav:favouritelists
19.Guide:ElectronicProgrammeGuide(EPG)
20.Alphanumerickeys0-9
21.Information:Detailsabouttheactivechannel
22.Exit:Quickexitfromamenupage
23.History:Directjumpbacktolastprogrammeviewed
24.Bluefunctionkey:Specialfunctioninon-screendisplays
25.Yellowfunctionkey:Specialfunctioninon-screendisplays
26.Pause/Play
27.Stop
28.Record:Recordingfunctions
29.Audio-Subtitles:Selectingaudiochannels(language1,language2,etc.)or
activatesthesubtitles
30.Personalplanner:PersonalPlannerscreen
31.Sleeptimer:sleeptimerscreen
Batteries:
Batteriesarerequiredtooperatetheremotecontrol(suppliedwiththeunit).Toinsertthebatteries,openthebatterycompartment
coverontherearoftheremotecontrol.Insertthebatteries(AAAsize,2x1.5V),bymatchingthe(+)and(-)markingsonthe
batteriestothemarkingsinsidethebatterycompartment.Replacethecompartmentcover.
Note:
Spent batteries should not be discarded in your domestic refuse. In most countries, you are legally obliged to ensure spent•
batteriesareproperlyrecycled.Theycanbedisposedofeitherinspecialbinsprovidedinyourcommunity,ormaybereturnedto
anyretailerwhosellsbatteries.
Usethebatteriescorrectlytoavoidpossibleleakageandcorrosion.Donottouchtheliquidwithbarehands,shouldleakage•
occur.
Donotuseanewbatterywithanoldbattery,orbatteriesofdifferentmanufacturers.•
Donotattempttorechargethesuppliedbatteries•
Ifyoudonotintendtousetheremoteforanextendedperiodoftime,removethebatteries.•
Ifbatteryleakageoccurs,wipeoutanyliquidinsidethebatterycompartmentandinsertnewbatteries.•
Using the Remote Control
Forbestresults,pointtheremotecontroldirectlyatthereceiverwhilepressingkeys•
Donot place the receiverin a locationexposedto direct sunlightorbright uorescent lighting,asthis may interferewiththe•
receiverandcauseitnottorespondtotheremote.

12
MainMenu:
BesidestheprogrammethatisreceivedfromtheTVstation,yourdigital
receiverisabletodisplaydifferentinformationonyourTVscreenlike:
Volumebar,Menu,Pop-ups…Allthisthingsareusedasaninterface
betweenreceiverandtheuser.ThisinterfaceisknownasGUI(Graphical
UserInterface)orOSD(OnScreenDisplay).TheactualGUIdisplay
generatedbyyourreceivermaydifferslightlyfromthoseshownonthe
picture11,ascontinuousupdatesofthesoftwaremayaltertheappearance
oreventhestructureofthemenus.
NavigationwithintheGUIdisplayiseffectedbymeansofthefourdirectional
keysand“OK”key,whichisusedtoconrmaselection,aswellasinsome
casesbymeansofthecolouredfunctionkeys.
Toenterintomainmenu,press“Menu”key(4)onyourremotecontrol.Beinginamenuandpressing“Menu”key(4)youwill
completelyexitfromalltheopenmenupages.Using“Exit”key(22)youwillexitonlyfromthelastopenmenupage.
Youcanseethestructureofthemenupagesingure12.Thenumbersinthebracketsshownumbersofthechapterinthismanual.
Note:
1–ForunitswithoutConaxCA,thereisthe“CommonInterface”option.
2–OnlyforConaxCAversion.
4.1. Settings
Toaccess“Settings”press“Menu”(4)andthenselect“Settings.”Youmay
selectthetypeofsettingsusingthenavigationkeysorthecorresponding
numberkeys.Inthischapter,alloptionsofthesettingsmenuwillbe
described.
Note:
Intheoptionsyoucanalsousenavigation“Left”and“Right”keytochange
thesettings(notforallsettings).
4. Graphical User Interface
Picture11
Picture13

13
En•
4.1.1. User preferences
Thisiswhereyoucansetthebasicparametersofyourdigitalreceiver(see
picture14).
4.1.1.1. Menu Language
TheGUIdisplaymaybeshowninavarietyoflanguages.Press“OK”(6)
andusethedirectionalkeys“Up”and“Down”selectthedesiredlanguage,
andthenconrmbypressingthe“OK”key(6).
Note:
ThelanguageusedforinformationaboutprogrammesintheEPG(chapter
4)doesnotdependfromthisselection.
4.1.1.2. OSD Transparency
ThetransparencyofOSDcanalsobeadjusted,i.e.thedegreetowhichtheTVimageisvisiblethroughtheoverlayoftheon-screen
menu.Selectthisoptionpressing“OK”key(6)andusingthedirectionalkeys“Up”and“Down”selectthedegreeoftransparency,
from0%to60%,thenconrmbypressingthe“OK”key(6).
4.1.1.3. Pop-up Timeout
Whenswitchingbetweenprogrammes,forinstance,amessageisbrieydisplayedwithprogrammeinformation(Now/NextEPG).
Thedurationofthismessagebeingdisplayedcanbeset,from1to9seconds.Selectthisoptionbypressing“OK”(6)andusingthe
directionalkeys“Up”and“Down”toselectthetimeout,thenconrmbypressingthe“OK”key(6).
4.1.1.4. Soundtrack
Someprogrammesarebroadcastedindifferentlanguages.Youcanselectyourlanguagepreferencewiththedirectionalkeys
andconrmtheselectionbypressingthe“OK”key(6).Ifamulti-lingualprogrammeisbroadcast,thenyourselectedlanguageis
automaticallytakenintoconsideration.
4.1.1.5. Subtitles
Someprogrammesarebroadcastwithdifferentsubtitles.Youcanselectyoursubtitlepreferencewiththedirectionalkeysandconrm
theselectionbypressingthe“OK”key(6).Ifmulti-subtitleprogrammesarebroadcast,thenyourselectedlanguageisautomatically
takenintoconsideration.
4.1.1.6. History depth
Ifyouwanttoswitchbetweenthelast2,3or4selectedprogrammes,youcanusethe“History”key(23)onyourremotecontrol.With
thisoption,youcandenehistorydepthforthiskey.Selecthistorydepth1,2or3withthedirectionalkeysandconrmtheselection
bypressingthe“OK”key(6).
4.1.1.7. Quick Save List
Youcanusethisoptiontospecifyintowhichfavouritelistyourfavouriteswillbeautomaticallysaved.Youmayselectfromthelistof
existingfavouritelistsorchoose“SelectFAVfromlist”toallowyoutochoosethelocationlater,whileaddingfavourites.
4.1.1.8. OSD colour
YoucanchangethecolouroftheGUIwiththisoption.Selectthepreferredcoloursetwiththe“OK”keyordirectional“Left”and
“Right”keys.
4.1.1.9. Background EPG collection
Ifthisoptionisactivated,thereceiverwillusethefreetunertosearchinthebackgroundonallchannelsfornewEPGdata.Select
thisoptionwiththe“OK”key(6)or“Left”and“Right”directionalkeys.
Picture14

14
4.1.1.10. EPG font size
ThisoptionallowsyoutochangetosizeofthetextintheEPG,toallowyoutoseemoreorlessdataatonce.Selectthisoptionwith
the“OK”key(6)or“Left”and“Right”directionalkeys.
4.1.1.11. Power Up Mode
Thisoptionallowsyoutosettheunittoautomaticallychangetoaspecicmodeduringpower-up.Ifyouselect“Stand-bymode”,the
receiverwillgointostand-byimmediatelyafterpower-up.Ifyouselect“Lastmode”,thereceiverwillchangetothesamemodeitwas
in,priortoswitchingitoff.Selectthisoptionwiththe“OK”key(6)or“Left”and“Right”directionalkeys.
Note:
DigitalreceiverisabletoswitchonsomeoftheTVsetsthatusethe“SlowBlanking”signalonaSCARTconnector.If“LastMode”is
selected,thereceiverandTVwillpower-upagain,afterapowerfailure..
4.1.1.12. Auto Upgrades
Bychoosing“Notify”,youwillseea symbolintheupperpartoftheOSDwhenanewupdateisavailable.Selectthisoption
withthe“OK”key(6)or“Left”and“Right”directionalkeys.
4.1.1.13. Zapping Screen
Withthisoption,youcandeneifzappingwillbeonthemainscreenorin
PIP(PictureInPicture).ThisoptionisvalidonlyifPIPmodeisactivated.
Selectthisoptionwiththe“OK”key(6)or“Left”and“Right”directionalkeys.
4.1.2. Audio/Video Settings
Thisiswhereyoucansetthebasicaudioandvideoparametersofyour
digitalreceiverrelatedtoconnectionsonrearpanel(seepicture15).
4.1.2.1. TV SCART
UsethisoptiontospecifyvideooutputtypeontheTVSCARTconnector.
Selectthisoptionwiththe“OK”key(6)or“Left”and“Right”directionalkeys.
CVBS(composite)–SignalisavailableontheSCARTconnector(13)as
wellasonthe“Videooutput”connector(10).
S-Video–SignalisavailableontheSCARTconnector(13)aswellasonthe
“S-Video”connector(12).
RGB–SignalisavailableonlyontheSCARTconnector(13)
YUV–SignalisavailableonlyontheSCARTconnector(13)
4.1.2.2. VCR SCART
UsethisoptiontospecifythevideooutputtypeontheVCRSCARTconnector.YoumayselectCVBS(composite)orS-Videoforthe
VCRSCARTconnector(14).Selectthisoptionwiththe“OK”key(6)or“Left”and“Right”directionalkeys.
4.1.2.3. Aspect Ratio
UsethisoptiontospecifythescreenratiooftheconnectedTVset.Selectthisoptionwiththe“OK”key(6)or“Left”and“Right”
directionalkeys.
4:3–Selectthisoption,ifyouhaveastandardTVwithautomaticformatdetection
16:9–Selectthisoptionifyouhaveawide-screenTV
4:3Letterbox–Selectthisoptiontoconvertastandard4:3videoto16:9.Thisisnormallyusedtodisplayavideoinwide-screen
formatonastandardTVthatdoesnothaveautomaticformatdetection.
Picture15

15
En•
4.1.2.4. Digital Audio Out
Usethisoptiontospecifydesiredaudiotypeonthedigitalaudiooutput(SPDIF).Thisoptionisvalidfortheopticalandcoaxoutputs.
Selectthisoptionwiththe“OK”key(6)or“Left”and“Right”directionalkeys.
4.1.2.5. OSD over VCR SCART
UsethisoptiontospecifyifyouwanttohavetheOSDappearontheVCRSCARToutputs.Selectthisoptionwiththe“OK”key(6)
or“Left”and“Right”directionalkeys.
Note:
ThisoptionisavailableonlyifTVSCARTissettoRGB.
4.1.2.6. RF Modulator Audio
Youcanusethisoptiontosetthemodulatorsubcarrierfrequency,whenusingtheRFmodulatoroutput.Selectthisoptionwiththe
“OK”key(6)or“Left”and“Right”directionalkeys.
5.5MHz–PALsystem
6.0MHz–PALIsystem
6.5MHz–SECAMsystem
4.1.2.7. RF Modulator Channel
Usethisoptiontoselectmodulatoroutputchannel.Selectthisoptionwiththe“OK”key(6)or“Left”and“Right”directionalkeysor
selectthisoptionwiththeOKkeyandenterthechannelwanted.
4.1.2.8. Test Picture
Usethisoptiontoactivatethetestthepictureonmodulatoroutput.Select
thisoptionwiththe“OK”key(6)or“Left”and“Right”directionalkeys.
4.1.3. Hard disk Settings
Thisisaplacewhereyoucanformatorsetthebasicparametersofthe
built-inharddisk(seepicture16).
4.1.3.1. Format the hard disk
Warning:
Allstoreddata(recordedprogrammesinthelibrary)willbelostduring
formatting.
Ifyouhavetoformatthebuilt-inharddisk,youcandothisfromthismenu
bypressingthe“Red”functionkey(8).Ashortwarningmessagewillbedisplayed,waitingforconrmation.Incaseyoudonotwant
todoformatthediskpressthe“Red”functionkey(8)or“Exit”key(22).Incaseyoureallywanttoformatbuilt-inharddiskpress
“Green”functionkey(9).Afterthis,youwillbeaskedtoenterafourdigitpincode.Ifyouenteranincorrectpin,“Wrongpincode”
willbedisplayed.Pressthe“OK”key(6)or“Exit”key(22)toturnreturntothepreviousmenu.Oncethecorrectpincodeisentered,
formattingwillbeginimmediately.Youwillthensee“Pleasewait”untiltheformattingiscomplete.Theformattingtimewilldepend
ontheharddisksize.
4.1.3.2. Default Record Folder
Usethisoptiontoselectthelocationwhereallrecordingsshouldbesaved.Press“OK”key(6)andselectoneofthefolders.Hereit
isalsopossibletoopenanewfolderbypressingthe“Green”functionkey(9)“CreateFolder”.Withthenumerickeys2-9,enterthe
nameofthenewfolderandpress“OK”(6).Inthismenu,thelettersbehindthenumerickeysonyourremotecontrolareactivated.
Youmayenterthetextinthesamewayasusingatelephonekeypad.Usethe“Red”functionkey(8)toconrmtheselection.
Numerickey“0”isusedtoexitfromthefolder.
Picture16

16
4.1.3.3. Instant Replay Time
Byactivatingthisoption,thelivestreamwillbebufferedandyoucanuserewindtowatchasceneagain.Thisonlyworksforthe
channelyouarewatching,andforthechosentimeperiod(30,60or90seconds).Ifthisoptionisactivated,theusercanwatchthe
sceneagainbypressingthe“Instantreplay”key(10).Toexitfromtheinstantreplaypress“Exit”key(22)orwaituntiltheendofthe
record.
Tosetinstantreplaytimepress“OK”key(6)andselectoneoftheoptionswithnavigationkey“Up”and“Down”.Attheend,press
“OK”key(6)toconrmselection
Note:Thisoptioncanslowdownchannelswitchingtime.
4.1.3.4. Start Guard Time
Thisisatimeperiodthereceiverusestostartrecordingbeforeprogrammedtime,incaseaprogrammestartsearlierthanscheduled.
Youcanchoosebetween1,2,3,5,10,15,30and60minutes.Press“OK”key(6)andselectoneoftheoptionswithnavigationkey
“Up”and“Down”.Attheend,press“OK”key(6)toconrmselection.
4.1.3.5. End Guard Time
Thisisatimeperiodthereceiverusestocontinuerecordingaftertheprogrammedendtime,incaseaprogrammestartslaterthan
scheduled.Youcanchoosebetween1,2,3,5,10,15,30and60minutes.Press“OK”key(6)andselectoneoftheoptionswith
navigationkey“Up”and“Down”.Attheend,press“OK”key(6)toconrmselection.
4.1.3.6. Record Subtitle
Ifthisoptionisactivated,allavailablesubtitleswillberecorded.ThisappliesonlytoDVBsubtitles,notteletextsubtitles.Press“OK”
key(6)andselectoneoftheoptionswithnavigationkey“Up”and“Down”.Attheend,press“OK”key(6)toconrmselection.
Note:Ifthisoptionisenabled,therecordingisdoneinthetransportstreamformat
4.1.3.7. Record Audio tracks
Ifthisoptionisactivated,allavailableaudiotrackswillberecorded,includedAC3andforeignlanguages.Press“OK”key(6)and
selectoneoftheoptionswithnavigationkey“Up”and“Down”.Attheend,press“OK”key(6)toconrmselection.
4.1.4.Time / Date
Thisisaplacewhereyoucansetthetimeandthedateaswellassomebasicparametersrelatedtothetime(seepicture17).
4.1.4.1. Automatic Time Update
Ifthe“AutomaticTimeUpdate”issetto“On”,thereceiverwillreceivethe
timeanddateasbroadcasted.Press“OK”key(6)andselectoneofthe
optionswithnavigationkey“Up”and“Down”.Attheend,press“OK”key(6)
toconrmselection.
Note:Sometranspondersmaytransmitanincorrecttimestamp.
4.1.4.2. Date
Thisoptionisableonlyif“AutomaticTimeUpdate”issetto“Off”anditis
usedtosetcurrentdate.Afterpressing“OK”,usethedirectionalkeys“Left”
and“Right”toselecttheday,monthoryear.Tosetdesiredvalueusethe
directionalkeys“Up”and“Down”.Conrmyourentrieswiththe“OK”key(6).
4.1.4.3. Local Time
Thisoptionisableonlyif“AutomaticTimeUpdate”issetto“Off”anditis
usedtosetcurrentlocaltime.Afterpressing“OK”,usethedirectionalkeys“Left”and“Right”toselectthehours,minutesorseconds.
Tosetdesiredvalueusethedirectionalkeys“Up”and“Down”.Conrmyourentrieswiththe“OK”key(6).
4.1.4.4. Time Zone
TheDVBstandardbroadcasttimeanddateintheGMTtimezone.Inordertodisplaylocaltimecorrectly,itmaybenecessarytoset
atimezone,indicatingthedifferencebetweenlocaltimeandGMT(e.g.inGermanydaylightsavingstimeinsummeris+2h,winter
timeis+1h).Press“OK”key(6)andselectoneofthetimezoneswithnavigationkey“Up”and“Down”.Attheend,press“OK”key
(6)toconrmselection.
Picture17

17
En•
4.1.4.5. Daylight saving Time
Thisoptionshowsifitiswinterorsummertimecalculation.Duringthe
wintertimecalculationthisoptionhastobesetto“Off”andduringsummer
calculationthisoptionhastobesetto“On”.Tochancepress“OK”key(6)
andselectoneofthetimeoptionswithnavigationkey“Up”and“Down”.At
theend,press“OK”key(6)toconrmselection.
4.1.5. Antenna Settings
Thisisaplacewhereyoucansetatypeofantennaconnectedtoyour
digitalreceiver.Onthepicture18,youcanseetheantennasettingsmenu.
4.1.5.1. Active Antenna
Press“OK”key(6)andselectoneoftheoptionswiththenavigationkey
“Up”and“Down”.Ifanactiveantennaisconnectedtoyourdigitalreceiver,
select“Yes”otherwiseselect“No”.Attheend,pressthe“OK”key(6)to
conrmselection.
Ifactiveantennaison,thereceiverwillsupplytheactiveantennawith5
voltsDC.Thereceiverisequippedwithshortcircuitprotectionontheactive
antennaoutput.Incaseofashortcircuitwhileactiveantennaison,apop-
upmessage,withinformationaboutshortcircuit,willappear(seepicture
18a).Inthatcase,disconnectantennafromthetuneronarearpanelofthe
receiverandpress“OK”key(6).
Thenextstepistoresolvetheproblem.
4.1.6. Channel Search
Thisisaplacewhereyoucandoautoormanualtuning,autoandmanual
channelsearch(seepicture18).
4.1.6.1. Auto tune
In“Autotune”thereareonlytwooptionsfortheusertosetbeforestaring
autotuning(seepicture20):
1–Searchmode.Hereitisnecessarytoselectbetween“Addnewservices”
and“Replaceservices”.Ifyouselect“Addnewservices”,thereceiverwill,
aftersearchingforchannels,addonlynewTVandradioprogramsintothe
MainTVandmainRadiolists.Ifyouselect“Replaceservices”,thereceive
will,aftersearchingforchannels,completelyreplacetheMainTVandMain
Radiolists.Inthiscase,thepreviouschannellistswillbedeleted.Press
the“OK”key(6)andselectoneofthetuningoptionswiththenavigationkey
“Up”and“Down”.Attheend,pressthe“OK”key(6)toconrmselection.
2–Tuner.Here,theusercanselectonwhichtunerthechannelsearchwill
bedone.Ifonlyoneantennawiththeloopthroughisconnected,theuser
canselecteitherTuner1orTuner2.Ifthedigitalreceiverisconnectedto
twodifferentantennas,theusercanusetheoptionTuner1&2tobeableto
scanservicesonbothantennas.Pressthe“OK”key(6)andselectoneof
thetunerswiththenavigationkey“Up”and“Down”.Attheend,pressthe
“OK”key(6)toconrmselection.
Picture20
Picture18
Picture18a
Picture19
Picture20

18
4.1.6.2. Finding and storing the channels
Pressthe“Red”functionkey(8),tostartautomatictuning(channelsearch).
Theprogressbarwillshowtheprogressofthescanning.The“Found
channels”screenwillshowalistofthechannelsfound,withthenumberand
typeofthechannel(TVorRadio).Youmaypressthe“Exit”key(22),during
thescanningprocesstostopandusethechannelsthathavealreadybeen
found.
Afterthechannelsearchisnished,orstoppedbytheuser,thesearch
resultswillbedisplayed.Hereusercanseehowmany“Freetoair”and
“Encrypted”,TVandRadioprogrammeshavebeenfound.Inaddition,the
usercanseehowmanyofthemarenew(seepicture22).
Pressthe“Green”functionkey(9),tosavethenewchannelsintothemain
TVandRadiolists.IfyoudonotwanttoupdatethemainTVandradiolists,
pressthe“Red”functionkey(8).Ifyouselected“Replaceservices”,allof
theservicesinthemainandfavouritelistswillbereplaced.
4.1.6.3. Manual tune
In“Manualtune”thereareuptosixoptionsyoucansetbeforestarting
manualtuning(seepicture23).Here,theusercanseethesignalstrength
andsignalqualityfortheselectedtunerwiththeselectedparameters.
4.1.6.3.1. Tuner
Usethisoptiontoselectthetuneronwhichthesearchwillbedone.Press
the“OK”key(6)andselectoneofthetuneroptionswiththenavigationkey
“Up”and“Down”.Attheend,pressthe“OK”key(6)toconrm.
4.1.6.3.2. Channel
Usethisoptiontosetthechannelonwhichthesearchwillbedone.Press
the“OK”key(6)andusethenumerickeysonyourremotecontroltoenter
thenumberofthechannelfrom5to12andfrom21to69.Attheend,press
the“OK”key(6)toconrm.Whenyouchangethechannel,thefrequency
valuewillbeautomaticallyadjustedtothecorrectfrequency.
4.1.6.3.3. Frequency
Usethisoptiontomanuallysetthefrequencyonwhichthesearchwillbe
done.Press“OK”key(6)andusethenumerickeysonyourremotecontrol
toenterafrequencyfrom174000kHzto230000kHzorfrom470000kHzto
862000kHz.Attheend,press“OK”key(6)toconrm.
4.1.6.3.4. Auto Mode
Thismodewillauto-detecttheFFTmodeandGuardIntervalparametersPressthe“OK”key(6)andselectoneoftheoptionswith
thenavigationkey“Up”and“Down”.Attheend,pressthe“OK”key(6)toconrmselection.Iftheoption“Yes”isselected,options
“FFTMode”and“GuardInterval”willbedisabled.
4.1.6.3.5. FFT Mode
Thisoptionisavailableonlyif“AutoMode”issetto“No”.UsethisoptiontosetFFTmode.Pressthe“OK”key(6)andselectoneof
theoptionswiththenavigationkeys“Up”and“Down”.Attheend,pressthe“OK”key(6)toconrmselection.
4.1.6.3.6. Guard Interval
Thisoptionisavailableonlyif“AutoMode”issetto“No”.Usethisoptiontosettheguardinterval.Pressthe“OK”key(6)andselect
oneoftheoptionswiththenavigationkeys“Up”and“Down”.Attheend,pressthe“OK”key(6)toconrmselection.
Picture21
Picture22
Picture23

19
En•
4.1.6.3.7. Finding and storing the channels
Findingandstoringthechannelsinmanualandautotunemodeissimilar,withtheexceptionofthemainandfavouritelists.Inmanual
mode,onlynewchannelsareaddedtomainTVandradiolistsandnootherchangesaremadetothelists.
4.1.7.Default settings
Thedefaultsettingsfunctionisprovidedtoreturnthereceivertoallthedefault
settingsprogrammedatthefactoryduringproduction.Thismaybenecessary
whenalargenumber of settings have accidentally been made incorrectly,
forexample.Asyoucanseeinapicture24,therearetwokindsofdefault
settings:“Factorydefaults”and“Settingsonly”.
4.1.7.1. Factory Defaults
Pressthe“OK”key(6)andconrmwiththe“Green”functionkey(9)ifyou
wanttochangetheunittothe“Factorydefault”settings.
Note:
Usingthisoptionwilldeletealldatastoredinthepersonalplanner,channel
lists,andfavouritelists.
Duringthisprocess,youwillalsobegiventheoptiontoformattheharddisk.
Itishelpfultodothisoccasionallytomaximizetheperformanceofthehard
disk. However,all dataon thedisk willbedeleted. During thisstep, you
willbeaskedtoenteraPINcode,tohelppreventaccidentaldeletionofthe
contentontheharddisk.ThedefaultPINcodeis“1111.”Ifyoudonotwant
todeletethedataonthedisk,press“Exit.”Afterthis,a“QuickStartGuide”
menuwillbeopen(seepicture25).
IntheQuickStartGuide,youshouldselectthecorrectmenulanguageand
country,tomakesuretheunitwilloperatecorrectlyinyourcurrentlocation.
YoucanalsosettheTimeandDate,orleavetheunitinAutomaticmode,to
collectthecorrectTimeandDateautomatically.Aftermakingthenecessary
changes,pressthe“Exit”key(22)toproceedtothenextstep.Nextstepis
tosettheuserpreferences(seechapterUserpreferencesformoredetail).
Aftermakingthenecessarychanges,pressthe“Exit”key(22)toproceedto
thenextstep,antennasetting(seeAntennaSettings).Afterantennasettingan“Automaticchannelsearch”willstart.Thispartisthe
sameasduringthe“Autotune”option(seechapterFindingandstoringthechannels).
Attheendusercansetaudioandvideooption(seechapterAudio/VideoSettings).
Seealsochapter1.2
4.1.7.2. Settings only
Pressthe“OK”key(6)andconrmwiththe“Green”functionkey(9)toifyouwanttoresettheSettingsonly.Usingthisoption,only
theonuserpreferencesandsettings,suchastimeanddate,willbereset.TheLibraryandallchannellistswillremainthesame.
Note:
Ifthemenuisnotdisplayedclearlyorinblackandwhite,afterchangingthesettings,itisbecausetheVideooutputmodewas
changedwhenyouresettheunittodefaultsettings.TocorrectthisproblemseechapterAudio/VideoSettings.
4.1.8. System information
Thismenudisplaysinformationrelatedtothesoftwareandhardwareversionofthedigitalreceiveraswellastheoptiontoupdatethe
software.Thisinformationmayberequiredifyourequestserviceorrepair.
Picture24
Picture25
Table of contents
Languages:
Other Inverto DVR manuals