manuals.online logo
Brands
  1. Home
  2. •
  3. Brands
  4. •
  5. Ioline
  6. •
  7. Industrial Equipment
  8. •
  9. Ioline CrystalPress User manual

Ioline CrystalPress User manual

Other manuals for CrystalPress

4

Other Ioline Industrial Equipment manuals

Ioline CrystalPress User manual

Ioline

Ioline CrystalPress User manual

Ioline CrystalPress-II User manual

Ioline

Ioline CrystalPress-II User manual

Ioline CrystalPress User manual

Ioline

Ioline CrystalPress User manual

Popular Industrial Equipment manuals by other brands

ABB +Q957 user manual

ABB

ABB +Q957 user manual

G.B.C BASIC EDGE 50 instruction manual

G.B.C

G.B.C BASIC EDGE 50 instruction manual

Tronair Batpak 11-6602-1000 Operation & service manual

Tronair

Tronair Batpak 11-6602-1000 Operation & service manual

Pilz PNOZ mi2p Operation manual

Pilz

Pilz PNOZ mi2p Operation manual

Clemco Zero BNP 6012 manual

Clemco

Clemco Zero BNP 6012 manual

Erskine Attachments V-Plow Operator's manual

Erskine Attachments

Erskine Attachments V-Plow Operator's manual

ABB HT610965 Operation manual

ABB

ABB HT610965 Operation manual

Morra MH 540 user manual

Morra

Morra MH 540 user manual

Eaton S090ST manual

Eaton

Eaton S090ST manual

GRIGGIO G 240 P4 instructions

GRIGGIO

GRIGGIO G 240 P4 instructions

Nexen AIR CHAMP HT45 user manual

Nexen

Nexen AIR CHAMP HT45 user manual

WTE V5 installation manual

WTE

WTE V5 installation manual

ABB HT845232 Operation manual

ABB

ABB HT845232 Operation manual

SMC Networks CJP Series Operation manual

SMC Networks

SMC Networks CJP Series Operation manual

JohnDow Industries JDI-AFT58 Operator's manual

JohnDow Industries

JohnDow Industries JDI-AFT58 Operator's manual

IMB MB9016A instruction manual

IMB

IMB MB9016A instruction manual

Clarke CUMB1 Assembly & operating instructions

Clarke

Clarke CUMB1 Assembly & operating instructions

amiad Arkal Spin Klin 2 user guide

amiad

amiad Arkal Spin Klin 2 user guide

manuals.online logo
manuals.online logoBrands
  • About & Mission
  • Contact us
  • Privacy Policy
  • Terms and Conditions

Copyright 2025 Manuals.Online. All Rights Reserved.

Quick Start Guide
Ioline CrystalPress
October 7, 2012 FILE P/N: 109831 R9 PRINT P/N: 109826 R9
The Quick Start Guide is intended to help a new user of the Ioline Crys-
talPress get everything setup and running quickly. Please note that
there are important notices, directions, troubleshooting, and other in-
formation in the CrystalPress User Guide and CrystalStudio User Guide in-
cluded as electronic manuals on the installation CD and also installed
with other les during setup. Shortcuts to these les are installed in
Start>All Programs>Ioline. Adobe Acrobat Reader® is required to view
the User Guides and other electronic documents provided by Ioline.
© 2012 Ioline Corporation. All rights reserved.
Important Cautions
nThe Ioline CrystalPress Motif Maker is designed to use high quality Rhinestones and Crys-
tals like those from Preciosa and Swarovski. See the last page for important information about
Rhinestone quality.
nDo not try to repair the machine without factory authorization.
nBe careful with hair, jewelry, or loose clothing near the machine to keep them from tangling in
moving parts.
nNever attempt to move the Carriage by hand when the power is on.
nKeep hands and other body parts away from the Carriage, Sorters, and the Drive Shaft when
the machine is in operation.
nBe careful when moving or lifting the machine, it is heavy!
2
Un-boxing the CrystalPress
2Remove the cardboard and the top foam. Re-
move the machine from the box and place on a
at surface.
5Install the right and left feet on the bottom of
the machine with a Phillips screw driver and the
screws in the accessory kit. IMPORTANT: Do not
roll the CrystalPress forward on the sorter bowls
to install the feet. This will damage the machine.
6Remove the foam from around the Carriage.
4Remove the tape holding the Carriage Belt.
Do not damage the belt material.
Remove Tape
3Remove the plastic sheeting from the machine
to expose the equipment. Face the machine so
that keypad is in front (facing the user).
Tools: Make sure you have a few tools on
hand before beginning installation:
1. Box knife
2. Regular screwdriver
3. Phillips screwdriver
1Use a box knife to cut the tape on the box. Pry
the staples loose with a regular screw driver then
open the box.
7Place the machine within 10’of the computer
used to design and send les.
Save Your Box: Packing the CrystalPress in the original
box is critical if it is ever necessary to store or ship it by
freight carrier. Buying a new box is expensive!
3
What’s in the Accessory Kit
Software CDROM (1)
Screws for Machine Feet (4)
* There is usually an extra screw
Sorter Wheels (2 or more)
USB Cable (1) Power Cable (1)
The Ioline CrystalPress comes with the following accessories. If you did not receive an item shown below,
contact Ioline Customer Service immediately. A detailed packing list is also included to check these items.
Machine Feet (2)
CrystalStudio
USB Hardlock Key (1)
C-Stick Body with Tip (1)C-Stick Tip (1)
Flat ‘A’ End
Square ‘B’ End
4
Introducing the CrystalPress
A. Left End Cover
B. Left Pinch Wheel
C. Right Pinch Wheel
D. Carriage
E. Pinch Wheel Lever
(hidden)
F. Right End Cover
G. Keypad
H. Foot (x2)
I. Right Sorter Bowl
(Sorter #1)
J. Drive Shaft (x2)
K. Transfer Sheet
L. Left Sorter Bowl
(Sorter #2)
M. Platen
N. Traverse
AB
I
G
M
CDF
N
H
K
L
J
J
H
E
Now that everything is unpacked, take a few minutes
to familiarize yourself with the CrystalPress before
diving into the installation details.
5
Installing CrystalPress Software
1. Insert the Software CDROM in the PC CDROM drive. The
installation should start automatically. If it does not:
a. Go to the Start Menu > Run.
b. Click on Browse and choose the CDROM Drive
(usually D:\)
c. Select ‘setup.exe’ then Open and Run.
2. The CrystalPress Setup Wizard will appear, click Next>
3. Select the components to install, click Next>
System Requirements: Ioline CrystalStudio software requires
one of the following 32 and 64 -bit operating systems.
 •Microsoft®Windows®XP(ServicePack3orhigher)
 •Microsoft®Windows®Vista(ServicePack1orhigher)
 •Microsoft®Windows®7
CrystalStudio also requires that Microsoft® .NET Framework
4.0 is installed. The CD installer will automatically detect if you
already have this software and will automatically install it if you
do not.
Note: Installation screens might look dier-
ent than what is pictured here, depending on
the version of Windows.
4. Conrm the Installation Directory, click Next>
WARNING: The screen may stay blank for extended periods
during dierent steps of the installation. This is normal. Do not
remove the CDROM as long as activity lights are blinking on
the front of the computer.
SECURITY: WindowsOperatingSystemsandAnti-Viruspro-
grams have security features that usually ask for permission
during multiple steps of the CrystalPress installation process.
Always choose“Allow”, “OK”, or “Yes” to proceed.
6
6. Ready to Install. Click next to install the software.
Installing the CrystalStudio Hardlock Key
Installation Steps
1. Insert the USB Hardlock Key into an available USB port on
your computer.
2. Wait for Windows to recognize and install the USB hardlock
drivers.
3. Once the message “Your new hardware is installed and ready
to use” appears, the CrystalStudio software is ready to use.
7. It is likely that a few windows will appear then automati-
cally close during installation as dierent programs and
drivers are installed. Security warnings may also appear.
Always choose “Allow”, “OK”, or “Yes” to proceed.
8. Details on using the CrystalStudio software are covered
in the electronic CrystalStudio User Guide included on the
CDROM and copied to the hard disk during installation.
STOP!
Do not start the CrystalStudio software yet.
Complete the Hardlock Installation process
described below before starting the program.
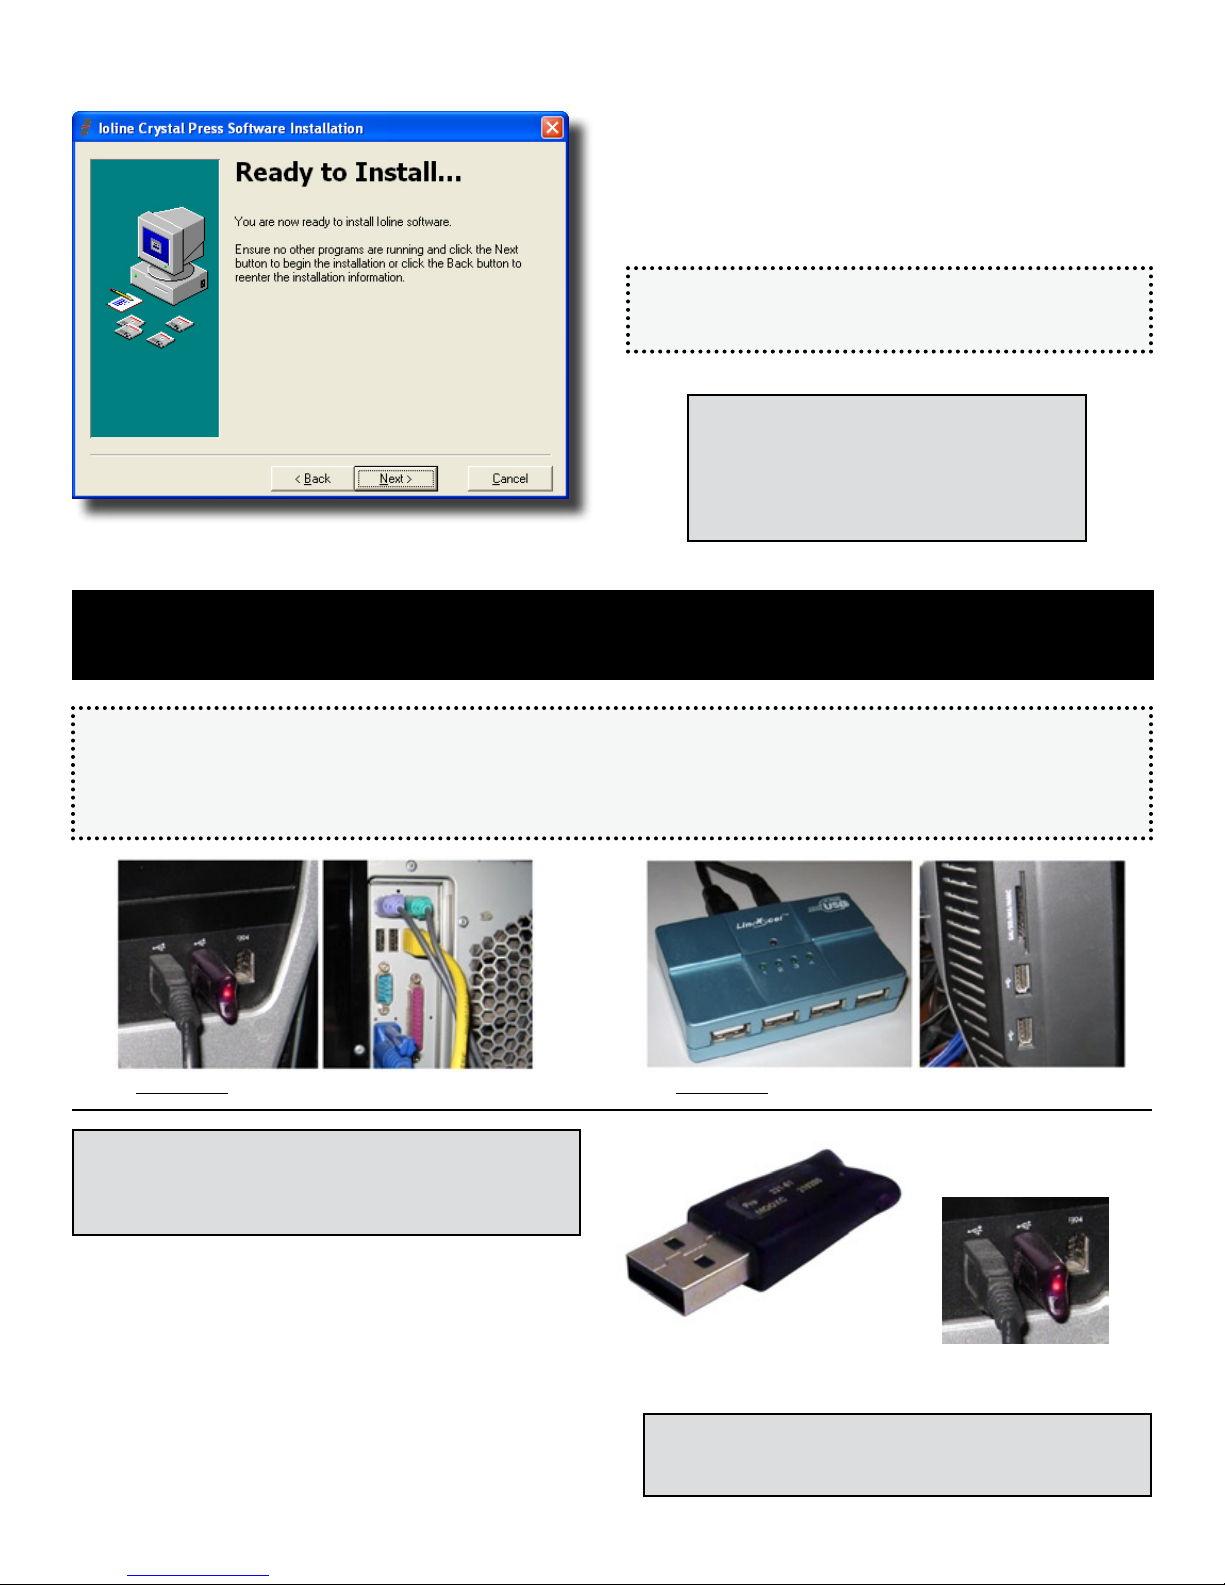
USB Ports vs. USB Hubs
Ioline recommends that the USB Hardlock Key required to make the CrystalStudio software run is only installed in a USB Port
that is part of the computer where the software is installed. Years of troubleshooting have shown that USB Hubs are not a reli-
able way to connect Hardlock Keys to computers. See the images below to nd a USB port on the computer.
USB Ports: These are OK for the Hardlock key USB Hubs: These are NOT OK for the Hardlock key
IMPORTANT: Drivers for the USB Hardlock Key are installed
during the CrystalPress Software installation process
described above. Make sure all the software is installed
before inserting the USB Hardlock Key.
NOTE: A red light should turn on inside the body of the
USB Hardlock Key when it is plugged into a USB Port. If a
light is not visible, contact Ioline Tech Support.
USB Hardlock
Key Lighted USB
Hardlock Key
Shortcuts to all CrystalPress manuals, CrystalStudio
and other Ioline programs are located in the Start Menu in
Start>All Programs>Ioline.
7
Setup the CrystalPress Sorter Bowl
1Rotate the Wiper Arm Clamp clockwise to unlock
the Wiper Arm.
2Rotate the Wiper Arm up.
3Install the Sorter Wheel on the shaft. Turn the
wheel until it drops into position. A small pin on
the sorter assembly ts into a single hole on the
bottom of the sorter wheel. Until the pin and
hole are aligned, the wheel will not seat properly
and the clamp .
4Screw on the Sorter Wheel Thumbscrew.
5Rotate the Wiper Arm down and turn the Wiper
Arm Clamp counter-clockwise to lock.
IMPORTANT NOTE: The Sorter Bowl instal-
lation steps listed below are included only
for reference. The CrystalPress machine is
shipped with two Sorter Wheels already in-
stalled in the Sorter Bowls. Use these steps
to change the Sorter Wheels if the crystal
size already installed in the machine is not
desired.
8
4
Assemble and Install the C-Stick
2
CP-II Only: Press the loose end of the vacuum
hose fully onto the tool body barb until it stops.
6
Loosen the Carriage Thumbscrew by turning it
counter-clockwise until the Clamp can swing
down over the C-Stick after insertion.
Rotate the Clamp down clockwise and tighten
the Thumbscrew until the C-Stick is snug. Do not
overtighten.
Thumbscrew
Clamp
Clamp
HINT: It usually helps to move the carriage all the way to the left end plate when installing
the C-Stick so that it does not roll along the traverse while tightening the Cable Clamp Nut
and Thumbscrew . Make sure power is o before moving the carriage by hand.
Push the black C-Stick cable into the socket at
the top left corner of the Carriage cover. Route
behind the pump rst on CP-II (pump hidden).
5
Note: Make sure the Socket Nut is loose then push
the cable all the way in until it stops. Lightly tighten
the nut after insertion. Don’t overtighten.
Note: Use rm pressure to ensure the tube is
seated all the way onto the barb.
Note: Make sure the Clamp is in the up position
before inserting the C-Stick.
3Insert the C-Stick into the Carriage Jaw as shown.
The C-Stick has a ring ange around the middle
that ts into a slot in the Carriage Jaw.
Thumbscrew
C-Stick
(CP-II shown)
Jaw
1Remove a C-Stick Tip and the C-Stick Body from
the protective bags. Install the tip on the body
by rotating counter clockwise as shown.
Note: Do not overtighten the tip as it will make
later removal dicult.
C-Stick Body
C-Stick Tip
Socket Nut
Insert
Cable
9
Prepare the CrystalPress to Print
2Peel the backing o a Transfer Sheet to expose
the sticky side.
3Slide a Transfer Sheet into the machine as shown.
Make sure the sticky side is facing up and that
the right and left wheels are aligned with the Pa-
per Strips on each side of the Transfer Sheet. Make
the sheet as straight as possible before lowering
the wheels with the Pinchwheel Lever.
5Slowly pour stones into the lower portion of
the right side Sorter Bowl. At least one gross of
stones is required for most sizes. Repeat in the
left Sorter Bowl if printing from both bowls.
IMPORTANT:DONOTOVERFILLTHEBOWL(see
table in the Cautions and Tips section below). The
stones should not pile higher than the crease in-
side the bowl casing as shown above. Too many
stones in the Sorter Bowl cause upsidedown
placements.
Paper Strip
Right Pinch Wheel
1Locate the Pinch Wheel Lever on the back of the
CrystalPress then rotate the lever back until it
stops. This will lift the Pinch Wheels.
Pinch Wheel Lever
Required Materials: It is time to load
the CrystalPress with consumables
before starting up the rst time.
Make sure you have Transfer Sheets
and crystals available for these steps.
New motif starts
above here...
Front edge of Transfer Sheet
White Pounce Strip
4The White Pounce Strip shows where printing
begins. Pull or push the Transfer Sheet so that
at least 1/4 inch of the edge is past the White
Pounce Strip to ensure smooth operation.
Note: Make sure that the stones for the rst Motif
match the size of the Sorter Wheel(s) installed in
the Sorter Bowl.
1 gross = 144 stones
10
Powering up the CrystalPress
1Plug in the power and USB cables to the back of
the CrystalPress. The square (B) connector on
the USB cable attaches to the CrystalPress.
Power Cable
USB Cable
Power Switch*
3Turn on power to the machine. The Carriage will
move to the right and hit the right end.
4Then the Carriage will move left until it hits the
left end plate.
2Plug in the USB cable to a USB port on the
computer where the CrystalStudio software was
installed. The at (A) connector on the USB cable
connects to the PC.
Note: A message should appear on the computer
that New Hardware is Found and that Windows is
searching for drivers. Make sure that the hardware
is installed successfully before sending a motif.
5The Carriage will move to the right until it stops
at the right end. Then the Sorter Wheels will turn
and stop. Once the green light appears on the
keypad the CrystalPress is ready to print.
Note: There are a number of solid red lights on
the CrystalPress on the Carriage and the Sorter
Bowls. These are normal and required for the ma-
chine to operate. Blinking lights indicate an error.
Directions on making Motifs and troubleshooting tips for using the CrystalPress are cov-
ered in the electronic CrystalPress User Guide included on the CDROM and copied to the
hard disk during installation. The CrystalStudio User Guide will help with using the software.
Note: The CrystalPress will always go through
the initialization process described below when
the power is turned on.
DON’T STOP NOW!
The Motif making process is reviewed in the Crys-
talPress User Guide. Follow those instructions and
learn to use the CrystalStudio software with the
CrystalStudio User Guide. These will help you make
the rst motifs with your CrystalPress.
* ON/OFF symbol (O/I) locations may vary