ION Party Rocker Plus User manual

Quickstart Guide English ( 3 – 6 )
Guía de inicio rápido Español ( 7 – 10 )
Guide d'utilisation rapide Français ( 11 – 14 )
Guida rapida Italiano ( 15 – 18 )
Schnellstart-Anleitung Deutsch ( 19 – 22 )
Snelstartgids Nederlands ( 23 – 26 )
Appendix English ( 27 )


3
Quickstart Guide (English)
Introduction
Box Contents
Party Rocker Plus
Microphone with Cable
1/8” Stereo Aux Cable
Power Cable
Quickstart Guide
Safety & Warranty Manual
Support
For the latest information about this product (system requirements, compatibility information,
etc.) and product registration, visit ionaudio.com.
Rechargeable Batteries
Rechargeable lead-acid batteries are the same type used in automobiles. As with your car
battery, how you use this battery has a significant impact on its lifespan. With proper use and
treatment, a lead-acid battery can last for years. Here are some recommendations for getting
the longest life from the internal battery.
General Usage
Fully charge the battery before using it.
Charge the battery completely after each use.
Storage For best product longevity, do not store at exceedingly hot (greater than
90°F / 32°C) or exceedingly cold (less than 32°F / 0°C) temperatures.
It is acceptable to leave your sound system plugged in. This will not
overcharge the battery.
If you leave the battery level low and do not charge it for 6 months, it may
permanently lose capacity.
Repair If the battery fails to charge, contact ION Audio at ionaudio.com.
Disposal Bring the unit to a recycling center or dispose of in accordance with local
ordinances.

4
Quick Setup
1. Make sure all items listed under Introduction > Box Contents at the beginning of this
guide are included in the box.
2. Read safety instruction booklet before using the product.
3. For optimal performance, place Party Rocker Plus in the center of the room so it is
unobstructed by walls, furniture, etc.
4. Turn down the Master Volume on the Party Rocker Plus.
5. Turn on Party Rocker Plus.
6. Connect your music player with an audio cable or Bluetooth. (see Connecting with a
Bluetooth Device for more details on this)
7. Adjust the volume on your music player and on Party Rocker Plus as needed.
8. Adjust the Light Mode button on Party Rocker Plus as needed.
9. Turn off Party Rocker Plus when not in use.
Connection Diagram
Items not listed under Introduction > Box Contents are sold separately.
Smartphone,
tablet, etc.
Power
Microphone

5
Features
Front Panel
1. Auxiliary input: This stereo 1/8” input
can be used to connect a smartphone,
MP3 player, or other audio source.
2. Microphone Inputs with Volume
Control (1/4”): These mono inputs
accept 1/4” inputs such as a microphone,
guitar, or other musical instrument.
3. Power/Charge LED: Indicates various states of activity on Party Rocker Plus.
•Solid Green LED = Party Rocker Plus is powered on.
•Solid Yellow LED = Battery is charging with the power on.
•Solid Green/Blinking Yellow LED = Party Rocker Plus is powered on and the battery
is low.
•Solid Red LED = Battery is charging with the power off.
•LED OFF =Power is off, power cable is connected, and the battery is fully charged.
4. Bluetooth LED/Disconnect Button: The LED will be lit when a device is paired to Party
Rocker Plus. This LED will not be lit when Party Rocker Plus is first powered on (unless it
was previously paired with a device). Press the button to disconnect a paired Bluetooth
device.
5. All Lights On/Off: Press this button to turn all lights on or off.
6. Light Mode: There are four modes to select from for how the dome lights react to the
music:
•Beat Sync: The dome lights spin and change color to the beat of the music playing.
•Auto: The dome lights spin and change color with a predetermined pattern regardless
of the beat of the music playing.
•Single Color: The lights change one color at a time and do not move.
•Freeze: All colors remain on and unmoving until a new mode is selected.
•Off: The dome lights turn off.
7. Light Buttons: Use these buttons to turn each color in the Dome on or off–Red, Green,
Blue, White, Pink, and Orange.
8. Echo: Use this knob to add or remove an echo effect to the Microphone Inputs.
9. Master Volume Control: This adjusts the speaker’s main mix volume, which includes
Microphone Inputs, Auxiliary Input, and the audio of a paired Bluetooth device.
1
2
3
4
57
6
89

6
Rear Panel
1. Power On/Off Switch: Turns Party
Rocker Plus on or off.
2. Power Cable Input (IEC): Insert the
included power cable here to power the
unit.
3. Dome: The dome light can spin and react
to the music playing (depending on the
Light Mode that is selected).
Warning: Do not look directly into the dome light. Do not sit, stand, or apply pressure on
the dome light.
Connecting with a Bluetooth Device
1. Turn on your Bluetooth device.
2. Power on Party Rocker Plus and it will automatically go into pairing mode to search for
Bluetooth devices. You will know you are in pairing mode when the Bluetooth LED is off.
3. If your Bluetooth device is not able to pair to Party Rocker Plus, press the Bluetooth
Disconnect button on the unit to break previous Bluetooth connections and reset the
Bluetooth module.
4. Navigate to your Bluetooth device’s setup screen, find Party Rocker Plus and connect.
Note: If your Bluetooth device prompts for a pairing code, enter 0000.
5. Bluetooth LED will light up solid when it is “paired.”
Note: If you experience trouble pairing or playing music, update your device's OS.
6. To disconnect pairing, press the Bluetooth Disconnect button on Party Rocker Plus.
7. To connect to another Bluetooth device, repeat steps 3-4.
Note: Maximum range will be achieved when using devices with Bluetooth 4.0.
Troubleshooting
If the sound is distorted: Try lowering the volume control of your sound source or musical
instrument. Also, try to reduce the overall volume of Party Rocker Plus.
If there is too much bass: Try adjusting the tone or EQ control on your sound source to lower
the bass level. This will allow you to play the music louder before clipping (distortion) occurs.
If there is a high-pitched whistling noise when using microphones: This is probably
feedback. Point the microphone away from the speaker.
If you can’t hear the microphone over the music volume: Turn down the music volume
from your source.
3
12

7
Guía de inicio rápido (Español)
Introducción
Contenido de la caja
Party Rocker Plus
Micrófono y cable
Cable auxiliar estéreo de 3,5 mm (1/8 pulg.)
Cable de alimentación
Guía de inicio rápido
Manual sobre la seguridad y garantía
Soporte
Para obtener la información más completa acerca de este product (los requisitos del sistema,
compatibilidad, etc) y registro del producto, visite ionaudio.com.
Baterías recargables
Las baterías de plomo-ácido recargables son del mismo tipo que se usa en los automóviles.
Al igual que con la batería del vehículo, la forma en que se usa tiene una influencia significativa
en la duración de su vida útil. Con un uso y tratamiento correctos, una batería de plomo-ácido
puede durar varios años. He aquí algunas recomendaciones para prolongar la vida útil de la
batería interna.
Uso general Cargue completamente la batería antes de usarla.
Cargue la batería completamente después de cada uso.
Almacenamiento Para lograr la mayor longevidad del producto, no lo almacene a
temperaturas muy altas (superiores 32°C / 90°F) o muy frías (inferiores
a 0°C / 32°F).
Es aceptable dejar su sistema de sonido enchufado. No sobrecargará
la batería.
Si deja que el nivel de la batería baje y no la carga durante 6 meses,
puede perder permanentemente su capacidad.
Reparación Si la batería no se carga, póngase en contacto con ION Audio en
ionaudio.com.
Disposición final Lleve la unidad a un centro de reciclaje o deséchela de acuerdo a las
ordenanzas locales.

8
Instalación rápida
1. Asegúrese que todos los artículos incluidos en Introducción > Contenido de la caja, al
comienzo de esta guía, estén incluidos en la caja.
2. Lea el folleto de instrucciones de seguridad antes de utilizar el producto.
3. Para lograr un rendimiento óptimo, coloque el Party Rocker Plus en el centro de la sala
donde no esté obstaculizado por paredes, muebles, etc.
4. Baje el control de volumen maestro del Party Rocker Plus.
5. Encienda el Party Rocker Plus.
6. Conecte su reproductor de música con un cable de audio o Bluetooth (para obtener más
detalles de esto, consulte Conexión con un dispositivo Bluetooth).
7. Ajuste el volumen en su reproductor musical y en el Party Rocker Plus según sea
necesario.
8. Ajuste el interruptor de modo de luz del Party Rocker Plus según sea necesario.
9. Apague el Party Rocker Plus cuando no lo use.
Diagrama de conexión
Los elementos que no se enumeran en Introducción > Contenido de la caja se venden por separado.
Teléfono
inteligente
(smartphone),
tablet, etc.
Suministro
eléctrico
Micrófono

9
Características
Panel frontal
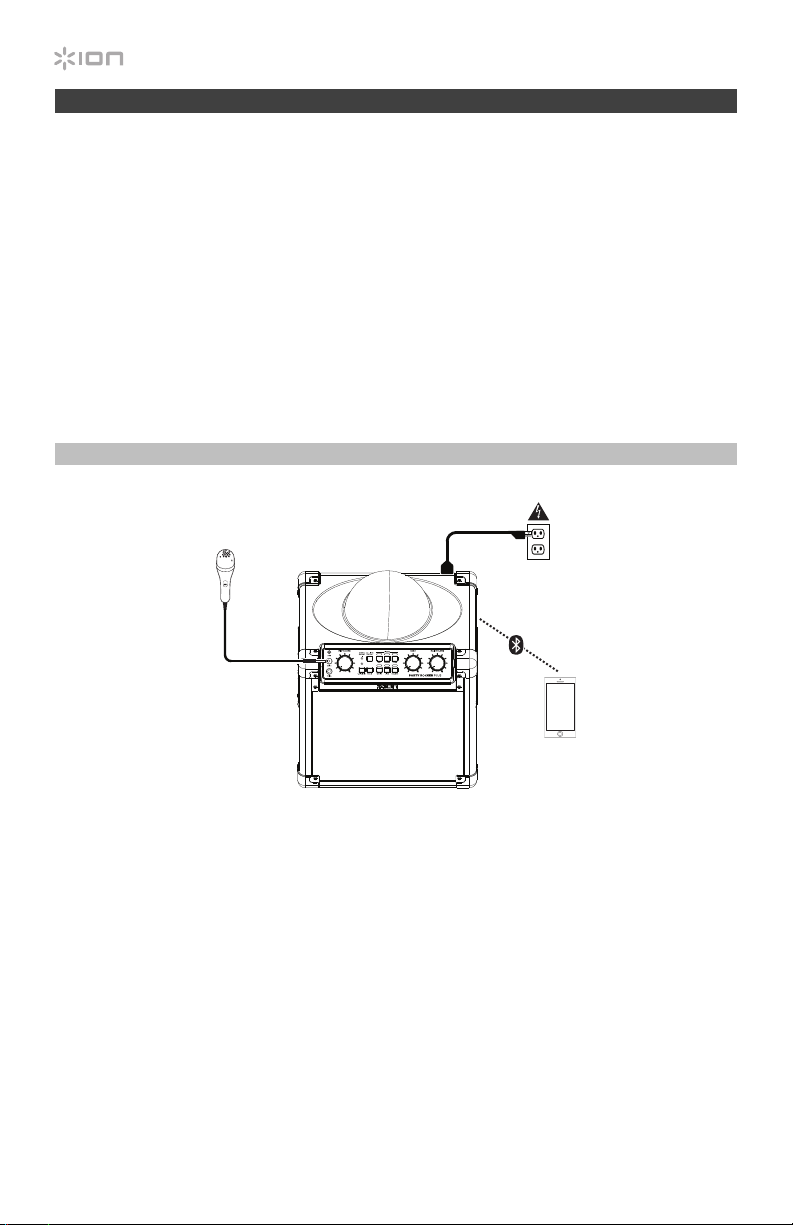
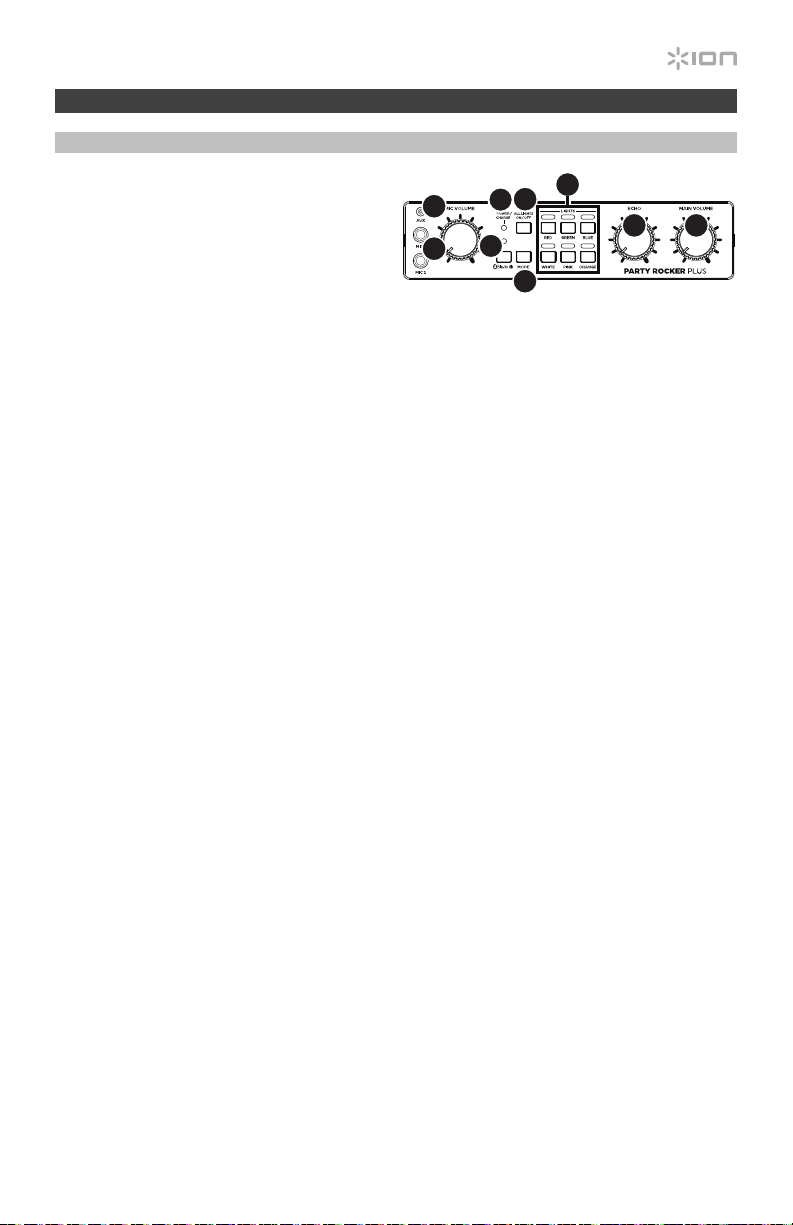
1. Entrada auxiliar: Esta entrada de 3,5
mm (1/8") estéreo se puede usar para
conectar un téléphone, MP3 u otra
fuente de audio.
2. Entradas de Micrófono con control
de volumen (1/4"): Estas entradas
mono admitir entradas de 6,35 mm
(1/4") tal como un micrófono, una guitarra u otro instrumento musical.
3. LED alimentación/carga: Indica los diversos estados de actividad del Party Rocker Plus.
•LED verde permanente = El Party Rocker Plus está encendido
•LED amarillo permanente = Se está cargando la batería con el equipo encendido
•LED verde permanente/amarillo intermitente = El Party Rocker Plus está encendido
y la batería se está agotando.
•LED rojo permanente = Se está cargando la batería con el equipo apagado
•LED apagado =El producto está apagado, el cable de corriente está conectado y la
batería está completamente cargada
4. Bluetooth LED/Botón desconectar: El LED se enciende cuando se aparea un dispositivo
al Party Rocker Plus. Este LED no se enciende cuando el Party Rocker Plus se enciende
por primera vez (a menos que hubiera sido apareado previamente con un dispositivo).
Pulse el botón para desconectar un dispositivo Bluetooth apareado.
5. Encendido/apagado de todas las luces: Pulse este botón para encender y apagar todas
las luces.
6. Modo de luz: Es posible seleccionar entre cuatro modos de reacción de la luz del domo a
la música:
•Sincronización con el ritmo: Las luces del domo giran y cambian de color al ritmo de
la música en reproducción.
•Automático: Las luces del domo giran y cambian de color con un patrón
predeterminado sin importar el ritmo de la música en reproducción.
•Color único: Las luces cambian de a un color a la vez y no se mueven.
•Congelar: Todos los colores permanecen encendidos e inmóviles hasta que se
selecciona un nuevo modo.
•Apagadas: Las luces del domo se apagan.
7. Botones de las luces: Utilice estos botones para encender o apagar cada color en el
domo – rojo, verde, azul, blanco, rosa y naranja.
8. Eco: Use esta perilla para agregar o quitar un efecto de eco al Entradas de Micrófono.
9. Control de volumen maestro: Este control ajusta el volumen de la mezcla principal del
altavoz, que incluye la entrada de micrófono, la entrada auxiliar, y el audio de un
dispositivo Bluetooth apareado.
1
2
3
4
57
6
89

10
Panel trasero
1. Interruptor de encendido / apagado:
Enciende y apaga el Party Rocker Plus.
2. Entrada del cavo de alimentación (IEC):
Inserte aquí el cable de alimentación
incluido para alimentación la unidad.
3. Domo: El domo luz puede girar y reaccionar
a la música que se reproduce (en función del
modo de luz seleccionado).
Advertencia: No mire directamente a la luz del domo. No se siente, se pare o aplique
presión sobre la luz del domo.
Conexión con un dispositivo Bluetooth
1. Encienda su dispositivo Bluetooth.
2. Encienda el Party Rocker Plus, que pasará automáticamente al modo de apareamiento
para buscar dispositivos Bluetooth. Se dará cuenta de que está en modo de apareamiento
cuando el LED está apagada.
3. Si su dispositivo Bluetooth no es capaz de aparearse con el amplificador, pulse el botón
de desconexión del amplificador para romper las conexiones Bluetooth anteriores y
reinicie el módulo Bluetooth.
4. Navegue a la pantalla de configuración de su dispositivo Bluetooth, busque Party Rocker
Plus y conecte.
Nota: Si su dispositivo Bluetooth solicita un código de apareamiento, ingrese 0000.
5. El Paired (Apareado) LED Party Rocker Plus se enciende con luz permanente cuando está
'apareado'.
Nota: Si tiene problemas para aparear su dispositivo o reproducir música, actualice el
programa operativo de su dispositivo.
6. Para desconectar el apareamiento, pulse el botón ‘Disconnect’ del Party Rocker Plus.
7. Para conectarse a otro dispositivo Bluetooth, repita los pasos 3 y 4.
Nota: El alcance máximo se logra cuando se utilizan dispositivos con Bluetooth 4.0.
Solución de problemas
Si el sonido está distorsionado: Pruebe bajando el control de volumen de su fuente de
sonido o instrumento musical. Pruebe también reduciendo el volumen general del Party
Rocker Plus.
Si hay demasiados graves: Intente ajustando el control de tono o ecualización de su fuente
de sonido para reducir el nivel de graves. De esta forma podrá reproducir la música con más
volumen antes de que se produzca el recorte (distorsión).
Si hay un silbido agudo cuando se usan micrófonos: Probablemente sea realimentación.
Apunte los micrófono apartándolos del altavoz.
Si no puede oír el micrófono por arriba del volumen de la música: Disminuya el volumen
de la música en su fuente.
3
12

11
Guide d'utilisation rapide (Français)
Présentation
Contenu de la boîte
Party Rocker Plus
Microphone et câble
Câble auxiliaire stéréo 3,5 mm
Câble d'alimentation
Guide d'utilisation rapide
Consignes de sécurité et informations concernant la garantie
Assistance
Pour les dernières informations concernant ce produit (la configuration système minimale
requise, la compatibilité, etc) et l'enregistrement du produit, veuillez visitez le site ionaudio.com.
Piles rechargeables
Les piles au plomb rechargeables sont du même type que les batteries utilisées dans les
automobiles. Comme pour la batterie de votre automobile, la manière dont vous l'utilisez a un
impact direct sur sa durée de vie. Cependant, avec une bonne utilisation la pile au plomb peut
avoir une durée de vie de plusieurs années. Voici quelques recommandations pour prolonger
au maximum la durée de vie de la pile interne.
Utilisation
générale
Chargez complètement la batterie avant de l’utiliser.
Rechargez la batterie complètement après chaque utilisation.
Entreposage Pour optimiser la longévité du produit, ne pas entreposer dans des
températures extrêmement chaudes (supérieur à 32°C / 90°F) ou extrêmement
froides (moins de 0°C / 32°F).
Il est acceptable de laisser votre système audio branché. Cela ne surchargera
pas la batterie.
Si vous laissez le niveau de batterie s’affaiblir sans la recharger pendant 6
mois, elle risquerait de perdre sa capacité de charge de façon permanente.
Réparation Si la batterie ne parvient plus à se recharger, contactez ION Audio à
ionaudio.com.
Élimination Apportez l’appareil dans un centre de recyclage ou disposez selon les
règlements de votre municipalité.

12
Démarrage rapide
1. Assurez-vous que tous les articles énumérés dans la section Présentation > Contenu de
la boîte au début de ce guide sont inclus dans la boîte.
2. Veuillez lire le livret des consignes de sécurité avant d'utiliser le produit.
3. Pour une performance optimale, placez le Party Rocker Plus dans le centre de la pièce afin
qu'il n’y ait aucune obstruction créée par des murs, des meubles, etc.
4. Mettez le bouton Master Volume du Party Rocker Plus au plus bas.
5. Mettez le Party Rocker Plus sous tension.
6. Branchez votre lecteur de musique avec un câble audio ou par Bluetooth (consultez la
section Jumelage d’un appareil Bluetooth pour de plus amples détails).
7. Réglez le volume de votre lecteur de musique et du Party Rocker Plus au niveau souhaité.
8. Réglez le sélecteur Light Mode du Party Rocker Plus au mode désiré.
9. Mettez le Party Rocker Plus hors tension lorsque vous ne l’utilisez pas.
Schéma de connexion
Les éléments qui ne figurent pas dans le Présentation > Contenu de la boîte sont vendus séparément.
Smartphone,
tablette, etc.
Alimentation
Microphone

13
Caractéristiques
Panneau avant
1. Entrée auxiliaire : Cette entrée stéréo
3,5 mm (1/8 po) permettent de brancher
un lecteur de téléphone, un lecteur MP3
ou autres sources audio.
2. Entrées microphone avec commande
de volume (1/4 po) : Ces entrées mono
peut accueillir un câble de 6,35 mm
(1/4 po) pour microphone, guitare ou un autre instrument de musique.
3. DEL d'alimentation/rechargement : Indique les différents états d'activité de la Party
Rocker Plus.
•DEL d’alimentation verte = La Party Rocker Plus est sous tension
•DEL d’alimentation jaune = Rechargement de la batterie lorsque l’appareil est sous
tension
•DEL d’alimentation verte/jaune clignotante = La Party Rocker Plus est sous tension
et la batterie est faible.
•DEL d’alimentation rouge = Rechargement de la batterie lorsque l’appareil est hors
tension
•DEL éteinte = L’appareil est hors tension, le câble d'alimentation est branché, et la
batterie est complètement rechargée.
4. Bluetooth DEL/Bouton déconnecter : La DEL de jumelage sera allumée lorsqu'un
périphérique est jumelé au Party Rocker Plus. Cette DEL ne sera pas allumée lorsque le
Party Rocker Plus est d'abord alimenté (à moins qu'il a été jumelé avec un périphérique
auparavant). Appuyez sur le bouton pour déconnecter le périphérique Bluetooth jumelé.
5. Activation/désactivation de toutes les lumières : Cette touche permet
d'activer/désactiver toutes les lumières.
6. Mode d’éclairage : Il y a quatre modes d’éclairage parmi lesquels vous pouvez choisir
comment les lumières réagissent à la musique :
•Beat Sync : Les lumières du dôme tournent et changent de couleur au rythme de la
musique.
•Auto : Les lumières du dôme tournent et changent de couleur selon une configuration
prédéterminée indépendamment du rythme de la musique.
•Couleur unique : Les lumières changent une couleur à la fois et sont fixes.
•Freeze : Toutes les couleurs restent allumées et sont fixes jusqu'à ce qu’un nouveau
mode est sélectionné.
•Off : Les lumières du dôme sont éteintes.
7. Sélecteur de couleurs : Utilisez ces touches pour activer ou désactiver chaque couleur
du dôme – rouge, vert, bleu, blanc, rose et orange.
8. Echo : Ce bouton de réglage permet d’ajouter ou de supprimer un effet d’écho au Entrées
microphone.
9. Volume général : Ce bouton permet de régler le volume du mix général qui comprend
l'entrée microphone, l’entrée auxiliaire, et l'audio d'un périphérique Bluetooth jumelé.
1
2
3
4
57
6
89

14
Panneau arrière
1. Interrupteur Marche/Arrêt : Permet de
mettre le Party Rocker Plus sous et hors
tension.
2. Entrée du câble d'alimentation (IEC) :
Brancher le câble d'alimentation ci-inclus
ici pour d'alimentation l'appareil.
3. Dôme : Le dôme lumière peut tourner et
réagir à la musique selon le mode
d'éclairage sélectionné.
Mise en garde : Ne pas regarder directement dans la lumière du dôme. Ne pas s'asseoir,
se tenir debout ou exercer une pression sur le dôme.
Jumelage d’un appareil Bluetooth
1. Mettez votre périphérique Bluetooth sous tension.
2. Mettez le Party Rocker Plus sous tension et il passera automatiquement en mode
jumelage afin de rechercher les périphériques Bluetooth. Vous saurez que vous êtes en
mode jumelage lorsque la DEL devient éteinte.
3. Si votre périphérique Bluetooth ne parvient pas à se jumeler à l’amplificateur, appuyez sur
le bouton Disconnect de l’amplificateur afin de supprimer la connexion à d'autres
périphériques Bluetooth et remettre à zéro le module Bluetooth.
4. Accédez à l'écran de configuration de votre périphérique Bluetooth, recherchez « Party
Rocker Plus » et lancez le jumelage.
Remarque : Si votre périphérique Bluetooth vous demande d’entrer un code de jumelage,
entrez 0000.
5. La jumelage DEL du Party Rocker Plus s’allumera lorsque le jumelage est réussi.
Remarque : Si vous éprouvez de la difficulté à jumeler votre appareil ou à faire jouer de la
musique, faites une mise à jour du système d'exploitation de votre appareil.
6. Appuyez sur le bouton Disconnect du Party Rocker Plus pour déconnecter le périphérique
Bluetooth branché.
7. Pour jumeler un autre périphérique Bluetooth, répétez les étapes 3 et 4.
Remarque : La plage maximale peut être atteinte avec l’utilisation d’appareils dotés de
Bluetooth 4.0.
Guide de dépannage
Lorsqu’il y a de la distorsion : Essayez de diminuer le volume sur l’appareil d’entrée audio ou
l’instrument de musique. Essayez également de réduire le volume général du Party Rocker
Plus.
Lorsqu’il y a trop de basses fréquences : Essayez de régler le niveau de tonalité et
d’égalisation sur l’appareil de source d’entrée audio afin de diminuer le niveau des basses
fréquences. Cela vous permettra d'augmenter le volume de la musique avant que l'écrêtage
se produise.
Lorsqu’il y a un sifflement aigu lors de l’utilisation des microphones : Ceci est
probablement causé par l’effet Larsen (feedback). Dirigez les microphones loin des
haut-parleurs.
Si vous ne pouvez entendre le microphone au-dessus de la musique : diminuez le volume
de la musique de la source audio.
3
12

15
Guida rapida (Italiano)
Introduzione
Contenuti della confezione
Party Rocker Plus
Microfono e cavo
Cavo aux stereo da 3,5 mm
Cavo di alimentazione
Guida rapida
Istruzioni di sicurezza e garanzia
Assistenza
Per conoscere le ultime informazioni in merito a questo prodotto (i requisiti di sistema complete,
compatibilità, ecc) e per la registrazione del prodotto, recarsi alla pagina ionaudio.com.
Batterie ricaricabili
Le batterie ricaricabili al piombo-acido sono dello stesso tipo di quelle utilizzate nelle
automobili. Come nel caso della batteria dell'auto, la maniera in cui si utilizza questa batteria
ha un notevole impatto sulla sua vita utile. Con un utilizzo adeguato, una batteria al piombo-
acido può durare per anni. Ecco alcune raccomandazioni per garantire la massima durata
dalla batteria interna.
Utilizzo generico
Caricare a fondo il prodotto prima dell'uso.
Caricare a fondo il prodotto prima di riporlo.
Come riporre
l’apparecchio
Per la massima longevità del prodotto, evitare di riporlo a temperature
eccessivamente elevate (superiori a 90°F/32°C) o eccessivamente
fredde (meno di 32°F/0°C).
L'impianto audio può essere lasciato collegato. Così facendo la
batteria non si sovraccarica.
Se si lascia il livello della batteria basso e non la si ricarica per 6 mesi,
potrebbe perdere capacità in via permanente.
Riparazioni Se la batteria non si carica, contattare il dipartimento parti di ricambio
alla pagina ionaudio.com.
Come eliminare
l’apparecchio
Recarsi con l’apparecchio presso un centro di riciclaggio oppure
eliminarlo in conformità con le normative locali.

16
Inizio rapido
1. Assicurarsi che tutti gli elementi elencati nel paragrafo Introduzione > Contenuti della
confezione sul frontespizio della presente guida si trovino nella confezione.
2. Leggere attentamente il libretto delle istruzioni di sicurezza prima di utilizzare il prodotto.
3. Per ottenere prestazioni ottimali, collocare l'Party Rocker Plus al centro della stanza in
modo che non sia ostacolato da pareti, mobili, ecc.
4. Abbassare il Volume Master sul Party Rocker Plus.
5. Accendere il Party Rocker Plus.
6. Collegare il lettore musicale con un cavo audio o Bluetooth (per maggiori informazioni in
merito, si veda il paragrafo Collegamento di un dispositivo Bluetooth).
7. Regolare il volume del lettore musicale e del Party Rocker Plus come desiderato.
8. Regolare l'interruttore Light Mode (modalità luce) sul Party Rocker Plus come desiderato.
9. Spegnere il Party Rocker Plus quando non è in uso.
Schema dei collegamenti
Elementi non elencati sotto Introduzione > Contenuti della confezione sono venduti separatamente.
Smartphone,
tablet, ecc.
Alimentazione
Microfono

17
Caratteristiche
Pannello anteriore
1. Ingresso ausiliario: questo ingresso
stereo da 3,5 mm (1/8") può essere
utilizzato per collegare un téléphone,
un lettore MP3 o altre sorgenti audio.
2. Ingressi microfono con controllo di
guadagno volume (1/4"): questi
ingressi mono accettare un ingresso
da 6,35 mm (1/4") quali un microfono,
chitarra o altro strumento musicale.
3. LED di alimentazione/carica: indica i diversi stati di attività del Party Rocker Plus.
•LED verde fisso = il Party Rocker Plus è acceso
•LED giallo fisso = la batteria è in ricarica con l'alimentazione accesa
•LED verde fisso/giallo lampeggiante = il Party Rocker Plus è acceso e la batteria è
scarica
•LED rosso fisso = la batteria è in ricarica con l'alimentazione spenta
•LED SPENTO =L'alimentazione è spenta, il cavo di alimentazione è collegato e la
batteria è carica
4. Bluetooth LED/Pulsante scollega: il LED sarà acceso quando un dispositivo è
accoppiato al Party Rocker Plus. Il LED non sarà acceso quando il Party Rocker Plus viene
acceso (a meno che non fosse accoppiato in precedenza con un dispositivo). Premere il
pulsante per scollegare di un dispositivo Bluetooth accoppiato.
5. Tutte le luci accese/spente: premere questo tasto per accendere e spegnere tutte le luci.
6. Modalità luci (light): Vi sono quattro modalità tra cui scegliere per come la cupola
reagisce alla musica:
•Beat Sync: le luci a cupola girano e cambiano colore al ritmo della musica che sta
suonando.
•Auto: le luci a cupola girano e cambiano colore con uno schema predeterminato,
indipendentemente dal beat della musica che sta suonando.
•Single Color (colore singolo): le luci cambiano un colore alla volta e non si muovono.
•Freeze: tutti i colori rimangono accesi e immobili fino a quando non viene selezionata
un'altra modalità.
•Off: le luci a cupola si spengono.
7. Tasti luce: servirsi di questi tasti per accendere o spegnere ciascun colore della cupola –
rosso, verde, blu, bianco, rosa e arancione.
8. Echo: servirsi di questa manopola per aggiungere o rimuovere un effetto eco al Ingressi
microfono.
9. Comando volume Master: questo comando regola il volume principale di mix
dell'altoparlante, che comprende l'ingresso microfono, l'ingresso ausiliario (aux), e l'audio
di un dispositivo Bluetooth accoppiato.
1
2
3
4
57
6
89

18
Pannello posteriore
1. Interruttore di alimentazione On/Off:
accende o spegne il Party Rocker Plus.
2. Ingresso cavo di alimentazione (IEC):
inserire il cavo di alimentazione in dotazione
per alimentazione l'apparecchio.
3. Dome (cupola): la cupola luce può girare e
reagire alla musica che viene riprodotta (a
seconda della modalità luci selezionata).
Avvertenza: non guardare direttamente la lampada a cupola. Non sedersi, stare in piedi,
né applicare pressione sulla lampada a cupola.
Collegamento a un dispositivo Bluetooth
1. Accendere il dispositivo Bluetooth.
2. Accendere il Party Rocker Plus: entrerà automaticamente in modalità di accoppiamento
per cercare dispositivi Bluetooth. Siete in modalità di accoppiamento quando il LED è
spenta.
3. Se il dispositivo Bluetooth non è in grado di allinearsi con l'amp, premere il tasto di
scollegamento sull'amp per interrompere precedenti collegamenti Bluetooth e resettare il
modulo Bluetooth.
4. Navigare nella schermata di configurazione del dispositivo Bluetooth, trovare “Party
Rocker Plus” e collegarlo.
Nota bene: se il dispositivo Bluetooth richiede un codice, inserire ‘0000’.
5. Il accoppiato LED del Party Rocker Plus rimarrà illuminato quando è "accoppiato".
Nota bene: in caso di problemi nell'accoppiare gli apparecchi o nel riprodurre la musica,
aggiornare il sistema operativo del dispositivo.
6. Per annullare il collegamento, premere il pulsante "Disconnect" (scollega) sul Party Rocker
Plus.
7. Per collegarlo ad un altro dispositivo Bluetooth, ripetere i passaggi 3-4.
Nota bene: la portata massima sarà raggiunta utilizzando dispositivi dotati di Bluetooth 4.0.
Risoluzione di problemi
Il suono è distorto: provare ad abbassare il volume della propria fonte audio o dello
strumento musicale. Inoltre, provare a ridurre il volume complessivo del Party Rocker Plus.
Eccessivi bassi: provare a regolare la tonalità o il comando EQ a livello della fonte audio per
abbasare il livello dei bassi. Ciò permetterà di suonare la musica più forte prima che salti (che
si verifichi distorsione).
Quando si utilizzano i microfoni si verifica un fischio ad alto pitch: si tratta probabilmente
di ritorno. Puntare i microfoni lontani dalle casse.
Se non si sente il microfono al di sopra del volume della musica: abbassare il volume della
musica a livello della fonte.
3
12

19
Schnellstart-Anleitung (Deutsch)
Einführung
Lieferumfang
Party Rocker Plus
Mikrofon und Kabel
3,5 mm Stereo Aux-Kabel
Netzkabel
Schnellstart-Anleitung
Sicherheitshinweise und Garantieinformationen
Kundendienst
Für aktuelledie neuesten Informationen zu diesem Produkt (Systemanforderungen, Informationen
zur Kompatibilität etc.) und zur Produktregistrierung besuchen Sie ionaudio.com.
Wiederaufladbare Batterien
Bei wiederaufladbaren Bleibatterien handelt es sich um die gleiche Art von Batterien, die in
Autos verwendet werden. Und wie bei Ihrer Autobatterie ist es auch für die Benutzungsdauer
dieser Batterie von äußerster Wichtigkeit, wie sie verwendet wird. Bei vorschriftsmäßigem
Gebrauch und richtiger Pflege kann eine Bleibatterie jahrelang halten. Lesen Sie die
nachstehenden Empfehlungen, um aus der eingebauten Batterie das Beste herauszuholen.
Allgemeine
Verwendung
Laden Sie den Akku vollständig auf, bevor Sie ihn verwenden.
Laden Sie den Akku nach jedem Gebrauch vollständig auf.
Aufbewahrung Lagern Sie das Produkt nie bei extrem warmen (mehr als 32°C / 90°F) oder
übermäßig kalten (weniger als 0°C / 32°F) Temperaturen, um die optimale
Langlebigkeit zu erzielen.
Sie können Ihr Sound-System angesteckt lassen. Der Akku wird dabei nicht
überladen.
Wenn Ihr Akku einen niedrigen Ladestand hat und Sie ihn 6 Monate lang
nicht aufladen, kann er dauerhaft an Kapazität verlieren.
Reparatur Wenn sich der Akku nicht aufladen lässt, kontaktieren Sie ION Audio über
ionaudio.com.
Entsorgung Bringen Sie das Gerät in ein Recyclingzentrum oder entsorgen Sie es
entsprechend lokaler Verordnungen.

20
Schnelles Einrichten
1. Achten Sie darauf, dass alle am Beginn dieser Anleitung aufgeführten Teile in der
Schachtel enthalten sind.
2. Lesen Sie die Sicherheitshinweise, bevor Sie das Produkt verwenden.
3. Um eine optimale Leistung zu erzielen, platzieren Sie Party Rocker Plus am besten in der
Raummitte, damit das Gerät nicht durch Wände, Möbel usw. behindert wird.
4. Regeln Sie die Gesamtlautstärke am Party Rocker Plus herunter.
5. Schalten Sie den Party Rocker Plus ein.
6. Verbinden Sie Ihren Musik-Player mit einem Audiokabel oder via Bluetooth (siehe
Verbindung mit einem Bluetooth-Gerät für weitere Details zu diesem Thema).
7. Stellen Sie die Lautstärke auf Ihrem Musik-Player und am Party Rocker Plus nach Wunsch
ein.
8. Stellen Sie den Lichtmodus-Schalter am Party Rocker Plus nach Bedarf ein.
9. Schalten Sie den Party Rocker Plus aus, wenn das Gerät nicht in Gebrauch ist.
Anschlussdiagramm
Teile, die nicht unter Einführung > Lieferumfang angegeben sind, sind separat erhältlich.
Smartphone,
Tablet, usw.
Stromversorgung
Mikrofon
Other manuals for Party Rocker Plus
2
Table of contents
Languages:
Other ION Speakers manuals

ION
ION Party Bot Micro User manual

ION
ION Trio LP User manual

ION
ION Highlander iPA103B User manual

ION
ION Explorer Bluetooth User manual

ION
ION Total PA Max User manual

ION
ION Block Rocker Bluetooth M5 User manual

ION
ION Glow Rocker User manual

ION
ION WATER ROCKER User manual

ION
ION Total PA Pro User manual

ION
ION UBER BOOM User manual

ION
ION patio mate User manual

ION
ION PROFILE LP User manual

ION
ION PATHFINDER GO User manual

ION
ION GEODE ROCK SPEAKERS User manual

ION
ION Party Rocker Plus User manual

ION
ION PHONESTATION User manual

ION
ION Clipster User manual

ION
ION PATHFINDER 320 User manual

ION
ION SPORT XL iPA103A User manual

ION
ION IPA150X User manual