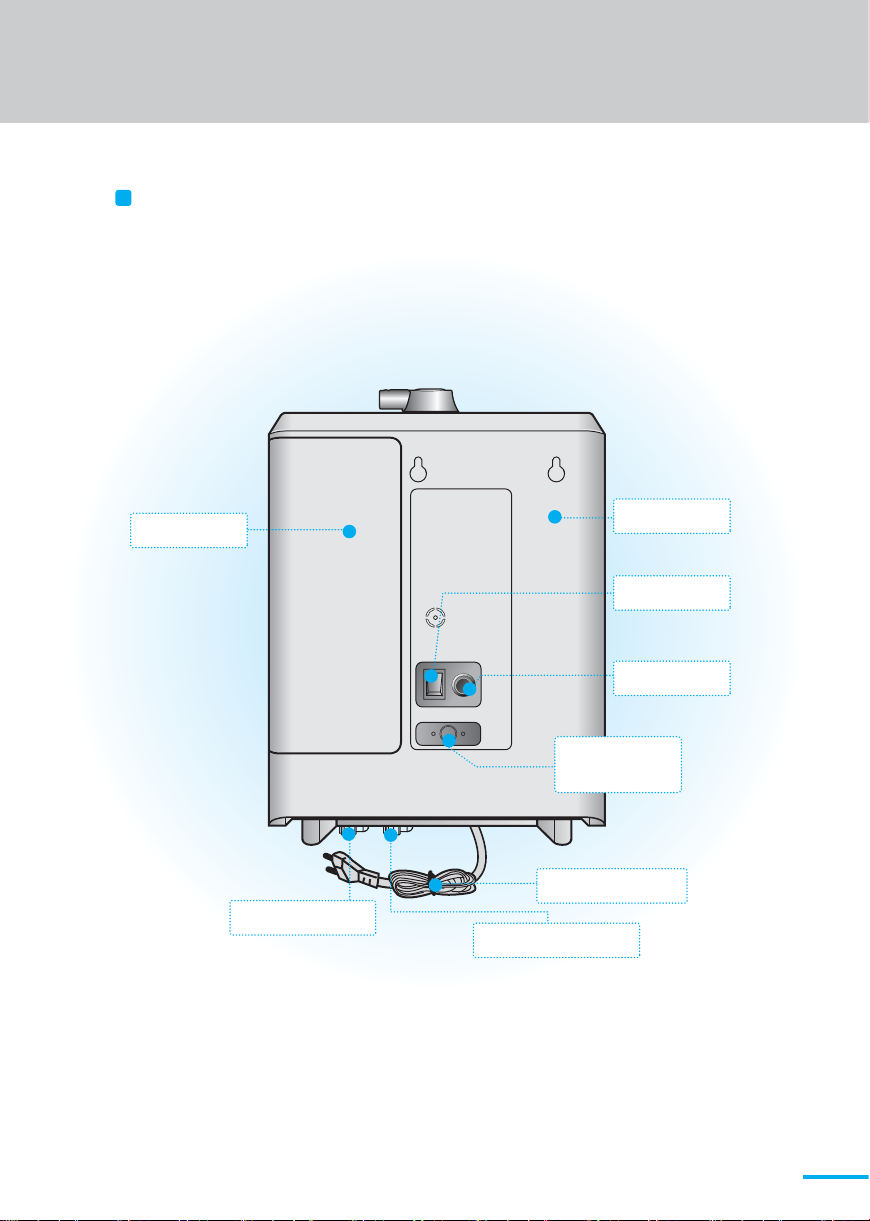
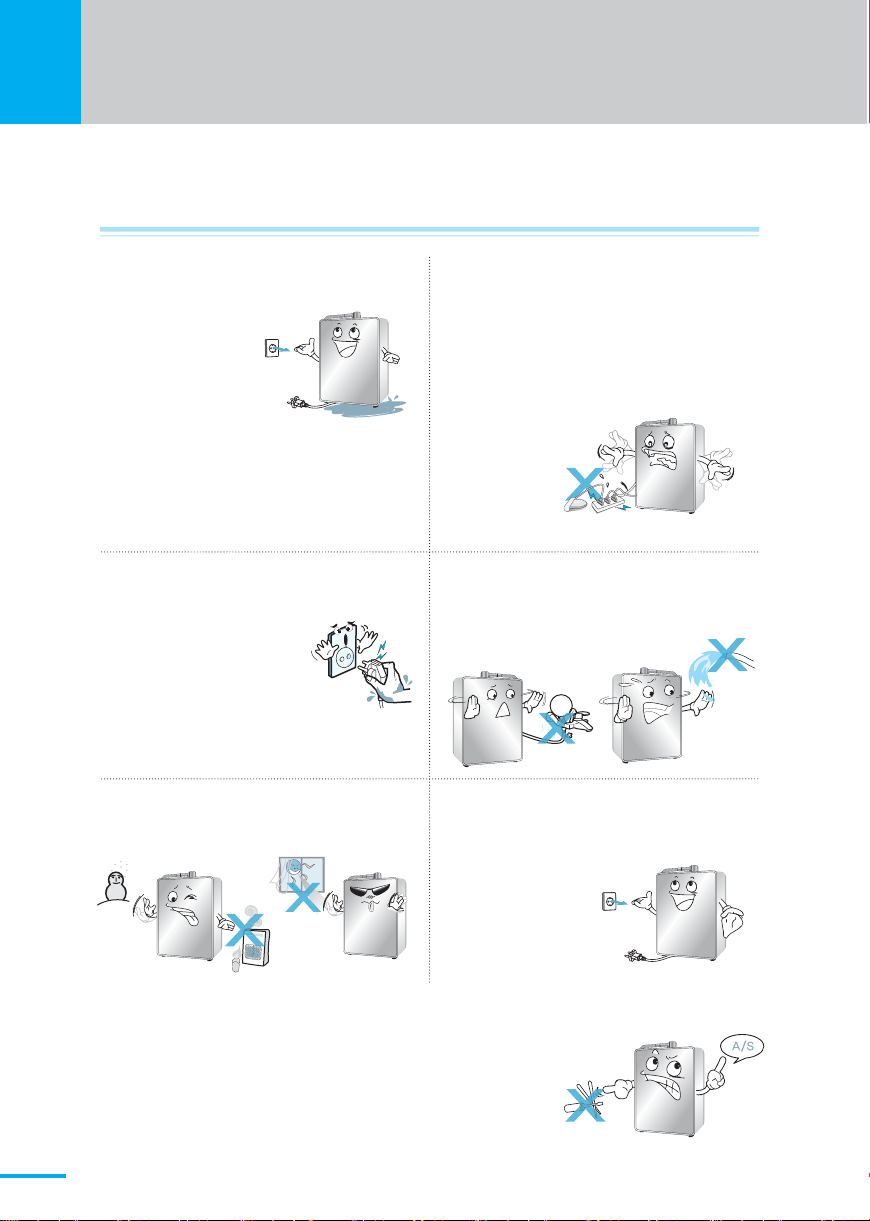
IONIA U-BLUE Instructions for use

Owner’s Operation Manual
Warning: Incorrect installation and/or operation could void your valuable warranty.
Please protect your investment! READ THIS MANUAL CAREFULLY
ALKALINE WATER IONIZER
Renement of Alkaline Ionized water(Hexagonal & Hydrogen Water)
U-BLUE

02
Safety Precautions
Hot
Water
If a break down occurs, do not make a repair by yourself. Contact the place of
purchase or A/S center.
If your ionizer becomes submerged
in water, unplug the power cord from
the wall BEFORE removing the
ionizer from the water.
Failure to do so may
cause electric shock!
NEVER attempt to repair or service the unit
yourself.
Contact your dealer.
Attempting to do so will void your valuable
warranty!
Do not use your ionizer at voltages other than
specified.
Do not plug in your ionizer where it will exceed
the rating of outlet or electric wiring.
Failure to do so can result in fire, injury and / or
damage to yourself, wiring or ionizer!
NEVER touch the power cord or plug with
wet hands.
- this may result in electric shock!
Protect your ionizer from freezing temperatures.
Protect your ionizer from direct sunlight.
Ensure the power plug is firmly and
properly inserted into the outlet.
- failure to do so may result in electric
shock or fire!
Do not attempt to repair or service the unit yourself. Contact your dealer.
Attempting to do so will void your valuable warranty!
Make sure to use your ionizer only with potable water which is suitable for
human consumption.
DO NOT use your ionizer with well water, water with extreme hardness,
high sediment or TDS levels without first consulting your dealer.
Do not run hot water through your ionizer.
Do not clean by pouring water over or spraying
the ionizer.
Unplug your ionizer if you plan not to use it for an
extended period or turn off the main power switch
on the back of the unit.
Filter replacement may be
necessary

03
Do not close, bend, pinch, press or otherwise
obstruct output ports or hoses.
If the appliance makes strange or unusual noises
or burning smells are detected, unplug the power
cord immediately and contact your dealer to
arrange service.
pH Reagent Liquid Precautions
Some helpful tips
Some helpful tips
Do not expose the pH measuring reagent to extreme heat, flames or fire.
It is combustible.
For storing your alkaline water, glass or ceramic is best. Always try and
keep your stored water cool and away from direct sunlight.
You can use plastic, but only use lexan (number7) or poly bottles
(Nalge type). It is always best fresh out of the machine and ideal
if consumed on a day-today basis.
Do not store alkaline water in stainless steel, bronze or
aluminum containers.
Save the box and Styrofoam your ionizer came packed in.
This will help if your ionizer needs to be transported at a later date.
Do not use an ionizer downstream of a sodium-based ion exchange
softening system or Reverse Osmosis system without first consulting
with your dealer.
Do not drink the pH reagent liquid, put it in the eyes or apply to the body.
- If the liquid is ingested, induce vomiting immediately and call a doctor.
- If the liquid gets in the eyes, flush immediately and thoroughly with
cool water; call a doctor.
- If spilled or dropped on your body, wash if off immediately.
Make sure to keep the pH reagent liquid tightly closed and out of the
reach of children.

04
Name and functions of partsⅠ
Front
Body
Alkaline outlet cap

05
Back
Faucet cable
harness port
AC Power cord
Acdic water outlet
Tap water inlet
Fuse holder
Main switch
Rear cover
Filter cover

06
Name and functions of partsⅠ
Ⅰ
Acidic Water Outlet
Alkaline Water Outlet
Function display panel
Body
Faucet

07
Display
Power button
Start and stops water flow into your ionizer.
pH level indicator
This 4 of LEDs display will indicate which level(1~4) is selected.
Alkaline select button
Used to select alkaline water and the desired level(1~4).
Acidic select button
Used to select acidic water and the desired level(1~4).
Filtered Only select button
Used to select filtered water Ionization is not functioning in this mode.
Filter life indicator
Displays the current filter life used.
When the color change the Orange and flickers, it is time to replace your filter.
Filtered water button
Acidic water button
Power button
pH level indicator
Alkaline water button
Filter life indicator

08
Accessories (Needed for faucet installation)
Caution
Product Requirement :
Water pressure should be maintained at a constant rate, when the water pressure is
too low, water cannot flow through the unit.
Alkaline Water
Outlet Adapter
(Hole size: 5/16”)
Please connect to top cap of ionizer
for installation Faucet.
Color chart Manual
Manual
Dust Pre-filter
Connector cordDiverter
Gasket
(installed under
the Faucet)Circle Plate
Faucet
pH test kit
Large Alkaline
Water Fitting Small Acidic
Water Fitting
Hose(5/16")
(Alkaline
Water Hose)
Hose(1/4")
(Acidic Tap
Water Hose)
Alkaline Water
Outlet Adapter
Accessories

How to install the faucet
09
All the fittings are push in style fittings. To attach the hoses to any fitting, firmly insert the end of
the hose into the fitting. Pull firmly to check to connection - you should not be able to pull the
hose out. To release the hose from the fitting, you must push the spring loaded ring protruding
from the end of the fitting while pulling the hose out.
WARNING: Incorrect installation could void your valuable warranty.
Professional installation is recommended.
Use appropriate tools to make 1.14in.
diameter hole in the location where you will set
up the faucet. Make sure the faucet location will
allow both spouts to reach the sink.
After the faucet is fixed, connect it to fitting
with 5/16 in hose(for Alkaline) like figure4.
Check the hose whether it is inserted properly
or not. Also, connect it with 1/4” hose(for Acidic)
like figure4 and connect the faucet to the body
with connector cord.
Once, centered secure the faucet to the counter
by tightening the circle nut under counter until the
faucet is secure and sufficiently tight.
Center the faucet in the hole properly over
the gasket.
To connect the faucet
Figure1
Figure2
Figure3
Figure4
2
1
3
4

How to install
Place the Ionizer in an appropriate place under your sink.
Connect the 1/4inch Acidic Water Hose to the small fitting on the Acidic Hose extending
from the faucet to Acidic Water Outlet on the Ionizer. Pull firmly to check to connection
You should not be able to pull the hose out.
Connect 5/16 inch Alkaline Water Hose attached to the Fitting of the faucet to the
Alkaline Water Outlet on the ionizer. Pull firmly to check to connection - you should not
be able to pull the hose out.
Connect the diverter between the Tap water pipe.
Install the dust pre-filter in the middle of 1/4 inch hose with the arrow pointed at the ionizer.
Connect the 1/4 inch hose with dust pre-filter to Tap Water Inlet on the bottom of the ionizer.
Pull firmly to check to connection you should not be able to pull the hose out.
Join the wire from the faucet to the Connect Wire(Harness). Plug the Connector Cord into
the Connector Port on the top of the ionizer.
6
5
7
8
9
10
Tap Water
Diverter

How to use
Power up your ionizer.
Turn the power button on.
Turn the power button to the "ON" position
on the back of the ionizer.
- The power button is ALWAYS left on.
Water supply
Supply water by opening the water supply valve.
To select Alkaline water
Initial operation
Start water flow through your ionizer.
- Press the "POWER" button on the top of your faucet to start the water flow.
NOTE: The water may initially come out discolored (light to charcoal gray) due to
carbon particulates in the new filter.
- This is not harmful and is typical of all carbon filters. Allow the water to flow for
2-3 minutes in the "Filtered" mode and this will flush all the carbon dust.
With the water running through your faucet then:
Press the "ALKALINE" button to select the desired setting from 1 - 4. The alkaline
water will come out from the top spout.
The display panel on the front of the faucet will show a blue Alkaline indicator and
blue number corresponding to the level selected.
NOTE : Your ionizer will always "remember" the last setting used.
If the previous selection was Alkaline Level 2, when you start flow through
the ionizer next time you use the ionizer it will automatically process at
Alkaline Level 2.
1
1
2
3
2
3
11
12
4
Connect the power cord into an appropriate outlet.
Make sure the outlet you plug your ionizer into is always live You must use a non-
switched outlet under the sink where you are installing the ionizer.
Power to the ionizer must always be on.

12
How to use
4
To select a different level, depress the "ALKALINE" button to move to next level until
the desired setting level is achieved. The blue number will change accordingly.
Acidic Water
Alkaline water levels Note: pH levels will always vary with different
source water.
Weak Alkaline water
This level is used for initial consumption
period (4-7 days). Let your body
adjust slowly to this increase in pH.
Weak to Medium Alkaline water
Move up to this level after the initial
adjustment period.
Adjust to this level for 3-4 days.
Most people will drink at level 2 or 3.
Strong Alkaline water
Generally, most people find this very
strong tasting and with powerful
detoxifying effects.
Medium to Strong Alkaline water
This is the most common level of
alkalinity for drinking purposes.
Some people may start to detect
a strong change in taste.
Alkaline Water
Level 1
Level 3
Level 2
Level 4
Level 1 Level 2 Level 3 Level 4

13
How to measure pH/ Wall hanger installation
1
2
3
4
Alkaline Water
Acidic Water
NOTE : Acidic water is used except for drinking. DO NOT DRINK
With the water running through your faucet then:
Press the "ACIDIC" button to select the desired setting.
The display panel will show an orange LEDs corresponding to the level selected.
The Acidic water will come out from the top spout.
To select a different level, depress the "ACIDIC" button to move to next level until
the desired setting level is achieved. The orange number will change accordingly.
NOTE : Your ionizer will always "remember" the last setting used.
If the previous selection was Acidic Level 2, when you start flow through
the ionizer next time you use the ionizer it will automatically process at
Acidic Level 2.
Descriptions of Acidic water levels Note: pH levels will vary with different
source water.
Weak Acidic water
Used for oral hygiene, mouth wash etc.
Weak to Medium Acidic water
For skin care, as an astringent.
Strong Acidic water
For sterilization purposes.
Medium to Strong Acidic water
For cleaning in the kitchen.
Level 1
Level 3
Level 2
Level 4
To select Acidic water
Level 1 Level 2 Level 3 Level 4

14
How to use
With the water running through your faucet, press the “Filtered Only” button.
The display panel will show a green symbol.
The Filtered water will come out of the top spout.
Filtered Water
With the water running through your faucet then depress
the power button. The water will stop and the display panel
will go dark indicating the ionizer is in standby or "asleep".
How to shut off the water flow from your ionizer
To select Filtered Only water

15
1
3
4
2
User can regulate the electrical current of the water
ionizer based on the water source.
Press the "FILTERED" button for 5 seconds
on the faucet.
Press the "ALKALINE" button to raise to the
desired setting, and depress the "ACIDIC"
button to lower to the desired setting.
To fix the setting you selected, depress
the "POWER" button on the faucet.
With the beep sound, the default setting
level 4 appears on the pH level indicator
of the display panel.
(You can select the desired setting from 1-7)
Raise (+) Lower (-)
Ex) Level 4
Level 1 Level 2 Level 3 Level 4 Level 5 Level 6 Level 7
How to set your individual pH levels

16
How to replace the filter
When the LED filter life indicator lighting,
it is time to replace your filter.
1
2
3
Open the filter housing cover.
slide the cover to the left and remove it.
IMPORTANT!
Stop water flow prior to filter replacement.
Remove the expired filter.
- Taking hold of the filter securely with your right hand, press the filter firmly down
against the spring loaded mechanism (figure1) to disengage the top of the filter
and then pull it toward you (figure2) and up to remove it.
- The upper part of the filter is separated from housing by
pressing firmly down. Once you have engaged the spring
loaded mechanism, you can then easily remove the filter
from the main body by pulling it toward you.

17
4
5
6
7
Insert the new filter into the compartment.
- Remove the plastic caps covering both ends of the new filter.
- Seat the large opening on the bottom of the filter cartridge
onto the base in the center of the filter cushion.
- Push the filter down and into the housing compartment
ensuring the opening at the top of the filter is seated
properly into the fitting at the top of the housing.
Check for leakage by running water through your ionizer before
replacing the housing cover.
Flush out the carbon dust.
- The water will initially come out discolored (light to charcoal
gray) due to carbon particulates in the new filter.
Allow the water to flow for 2-3 minutes in the "Purified" mode
and this will flush all the carbon dust.
Immediately after filter replacement, the water will come
out black and unclear due to the activated carbon particulates in the new filter but will
become clear momentarily. (It is not harmful.)
Press the reset button(Alkaline Button) located on the top of the faucet,
and depress for 4 seconds.
NOTE: When filter life indicator is reset, and also when machine is new,
the “FILTER REPLACE” light will not be flashing.
for 4 seconds

18
Filter Composition
Composition of filter(optional)
Change filter when follow phenomena occur even filter change icon does not flicker.
- When water flows little because filter is blocked due to heavily contaminated water
- When water smells because seriously contaminated water is flowed in
- When lots of foreign substance in water (turbid water, invisible substance) is eliminated in a short time
- When reusing it after you do not use it for a long time
Effective period of use of filter may differ greatly depending on season and usage
environment (quality and pressure of water and amount of use)
It is better to use UF(Combined hollow fiber membrane) filter initially, with power off,
after making water of 20ℓ(1㎏f/㎠) flow for approx. 5 minutes at minimum without fail,
in order to eliminate hydrophilic substance.
(If water pressure is below 1㎏f/㎠, a time longer than 5 minutes is needed)
Caution
Recommended period for changing filter
Reference
High Performance Carbon Filter High Performance UF Filter
Activated Carbon
Fiber Filter
Fiber Filter
Fiber Filter
Ultra-Hollow
Membrane
Mesh Gauze
Fiber Filter
KDF55
Activated Carbon

19
Fill one of the test container provided about 1/4 full
with alkaline, acidic or purified water.
Drop 2 or 3 drops of the pH reagent into the
container and shake it.
If the reagent and water are not mixed well,
the correct result may not be and shake it.
How to measure pH
Caution
Important Note: Water quality and mineral content vary greatly in different Iocalities
and will directly impact performance of your ionizer with respect to pH.
The pH value is determined by matching the color
the pH color chart provided.
-DO NOT consume water containing reagent.
-Keep the pH reagent Iiquid, color chart, and OPEN FLAMES!
-For contact with eyes, flush Iiberally with fresh water, seek medical help.
-If ingested, induce vomiting, seek medical help.
PURIFIED
WATER
ALKALINE
WATER
ACIDIC
WATER
2
1
3
How to measure pH

20
Trouble Shooting Guide
The Function Display
Panel does not come on. A power plug is not properly
inserted, or it is inserted into a
faulty outlet.
The fuse is blown.
The fuse is not inserted properly.
ResolutionCause(s) Abnormal condition
Properly insert power plug into
a correctly functioning power
outlet
Replace the fuse. A spare fuse is
located in the rear-panel fuse
holder. (3A / 250V fuse)
pH test shows alkaline water
color as neutral (7) while
acidic water color gets
yellow (6). This is normal
if initial pH is 6.5
Faulty or evaporated reagent:
alkaline / acidity are always
produced in inverse proportion.
Therefore, showing an acidic
color means inversely that alkaline
water has to be generated from
the unit.
Lack of alkaline color can result
from a chemical reaction where
carbonic acid in water evaporates
some test reagent elements.
Test pH value on level
3 or 4 water;
replace reagent.
Power supply is suddenly
cut off while operating the
unit.
Elevated level of salt in the
water or high TDS; extended
operation at high pH;
sudden change in electrical
current. In these cases your
machine will shut down
automatically to protect the
electrodes and circuitry.
Wait - the unit will become
operational again after about
one hour. Your Machine has a
safety mechanism built-in to
protect the electrodes and
circuitry. This mechanism will
shut the Machine down
automatically. This mechanism
protects the unit from overuse
or excessive electric current.
Low output of alkaline water
from the unit. Filter is clogged. Premature
clogging may be caused by
sudden drop in water quality and
an influx of sediment or other
contaminants, which stress
the filter.
Low pressure in your household
plumbing.
The input hose is bent, kinked or
otherwise restricted.
Replace your filter.
Clean Pre-filter
Ensure water supply valves are
fully open. The water pressure
in house may be too low.
Straighten the bent hose.
Table of contents
Popular Other manuals by other brands

Kohler
Kohler RIALTO K-3386-JA installation instructions

AND
AND AD-1688 instruction manual

Franklin Fueling Systems
Franklin Fueling Systems APT installation instructions

Mobotix
Mobotix M26 Allround Quick install

Majestic
Majestic Rio Case 2 Dimension & installation guide

IceCap
IceCap K2-50 quick start guide

Plantronics
Plantronics BLACKWIRE C210-M Quick setup guide

PowerBlast
PowerBlast P200 Owner's Manual and Operating Instructions

Safety 1st
Safety 1st GA090 user guide

Telcoma Automations
Telcoma Automations SNAP 4 Operation and Programming Instructions

SilverStone
SilverStone LC10 manual

Dacor
Dacor Epicure PN AFG36 installation instructions