ionmax Ray Ion801 User manual


Thank you for purchasing the Ionmax Ray Far Infrared Heater. The Ionmax
Ray produces far infrared (FIR) rays, simulating heat from the Sun. The Sun's
rays pass through the atmosphere and are absorbed by bodies or objects they
HQFRXQWHUZLWKRXWKHDWLQJWKHDLU),5UD\VHI¿FLHQWO\SDVVKHDWWRZKHUHLWLV
needed and function even in large areas, as they don't heat air that may be lost
to drafts or high ceilings.
Please read this manual carefully before use and keep it for future reference.
The package includes:
• Ionmax Ray Far Infrared Heater ION801
• User Manual
SAFETY INSTRUCTIONS 1
PRODUCT DIAGRAM 2
SPECIFICATIONS 2
FEATURES 3
CONTROL PANEL 4
OPERATING INSTRUCTIONS 4
MAINTENANCE INSTRUCTIONS 6
STORAGE INSTRUCTIONS 6
TROUBLESHOOTING GUIDE 7
WARRANTY DETAILS 8
WARRANTY REGISTRATION 9
DEAR CUSTOMER
CONTENTS

SAFETY INSTRUCTIONS
PLEASE READ ALL THE INSTRUCTIONS CAREFULLY BEFORE
USING THE FAR INFRARED HEATER AND SAVE THEM FOR FUTURE
REFERENCE.
This appliance is intended for domestic and light commercial use only. Any other use is not
UHFRPPHQGHGDQGPD\FDXVH¿UHHOHFWULFDOVKRFNVRURWKHULQMXU\WRSHUVRQVRUSURSHUW\
ƔUse only as directed in the User Manual.
ƔDo not allow children or persons with reduced physical, sensory, or mental capabilities to
operate the unit without adult supervision.
ƔOnly designed for use in a 200-240V, 50Hz outlet.
ƔThe heater must not be located immediately below a socket outlet.
ƔDo not use this heater with a programmer, timer, separate remote-control system or any
RWKHUGHYLFHWKDWVZLWFKHVWKHKHDWHURQDXWRPDWLFDOO\DVD¿UHULVNH[LVWVLIWKHKHDWHULV
covered or positioned incorrectly.
ƔDo not use this heater in the immediate surroundings of a bath, a shower or a swimming
pool, or in any situation where it could get wet.
Ɣ.HHSDOOÀDPPDEOHPDWHULDOVVXFKDVIXUQLWXUHEHGGLQJSDSHUFORWKLQJDQGFXUWDLQVDW
least 90 cm from the front and top of the appliance. Do not use the appliance in areas
ZKHUHJDVROLQHRURWKHUÀDPPDEOHOLTXLGVDUHXVHGRUVWRUHG
ƔThis appliance gets very hot when in use. To prevent burns, do not touch hot surfaces with
bare skin. Use the handle when moving the appliance. To prevent overheating and the risk
RI¿UH'2127FRYHUWKHDSSOLDQFHZKLOHLWLVLQRSHUDWLRQ
ƔConnect the appliance directly to a suitable outlet. DO NOT use this appliance with an
extension cord or outlet strip. To prevent current overload and blown fuses, make sure
that no other appliance is plugged into the same outlet or into another outlet wired into the
same circuit.
ƔIt is normal for the heater’s plug and cord to feel warm to the touch. However, an
excessively hot or deformed plug or cord is not normal and may be the result of a
defective electrical outlet. Defective outlets must be replaced before using the heater.
Plugging the heater into a worn outlet may result in overheating of the power cord or may
EHD¿UHULVN
ƔIf the supply cord is damaged, to reduce the risk of malfunction it must be replaced by the
PDQXIDFWXUHULWVVHUYLFHDJHQWRUDOLFHQVHGDQGTXDOL¿HGSURIHVVLRQDO
ƔMake sure that the plug is fully inserted into the outlet. Wall outlets may deteriorate with
time, so check the plug periodically for signs of overheating or deformation. If the outlet
has deteriorated, stop using it and have it repaired.
ƔTo protect against electrical shocks, do not immerse the unit, plug or cord in water, or
VSUD\ZLWKOLTXLGV
Ɣ7RSUHYHQWGDPDJHWRWKHXQLWVZLWFKWKHKHDWHURII¿UVWE\SUHVVLQJWKH67$1'%<NH\
before unplugging the power cord.
ƔDo not run the power cord under carpeting, or cover it with rugs or runners. Arrange the
cord away from areas where it may be tripped over.
Ɣ7RUHSDLUWKHXQLWWDNHLWWRDTXDOL¿HGVHUYLFHHQJLQHHU5HSDLUVFDUULHGRXWE\XQTXDOL¿HG
people may cause damage to the unit or injury to persons or property and void the
warranty.
1
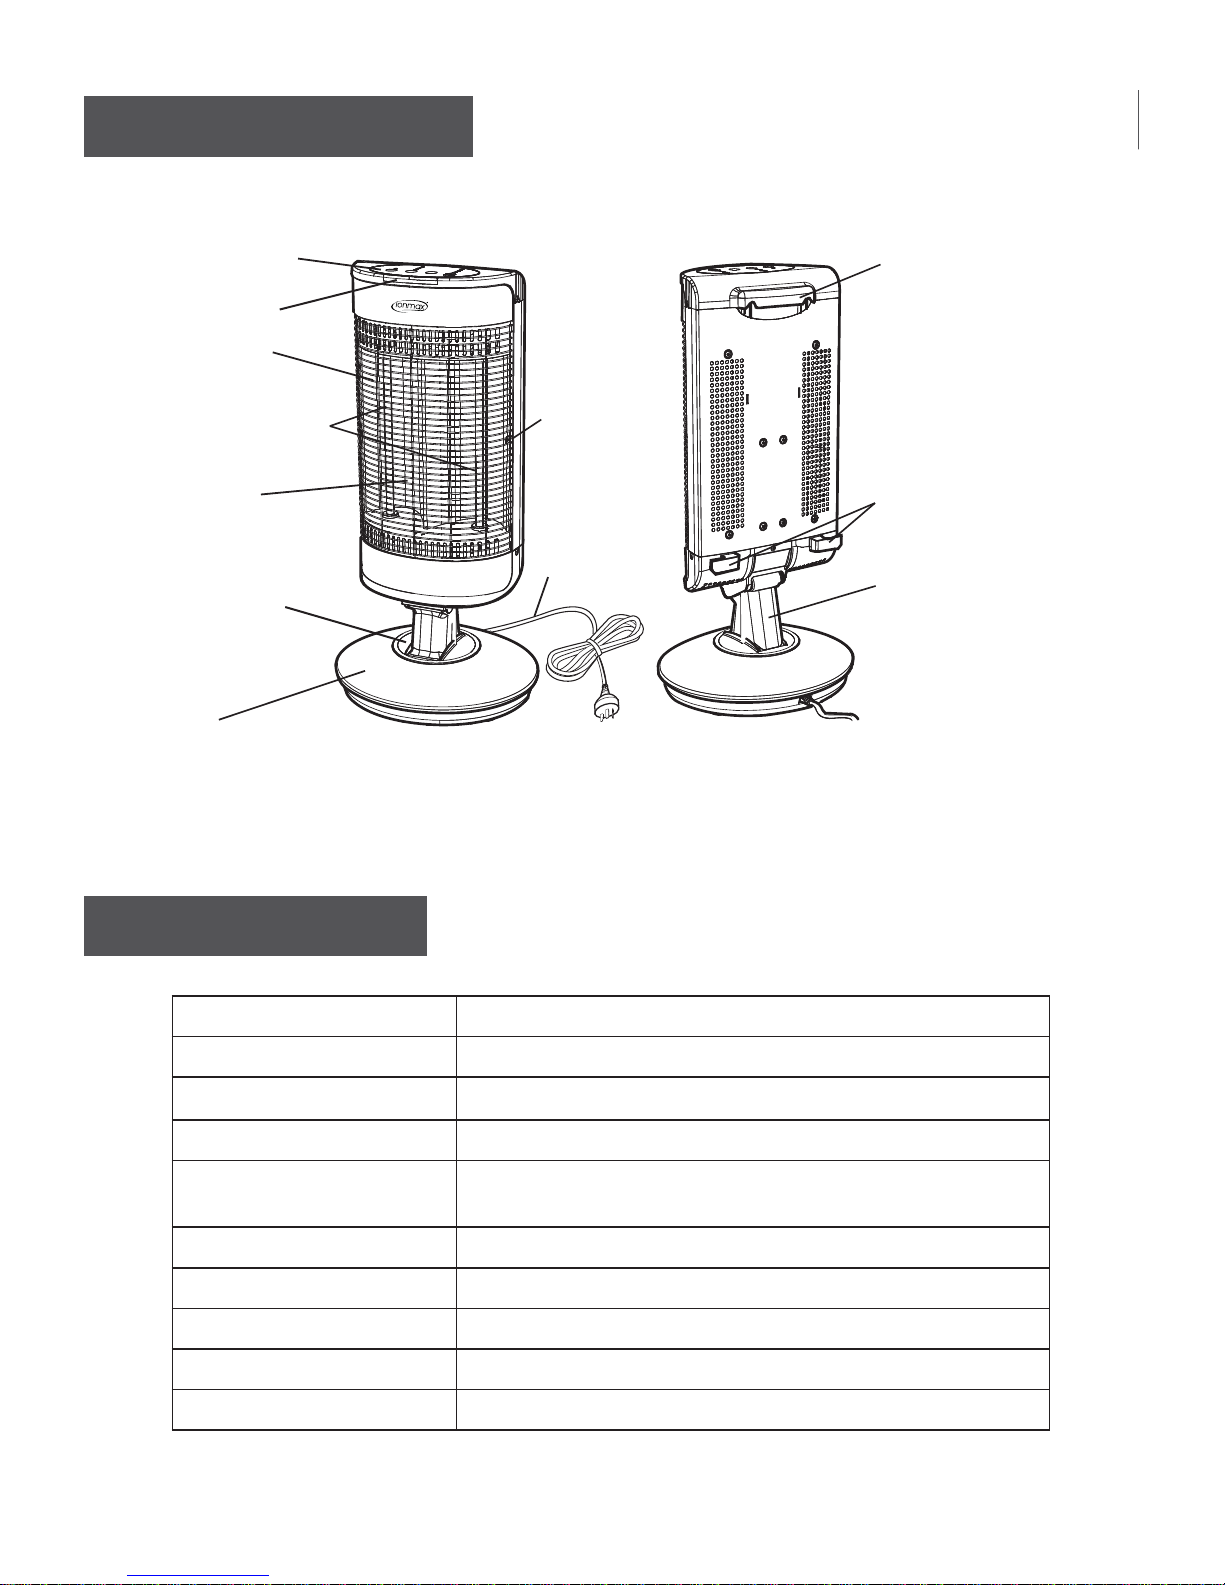
PRODUCT DIAGRAM
Model Ionmax ION801
Voltage 200-240V, 50Hz
Power Rating 200-1200W, 9 level adjustment
Timer 1 - 9 hour setting, automatic switch-off at 10 hours
Heating Elements 2 far infrared ceramic coating sheath heaters
(Average emissivity over 0.9)
Auto Swing 70°
Manual Rotate 60°
Tilt Angle Smooth 10° downward to 30° upward
Dimensions 354 (width) x 318 (depth) x 729 (height) mm
Weight 6.1 kg
SPECIFICATIONS
Control panel
Power light
Protective
grille
Sheath heaters
Reflector
(behind the heater)
Swing stand
(60° manual,
70° auto)
Base
Handle for lifting
and tilting
Power cord holder
Automatic
balance link
Fixing screw
for grille
Power cord
2
FEATURES
1. Instant far infrared heating. Heat is not wasted heating the air.
2. Thermal waves easily penetrate and warm up the body.
aȝPIDULQIUDUHG
3. Nine heat settings (200W to 1200W) to meet the needs of low power (for
near use) or high power (for far use).
4. 120° coverage (50° radiation and 70° auto swing. Additional 60° manual
DGMXVWPHQWIRU¿QHWXQLQJ
5. 1 - 9 hour timer (default 10-hour auto switch-off).
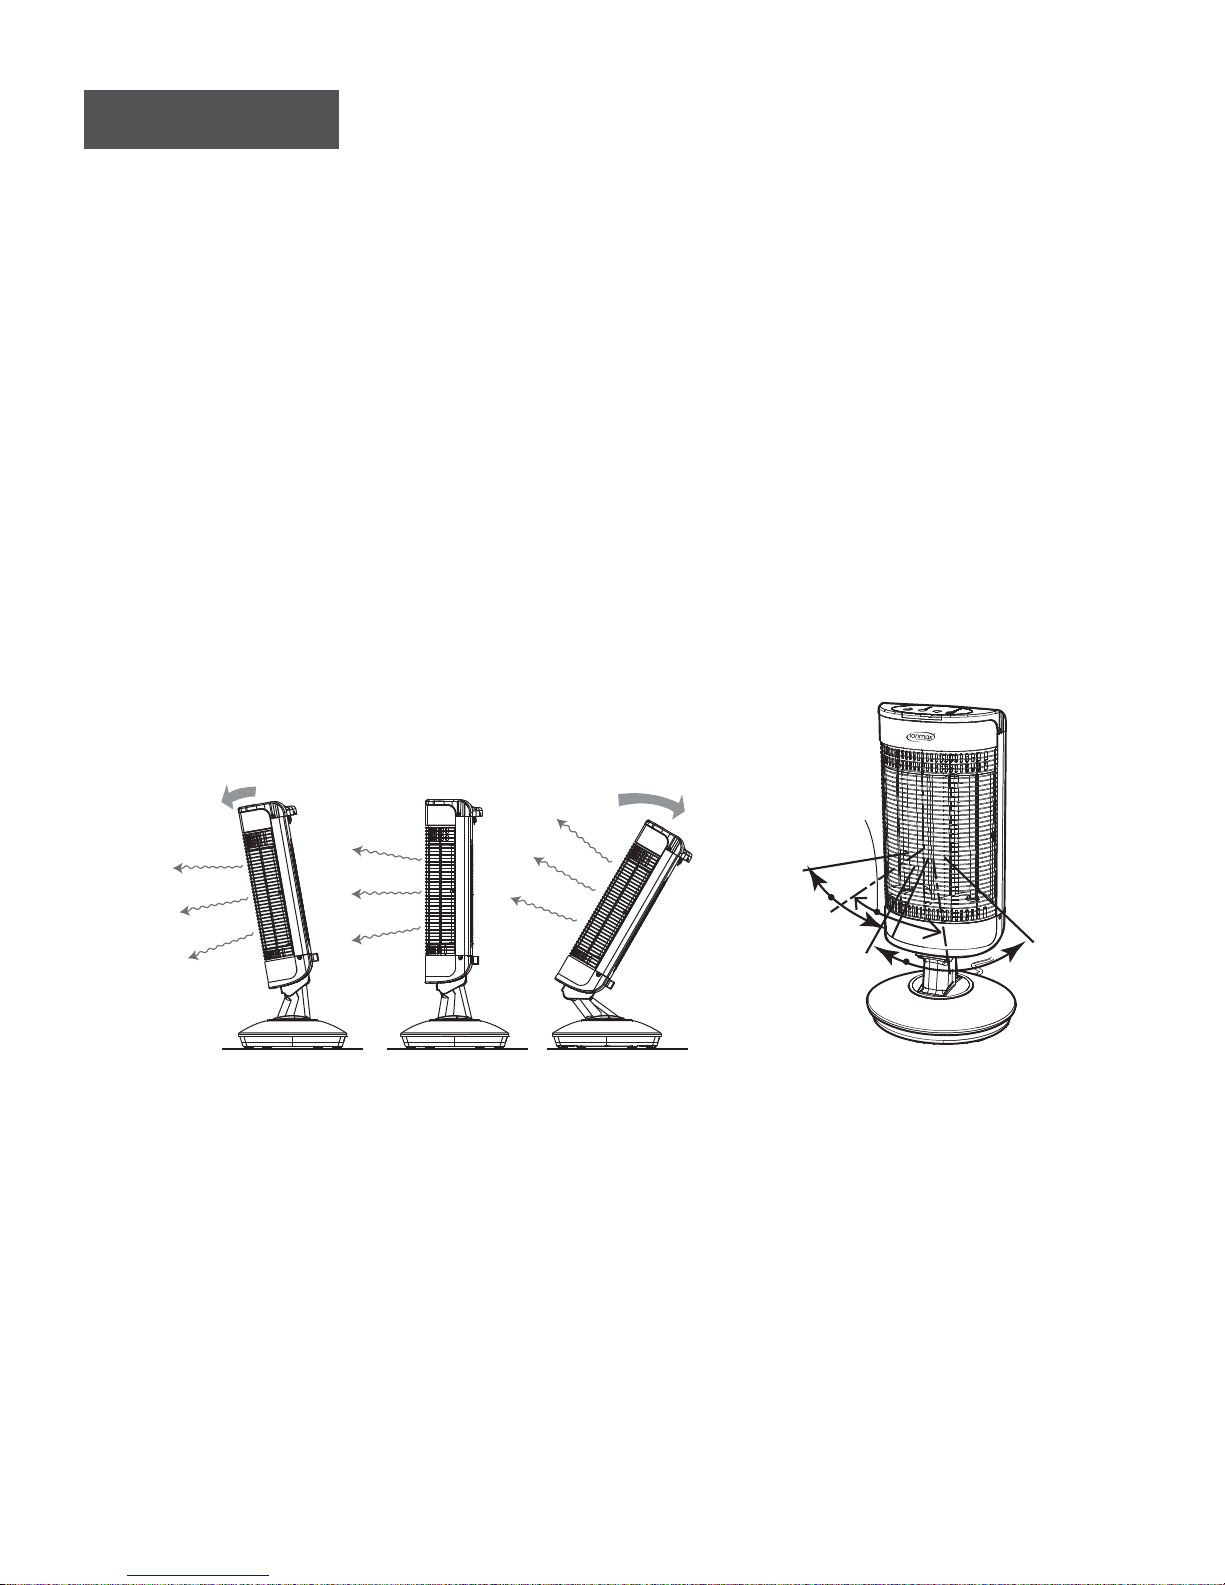
6. Versatile tilt: 10° downward and 30° upward.
7. Top handle for easy lifting and tilting adjustments.
8. Smart postures for automatic balance.
The body of the unit can be manually tilted between 10 degrees forward
(downward) and 30 degrees backward (upward). The unit will keep itself
balanced.
10° downward 30° upwardVertical
60°
manual
rotation
70°
auto swing
3
OPERATING INSTRUCTIONS
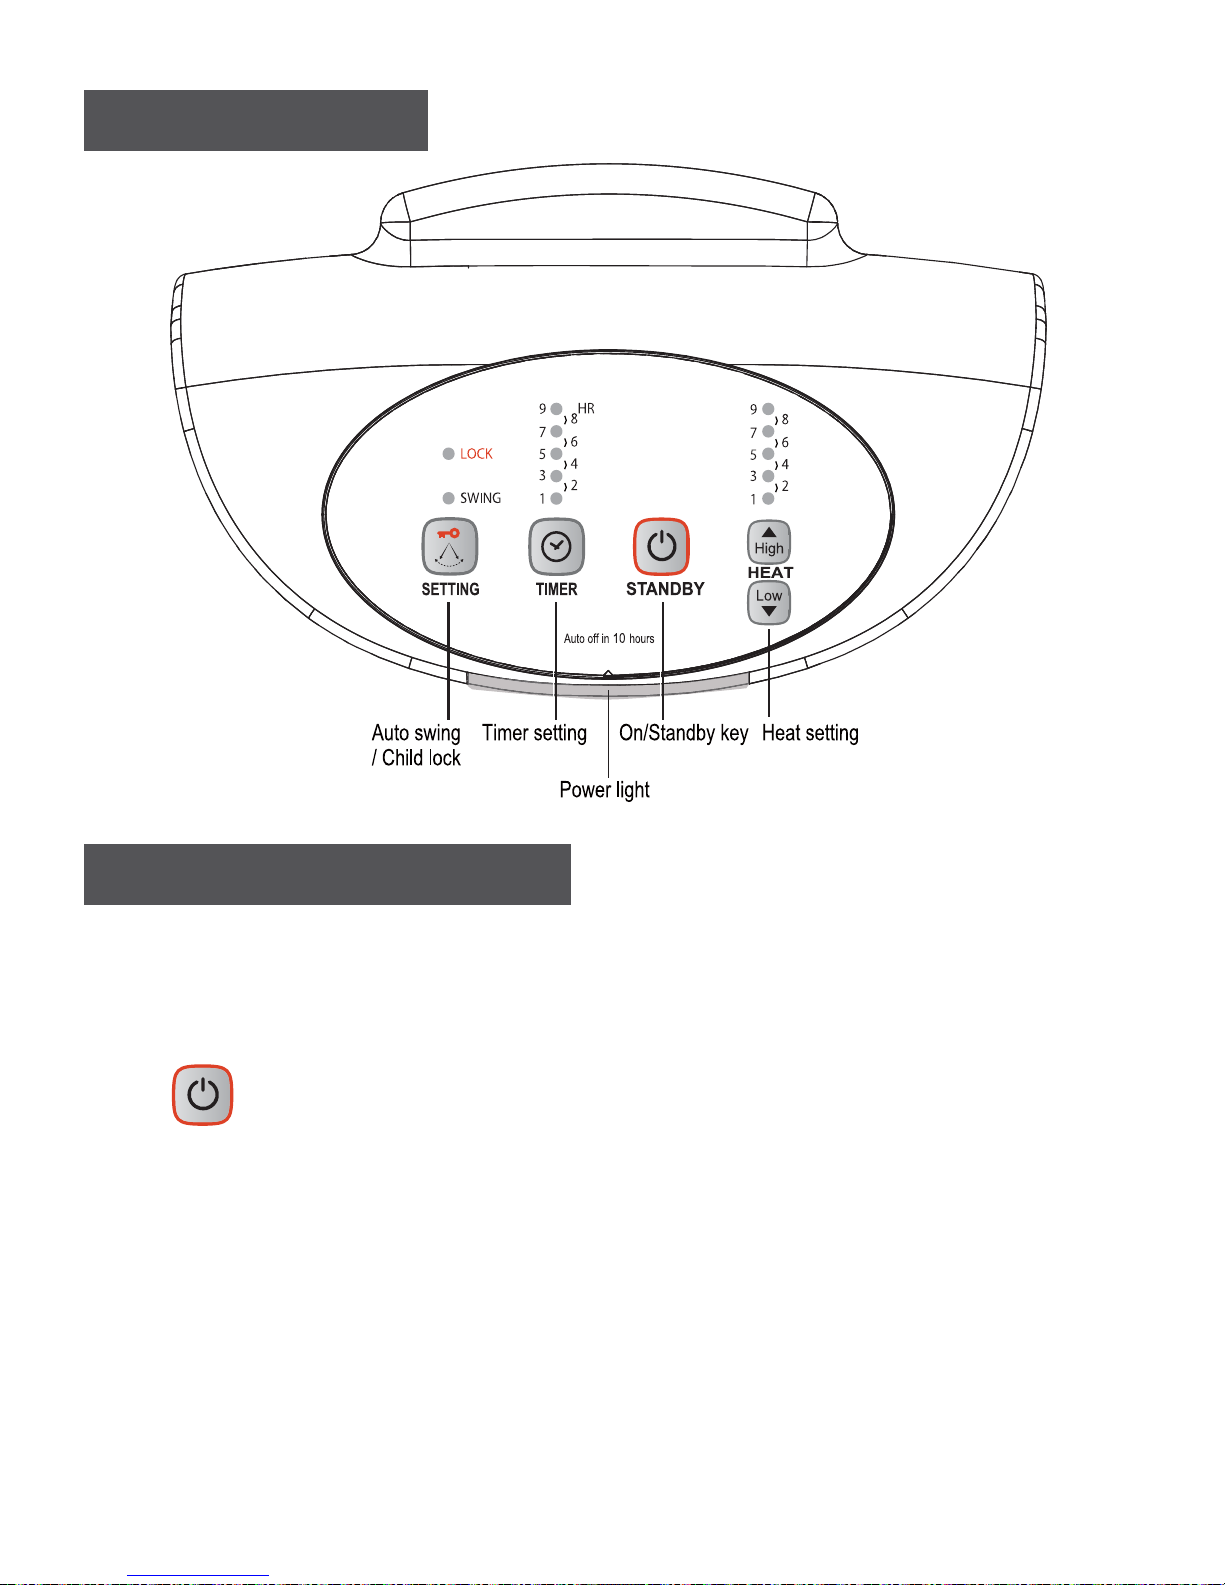
CONTROL PANEL
3ODFHWKHXQLWRQDÀDWVWDEOHVXUIDFH
Note: For safety reasons, the unit will automatically shut itself off when tilted or
if it falls over.
STANDBY
Connect the power plug to the appropriate electrical socket outlet.
The heater is preset to remain switched off after initial connection to a power
outlet.
Press the STANDBY key to turn the appliance ON. Power light will illuminate.
Press the STANDBY key again to return device to Standby mode. Power light
will switch off.
Wattage and swing settings will be resumed the next time it is switched on (if
there is no power failure).
4

HEAT SETTING
There are 9 heat settings.
3UHVVWKH+LJKNH\RU/RZNH\WRLQFUHDVHRUGHFUHDVHWKHKHDWOHYHO
One or two LEDs will illuminate to indicate the heat setting.
TIMER SETTING
By default, the unit will only operate for 10 hours at a time when switched
RQ:KHQQR7,0(5LVVHWWKHWLPHU/('VDUHQRWLOOXPLQDWHGWKHXQLWZLOO
operate for 10 hours and turn off automatically.
Press the “TIMER” key to select the desired operating time (1 - 9 hours).
3UHVVLQJWKH7,0(5NH\RQFHDFWLYDWHVWKHWLPHUDWKRXU&RQWLQXHSUHVVLQJ
to extend hourly or to switch the timer function off.
One or two LEDs will illuminate to indicate the timer setting.
The unit will automatically switch off at the end of the selected time period.
As the timer counts down, the timer LEDs will change to indicate the time
remaining.
AUTO SWING or CHILD LOCK
Press the “SETTING” key to select Swing or Stop. The swing angle is 70°.
When swinging, the “Swing” LED illuminates.
The unit can be manually rotated through 60°. The swing is based on the
manually rotated position.
Press and hold the “SETTING” key for 3 seconds to set the Child Lock mode.
Press the key for another 3 seconds to release the Child Lock mode. When
locked, the “Lock” LED illuminates.
When the unit is switched on and Child Lock is set, only Standby and Child
Lock release can be activated.
Child Lock can also be set when the unit is switched off. When switched off and
locked, no other key (except Child Lock release) can be activated.
5

Clean the unit regularly or when there is dust inside the grille and on the
UHÀHFWRUVXUIDFHDVGXVWEXLOGXSPD\UHGXFHWKHWKHUPDOUHÀHFWLRQSHUIRUPDQFH
DQGFDQLQFUHDVHWKHULVNRI¿UH
To clean the unit:
1) Switch off and unplug the unit. Wait until the unit has completely cooled
down.
5HOHDVHWKH¿[LQJVFUHZIRUWKHSURWHFWLYHJULOOH
3) Gently slide the protective grille up to release the lower right corner.
4) Slide the protective grille back down to release the upper right corner.
5) Open the grille as shown.
8VHDVRIWGU\FORWKRUGDPSEXW127GULSSLQJZHWWRFOHDQWKHUHÀHFWRUV
and other surfaces.
7) After cleaning, close the grille and reattach it in the reverse order of removal.
'2127RSHUDWHWKHXQLW:,7+287¿[LQJWKHJULOOHLQSRVLWLRQ
1) Make sure the unit is unplugged and dry.
2) Cover it and store in a cool, dry place.
MAINTENANCE INSTRUCTIONS
STORAGE INSTRUCTIONS
6
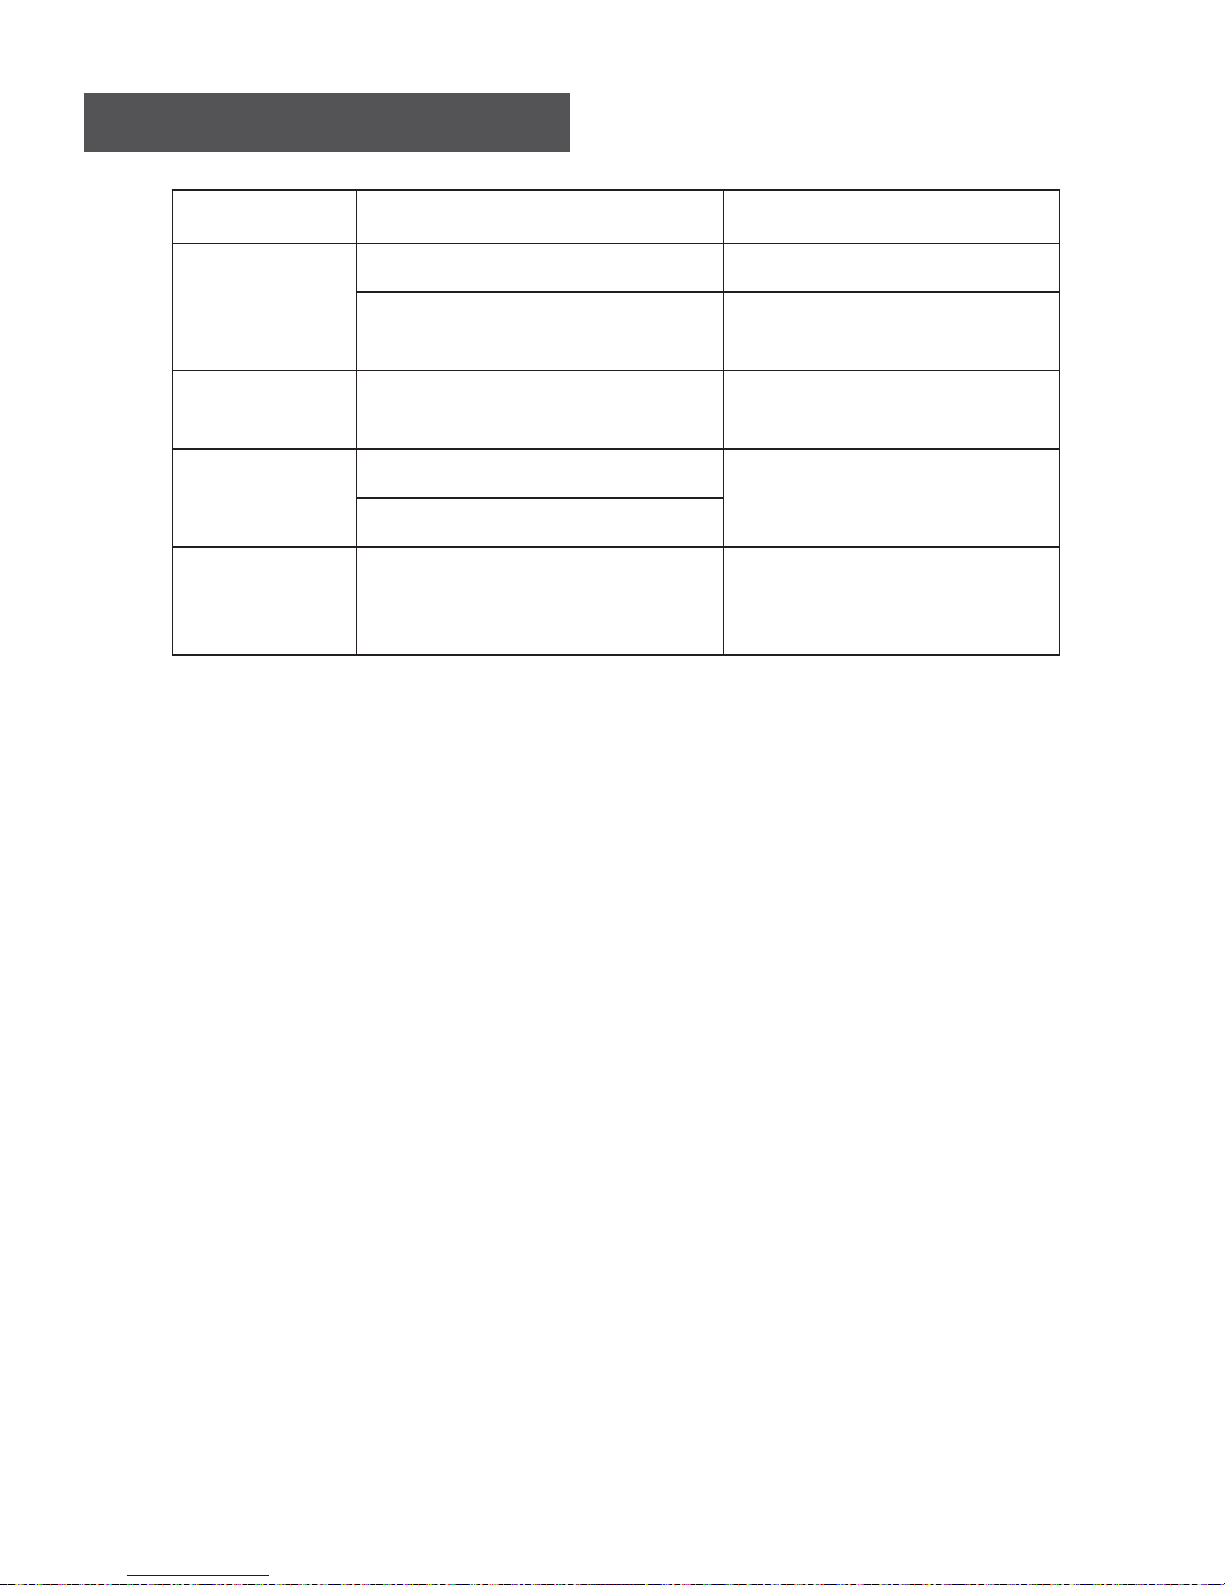
TROUBLESHOOTING GUIDE
Problem Probable Cause Solution
Unit not
operating
Power cable not plugged in Plug in power cable
Power cable not plugged in
properly
Plug in power cable
correctly
Burning
smell
Excessive dust buildup on
UHÀHFWRUV
&OHDQUHÀHFWRUV
Abnormal
noise
Loose parts inside the unit Contact customer service
centre
Swing motor faulty
Indicator
lights not
switching on
Product circuit control failure Contact customer service
centre
7

WARRANTY DETAILS
Congratulations on your purchase! It is our aim to provide you with quality products
that you can trust. Our products come with guarantees that cannot be excluded under the
Australian Consumer Law. You are entitled to a replacement or a refund for a major failure and
for compensation for any other reasonably foreseeable loss or damage.
You are also entitled to have the goods repaired or replaced if the goods fail to be of
acceptable quality and the failure does not amount to a major failure.
The Guarantee
The product is guaranteed to be free from defects in workmanship and parts for a period
of 12 months from date of purchase. Defects that occur within this warranty period, under
normal use and care, will be repaired, replaced or refunded at our discretion, solely at our
NOSHNMØVHSGØMNØBG@QFDØENQØO@QSRØ@MCØK@ANTQØ3GDØADMDÚSRØBNMEDQQDCØAXØSGHRØV@QQ@MSXØ@QDØHMØ
addition to all rights and remedies in respect of the product that the consumer has under the
Trade Practices Act and similar state laws.
Proof of Purchase
This warranty is valid for the original purchase and is not transferable. Please keep your
purchase docket or receipt as proof of purchase and as proof of date on which the purchase
was made. The purchase docket (or a copy) or receipt must be presented with the warranty
when making a claim under this warranty.
Service during the Warranty Period
(Return Authorisation Number) or submit a support ticket on my.andatech.com.au. Ensure
that the RA# is clearly stated on the outside of the packaging and that the product is properly
packaged so that no damage occurs to the product during transit. Shipping of the product
back to us for warranty will be at your cost. A product return without the RA# or proof of
purchase will not be accepted.
Extent of Warranty
This warranty is limited to defects in workmanship or parts. All defective products or parts will
be repaired or replaced. This warranty does not cover manuals and packaging.
Normal Wear and Tear
This warranty does not cover normal wear and tear to the product or parts.
Exclusions
This warranty does not cover:
• Any defect caused by an accident, misuse, abuse, improper operation, lack of reasonable
B@QDØTM@TSGNQHRDCØLNCHÚB@SHNMØKNRRØNEØO@QSRØS@LODQHMFØNQØ@SSDLOSDCØQDO@HQØAXØ@ØODQRNMØ
not authorised by the distributor.
• Any product that has been damaged by a lightning strike either directly or indirectly or a
main power surge or liquid ingress.
• The product if it is located outside of Australia.
• Any damage caused by improper power input or improper cable connection.
Andatech
PO Box 3038, Nunawading VIC 3131, Australia.
Table of contents
Popular Heater manuals by other brands

oventrop
oventrop Regucor Series quick start guide

Blaze King
Blaze King CLARITY CL2118.IPI.1 Operation & installation manual

ELMEKO
ELMEKO ML 150 Installation and operating manual

BN Thermic
BN Thermic 830T instructions

KING
KING K Series Installation, operation & maintenance instructions

Empire Comfort Systems
Empire Comfort Systems RH-50-5 Installation instructions and owner's manual

Well Straler
Well Straler RC-16B user guide

EUROM
EUROM 333299 instruction manual

Heylo
Heylo K 170 operating instructions

Eterna
Eterna TR70W installation instructions

Clarke
Clarke GRH15 Operation & maintenance instructions

Empire Heating Systems
Empire Heating Systems WCC65 Installation and owner's instructions


