IRIS BLW-C2 User manual

CONTENT PAGE
Safety Precautions........................ 1
Parts .................................. 3
Usage Instructions
Range of Applications. . . . . . . . . . . . . . . . . . . . . . 5
Operation Instructions ..................... 6
How to Use.............................. 7
Cleaning and Maintenance..................12
Other
Troubleshooting ..........................13
Specifications. . . . . . . . . . . . . . . . . . . . . . . . . . . . 14
Warranty ...............................15
TIMER
TEMPERATURE
START/ON
CLEAR/OFF
PRESET FUNCTIONS
WINTER SUMMER
WARM UP
Dust Mite Eliminator
MODE
TIME MINS
SETTINGS
POWER SUPPLY
by IRIS USA, Inc.
Model BLW-C2
Thank you for your purchase. Please read this instruction manual carefully to ensure proper
use. Read all safety precautions prior to use. Please store this instruction manual in a safe
place for future reference.
READ AND SAVE THESE INSTRUCTIONS
Blanket Warmer

Disassembly prohibited.
• Do not disassemble, repair, or modify. Doing so can cause fire, electric shock, or injury.
• Repair by persons other than trained repair technicians can be dangerous.
Product use.
• Use on a level, stable surface. Placing product on uneven and unstable surfaces can cause the product to fall
over, leading to injury or damage to property in the vicinity of the product.
• Always grasp the power plug to unplug it, do not unplug it by pulling on the power cord. Pulling on the power
cord can damage it, which can cause fire or electric shock.
• Always unplug the power plug from the electric socket when the product will be unused for extended periods
of time. Failing to do so can lead to fire or electric shock caused by short-circuits due to reduced insulation.
• Do not move the machine while in use. Doing so may cause burns.
• Please perform cleaning and maintenance after the product has cooled down. Not doing so may cause
burns.
Unplug.
• Unplug the power plug from the electric socket when performing maintenance, inspecting, or moving the
product. Do not modify the plug in any way.
• Grasp the plug and remove from the receptacle or other outlet device. Do not unplug by pulling on the cord.
• When removing the power plug from the socket, please ensure that the machine has stopped running. Not
doing so may cause damage to the plug blades or socket, or may cause a fire.
• This appliance has a polarized plug (one blade is wider than the other). To reduce the risk of electric shock,
this plug is intended to fit in a polarized outlet only one way. If the plug does not fit fully in the outlet, reverse
the plug. If it still does not fit, contact a qualified electrician. Do not modify the plug in any way.
Use power plugs and power cords correctly.
• Failing to do so can cause fire or electric shock due to short-circuits.
• Insert the power plug securely all the way into the electric socket.
• Regularly remove dust from the power plug.
• When dust is allowed to build up, insulation is hampered due to moisture, which can cause fire or electric
shock.
• Use only 120V AC. Other current/voltage can cause fires.
• Do not use if the power cord or the power plug is damaged, or if the power plug is loose when plugged into
the electric socket. Doing so can cause fire or electric shock due to short-circuit.
• Do not wind the cord around the product when not in use as this may cause product failure.
Do not damage the power cord.
• Damaging, modifying, forcefully bending, pulling, twisting, putting heavy objects, or pinching can damage
the power cord, which can cause fire or electric shock.
• Do not use if the power cord is bundled up. Doing so can cause fires. Always extend the cord out before
using.
• Do not pull on the power cord when carrying or storing the product. Pulling on the power cord can cause fire
or electric shock.
• Do not pull or lift the product by holding the cord. This may cause damage to the cord or fire.
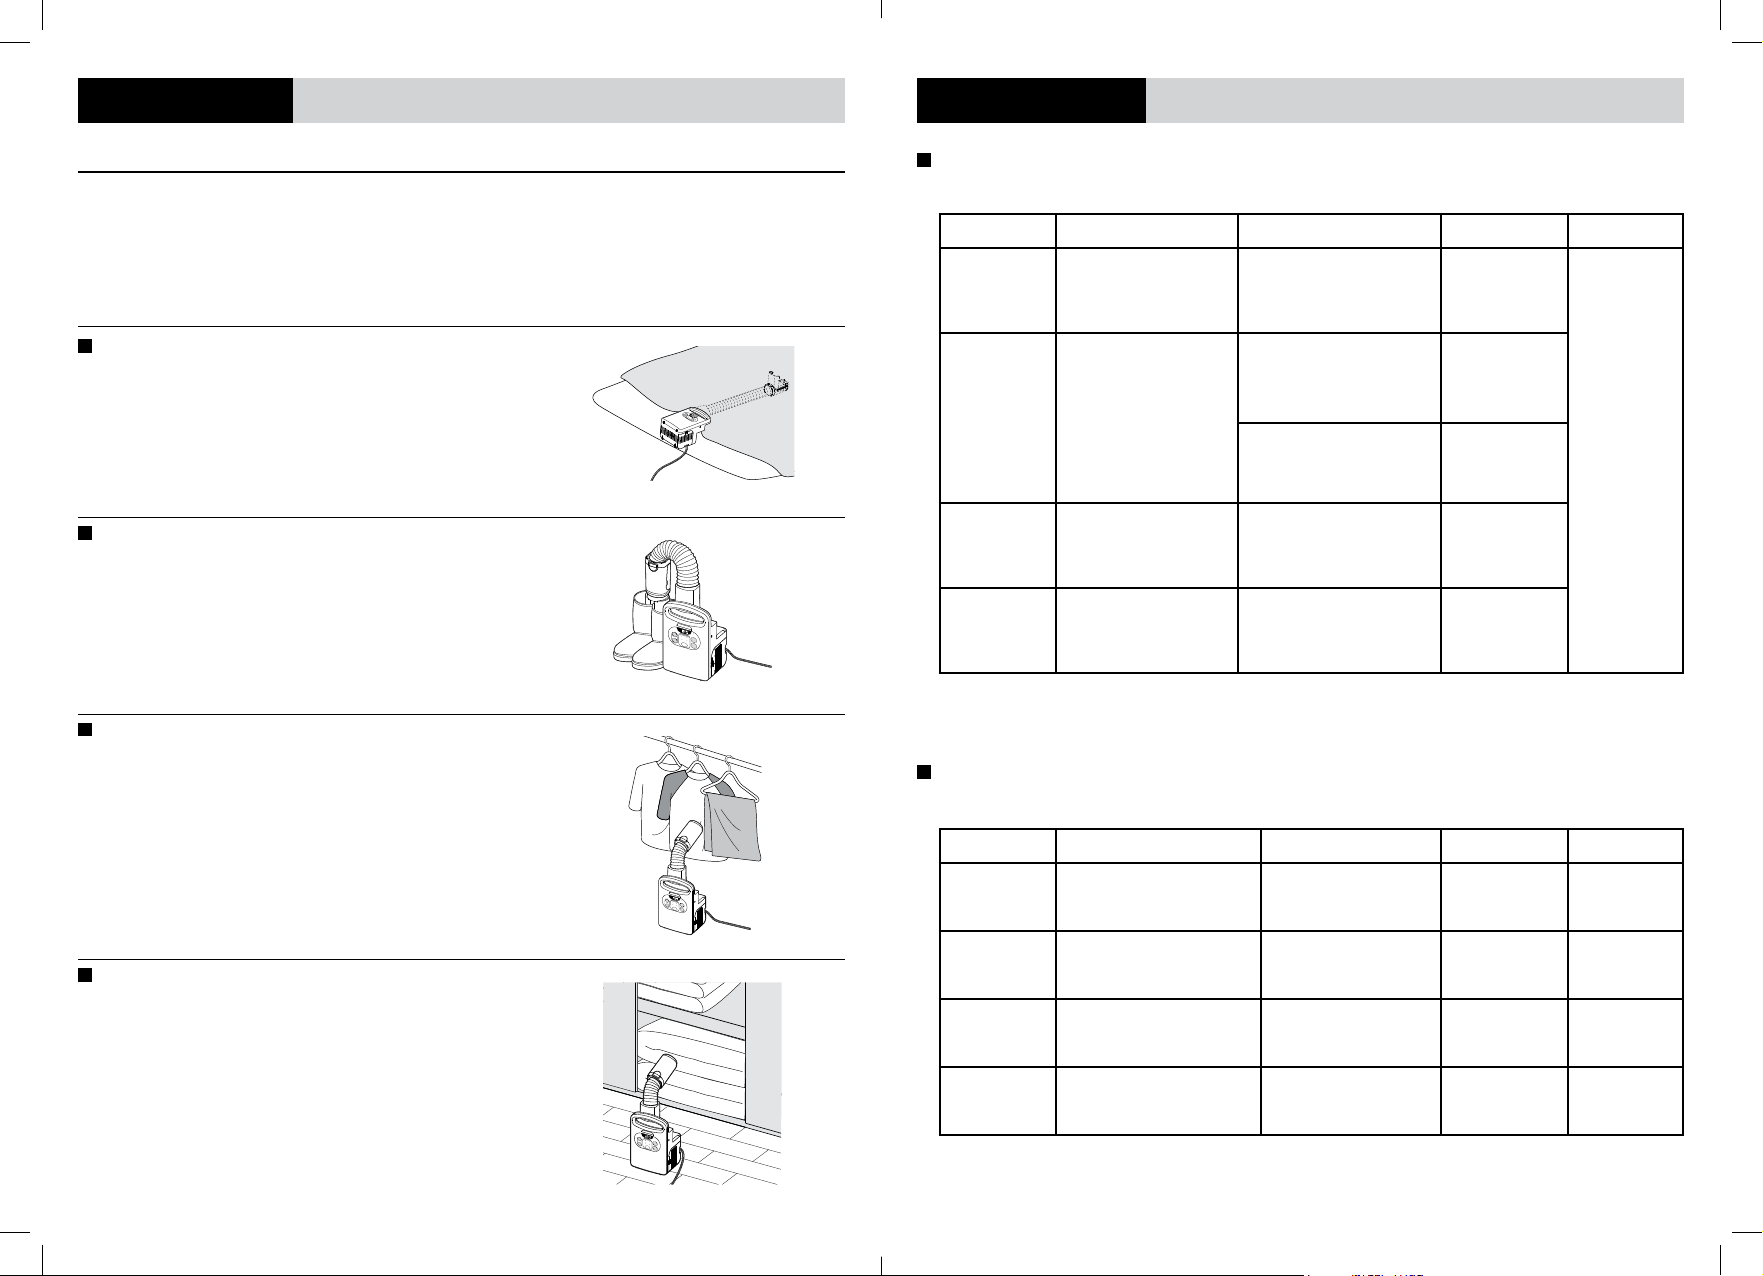
Do not damage the hose.
• Do not move the product by holding the hose. This may cause the main body to fall and cause injury. Make
sure to hold the handle tightly when moving the product.
• Do not pull or lift the product by holding the hose. This may cause the main body to fall and cause damage to
the hose.
• Please do not use the product with the hose folded.
• Please do not pull the hose by force.
Abnormalities and malfunctions can cause smoke, re, or electric shock.
Stop use immediately, cut power, and unplug from the electric socket when abnormalities or malfunctions occur.
Examples of Abnormalities
• Abnormal sounds or odors.
• Power plug or power cord become abnormally hot.
• Loss of power, etc. when power cord is moved.
• The product periodically stops during operation.
• Tingling sensation from electric current felt when the product is touched.
• Stop use and contact IRIS USA, Inc. customer service at 1-800-320-4747
Avoid re hazards.
• Do not spray with insecticides, hair sprays, or lubrication oils, etc.
• Do not use near flammable substances (kerosene, gasoline, paint thinner, etc.), objects that have flames
(cigarettes, incense, etc.) or combustible materials. Can cause fires.
• Do not block air flow in or out. This may cause the product to overheat and cause a fire.
• Do not put any foreign materials such as metal into the product. This may cause the product to overheat and
cause a fire.
• Do not use to dry clothes with oil or solvent stains. Oils, dry-cleaning solvents, gasoline, benzene, paint
thinner, or other such chemicals may cause clothing articles to combust or fire.
• Do not use the product with other sources of heat such as electric blankets or heaters. This may cause fire.
Wet hands prohibited.
• Do not unplug power plug when hands are wet.
Do not use the product outdoors.
• Do not use in rooms with high humidity levels such as bathrooms.
• Do not get the unit wet, or put the unit in water. Getting the product wet can cause fire or electric shock.
• Use in environments with salty or sooty air, such as coastal or thermal regions, may cause a decrease to the
length of the product life.
If handled incorrectly, contents can lead to personal injury or physical damage.
• Keep out of reach of children and infants.
• Do not climb or sit on the product. This may cause injury, machine failure, or damage.
• Do not drag the product when moving it. Dragging product can damage carpet and floors.
• Be especially mindful not to allow children or elderly people near product. Being near the product can be
harmful to their physical condition and to their health.
• During and immediately following use, do not use the blanket or allow pets on the blanket. Doing so may
cause burns.
• Do not point heat flow directly at a person or pet. Doing so may cause burns.
• Do not hang clothes on the air outlet while the machine is running. This may cause abnormal heating or
product failure.
• Do not put any part of the product into the blanket other than the hose. This may cause fire.
• Do not use the product in a wardrobe or closet while the door is closed. This may cause abnormal heating or
product failure.
• Do not use to dry dripping clothes. Doing so may cause electric shock.
• Do not use on products with low heat resistance such as leather or synthetic leather sofas or shoes, clothes
with low heat resistance, or items with screen printing. This may cause distortion or deterioration.
• Do not use the product on glass such as windows or mirrors. This may cause damage due to the sudden
temperature change.
SAFETY PRECAUTIONS
Prior to use, please read the safety precautions carefully to ensure proper use. The precautions listed here are described under
classification of Warnings and Cautions, and are intended to prevent harm or damages to users and other persons. All of these
precautions are critical in terms of safety. Please follow them at all times.
Graphic Symbol Indications: Indicates content that could lead to death or injury if handled incorrectly.
CAUTION PROHIBITED INSTRUCTIONS THAT MUST BE FOLLOWED
1 2

TIMER
TEMPERATURE
START/ON
CLEAR/OFF
PRESET FUNCTIONS
WINTER SUMMER
WARM UP
DustMite Eliminator
MODE
TIME MINS
SETTINGS
POWERSUPPLY
Extendable hose
Handle
Air outlet
Operational panel
Power plug
Power cord
Cover
Air flap
Air outlet
NozzleAir entry port (bottom)Air entry port (side)
TIMER
TEMPERATURE
START/ON
CLEAR/OFF
PRESET FUNCTIONS
WINTER SUMMER
WARMUP
DustMite Eliminator
MODE
TIME MINS
SETTINGS
POWERSUPPLY
TIMER
TEMPERATURE
START/ON
CLEAR/OFF
PRESET FUNCTIONS
WINTER SUMMER
WARMUP
DustMite Eliminator
MODE
TIME MINS
SETTINGS
POWERSUPPLY
Air outlets
Nozzle attachment
POWER SUPPLY indicator
CLEAR/OFF button
START/ON button
TIMER
TEMPERATURE
START/ON
CLEAR/OFF
PRESET FUNCTIONS
WINTER SUMMER
WARM UP
Dust Mite Eliminator
MODE
TIME MINS
SETTINGS
POWER SUPPLY
Manual settings
Remaining time (minutes)
Dust Mite Eliminator
Mode indicator
WINTER
SUMMER
WARM UP
MODE button
TIMER button
15 (minutes)
30
45
60
75
90
120
180
Temperature indicator
High temperature air
(about 149°F/65°C)
Low temperature air
(about 122°F/50°C)
Air blast
(room temperature)
High temperature air
(about 149°F/65°C)
Low temperature air
(about 122°F/50°C)
Air blast
(room temperature)
TEMPERATURE button
Air
outlet
Bridge the
shoe drying
attachment
between
two shoes
Front
PARTS
No warming bag is used in the blanket warmer. Air is blown directly into the area to be warmed.
Bottom/Sides
Attachments
Shoe drying attachment included.
How to use:
1 Bridge the shoe drying attachment between two shoes.
2 Follow “Drying Shoes” directions (P9).
Operation Panel
3 4

TIMER
TEMPERATURE
START/ON
CLEAR/OFF
PRESETFUNCTIONS
WINTER SUMMER
WARMUP
DustMiteEliminator
MODE
TIME MINS
SETTINGS
POWERSUPPLY
TIMER
TEMPERATURE
START/ON
CLEAR/OFF
PRESETFUNCTIONS
WINTER SUMMER
WARMUP
DustMiteEliminator
MODE
TIME MINS
SETTINGS
POWERSUPPLY
TIMER
TEMPERATURE
START/ON
CLEAR/OFF
PRESETFUNCTIONS
WINTER SUMMER
WARMUP
DustMiteEliminator
MODE
TIME MINS
SETTINGS
POWERSUPPLY
TIMER
TEMPERATURE
START/ON
CLEAR/OFF
PRESETFUNCTIONS
WINTER SUMMER
WARMUP
DustMiteEliminator
MODE
TIME MINS
SETTINGS
POWERSUPPLY
APPLICATION PAGE
Drying and warming blankets, dust mite elimination ........................................................7
Drying shoes ......................................................................................9
Drying wet clothes ................................................................................. 10
Warming closets and wardrobes ...................................................................... 11
MODE Use For Temperature Settings Running Time Reference Page
WINTER Warming blankets in
colder seasons
High Temperature Air
(approx. 149°F/65°C) 60 minutes
7
SUMMER Warming blankets in
hotter seasons
High Temperature Air
(approx. 149°F/65°C)60 minutes
Remove hot air by
Air Blast 20 minutes
WARM-UP Warming blankets before
sleep in colder seasons
High Temperature Air
(approx. 149°F/65°C) 20 minutes
DUST MITE
ELIMINATION Eliminate dust mites High Temperature Air
(approx. 149°F/65°C) 100 minutes
OCCASION Temperature Air Temperature Indicator Time Reference Page
SHOES
(CLOTH)
High Temperature
(approx. 149°F/65°C) Red 60 minutes 9
SHOES
(LEATHER)
Air Blast
(about room temperature) Blue 120 minutes 9
CLOTHES Low Temperature
(approx. 122°F/50°C) Yellow 75 minutes 10
WARMING
CLOSETS
Low Temperature
(approx. 122°F/50°C) Yellow 90 minutes 11
* You can also warm the blanket with the manual settings.
RANGE OF APPLICATIONS OPERATION INSTRUCTIONS
Drying and warming blankets, dust mite elimination.
Drying shoes.
Drying wet clothes.
Warming closets and wardrobes.
Automatic Warming Mode
Run the blanket warmer with the air temperature and time predetermined by each mode.
Manual Settings
Select the temperature and running time.
5 6

Dry Blanket / Warm Blanket / Eliminate Dust Mites
Blanket Size Indication (This product can warm sheets and blankets together.)
Please make sure the blanket the product is being used on can withstand temperatures higher
than 158°F/70°C. The warm air temperature may cause damage to the performance
of the blanket, such as low repulsion, pilling, etc.
CAUTIONS
Twin / Full
• Mattress: 39.4-82.7 in/100-210 cm (6.6 lbs./3 kg)
• Blanket: 59.1-82.7 in/150-210 cm (6.6 lbs./3 kg)
Queen / King
• Mattress: 55.1-82.7 in /140-210 cm (8.8 lbs./4 kg)
• Blanket: 74.8-82.7 in /190-210 cm (8.8 lbs./4 kg)
1. Unfold the hose and open the air ap at the hose tip until it is
locked into place, then place the product on the blanket with the
operation panel facing upwards.
About the Air Flap:
You can expand the coverage of warm air by making space under the
blanket.
Air flap
Hose tip
Open
• Fully stretch out the hose.
• This product will stop operating if it is laid down with the air
entry port on the right side facing down.
• Ventilate the room frequently as moisture is released from
the blanket.
• Keep the side air entry port at least 6 in/15 cm from the
wall.
• Place a large towel between the blanket and floor before
drying or warming. (Condensation may occur due to the
moisture between the floor and blanket).
2. Warm the blanket.
Insert the edge of the blanket into the space between the main body
and hose.
*Please do not pull the blanket by force, otherwise it may cause
damage to the blanket and air flap.
Hold down firmly to prevent air leakage between the hose and blanket.
• Please do not place the blanket on the main body or block
the air entry ports.
• The non-overlapped area between the mattress and blanket
may not heat sufficiently.
• This product cannot solely dry a mattress. Make sure to
place the blanket on the hose before use.
CAUTIONS
Body
Insert here
Blanket
Air entry port
TIMER
TEMPERATURE
START/ON
CLEAR/OFF
PRESETFUNCTIONS
WINTER SUMMER
WARMUP
DustMiteEliminator
MODE
TIME MINS
SETTINGS
POWERSUPPLY
3. Insert the power plug securely into the electric socket.
In standby mode, press any key to light up the power indicator, and it will
then enter mode selection.
4. Select automatic warming mode.
Press the MODE button to select desired mode.
5. Press START/ON button.
This product will display the remaining time after it starts running. It will
stop heating after set time has run out, and then it will cool down the main
body and hose with a 20 second air blast before it stops running.
• During and immediately following use, do not use the blanket or allow
pets on the blanket. Doing so may cause burns.
• Do not unplug the power plug while product is running.
• Press the CLEAR/OFF button if you want to stop warming. Product
will stop warming and will blast air for 20 seconds, and then the
product will stop running.
• The power indicator will turn off 5 minutes after use.
• If the warmer does not warm the whole length of the blanket or does
not reach the corners, please insert the hose on the other side of the
blanket and run the product again.
*It is more efficient to use a mattress cleaner after dust mite elimination.
6. Put the product away after use.
• Firmly grip the power plug to unplug it from the electric socket.
• Close the air flap and fold the hose.
• Bundle up the power cord. Fold
Bend
Press
gently
to store
hose
Power cord
Cover
(Back)(Front)
TIMER
TEMPERATURE
START/ON
CLEAR/OFF
PRESETFUNCTIONS
WINTER SUMMER
WARMUP
DustMiteEliminator
MODE
TIME MINS
SETTINGS
POWERSUPPLY
TIMER
TEMPERATURE
START/ON
CLEAR/OFF
PRESETFUNCTIONS
WINTER SUMMER
WARMUP DustMiteEliminator
MODE
TIME MINS
SETTINGS
POWERSUPPLY
TIMER
TEMPERATURE
START/ON
CLEAR/OFF
PRESETFUNCTIONS
WINTER SUMMER
WARMUP Dust Mite Eliminator
MODE
TIME MINS
SETTINGS
POWERSUPPLY
MODE
PRESET FUNCTIONS
WINTER SUMMER
WARM UP
Dust Mite Eliminator
WARM UP
SUMMER
WINTER
(High temperature air 100 minutes)
(High temperature air 20 minutes)
(High temperature air 60 minutes + air blast 20 minutes)
(High temperature air 60 minutes)
START/ON
HOW TO USE
CAUTIONS
TIMER
TEMPERATURE
START/ON
CLEAR/OFF
PRESETFUNCTIONS
WINTER SUMMER
WARMUP
DustMiteEliminator
MODE
TIME MINS
SETTINGS
POWERSUPPLY
7 8

• Please make sure the clothes you’re drying can withstand
temperatures higher than 158°F/70°C.
• Do not place the product directly underneath dripping clothes as
water droplets on the product may cause electric shock or
short-circuiting.
• To keep the hose from falling over, do not extend all the way out. To
adjust the angle of air flow, please incline the hose at the base of
the air outlet.
• The warm air temperature may cause damage to the cloth, such as
pilling.
CAUTIONS
CAUTIONS
Drying Shoes (manual settings)
Please close the air flap before use.
1. Add the shoe drying attachment to the end of the hose.
2. Insert the shoe drying attachment into the shoes.
Tips for faster drying:
• Remove excess water with a dry cloth.
• Loosen shoelaces and place them in the shoes.
3. Insert the power plug securely all the way into the electric
socket.
In standby mode, press any key to light up the power indicator and
enable settings selection.
4. Manual settings selection.
Select the running temperature and time according to the type of shoes.
TIMER
TEMPERATURE
START/ON
CLEAR/OFF
PRESETFUNCTIONS
WINTER SUMMER
WARMUP
DustMiteEliminator
MODE
TIME MINS
SETTINGS
POWERSUPPLY
TIMER
TEMPERATURE
START/ON
CLEAR/OFF
PRESETFUNCTIONS
WINTER SUMMER
WARMUP
DustMiteEliminator
MODE
TIME MINS
SETTINGS
POWERSUPPLY
The drying time differs due to wet conditions, shoe materials and types, room temperature,
and moisture levels. Please dry again if shoes are not sufficiently dried.
Leather, artificial leather and vinyl shoes may deform and change color from warm
temperatures. Please make sure to only select “Air Blast” (Blue) mode.
5. Press START/ON button.
This product will display the remaining time after it starts running. It will
stop heating after set time has run out.
• If START/ON button is not pressed, product will return to standby
mode after five minutes.
• Press CLEAR/OFF button if you want to stop drying. It will stop
heating and then it will cool down the main body and hose with a
20 second air blast before it stops running.
START/ON
6. Put the product away after use.
• Firmly grip the power plug to unplug it from the electric socket.
• Detach the shoe drying attachment from the hose.
• Refold the hose.
• Bundle up the power cord.
Drying Clothes (manual settings)
Please close the air flap before use.
1. Unfold the hose to face the air outlet towards clothes.
TIMER
TEMPERATURE
START/ON
CLEAR/OFF
PRESETFUNCTIONS
WINTER SUMMER
WARMUP
DustMiteEliminator
MODE
TIME MINS
SETTINGS
POWERSUPPLY
2. Insert the power plug securely all the way into the electric socket.
In standby mode, press any key to light up the power indicator and enable
settings selection.
3. Manual settings selection.
Select the running temperature and time according to wetness of clothes.
Example: Set temperature to Low and set timer to 75 Minutes.
HOW TO USE
Cloth Shoes Leather Shoes, Boots
Red
TEMPERATURE
TEMPERATURE
Blue
Press TEMPERATURE button to select
“High Temperature” (Red).
Press TEMPERATURE button to select
“Air Blast” (Blue).
TIMER
TIME MINS
TIMER
TIME MINS
Press TIMER button to set remaining time to
60 minutes.
Press TIMER button to set remaining time to
120 minutes.
910

CAUTIONS
Air Filter (clean once a month)
Use a vacuum hose/nozzle or other cleaning device to clear the
air filter.
A clogged or dirty air filter will cause the product to function
poorly.
Please replace the air filter when it is broken or has holes. Please
contact IRIS USA, Inc. Customer Service for assistance.
4. Press START/ON button.
This product will display the remaining time after it starts running. It
will stop heating after set time has run out, and then it will cool down
the main body and hose with a 20 second air blast before it stops
running.
• If START/ON button is not pressed, product will return to standby
mode after five minutes.
• Press CLEAR/OFF button if you want to stop drying. It will stop
heating and then it will cool down the main body and hose with a
20 second air blast before it stops running.
START/ON
6. Put away the product after use.
• Firmly grip the power plug to unplug it from the electric socket.
• Refold the hose.
• Bundle up the power cord.
Various Uses (manual settings)
Please close the air flap before use.
Closet and Wardrobe
Keep the main body upright and closet door open. Point the air outlet
towards the closet and run the product at “Low Temperature” mode
(Yellow).
TIMER
TEMPERATURE
START/ON
CLEAR/OFF
PRESETFUNCTIONS
WINTER SUMMER
WARMUP
DustMiteEliminator
MODE
TIME MINS
SETTINGS
POWERSUPPLY
Please do not place the main body inside
the closet.
Keep the closet door and drawers open
wide while in use.
Underneath the Sink
Keep the main body upright and cabinet door open. Point the air outlet
towards the cabinet and run the product at “Low Temperature” mode
(Yellow).
Please perform cleaning and maintenance after the product has cooled down. Not doing so may
cause burns or electrical shock. Unplug the power plug from the electric socket before cleaning.
CAUTIONS
Air entry ports Air entry port
TIMER
TEMPERATURE
START/ON
CLEAR/OFF
PRESETFUNCTIONS
WINTER SUMMER
WARMUP
DustMiteEliminator
MODE
TIME MINS
SETTINGS
POWERSUPPLY
TIMER
TEMPERATURE
START/ON
CLEAR/OFF
PRESETFUNCTIONS
WINTER SUMMER
WARMUP
DustMiteEliminator
MODE
TIME MINS
SETTINGS
POWERSUPPLY
Cover
TIMER
TEMPERATURE
START/ON
CLEAR/OFF
PRESETFUNCTIONS
WINTER SUMMER
WARMUP
DustMiteEliminator
MODE
TIME MINS
SETTINGS
POWERSUPPLY
Use of strong cleaning agents such
as amylacetic ester, alcohol, oil, etc.
can cause fading, deformation or
breakdown.
TIMER
TEMPERATURE
START/ON
CLEAR/OFF
PRESET FUNCTIONS
WINTER SUMMER
WARMUP
DustMite Eliminator
MODE
TIME MINS
SETTINGS
POWERSUPPLY
1. Remove dust with a vacuum hose/nozzle.
2. Remove the cover to clean the dust on the air entry ports.
HOW TO USE CLEANING AND MAINTENANCE
CAUTIONS
Main Body
Use a cloth with diluted neutral cleaning agent to wipe the
product.
11 12

STATUS POSSIBLE CAUSE REMEDY
Not running
No air coming out
Power plug is not securely plugged into
the electric socket.
Please plug the power plug securely into
the electric socket.
START/ON button has not been pressed. Please press the START/ON button.
Air temperature does not change This is normal as the product is adjusting the temperature.
Blanket is not dry
Blanket is not warmed up
Trying to dry several blankets at once. Please dry one blanket at a time.
Air filter is dirty. Please clean the air filter (P12).
The blanket is not laid out correctly. Please lay down the blanket correctly
(P7).
The blanket is too heavy.
Please lift the blanket a little so warm
air can reach the bottom of the heavy
blanket.
The air flap is not opened. Please open the air flap (P7).
The air entry port or air outlet is blocked.
Please remove anything blocking the
air entry port or air outlet and run the
product again.
The air entry port or suction port is too
close to the wall.
Please keep the product at least 15cm
away from the wall.
Error code is indicated as [E1] Air entry port on right side is facing
down when choosing the mode.
Please place the product in the correct
position to dismiss the error.
Error code is indicated as [E2] Air entry on right side is facing down
while product is running.
Please place the product in the correct
position to dismiss the error the product
again.
Error code is indicated as [E3] The product is running in an area with
high temperatures or too much warm air
from other heaters.
The product is running with a folded
hose.
The main body temperature is rising
abnormally.
Unplug the power plug from the electric
socket and leave it alone to cool
down. The error will clear off when the
temperature of each part returns to
normal. The product cannot operate
until it temperatures return to normal.
When the error message is dismissed,
the product will automatically restart.
Error code is indicated as [E4]
Error code is indicated as [E6]
Error code is indicated as [E7]
Error code is indicated as [E5] Product failure has occurred.
Please unplug the power plug from
the electric socket and contact IRIS
Customer Service Center. Do not touch
the product until the main body has
cooled down.
MODEL SPECIFICATIONS
RATED VOLTAGE 120V~
RATED CURRENT 5.2A
RATED FREQUENCY 60 Hz
PRODUCT WEIGHT 3.97lbs. / 1.8kg
PRODUCT SIZE
(NOT INCLUDING THE POWER CORD)
6.3 W x 5.4 D x 14.2 H in
160 W x 137 D x 360 H mm
CORD LENGTH 78.7 in / 2.0m
ATTACHMENTS Shoe drying attachment
SAFETY DEVICES Temp Sensor, Thermostat, Thermal Fuse
TIMER 15, 30, 45, 60, 75, 90, 120, 180 minutes
ITEMS INCLUDE Blanket warmer, shoe drying attachment
*Specifications are subject to change without prior notice.
SPECIFICATIONSTROUBLESHOOTING
Before making repairs, please read the following content carefully to fix common problems.
Problems that could not be resolved.
Please contact the dealer of purchase or IRIS USA, Inc. Customer Service.
Warning: Do not disassemble, repair or modify the product yourself. Any other servicing should be performed by any
authorized service representative.
13 14

Attn: Customer Service (Returns Department)
IRIS USA, Inc.
13423 West Cactus Road
Surprise, AZ 85379
©2019 IRIS USA, Inc. All rights reserved.
THE MANUFACTURER WARRANTS
Your IRIS USA, Inc. products are to be free from defects in material and workmanship under normal
non-commercial, household use, when operated and cared for in accordance with the Manufacturer’s written instructions
provided.
THE 1-YEAR WARRANTY (“WARRANTY”) DOES NOT COVER
Any damage caused by accident, misuse, or abuse, including without limitation, damage caused by use in a humid
area, improper cleaning, neglect, alteration, fire, theft, non-recommended temperature use and does not apply to minor
imperfections, scratches, stains, discoloration, surface markings as a result of shipping or other damage to external or internal
surfaces which does not impair the utility and/or functionality of the product.
TO OBTAIN SERVICE
If service should be necessary, you should contact IRIS USA, Inc. Customer Service (“Customer Service”) at 1-800-320-4747.
You may then return the properly packaged product(s), (using adequate packing and shipping material to prevent damage in
transit), with postage prepaid along with name, address, telephone number, model number, and proof of date of purchase (a
copy of the receipt) and a detailed description of the claimed defect. This warranty shall not cover any damage incurred to the
products during transit to Customer Service. You shall have the obligation and responsibility to: pay for all services and parts
not covered by the warranty.
MANUFACTURER’S OBLIGATION
The Warranty may not be altered, expanded, extended, revised or varied except by written instrument executed by the
Manufacturer.
THE MANUFACTURER’S LIABILITY UNDER THIS WARRANTY IS LIMITED TO THE REPAIR OR REPLACEMENT OF THE
DEFECTIVE PRODUCT(S) AT THE MANUFACTURER’S SOLE AND EXCLUSIVE OPTION. THE MANUFACTURER WILL REPLACE
ANY ITEM FOUND TO BE DEFECTIVE IN MATERIAL OR WORKMANSHIP WITH THE MOST COMPARABLE CURRENT ITEM. IRIS
USA, INC. DOES NOT ACCEPT SPECIAL REQUESTS, NOR DO WE HAVE THE ABILITY TO UPGRADE IN EXCHANGE FOR MONEY.
THE MANUFACTURER SHALL NOT BE LIABLE FOR ANY SPECIAL, INCIDENTAL OR CONSEQUENTIAL DAMAGES, WHETHER
DIRECT OR INDIRECT. THE WARRANTIES SET FORTH HEREIN ARE EXCLUSIVE AND NO OTHER WARRANTIES, EXPRESS
OR IMPLIED, INCLUDING BUT NOT LIMITED TO ANY WARRANTY OF MERCHANTABILITY OR FITNESS FOR A PARTICULAR
PURPOSE OR USE ARE MADE WITH RESPECT TO THE PRODUCTS.
Some states do not allow the exclusion of limitation of incidental or consequential damages, so the above limitation exclusions
may not apply. This Warranty gives specific legal rights, and there may also be other rights which vary from state to state.
DISCONTINUED ITEM RETURNED
If the item returned is discontinued and is no longer available, IRIS USA, Inc. will automatically replace your item with the most
comparable item currently manufactured.
MANUFACTURER 1-YEAR WARRANTY
15 16

CONTENIDO PÁGINA
Precauciones de seguridad ................19
Piezas ................................21
Instrucciones de uso
Rango de aplicaciones ....................23
Instrucciones de funcionamiento ............24
Cómo utilizar ...........................25
Limpieza y mantenimiento ................30
Otros
Solución de problemas....................31
Especificaciones ........................32
Garantía ...............................33
TIMER
TEMPERATURE
START/ON
CLEAR/OFF
PRESET FUNCTIONS
WINTER SUMMER
WARM UP
Dust Mite Eliminator
MODE
TIME MINS
SETTINGS
POWER SUPPLY
de IRIS USA, Inc.
Series BLW-C2
Gracias por su compra. Lea este manual de instrucciones para garantizar un uso adecuado.
Lea todas las precauciones de seguridad antes de usar. Guarde este manual de instrucciones
en un lugar seguro para consultas futuras.
LEA Y GUARDE ESTAS INSTRUCCIONES.
Calentador de mantas
17 18

Prohibido desarmar.
• No desarmar, reparar o modificar. De hacerlo, puede causar incendios, descargas eléctricas o lesiones.
• Solo técnicos capacitados deben intentar la reparación; de lo contrario, puede ser peligrosa.
Uso del producto.
• Usar en un piso estable y plano. Colocar el producto en pisos irregulares e inestables puede causar que se
caiga y provocar lesiones o daños a la propiedad en los alrededores del producto.
• Siempre agarre el enchufe de alimentación para desconectarlo, no lo desenchufe tirando del cable de
alimentación. Si tira del cable de alimentación puede dañarlo, lo que puede causar un incendio o descarga
eléctrica.
• Siempre desconecte el enchufe del tomacorriente cuando no vaya a utilizar el producto durante períodos
prolongados de tiempo. De no hacerlo puede provocar un incendio o descarga eléctrica por cortocircuitos
debido a un aislamiento reducido.
• No mueva el equipo mientras está en uso. De hacerlo, puede causar quemaduras.
• Realice la limpieza y el mantenimiento después de que el producto se haya enfriado. De lo contrario, puede
causar quemaduras.
Desenchufar.
• Desconecte el enchufe del tomacorriente cuando realice mantenimientos, inspecciones o mueva el producto.
• Agarre el enchufe y extráigalo del receptáculo u otro dispositivo de alimentación. No desenchufe el aparato
tirando del cable.
• Cuando saque el enchufe del tomacorriente, asegúrese de que el equipo esté apagado. De lo contrario,
puede dañar las clavijas o el enchufe, o puede provocar un incendio.
• Este aparato posee un enchufe polarizado (una clavija es más ancha que la otra). Para reducir el riesgo de
descarga eléctrica, este enchufe entra en un tomacorriente polarizado en un solo sentido. Si el enchufe
no entra por completo en el tomacorriente, gire el enchufe. Si aun así no encaja, contacte a un técnico
electricista calificado. No modifique el enchufe de ninguna manera.
Utilizar los enchufes y cables de alimentación correctamente.
• De no hacerlo puede causar un incendio o descarga eléctrica debido a cortocircuitos.
• Inserte el enchufe de alimentación firmemente y por completo en el tomacorriente.
• Quite el polvo del enchufe de alimentación periódicamente.
• Cuando se deja que el polvo se acumule, se dificulta el aislamiento debido a la humedad, lo que puede
causar un incendio o descarga eléctrica.
• Usar solamente con 120 V CA. Otra corriente/voltaje puede causar incendios.
• No utilizar si el cable de alimentación o el enchufe están dañados, o si el enchufe de alimentación está flojo
cuando se conecta al tomacorriente. De hacerlo, puede causar un incendio o descarga eléctrica debido a un
cortocircuito.
• No enrolle el cable alrededor del producto cuando no esté en uso ya que esto puede causar fallas en el
producto.
No dañe el cable de alimentación.
• Dañar, modificar, doblar a la fuerza, tirar, retorcer, poner objetos pesados, o pellizcar el cable de
alimentación puede dañarlo, lo que puede causar un incendio o descarga eléctrica.
• No utilizar si el cable de alimentación está enrollado. De hacerlo, puede causar incendios. Siempre extienda
el cable antes de usarlo.
• No tire del cable de alimentación cuando transporte o almacene el producto. Tirar del cable de alimentación
puede causar un incendio o descarga eléctrica.
• No jalar ni levantar el producto por el cable. Esto puede causar daños al cable o incendios.
No dañar la manguera.
• No mueva el producto por la manguera. Esto puede causar que el cuerpo principal se caiga y cause lesiones.
Asegúrese de sostener firmemente el mango al transportar el producto.
• No jalar ni levantar el producto por la manguera. Esto puede provocar que el cuerpo principal se caiga y
cause daños a la manguera.
• No use el producto con la manguera doblada.
• No tire de la manguera a la fuerza.
Las anomalías y averías pueden causar humo, incendios o descargas eléctricas.
Dejar de usar inmediatamente, apagar y desenchufar del tomacorriente cuando ocurran anomalías o averías.
Ejemplos de anomalías
• Ruidos u olores anómalos.
• El enchufe de alimentación o el cable de alimentación se calientan demasiado.
• Pérdida de potencia, etc., cuando se mueve el cable de alimentación.
• El producto se detiene periódicamente durante el funcionamiento.
• Se siente una sensación de hormigueo por la corriente eléctrica al tocar el producto.
• Dejar de usar y comunicarse con el servicio al cliente de IRIS USA, Inc. al 1-800-320-4747
Evitar los riesgos de incendio.
• No rociar con insecticidas, aerosoles para el cabello, o aceites de lubricación, etc.
• No usar cerca de sustancias inflamables (keroseno, gasolina, diluyentes de pintura, etc.), objetos con llamas
(cigarrillos, incienso, etc.) o materiales combustibles. De hacerlo, puede causar incendios.
• No bloquee el flujo de aire de entrada o salida. Esto puede causar que el producto se sobrecaliente y
provoque un incendio.
• No coloque ningún material extraño, tal como metales en el producto. Esto puede causar que el producto se
sobrecaliente y provoque un incendio.
• No lo use para secar la ropa con manchas de aceite o de solventes. Los aceites, solventes de limpieza en
seco, gasolina, benceno, diluyente de pintura u otros químicos similares pueden hacer que las prendas de
vestir se quemen y provocar un incendio.
• No utilice el producto con otras fuentes de calor, como mantas eléctricas o calentadores. Esto puede causar
incendios.
No usar con las manos húmedas.
• No desconecte el enchufe de alimentación con las manos húmedas.
No utilizar el producto en exteriores.
• No utilizar en habitaciones con altos niveles de humedad, tales como los cuartos de baño.
• No mojar la unidad ni la ponga en el agua. Mojar el producto puede causar un incendio o descarga eléctrica.
• El uso cerca del mar o en lugares con mucho hollín, como regiones costeras o térmicas, puede causar una
disminución de la duración de la vida útil del producto.
Indica contenido que podría llevar a la muerte o lesiones por un manjeo inadecuado.
• Mantener fuera del alcance de niños y bebés.
• No se suba ni se incline sobre el producto. De hacerlo, puede provocar lesiones o descargas eléctricas.
• No arrastre el producto al moverlo. Arrastrar el producto puede dañar alfombras y pisos.
• Tenga mucho cuidado de no permitir que niños o personas mayores estén cerca del producto. Estar cerca del
producto puede ser perjudicial para su condición física y salud.
• Durante e inmediatamente después del uso, no utilice la manta ni permita que las mascotas se acuesten en
la manta. De hacerlo, puede causar quemaduras.
• No apunte el flujo de calor directamente a una persona o mascota. De hacerlo, puede causar quemaduras.
• No cuelgue ropa en la salida de aire mientras el equipo está funcionando. Esto puede causar calentamiento
anormal o falla del producto.
• No coloque ninguna parte del producto en la manta que no sea la manguera. Esto puede causar incendios.
• No use el producto en un guardarropa o armario mientras la puerta esté cerrada. Esto puede causar
calentamiento anormal o falla del producto.
• No lo use para secar ropa que gotea. De hacerlo puede causar una descarga eléctrica.
• No lo use en productos con baja resistencia al calor como sofás o zapatos de cuero o cuero sintético,
ropa con baja resistencia al calor o artículos con impresión serigráfica. Esto puede causar deformación o
deterioro.
• No use el producto sobre vidrios, tales como ventanas o espejos. Esto puede causar daños debido al cambio
brusco de temperatura.
PRECAUCIONES DE SEGURIDAD
Antes de usar, leer las precauciones de seguridad en detalle para garantizar un uso adecuado. Las precauciones que se indican
aquí están definidas bajo las clasificaciones de Advertencias y Precauciones, y están destinadas a evitar daños o perjuicios a
los usuarios y otras personas. Todas estas precauciones son cruciales en términos de seguridad. Cúmplalas en todo momento.
Indicaciones de los símbolos gráficos: Indica contenido que podría llevar a la muerte o lesiones por un manejo inadecuado.
PRECAUCIÓN PROHIBIDO INSTRUCCIONES QUE DEBEN SEGUIRSE
19 20

Salida de aire
Accesorio de boquilla
Indicador de POWER SUPPLY
(encendido)
Botón CLEAR/OFF
Botón START/ON
TIMER
TEMPERATURE
START/ON
CLEAR/OFF
PRESET FUNCTIONS
WINTER SUMMER
WARM UP
Dust Mite Eliminator
MODE
TIME MINS
SETTINGS
POWER SUPPLY
Configuraciones
manualmente
Tiempo restante (minutos)
Dust Mite Elimenator
(Eliminador de ácaros de polvo)
Indicador de modo
WINTER (Invierno)
SUMMER (Verano)
WARM UP (Calentar)
Botón de MODE
Botón de TIMER
15 (minutos)
30
45
60
75
90
120
180
Indicador de temperatura
Aire a alta temperatura
(aprox. 149°F/65°C)
Aire a baja temperatura
(aprox. 122°F/50°C)
Chorro de aire
(temperatura ambiente)
Aire a alta temperatura
(aprox. 149°F/65°C)
Aire a baja temperatura
(aprox.122°F/50°C)
Chorro de aire
(temperatura ambiente)
Botón de TEMPERATURE
Rojo
Amarillo
Azul
PIEZAS
Panel de control
TIMER
TEMPERATURE
START/ON
CLEAR/OFF
PRESET FUNCTIONS
WINTER SUMMER
WARM UP
DustMite Eliminator
MODE
TIME MINS
SETTINGS
POWERSUPPLY
Manguera extensible
Asa
Salida de aire
Panel de control
Enchufe
Cable de alimentación
Cubierta
Aleta de aire
Salida de aire
BoquillaPuerto de entrada
de aire (inferior)
Puerto de entrada
de aire (lateral)
TIMER
TEMPERATURE
START/ON
CLEAR/OFF
PRESET FUNCTIONS
WINTER SUMMER
WARMUP
DustMite Eliminator
MODE
TIME MINS
SETTINGS
POWERSUPPLY
TIMER
TEMPERATURE
START/ON
CLEAR/OFF
PRESET FUNCTIONS
WINTER SUMMER
WARMUP
DustMite Eliminator
MODE
TIME MINS
SETTINGS
POWERSUPPLY
Salida
de aire
Extenderse el
accessorio
para secar
zapatos entre
zapatos
Parte delantera
No se necesitan bolsas de calentamiento en el calentador de mantas. El aire se sopla directamente en el área a calentar.
Parte inferior/Lateral
Accesorio
Accesorio para secar zapatos incluido.
Alcance de utilidad:
1 Coloque la punta del accesorio de secar zapatos entre los dos zapatos.
2 Siga las instrucciones del “Secado de zapatos” (P27).
21 22

MODO Usos Configuración de
temperatura
Tiempo de
funcionamiento
Página de
referencia
WINTER
(INVIERNO)
Calentar la manta
en invierno
Aire a alta temperatura
(aprox. 149°F/65°C) 60 minutos
25
SUMMER
(VERANO)
Calentar la
manta en verano
Aire a alta temperatura
(aprox. 149°F/65°C)60 minutos
Eliminar el aire caliente
con un chorro de aire 20 minutos
WARM UP
(CALENTAR)
Calentar la manta antes
de dormir en invierno
Aire a alta temperatura
(aprox. 149°F/65°C) 20 minutos
DUST MITE ELIMINATOR
(ELIMINACIÓN DE
ÁCAROS DEL POLVO)
Eliminar los ácaros
del polvo
Aire a alta temperatura
(aprox. 149°F/65°C) 100 minutos
USOS Temperatura Indicador de temperatura
del aire Tiempo Página de
referencia
ZAPATOS
(DE TELA)
Alta temperatura
(aprox. 149°F/65°C) Rojo 60 minutos 27
ZAPATOS
(DE CUERO)
Chorro de aire
(temperatura ambiente) Azul 120 minutos 27
ROPAS Baja temperatura
(aprox. 122°F/50°C) Amarillo 75 minutos 28
CALENTAR
ARMARIOS
Baja temperatura
(aprox. 122°F/50°C) Amarillo 90 minutos 29
* También puede calentar la manta con las configuraciones manualmente.
TIMER
TEMPERATURE
START/ON
CLEAR/OFF
PRESETFUNCTIONS
WINTER SUMMER
WARMUP
DustMiteEliminator
MODE
TIME MINS
SETTINGS
POWERSUPPLY
TIMER
TEMPERATURE
START/ON
CLEAR/OFF
PRESETFUNCTIONS
WINTER SUMMER
WARMUP
DustMiteEliminator
MODE
TIME MINS
SETTINGS
POWERSUPPLY
TIMER
TEMPERATURE
START/ON
CLEAR/OFF
PRESETFUNCTIONS
WINTER SUMMER
WARMUP
DustMiteEliminator
MODE
TIME MINS
SETTINGS
POWERSUPPLY
TIMER
TEMPERATURE
START/ON
CLEAR/OFF
PRESETFUNCTIONS
WINTER SUMMER
WARMUP
DustMiteEliminator
MODE
TIME MINS
SETTINGS
POWERSUPPLY
APLICACIONES PÁGINA
Secar y calentar mantas, eliminar ácaros del polvo ........................................................ 25
Secar zapatos .................................................................................... 27
Secar ropa mojada................................................................................. 28
Calentar armarios y guardarropas ..................................................................... 29
Secar y calentar mantas, eliminar ácaros del polvo.
Secar zapatos.
Secar ropa mojada.
Calentar armarios y guardarropas.
RANGO DE APLICACIONES INSTRUCCIONES DE FUNCIONAMIENTO
Modo de calentamiento automático
Enciende el calentador de mantas a la temperatura ambiente y durante el tiempo predeterminado para cada modo.
Conguraciones manualmente
Seleccione la temperatura y el tiempo de funcionamiento.
23 24

CÓMO UTILIZAR
Secar manta/Calentar manta/Eliminar los ácaros del polvo
Alcance del calor aplicable (Este producto puede calentar sábanas y mantas juntas.)
Asegúrese de que la manta en la que se utiliza el producto pueda soportar temperaturas
superiores a 158 °F/70 °C. La temperatura del aire caliente puede dañar el rendimiento
de la manta, causando baja repulsión, formación de bolas, etc.
PRECAUCIONES
Personal / Matrimonial
• Colchón: 39.4-82.7 in/100-210 cm (6.6 lbs./3 kg)
• Manta: 59.1-82.7 in/150-210 cm (6.6 lbs./3 kg)
Reina / Rey
• Colchón: 55.1-82.7 in /140-210 cm (8.8 lbs./4 kg)
• Manta: 74.8-82.7 in /190-210 cm (8.8 lbs./4 kg)
1. Despliegue la manguera y abra la aleta de aire en la punta de la
manguera hasta que quede bloqueada en su lugar, luego coloque
el producto sobre la manta con el panel de control hacia arriba.
Acerca de la aleta de aire:
Puede expandir la cobertura de aire caliente haciendo espacio debajo
de la manta.
Alerta de aire
Punta de
la manguera Abrir
• Estirar completamente la manguera.
• Este producto dejará de funcionar si está colocado con el
puerto de entrada de aire en el lado derecho hacia abajo.
• Ventile la habitación con frecuencia a medida que se libera
la humedad de la manta.
• Mantenga el puerto de entrada de aire lateral al menos a 6
pulg./15 cm de la pared.
• Coloque una toalla grande entre la manta y el piso antes de
secar o calentar (puede ocurrir condensación debido a la
humedad entre el piso y la manta).
2. Calentar la manta.
Inserte el borde de la manta en el espacio entre el cuerpo principal y
la manguera.
* No tire de la manta a la fuerza, de lo contrario, puede dañar la manta
y la aleta de aire.
Mantenga presionado firmemente hacia abajo para evitar fugas de aire
entre la manguera y la manta.
• No coloque la manta sobre el cuerpo principal ni bloquee los
puertos de entrada de aire.
• El área no superpuesta entre el colchón y la manta puede
no calentarse lo suficiente
• Este producto no puede secar exclusivamente un colchón.
Asegúrese de colocar la manta sobre la manguera antes de
usar.
PRECAUCIONES
Cuerpo principal
Insertar aquí Manta
Puerto de entrada
de aire
TIMER
TEMPERATURE
START/ON
CLEAR/OFF
PRESETFUNCTIONS
WINTER SUMMER
WARMUP
DustMiteEliminator
MODE
TIME MINS
SETTINGS
POWERSUPPLY
PRECAUCIONES
TIMER
TEMPERATURE
START/ON
CLEAR/OFF
PRESETFUNCTIONS
WINTER SUMMER
WARMUP
DustMiteEliminator
MODE
TIME MINS
SETTINGS
POWERSUPPLY
3. Inserte el enchufe de alimentación de forma segura en el tomacorriente.
En el modo de espera, presione cualquier tecla para que se ilumine el indicador de
encendido, y luego ingrese la selección del modo.
4. Seleccione el modo de calentamiento automático.
Presione el botón MODE para seleccionar el modo deseado.
5. Presione el botón de START/ON.
El producto mostrará el tiempo restante después de que empiece a funcionar. Dejará
de calentar después de que se haya agotado el tiempo programado, y luego enfriará el
cuerpo principal y la manguera con un chorro de aire de 20 segundos antes de que
deje de funcionar.
• Durante e inmediatamente después del uso, no utilice la manta ni permita que las
mascotas se acuesten en la manta. De hacerlo, puede causar quemaduras.
• No desenchufe el cable de alimentación mientras el producto esté en
funcionamiento.
• Presione el botón de CLEAR/OFF si desea detener el calentamiento. El producto
detendrá el calentamiento y emitirá chorros de aire durante 20 segundos, y luego
el producto dejará de funcionar.
• El indicador de encendido se apagará 5 minutos después del uso.
• Si el calentador no calienta a todo lo largo de la manta o no llega a las esquinas,
inserte la manguera en el otro lado de la manta y vuelva a conectar el producto.
* Es más eficiente usar un limpiador de colchón después de la eliminación de los
ácaros del polvo.
6. Guarde el producto después de usarlo.
• Sujete firmemente el enchufe de alimentación para desenchufarlo del
tomacorriente.
• Cierre la aleta de aire y doble la manguera.
• Enrolle el cable de alimentación. Plegar
Doblar
Presione
suavemente
para almacenar
la manguera
Cable de alimentación
Cubierta
(Parte trasera)(Parte delantera)
TIMER
TEMPERATURE
START/ON
CLEAR/OFF
PRESETFUNCTIONS
WINTER SUMMER
WARMUP
DustMiteEliminator
MODE
TIME MINS
SETTINGS
POWERSUPPLY
TIMER
TEMPERATURE
START/ON
CLEAR/OFF
PRESETFUNCTIONS
WINTER SUMMER
WARMUP Dust Mite Eliminator
MODE
TIME MINS
SETTINGS
POWERSUPPLY
TIMER
TEMPERATURE
START/ON
CLEAR/OFF
PRESETFUNCTIONS
WINTER SUMMER
WARMUP DustMite Eliminator
MODE
TIME MINS
SETTINGS
POWERSUPPLY
MODE
PRESET FUNCTIONS
WINTER SUMMER
WARM UP
Dust Mite Eliminator
(Eliminar los ácaros del polvo)
WARM UP (Calentar)
SUMMER (Verano)
WINTER (Invierno)
(aire a alta temperatura durante 100 minutos)
(aire a alta temperatura durante 20 minutos)
(aire a alta temperatura durante 60 minutos + Chorro de aire durante 20 minutos)
(aire a alta temperatura durante 60 minutos)
START/ON
25 26

PRECAUCIONES
El tiempo de secado difiere debido a las condiciones de humedad, los materiales y
tipos de calzado, la temperatura ambiente y los niveles de humedad. Vuelva a secar
si los zapatos no están lo suficientemente secos.
Los zapatos de cuero, cuero artificial y vinilo pueden deformarse y cambiar de color
debido a las temperaturas calientes. Asegúrese de seleccionar solamente el modo
“Chorro de aire” (Azul).
PRECAUCIONES
Secado de zapatos (conguraciones manualmente)
Cierre la aleta de aire antes del uso.
1. Agregue el accesorio de secar zapatos al extremo de
la manguera.
2. Inserte el accesorio de secar zapatos dentro del zapato.
Consejos para un secado más rápido
• Elimine el exceso de agua con un paño seco.
• Quite los cordones y colóquelos en los zapatos.
3. Inserte el enchufe de alimentación rmemente y por
completo enel tomacorriente.
En el modo de espera, presione cualquier tecla para que
se ilumine el indicador de encendido y habilitar la
selección de las configuraciónes .
4. Selecciónes de la conguraciones manualmente.
Seleccione la temperatura y el tiempo de funcionamiento según el tipo de calzado.
TIMER
TEMPERATURE
START/ON
CLEAR/OFF
PRESETFUNCTIONS
WINTER SUMMER
WARMUP
DustMiteEliminator
MODE
TIME MINS
SETTINGS
POWERSUPPLY
TIMER
TEMPERATURE
START/ON
CLEAR/OFF
PRESETFUNCTIONS
WINTER SUMMER
WARMUP
DustMiteEliminator
MODE
TIME MINS
SETTINGS
POWERSUPPLY
Zapatos de tela Zapatos de cuero, botas
Rojo
TEMPERATURE
TEMPERATURE
Azul
Presione el botón de TEMPERATURE para seleccionar
la temperatura alta “Alta temperatura” (Rojo).
Presione el botón de TEMPERATURE para seleccionar
el chorro de aire “Chorro de aire” (Azul).
TIMER
TIME MINS
TIMER
TIME MINS
Presione el botón de TIMER para establecer el tiempo
restante a 60 minutos.
Presione el botón de TIMER para establecer el tiempo
restante a 120 minutos.
• Asegúrese de que la ropa que está secando puede soportar
temperaturas superiores a 158 °F/70 °C.
• No coloque el producto directamente debajo de la ropa que gotee,
ya que las gotas de agua en el producto pueden provocar descargas
eléctricas o cortocircuitos.
• Para evitar que la manguera se caiga, no la extienda por completo.
Para ajustar el ángulo del flujo de aire, incline la manguera en la
base de la salida de aire.
• La temperatura del aire caliente puede causar daños a la tela, tal
como la formación de bolas.
5. Presione el botón de START/ON.
El producto mostrará el tiempo restante después de que empiece a
funcionar. Dejará de calentar después de que termine el tiempo
establecido.
• Si no se presiona el botón de START/ON, el producto regresará al
modo de espera después de cinco minutos.
• Presione el botón de CLEAR/OFF si desea detener el secado. Dejará
de calentar y luego enfriará el cuerpo principal y la manguera con un
chorro de aire de 20 segundos antes de que deje de funcionar.
START/ON
6. Guarde el producto después de usarlo.
• Sujete firmemente el enchufe de alimentación para desenchufarlo del
tomacorriente.
• Separe el accesorio de secar zapatos de la manguera.
• Repliegue la manguera.
• Enrolle el cable de alimentación.
Secado de ropa (conguraciónes manuales)
Cierre la aleta de aire antes del uso.
1. Desdoble la manguera apuntando la salida de aire hacia la ropa.
TIMER
TEMPERATURE
START/ON
CLEAR/OFF
PRESETFUNCTIONS
WINTER SUMMER
WARMUP
DustMiteEliminator
MODE
TIME MINS
SETTINGS
POWERSUPPLY
2. Inserte el enchufe de alimentación rmemente y por completo en el
tomacorriente.
En el modo de espera, presione cualquier tecla para que se ilumine el
indicador de encendido y habilitar la selección de las configuraciónes .
3. Selecciónes de la conguraciones manualmente.
Seleccione la temperatura y el tiempo de funcionamiento según la
humedad de la ropa.
Ejemplo: Ajuste la temperatura a baja y configure el temporizador en
75 minutos.
PRECAUCIONES
CÓMO UTILIZAR
27 28

PRECAUCIONES
PRECAUCIONES
PRECAUCIONES
4. Presione el botón de START/ON.
El producto mostrará el tiempo restante después de que empiece a
funcionar. Dejará de calentar después de que se haya agotado el
tiempo programado, y luego enfriará el cuerpo principal y la manguera
con un chorro de aire de 20 segundos antes de que deje de funcionar.
• Si no se presiona el botón de START/ON, el producto regresará al
modo de espera después de cinco minutos.
• Presione el botón de CLEAR/OFF si desea detener el secado.
Dejará de calentar y luego enfriará el cuerpo principal y la
manguera con un chorro de aire de 20 segundos antes de que
deje de funcionar.
START/ON
6. Guarde el producto después de usarlo.
• Sujete firmemente el enchufe de alimentación para
desenchufarlo del tomacorriente.
• Repliegue la manguera.
• Enrolle el cable de alimentación.
Varios usos (conguraciones manualmente)
Cierre la aleta de aire antes del uso.
Armarios y guardarropas
Mantenga el cuerpo principal en posición vertical y la puerta
del armario abierta. Apunte la salida de aire hacia el armario y
haga funcionar el producto en el modo temperatura baja “Baja
temperatura” (Amarillo).
TIMER
TEMPERATURE
START/ON
CLEAR/OFF
PRESETFUNCTIONS
WINTER SUMMER
WARMUP
DustMiteEliminator
MODE
TIME MINS
SETTINGS
POWERSUPPLY
No coloque el cuerpo principal
dentro del armario.
Mantenga la puerta del armario y
los cajones abiertos de par en par
mientras esté en uso.
Debajo del fregadero
Mantenga el cuerpo principal en posición vertical y la puerta del
armario abierta. Apunte la salida de aire hacia el armario y haga
funcionar el producto en el modo de temperatura baja “Baja
temperatura” (Amarillo).
Filtro de aire (una vez al mes)
Use una manguera/boquilla de aspiradora u otro dispositivo de
limpieza para limpiar el filtro de aire.
Un filtro de aire obstruido o sucio hará que el producto funcione
mal.
Reemplace el filtro de aire cuando se rompa o tenga agujeros.
Comuníquese con el Servicio al cliente de IRIS USA, Inc. para
obtener ayuda.
Realice la limpieza y el mantenimiento después de que el producto se haya enfriado. De
no hacerlo puede causar quemaduras o descargas eléctricas. Desconecte el enchufe del
tomacorriente antes de limpiarlo.
Puertos de entrada de aire Puerto de entrada de aire
TIMER
TEMPERATURE
START/ON
CLEAR/OFF
PRESETFUNCTIONS
WINTER SUMMER
WARMUP
DustMiteEliminator
MODE
TIME MINS
SETTINGS
POWERSUPPLY
TIMER
TEMPERATURE
START/ON
CLEAR/OFF
PRESETFUNCTIONS
WINTER SUMMER
WARMUP
DustMiteEliminator
MODE
TIME MINS
SETTINGS
POWERSUPPLY
Cubierta
TIMER
TEMPERATURE
START/ON
CLEAR/OFF
PRESETFUNCTIONS
WINTER SUMMER
WARMUP
DustMiteEliminator
MODE
TIME MINS
SETTINGS
POWERSUPPLY
El uso de agentes de limpieza
fuertes como éster amilacético,
alcohol, aceite, etc., puede
causar decoloración,
deformación o rotura.
TIMER
TEMPERATURE
START/ON
CLEAR/OFF
PRESET FUNCTIONS
WINTER SUMMER
WARMUP
DustMite Eliminator
MODE
TIME MINS
SETTINGS
POWERSUPPLY
1. Elimine el polvo con una manguera/boquilla de vacío.
2. Retire la tapa para limpiar el polvo en los puertos de
entrada de aire.
LIMPIEZA Y MANTENIMIENTO
Cuerpo principal
Use un paño con un agente de limpieza neutro diluido para limpiar
el producto.
CÓMO UTILIZAR
29 30

ESTADO POSIBLE CAUSA SOLUCIÓN
No funciona
No sale aire
El cable de alimentación puede no
estar insertado correctamente en el
tomacorriente.
Insertar el enchufe de alimentación firmemente
en el tomacorriente.
No se ha presionado el botón de
START/ON. Presione el botón de START/ON.
No cambia la temperatura del aire Esto es normal ya que el producto está ajustando la temperatura.
La manta no está seca
La manta no se calienta
Está tratando de secar varias
mantas a la vez. Seque una manta a la vez.
El filtro de aire está sucio. Limpie el filtro de aire (P30).
La manta no se ha colocado
correctamente. Coloque la manta correctamente (P25).
La manta es demasiado pesada.
Levante la manta un poco para que el aire
caliente pueda llegar al fondo de la manta más
pesada.
La aleta de aire no está abierta. Abra la aleta de aire (P25).
El puerto de entrada o salida de aire
está bloqueado.
Quite todo lo que bloquee el puerto de entrada o
salida de aire y vuelva a conectar el producto.
El puerto de entrada de aire o el
puerto de succión está demasiado
cerca de la pared.
Mantenga el producto a una distancia mínima de
15 cm de la pared.
Se indica el código de error [E1]
El puerto de entrada de aire en el
lado derecho está colocado hacia
abajo cuando se elige el modo.
Coloque el producto en la posición correcta para
descartar el error.
Se indica el código de error [E2]
La entrada de aire en el lado
derecho está hacia abajo mientras
el producto está funcionando.
Coloque el producto en la posición correcta para
descartar el error.
Se indica el código de error [E3] El producto está funcionando en
un área con altas temperaturas o
donde hay demasiado aire caliente
de otros calentadores.
El producto está funcionando con la
manguera doblada.
La temperatura del cuerpo principal
está aumentando anormalmente.
Desenchufe el cable de alimentación del
tomacorriente y déjelo solo para que se enfríe.
El error desaparecerá cuando la temperatura de
cada parte regrese a la normalidad. El producto
no puede funcionar hasta que las temperaturas
vuelvan a la normalidad. Cuando se descarte
el mensaje de error, el producto se reiniciará
automáticamente.
Se indica el código de error [E4]
Se indica el código de error [E6]
Se indica el código de error [E7]
Se indica el código de error [E5] Se ha producido una falla del
producto
Desconecte el enchufe del tomacorriente y
póngase en contacto con el Centro de atención al
cliente de IRIS. No toque el producto hasta que el
cuerpo principal se haya enfriado.
MODELO ESPECIFICACIONES
TENSIÔN NOMINAL 120V~
CORRIENTE NOMINAL 5.2A
FRECUENCIA DE ALIMENTACIÔN 60 Hz
PESO DEL PRODUCTO 3.97lbs. / 1.8kg
TAMAÑO DEL PRODUCTO
(NO INCLUYE EL CORDÓN)
6.3 W x 5.4 D x 14.2 H in
160 W x 137 D x 360 H mm
LONGITUD DEL CABLE DE ALIMENTACIÓN 78.7 in / 2.0m
ACCESSORIO Accesorio para secar zapatos
DISPOSITIVOS DE SEGURIDAD Sensor de temperatura, termostato, fusible térmico
TEMPORIZADOR 15, 30, 45, 60, 75, 90, 120, 180 minutos
ARTÍCULOS INCLUIDOS Calentador de mantas, accessorio para secar zapatos
*Especificaciones sujetas a cambios sin previo aviso.
SOLUCIÓN DE PROBLEMAS
Antes de realizar reparaciones, lea detenidamente el siguiente contenido para solucionar los problemas comunes.
Problemas que no se pueden resolver.
Comuníquese con su distribuidor o con el servicio de atención al cliente de IRIS USA, Inc.
Advertencia: No desmonte, repare o modifique el producto. Cualquier otro servicio debe ser realizado por un
representante de servicio autorizado.
ESPECIFICACIONES
31 32

Attn: Customer Service (Returns Department)
IRIS USA, Inc.
13423 West Cactus Road
Surprise, AZ 85379
©2019 IRIS USA, Inc. Todos los derechos reservados.
EL FABRICANTE GARANTIZA
Los productos IRIS USA, Inc. están libres de defectos en los materiales y mano de obra bajo uso normal doméstico, no
comercial, cuando se los utiliza y cuida de acuerdo con las instrucciones por escrito del fabricante que se proporcionan.
LA GARANTÍA DE 1 AÑO (“GARANTÍA”) NO CUBRE
Todo daño causado por accidente, uso incorrecto o abuso, incluidos entre otros, daño causado por el uso en un área húmeda,
limpieza inadecuada, negligencia, alteración, incendio, robo, temperatura de uso no recomendada y no aplica a imperfecciones
menores, rayones, manchas, decoloración, marcas en la superficie como resultado del envío u otro daño a las superficies
externas o internas que no perjudiquen la utilidad o funcionalidad del producto.
PARA OBTENER SERVICIO AL CLIENTE
Si necesita ayuda, debe comunicarse con el Servicio al cliente de IRIS USA, Inc. (“Servicio al cliente”) al
1-800-320-4747. Puede devolver el producto empacado apropiadamente (usando el embalaje y material de protección
adecuados para evitar que se dañe durante el envío) con el franqueo prepagado, nombre, dirección, número de teléfono,
número de modelo y prueba de la fecha de compra (una copia del recibo) y una descripción detallada de la avería reclamada.
Esta garantía no cubrirá los daños causados a los productos durante el envío al Servicio al cliente. Usted tiene la obligación y
responsabilidad de: pagar todos los servicios y piezas que no cubra la garantía.
OBLIGACIÓN DEL FABRICANTE
La Garantía no se puede alterar, expandir, extender, revisar o variar excepto bajo instrumento por escrito del fabricante.
LA RESPONSABILIDAD DEL FABRICANTE BAJO ESTA GARANTÍA ESTÁ LIMITADA A LA REPARACIÓN O REEMPLAZO DEL
PRODUCTO (O PRODUCTOS) DEFECTUOSO(S) A LA DISCRECIÓN ÚNICA Y EXCLUSIVA DEL FABRICANTE. EL FABRICANTE
REEMPLAZARÁ CUALQUIER ARTÍCULO DEFECTUOSO EN MATERIAL O MANO DE OBRA CON EL ARTÍCULO ACTUAL
QUE MEJOR SE COMPARE. IRIS USA, INC. NO ACEPTA SOLICITUDES ESPECIALES, NI TIENE LA POSIBILIDAD DE HACER
MEJORAS A CAMBIO DE DINERO. EL FABRICANTE NO SERÁ RESPONSABLE POR DAÑOS ESPECIALES, INCIDENTALES O
CONSECUENTES, SEAN DIRECTOS O INDIRECTOS. LAS GARANTÍAS AQUÍ ESTABLECIDAS SON EXCLUSIVAS Y NO SE HACE
NINGUNA OTRA GARANTÍA, EXPRESA O IMPLÍCITA, INCLUIDAS ENTRE OTRAS, GARANTÍA DE COMERCIALIZACIÓN O
APTITUD PARA UN PROPÓSITO O USO ESPECÍFICO CON RESPECTO A LOS PRODUCTOS.
Algunos estados no permiten la exclusión o limitación de daños incidentales o consecuentes, por lo que las exclusiones de
limitación mencionadas podrían no aplicar. Esta garantía le brinda derechos legales específicos y podría haber otros derechos
que varíen de un estado a otro.
DEVOLUCIÓN DE ARTÍCULO DESCONTINUADO
Si el artículo devuelto está descontinuado o ya no está disponible, IRIS USA, Inc. remplazará automáticamente su artículo con
el que mejor se compare y fabrique en ese momento.
GARANTÍA DE 1 AÑO DEL FABRICANTE
33 34

CONTENU PAGE
Précautions de sécurité ................... 37
Pièces ................................ 39
Instructions d’utilisation
Gamme d’applications .................... 41
Consignes d’utilisation .................... 42
Mode d’emploi .......................... 43
Nettoyage et entretien .................... 48
Autre
Dépannage............................. 49
Caractéristiques......................... 50
Garantie ............................... 51
TIMER
TEMPERATURE
START/ON
CLEAR/OFF
PRESET FUNCTIONS
WINTER SUMMER
WARM UP
Dust Mite Eliminator
MODE
TIME MINS
SETTINGS
POWER SUPPLY
de IRIS USA, Inc.
Series BLW-C2
Merci de votre achat. Veuillez lire attentivement ce guide d’utilisation afin d’assurer sa bonne
utilisation. Lire les précautions de sécurité à prendre avant utilisation. Veuillez conserver ces
instructions pour référence future.
LIRE ET CONSERVER CES INSTRUCTIONS.
Chauffe-couverture
3635

Démontage interdit.
• Ne pas démonter, réparer ou modifier. Le faire pourrait entraîner un incendie, un choc électrique ou des
blessures.
• La réparation par des personnes autres que les techniciens de réparation autorisés peut être dangereuse.
Utilisation du produit.
• Utiliser le produit sur un surface plat et stable. Placer le produit sur un surface instable ou inégal peut causer
la chute du produit et entraîner des blessures ou des dommages matériels à proximité du produit.
• Toujours débrancher en tenant par la fiche d'alimentation. Ne pas débrancher en tirant sur le cordon
d’alimentation. Tirer sur le cordon d’alimentation peut l’endommager, ce qui peut causer un incendie ou un
choc électrique.
• Toujours débrancher la fiche d'alimentation de la prise de courant si vous n’utilisez pas le produit pendant
une longue période de temps. Ne pas le faire pourrait entraîner un court-circuit en raison d'une capacité
d’isolation diminuée, ce qui pourrait causer un incendie ou un choc électrique.
• Ne pas déplacer la machine pendant son utilisation. Cela pourrait provoquer des brûlures.
• Ne pas effectuer le nettoyage et l’entretien si l’appareil est encore chaud. Cela pourrait provoquer des
brûlures.
Débrancher.
• Débrancher la fiche d'alimentation de la prise de courant pendant l’entretien, l’inspection ou le déplacement
du produit.
• Agripper la fiche et la retirer du réceptacle ou autre dispositif d’alimentation. Ne pas débrancher en tirant sur
le cordon.
• Au moment de débrancher la fiche d’alimentation de la prise de courant, s’assurer que la machine est à l’arrêt.
Sinon, cela pourrait endommager les lames de la fiche ou la prise, ou provoquer un incendie.
• Cet appareil est équipé d’une fiche polarisée une lame est plus large que l'autre. Afin de réduire le risque de
choc électrique, il n'y a qu'une seule façon d'insérer cette fiche dans une prise de courant polarisée. Si la
fiche ne s’insère pas complètement dans la prise de courant, inverser la fiche. Si elle ne s’enfonce toujours
pas, contacter un électricien qualifié. Ne pas tenter de modifier la fiche d’alimentation de quelque façon que
ce soit.
Utiliser correctement les ches et cordons d’alimentation.
• Ne pas le faire pourrait entraîner un court-circuit causant un incendie ou un choc électrique.
• Insérer complètement la fiche d’alimentation dans la prise de courant.
• Dépoussiérer régulièrement la fiche d’alimentation.
• La poussière accumulée diminue la capacité d’isolation en raison de l’humidité, ce qui pourrait entraîner un
incendie ou un choc électrique.
• Utilise uniquement du courant 120 V CA. D’autres types de tension peuvent causer un incendie.
• Ne pas utiliser si le cordon ou la fiche d’alimentation sont endommagés, ou si la fiche est mal insérée dans la
prise de courant. Le faire pourrait entraîner un court-circuit causant un incendie ou un choc électrique.
• Ne pas enrouler le cordon autour de l’appareil entre chaque utilisation, car cela peut provoquer une panne de
l’appareil.
Ne pas endommager le cordon d’alimentation.
• Ne pas endommager, modifier, tordre, tirer, pincer ou plier excessivement le cordon d’alimentation, ni placer
d’objets lourds sur le cordon, car cela pourrait causer un incendie ou un choc électrique.
• Ne pas utiliser si le cordon d’alimentation est emmêlé. Le faire pourrait entraîner un incendie. Toujours
déplier le cordon avant utilisation.
• Ne pas tirer sur le cordon d’alimentation quand vous rangez ou entreposez le produit. Tirer sur le cordon
d’alimentation peut causer un incendie ou un choc électrique.
• Ne pas déplacer ou tirer l’appareil en tirant sur le cordon. Cela pourrait endommager le cordon ou produire
un incendie.
N’endommager pas le tuyau extensible.
• Ne pas déplacer l’appareil en tirant sur le tuyau. Cela pourrait faire tomber le boîtier principal et causer des
blessures. S’assurer de bien tenir la poignée au moment de déplacer l’appareil.
• Ne pas déplacer ou tirer l’appareil en tirant sur le tuyau. Cela pourrait faire tomber le boîtier principal et
endommager le tuyau.
• Ne pas utiliser l’appareil si le tuyau est replié.
• Ne pas tirer sur le tuyau en forçant.
Les anomalies ou défaillances peuvent causer de la fumée, un incendie ou un choc électrique.
Cesser l’utilisation immédiatement, éteindre l’appareil et débrancher de la prise électrique en cas d’anomalies ou
de défaillances.
Exemples d’anomalies
• Sons ou odeurs anormaux.
• La prise ou le cordon électrique chauffe de manière anormale.
• Perte de courant, etc., lorsque le cordon électrique est déplacé.
• Le produit cesse de fonctionner périodiquement pendant son utilisation.
• Sensation de fourmillement similaire à un choc électrique lorsque vous touchez le produit.
• Cesser l’utilisation et contacter le service à la clientèle d'IRIS USA, Inc. au 1-800-320-4747.
Éviter les risques d'incendie.
• Ne pas vaporiser d'insecticides, de laques pour les cheveux, d’huiles lubrifiantes, etc.
• Ne pas utiliser à proximité de substances inflammables (kérosène, essence, diluant à peinture, etc.), d’objets
enflammés (cigarettes, encens, etc.) ou de matériaux combustibles.
• Ne pas bloquer la circulation de l’air, entrante ou sortante. Cela pourrait produire une surchauffe de l’appareil
et un incendie.
• Ne pas placer de matériaux étrangers tel que du métal dans l’appareil. Cela pourrait produire une surchauffe
de l’appareil et un incendie.
• Ne pas utiliser pour sécher des chaussures ou d’autres articles ayant des taches d’huile ou de solvant. Les
huiles, les solvants pour nettoyage à sec, l’essence, le benzène, le solvant à peinture ou tout autre produit
chimique peuvent causer un incendie.
• Ne pas utiliser l’appareil avec d’autres sources de chaleur telles que des couvertures chauffantes ou des
radiateurs. Cela pourrait causer un incendie.
Ne pas toucher avec les mains mouillées.
• Ne pas débrancher la fiche avec les mains mouillées.
Ne pas utiliser le produit à l’extérieur.
• Ne pas utiliser dans les pièces très humides telles que les salles de bain.
• Ne pas mouiller l’appareil ni le plonger dans l’eau. Mouiller l'appareil peut causer un incendie ou un choc
électrique.
• Ne pas utiliser dans des environnements enfumés ou à proximité de ce type d’environnement. Cela pourrait
entraîner un incendie.
Indique un risque de blessures ou de dommages matériels si l'instruction est mal suivie.
• Ne pas laisser à la portée d’enfants ou de bébés.
• Ne pas monter sur l’appareil ni s’asseoir dessus. Cela pourrait causer des blessures, entraîner une panne de
la machine ou l’endommager.
• Ne pas traîner le produit lorsque vous le déplacez. Traîner le produit peut endommager les tapis et les
planchers.
• Assurez-vous, en particulier, qu’aucun enfant ou aucune personne âgée ne se trouve à proximité. Se tenir
près du produit peut être nocif pour leur condition physique et leur santé.
• Pendant et immédiatement après utilisation, ne pas utiliser la couverture ni laisser les animaux domestiques
se mettre dessus. Cela pourrait provoquer des brûlures.
• Ne pas diriger la chaleur directement sur quelqu’un ou sur un animal. Cela pourrait provoquer des brûlures.
• Ne pas faire sécher de vêtements sur la sortie d’air quand l’appareil est en marche. Cela pourrait produire un
chauffage anormal ou une panne de l’appareil.
• Mis à part le tuyau, ne mettre aucune partie ou pièce de l’appareil dans la couverture. Cela pourrait causer
un incendie.
• Ne pas utiliser l’appareil dans une armoire ou un placard dont la porte est fermée. Cela pourrait produire un
chauffage anormal ou une panne de l’appareil.
• Ne pas utiliser pour sécher des vêtements mal essorés. Cela pourrait entraîner un choc électrique.
• Ne pas utiliser sur des produits qui résistent mal à la chaleur tels que les canapés ou chaussures en cuir
ou cuir synthétique, les vêtements à faible résistance thermique ou les articles sérigraphiés. Cela pourrait
causer des déformations ou détériorations.
• Ne pas utiliser l’appareil sur du verre (fenêtres et miroirs par ex.) Le changement soudain de température
peut l’endommager.
PRÉCAUTIONS DE SÉCURITÉ
Avant l’utilisation du produit, veuillez lire attentivement les précautions de sécurité afin d’assurer sa bonne utilisation.
Les précautions répertoriées ici sont décrites en tant qu’avertissements et mises en garde dont l’objectif est de prévenir
les préjudices ou les dommages que des utilisateurs ou d’autres personnes pourraient subir. Toutes ces précautions sont
d’importance critique pour la sécurité. Veuillez suivre ces directives en tout temps.
Légende des icônes: Indique un risque de blessure ou de mort si l’instruction est mal suivie.
ATTENTION INTERDIT INSTRUCTIONS À SUIVRE
37 38
Other manuals for BLW-C2
1
Table of contents
Languages:
Other IRIS Food Warmer manuals
Popular Food Warmer manuals by other brands

Werkmeister
Werkmeister Kryotherm atur Instructions for use

True
True TA1H-1S Specifications

Norpro
Norpro 5569 instructions

Delfield
Delfield E-Chef EHEI36C Installation and operation manual

winholt
winholt NHPL-1833-ECOC-2D-DGT Operational, Maintenance & Service Bulletin

Relags
Relags Origin Outdoors 180868 manual