ISC TK 720/1 User manual

TK 720/1
Tischkreissäge Artikel-Nr.: 4340600
Ident-Nr.: 01021

Komponenten / Ersatzteile
Position Artikel-Nr. Beschreibung
42 434060002042 PVC -insert

Art.-Nr.: 43.406.03
TS 720/1
Operating Instructions
Bench-Type Circular Saw

2
Please pull out pages 2-5.
Please read the operating
instructions carefully before
assembling and using

3
2
3
1
21
a
22
4
23
c

4
56
24
78
25
25
b
26

5
10
1211
9
25
d
25

6
13

7
GB
Layout (Fig. 1)
1Saw table
2Saw blade guard
3Push stick
4Saw blade
5Splitter
6Table insert
7Parallel stop
8Motor
9Power cable
10 Stand
11 On/Off switch
12 Star-grip screw for parallel stop
13 Table support
14 Angle stop
15 Star-grip screw for height adjustment
16 Star-grip screw for the stop rail
17 Star-grip screw for the table support
18 Star-grip screw for saw blade guard
2. Items supplied
Carbide-tipped saw blade
Parallel stop
Angle stop
Push stick
Bench-type circular saw
3. Proper use
The TS 720/1 bench-type circular saw is designed
for the slitting and cross-cutting (only with the angle
stop) of all types of timber, commensurate with the
machine’s size. The machine is not to be used for
cutting any type of roundwood.
The machine is to be used only for its prescribed
purpose.
Any use other than that mentioned is considered to
be a case of misuse. The user/operator and not the
manufacturer shall be liable for any damage or injury
resulting from such cases of misuse. The machine is
to be operated only with suitable saw blades. It is
prohibited to use any type of cutting-off wheel.
To use the machine properly you must also observe
the safety regulations, the assembly instructions and
the operating instructions to be found in this manual.
All persons who use and service the machine have
to be acquainted with this manual and must be
informed about its potential hazards.
It is also imperative to observe the accident
prevention regulations in force in your area.
The same applies for the general rules of
occupational health and safety.
The manufacturer shall not be liable for any changes
made to the machine nor for any damage resulting
from such changes.
Even when the machine is used as prescribed it is
still impossible to eliminate certain residual risk
factors. The following hazards may arise in
connection with the machine’s construction and
design:
Contact with the saw blade in the uncovered saw
zone.
Reaching into the running saw blade (cut
injuries).
Kick-back of workpieces and parts of workpieces
Saw blade fracturing.
Catapulting of faulty carbide tips from the saw
blade.
Damage to hearing if correct ear-muffs are not
worn.
Harmful emissions of wood dust when the
machine is used in closed rooms.
4. Important notes
Please read this manual carefully and pay attention
to the information provided. Use this manual to
familiarize yourself with the machine, its correct use
and safety regulations.
Safety regulations
Caution! When using electric tools it is imperative
to take the following basic safety precautions in
order to reduce the risk of electric shock, injury
and fire. Read and take note of these instructions
before you use this tool.
Follow all these safety regulations before and
while working with the saw.
Do not lose these safety regulations.
Avoid body contact with earthed parts.
When equipment is not being used it should be
kept in a dry, closed place out of children’s
reach.
You will work better and more safely if you keep
your tools sharp and clean. Check the power
cable regularly and have it replaced by an
authorized specialist at the first sign of any
damage.
Check your extension cables regularly and
replace them if damaged.
When working outdoors, use only extension
cables that are approved for outdoor use and
which are marked accordingly.

8
GB
Concentrate on what you are doing. Take a
sensible attitude to your work. Never use the tool
when you are tired.
Never use a tool with a switch that cannot be
turned on and off.
Caution! The use of plug-in tools and
accessories other than those intended may put
you at risk of injury.
Always pull the plug out of the power socket
before adjusting or servicing the machine.
Give these safety regulations to all persons who
work on the machine.
Do not use this saw to cut fire wood.
Do not use this saw to cross-cut roundwood.
Caution! Hands and fingers may be injured on
the rotating saw blade.
The machine is equipped with a safety circuit-
breaker (11) to prevent it starting up again after a
voltage drop.
Before you use the machine for the first time,
check that the voltage marked on the rating plate
is the same as your mains voltage.
If you need to use an extension cable, make sure
its conductor cross-section is big enough for the
saw’s power consumption. Minimum cross-
section: 1 mm2.
If you use a cable reel, the complete cable has to
be pulled off the reel.
Do not carry the tool by its cable.
Check the power cable (9). Never use a faulty or
damaged power cable.
Do not use the cable to remove the plug from the
socket-outlet. Protect the cable from heat, oil and
sharp edges.
Do not leave the saw in the rain and never use it
in damp or wet conditions.
Provide good lighting.
Non-slip shoes are recommended when working
outdoors.
Do not saw near flammable liquids or gases.
Wear suitable work clothes! Loose garments or
jewelry may become caught up in the rotating
saw blade.
Wear a hair net if you have long hair.
Avoid abnormal working postures.
Operators have to be at least 18 years of age.
Trainees of at least 16 years of age are allowed
to use the machine under supervision.
An untidy work area invites accidents.
Do not allow other persons, especially children,
to touch the tool or cable. Keep them out of your
work area.
Keep children away from the machine when it is
connected to the power supply.
Keep your workplace clean of wood scrap and
any unnecessary objects.
Persons working on the machine should not be
distracted.
Note the direction of rotation of the motor and
saw blade.
After you have switched off the motor, never
slow down the saw blade (4) by applying
pressure to its side.
Fit only blades (4) which are well sharpened and
have no cracks or deformations.
Use only circular saw blades (4) made of high-
alloy high-speed steel (HSS).
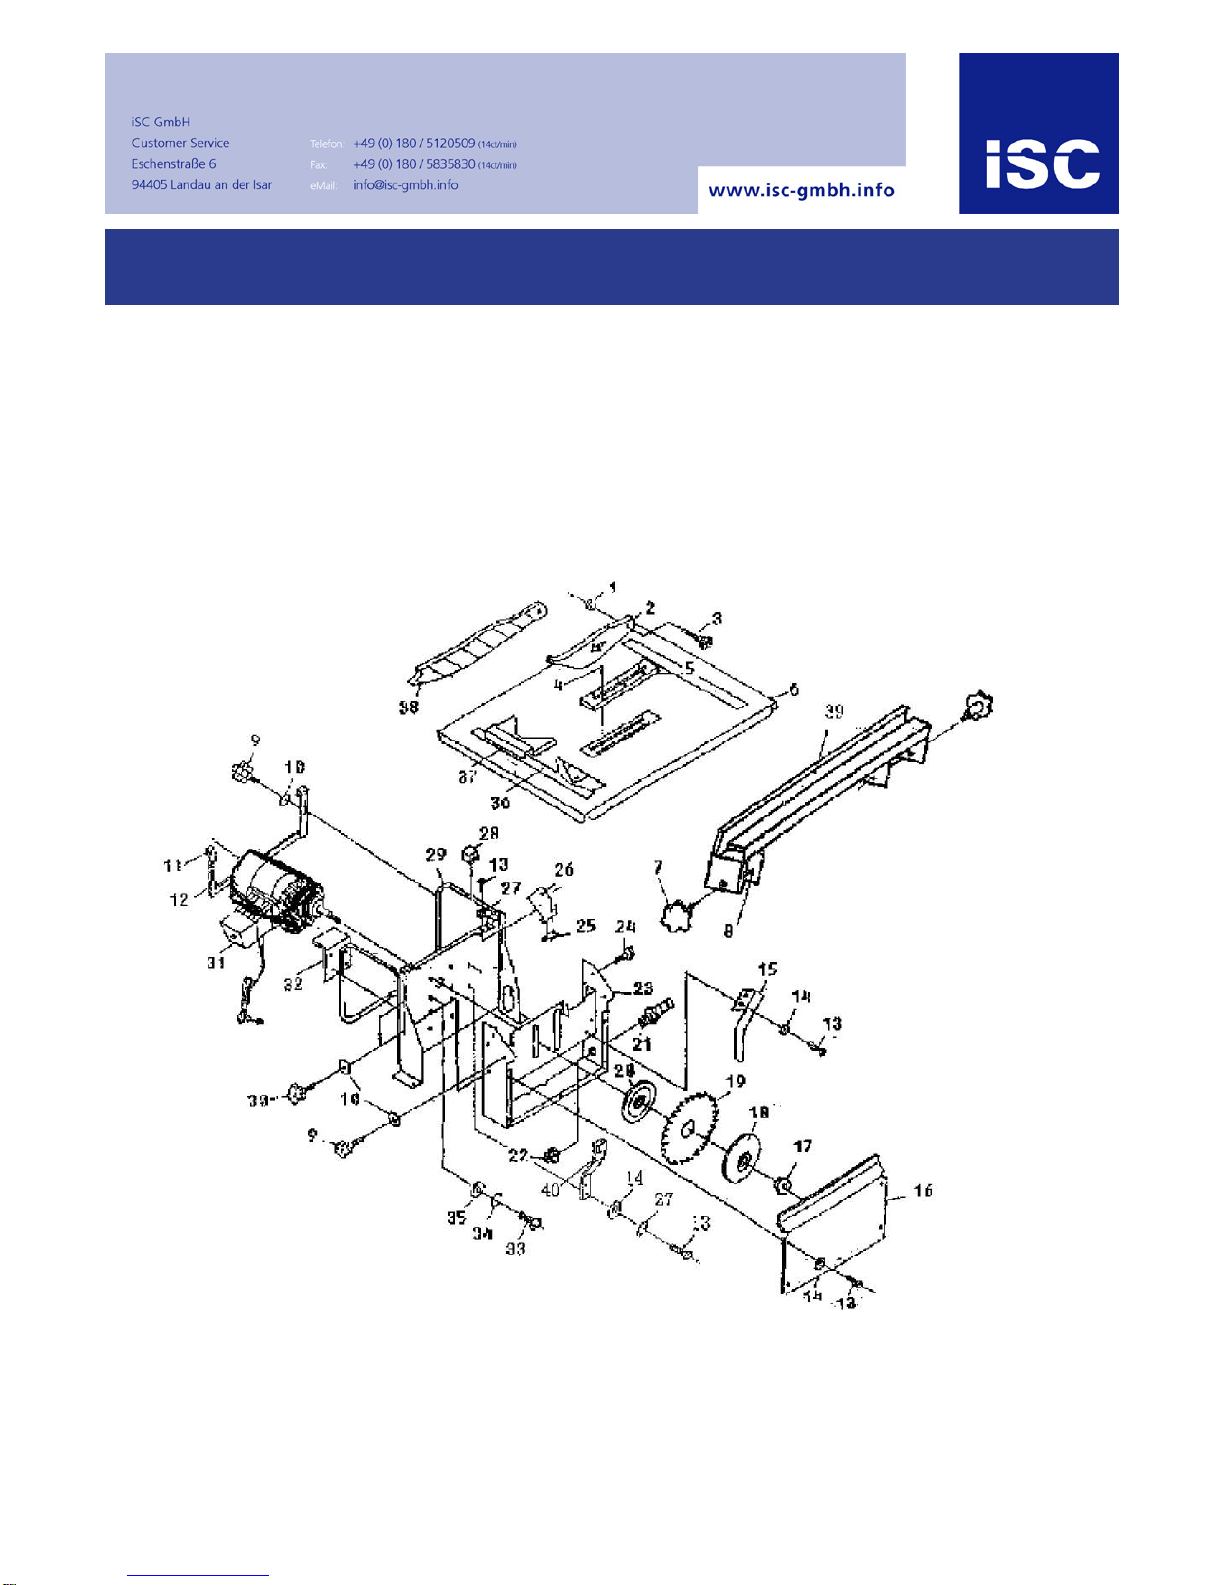
Never dismantle the machine’s safety devices (2,
5) or put them out of operation.
The machine is to be operated only with tools
which conform with prEN 847-1: 1966.
Faulty saw blades (4) have to be replaced
immediately.
Never use saw blades which do not comply with
the data specified in this manual.
It is imperative to make sure that all devices (2,
15) which cover the saw blade are in good
working order.
Caution! It is prohibited to use this saw to make
plunge cuts.
Damaged or faulty safety devices have to be
replaced immediately.
The splitter (5) is an important safety device. Not
only does it guide the workpiece, it also prevents
the kerf closing behind the blade so that there is
no kickback from the workpiece. Note the
thickness of the splitter. The splitter should never
be thinner than the saw blade body or thicker
than the width of its kerf.
The guard hood (2) has to be lowered over the
workpiece for each cut.
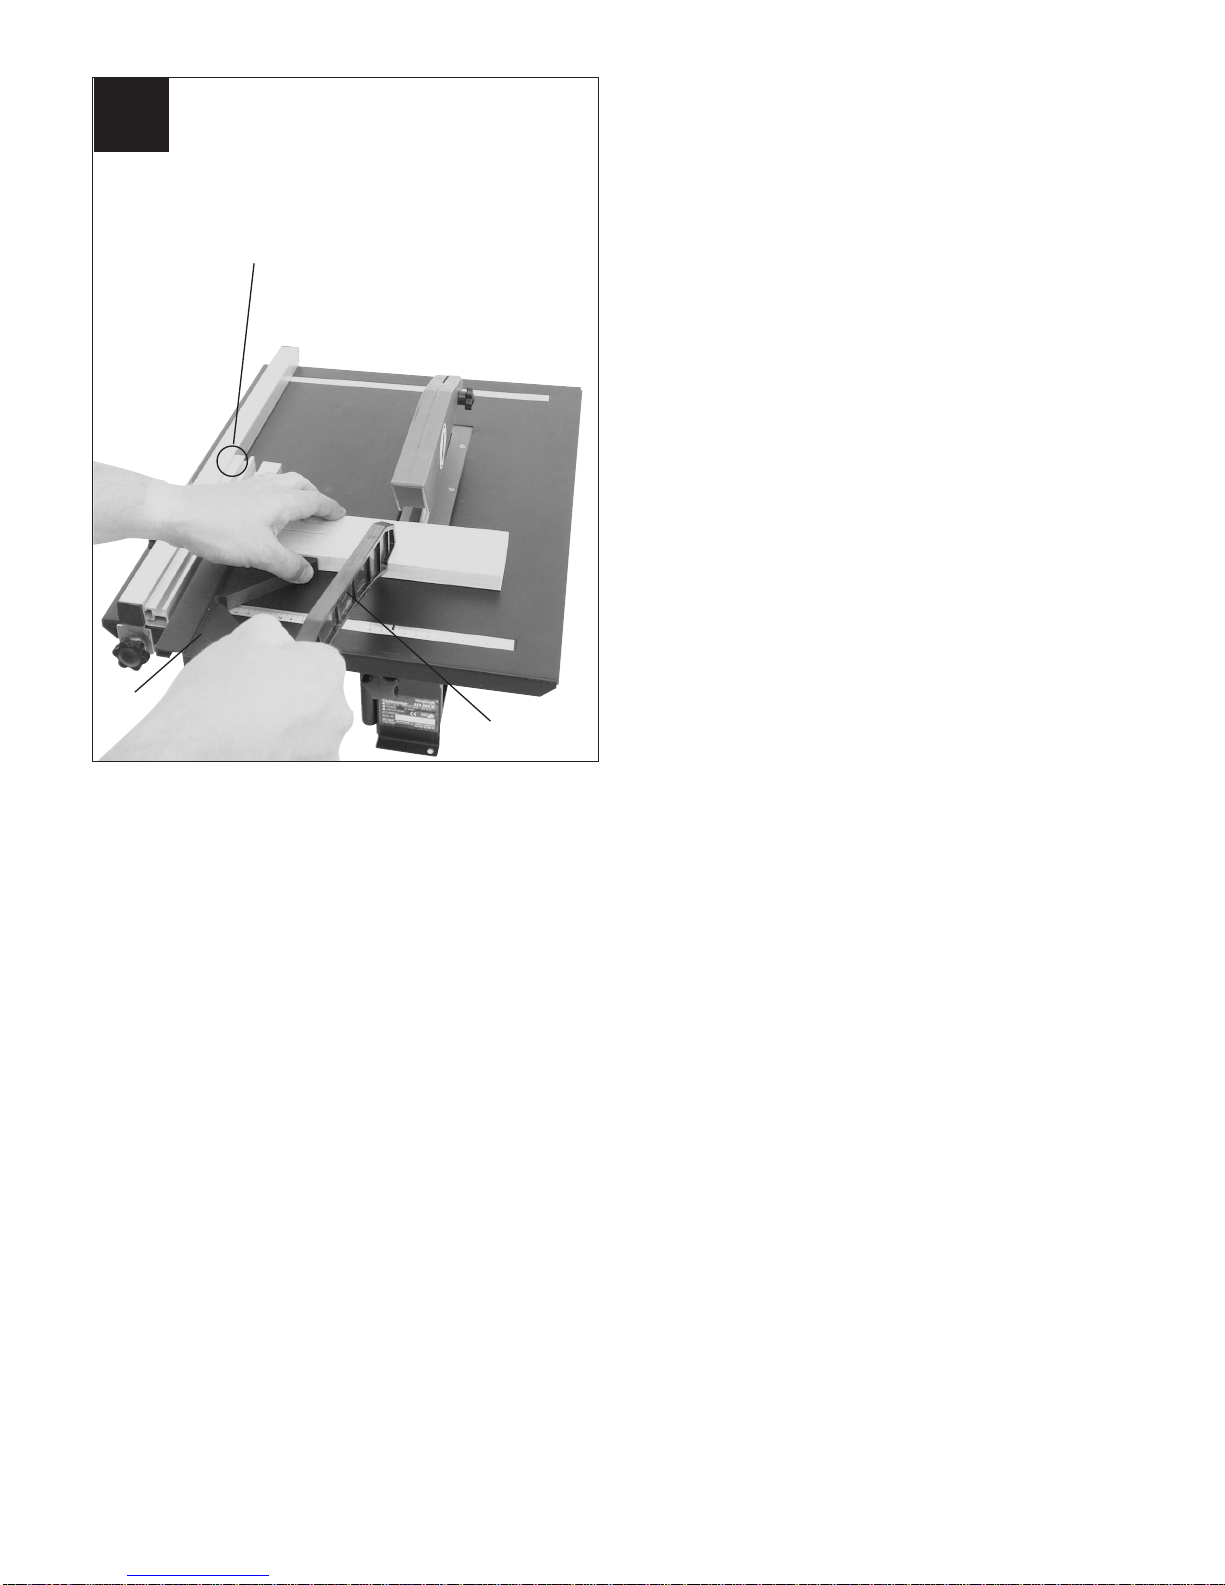
Be sure to use a push stick (3) when slitting
narrow workpieces (smaller than 120 mm in
width).
Never cut workpieces which are too small to hold
securely in your hand.
It is imperative for the parallel stop to be clamped
on the right-hand side of the blade whenever you
cut narrow workpieces to size.
Always stand to the side of the saw blade when
working with the saw.
Never load the machine so much that it cuts out.
Always press the workpiece firmly against the
saw table (1).
Make sure that off-cuts do not catch on the saw
blade crown. Risk of catapulting!
All guards and safety devices have to be refitted
immediately after completion of any repairs or
maintenance.

9
GB
It is imperative to observe the manufacturer’s
safety, operating and maintenance instructions
as well as the dimensions quoted in the
technical data.
It is imperative to observe the accident
prevention regulations in force in your area as
well as all other generally recognized rules of
safety.
Note the information published by your
professional associations (VBG 7j).
Switch on the dust extraction system each time
you use the machine.
Use the saw only with a suitable vacuum
extraction system or a standard industrial
vacuum cleaner.
Never use the cable for any purpose other than
that for which it is intended!
Never remove loose splinters, chips or jammed
pieces of wood when the saw blade is running.
To rectify faults or remove jammed pieces of
wood, always switch off the machine first. - Pull
out the power plug! -
If the sawing gap is worn, replace the table insert
(6). - Pull out the power plug! -
The bench-type saw has to be connected to a
230 V socket-outlet with earthing contact and
minimum fusing of 10 A.
Never use tools or attachments with insufficient
power for the job in hand.
Never use tools on jobs for which they were not
intended!
Make sure you stand squarely and keep your
balance at all times.
Check the tool for possible damage!
Each time before re-using the tool, carefully
check that the guards or any slightly damaged
parts are working as intended.
Check that the moving parts are in good working
order, that they do not jam, and that no parts are
damaged. Make sure that all parts are fitted
correctly and that all other operating conditions
are properly fulfilled.
Unless otherwise stated in the operating
instructions, damaged guards and parts have to
be repaired or replaced by an authorized service
center.
Have damaged switches replaced by a customer
service workshop.
This electric tool complies with the pertinent
safety regulations. Repairs are to be carried out
only by a qualified electrician using original
replacement parts or the user may suffer an
accident.
Caution! Risk of injury! Do
not reach into the running
saw blade.
Wear goggles
Wear ear-muffs
Wear a breathing mask
Noise emission values
The saw’s noise is measured in accordance with
DIN EN ISO 3744; 11/95, E DIN EN 31201; 6/93,
ISO 7960 Annex A; 2/95. The machine may
exceed 85 dB(A) at the workplace. In this case,
noise protection measures need to be introduced
for the user (ear-muffs).
Cutting Idling
Sound pressure level LPA 105.0 dB(A) 85.0 dB(A)
Sound power level LWA 114.6 dB(A) 94.6 dB(A)
„The quoted values are emission values and not
necessarily reliable workplace values. Although there
is a correlation between emission and immission
levels it is impossible to draw any certain conclusions
as to the need for additional precautions. Factors
with a potential influence on the actual immission
level at the workplace include the duration of impact,
the type of room, and other sources of noise etc.,
e.g. the number of machines and other neighboring
operations. Reliable workplace values may also vary
from country to country. With this information the
user should at least be able to make a better
assessment of the dangers and risks involved.“

10
GB
5. Technical data
Asynchronous motor 230 V 50 Hz
Power rating 720 W S2 30 min
Idle speed n02800 rpm
Carbide saw blade 205 x 16 x 2.4 mm
Number of teeth 20
Table size 513 x 400 mm
Cutting height max. 43 mm
Height adjustment infinite 0 - 43 mm
Connector for dust extractor dia. 35 mm
Size, complete 513 x 400 x 300 mm
Weight 14 kg
Load factor:
A load factor of S2 30 min (intermittent periodic
duty) means that you may operate the motor
continuously at its nominal power level (720 W)
for no longer than the time stipulated on the
specifications label (30 minutes ON period).
If you fail to observe this time limit the motor will
overheat. During the OFF period the motor will
cool again to its starting temperature.
6. Before putting the machine into
operation
The machine has to be set up where it can stand
firmly, e.g. on a work bench, or it must be bolted
to a strong stand.
All the covers and safety devices have to be
properly fitted before the machine is switched on.
It must be possible for the saw blade to run
freely.
When working with wood that has been
processed before, watch out for foreign bodies
such as nails or screws etc.
Before you actuate the On/Off switch, make sure
that the saw blade is correctly fitted and that the
machine’s moving parts run smoothly.
Before you connect the machine to the power
supply, make sure the data on the rating plate is
the same as that for your mains.
l
7. Assembly
Always pull out the power plug before carrying
out any maintenance or conversion work.
7.1 Fitting the saw blade (Fig. 2/3)
Caution! Pull out the power plug.
Raise the saw table (1) to its top position (see
8.3).
Remove the chip bin cover (19) by undoing the
four fixing screws (20).
Undo the nut (17) with a size 19 wrench on the
nut (21) itself and a second fork wrench (size 8)
on the motor shaft (a) to apply counter-pressure.
Caution! Turn the nut (21) in the direction of
rotation of the saw blade (4).
Take off the outer flange (22) and pull the old
saw blade (4) off the inner flange by dropping the
blade at an angle.
Clean the mounting flange.
Fit the new saw blade in reverse order.
Caution! Note the direction of rotation (see arrow
on the saw blade).
7.2 Adjusting the splitter (Fig. 4-6)
Remove the saw blade guard (2) (see 7.3).
Take out the table insert (6) (see 7.4).
Slacken the two hexagon socket-head screws
(24).
Adjust the splitter (5) so that the gap between the
saw blade (4) and the splitter (5) equals 3 - 5 mm
(see Fig. 6)
The splitter (5) has to be in line with the saw
blade (4) in longitudinal direction.
Retighten the two screws (24).
The setting of the splitter has to be checked each
time after changing the saw blade.
7.3 Fitting the saw blade guard (Fig. 4)
Mount the saw blade guard (2) on the splitter (5)
and align.
Insert the knurled screw (18) through the hole in
the saw blade guard (2) and in the splitter (5)
and secure it with the nut.
To remove the saw blade guard, proceed in
reverse order.
7.4 Replacing the table insert (Fig. 4)
Caution! Pull out the power plug.
Remove the 6 screws (23).
Take off the saw blade guard (2) (see 7.3).
Lift the worn table insert (6) up and out.
Fit a new table insert in reverse order.

8.0 Using the saw
8.1 On/Off switch (Fig. 1)
The saw can be switched on by pressing the
green pushbutton Å.
The red pushbutton Ä has to be pressed to
switch off the saw.
8.2 Parallel stop
8.2.1 Stop height (Fig. 7/8)
The parallel stop (7) supplied with the bench-
type circular saw has two different guide faces.
For thick material you must use the stop rail (25)
as shown in Fig. 7, for thin material you must use
the stop rail as shown in Fig. 8.
To change the height of the stop, slacken the two
knurled screws (16) and pull the stop rail off the
carrier rail.
Turn the stop rail (25) 90° to the left or the right,
depending on the required height of the stop,
and plug in back on the carrier rail (26).
Re-tighten the knurled screws (16).
8.2.2. Stop length (Fig. 7/8)
To prevent the workpiece becoming jammed,
always slide the stop rail (25) to the front edge of
the table (1) and fix it in place with the two
knurled screws (16) (see 8.2.1).
8.2.3 Cutting width (Fig. 8)
The parallel stop (7) has to be used when
making longitudinal cuts in wooden workpieces.
Slide the parallel stop (7) to the right or left side
of the saw table (1).
The parallel stop (7) can be set to the required
dimension with the help of the scale (b) engraved
on the saw table (1).
Tighten the two thumb screws (12) in order to fix
the parallel stop (7).
8.3 Adjusting the cutting height (Fig. 4/9)
Slacken the four thumb screws (15).
The saw table (1) can be raised or lowered to
adjust it to the required cutting height.
The cutting height can be read off the scale (c) of
the splitter (5).
Fix the saw table (1) with the thumb screws (14).
Important: Always tighten the thumb screws
securely to prevent the saw table dropping
accidentally.
9. Sawing operations
After each new adjustment it is advisable to
carry out a trial cut in order to check the set
dimensions.
After switching on the saw, wait for the blade to
reach its maximum speed of rotation before
commencing with the cut.
Secure long workpieces against falling off at the
end of the cut (e.g. with a roller stand etc.)
Take extra care when starting the cut!
9.1 Cutting narrow workpieces
(width less than 120 mm) (Fig. 7)
Adjust the parallel stop (7) to the width of
workpiece you require.
Feed in the workpiece with two hands. Always
use the push stick (3) in the area of the saw
blade (4).
(A push stick is supplied with the saw!)
Always push the workpiece through to the end of
the splitter (5).
Caution! With short workpieces, use the push
stick from the beginning.
9.2 Cutting extremely narrow workpieces
(width less than 30 mm) (Fig. 11)
Adjust the parallel stop (7) to the width of
workpiece you require.
Use the push block (d) to press the workpiece
against the stop rail (25) and push the workpiece
with the push stick (3) through to the end of the
splitter (5).
There is no push block supplied with the saw!
(Available from your specialist dealer)
9.3 45°-cuts on small workpieces (Fig. 12)
You must always use the parallel stop (7) and the
angle stop (14) when making 45° cuts.
Insert the angle stop (14) in the stop rail (25) of
the parallel stop (7).
Adjust the parallel stop (7) to the required length
of the workpiece and clamp securely.
Insert the workpiece in the angle stop (14).
Switch on the saw and slide the angle stop (14)
together with the workpiece along the stop rail
(25) into the blade (4).
Switch off the saw when the cut is completed.
GB
11

GB
12
9.4 Making cross cuts (Fig. 13)
Always use the parallel stop (7) and the angle stop
(14) when making cross cuts.
Workpieces must not exceed a maximum length of
160 mm between the parallel stop (7) and the blade
(4), and a maximum width of 70 mm.
Slide the angle stop (14) into the stop rail (25) of
the parallel stop (7).
Adjust the parallel stop (7) to the required length
of the workpiece and clamp in place.
Place the workpiece in front of the
angle stop (14).
Switch on the saw and, with the help of the push
stick (3), push the angle stop (14) together with
the workpiece along the stop rail (25) into the
blade (4).
Switch off the saw when you have finished the
cut.
10. Maintenance
Remove dust and dirt regularly from the
machine. Cleaning is best done with compressed
air or a rag.
Never use caustic agents to clean plastic parts.

13
Landau/Isar
16.11.2001
Brunhölzl
Produkt-Management
Landau/Isar
16.11.2001
Brunhölzl
Produkt-Management
Landau/Isar, datum
16.11.2001
Brunhölzl
Produkt-Management
Landau/Isar, (date)
16.11.2001
Brunhölzl
Produkt-Management
Landau/Isar, (date)
16.11.2001
Brunhölzl
Produkt-Management
Landau/Isar, den
16.11.2001
Brunhölzl
Produkt-Management
EG Konformitätserklärung
Der Unterzeichnende erklärt im
Namen der
Firma
Archivierung / For archives: 4340611-32-4141800-E
TS 720/1
–Seriennummer auf
dem Produkt –
der
EG Maschinenrichtlinie
98/392/EWG mit
Änderungen
EG Niederspannungs-
richtlinie 73/23 EWG
EG Richtlinie Elektro-
magnetische Verträglichkeit
89/336 EWG mit
Änderungen entspricht.
Typ
Marke
daß die
Maschine/Produkt
EC Declaration of Conformity
The Undersigned declares, on
behalf of
–Serial number specified on
the product -
is in accordance with the
EC Directive regarding
machinery 98/392 EEC, as
amended;
EC Directive regarding
low-voltage equipment
73/23 EEC;
EC Directive regarding
electromagnetic compatibility
89/336 EEC, as amended.
Type
produced by:
that the
Machine / Product
Déclaration de Conformité CE
Le soussigné déclare, au nom
de
–no. série indiqué sur le
produit -
correspond(ent) à la
Directive CE relative aux
machines 98/392 CEE avec
les modifications y
apportées;
Directive CE relative aux
basses tensions 73/23 CEE;
Directive CE relative à la
compatibilité électro-
magnétique 89/336 CEE
avec les modifications y
apportées.
– serienummer op het produkt-
conform de volgende
richtlijnen is:
EG machinerichtlijn
98/392/EWG met wijzigingen
EG laagspanningsrichtlijn
73/23 EWG
EG richtlijn Elektro-
magnetische compatibiliteit
89/336 EWG met wijzigingen
Type
du fabricant
que
la machine / le produit
EC Conformiteitsverklaring
De ondertekenaar verklaart in
naam van de
firma
type
merk
dat de
machine/produkt
Declaracion CE de
Conformidad
Por la presente, el abajo
firmante declara en nombre de
la empresa
–No. de serie en el producto:
satisface las disposiciones
pertinentes siguientes:
Disposición de maquinaria
de la CE 98/392/CEE con
modificaciones
Disposición de baja tensión
de la CE 73/23 CEE
Disposición de la
compatibilidad electro-
magnética de la CE 89/336
CEE con modificaciones.
tipo
marca
que el/la
máquina/producto
Declaração de conformidade
CE
O abaixo assinado declara em
nome da
empresa
–cujo número de série
encontra-se no produto -
corresponde à
Directiva da CE de
máquinas 98/392/CEE, com
alterações
Directiva da CE de baixa
tensão 73/23 CEE
Directiva da CE de
compatibilidade electro-
magnética 89/336 CEE, com
alterações
tipo
marca
que
a máquina/o produto
ISC GmbH · Eschenstraße 6 · D-94405 Landau/Isar
Tischkreissäge Bench-type
circular saw Scie circulaire à table Tafelcirkelzaag Sierra circular de mesa Serra circular de mesa
EN 61029-1; EN 55014; E DIN VDE 0740 Teil 502 12’92; DIN EN ISO 3744 11’95; E DIN EN 31201 6’93; ISO 7960 Anhang A 2’95; EN 55104;
EN 61000 3-2; IEN 61000 3-3; IEC 61029-2-1: 1993; IEC 1029-2-1: 1993
TÜV Product Service

14
Notes:

15
Notes:

WARRANTY CERTIFICATE
The guarantee period begins on the date of sale and
is valid for 2 years.
Responsibility is assumed for faulty construction or
material or functional defects.
Any necessary replacement parts and necessary
repair work are free of charge.
We do not assume responsibility for consequential
damage. Your statutory rights are not affected.
Your customer service partner
Technical specification subject to change
wegm. 11/01
Einhell UK Ltd
Brook House, Brookway
North Chesire Trading Estate
Prenton, Wirral, Chesire
CH 43 3DS
Tel. 0151 6084802, Fax 0151 6086339
Service UK:
Table of contents
Other ISC Saw manuals
Popular Saw manuals by other brands

Stihl
Stihl TS 400 Cutquick instruction manual

Chicago Electric
Chicago Electric 65570 Owner's manual & safety instructions

EINHELL
EINHELL BM 200 operating instructions

GreenWorks
GreenWorks CRD401 Operator's manual

Dremel
Dremel 670 Operating/s Original instructions

Craftsman
Craftsman 137.186290 Operator's manual